 Reddit reviews 25 Pcs Black Adhesive Backed Nylon Wire Adjustable Cable Clips Clamps
We found 28 Reddit comments about 25 Pcs Black Adhesive Backed Nylon Wire Adjustable Cable Clips Clamps. Here are the top ones, ranked by their Reddit score.
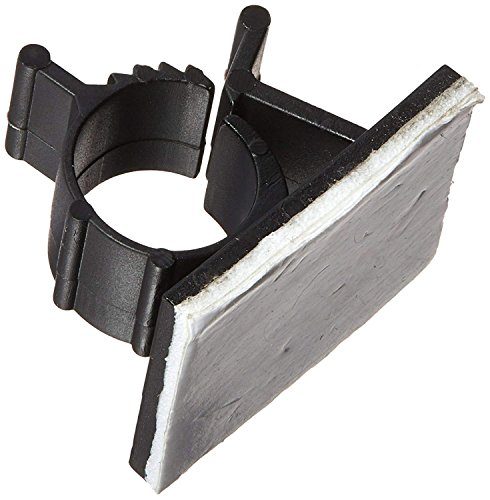
Product Name : Adjustable Cable Clamp;Material : NylonBase Size : 25 x 19 x 2mm/ 1" x 0.7" x 0.07"(L*W*T);Fit for Cable Diameter(Max.) : 10mm/ 0.4"Color : BlackWeight : 56gPackage Content : 25 x Adhesive Adjustable Cable Clamp
Here are the parts I used:
The cable raceway and the cable clips made the biggest difference. In the past I would just use the velcro strips, which would help with making the cables look more clean, but not with hiding them altogether.
The process I used was:
Just undid five years worth of accumulated mess. Saw the beautiful workstations on this channel, and just couldn't take the cognitive dissonance anymore.
The before-and-after pics are available here: https://imgur.com/a/cjznWXZ
Installed a raceway and new power strips under the desk. The project took about four hours or so.
This channel had tons of great product and technique suggestions, and this YouTube video was also extremely helpful: https://youtu.be/Uc01oUqmxhE
Here's what I ended up using:
The next phase would probably be lighting, but I'm far less comfortable in that area. Thinking of a simple LED strip behind the desk using color that is keyed off the screen color. Any suggestions here?
Also, my mic arm clamp doesn't attach to the desk well because the desk has a lower drawer level that bumps into the base of the clamp. Looking for a mic arm clamp that is short--maybe 4-6 inches. I couldn't find easily on Amazon. Can anyone point me in the right direction?
All other suggestions welcome!
Yup, I have those on the way and some of these as well for another thing I'm doing.
On DIY pickups- give it a shot by all means, but if it sounds like shit don't rule out pickups as a concept because the bad sound could just be the homemade piezo rather than the concept.
Also for the camera, you can get a tiny little mini shotgun mic that goes on the 3.5mm port on top of the phone. They're not terribly expensive as I recall...
Well for the wires you could probably simplify it a bit. Short pins 11-12 and that should constantly activate the drive motor, so the drive LED won't go off but it will save wires (should be same as grounding it). That means you only need 3 wires from each drive to the Arduino- Arduino Ground, Direction, and Step.
So if it were me, I'd get some nice easy to manage wire like for example 24/4 phone cable. Then I'd crimp terminal pins on each end (with some heat shrink for insulation of course), female pins go on the drive side, then the Arduino side gets two male pins for the Arduino and the other two go in a terminal block (much like the ones you have) which break out the Arduino's ground. Result is you have one thin data wire going to each drive which you can easily manage with cord clips, and then coming back to a central place where it can be nicely contained. Power is easy, just get a bunch of Molex-to-floppy Y splitters and some more cord clips you're done. Remember that you can make Molex connections yourself (just need the parts, which is useful for cable management...
You can use adhesive clamps for the cables below your GPU.
http://www.amazon.com/Black-Adhesive-Backed-Adjustable-Clamps/dp/B005MN2QHK/
They look big, but that's just the picture enlarging it. 0.7" Height.
I have https://amzn.com/B005MN2QHK and https://amzn.com/B002DNM42O coming. Going to put these and my power strip the the bottom of the desk to hide them all.
http://www.amazon.com/gp/product/B005MN2QHK/ref=oh_details_o02_s00_i00?ie=UTF8&psc=1 Just ordered some myself lol
These are what I use and they work great! https://www.amazon.com/gp/product/B005MN2QHK/ref=ox_sc_act_title_3?smid=AMPVKRRPP4LI5&psc=1
Just mount everything under the desk with adhesive backed cable clips and double sided tape.
For the love of god, fix your cable management. I'd recommend a lot of these.
You might like these http://www.amazon.com/Black-Adhesive-Backed-Adjustable-Clamps/dp/B005MN2QHK
There adhesive too so maybe a little less permanent if you wanted to change things later.
If you want to avoid buying/making a new board, you can probably:
 
You should be able to, at the very least, get that Loop Station on there.
http://www.amazon.com/Black-Adhesive-Backed-Adjustable-Clamps/dp/B005MN2QHK/ref=sr_1_9?ie=UTF8&qid=1463432736&sr=8-9&keywords=cable+holders
I've been using these and they were exactly what I was looking for. Works Perfectly.
Double check the diameter though, I'm not at home so I don't have access to the exact ones I ordered.
The power strip is attached with this tape. I used cable clips similar to these but replaced the crappy tape that comes on them with the same stuff I used for the power strip. The ones I actually used I found at Ace Hardware. All of the power bricks are attached with Velcro so that they can be easily removed. I also used these cable ties so, again, everything can be easily removed. I was able to pick it all up at Ace Hardware but if you're not near one of those I'm sure Homedepot or any hardware store should carry most of this stuff. Hope this helps!
Not sure about cable management in the case for but the desk...
I believe thats a malm desk so it has the rack in the back which means adding another won't be easy (really everything doesn't fit?). You could try using something like this or this with some 3m tape so you can mount the cables on the bottom of the desk so they aren't hanging. You could also wrap the cables to decrease the amount of slack using something like this. Any cables coming from the back of the monitors or the desk you can try using this. You could consider mounting your surge protector on the desk if it is not already so that no cables are dangling down to it and the only thing would be the surge protector wire.
Additional things you could look into would be a boom arm for the mic so its not sitting in the middle, might clean it up a bit. Also, if you are really dedicated to making it look nice and don't tend to rearrange that often, you could look into drilling holes for the wires for the keyboard/mouse (I'm personally not a fan of this method but people do it).
It might take a bit of cash to do ALL of that so maybe just prioritize what you think will give the best results.
Any of the
Carbide cases, the 600Tfuck it, all the Corsair cases. Antec P280.... I think your condition of having well-placed cable tie-downs is made moot by the ability to use stuff like this and these.Just because it doesn't come with them built into the motherboard platen (o_O) doesn't mean that case should be excluded just because of that. You're putting a lot of lesser quality cases on that list and missing out the champs that have been used multiple times over by people on this subreddit and others.
Same clips on Amazon (US): http://www.amazon.com/gp/product/B005MN2QHK
Thanks.
I have two cars and three 'projects'.
One underhood project:
Two under-dash projects that are identical, one for each car:
The hard part is figuring out where to get a non-fused 12V supply under the dash. An add-a-fuse circuit is very appealing and I should find places where an extra 5-10A won't pop anything, so I may end up doing one 5-10A-add-a-fuse on an ignition-hot line, instead of a 12v-master-fuse + ignition-hot-relay, as the single master fuse for all these.
Then it would just be a 15A strip terminal instead of a big fat 100A ground bar at the ground side, and a small fuse box at the positive side (with 1A or 2A fuses for each circuit, depending on their needs).
---
I really appreciate your feedback. The only reason I haven't already built all this is because of worries of fucking up and coming back to a smoldering ash heap.
---
I'm also figuring out how to mount all this securely under the hood... I figure these little wire clamps for the wires, and something like this velcro alternative to mount things like the fuse box, except it's hard to tell what temperature they're rated for (and it seems that the 3M stuff I linked will fall off due to heat.) Any ideas there? I want something that is 1) secure as fuck, but 2) that I could potentially remove without damage in the future, maybe using a heat gun or something. I would be mounting it mostly to plastic, but I don't want to drill any holes if possible.
Wow! Thanks for that deal. I've just bought 3 packs of those combined with 2 packs of those, no more excuse to keep that cable mess around my computer, TV, Rpi, etc.
http://www.amazon.com/Black-Adhesive-Backed-Adjustable-Clamps/dp/B005MN2QHK/ref=sr_1_3?ie=UTF8&qid=1420485965&sr=8-3&keywords=wire+clips+adhesive
These things are friggin awesome, and for <$3 with shipping, what do you have to lose?
I stuck a few along the back/bottom of my desk, and routed the cables through there. It keeps them nice and bundled, tucked out of the way, and neatly routed. If I ever have to change anything, just click em open (no zipties to cut or velcro to mess with). The best part is, for my mouse/kb I wrapped the cable around once and put the clip near the drawer, so it's never slid or dangled or pulled even once.
I looked at both recently and ended up going for the I. The II have USB and also 7.1 surround IIRC but in headphones, the surround is not real, it's a virtual 7.1 recreated through the two headphones you have so I really didn't think is was worth the extra money. There may be some other small features, though, but I'm perfectly happy with the I.
One suggestion to avoid tangling is routing the cable carefully around your desk with a solution like this or something similar.
Also get a headphone stand or holder if you don't have one and build the habit of hanging the headphones facing forward, i.e. without turning it 180°, which I feel is a fairly intuitive thing to do unfortunately, so that you don't spin the cable every time to put the headphone on and off.
> Any advice on hardwiring? If I get the F50, It sounds like Ill need a pro to install it.
If you really really want to pay someone else to install it, buy a more expensive camera:
BlackSys CH-100B 2-Channel ($269.99 USD)
Thinkware F770 2-CH ($360 - $10 = $350 USD)
BlackVue DR650S-2CH($360 - $10 = $350 USD)
Hardwiring: Start at the fuse box. So when I hardwired my first dash camera, the cord was 1 inch too short, and I had already applied the adhesive strip to the window. (1) Move the dash camera, hard didn't do this or (2) readjusted the entire kit <- Did this one.
Locate Fuse box(es): Generally there are 2 fuse boxes in a vehicle, some have 3: (1) Under the hood (don't use this one), (2) Under the dashboard Driver/Passenger side (Most use this one) (3) Some, but most vehicles all have a fuse box in the trunk, and some people have to use this one (but not most.) - Consult your owner's manual. (Googling youtube videos of your vehicle model/make/year + Fusebox location also helps.)
Tap a Fuse or Add a fuse: If it is included in your kit, great, if not purchasing one makes the job a lot easier ($1-5 USD). Tap A fuse/Add a fuse should match your vehicle, and there are different types: ATO, Mini, Low Profile Mini, Micro2.
If you look at the Tap a Fuse/Add a fuse, you will see 2 slots: 1st slot protects your vehicle (use the fuse you pulled out of your vehicle), 2nd slot protects your dash camera (1-5 amp fuse - Sometime have them included in the kit, others purchased separately.)
Always on vs only on when ignition is on: Parking mode dash cams should be plugged into an Always on slot in your fuse box. (Generally there is a powered, but unused slot, rear wipers works great.)
Most non parking mode dash cams are plugged into a fuse slot that is only powered when the vehicle is on. (Avoid Airbags, alarm system, Headlights, ignition system, air conditioner and other sensitive or high voltage fuses.) - Cig Lighter is a common choice for this type, test if it is always on or ignition only by using it while key is not in vehicle.
Ground wire: Find a bolt that is not painted, unscrew it slightly, put ground wire connector behind it, screw it back in. - Sounds hard, is not, generally there is one located in or near the fuse box. (This completes the circuit, Fuse box (positive), Ground wire (negative.)
Hiding wires: Most vehicles you can hide the wires in the weather stripping of the vehicle, and the headliner. If not buy wire clips. - I hid mine in the weather stripping; You can see 1 wire, but it is hard to notice since I followed the natural lines of the vehicle's interior.
Or the other option: You can take apart the A pillar, and hide the wires in there (not suggested.)
There are almost an endless series of videos of how to install a dash camera, watch a few.
> But I have a bigger question: does hardwiring not hurt the battery life of the car? Are there drawbacks like the car not starting if it takes up too much juice in park mode?
The Thinkware F50 has built in low voltage protection, and a timer cut off.
There are drawbacks to using your car's battery, most car batteries are Cranking batteries (meant to give you a short burst of energy to start your vehicle, and then rapidly recharged.)
Some (very few) have a hybrid battery - It is a mixture of deep cycle (long use) and a cranking battery. Deep Cycle batteries are for like powering a radio with the engine off on a boat. Generally in this setup you would have 1 cranking, and 1 deep cycle (like on a boat).
While in parking mode dash cams only write to the Micro SD card when motion is detected. Excellent Parking mode dash cams are low power while in park mode, discreet enough to not attract unwanted attention, and buffered (records a few seconds before motion is detected, and a few seconds after.) - The Thinkware F50 has this.
I am actually not familiar with the Thinkware F50 menu options, but many can be set to different voltage levels/timers.
Ikea has a good selection for cable management.
https://www.amazon.com/Black-Adhesive-Backed-Adjustable-Clamps/dp/B005MN2QHK/ref=pd_lpo_vtph_23_lp_t_4?_encoding=UTF8&amp;psc=1&amp;refRID=BXAR9F5ZKVS72KDG2CSG
I use these.
Could you upload your model/render if it's real size? I've thinking about one myself (indesk build) since wants to change the layout of my battlestation room :D.
EDIT: Also you could use some of this to take wires away from your legs (I hate having them around).
never seen one 'fool' proof. When you got people swearing by them you have someone that hasn't been screwed by one yet lol.
sure sure.. some of that could be user error.. but if you make a user error on something like this you don't have to re-run the whole cable.
plus tacking something down on a wall looks kinda well aweful where as something like this looks pretty good when done decently.. but more work.
EDIT: if you read the last part of my first comment i said you probably won't damage it.. but that one time.... you know.. murphy's law.
There are lots of better options than duct tape. You can see tons in the 'customers also bought' section.
http://www.amazon.com/Black-Adhesive-Backed-Adjustable-Clamps/dp/B005MN2QHK/
I've been routing my cables using these clips to hide them around the back of my desk and down the back of one of the legs to the floor. Can't see a thing.
you are going to cry when you need to move one of those cables.
I highly recommend these next time you "remodel"
https://www.amazon.com/Black-Adhesive-Backed-Adjustable-Clamps/dp/B005MN2QHK/ref=pd_sim_147_8?_encoding=UTF8&amp;psc=1&amp;refRID=03VFPGVZ390908FHPQV7