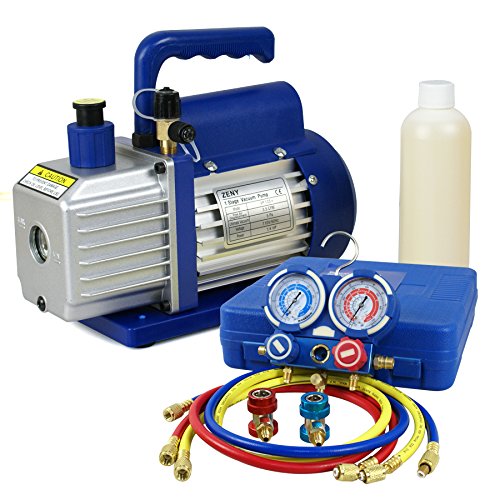
Best air conditioning tools & equipment according to redditors
We found 191 Reddit comments discussing the best air conditioning tools & equipment. We ranked the 77 resulting products by number of redditors who mentioned them. Here are the top 20.
We found 191 Reddit comments discussing the best air conditioning tools & equipment. We ranked the 77 resulting products by number of redditors who mentioned them. Here are the top 20.


Refrigeration research engineer here, with a masters in mechanical engineering.
Yes you can dry clothing in a vacuum chamber, but it would take forever.
Between freezing and room temp, the saturation pressure of water is a few kPa (a standard vacuum pump like this would work). It would take forever, the engineering term for several hours or longer, because water has a high enthalpy of evaporation--evaporating water carries away a lot of heat (you've experienced this whenever you sweat)--so the limiting factor will be the temperature of the water and clothing.
To make a long story short, there's a vapor pressure that matches a certain liquid temperature--warmer liquids have a lot of heat so liquid is easily evaporated and the pressure they can sustain will be higher. If you start evacuating gas from the chamber, some water evaporates to make up the reduction in pressure which carries away heat cooling the remaining liquid until the pressure in the chamber matches the vapor pressure corresponding to the temperature of the water.
From the saturation pressure link, the saturation pressure at 0 C is about 0.6 kPa, a cheap vacuum pump will probably be able to pump down to that. Assuming this is the case, your clothing will sit wet at 0 C while water very slowly evaporates. The temperature of the remaining water will be where the heat flowing into the clothing/water from the chamber walls balances the heat the evaporating water carries away. It might be 0 C, it might be -20 C or lower. Regardless this will be a very long time.
The enthalpy of vaporization for water is 2260 kJ/kg. If 100 watts of heat flows into the chamber, it'll take 6.3 hours to evaporate a liter of water. This is the fastest it could possibly take. Fabric is not a good conductor of heat so the parts of fabric that are not touching walls will take a very long time to dry. People who work with vacuum spaces hate getting water in them because it takes so long to get rid of.
Hey guys as a heads up. In the lab if we make silicone we always degas the mixture before pouring. To degas just put the silicone after mixing into a closed container and pull vacuum. I think even a cheap aspirator will pull enough vacuum to work. Pull until the bubbles stop than you're good to go.
https://www.amazon.com/Dynalon-312635-Faucet-Aspirator-Vacuum/dp/B004AHL77E
https://www.amazon.com/Nalgene-6140-0010-Aspirator-Polypropylene-Threading/dp/B003OBYNBO
Both look promising. Google degassing silicone for more it's a common technique in soft litho.
Edit: For a chamber just get a plastic dessicator. They aren't that expensive : https://www.amazon.com/United-Scientific-55204-Polypropylene-Polycarbonate/dp/B00ES3GPMM
Edit2: Cus degassing silicone just looks so pretty : https://www.youtube.com/watch?v=bbSvzD8g_S0
Edit3: Decent part combo for degassing
https://www.amazon.com/Stainless-Chamber-Urethanes-Silicones-Epoxies/dp/B00KSWL29I/
https://www.amazon.com/Single-Stage-Rotary-Economy-Vacuum-Refrigerant/dp/B012CFTYX4/ref=pd_bxgy_236_img_2?ie=UTF8&refRID=1N0WKYM5MHVXTF9FVB8K
Remember keep the vacuum so that it slowly degasses you do not want it to bubble over and all into your chamber.
My humble opinion -
Robinair 15500 pump with a ProVac chamber is your best budget value.
Interesting idea! I went on a hunt and this is the coolest thing I've found:
It's done with a process called plastination:
> The water and fat are replaced by certain plastics, yielding specimens that can be touched, do not smell or decay, and even retain most properties of the original sample.
They're been doing this since 1970s so I figure there's probably a guide online. Next logical step was a search for "DIY plastination":
I do not have any evidence that the same procedure would work on mushroom flesh, other than the flickr link above.
EDIT:
Per the plastination patent by Gunther von Hagens:
>EXAMPLE 3
>A globular cactus having a diameter of approximately 15 cm was partly hollowed out from its root end by means of a curette, and it was then immersed sequentially for three hours each in 50% aqueous acetone, pure acetone, and dichloromethane. Thereafter it was immersed in a solution of a commercial epoxy resin prepolymer stable at low temperature, but curing at elevated temperature. The vat holding the prepolymer and the immersed cactus was stored in a vacuum at 10° C. for eight hours, whereby all volatile solvent was extracted. When drained of excess prepolymer and held in an oven at 40° C. for six hours, the cactus hardened, but otherwise retained its original appearance and color.
Just curious how much a DIY setup would cost so I made a shopping list:
Without tools, the best you can really do is look for oiliness on the pipe. When you find a joint that feels oily (look for dark colours on the pipe, usually covered in very fine dust. Once you rub the dusty area with your fingers you'll feel the oiliness), spray/pour a small amount of washing up liquid over it and look for bubbles. If there's any refrigerant left in the system, you'll usually see bubbles appear (or over a longer period, foam). Of course if the gas has all escaped already - and we're only talking a couple of hundred grams here - then you won't see any bubbles.
Most domestic gear has no access fitting at all so even locating the leak can be difficult if there's no visual indication. You need to get pressure in there so you can leak test - this means adding a bullet piercing valve (like this).
Then you need to put something in via your bullet piercing valve to raise the system pressure. It's best to use dry nitrogen to leak test to save wasting refrigerant, but since you most likely don't have that on hand you could buy yourself some refrigerant (most likely R134a) and pressurise with that. That's a big no-no here (both disposable cylinders and dumping gas to atmosphere by charging a system with a known leak) but I'm guessing your in the US, and those sorts of laws seem remarkably lax so go for gold. It's not like you'll be ruining MY ozone layer too, right? ;)
You also need to regulate the pressure going in to the system. This is where you need gauges. Connect the yellow line to your bottle, connect the blue line loosely to your bullet piercing valve, purge from cylinder to piercing valve by opening the cylinder tap + gauges tap, and releasing some pressure via the loose fitting, then tighten the fitting and close your gauges tap. Open the bullet piercing valve. Open the gauges tap slowly and give it ~50psi of system pressure.
Then you can go for gold with your soap, or you can lash out and grab yourself some "proper" leak detection fluid (like this), or better yet an electronic leak detector (like this one).
Once you've found your leak, you want to release your nitrogen (or reclaim your refrigerant using a reclaim plant and a spare cylinder), then repair it using an oxy/acetalyne set, or since it's only tiny pipework you can get away with a MAPP gas set.
If it's a copper->copper joint, you're laughing - polish the pipework up with emery cloth, heat the pipe until it's just this side of glowing red, and feed the joint with brown tip silver solder.
If it's a copper->steel joint, then it's a bit more of a pain. You need blue tip silver solder and flux. Clean your joint with the emery cloth, give it a nice coating of flux on every surface you need solder to stick to, then heat it up until it's a fair way short of glowing red. Feed the blue tip solder in and STOP. Unlike brown tip (15% silver) you can't just keep feeding blue tip (45% silver) as it ruins the weld.
Now, since you put on a bullet piercing valve and they leak like a sieve in the long term, we need to replace that with a schrader access valve. Since it's most likely going to be in a straight through piece of pipe, you can save time and grab yourself a pre made access valve in 1/4" pipe. Cut away the hole left by the bullet piercing valve, polish the copper and cut the pipework with a ~10mm gap using a tube cutter. Then slip your access fitting assembly in there, and follow the copper->copper joint procedure.
Of course, now that we've done all that you need to change the liquid line filter drier too. I'd recommend a 1/4" solder in core drier in place of the original copper spun drier because... well, copper spun driers are terrible. Follow the pipe cutting procedure from the piercing valve instructions and the soldering instructions from the copper->copper joint instructions and that's done too. Remember - always try and mount the drier so it's outlet is LOWER than its inlet. This turns the drier into a small liquid receiver and helps ensure a good liquid seal over the capillary tube. Speaking of capillary tubes, if it was inserted straight into the original copper spun drier CUT the capillary, don't try and unsweat it. The chances of blocking it up are about 82.5634% (approximately) when you unsweat capillarys. You're much better off chopping it with a set of capillary tube cutters and ensuring a good clean capillary. The ~30mm of wasted capillary will affect performance, but almost certainly not to any sort of measurable degree.
Then give the system a good evacuation using a vacuum pump and ensure it reaches a good vacuum (sub-500 micron) with a digital vacuum gauge.
Then using a set of electronic scales, charge your freshly evacuated system (remembering to purge!) to the charge recommended by the manufacturer.
Voila! You have just fixed your chest freezer.
..... Alternatively, pay someone to do it for you and/or recycle the components and buy yourself a new one.
Homebrew Materials:
Vacuum Pump Oil
Vacuum Tubing
1/4" Barb x 1/4" NPT Male Hose Fitting
1/4" Male x 1/4" Female NPT Extension Hose
Vacuum Pump
Filters
Spatulas
Magnetic Stir Bar
Digital Hotplate with Magnetic Stirrer
Nitrile Gloves (Better than Latex)
Empty Capsules (Buy Separated unless you hate your life)
Capsule Machine (If you value your sanity, buy more than a 100... I hated my life doing this)
Mohr Pipets
Pipette 10ml
Mortar and Pestle (If you're doing orals, get this... Otherwise, you're playing Russian Roulette with your doses and liver)
Funnel (For pouring into small places)
Alconox (For clean your shit)
Temperature Gun (How hot is my shit?)
Graduated Cylinder (If you measure with beakers, you're a fucking idiot... And you should consider Volumetric Flasks)
Beaker Set
1 Liter Beaker (Because brewing en'masse is better)
Scale (I have a 2kg one, too)
Calibration Weight Set
Calibration Weight 100g (Because you need two for the scale linked)
Vacuum Regulator (Unless you want to filter 9001 times due to broken shit)
Oil (Any USP grade, filtered or unfitlered)
BB
BA
Butyl Stoppers
Flip Top Seals
Crimper
Vials (Unsealed)
Autoclave (Cheaper than an oven, why are you using an oven?!)
Weight Boats (Buy a million of these. They're cheap and useful)
Did I miss something? Probably. Yes.
Using this jar sealer and this vacuum pump, you can vacuum seal the big mason jars to store bulk items without having to buy an expensive food sealer.
Are you using an NPT or triclamp style tube? If you're using NPT (national pipe thread, american pipes in inches basically) you can get a brass NPT ball valve, a reducer to put into the valve for a smaller thread size, and another brass piece, this time a 1/4" flared end for gas. You'll need teflon pipe threading tape to seal everything up and a vice grip or a couple of pipe wrenches to put the thing together. You can get all of this on amazon.
If you have a device like in picture with triclamp ends you'd already know where to get all of this crap but www.glaciertanks.com and www.brewershardware.com sell all the triclamp pieces you will ever need. Glacier Tanks is in oregon and supports the CLS extractor community directly by selling pre-fabbed terpinator style lids and collection pots, Brewers Hardware has a bunch of stuff they don't carry though as well. I've used both and they are awesome. Brewers Hardware also has lower prices on a lot of stuff like the spools you'll be using as extraction tubes, and they sell the national pipe thread to triclamp ends that I'm gonna need to modify my own old open blast tubes (my 1-2 and 3-5oz tubes depending on material and how tight it packs) into CLS parts. I have a calculator setup i've figured out though for how big of a tube can fit how much material for CLS use though. a 3"x18" spool fits about a half pound (bhogart sells a 3"x36" as their 1LB unit and it fits roughly that), so I figured out its volume from there and I can figure out how big of a tube will fit say 1oz, 2 ounces, and so on. you don't need perfectly filled tubes with CLS extractors either, you can fluff the top with coffee filters so the butane disperses evenly on the top, and typically in a shower style unit like the Bhogart, the top few inches don't get properly extracted anyways if you fill it all the way to the brim. I try to leave 2-3 inches at the top of the 36" column bare so it can just shower down and it seems to work really well, but with a narrower tube size you will probably be okay.
IF you got this far, you also are going to want a can cracker. You can use it on the top of the pipe in lieu of the brass hose hookup by screwing it directly to the top, but you need to make sure you get the right fittings for it. It looks like the crackers they sell all have the 1/4" flare end facing the wrong angle, so you'll probably need the hose after all. here's the cracker and a link to the right type of hose, as well as a link to one of the fitting types (though maybe not in the right NPT thread you need).
cracker: http://smile.amazon.com/Robinair-10102-Side-R134A-Respective/dp/B0009XT7NY/ref=sr_1_2?ie=UTF8&qid=1421275663&sr=8-2&keywords=refrigerant+can+
PTFE lined chemical hose buying list. you want 1/4": http://smile.amazon.com/Unisource-Chemical-Assembly-Connection-Pressure/dp/B007USNQNI/ref=sr_1_6?ie=UTF8&qid=1421275772&sr=8-6&keywords=ptfe+lined+hose
the style of brass end you need: http://smile.amazon.com/dp/B000WTXICQ/ref=biss_dp_t_asn
brass coupler to put the end into:
http://smile.amazon.com/dp/B006PKMJCQ/ref=biss_dp_t_asn
something to put the brass coupler into to make it fit your valve: http://smile.amazon.com/dp/B00835RTY4/ref=biss_dp_t_asn
2" brass valve: http://smile.amazon.com/dp/B0081LIGIS/ref=biss_dp_t_asn
ptfe tape: http://smile.amazon.com/Dixon-Valve-Coupling-TTB50-Temperature/dp/B00IIJB7F2/ref=sr_1_3?s=industrial&ie=UTF8&qid=1421277137&sr=1-3&keywords=ptfe+tape
after reading around, you said your pipe was 2" so i modified the list with everything you'd need to modify a 2" pipe.
Don't waste your time on a brake bleeding kit. Hand pumps take constant strenuous pumping to reach -29mm/hg and they aren't meant for that sort of constant use. I went through 3 hand pumps that each lasted a maximum of 3 weeks before I sucked it up and bought an electric pump. You can find them on amazon for around $100. Best purchase I've ever made.
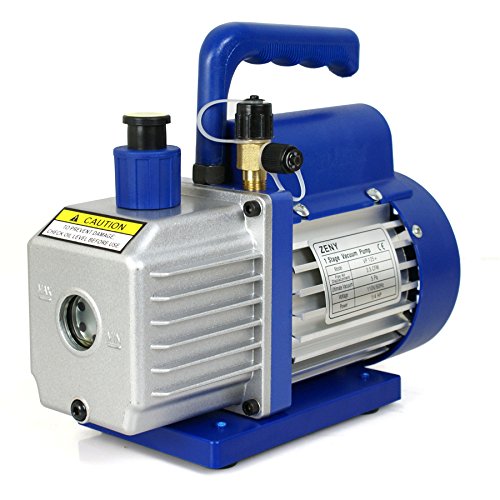
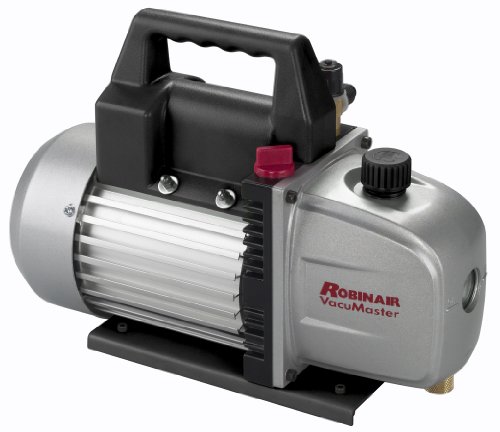
Here's a 3.0 cfm single stage robinair that would be more than sufficient (I use a 1.5 cfm and it pulls the necessary vac in seconds). http://www.amazon.com/Robinair-15310-VacuMaster-Single-Stage/dp/B005CO9GX6/ref=sr_1_7?ie=UTF8&qid=1343111350&sr=8-7&keywords=vacuum+pump
This has been asked a thousand times, at least twice this past week. Please use the search next time. Anyway I'll just copy and paste my last response:
I would go for this chamber:
http://www.ebay.com/itm/Vacuum-and-Degassing-chamber-1-5GL-/221257099507?pt=BI_Pumps&hash=item3383f368f3
If not this one, then a stainless steel one, the bell plastic chambers are not good if you have a heat pad or something in it.
Go for this vac pump:
http://www.amazon.com/gp/aw/d/B005CO9GX6/ref=mp_s_a_1_5?qid=1375793140&sr=1-5&pi=AA160
You could get one cheaper there on amazon or eBay, it's up to you, but I recommend a 3 CFM pump or higher.
This hot plate is battery powered, fits in the chamber, and can keep a pretty good constant low temp:
http://www.amazon.com/Aroma-AHP-303-Single-Plate-Black/dp/B0007QCRNU/ref=sr_1_1?ie=UTF8&qid=1375192614&sr=8-1&keywords=battery+hot+plate
Hopefully this gets you started in the right direction, there are many many options for a nice vac set up, I'm sure if you look around you'll find good deals.
You have to vacuum the air out of the system before putting refrigerant in. You can do this yourself if you have a set of filler valves, a vacuum pump, and a very accurate digital scale. Most people don't have these lying around, so they'll just go to the shop for this part only.
Edit: You could use a kit like this. You would also need the scale to measure the correct amount of refrigerant going in.
What do you mean, they have plenty of options great for the whole family.
If you can afford them, an older US-made RobinAir pump is considered by many to be the highest quality pump you can buy, but they're not cheap. For stabilizing, I use a modern RobinAir 15310 that I bought on Amazon for $70 on sale. It works fine, although it does blow a fine oil mist into the air occasionally (use it outside).
I also have two Glass Vac chambers from Best Value Vacs (purchased on Amazon) in 3 & 5 gallon sizes. Perfect for pouring in a gallon or two of resin and stabilizing anything up to about 10" in diameter. The aluminum pots are easy to empty and clean after stabilizing.
The only downside is that I can't stabilize long pieces, since it has to fit reasonably in the pot and be submerged, but 90% of what I do is small project blanks.
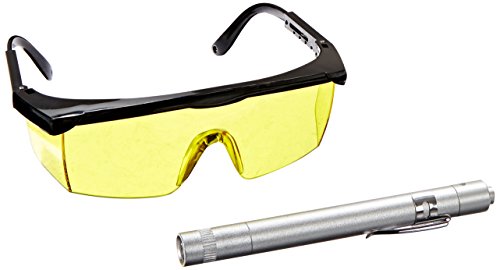
I've had success UV dye:
https://smile.amazon.com/Interdynamics-Certified-Fuel-Systems-ounce/dp/B002M4G24U/
Here's some cheap blacklights:
https://smile.amazon.com/Interdynamics-Certified-Detection-Glasses-438/dp/B003JOB594/
https://smile.amazon.com/POCKETMAN-UV-Ultraviolet-Blacklights-Flashlight-Detecting/dp/B01FS64GNC/
That being said, ih8mud is a much better place for these questions. It's much more active.
ball valve with a 45* angle on it so the cans dump and also an adapter to fit the 1/4" NPT of the T and the 1/4" flare thread from the ball valve.
Can tapper: http://www.amazon.com/gp/product/B0009XT7NY/ref=oh_details_o05_s00_i00?ie=UTF8&psc=1
(remove the schrader valve on the side you use and also the ball in the inside as well.)
Ball valves: http://www.amazon.com/gp/product/B0014JC9HI/ref=oh_details_o07_s00_i00?ie=UTF8&psc=1
(I had to file down the end of the ballvalve where the adapter fits on because at first it was only held on by one thread. Making the ball valve shorter allowed it to fit inside the adapter deeper and make contact with more threads)
Adapter: http://www.amazon.com/gp/product/B0056ODEP8/ref=oh_details_o02_s00_i00?ie=UTF8&psc=1
(take a pair of needle nose pliers to remove the unnecessary internals that would reduce the flow rate.)
I got the T splitter from ebay. I found one with male 1/4" NPT on the bottom and female 1/4" NPT on each side.
Light : https://www.amazon.com/gp/aw/d/B07D6D91FC?psc=1&ref=ppx_pop_mob_b_asin_title
Dye: https://www.amazon.com/gp/aw/d/B002M4E0VC?psc=1&ref=ppx_pop_mob_b_asin_title
Light has 3 strength settings ajs uses 3 AA.
Very bright. I was amazed when I found the leak. Super bright with the dye. I did look at night to make sure I found it but I'm sure you don't have to look ar night, I just wanted to really make sure I could see it lol
Well I guess it's not a dye it's like a 2 part turkey baster and you fill it with the blue fluid in two chambers, then open the cap and start it. Hold the turkey baster looking thing over the radiator sucking no fluid just air above hole from the radiator and the fluid instantly turns green when funes are detected in radiator. Here is the one I have and use.
https://www.amazon.com/UVIEW-560000-Combustion-Leak-Tester/dp/B000NPDL76
start with this and a blacklight - right tools for the job and all that
I suggest another lower end pump from robinair
at full vacuum thc and terps will boil off below room temperature
I've got a 2000 honda civic and need to do some A/C work.
think I might be buying this kit
http://www.amazon.com/FJC-KIT6-Vacuum-Pump-Gauge/dp/B001C6LG3Q/ref=sr_1_3?ie=UTF8&qid=1371620274&sr=8-3&keywords=ac+gauges
pretty good video on AC
https://www.youtube.com/watch?v=lglPJuBXVeE
FAQ about doing it on honda-tech
http://honda-tech.com/showthread.php?t=1665946
Also sometimes you can get the tools on loaner program with Autozone or Advance Auto
The one I've been using works great. This one is marketed towards the marijuana industry for making concentrates, but its no different than any other vacuum chamber. The only difference between mine that that one is that I bought that vac chamber alone, and a Robinair 5cfm Pump separately. That first link wasn't an option when I bought it.
Cool, thanks. One other thing. How would I connect the tubing from my vacuum pump to the glass beaker? Mine currently has some screw on inlet ports. I'm using a Robinair Pump
Sounds like vacuum would be your best choice - no rotovap (the roto part and delicate doesn't seem to go well together for me) and no heat necessary.
Sealing the container and getting a cheap vacuum pump and leaving it running would make a huge difference imo. Just make sure that the container in which you soak your stuff won't explode from the vacuum. It'd be best if, while under vacuum, the container would be in another container, that would contain the possible explosion - for your own safety.
https://www.amazon.com/Kozyvacu-TA350-Single-Stage-Refrigerant-Recharging/dp/B01N6IOBWF/ref=sr_1_3?keywords=vacuum+pump&qid=1566315507&s=gateway&sr=8-3
Hey, I used to live in Sacramento too! (but I didn't move here to work for Epic, lol)
Most cars have 50/50 glycol/water in them already, so you shouldn't need to change it unless you've been topping up with straight water as Californians are known to do. Madison doesn't get cold enough to need 60/40. You can buy a floaty ball tester (like that but not "professional") for $2 at Farm and Fleet or any auto parts store. Last winter was the coldest in 30+ years and it got somewhere around -25°F.
What you will need to do is use up all your washer fluid before it freezes for the first time. California has this wonderful low-VOC stuff that "protects to 32°F", i.e. doesn't do shit for freezing. The stuff you get here freezes somewhere around -20 to -30°F. Resist the temptation to use the sprayer to melt ice off your windshield. Sometimes you can get away with it, but just scrape it.
Use one of these to check for combustion gasses in the coolant.
sorry, I don't know exact models but in some models the engine is higher than the radiator, trapping the bubble in the engine. you'll need one of these
They make a combustion gas tester.
https://www.amazon.com/UView-560000-Combustion-Leak-Tester/dp/B000NPDL76
Sometimes that helps diagnose.
vacuum pumps for your needs are cheap, https://www.amazon.com/ZENY-Single-Stage-Economy-Conditioner-Refrigerant/dp/B012CFTYX4/ref=sr_1_1_sspa?ie=UTF8&qid=1541948266&sr=8-1-spons&keywords=vacuum+pump&psc=1
I'm pretty sure battery water is distilled. Most super markets have distilled water.
Also most parts stores have pre mixed coolant that has distilled water.
You want coolant in your reservoir, that way when your coolant expands as it heats it will go in there, and when it cools down it will syphon back in. It's also kind of back up coolant, if you get a leak it get topped off by the stuff if the reservoir.
The way I do a coolant flush at work if it really needs it:
I drain the coolant, I remove both heater hoses, I hook a hose the the heater core and flush it one way, then the other, reinstall the heater hoses, I fill it back up with regular water and coolant flush, I run it until it gets hot, drain it, and fill it back up with coolant.
I use one of these when bleeding the cooling system:
https://www.amazon.com/Lisle-24680-Spill-Free-Funnel/dp/B00A6AS6LY
If you want to get really fancy you can vacuum fill, but that's more of a professional tool, really only worth buying if you work on cars a lot. Here's the one I have: https://www.amazon.com/UView-550000-Airlift-Cooling-Checker/dp/B0002SRH5G
You hook compressed air to the system and it sucks all the air out, then you close the valve and hook it to a hose that goes to a container full of coolant and it sucks it back in, gets rid of all the air pockets and checks for leaks at the same time, so it's really handy if you're in a hurry trying to make money.
> stainless steel 316 Tee
http://www.amazon.com/dp/B003LSSLE0/ref=biss_dp_t_asn -----
>stainless steel 316 nipple 1/4 ----------
http://www.amazon.com/gp/product/B004Y18C56/ref=pd_luc_rh_bxgy_01_02_t_lh?ie=UTF8&psc=1 ----
>ball vales
http://www.amazon.com/Stainless-Steel-Mini-Ball-Valve/dp/B006VE3BF0/ref=pd_sim_sbs_auto_2?ie=UTF8&refRID=0QATKNJ8JPYS71CX5ZPG
>can tap
http://www.amazon.com/Robinair-10102-Side-R134A-Respective/dp/B0009XT7NY/ref=sr_1_2?ie=UTF8&qid=1417119173&sr=8-2&keywords=can+tapper
No, I just used the regular housing gasket.
Oh yeah, I had a tough time bleeding my car for some reason. I ended up using this tool to bleed it. If you have access to an air compressor, this or this cheaper one would work better. With the funnel, there's no BMW adapter, so I had to make one out of an old cap by drilling a hole with step bit.
Ya I've never understood the point of struggling using a caulking gun and a syringe filter. Use the money you saved buying raw and get a vacuum pump. 15 seconds with a bottle top filter.
this is the chamber ive used for years: http://www.ebay.com/itm/ProVac-vacuum-chamber-3-gallon-size-/272086243605?hash=item3f599a9915:g:wfIAAOSwiLdWBPL6
this is the vac ive used for years http://www.amazon.com/gp/product/B0017R95DI?keywords=vacuum%20pump&qid=1451920342&ref_=sr_1_19&sr=8-19
this is the griddle ive used for years
http://www.amazon.com/Presto-07047-Touch-Electric-Griddle/dp/B0051XSIO6/ref=sr_1_9?ie=UTF8&qid=1451920465&sr=8-9&keywords=electric+griddle
Gasses can stay in solution because of temperature, and because of pressure. With soda, opening the top releases all the pressure, and so all of the CO2 bubbles come out of solution and fizz up - CO2 is a gas at room temp and pressure, like butane.
We can only heat up our product so much, and so we can do the rest of the work with pressure. Applying a vacuum to the concentrate forces the remaining butane still in solution to become a vapor, which can bubble out.
Something like this would be awesome: http://www.amazon.com/Actron-CP7830-Hand-Vacuum-Pump/dp/B0009XQUK2/ref=sr_1_1?ie=UTF8&qid=1346382578&sr=8-1&keywords=hand+vacuum+pump
That, the right top, and a mason jar is all that you need. Warm it up on some parchment paper till it's very runny, put the piece of paper in the jar, vacuum the crap out of it and watch it bubble up, let it cool. Repeat 3-4x.
https://www.amazon.com/UVIEW-560000-Combustion-Leak-Tester/dp/B000NPDL76
That won't tell you which gasket is leaking, but it will tell you if either of them are. If there is exhaust gas in your coolant system, then you're replacing something. You'll get it broken down to replace the LIM gasket and you'll be able to tell if that's the issue or not once you get the LIM off and inspect it. If it's ok, then you'll just keep going and pull the head. On a 3800 engine, it's gonna be the LIM gasket 99% of the time.
You can try a combustion leak tester. It's made to detect combustion exhaust gases in your coolant system, which only occurs if there's a headgasket leak between the cylinders and cooling system/water jackets. I don't know what you guys have across the pond, but auto parts stores here will rent the tool out for free (with a security deposit that is returned when the tool is returned), you just gotta buy the bottle of liquid. ...if you can find an employee that knows what the heck you are talking about lol. Last time I needed one, I had to try several different stores before I found someone who knew what it was.
They look like this:https://www.amazon.com/UView-560000-Combustion-Leak-Tester/dp/B000NPDL76
It does sound like your head gasket is a goner though. Unless there's a crack in the metal somewhere, it shouldn't need a new head, but you should get the head resurfaced to ensure it's flat. We don't have any machine shops in my area, so last set of head gaskets I did, I used a big thick mirror as a flat working surface and glued sandpaper onto it and used that to sand down the head. People here will probably discourage this, but it's a decades old tried-and-true DIY method.
That's a vacuum pump
http://www.amazon.com/Robinair-15800-VacuMaster-Economy-Vacuum/dp/B001P7C7QM/ref=lp_15707041_1_2?s=automotive&ie=UTF8&qid=1427411598&sr=1-2
Fixing it is really easy. It's just plumbing, and the special tools needed can be bought for $130 online.
I know people have different priorities, but I consider AC to be pretty much a direct quality of life feature on a daily driver. Cleaning out a muddy alternator ain't that hard.
I actually recommend this pump, it's faster and makes the same if not stronger vacuum on my gauge (as unreliable as that is). And it's cheaper. And Grey Wolf has been using one for 4-5 years, apparently.
http://www.amazon.com/gp/product/B000XMG3T2/ref=oh_details_o07_s00_i00?ie=UTF8&psc=1
got the CCVP6S 6 CFM Single Stage Vacuum Pump and a 3-gal chamber. I'm sitting at an elevation of 2200ft, so pull to 27.82 hg
I just purchased a $100 5G vac chamber off amazon along with a vac pump off amazon as well - all said and done $160.
Tried to get link for Vac chamber setup but doesn’t look like it’s sold anymore, see vac pump link below though -
https://www.amazon.com/gp/aw/d/B012CFTYX4/ref=ppx_yo_mob_b_inactive_ship_o0_img?ie=UTF8&psc=1
Here's my setup:
Vacuum Chamber: https://www.amazon.com/gp/product/B00I3Q8D2K
$117
Pump:
https://www.amazon.com/gp/product/B012CFTYX4
$52
That pot will hold a lot of wood, but you also need a couple gallons of Catus Juice to fill it. Grab a cheap toaster oven from Salvation Army to cure.
Listen to /u/Glock19mos. I don't typically dye (I purchase mine dyed) and his pictures speak volumes about his capabilities with the process.
gauge https://www.amazon.com/gp/product/B00UNPAR50
vacuum https://www.amazon.com/gp/product/B00BXMRP4I
Besides that....I guess a drill, screw driver, the normal stuff.
[FYI for the Americans here, a Stream is basically a Civic].
There should not be pressure in the system if you leave it for a few days, there should be a vacuum.
There's a test kit for combustion gasses in the coolant. Has anyone done that test? https://www.amazon.com/UVIEW-560000-Combustion-Leak-Tester/dp/B000NPDL76
Also when the car is idling and you remove radiator cap, do you see bubbles coming up thru coolant?
Self-wrencher here. AFAIK, the belt tensioner moving is normal. The angry noise you hear is your A/C compressor turning on (specifically, the clutch engaging so the internals actually spin). That's normal, although the cycle times are off.
​
Your A/C system is supposed to function like that, it'll have a drop in pressure when the A/C compressor is engaged as it pulls the freon through the system (so the low side drops, and the high side rises). The trick is balancing it all- Putting enough freon in so that there is still enough pressure when it's running (as too low of a pressure will cause the unit to stop running), but also not overfilling it to the point where either the low or high sides get too pressurized and pop a seal (or compressor).
​
If you're using one of those cheap gauges mounted on top of a can, you're going to have off-readings. They're ok for most things, but I'd recommend one of the fancier full kits (the one with the vacuum is optional) so you can see the pressure independent of the can (and also measure the high side pressure as well).
​
Worst case, just replace the tensioner & pulley if you think it's a problem (they're like $30 bucks and a ratchet pull followed by a bolt to remove/replace).
> vacuum pump I have is a 1.5 cfm robinair vacumaster
Is this it? http://www.amazon.com/Robinair-15115-VacuMaster-Single-Stage/dp/B005CO9FDW/ref=sr_1_2?ie=UTF8&qid=1404918357&sr=8-2&keywords=vacuum+pump+1.5+cfm+robinair+vacumaste
Did you get the little valve thinggy too? Would that work to regulate pressure? I mean, pretend, for everyone's sake that I am a 5 year old....
Right now its at about 280 k miles. Looking up online there is a combustion leak tester. What is your thoughts on it?
Also if it is blown head gasket do you think those head gasket sealers would work?
Everyone is telling me to get rid of my 5.0 but fuck that I love her!
I will look into compression test right now
edit: fixed links
these cars are notorious for blowing a head gasket, but usually do so around 130-140k. Maybe you were unlucky. It might be worth doing a combustion gas check with a kit you can get at any auto part store.
http://www.amazon.com/UVIEW-560000-Combustion-Leak-Tester/dp/B000NPDL76
https://www.amazon.com/Robinair-15310-VacuMaster-Single-Vacuum/dp/B005CO9GX6/
The whole thing is connected to a vacuum pump..
I have some videos that I need to upload somewhere (good anonymous alternative to youtube?).I have no idea what my CFM of my pump is but it pulls through quite literally anything.And another set of random photos from cooking that night while engineering
New ideas are I need one of these mesh filters. Perhaps 2. They draw pretty hard. These are impossible to do by your self however they may be of use in the 'power assist' mode with the vacuum pump. Definitely need one on the outlet of the first jar to keep depris from the next.
Also think I need to have buffer jars hooked up backwards. The one closest to the vacuum pump empty hooked up to a jar full of water. That way when it sucks through 1 full jar you know that all air in all of the jars has been 'smoked' through. Given enough equipment you could pack 1 massive 1g bowl hook it up to 28 mason jars in series. (You'd have to play around with sizing). And then everyone in the room can carry around a jar full of 'vaporized' 1 gram. Put a straw in it and just inhale in as much or as little time as you want.
Also need to figure out where to get a glass downspout locally to use that instead of the pipe.
I use a Robinair 15800 VacuMaster 8-CFM Two-Stage Vacuum Pump.
Works like a champ. I first saw Rump Wax using it in a video post last year or something and grabbed the same one as him. Have nothing but good things to say about it.
Interdynamics Certified A/C Pro Engine Cooling Systems UV Dye (1 Ounce) https://www.amazon.com/dp/B002M4E0VC/ref=cm_sw_r_cp_api_i_hPUADbY33B7CS
Check this out at Amazon.com
Interdynamics Certified A/C Pro Engine Cooling Systems UV Dye (1 Ounce) https://www.amazon.com/dp/B002M4E0VC/ref=cm_sw_r_other_apa_i_Lp8wDb30153E3
Get some of this (AutoZone, Advance, O'Reilly all have it too) and some of the glasses and UV flashlight. Pour it in the coolant and let it run for just a short while (since it seems like it is leaking pretty fast, you don't want it to go too long and let the dye get all over the place, which will make it more difficult to track down the exact source of the leak)...then just wait until after dark and go outside, open the hood, put on the glasses and shine the UV light around under the hood until you see where looks like a highlighter exploded. I definitely don't recommend buying the stuff that you can pour into the radiator to "fix" a leak if you find one, that stuff seems to long term make matters worse, not better.
I was going to suggest this below my last comment but saw your response here.
A head gasket could also leak between the cylinder and the coolant passages creating excessive pressure in the cooling system and overheating. There are kits available for testing the presence of combustion gases in the cooling system like these: UVIEW 560000 Combustion Leak Tester https://www.amazon.ca/dp/B000NPDL76/ref=cm_sw_r_cp_api_Yr.DxbRWDM302
Note that the head gasket might not be leaking both ways(cylinders > coolant, coolant > cylinders). If coolant was leaking into the cylinders, you would see white clouds of smoke from your exhaust, not water. I would assume if you saw water it would be a bad enough leak to hydro lock your engine.
Edit: Sorry for bad formatting...still learning to Reddit.
Update:
The system was empty. Added a little bit of UV oil and a can of refrigerant to diagnose the issue. AC turned on almost instantly, low side pressure around 30 psi by the end of the can; manifold gauges rock.
Plan is to run the AC for just a week or so to avoid long-term issues, just long enough to find the issue.
Hopefully we'll find the leak. If so, we'll buy the parts to replace.
In any event, we'll also get the accumulator and an o-ring set, pay for evac, replace the parts, pull vacuum, and charge it up properly.
Gotta get a vacuum too. Still confused whether the vacuum needs the r134a adapter - the adapter is illegal to ship to california for some reason; the vacuum in question (link) says it's made specifically for r134a but half the people say you need an adapter and half say you don't. (I got the manifold gauges I linked before - this one (link).
Time to do a combustion leak test. or have one done.
https://www.amazon.com/UVIEW-560000-Combustion-Leak-Tester/dp/B000NPDL76/ref=sr_1_1?ie=UTF8&qid=1475125843&sr=8-1&keywords=Combustion+Leak+Tester
careful with designs like this, horror stories of jars popping should lead you to get the correct equipment. This and this
Hmmm.... I don't want to scare you, I'm obviously just another shadetree intent on saving money and learning myself.
But coolant, as it boils, shouldn't alter it's state or composition. It just boils off into steam or pressurizes the system until it literally boils out of the overflow tank..
The white/orange worries me a bit. Orange could maybe be rust related, but naggs me as dexcool gelling up.
Coolant turns thick and milky when it mixes with oil at high temperature, looks like inconsistent chocolate milk. Real terrible stuff for an engine. Gums up everything and leaves a sludge residue on most of the moving parts.
I also don't like the look of the 'floaters' in the rad fill picture, espescially if this fluid is relatively 60%-75% new. It looks (to me, from the picture) like water mixing with oil. I'd like others to look at and comment on this as well.
At this point, I would do a combustion gas leak test.
You can get a [Cumbustion Gas Leak Tester] (https://www.amazon.com/UView-560000-Combustion-Leak-Tester/dp/B000NPDL76) for under $50 there on amazon. Probably cheaper elsewhere.
The concept is simple, you pull off the radiator cap, put the tester up to the opening after you fill the tool with the included dye. Start the vehicle,
The tool then creates suction (when pressed against the radiator cap opening) and draws a bit of air through it's tube from the radiator itself.
If the dye changes color, it indicates Cumbustion gas in the cooling channels, which could indicate either a bad intake or head(s)/gaskets.
Also a major indicator that oil is also doing the chacha with your coolant.
So, how do ya feel about pulling the motor? Lol
Does it throw ANY codes?, idle/Accelerate/decelerate funny?
Depending on how vested you are in a properly running vehicle, keeping costs low, and/or preventing terrible things before they become terrible, you may just leave it and continue driving while keeping a hawk eye on gauges, sounds/smells and appropriate liquids.
Or maybe pull the oil pan and find out exactly what's going on under there..
Possibly take the car into a shop/dealer and see what they have to say.... I'm here with ya until the end either way haha.
Edit* There also is a test, a mentor once taught me,. I'd have to confirm, but it goes something like pull the spark plugs, look for obvious signs of fouling/detontion etc. Put them back. Pull each spark plug one at a time. Pour distilled water into the spark plug sleeve (threaded hole on the block.) Then you try and start the car. Theory goes that if there are any cracks in the cylinder walls, head gaskets et cet, you'll get water spewing itself from the spark plug hole you're working with. To clarify, you do the test on each spark plug separately. Also tests compression I believe. Will update when I locate my notes on the subject.
Edit* I just read the other comment, honestly, you may have a serious problem and I think you should be worried about this car ceasing to function soon.
The new presence of the milky substance, is absolutely the result of whatever* was still in the block mixing in with your radiator contents as it cycles it's way through, however I believe I recall you stating you put a garden hose up to it. This makes me think that that either the heat warped a head, or ruined a gasket seal while contracting, I also think the same happeneded to your water pump.
Only, with the intake your the heads, it's oil plumbing around where it shouldn't. Or coolant running rougue in similar fashion. It's entirely possible the sudden coolant blow was a symptom, and not the cause.
I guess some options, in the case that lady luck isn't on your team, are to save for a new car, trade this one in, or buy a harbor freight engine hoist and get ready to develop mild, temporary alcoholism and a sudden tick in the left eye.....
Yes. Get a valve core remover and a 3/8" hose. I can pull a vacuum on a system to 250 microns in less than 15 minutes. Here was my original set up. It's a bit pricey to get started but you can get it piece by piece. You don't have to get it all at once.
Vacuum pump
Core remover
3/8" hose
Micron gauge
I recently upgraded my vacuum pump to a 7cfm and have two 1/2 " hoses with valve core removers. I can now pull a vacuum to 250 microns in less than 5 minutes on average. Saves a ton of time when heat waves hit and you are running around like crazy.
Coolant pressure test, exhaust gas chemical test (like this) or a cylinder leakdown test would be the way to check that. Unless you overheated the car, I would be amazed if you really had a head gasket failure though. Head gasket failures are very rare in the VW world.
https://www.amazon.com/ZENY-Single-Stage-Economy-Conditioner-Refrigerant/dp/B012CFTYX4/ref=sr_1_1_sspa?s=automotive&ie=UTF8&qid=1541546220&sr=1-1-spons&keywords=vacuum+pump&psc=1
Ok. Here is what you need to do and it’s what a mechanic shop would also do. If you do not have the following then you can get them from amazon. I have included the links below.
Interdynamics Certified A/C Pro UV Leak Detection Kit, UV Light with Glasses, 438 https://www.amazon.com/dp/B003JOB594/ref=cm_sw_r_cp_api_i_NWX7CbJHG1TTV
Tracer Spectronics Corp TP39000008 Dye-Lite Coolant/Auto Body Dye https://www.amazon.com/dp/B000NPIYLO/ref=cm_sw_r_cp_api_i_MZX7CbMADX2P3
It’s about $40 in detection parts but totally worth it. Fill your radiator and overflow tank with coolant (super cheap concentrate with water mix from Walmart is fine) and then add about .5- .75 ounces directly into the radiator. Keep track of your coolant levels and within a day (maybe more it depends on the size or location/locations of the leak) you can use the uv light and glasses to pinpoint the leak. If you have a garage you can do this in then great if not wait for nighttime and make sure you are not near any street lights.
This will pinpoint the leak and we can go from there. Hopefully it’s just something that was not tightened correctly/a hose.
A couple things come to my mind.
You could look into a vacuum pump like the ones used to draw down AC systems.
Something like this:
https://www.amazon.ca/Robinair-15115-VacuMaster-Single-Stage/dp/B005CO9FDW/
It would probably take a while but I'm sure it would eventually pull water through.
I'm just not sure how they react to water being pulled through the pump, I would hate for the pump to blow when it got the water through.
Is there power down at the lake?
A small utility pump could fill that line up no problem.
You might want to look into a small invertor generator and pump the line full from the far end.
You could also get a small battery powered pump like this:
https://www.homedepot.com/p/RYOBI-18-Volt-ONE-Hybrid-Transfer-Pump-P750/300258095
You would need to cut in a tee near the bottom and add a valve and garden hose female connector but that's very simple with poly pipe.
How much rain do you get? A full 55 gallon rain barrel would probably be able to fill the line up too.
Its called a side can tap.
You just have to remove the schrader valve inside the 1/4 fitting.
http://www.amazon.com/Robinair-10102-Side-R134A-Respective/dp/B0009XT7NY/ref=sr_1_11?ie=UTF8&qid=1412257252&sr=8-11&keywords=refrigerant+can+tap
Yes the tension will help it stay on, but probably not enough. Get this stuff put it in your coolant, use an ultra violet light to look in the engine to find the leak.
http://www.amazon.com/Interdynamics-375CS-Radiator-Coolant-Dye/dp/B002M4E0VC
This may not be the best, or up to daily use/abuse, but there are options for the DIY'er that will work without breaking the bank:
F2C 3.5CFM 1/4HP HVAC Air Vacuum Pump Kit with/AC Refrigeration Gauge https://www.amazon.com/dp/B01AAB2YCU/ref=cm_sw_r_cp_api_i_ZtfCCbHQZW53H
Here is the vacuum pump I use with a pressure gauge and a big pickle jar. It works. https://www.amazon.com/ZENY-Single-Stage-Economy-Conditioner-Refrigerant/dp/B012CFTYX4/ref=sr_1_4?ie=UTF8&qid=1501206918&sr=8-4&keywords=vacuum+pump
This is what I was looking at.
I would try and find a place that will rent you one of these Napa probably has them. If it is a newer car or has dual climate control, etc. refilling without a vacuum tool is a pain. Obviously you need access to a air compressor. Edit- have you found the slow leak? The overheating could be a result of that and/or the overheating made the leak much worse. (for example a head gasket)
I've seen a guy use a pressure cooker bottom he got from a thrift store for $3.50. He drilled a hole into the side and epoxied a copper tube to hook to the vacuum. He went to a plastics place and ordered a 3/4" thick acrylic circle that covers the top of the pressure cooker. I think that cost $30. He said he wiped dish soap on one side of the acrylic and let it dry. Then he placed the acrylic on a bead of silicone aquarium goop around the rim of the pressure cooker. The soap allowed him to peel the acrylic plate off the silicone after it hardened.
Anyway, he sprays into a pyrex bowl that fits nicely in the vacuum chamber. Once the obvious butane has boiled off, (he leaves it overnight), he covers the top with the acrylic and purges, using a single-vane vacuum pump. Total cost was about $115.
VAC Oven http://www.acrossinternational.com/570F-VO-16050-16x14x14-19-Cu-Ft-Desktop-Digital-Vacuum-Oven-VO16050.htm im getting the smaller 1300$ one. only .9 cubic ft that one is a beast. 1.9 my dream. and vac pump http://www.amazon.com/Robinair-15500-VacuMaster-Vacuum-Pump/dp/B000O1C47M Done and Done. and of course some hose clamps and a bit of 3/8" tubing.
UVIEW 560000 Combustion Leak Tester https://www.amazon.ca/dp/B000NPDL76/ref=cm_sw_r_cp_apa_i_sxjVDbMXN8XFW
Something like that. Or take it to a mechanic and they can test it for you. Might be cheaper idk.
Buy a quality strut spring compressor, do NOT go cheap. I bought this one from OTC after renting the autozone version a few times. I like this one because it includes safety pins so the spring shouldn't be able to get out of the clamps. https://www.amazon.com/OTC-6494-Clamshell-Spring-Compressor/dp/B0002SRHU6
fuck that, my truck needs this
The answer really depends on where its leaking from. If you can find the leak UV dye can help if you cant find it make sure to get a black light and yellow glasses. Let the car idle for a bit and let the cooling fan kick on and off a couple of times while monitoring the temperature gauge making sure you don't over heat. Put on the glasses and shine the light on all of the cooling system components looking for anything that shines green. Once you know where its leaking from you will know if you can tackle the job yourself, as others have said a bad hose/connection is easy, but a radiator and head gasket are tougher. A radiator is doable with a good walkthrough and I'm sure there are plenty out there, but the head gasket would be pretty tough on someone with limited experience and tools.
2004 Impala ex-owner here with a couple of tips for whatever they're worth.
First and foremost, the petcock (the drain valve for the radiator) is located right there where it drips in the first video, above the actual drain. Tighten that sucker up if it's loose -though I doubt that's the problem. It would be leaking from the middle of the drain, not around it.- which leads me to the next point.
Have you hit any hard potholes or bumps recently? Jiggle the radiator- does it move about, i.e. not snug and tight?
I ask because something similar happened to me traveling on a dirt road once, where I hit a bump, and it knocked the condenser off its hooks. The condenser/radiator aren't secured the best, and Chevy thought it would be genius to have protruding pointy screws right below it, and when the thing fell, the screws pierced the condenser and leaked all my A/C fluid. (I don't know your level of expertise, so just in case, the condenser is a smaller and thinner 'radiator' meant for the A/C system, and it sits in front of the radiator.) Maybe something similar may have happened to you.
That leak looks 85% likely that it's coming directly from the radiator, (and if not, it's coming from a hose that leads to/from the radiator, but I'm not convinced if it's pooling underneath.) Regardless, you're gonna be playing around with the radiator, so learn up on it- it's not that hard to replace.
If you're willing to splurge the extra $10-15, get yourself one of those UV dye kits that come with a UV dye and light. Clean and dry everything up as much as you can, and drip a couple of drops in the radiator. Let it flow for a minute with some coolant, and make like you're in CSI- look for highlighter splotches and follow them back. If they concentrate throughout the fins of the radiator or pool underneath it, you have to change the whole thing. If they seem to be a bit splattered higher up closer to a hose, you found the culprit. Either way, it's not a super hard or bad replacement if you have the patience and a basic set of tools. And if you can't see the source of the leak, as I said, it's most likely damage to the underside/ within the fins of the radiator.
Regardless, I always add my own personal disclaimer: I might be wrong.
Edit: The UV dye and the UV light in question. That particular dye says it's not compatible with DEX-COOL which the impala has, but if I were in that position, I'd give your radiator a nice flush anyways while you're down there. Or, look for one that is compatible.
I bought my chamber off of ebay, if you want to stabilize wood ive read you need to get a pyrex lid for the chamber, or if you're just using a pressure pot or something to make one I guess you don't have to worry about it but it helps to see inside to prevent overflow. There's a few different brands but shattervac is the one that comes to mind it's designed specifically for stabalizing wood .This is the pump I bought and it works like a champ, what you're paying for with the pumps is speed, and to evacuate a small chamber doesn't really take long. I would definitely invest in some casting resin though it's amazing what you can do with it, i think I paid 30$ for half a gallon and I haven't even gone through half of it yet even with all my dicking around with it.
https://www.amazon.com/dp/B012CFTYX4/ref=cm_sw_r_other_awd_CB2IwbH651W8M. This is all you need in a vacuum. I've been working on both a bestvalue and a provac recently. Hands down the best value has an easier seal to deal with than the provac. The vacuum listed links an adapter. You might need this depending on the hosing you use
These are a pretty slick way of filling the cooling system from scratch. Probably cheaper to fix the bleed plug, though.
If you do get the plug out, you can replace it with a bleed screw (eg Dorman 13915) that will make the bleed process a heck of a lot easier in the future.
http://www.amazon.com/Robinair-15310-VacuMaster-Single-Vacuum/dp/B005CO9GX6/ref=sr_1_3?ie=UTF8&qid=1451465073&sr=8-3&keywords=robinair+vacuum+pump
What is missing in terms of accessories in this deal? It's super affordable so seems worth it if I only need to buy hoses or whatever?
I've actually been looking online recently, I just wanted to know if I could find anything locally. And does one stage or two stage matter?
I've been thinking about this one.
https://www.amazon.com/ZENY-Single-Stage-Economy-Conditioner-Refrigerant/dp/B012CFTYX4
There is a chemical test for exhaust gasses in the coolant. That is probably the best test. This is the tool. https://www.amazon.com/UView-560000-Combustion-Leak-Tester/dp/B000NPDL76
​
A cylinder leak down tester is an option too. Although you don't really need to do the leak down test. You may be able to just use your compression tester hose and put 100 psi in the cylinder from your air compressor. If the head gasket is leaking into the water jacket, you will get bubbles in the coolant.
​
You could do a coolant system pressure test, but that won't really tell you that much. You already know it is leaking.
​
Does that bike have a weep hole on the water pump body? Any signs of coolant in the weep hole?
dudee.. thats such a bad idea... the mason jar could implode and yeahh bad things will come of that.
get a vacuum oven:
http://www.ebay.com/itm/0-9-Cu-Ft-Lab-Digital-Vacuum-Drying-Oven-250-C-12x12x11-/200438959256?pt=LH_DefaultDomain_0&hash=item2eab17cc98
pump for the oven:
http://www.amazon.com/Robinair-15500-VacuMaster-Vacuum-Pump/dp/B000O1C47M/ref=sr_1_3?ie=UTF8&qid=1375269744&sr=8-3&keywords=vacuum+pump
BEST butane extraction tool (cant wait to see someone tell me otherwise):
http://www.tamisiumextractors.com/index.php/custom-build/te8000-5-lbs
this is a proper setup besides the oven is made in china and is finicky sometimes
what pump are you running with this one? http://www.amazon.com/FJC-KIT6-Vacuum-Pump-Gauge/dp/B001C6LG3Q/ref=sr_1_3?ie=UTF8&qid=1369336827&sr=8-3&keywords=vacuum+pump is this in the right ball park?
Ever use the clamshell type such as http://www.amazon.ca/OTC-6494-Clamshell-Spring-Compressor/dp/B0002SRHU6
here is my parts list lol i think this would be a better idea splitter. can-tap. going from the splitter to my glacier top. and camico adapter. and ball valves. Does this look adequate or which part do I need to be able to press the valve depressor?
i vacuum degas my vino as well. tbh you want something like this: https://www.amazon.com/gp/product/B00BXMRP4I/ref=oh_aui_search_detailpage?ie=UTF8&psc=1
i can pull -25in.Hg vacuum with it. i find i still have to shake the carboy to make sure i get all the disolved co2 out.
Also plan on pairing the pvac chamber with http://www.amazon.com/gp/aw/d/B001P7C7QM/ref=mp_s_a_1_2?qid=1395938434&sr=8-2&pi=SX200_QL40
Can I get anything better without upgrading to a vac oven?
Or is the pvac and this pump pretty high quality
http://www.amazon.com/gp/product/B00HJESEI0/ref=ox_sc_act_title_1?ie=UTF8&psc=1&smid=A27V8MMU54HKB2
http://www.amazon.com/gp/product/B00BXMRP4I/ref=ox_sc_act_title_2?ie=UTF8&psc=1&smid=A24FJG9QJIEUE2
Would this be okay to use?
Thanks. I have Everclear in a spray bottle.
Here's my pump:
https://www.amazon.com/gp/product/B000O1C47M
I've never run the pump for more than a few hours. Another problem I have is that I have no easy way to check the pressure when it gets really low (I'm on a budget), so I have a battery-driven arduino with a BMP183 sensor inside the chamber. Eventually the battery dies so I have a limited amount of testing time. I can fix that with some deep sleep.
Home brew pump and filter question: I'm going to be using the follow pump and filter combo. Do I need a valve to reduce pressure? I'll let the oil cool to Luke warm before filtering.
http://www.medical-and-lab-supplies.com/nalgene-nylon-membrane-complete-unit-150-ml-count-1.html
https://www.amazon.com/gp/product/B005CO9FDW/ref=oh_aui_detailpage_o00_s00?ie=UTF8&psc=1
Several options available.... this is the best resource on the internet for the discussion:
https://tokecity.com/forums/showthread.php4?t=43587
You can get one at Harbor Freight for under $100 but I was able to get a deal on this one through my employer so I paid about $100 for it...
http://www.amazon.com/gp/product/B000O1C47M/ref=oh_o00_s01_i00_details
This is the one I purchased. It gets around our Subaru group pretty well. People love it.
Being that it was Firestone, I'm surprised it wasn't more to be honest. Still though you can certainly save yourself $40-$50. You can get a cheap vacuum pump off amazon that will get the job done for $60 here: https://www.amazon.com/gp/product/B012CFTYX4/ref=s9_acsd_top_hd_bw_b13u7N_c_x_1_w?pf_rd_m=ATVPDKIKX0DER&pf_rd_s=merchandised-search-3&pf_rd_r=NXXYP4JC802N2NRXEGN7&pf_rd_t=101&pf_rd_p=e98866ae-299e-5a56-8e32-a4a8bf2f2b3f&pf_rd_i=15707041
Just dont expect it to be /r/buyitforlife quality of course.
As far as finding on the how to of AC systems I would check out ChrisFix's videos here:
How to replace a compressor: https://www.youtube.com/watch?v=rulXlnG2Unk
How to recharge an AC system: https://www.youtube.com/watch?v=Pdq8JAlct6s
How to find a leak (if need be): https://www.youtube.com/watch?v=pCv7rCdcXsc
chamber
pump This works for me but honestly you'll want to get a two stage pump as mentioned in the below article.
Useful reading
Antifreeze should be used all of the time regardless of the temperature outside. It's not just for preventing the water freezing, it also has additives in it that raises the boiling point of water and anti corrosion properties to stop things corroding. Get an antifreeze tester to test the strength, but a rule of thumb is a 50/50 mix for most cold climates.
Someone else has also mentioned a thinner weight oil. Personally I'd use semi synthetic on an older engine.
Before you go do a service on both vehicles. Change the oil and filters, fuel filters, check the spark plugs and the leads / distributor cap on the van. Also check transmission and axle oils. Take spare belts with you too, something as simple as a broken belt could hold you up for a few hours if you don't have a spare!
Yuck. That sound like it might be burning Coolant. Might be the intake gasket. My friends Pacifica did the same thing, ran bad when cold and white smoke. Then would be fine. Well one day the intake gasket completely blew and it chugged to a stop. It also could be a damaged head or blown head gasket. I would buy this, it's really easy to use
Maybe I should buy those stop leak solutions . Or a detection kit that I seen on YouTube.
https://www.amazon.com/gp/product/B003JOB594/ref=as_li_tl?ie=UTF8&tag=scottykilmerc-20&camp=1789&creative=9325&linkCode=as2&creativeASIN=B003JOB594&linkId=b25299640eda129853918177c12a11db
Alright so everything I got-
New condensor
r134a refrigerant
compressor kit
vacuum
vacuum gauge set
Think that's basically everything! Thoughts?
Wide-Mouth Jar Adapter
I have a brake-bleeder hand pump, works just fine.
I added an image and now it does not show my text post.. Here it is again:
Looking at this specifically.
https://www.amazon.com/gp/aw/d/B0009XT7NY/ref=ox_sc_act_image_21?ie=UTF8&psc=1&smid=ATVPDKIKX0DER
I have a 90g closed column pressurized extractor from Extraction Experts. (http://www.extractionexperts.com/products.html) It includes:
Main Stainless Steel herb fill column.
1 top lid with valve and 3/8 gas flare fitting.
1 bottom lid with valve and fine barb exit port.
1 50 micron screen.
1 150 micron screen.
2 clamps to secure each lid.
The question:
Really appreciate want help. Thanks to all!