Best air tool parts & accessories according to redditors
We found 443 Reddit comments discussing the best air tool parts & accessories. We ranked the 198 resulting products by number of redditors who mentioned them. Here are the top 20.
We found 443 Reddit comments discussing the best air tool parts & accessories. We ranked the 198 resulting products by number of redditors who mentioned them. Here are the top 20.


Don't even need the soda stream - get a carbonation cap, a Co2 regulator, a ball lock gas coupler, and some 5/16" tubing. Also probably get some tubing clamps from the hardware store to help keep everything together.
With that setup, you can carbonate anything you want in a regular plastic soda bottle. Screw on the cap, snap the coupler to it, and pressurize it directly from the Co2 tank. You don't even need to limit yourself to carbonating liquids. Cut up little pieces of fruit so they fit into the soda bottle and you can carbonate them too.
Also, if you're buying a Co2 tank, don't get a new one. Look on Craigslist, old welding tanks are fine. When you take a tank to be "refilled" at a welding shop (or even a homebrew shop), you don't get the same tank back. They just swap it out for a full one. So if you bought a shiny new one, that's just a waste of money.
Same, it does a great job, and also works for cleaning the deck of my riding mower. I got mine much cheaper at Amazon, by the way.
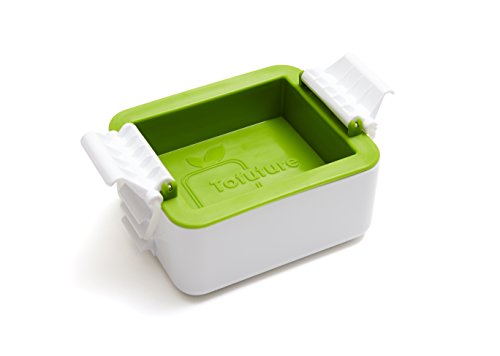
Honestly, I bought myself a tofu press and I use it so often...it really does make pressing tofu easier.
I had the EZ tofu press for a while and then I upgraded to this one
Tofuture- https://www.amazon.com/dp/B01698J0RU/ref=cm_sw_r_cp_api_i_AsrqDb9Y5TGHK
I like it more because the tofu water gets squeezed into its own little compartment instead of just out the sides.
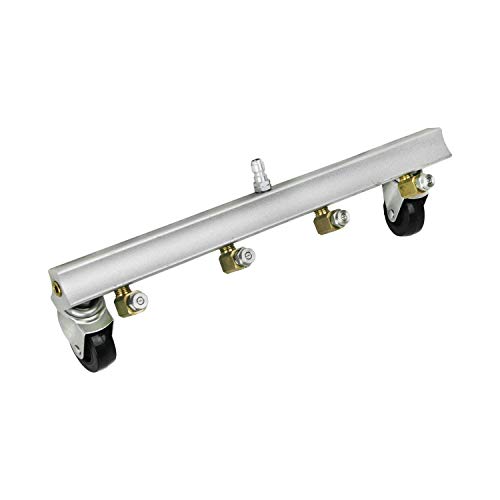
https://www.amazon.com/BE-PRESSURE-85-400-062-Undercarriage-Cleaner/dp/B0065OYYQQ
You're welcome.
Not sure if you're looking for extra frugality, but you can make your own SodaStream for cheap. Only problem is that it's ugly as sin. That said, you can also buy a paintball co2 canister and an adapter and hook that up to your SodaStream to replace the stupid expensive little cartridges.
EDIT: Found the instructions to do it, don't remember where they're from though.
Don't even need the soda stream - get a carbonation cap, a Co2 regulator, a ball lock gas coupler, and some 5/16" tubing. Also probably get some tubing clamps from the hardware store to help keep everything together.
With that setup, you can carbonate anything you want in a regular plastic soda bottle. Screw on the cap, snap the coupler to it, and pressurize it directly from the Co2 tank. You don't even need to limit yourself to carbonating liquids. Cut up little pieces of fruit so they fit into the soda bottle and you can carbonate them too.
Also, if you're buying a Co2 tank, don't get a new one. Look on Craigslist, old welding tanks are fine. When you take a tank to be "refilled" at a welding shop (or even a homebrew shop), you don't get the same tank back. They just swap it out for a full one. So if you bought a shiny new one, that's just a waste of money.
Play around with it. I found FL studio pretty intuitive. Theres a number of good "FL Studio for beginner" videos on youtube. The way i learned things was by googling for an answer after 5 or 10 minutes of fiddling around with no luck...couldn't figure out the most efficient way to sample? I'd just youtue "how to sample in FL Studio" and i've been using said method since then.
I'm pretty sure there is a $200-$300 version of FL studio that has most of what i you use/will use.
I've only ever mixed in FL studio, imo, my tracks come out well enough that they don't require mastering.
You either need Jam origin or a decent mic to record guitar. I had a friend use a vocal mic and play his acoustic guitar into the mic. He sound proofed the area and made sure the apartment was quiet. Again, jam origin works.
Estimating all costs, you'd could get everything you need for $350 maybe? FL Studio, a basic sound interface (Basic as in this, used Akai MPK, and either a decent small pair of studio monitors or studio headphones (The $30 AKGs from Guitar Center will work for now_
If you are looking for an audio only media center, take a look at Volumio or Pi MusicBox, or maybe Rune Audio.
If you are going to use HDMI for Audio, you are good. If you you want to use the 1/8 inch audio out, it's time to look at a separate DAC. This one is my favorite.
You need a USB phono preamp. It's a box on which you can plug your turntable. You then plug that box on your computer via USB and it will show up as an audio interface / sound card.
Example.
I don't think you'll need any software (unless you want to record).
I bought everything to do it at home because it was cheaper than having a few rifles done by other people. And I like learning new things and doing it myself.
$120 Benchtop Blast Cabinet
$45 50lbs Aluminium Oxide blast media
$40 Dewalt Touch-up Spray gun
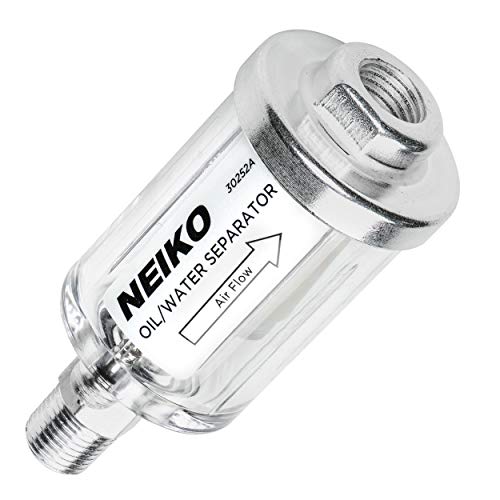
$8 Oil/Water Separator
$18 3M Respirator
$8 Powder Free gloves
$14 5ml Glass syringe for easily measuring small amounts of H-Series catalyst. Not necessary but nice. (Grainger.com)
$20 Gallon of Acetone (hardware store)
$30 for misc hoses/fittings
$$$ Container for soaking parts in acetone. I use a 50cal ammo can for almost everything
$$$ Oven for curing if using H-series. I use an old large toaster oven.
$$$ Air compressor with regulator (I already had this)
$$$ Cerakote (plus mesh strainer, graduated cylinder, tape, etc)
​
$300 not including the compressor, Cerakote or oven.
​
Definitely buy extra Cerakote to practice with and learn how to adjust the spray gun. I practiced on some old tools and a rusty vise that I had. I now have a Stormtrooper White vise on my workbench.
​
I make 40-50 gal batches for the nursery where I work and we use this pump for aeration. Poly tubing from the pump into a section of black soaker hose bent to a figure 8 shape with the cap on the end of the hose. Pushes out a great column of bubbles when weighted down (I use a 2 ft. piece of rebar tied to the soaker hose) to the bottom of the barrel.
My recipe for 40 gallons:
All the solids go in a mesh bag intended for grains in a homebrewer's setup. Alfalfa expands/floats, so put some rocks in there. We also have a smaller pump with an airstone inside the bag to force microbes out into the solution. 48 hrs. or so of bubbling/foaming. I run it through a Dos-a-tron at the highest setting it will allow, 2% solution. I wish I could get up to about 15% tea in that solution for out potted plants and maybe even 50% on our propagation beds. I've just poured full strength tea on our beds from a watering can before. I alternate with a fish emulsion fertilizer, so it's hard to say exactly what effects are attributable to either fertilizer regimen, so hope this helps.
> Obviously the run current is way out of spec, but I don't know what would cause this.
Two things come to mind:
1. If the water supply line is somehow becoming intermittently blocked, that could cause overloading. Not sure how that would happen, though, I'd say a problem at the pump is more likely.
2. Your might be over-drawing. Your pump expects to be submerged and water-cooled, if the water draws down too far it spins free, you get no water, and it overheats. This is often accompanied by muddy water, but not necessarily. Most townships have public well logs, so you might check if you have the shallowest well in the area, and ask around if anyone at a similar depth has had issues.
If you have a bypass valve or slip joint at the pump head, open it and turn on the pump to see if there's any difference without the tank and lines in play. The more you can isolate the problem, the better.
I might also try powering everything down and "snaking" with 65 feet of wire just to see if I hit anything before calling for the pump to be pulled.
I'm sure this isn't officially recommended, but personally I would also try using an air/water fitting, something like this, shut everything down-stream, and blow the pump line out backwards, regulated to no more than 55 psi. If that helped, it would mean you've got some crap pulled into your pump and it's just going to happen again, but the pump itself might be ok.
Just pulling the pump and putting it back will probably cost a few hundred dollars in labor and new pipe. A ten-year warranty is not uncommon for a pump like that, though, so you might get a break if you have to replace it and can find the info. Otherwise, expect maybe $3-500 for a new ~10gpm pump.
Yeah, I would think that it would work fine. Just attach a regulator with a water trap to the beginning of the line going to your
compressor. Edit: to your airbrush.https://www.amazon.com/PointZero-Airbrush-Compressor-Regulator-Water-Trap/dp/B004KNAHE2
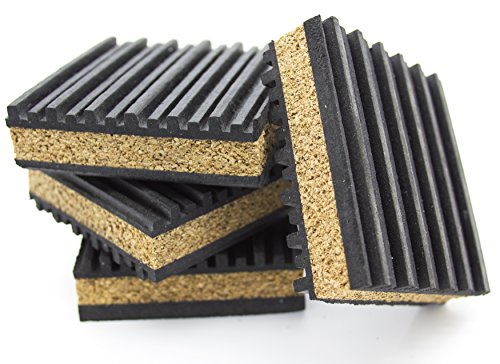
If it's the desk legs banging the floor, anti vibrations pads
Or is the desk itself noisy? Not much could be done without introducing some slop into your setup.
Maybe try some anti vibration feet for your bed? That might stop the vibration from transferring to the bed frame while you're sleeping. I don't really have any recommendations of what style to use but there seems to be a few different options on amazon. https://www.amazon.com/dp/B00HZS0CH6/ref=cm_sw_em_r_mt_dp_U_zQi1CbJJZNBAJ
That gave me a great idea! What if I bought all 5 of these items and rigged them up in order onto a 12 oz soda bottle:
I got a Tofu Press after somebody recommended them recently. There are cheaper models but this one comes with a compact way to collect the unwanted water.
Had my first tofu meal from it the other day after leaving it to press in the fridge overnight and it crisped up really nice after frying. I just need to learn how to season it now!
On the topic of ramen. If there's any UK supermarkets supply chain staff reading this sub for ideas about what to acquire. I'm interested in miso paste and nutritional yeast. Using veggie stock and yeast extract to add the savory flavour to sauces gets a little dull when compared to my old meat eating chicken/lamb/beef/pork/etc stock options.
I have one! This one to be exact! I really recommend it if you like the convenience/eat a bit of tofu. It does take more time than using books but no more paper towels/towels. It's easy to clean and I never have to worry about my Harry Potter books falling off the counter.
My Vega Sport vanilla protein powder ran out, so I decided to try the chocolate one this time. Pretty disappointed.
I have been vegan for almost two years and FINALLY got an actual tofu press. You guys, what the hell took me so long? In all the vegan food blogs I've read, they act like it's not a big deal, and you can just wrap it in a tea towel and smoosh it under a heavy pan and it will be the same as using a press. This is just WRONG. If you eat tofu, get a fucking tofu press. I have this one and can recommend it, although I'm going to need to buy a second because I'm cooking for four people and one block of tofu is generally not enough.
Also, just got a new cook book that I am LOVING, so I thought I would share: America's Test Kitchen: Vegan for Everybody
I pour from the bottle to one vial sample like this: https://photos.app.goo.gl/vkT7YPlXa2QIwfQ22
I bought these vials from Amazon. You can get 50 pieces for 8-10 bucks. See link below (not affiliated): BCP 50pcs Plastic Graduated Vial Tube with Screw Caps https://www.amazon.com/dp/B074QKMF2G/ref=cm_sw_r_cp_apa_LWfGAb8TSCRYD
Wera 05073593001 Metric, Blacklaser, 9 Pieces
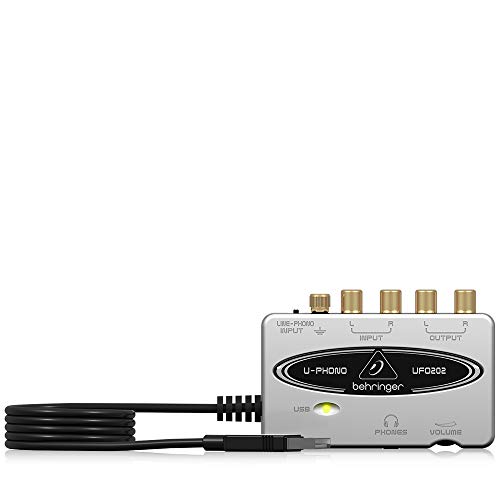
Yes, that should work, but I would highly recommend a different Behringer, the UFO202. It has the phono preamp, as well as a DAC for stereo input, and stereo output, and a headphone amplifier. I have been using an earlier version since the Pi 1B days.
Just plug the turntable into it, and it's USB into the Pi.
I agree with troubleshooting, a lot of times sediment from the water heater will get kicked up and clog a line.
The fact that you have cold pressure but not hot eliminates the shower head and shower hose as culprits. That leaves the hot water line itself and the hot side of the faucet.
The first thing I would do is switch the hot and cold on the back of the faucet and see if you get full pressure from the hot line when it's connected to the cold side of the faucet, that would indicate that the problem is in the faucet itself.
If that doesn't work I would follow the hot line as far as you can to be sure it's not kinked anywhere. If it's not I would drain all the water from the RV through the low points, remove the line from the shower faucet side, bypass the water heater, close the low points, and blow the line out through your city water with compressed air with something like this.
Edit: have someone with a bucket at the detached shower line, it'll make a huge mess if it's not directed into the shower.
The reason why /u/triviper said it's about $200+ to start airbrushing is because you need not just the airbrush, but the compressor, moisture trap, hose, and adaptors if you're buying everything separately and want a setup that will last you a long time.
My setup isn't the best, but I got
*ie=UTF8&qid=1469082512&sr=8-1&keywords=moisture+trap)
Total = ~$145
Hope this helps. Brings me back to when I was researching all this for myself.
My setup isn't the best, but it's the bare minimum that I was comfortable with. Two years later and I'm still using the same stuff except I got a spray booth and respirator since I'm using lacquers now
/u/MacdougalLi /u/xhui /u/arkanoid2520
Edit: my bad, this doesn't factor into the paint, alligator clips, and various topcoats. Note that I had all of the former because I started out with spray cans. The cost will probably go up to $170 - $200 depending on what you also get
I do not live in the salt belt but I am under the impression water cases iron to oxidize (rust) but salt accelerates the reaction because salt increases the conductivity of water. So from that logic, seems like the best bet is to rinse the undercarriage as much as possible to remove the salt. If you are super concerned which sounds like you are, I wonder if picking one of these up would help. If you have a garage for after the rinse to let the undercarriage dry I think would be ideal. https://www.amazon.com/BE-PRESSURE-85-400-062-Undercarriage-Cleaner/dp/B0065OYYQQ
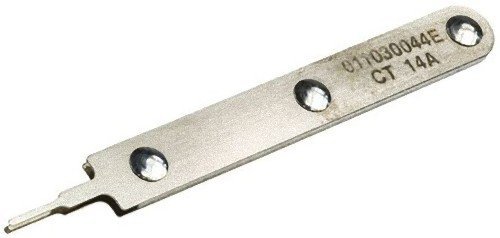
The official tool (Molex 11-03-0044 Mini-Fit Jr Extraction Tool):
https://www.amazon.com/dp/B00GOIY1NE
I bought the SS carb caps after my plastic one cracked and started leaking: https://www.amazon.com/Stainless-Carbonation-Barb-Drink-Bottles/dp/B00V334SME
Haven't had any issues, they work great for me. They're also awesome because they fit both gas and liquid QDs. So I also use them to flush my lines after a keg kicks.
Such a generous offer.
https://smile.amazon.com/dp/B01698J0RU/?coliid=I1JG4DHCSIL8M2&colid=28H3LQ6WV3WB4&psc=0&ref\_=lv\_ov\_lig\_dp\_it
My favorite thing is press it and then fry it on medium heat with equal parts rice wine vinegar and soy sauce. It's not 100% WFPB but there's no oil and the sugar in the rice wine vinegar is pretty minimal if you don't use a ton.
If you want it more crispy, bake it in the oven. You can then use it immediately for hot dishes or let it cool and toss it into a salad.
If you get soft tofu you can cut it (no pressing needed) and toss it into miso soup broth.
A lot of people make tofu scramble (kind of like scrambled eggs) but I haven't personally tried it yet.
Sometimes when I'm craving something crispy I'll press it, toss it in cornstarch and fry it in oil. Obviously not WFPB approved but it's my occasional treat.
Edit: a tofu press isn't necessary but totally worth it if you plan to eat tofu often. I have this one. https://www.amazon.com/gp/aw/d/B01698J0RU/ref=sxts_1?ie=UTF8&qid=1504284431&sr=1&pi=AC_SX236_SY340_FMwebp_QL65
it really depends on your budget. One of my favorite brushes is a badger 105 patriot found here
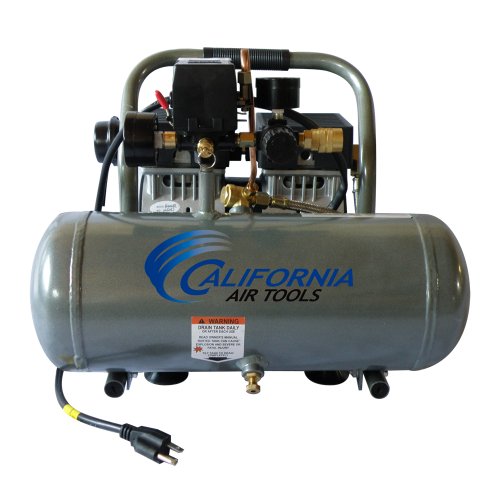
This brush will last you a long time with proper care. It's also reasonably priced and has a great spray pattern (pencil line to almost three inches). As for a compressor I personally use a California air tool - quite air model found here
I use this guy because of the large tank and because it has a rust free tank. Most model or little compressors have tanks that are made out of iron which will rust after some time. But depending on how much you wanna spend here are ones I would recommend because they come with a tank and an adjustable regulator/water trap (but as you can see they are not to far off from the California one)
Paache
PointZero
I have the second one in that list, however after a year the tank rusted even with proper care :(
Hey /r/audiophile! Three questions for you today.
I have seen the Behringer UCA202 recommended on here a few times for a DAC, but I am considering the UFO202 instead because I want to also be able to record vinyl to my computer. Is this the right choice? Will I still be able to use the UFO202 as a DAC for playback?
Also, if I plug a 3.5mm to RCA cable from the headphone jack of my computer to the AUX input of a receiver (Yamaha CR-450), will I get any additional benefit from adding a DAC, or does the receiver serve as a DAC?
3rd question: If I were to use that same 3.5mm to RCA cable to go from the headphone jack of the UCA/UFO202 to the receiver, would that be just as good as getting an RCA-RCA cable, or would that throw away some or all of the benefit of the DAC in the first place?
Thanks!
What do you need USB in for? There is no such thing as a "small" receiver. There are slimmer receivers but they are still long devices. The art phono plus has usb to connect to your computer but I'm not sure it's what you're after. A similar device is the behringer uphono if you want to buy a seperate phono preamp.
For an amp you can get a very small 2 channel amp like an smsl. If you want small you will have to sacrifice a lot of features. Receivers have sooo many features at the cost of size. They are really the only option if you want all-in-one.
EDIT: the black smsl is sold out but there are other colors available if you are trying to buy right away.
The 222 does DSP effects. I wouldn't bother.
Look at the UF0202 for vinyls if you need a pre-amp.
Here are a few to consider:
BEHRINGER MICROPHONO PP400 http://amzn.com/B000H2BC4E
BEHRINGER U-PHONO UFO202 http://amzn.com/B002GHBYZ0
Pro-Ject Audio - Phono Box MM http://amzn.com/B000YEK1AQ
Little Bear Tube valve Phono Turntable RIAA MM Preamp preamplifier amplifier Ver2.2 http://amzn.com/B00H0FIGUO
Well I am by no means an expert but here is what I got:
Paasche Talon TG-3f - It does the job. I am not painting eyes with it, mostly priming, and wide cloak and base colors.
I too had a compressor but needed to grab a Water Trap the compressor I have is super load and not 'made' for airbrushing 'per se'. So I need to regulate the water in the paint.
Then get a bottle of Air Brush Thinner. You can then use any paint you want through it (make it much thinner than normal skim milk painting consistency).
I did pick up some airbrush paints to practice with on cardboard and canvas ... figured the more I use it the better I will get. My intent is to use Vallejo Black/White primer through it. Save me from having to use so many cans of spray paint.
edit Also should mention a couple videos that influenced me/I am using to learn from: Tons of airbrushing stuff later in the video of this BIG resin kit, Tested beginners guide, more resin kit with an airbrush, and just for giggles how to clean it which in my humble opinion is the largest deterrent of the process.
An air compressor with a moisture trap and a narrow nozzle. You can get a small desk-sized compressor for under $100 from a pawn shop. A filter and moisture trap is cheap on Amazon.
You just can't get the power of compressed air from a little electric pump.
It all depends on the temperature of your tank and hose. I can't say how long it will take because there's a lot of factors, but if it's been sitting there long enough to be around the ambient temperature, then it will condense in the tank and pool at the bottom (this will cause corrosion unless you drain it weekly). If your hose is the first time it reaches dewpoint, then you will be spraying a bit of water with the air. This is what happens most of the time if you are using the air soon after it is compressed.
Basically if you move very little volume like cleaning the occasional case, then you would be fine to buy something like this which gives you a few things. First is the trap. This needs to be downline from the compressor enough for the air to cool sufficiently for the water to condense into the trap. If you place this immediately after the compressor while it is running, it will do nothing. Second, it has a regulator to accurately change the pressure which would be nice for not blasting and breaking a fan or something. Third, it has a gauge to show your delivered pressure. With this you can fill your tank to as high of a pressure as it is rated for and fine-tune the pressure here.
Anyway, like you say, it's probably not much of a big deal and the average person will be fine, but it's something to be aware of.
Here's how you can figure out what the dewpoint of your compressed air is if you want:
The air in your tank needs to be under that temperature for water vapor to condense and for a trap to be useful. It's hard to say for sure without measuring it, but air can be around 300 F after being compressed, so it could take some time to cool sufficiently. Hope that wasn't too wordy.
Can you buy one of these and a pressure washer?
BE PRESSURE 85.400.062 16" Undercarriage Cleaner, 4000 PSI https://smile.amazon.com/dp/B0065OYYQQ/ref=cm_sw_r_cp_apa_H0m6BbE99140Q
I live in South TX, never had to worry about rust..
Here's the tool: https://www.amazon.com/Molex-11-03-0044-Connector-Accessories-Extraction/dp/B00GOIY1NE
The 24-pin motherboard, 4/8-pin CPU power, and 6/8-pin GPU power connectors are all Molex Minifit Jr. connectors. There's a huge lineup of tools just for them. Pin extractors are pretty cheap though.
Do you struggle to finish an entire growler? I'm trying to understand how 4 pints of beer is hard for a group of people to finish. Getting past that point. What are you trying to accomplish by having a pressurized growler? Prevent oxidation?
There are carbonation caps which you can do almost what you want. Although I'd use a 2 liter soda bottle and put a pickup tube that goes down to the bottom.
https://www.amazon.com/Happybrew-325-Stainless-Carbonation-Bottles/dp/B00V334SME
My setup is something like this:
Homebrew shops generally carry the tanks, and can fill them for you. You're probably looking at $120-$150 initial cost, but your cost per carbonation is pretty close zero: just the cost to refill the tank.
With this setup, you carbonate directly in plastic soda bottles. I generally use seltzer bottles, since they don't have any residual flavors in them, and they're designed to hold the pressure.
Transfer whatever you want to carbonate into a plastic bottle (about 3/4 full). Get it as cold as possible: for sodas, that's as close to 32-F as you can get; for cocktails, it's maybe 20 to 25-F. Squeeze the excess air out, screw on the carbonator cap, attach the gas hose, and shake the hell out of the bottle. Release the pressure (carefully; some mixtures can foam a lot), and repeat once or twice if you want really strong carbonation. For water, I usually carbonate around 35 psi. For cocktails, closer to 45 psi.
To bottle cocktails or sodas once they're carbonated, you can use 187ml champagne bottles and an inexpensive bottle capper. Your local homebrew shop probably carries both.
Tofu press!! Like this one . Works way better than paper towels with none of the waste.
Edit: scratch that first link the UK version is like £40!!! This one is more reasonably priced the only downside is that it presses less tofu at a time.
I have this one and it’s great and makes no mess. It’s easy to drain and works well. Tofu Press - a unique and stylish tofu press to transform your tofu by Tofuture https://www.amazon.com/dp/B01698J0RU/ref=cm_sw_r_cp_api_i_5ui1Cb3J8XBHC
Wow. That Home Depot stuff. Ugh.
I mean . . . I use tools fairly regularly. And assuming I can get equal functionality, I will definitely consider aesthetics. Even most guys, at least those who take care of their tools, appreciate well-made and good-looking tools. They just have a different sense of aesthetics, usually.
And I like pretty tools, even? Like some tools are actually brightly colored and attractive as a design element. Like high-end L wrench sets sometimes have different colors to help you differentiate different sizes at a glance. Something like this set from Wera. If I didn't already have a quality set, I'd definitely buy that instead because Wera is a great brand, and those are cute.
This will sound dumb, but I even own one or two tools that I never used because they're cute enough that I just like to look at them.
I think what annoys me here is that this was obviously designed by dudes with a Pink It And Shrink It design philosophy, which I hate more than anything. Lacking any real sense of aesthetics, they just decided that what women really need is to be penned into a box of Barbie-like hyperfemininty by men. I sometimes like pink things, and I sometimes like stereotypically feminine things, but I don't like it when it's men shoving ugly, patronizing, pink merch down my throat. Like here, buy my crap to validate your femininity. Sorry, bro, I'm not that insecure! I'm not a man.
That stuff looks like garbage, too. Part of the reason I hate Pink It And Shrink It design is that . . . they don't even shrink it. They don't do anything. Almost as a rule, "women's specific design," is a lie, and companies do little or nothing to design gear that takes into account the ergonomic needs of women. Like for tools, women have smaller hands on average, and certain tools would really benefit from being a little smaller for women. But they wouldn't do that because we're an afterthought. They just take their dude's gear, do a shitty recolor job, and then sell it at a premium, resulting in kit that's often both /worse/ and /sold at a mark-up/.
As someone who bought a Wabi after recently getting into bikes for commuting, buy a torque wrench and some good hex keys. Those rear wheel bolts will often slip if not properly torqued and unless you have quality tools, you will round the bolts like my Craftsman's did trying to get to that torque. The torque wrench will be useful if you ever install or reinstall some parts. After doing so without a torque wrench to tell me when to stop on the stem a few times, the face-plate was near catastrophic failure because I over-tightened the bolts and cracked the aluminum in several places. Almost every problem I've had with the bike has had to do with not knowing how tight something should be, and buying a torque wrench sooner could have saved me hundreds of dollars and so many hassles.
It came in a standard air hose kit which included a tire nozzle, and a trigger type blow gun thats perfect for this application and it accepts different screw on tips for blowing up pool toys to air needles to blow up soccer balls.. http://www.amazon.com/Air-Blow-Gun-Kit/dp/B000FVUO4G/ref=sr_1_9?s=power-hand-tools&ie=UTF8&qid=1425923489&sr=1-9
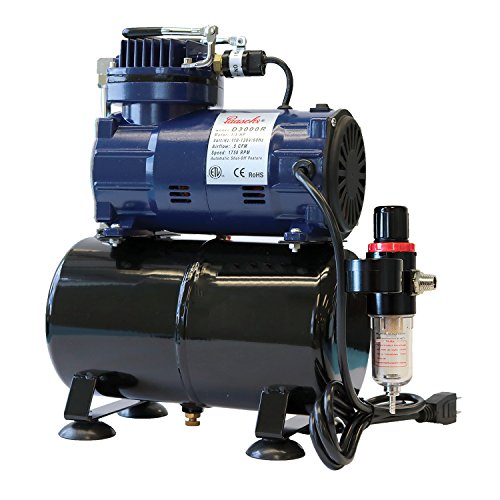
Wanting to get a decent airbrush compressor with tank. Amazon recommends this unit and I'm not sure if that'll work or not. Reviews are good and its in my price range. Would be open to suggestions if that's not a great idea or whatnot.
Thanks for the help!
Here is a decent one
http://www.amazon.com/Paasche-D3000R-Compressor-Regulator-Moisture/dp/B001CJPWYM?ie=UTF8&psc=1&redirect=true&ref_=oh_aui_detailpage_o00_s00
You'll probably get a better response over at /r/modelmakers or /r/modelcars.
A 30+ year-old airbrush probably isn't too good for a beginner to start with. Depending on your budget, you can get airbrush kits from Amazon for under $100, or go all out for a Paasche, Badger, or Iwata setup for $200 and up.
This is the kit I started with. The brushes are surprisngly well-made, and I haven't had any problems with them, except the big one's plastic handle broke. The compressor isn't that good, but it's good enough to get some experience. Mine won't hold pressure after 2 years, and the regulator sucks, but I've painted some pretty cool models with it.
Again, it all depends on your budget. If you're under $100, check out the Master Airbrush stuff on Amazon - if you have more to spend, look for a compressor with a storage tank like this.
I’ve been using this Paasche compressor and it’s been excellent so far. Precise control of pressure with a gauge and a moisture trap built in. It’s decently quiet too. I’ve heard tankless compressors can cause issues with sputtering paint due to potentially inconsistent airflow so a compressor with a tank could likely resolve those issues. I’m also using an Iwata eclipse.
I use an app called Radiofonic, but any internet radio app or even Safari works fine. I’ll let you know when I get a Tutorial together. This is the preamp I’m using: BEHRINGER U-PHONO UFO202 https://www.amazon.com/dp/B002GHBYZ0/ref=cm_sw_r_cp_api_KN9RBbD4TJ0MK
I don't think the phono pre amp will help for your particular use case, while you may need a pre amp, its not going to help with the mixing of sounds. If I understand correctly you want computer sounds mixed with the vinyl player output. Some have recommended a line mixer which I'm sure is a valid option however it is another thing cluttering up the desk. Something most people don't consider is that windows has a way to do this natively. If you were to hook up your record player via usb (if it has it) or through a phono USB interface like that you can listen to that recording device, mixing it in with windows sounds.
The new X version Audio-Technica AT-LP60X is on sale for $69. The only upgrade for it is from the stock conical to elliptical LP Gear CFN3600LE stylus $29.
Behringer Headphone Amp is a cheap option to use for earbuds. Or Behringer U-Phono adds a USB output.
If you only have a small room, PreSonus Eris E3.5 $99 speakers have a headphone jack or look for larger speakers for a medium size room or larger.
Better headphone amps start around $100.
Better turntables with adjustable tracking force and a better cartridge:
I use this one by behringer which is nice because it has a built-in phono pre-amp so you can also use it to record vinyl to mp3.
Just make sure you have it going through a mixer with a pre-amp to bring the phono up to line level. Alternatively, something like this might be useful if you don't have anything else with a pre-amp.
For those interested in doing this, but don't have the equipment, here are several audio interfaces for capturing vinyl to digital:
The Behringer UCA202 would be good for setups with an external preamp, output through the monitor function (tape out) of a receiver with built-in phono preamp, or a turntable with a built-in preamp.
The UFO202 has a built-in phono preamp and would be good for connecting the turntable directly to the computer -- no external preamp or receiver needed. The ART USB Phono Plus would be the same, except you will get a definite upgrade in clarity and presentation with it's phono preamp.
All of these interfaces max out at 16 bit / 48 kHz, so they are not high-res (24 bit / 88.2 kHz or higher), but they are going to capture at CD or better quality, which should be fine in most instances.
I don’t recommend this. Unlike the line-in that used to exist on previous models, you would be recoding to a monophonic input and totally trash the sound quality.
The best solution would be to pickup something a little more costly, but could actually preserve the remaining quality of the cassettes.
https://www.amazon.com/dp/B002GHBYZ0/ref=cm_sw_r_sms_c_api_i_QNS-AbVSPPWG1
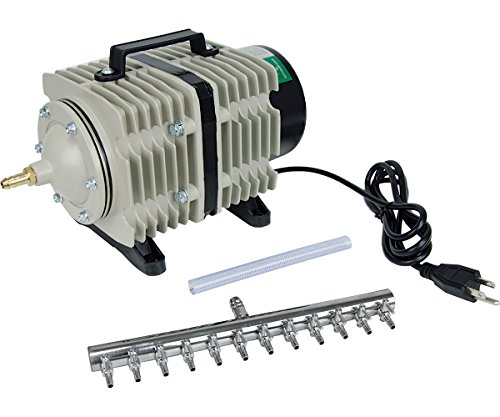
Optimally you would want to get an air pump where you can draw air in from the outside. I'll explain why.
Typically the CO2 levels in your house are anywhere from 500 - 800 PPM (sometimes even 1000 PPM) higher than the constant 400 PPM outdoors.
One nasty side effect from pumping CO2 rich O2 into your nutrient solutions is it will start to lower your PH. By running an air line outside for fresher air- you can avoid this. This also sets you up for running CO2 in the future if you want.
This pump will allow you to attach a hose to pull air in from the outside.
The air compressor I use with my laser is similar to this one. It has been working quite well so far and isn't too noisy despite what the reviews on Amazon say. My exhaust blower is much noisier and drowns out the compressor noise. It puts out enough air to keep my cutting clean, but I will probably upgrade later so I can get more airflow.
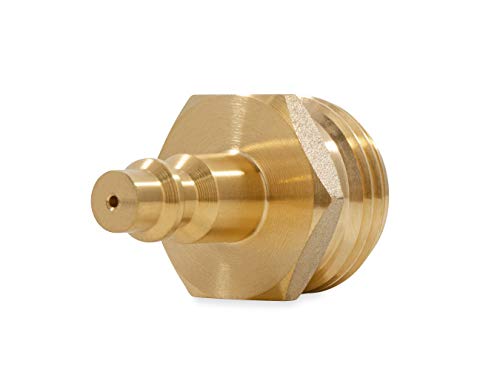
https://www.amazon.com/Camco-Brass-Connect-Aids-Removal-36143/dp/B002XL2IEA
This is the adapter I have. It hooks up to the quick connect hose I have on my 5 gallon air compressor. I don’t know if a plug in will work with it, just a heads up.
Also’ make sure you blow out the toilet. I have a friend that didn’t once and it cracked the valve.
Do yourself a favor and spend seven bucks and do it the right way. It will even save you a bunch of time.
Buy this product:
https://www.amazon.com/Camco-Brass-Connect-Aids-Removal-36143/dp/B002XL2IEA
Drain your tanks. Leave the drains open, open all of your faucets, hook this up and run ~40-50 psi compressed air through your lines for about 5 minutes. Disconnect, leave the faucets and drains open, pour a little antifreeze down each drain so it's in the P traps, and you're done. There is absolutely no need to go so overboard, and you're wasting a bunch of time.
attach this to your compressor.
http://www.amazon.com/PointZero-Airbrush-Compressor-Regulator-Water-Trap/dp/B004KNAHE2?ie=UTF8&psc=1&redirect=true&ref_=oh_aui_detailpage_o03_s00
Why on that website? The stuff on there is both expensive and pretty crappy.
Gun to my head, I'd go for this one, but it's $25 cheaper for the same stuff on Amazon.
I'll break down why for you, too.
The Iwata Eclipse HP-CS is a damn fine airbrush. It's not gonna give you the finest lines or the broadest strokes in the whole wide world, but it will keep on kicking and you can depend on this thing for a long, long time. You can cheap out on the airbrush in a pinch, but you're looking for a bad time if you skimp on your tools. 3 crappy airbrushes can't compete with one rock-solid one.
If you're going for a compressor, get one with a tank for multiple reasons.
I'm not trying to be a dick about it. Airbrush-specific compressors fall into two categories: affordable garbage and expensive perfection. There doesn't seem to be a reasonable middle ground. I'd suggest you skip the "airbrush" tag altogether and get a standard air compressor from the hardware store (or online, whatever tickles you) and run with it. For $10 in fittings, you'll have whatever PSI you want where you want it and you're not paying that hobby tax. I use this compressor and it's pretty fantastic. Quiet compared to most compressors, cheaper than most, and it kicks on once every 5 minutes or so for about 20 seconds while I'm in the thick of things. It's not as silent as the $400-$1200 compressors for airbrushing, but it's quiet enough during full-tilt operation to hear the TV from the other room.
I think this should help. It may not solve the problem outright, as there are many potential pathways for low frequency energy to travel through an old house, but it should help.
Rather than those hifi stands, I would use a set of vibration isolation pads.
This: http://www.amazon.in/Skil-8600-Air-Blower/dp/B00I9IBE7S/ref=sr_1_3?ie=UTF8&qid=1482760918&sr=8-3&keywords=blower
I use this: https://www.amazon.in/gp/product/B00I9IBE7S/ref=oh_aui_search_detailpage?ie=UTF8&psc=1
I bought one of these https://www.amazon.com/Stainless-Carbonation-Barb-Drink-Bottles/dp/B00V334SME
I just have to disconnect one of my other gas post ball locks from a different keg and I'm good to go.
Second this! It's actually really easy to make at home. Forget about that overpriced landfill-saturating Soda Stream. Go to your local gas dispensary, get a 5lb or 20lb tank of "food grade" CO2, a regulator, some tubing, and a carbonator cap. It's crazy easy, and you end up saving big in the long run. Pennies per gallon instead of dollars per pint. My regulator caps out about 45PSI. I'd recommend maybe 60PSI given my results.
You can hook up your CO2 tank directly to a 2L soda bottle, and bypass the whole Sodastream machine.
Just get one of these hoses with a ball valve adapter to connect to your regulator, and [one of these ball valves to screw onto your soda bottle].(https://www.amazon.com/Stainless-Carbonation-Barb-Drink-Bottles/dp/B00V334SME/ref=pd_bxgy_328_img_3?_encoding=UTF8&psc=1&refRID=53SWD2Y7DFRQ6TR07RPB)
Quick and simple guide: http://www.popsci.com/diy/article/2012-06/how-make-your-own-home-carbonation-system
Carbonation cap: https://www.amazon.com/dp/B00V334SME/
Hose and quick disconnect: https://www.amazon.com/dp/B0064OI77Y/
Pressure regulator: https://www.amazon.com/dp/B002UZUJ22/
For the tank, contact a local welding shop and ask them to price a pure CO2 cylinder. Tell them what it's for if they ask about grade. Make sure you find out cylinder cost as well as refill cost. I could have gotten a cheaper cylinder on Amazon apparently, but I didn't overpay by much. Mine's a 20 pound, but you can get 5 and 10 as well.
Something like this (random from google for example): https://www.amazon.com/Happybrew-325-Stainless-Carbonation-Bottles/dp/B00V334SME
Just need any bottle, any regulator to fit that bottle, beer tubing, a soda keg disconnect, and something called a "carbonator cap". The stainless ones can be found on amazon.
https://www.amazon.com/Stainless-Carbonation-Barb-Drink-Bottles/dp/B00V334SME/ref=sr_1_4?ie=UTF8&qid=1482679787&sr=8-4&keywords=carbonation+cap
Probably not that one. Get one that says it works for both liquid and gas posts like this one. Some do. Some don't. Dual use post allows you to use the bottle for cleaning and maybe it has other uses.
Edit: changed link to the better carb cap that I bought, which includes a barb on underside.
If it won't lock in again then replace it. Someone on here suggested these to me: JIUWU Pneumatic Air Straight Fitting 4mm thread M6 One touch hose Connector Pack of 10 https://www.amazon.com/dp/B00WE1A3D2
They work and don't require any new printed parts, and prime shipping means they show up fast.
A few things typically break shortly after you start using one of these.. the biggest pain, and it's not even a printed part, is rewiring the bed so they don't rub on the hole going into the base.
Printed parts, I print an extra extruder arm and baseplate (part on top of the tower that feeds filament. This breaks second. I'll find the file I like to use, it's hard to find on thingiverse for some reason. WK7 has one, but it's not as tight and gives space for flexible filament to bend. Further you'll need, at least one https://www.amazon.com/gp/product/B00WE1A3D2/ref=ppx_yo_dt_b_asin_title_o01_s00?ie=UTF8&psc=1 and send me a self addressed stamped envelope and 1 dollar and i'll send you one. IM for an address.
Height spacer for when you get fed up with a warped print bed and move to glass.
There are a few options for each one, if you want links I can provide you the ones I like. It's sometimes funner to see what's available and play with the options yourself.
I had this happen to me too and these worked out beautifully. https://www.amazon.com/gp/aw/d/B00WE1A3D2/ref=gp_aw_ybh_a_46?ie=UTF8&psc=1&refRID=KZ034DRXZ93250TN11CA comes in a ten pack too which is great
I may be a bit preachy with it, but this is one of the best kitchen gadgets I've bought: https://www.amazon.co.uk/dp/B01698J0RU/ref=cm_sw_r_cp_apa_TPHGAbWW8W7YM
This is the one I have. My parents got it for me for Christmas and holy fuck do me and my boyfriend eat so much more tofu now. My parents did their research and passed on to me that the trick to this one is always start on the first rung and move it down every few hours till you’re on the last rung
This ones better: https://www.amazon.com/Tofu-Press-stylish-transform-Tofuture/dp/B01698J0RU/ref=mp_s_a_1_4?ie=UTF8&qid=1541244902&sr=8-4&pi=AC_SX236_SY340_QL65&keywords=tofu+press&dpPl=1&dpID=31jkeGeCX-L&ref=plSrch
I use these food service towels that are meant to be reused but they have a limited life span so they can be thrown away. And I put paper towels in between the food service towels and the tofu. It’s not as environmentally friendly, but I haven’t had moldy smelling tofu.
Also, there’s the tofu press that I SO desperately want.
It gets easier the more you do it! You can always change up what you're adding as well, it definitely doesn't have to be an exact science.
Liquid smoke is a concentrated liquid, you can get it from most grocery stores or somewhere like Amazon. I like it because it adds a little bit of smokiness / depth to the tofu.
If you're going to be eating tofu, you will definitely want a dedicated press. [This one](Tofu Press - a unique and stylish tofu press to transform your tofu by Tofuture https://www.amazon.com/dp/B01698J0RU/ref=cm_sw_r_cp_api_i_UZa3DbYMNSGMX) is my personal favorite. There are others out there that are good at getting rid of the liquid in the tofu, but they tend to smash it and change the shape. I like this one because it keeps everything together, while still squeezing out all the liquid. I've used it for almost a year now and I'll never switch to anything else personally, haha.
Yesss. I use my grill pan. Buying two tofu presses was the best decision I ever made. The ToFuture ones are great because after pressing you can marinate in the same container. I make two blocks at a time because it’s kind of a process and I like to have leftovers.
I don’t! I place firm tofu on a plate between two paper towels and then place a heavy pot on top. However I have seen this one recommended by vegan cook-related Youtubers: https://www.amazon.com/dp/B01698J0RU/ref=sspa_dk_detail_0?psc=1&pd_rd_i=B01698J0RU&pd_rd_wg=oL1BZ&pd_rd_r=0MDQRS4BC4M9VHY7FXGQ&pd_rd_w=tMdS3
However, you should really only press firm tofu! Silken and soft tofus don't need and shouldn't be pressed because they would completely break apart.
For recipes like this, I cut a block of pressed tofu into small cubes and bake it until it's a bit crispy, then mix it in once the rest of the dish is cooked.
I'd recommend getting a Tofuture press. It seems like it's a bit expensive, but it's way more convenient and thorough than just using a plate with heavy cans, or one of those presses where you turn a knob. Use firm or extra firm, dump out the liquid once after about ten minutes and then let it press over night and dump out the liquid again.
For baking, use a silicone mat.
I bake the tofu cubes at 400F for about 25-35 minutes (depending on the size of the cubes and the desired crispiness).
They'll be lightly crispy but still tender on the inside. There's no need to marinate them either, as they'll get coated in whatever sauce you've got in the dish you're adding them to.
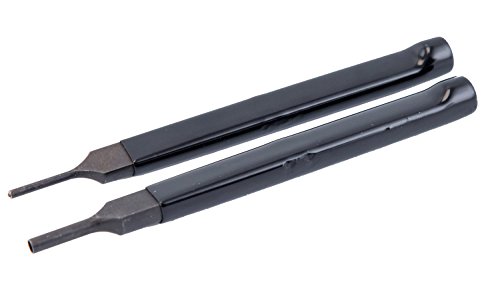
Good list, here is another that i always recommend. It isn't one of those tools that is a must, but it makes things alot easier when installing a bolt catch.
https://www.amazon.com/gp/product/B01B3NU46C/ref=oh_aui_detailpage_o00_s00?ie=UTF8&psc=1
Originally bought this starter set and this Punch Set.
Then when I decided to use a polymer lower for my AR pistol build, I ordered this combo starter and Punch kit
I recommend this and these
It’s a set of vials and syringes. I would recommend getting a vial holder as well. That way, you have all the vials in one places and are not as likely to spill. The vials are nice because you can test small batch mixtures. Label the tops of the vials and keep a notebook. Rhodia is good or something else that can show off sheen. This way, you can more down the vial designation, the proportions, the inks used and what the resulting color looks like.
Another thing you would want to learn about is color therapy because a cool yellow mixed with a warm blue will give you a different green than a warm yellow mixed with a cool blue. Rot dye has a great mixing chart that is a wonderful resource for color mixing.
Beyond that, different inks interact and react in sometimes unexpected ways when mixed, which is another reason to have small vials to see what the reactions are and if the ink start to separate or do something else unusual.
I know Amazon has some good options for that. Especially if you're looking for cheap ones. I'll get the link looking better in a second, but I'd start here (https://www.amazon.com/dp/B074QKMF2G/ref=cm_sw_r_cp_apa_i_-azRDbJG85M1P)
I get mine from Amazon, but I also use a lot of tubes. Instead of inking up my pens from bottles, I only use sample vials (or something like a TWSBi inkwell for my larger pens). It's a great way to avoid contamination of your ink. We live in a pretty moldy area, so I"m always concerned about fuzz on the pens syndrome.
Note: there are other types of tubes that are on eBay, but these cryotubes are by far the best. The other clear ones can't have 5ml unless you fill it to the brim, making a mess of things. These tubes are exactly like the ones sold on Goulet pens, only it has blue lids instead of clear.
https://www.amazon.com/gp/product/B074QKMF2G/ref=oh_aui_detailpage_o09_s00?ie=UTF8&psc=1
If you'd like a rack for your sample vials, here's a link to the one that I purchased. It is identical to hte ones sold on Goulet.
https://www.amazon.com/gp/product/B005Z4QWIK/ref=oh_aui_detailpage_o07_s02?ie=UTF8&psc=1
Also, if you have a CO2 tank you should be prefilling the racking carboy. Get an air nozzle. Something like this.
this
http://www.amazon.com/Air-Blow-Gun-Kit/dp/B000FVUO4G/ref=sr_1_7?ie=UTF8&qid=1395584938&sr=8-7&keywords=air+blowgun
Fill with hot tap water and if you have an air compresses with an soft rubber tip to pump air into it till it pops back into place then close the spigot and let sit for a day or so.
I've always used something like this.
https://www.amazon.com/CENTRAL-PNEUMATIC-Neighborhood-Corner-Store/dp/B01LWUJZQ4
With a with a blower
https://www.amazon.com/Neiko-31112-Interchangeable-Nozzles-Over-Sized/dp/B000FVUO4G
Been using them for years in IT, makes quick work of dust bunnies.
do you have a compressor? I think it'd be pretty easy to rig it to go both directions, just have the tube open at both ends, and use one of these guys at each station to create a venturi effect kinda deal
never heard of point zero, looks like they are rebranded masters stuff. The paasche is known brand, quieter, but less powerful. If you plan on using the compressor for airbrushing you won't need it more powerful though.
Man there is a lot to cover.
But to start, get a compressor with a reservoir so you can have extended paint sessions without overheating the pump. Something like this, Also some Dentist supply depot have oilless compressors with reservior ( the oiless part is very important for painting) that are really quiet but can get a bit expensive.
Get a good airbrush, you can find good quality airbrush in amazon but skip ANY of this type you won't get much out of those. This is a very good gravity fed airbrush.
Thank you for the response. How much time do you usually airbrush for? Do you do a lot of detail work with it? I was thinking I would just be doing base coats and the initial highlights, then finishing with a brush.
These Master or Paasche tanks seem good. I am concerned about the 1 star reviews though, seems like they can break.
For now I think I am going to try my Hitachi and see how it goes. I can always get an airbrush compressor later.
Long post incoming....
So, I don't think I've seen many airbrush discounts. Badger did a nice promotion where you could buy any airbrush for $55 for their 55 year anniversary this summer, but other than that it's kind of hard to find discounts. As far as Prime Day, I doubt they're going to have discounts on airbrushes, that's a pretty niche product they don't really get into. If you want to get started with that, I'd do something like this:
You then need a cleaning pot, some cleaning fluid, and an airbrush hose All told, that's like $300.
Then you need paint, paint brushes, a hobby knife, super glue, a mini hand drill, some small drill bits, sprue cutters, basing materials (cork board, model railroad ballast, etc) and I find a pair of tweezers helpful. That could add up to another $200 in materials (and obviously can cost way more, paint is expensive). So of your $550 budget, you would then have $50 remaining for models... which will buy you one model kit. So if you're looking to get started for $550, I'd probably forget the airbrush for now, and just get paints that can be used with one later. I recommend Vallejo paints. The eyedropper bottles work great for airbrushing, and you can just thin them with water. I haven't met one yet that doesn't work. A paint set like this would set you up nicely for doing an Imperial Guard army.
As far as what army to play... Guard is fun, but if you like the modern military aesthetic, Space Marines might be more what you're after. The new Repulsor Executioner tanks look awesome, and the new Primaris marines are great looking models... some of the best GW has produced. The Guard kits are looking kinda... dated IMO.
Don't do compressed air. Either a CO2 tank with a good regulator, or a comressor. I have this one, I think, got it for something like $120. Very quiet, about the size of a laptop, you can use the plug in the picture for scale.
Although on earlier MacBook Pros the audio jack had both output and input contacts, on the 2018 (which I own) it is only listed as a "headphone jack" and not under inputs. I thought I might have read that they changed this at some point. So I have some doubts as to whether you can get audio in through the headphone jack.
If you find a cable that makes it work as an input, then I am wrong about that. But there are other things to consider.
Traditional turntables output an RIAA signal which is not suitable for normal line input. Those require a "phono preamp" to transform the signal into line level for Line In ports on audio equipment (and for Macs that have a real Line In). But if you have a turntable with a built-in phono preamp or already connected one, ignore this paragraph. If you need one, they are relatively inexpensive.
If you find out that you can't use the headphone jack as an input, your other option is to use a USB audio interface. This would have analog audio jacks for the incoming signal, and a USB port to connect to a USB port on your Mac. It would show up as an input source in your Mac Sound system preference pane. While there are many USB audio interfaces out there, if you need a phono preamp make sure that is included.
If you realize you need a USB audio interface, this is an example of what I mean and it's less than $30. I do not know how good that one is becaue I have a different brand that cost about the same price, but the reviews are positive.
As far as software, GarageBand should be able to do it, if you want something more focused, Audacity is free and widely used for these types of conversions.
Or use one of these $30 devices and you'll also be able to record playback to your PC via USB.
https://www.amazon.com/Behringer-UFO202-BEHRINGER-U-PHONO/dp/B002GHBYZ0/ref=sr_1_1?ie=UTF8&qid=1468898427&sr=8-1&keywords=behringer+u-phono+ufo202
Super cheap and versatile. This is not for audiphiles!
Are you just playing a few songs for the wedding and want the cool factor? If so, sure, get the portable player. One or 2 plays of your records isn't going to hurt them. If you mean you plan to have the reception music DJ'd old school with vinyl, I think you're really going to want some kind of traditional setup with 2 decks and someone to manage them. You absolutely do not want your friends messing around with the equipment and your records. Without 2 decks you'll have big gaps in the music.
Or, save the $80, get one of these for $30 and start ripping your vinyl now. Put the Crosley on display and play a few of the special dances on it, but then shut it down and switch to your ripped collection and other digital music.
http://www.amazon.com/Behringer-UFO202-Audio-Interface/dp/B002GHBYZ0/ref=sr_1_1
I'm thinking it's doable for around $1,000. Thanks for asking /r/ZeosPantera!
----
What about using basically a karaoke system? Would that work for my needs? It's not going to be the high quality kind of thing you guys normally talk about here, but it may fit what we want.
If so, the best seem to be the Roland B-55 (Amazon link) or the Hisonic PA-687S. They only support two wireless mics at a time, but I could probably make that work. The key reason why I like them is because they support line out. Which I could then plug into a computer via an adapter (like the Behringer UFO202 Audio Interface). I honestly don't know if this would actually work though.
Could I use a mic/amp and audio interface setup like this as audio for software like Skype? I just don't want to spend this much money and find it doesn't work.
^Edit: ^Added ^the ^second ^amp/speaker ^option
My gut reaction is that it's an issue with your stereo and not with using the headphone jack itself, but it's difficult to say based on your comments. Have you tried plugging another source (ipod) into your stereo? Is the auto quality the same?
If you think it is the audio output out of the computer you can try a cheap external sound card like this.
I'm a bit surprised to find that something like that exists on amazon.co.uk here but it's a bit out of your budget.
Instead, you might look at this separate headphone amp and connect it to this phono preamp.
Finally, you could see if the Behringer UFO202 can be used for playback in addition to recording which is it's primary function. The headphone output on it is pretty sub-par on low impedance headphones.
The Q2N can function as a 720p USB webcam, though it's quite wide-angle (like a go-pro) so it would need to be closer than you'd think to get a good shot.
Your budget really is too low for anything other than webcams really, though you can get some pretty decent webcams for that price.
Hve a look at the Logitech C920. You'd have enough left over for a USB audio interface so you could run an output from the desk into your streaming package.
The thing is though, webcams don't have zoom. The zoom/pan that is done by software is simply blowing up the image so you're not gaining any detail, so things will just look blurrier when you zoom in.
Ideally, you'll need to reduce the distance between the camera and the stage somehow. You could, for example, suspend the camera from the ceiling, or mount it on a desk at the front of the bar?
However, if you're streaming at 720p or lower resolution, then you could potentially zoom in on the video in your streaming package without losing quality (don't use the webcam software, use something like OBS).
The Zoom Q2N would work as it can function as a USB webcam, but it's got a go-pro like wide-angle lens on it so it would need to be even closer than a normal webcam.
Really to pull this project off well, you'd need to spend at least a few more hundred dollars. A consumer camcorder like a Canon Vixia, plus a HDMI capture device like a Blackmagic Web Presenter would be the ideal budget setup.
Of course. OP can go cheap and get a Behringer U-Phono. Won't record hi-res, but can do 16/44, which is plenty.
http://www.amazon.com/Behringer-UFO202-BEHRINGER-U-PHONO/dp/B002GHBYZ0/ref=pd_sim_267_6?ie=UTF8&dpID=41MOgnznR%2BL&dpSrc=sims&preST=_AC_UL160_SR160%2C160_&refRID=1PKPY1C6X97XKX7RG62X
Yes, you will need a mixer of some kind. A USB mixer will be your audio interface.
If your turntable doesn't have a preamp, you will need one. I have been using one of THESE for years and it's great. You can use either the analog outputs into your mixer or connect it directly to a USB port on your computer to bypass the mixer.
Are the Cassette and Turntable separate device, and I mean separate from the amp? If they are you might have a better chance with Behringer USB Interfaces. Behringer makes one that is specifically for turntables.
Let me see if I can find it -
https://www.amazon.com/Behringer-UFO202-BEHRINGER-U-PHONO/dp/B002GHBYZ0/
It has a switch so you could use LINE for the Cassette and PHONO for the Turntable.
The Scarlette 2i2 would only work if you have standard Line Level inputs to the device, either Unbalanced (RCA) or Balanced (XLR).
If the Cassette and Turntable are built into the unit, then you are somewhat screwed, but there are some devices that can drop Speaker Level down to Line Level.
Let's see if I can find some of those -
https://www.amazon.com/Mr-Ho-2-Channel-Converter-Adjustable/dp/B07BBM1M5Z/
https://www.amazon.com/Massive-Audio-Hi-Low-Speaker-Converter/dp/B0045F1F0U/
https://www.amazon.com/Kicker-KISLOC-2-Channel-Speaker-Converter/dp/B00I4EF1BC/
https://www.amazon.com/s/ref=nb_sb_noss_1?url=search-alias%3Daps&field-keywords=speaker+level+to+line+level+converter&rh=i%3Aaps%2Ck%3Aspeaker+level+to+line+level+converter
u/housecat420 I dunno if you're still looking for an answer to this, but roughly seconding the answer above. I'm running my turntable into this Behringer USB/Audio interface with phono preamp, into a USB OTG cable with power, into an old Android (in this case a OnePlus One) running AirAudio. The phone isn't fully rooted, just developer options set to allow AirAudio root access. AirAudio source set to mic like u/goodhur mentioned. Works really well so far.
Another thought I just had, if you connect the bx5 to you computer, you could use one of these: http://www.amazon.com/Behringer-UFO202-BEHRINGER-U-PHONO/dp/B002GHBYZ0 to playback records. That may be your cheapest option.
You can connect the ground wire to any casing screw. You will need a pre amp if your stereo does not have a phono input. You can connect to your computer using a usb audio interface. Something like this has both things you are looking for. I don't have any personal experience with this particular item. You can also find seperate phono pre amp and usb interfaces.
Edit: In the case where your receiver does not have a phono input and you are adding a pre amp, connect the turntable ground to the pre amp. There will be a connector screw.
All you need is a [Behringer UFO202] (http://www.amazon.com/Behringer-UFO202-BEHRINGER-U-PHONO/dp/B002GHBYZ0)
Behringer UFO202 is only $40 but honestly it's a piece of junk.
302USB for $50 might be a little better. Never used it so I couldn't tell you.
This Lexicon Alpha unit for $60 looks decent for the price. Has balanced TRS outputs as well as a couple of inputs. Again, never used it so not sure how good it is.
Here's the thing, you bought a great pair of studio monitors, but any of these three options will likely output less than the potential quality of those Rokits. I really recommend spending the extra money on something comparable to the Audiobox I mentioned in my first comment to get the most out of your investment. If not, that third link would be my next choice. TRS will provide better quality than an RCA connection, hands down.
To find more options, just look up "audio interface." Add "usb", "firewire" etc to get more specific results based on your setup.
I would think you would have noticeably better sound with a $35 Behringer dac. UCA202 I think it is. Or if you got this one instead you wouldn't need a preamp to play a turntable as it works as a phono preamp as well. Cheap and probably not a long term solution but great while your broke.
If you aren't aware, that is sarcasm.
I would avoid getting a usb turntable as most of them are shit. Instead, I'd try to find a nice used turntable, receiver, and something like this. What is your local craigslist?
You can replace the preamp + RasPi set up with one of these if you want USB audio. I assume it should be relatively close quality-wise since it's by the same manufacturer as the preamp at a similar price point.
As for the turntable, just scour Ebay and Craigslist for deals. /r/vinyl and other audiophile forums have a lot of reviews of older turntables so you can at least get an idea of the quality. Ideally if you can see the turntable in person you should try it out and see if you like how it sounds before you buy it.
Just bear in mind that (just like cars) your setup will only be as good as its worst component.
http://www.amazon.it/gp/product/B002GHBYZ0?psc=1&redirect=true&ref_=ox_sc_act_title_1&smid=A3JULAK39SLJ94
Ho visto che mi serve questo, ma se la rileva come scheda audio non mi conviene prenderla esterna per poi attaccarci il giradischi?
Sono confusissimo
Just pin the fan with something to keep it from spinning. Put a pen through it. As for the compressor itself you need to be careful with that. Compressors tend to condense moisture in the tanks. I keep mine stored with the drain valve open so anything that condenses in is during times it's not in use drains out. Even that isn't a sure thing though so before I even considered using it for a purpose like this I installed an oil/water separating filter in line to make sure any leftover moisture got filtered out. They are not expensive and a good thing to have as they protect your air tools from corrosion as well. A desiccant dryer works even better, but is a lot more expensive. Here is what I have on mine. https://www.amazon.com/Neiko-30252A-Water-Separator-Outlet/dp/B002GQ3SUA/ref=pd_sim_469_2?_encoding=UTF8&psc=1&refRID=R9QATQYGZXACBZ21C5J9
Talk with your local paint supplier on that particular brand's processes - but you will likely want/need to reprime it so it is sure to stick (and the primer you want to be compatible with the paint you use). I know the primer I used, you wanted to lay paint on it within 48 hours or so for best adhesion.
It takes some practice to get the amount of paint correct, as well as dialing in the gun (watch some Youtube videos). There is a somewhat fine line between putting the final coat on too light and it showing up dry, or all of a sudden you put too much on and you have a run. Don't forget to clean the gun thoroughly after each use.
Final advice? Don't sweat the imperfections, it's a track bike and we aren't pro racers. Also accept that your first full paint job or at least the first couple pieces you do will probably not look great as you learn how to setup the gun and control how much paint to lay down.
You really should have an inline filter on your air line.
https://www.amazon.com/gp/product/B002GQ3SUA/ref=s9_acsd_topr_hd_bw_b3jQpjX_c_x_w?pf_rd_m=ATVPDKIKX0DER&pf_rd_s=merchandised-search-4&pf_rd_r=QZVN29F2X7P526SCZ3TT&pf_rd_t=101&pf_rd_p=dc68059f-0cd4-554c-860c-419946e51f9b&pf_rd_i=3419729011
This is what I use: Active Aqua Commercial Air Pump, 12 Outlets, 112W, 110 L/min https://www.amazon.com/dp/B002JPPFJ0/ref=cm_sw_r_cp_api_i_bZ27AbR3R4NBW Seems sufficient for my needs
This fan
This pump
Right now it's venting outside but I'm looking into at least some filtration to not upset the neighbors.
https://www.amazon.com/Active-Commercial-AAPA45L-Outlet-Liters/dp/B002JPRNOU
Love this thing
>where did you find that bucket lid? I've seen that sort of bucket all over the place on this subreddit, but never actually found out where to buy them, my bucket ended up being a full DIY.
I found them at a local garden center that carries some hydroponic equipment. I don't know where you're from but if I can find them where I am from I'm sure you can. You can always get them online too just search "6 inch net pot bucket lid"
>Any specific reason for putting the check valves at the air stones instead of at your pump or your splitter?
No, that's just how I did it. The check valve could go anywhere in the line really. My train of thought was just the less water that gets in the line the better, so I put it as close to the air stone as possible.
>Are you running 4 buckets in (R?)DWC? Whats the output/capacity of your oxygen pump?
I run 4 separate DWC buckets. My pump is a Hydro Farm AAPA45L
>would you say that your seedlings are stretching a bit or is that the natural length of them when starting them in rock wool cubes?
I've used different lights for seedling starting and I find they always seem to stretch like that, I combat it by planting the rock wool cube low in the net pot so I can build the clay pellets up around the stem as they grow. Unfortunately I must have been a bit too rough when I was moving the net pots into the buckets, or I dropped something but I broke the stem on GSC #1, the one that was in the pic. I found it with the stem bent past 90° with the leaves resting on the clay pellets. I propped it up with some toothpicks and hoping it'll pull through.
​
​
Those ratings are for fish tanks. You want as much air as possible. If you want to split an air pump between multiple buckets, get a more powerful one like this.
Found this one - http://www.amazon.com/gp/product/B002JPRNOU/ref=ox_sc_act_title_1?ie=UTF8&psc=1&smid=ATVPDKIKX0DER
for 40 bucks. I think for what I need it should do fine. I mean, I was prepared to go with something 3x weaker just last night. It's a 20 watt/45 LPM setup. Getting damn near everything else off amazon except the buckets and the grommets/water level indicator setup so I figured it's not bad, free shipping with prime and all.
You'd connect a gadget like in the link below to your city water connection. No it won't clear your freshwater tank as that will have its own drain.
Camco Blow Out Plug With Brass Quick Connect-Aids In Removal of Water From Water Lines (36143) https://www.amazon.com/dp/B002XL2IEA/ref=cm_sw_r_cp_apa_i_DTbYDb4CT1YXS
I use an air compressor with an inline moisture trap and there has never been an issue. I've been doing this for 20 years and not once have I ever had a problem.
EDIT: If the compressor has this on it http://www.amazon.com/Airbrush-Compressor-Regulator-Water-Trap-Filter/dp/B004KNAHE2 and you clean it properly, then you will NOT have any issues. I would stake my house on that.
http://www.amazon.com/Airbrush-Compressor-Regulator-Water-Trap-Filter/dp/B004KNAHE2/ref=sr_1_2?s=arts-crafts&ie=UTF8&qid=1411683902&sr=1-2&keywords=airbrush+regulator
You're looking for something like this:
http://www.amazon.com/PointZero-Airbrush-Compressor-Regulator-Water-Trap/dp/B004KNAHE2/
It's almost the same as mine.
Don't forget to get a moisture trap, something like this https://www.amazon.com/PointZero-Airbrush-Compressor-Regulator-Water-Trap/dp/B004KNAHE2 because compressing air wrings the humidity out of it, which can throw off the spray balance with acrylics. Other than that, any compressor will do, like most folks suggest. Depends on your tolerance for noise.
I used cheap-ass Master airbrushes and a 3-gal shop compressor with a digital regulator and a moisture trap in between the compressor and the brush. The below, plus a few trips to a hardware store for pneumatic fittings, should be enough.
https://www.amazon.com/Master-Airbrush-Multi-Purpose-Gravity-Dual-Action/dp/B00EKUU0WY/ref=sr_1_4?ie=UTF8&qid=1527561384&sr=8-4&keywords=master+airbrush
https://www.amazon.com/PORTER-CABLE-C2002-Oil-Free-Pancake-Compressor/dp/B000O5RO1Y/ref=sr_1_3?s=power-hand-tools&ie=UTF8&qid=1527561398&sr=1-3&keywords=compressor
https://www.amazon.com/PointZero-Airbrush-Compressor-Regulator-Water-Trap/dp/B004KNAHE2/ref=sr_1_6?ie=UTF8&qid=1527561429&sr=8-6&keywords=airbrush+moisture+trap
https://alclad2.com/finishes/
People regularly say you should get a more expensive, higher quality brush, but to date I've yet to have major problems with my cheapo ones. It seems like the main benefit of the better brushes is ease of cleaning and durability.
thanks.
My badger compressor uses 'bleed-through' as well. (I think) It always runs no matter what.
I ended up ordering these two.
http://www.amazon.com/gp/product/B000BROVMK
http://www.amazon.com/gp/product/B004KNAHE2
Thanks for your suggestion!
Hose (I'm using it with an iwata eclipse): https://www.amazon.com/gp/aw/d/B01KDNSU4G/ref=yo_ii_img?ie=UTF8&psc=1
Moisture trap/second regulator: https://www.amazon.com/gp/aw/d/B004KNAHE2/ref=yo_ii_img?ie=UTF8&psc=1
I highly recommend a moisture trap with another regulator on it like that. It will give you fine control over the pressure. This one is a knock off of a few others that look/function exactly the same. The psi readout seems a little funny as pressure drops a full 10 psi when you start the air, but it doesn't seem to affect anything.
As for adapters, I needed a quick release tip, connected to an adapter, connected to a nipple (to extend the moisture trap further out because it touches the air tank), connected to the trap, connected to an adapter for the hose, connected to the hose. I can take a pic later if you'd like.
[Something like this?] (https://www.amazon.com/dp/B0065OYYQQ/ref=cm_sw_r_cp_apa_k9ydAbZ6NZDVK)
>https://www.amazon.com/BE-PRESSURE-85-400-062-Undercarriage-Cleaner/dp/B0065OYYQQ
​
https://www.reddit.com/r/teslamotors/comments/b7jqtk/how_to_wash_your_undercarriage_at_home/
A couple questions to consider:
I assume you're in the US because you linked to Amazon US. And because you came to the conclusion that you should get an Iwata or Badger.
Let me address the spray booth first. The main selling point and feature of the booths you linked on Amazon is portability. They're not that portable, but because they fold up they are more portable than something you might build out of a plastic storage bin and some fans. If you feel like you can build your own (there are lots of articles on the internet for this) that meets your (safety) requirements/desires for less than the portable spray booths online, than you might want to consider building your own. Otherwise, what you're paying for is the ability to fold it up and bring it on trips to group builds. Also keep in mind that these used to go for $60-70 USD and seem to be getting more expensive with time.
As for the airbrush, if you have the money and want stuff that works out of the box, then you should just get a kit. There are other vendors (Chicago Airbrush Supply off the top of my head) outside of Amazon that could potentially get you a better deal.
If you are a DIY person and potentially have need of power/air tools in the future, you might want to consider a mini shop compressor. This one by CA air tools is recommended by some people here because it's supposed to be pretty quiet while delivering pancake compressor pressures. The caveat is that you have to be comfortable with buying the right fittings/adapters to make the airbrush/hose work with the compressor.
If you don't have or aren't willing to spend money, then you can just go to Harbor Freight tools and get a compressor, hose, and accessories, then go to Hobby Lobby with a 40% coupon and buy an Iwata Neo or a Badger Patriot 105.
edit: Definitely agree with /u/Funakatown that you generally get what you pay for. If you're really into the hobby, investing in good tools from the beginning is totally worth it. These tools and skills are good not just for gunpla, but all plastic model/miniature hobbies, cosplay, and general DIY. On the flip side though, if you live in an apartment and you never know when you might be moving, or there just isn't much stability in your life now, it's understandable to not invest too much in. Especially since it might be hard to get your money back if you have to sell your stuff down the road because you can't take it all with you. Or you find that you hate airbrushing, which does happen to some people.
I have this one (as well as a Krome) and aside from being a bit louder than I would like, but it does a great job. If you have amazon prime, it is even better; you'll save a ton on shipping
http://www.amazon.com/gp/product/B00889ZYD8/ref=od_aui_detailpages00?ie=UTF8&psc=1
look at the warehouse deals, its about 140 or 150 depends on your state.
Here is a youtube video of a much larger model... https://www.youtube.com/watch?v=ZZryRKHrCKc
Would any of these work for you?
I considered Noctuas but Dell does this funky thing there they rewire the connections from the standard 3 pin connector and you’ll get a fan failure light and they won’t turn on if you don’t rewire it yourself. I just lacked the tools to do the rewiring so I opted for a Sunon kit which already had the proper connector and came with extenders (I’m not confident the fan cables would have been long enough on the Noctuas). A bit pricey but well worth it after installation. Ships pretty quick from California even without prime. I’m on the east coast and had them in 4 days.
https://www.amazon.com/dp/B00XI478SW/ref=cm_sw_r_cp_awdb_t1_foxXDb3BG4KNE
Noctuas would have been cheaper for sure (I think they’re $15/ea or so, but if I needed to require the connectors I’d also need one of these so my options were $95 prime to do it myself, of $99 + shipping to buy what I knew would work plug-and-play.
I swear half my homelab experience has been buying stuff super cheap and then pouring more money than its worth into getting it working the way I want it. I guess you learn stuff doing these upgrades yourself though :)
I did not like the idea of cutting my wires, so I used a crimp extractor.
Wire is mil-spec 16 AWG tefzel jacket in white:
https://www.amazon.com/gp/product/B01LZNZISW/ref=ppx_yo_dt_b_asin_title_o01_s00?ie=UTF8&psc=1
Connectors were pulled from the existing PSU cables using a depinning tool. As an aside, they are from the Molex Minifit Jr family and specs can be found all over the internet if you need to order separately:
https://www.amazon.com/gp/product/B00GOIY1NE/ref=ppx_yo_dt_b_asin_title_o04_s00?ie=UTF8&psc=1
I am lucky enough to have access to a wide variety of crimpers at work but this is the model that I used:
https://www.digikey.com/product-detail/en/molex/0638190900/WM9026-ND/1873804
And the contacts are from Amazon:
https://www.amazon.com/gp/product/B07FKVBNK5/ref=ppx_yo_dt_b_asin_title_o05_s00?ie=UTF8&psc=1
Is it ok to dust your pc with this?
https://www.amazon.in/Skil-8600-Air-Blower/dp/B00I9IBE7S/257-0458027-4955123?_encoding=UTF8&%2AVersion%2A=1&%2Aentries%2A=0&portal-device-attributes=desktop
I like this version of the carb cap. The barb on the underside let’s you connect tubing for a few extra uses: https://www.amazon.com/dp/B00V334SME/ref=cm_sw_r_cp_api_i_rrkACb3FQHYP7
It's not classy, but I like to use a 2L soda bottle, filled through a carbonation cap with a tube to minimize CO2 loss. Cheap and effective, if sketchy-looking.
I have this hooked up to a submersion pump (Mark II keg/carboy washer). I just hook the ball lock to it, slip a half inch silicone hose over the tap and lay it in the basin to recirculate.
I use the stainless carb cap with a barb on it https://www.amazon.com/dp/B00V334SME/ref=cm_sw_r_cp_awdb_.jT8ybMVS3DKG
I put a piece of vinyl tubing on the carb cap barb and stick that inside 1/2" silicon tubing as an a reducer of sorts. The pump has a barb that fits 1/2" tubing.
I don't know if you have a craft brew set up or not, but a bottle of co2 and a carbonation cap like this will let you mix up, oxygen purge and keep, essentially for ever.
Yeah, put the regulator on low to fill the balloon. I used one of these things to fill it, have ball lock QD attached to regulator, but many configurations are valid. I think I've seen the barb-qds cheaper on Ebay
i think most revisions use an M6 coupler
useful to keep around, I used some to make dryboxes.
That would work, you'll just have to be careful that you've still got enough length on the tube that you don't choke up the filament path when the X axis is all the way out.
Here's a link for replacement fittings.
https://www.amazon.com/gp/product/B00WE1A3D2
This is for extra PFTE tubing
https://www.amazon.com/Meters-Filament-3D-printer-Rostock/dp/B00THZKC8Y
JIUWU Pneumatic Air Straight Fitting 4mm thread M6 One touch hose Connector Pack of 10 https://www.amazon.com/dp/B00WE1A3D2/ref=cm_sw_r_cp_apa_i_gBlACbGT9J0X4
I bought 10 for ~$7 on amazon JIUWU Pneumatic Air Straight Fitting 4mm thread M6 One touch hose Connector Pack of 10 https://www.amazon.com/dp/B00WE1A3D2/ref=cm_sw_r_cp_apip_Ex8VNlMxPNHxG
The blue-topped connector is a fitting that connects to a lock-washer-looking piece of garbage that sits just inside the extruder case. If you unscrew the top of the extruder case, you should see that the lock-washer-thing has shattered, which means the connector can't keep the tube held in place. On another extruder, you'd be able to swap out this shit plastic fastener with something like this: https://www.amazon.com/gp/product/B00WE1A3D2/ref=oh_aui_detailpage_o01_s00?ie=UTF8&psc=1
But this won't work with the stock extruder casing because there's no threading to screw it into. If you were able to drill your own threading or swap out the plastic bit that broke, you'd be all set. Otherwise, you need a new extruder case and you might as well swap out all the parts with cheap metal versions that won't break down.
Wiki is: http://mpselectmini.com/
Some items I bought from Amazon (don't buy the hot end pieces if you have a V2. They changed the hot end to an all metal one):
https://www.amazon.com/gp/product/B00WE1A3D2/ref=oh_aui_detailpage_o00_s00?ie=UTF8&psc=1
https://www.amazon.com/gp/product/B00T2DNKJY/ref=oh_aui_detailpage_o01_s00?ie=UTF8&psc=1
https://smile.amazon.com/gp/product/B01LAYCRAA/ref=oh_aui_detailpage_o07_s00?ie=UTF8&psc=1
https://smile.amazon.com/gp/product/B00L4UXQ42/ref=oh_aui_detailpage_o08_s00?ie=UTF8&psc=1
V
https://smile.amazon.com/gp/product/B00MQKW230/ref=oh_aui_detailpage_o09_s01?ie=UTF8&psc=1
https://smile.amazon.com/gp/product/B01A81FXMK/ref=oh_aui_detailpage_o05_s00?ie=UTF8&psc=1
https://smile.amazon.com/gp/product/B01ACIFPYA/ref=oh_aui_detailpage_o00_s00?ie=UTF8&psc=1
Tofu is pretty easy to put in everything if you know how to cook it and is a better source of protein than meat on a per oz basis. And it's inexpensive also, you can get a brick of tofu for like $2 and it contains +40g of protein and only like 360 calories. A cheap tofu press will pay for itself the first time you use it, only real requirement for cooking with tofu. I have this press and its really nice, because you can keep increasing the strength of the press as more water drains, and the water just sits in the basin on the bottom so there is no mess. The power towel and heavy object trick is tedious and I don't recommend it.
Personally, asian style tofu dishes are the fastest to make imo.
Press and cube the tofu, then toss it in corn starch. Put about maybe 1/4 cup of high heat oil (I use canola) in a pan and get it real hot, then fry the tofu. If the tofu looks dusty still, add a bit more oil. The outside of the tofu should be nice and golden and crispy when its done, takes about 4-6 minutes. Turn the heat off, and then put your favorite choice of sauce on, using the heat left in the pan to reduce the sauce. Eat. If you want to get fancy you can add rice or veggies like lightly steamed broccoli into the mix. Assuming you let the tofu press sit while you did other things, the actual prep & cook time is less than 20 minutes. The oil, sauce, and corn starch obviously add some calories.
Burritos with imitation Chipotle sofritas are also a fav of mine, but that takes more time and planning since beans are involved (please see my recent PSA of why you should never rush bean prep lol). You can cheat the intricate recipes for sofritas mix with straight up pulling the pressed tofu apart with forks, then mixing taco seasoning (I recommend medium or hot), some lime juice, a bit of black pepper, and a tiny bit of vinegar, a bit of water, then letting it simmer. It doesn't taste as legit, but requires WAY less time and ingredients.
Or if you are feeling real lazy and don't mind boring foods, quinoa and a bit of brown sugar go a long way also for good macro split meal that is also on the cheap.
I am gluten intolerant so I’m really thankful for Beyond Meat being the popular option as well. Especially for their plant based sausage and their chicken when cooked right.
Its really frustrating that the few unique vegan options around me feature seitan so I can’t eat it. Happy for others obviously, it just looks so good! 😭
Oh gosh, I hope it rises in popularity in Australia so it’ll be less expensive. I’m in the states so, its not too much. But I am trying to make better use of tofu as its really delicious. I like a redditor’s comparison of tofu with flour.
Mix it with the right ingredients and you have something amazing, you don’t eat it as is to get the most out of it. I read some people actually eat it raw, but I’m saving all of mine for the meal I’m making.
This is the link to the tofu press I got
I had the same dilemma for a long time! I highly recommend buying one, as it's so much more convenient. I recently got this tofu press, and it's been great!
My goto lately has been either tofu "eggs" or scramble, which I make by combining a seasoning mix to coat the outside of pressed, not previously frozen firm tofu. I just eyeball it, but it's mostly nutritional yeast, with a few dashes of turmeric, some onion and garlic powder, some ground mustard, salt, pepper, and about a Tbsp of corn starch mixed well. I just cut a hunk of tofu into four equal sized flat planks and coat them well and throw them in the skillet with veggie sausage, onions, peppers, sometimes vegan cheese, and always hot sauce. Super easy, and super tasty!
Tofuture
https://www.amazon.com/dp/B01B3NU46C/ref=cm_sw_r_cp_apa_i_zCvlDbQ0BSQP1 I find this rather handy, no scratches on any I've built so far.
These are very handy for installing the bolt catch: https://www.amazon.com/Wheeler-710906-Engineering-Catch-Install/dp/B01B3NU46C/ref=sr_1_1?s=sporting-goods&ie=UTF8&qid=1519798996&sr=1-1&keywords=bolt+catch+install+tool
As far as hammers go, get one that has multiple heads (Steel, Brass & Nylon/Delrin). I use this one but there are several others: https://www.amazon.com/Lyman-7031290-Brass-Tapper-Hammer/dp/B00162SAQ2/ref=sr_1_4?s=sporting-goods&ie=UTF8&qid=1519799046&sr=1-4&keywords=gunsmith+hammer
I would use one of the PWS ratcheting end plates instead of a regular castle nut. You don't have to stake it and it has a QD socket as well. They're all I use now: https://www.rainierarms.com/primary-weapons-systems-ratchet-lock-sling-mount-plate-and-castle-nut/
I also have a Magpul Bev Block and use it a lot.
/u/tnarmsco Do you know if this bolt catch install kit works on your your polymer AR308 lowers? Thank you.
https://www.amazon.com/gp/product/B01B3NU46C/ref=ox_sc_act_title_1?smid=ATVPDKIKX0DER&psc=1
Don't remember which ones I actually bought, but this looks like a good deal.
These seem to be better quality, still a good price.
https://www.amazon.com/RentACoop-Animal-Bottle-Hamster-Rabbit/dp/B07FMC845L
My pig LOVES to play with his water bottle and used to wreck the spouts constantly. We’ve had this one for maybe 6 months without any leaking - https://www.amazon.com/dp/B07FMC845L/ref=cm_sw_r_cp_api_i_uTACDbJCNGC6S
32 oz No Drip Small Animal Water... https://www.amazon.com/dp/B07FMC845L?ref=ppx_pop_mob_ap_share
This one works well to not leak for me!
I bought this bottle, and Ive never see it leak. It also has a warranty and is much quieter than ball mechanism bottles.