Best bike tools & maintenence products according to redditors
We found 1,544 Reddit comments discussing the best bike tools & maintenence products. We ranked the 491 resulting products by number of redditors who mentioned them. Here are the top 20.
We found 1,544 Reddit comments discussing the best bike tools & maintenence products. We ranked the 491 resulting products by number of redditors who mentioned them. Here are the top 20.


Here's some other riding tips:
Always use a quality ulock (no masterlock) and lock your frame and rear wheel to a rack - use a cable for the other wheel if you got one. I use On Guard brand and have never had a problem.
Get an all in one bike multitool like this one This one's great because it has tire irons for fixing a tube, spoke wrenches for straightening a wheel, and other tools that you'll never knew you needed until you do, all together in one unit.
Learn how to replace a tube! It's really not hard with tire irons and a small travel pump. Carry a new tube on you at all times - or go lightweight and carry a patch kit. After you replace your first tube, learn how to patch it at home and use that as your spare. Keep one of these valve adapters screwed on to you valve stem for gas station air ups to full pressure if the hand pump wears you down.
Learn to adjust your seat if your taint is getting beat up by your seat. More cushion does not make for a more comfortable ride! Your ass bones are all that need to be supported and cushion covers feel nice for the first 10 minutes, but that added friction will only give you saddle sores. Proper seat adjustment is just as important as the type of seat. Your legs should almost be fully extended when the pedal is closest to the street. Slight angle adjustments to the saddle are huge in terms of ride quality and it's just one screw under the seat.
Keep your chain and gears clean, use a chain specific all-in-one lube and cleaner and wipe thoroughly. The more noise your bike makes, the more friction to the moving parts which means more wear and tear, and loss of energy.
Always carry a bandanna or rag to wipe the grease, grime, sweat, or blood incurred from riding.
Wear a fucking helmet! If you don't like looking like a dork with alien technology aerodynamics on your head, rock a rounded multi-sport helmet that you can also use while on the slopes or when cruising some fruit boots. Lock it to your bike through the straps that aren't easily undone, just don't leave it like this overnight if you don't want it stolen.
There's plenty of other stuff, but most importantly don't ride like a dick. You should ride in the street and, again, never ride at night without good lights -it's just stupid and dangerous.
That's a great bike to start with. I started off with a bike in much worse condition.
I usually start off by giving the bike a quick wash. Just water and some dish soap to get off all dust and loose dirt. After that I dry it with an old towel.
Then comes the tear down. I put it on my stand and remove the wheels and set them aside. Then I just start cutting off all the cables (brakes and derailleur). After that, the chain gets it. I use the Park chain tool.
Then its on to removing the derailleurs, cranks, stem/bars, brakes, etc. Rear derailleurs are mostly removable with a 5mm allen wrench. Front derailleurs, too, although some of the older ones may just have a hex head. The seat post binder bolt is usually 5mm, also. Hopefully it isn't stuck. If it is, just come back and ask for methods.
Onto the stem and handlebars. To remove the stem, just loosen up the bolt up top a couple turns and tap it with a hammer and hopefully it slides out without a fight. Then remove the brake levers from the bar, then the bar from the stem.
I use this tool for the allen bolts. Park AWS 10
To remove the pedals from the cranks, I use a snap-on 15mm wrench. Remember, the pedal on the left side is reverse-threaded.
The bolt (or nut) on the crank arms is most likely 14mm and on much older bikes sometimes 15mm. I use a 14mm socket with a ratchet.
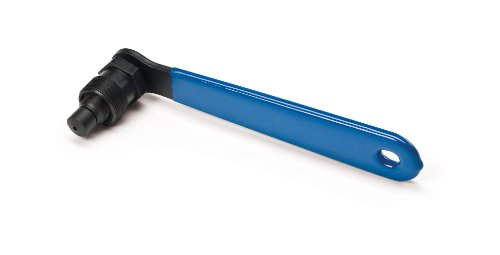
Removing the cranks from the bottom bracket spindle can be a pain sometimes. The tool to remove them is a crank puller. I use the park ccp-22. Make sure the threads are clean on the crank apply a little grease on the tool. Try to make the tool screw in the most it can and don't cross-thread. Aim to get the tool to bottom-out on the crank. Then you start spinning the handle and then you'll get a little workout on your arms.
By this point I usually just have a frame, fork, headset, and bottom bracket left. I'm tired so I'll just stop typing for now, heh.
Ask If you need any help. Someone will gladly help you here and see if you have a local bike co-op/ kitchen nearby. They could be a great asset.
hate flats, learn how to switch out tubes, saved me a lot of hopelessness and the gear required is pretty light to carry around.
lever
tubes
ratchet wrench 15mm
portable air pump
back up and running in 15-20 min.
Bike tire lever for separating the rim and tire.
http://www.amazon.com/Pedros-Bicycle-Tire-Lever-Pair/dp/B000IZGFCE
I've created a short list of everything I have, linked items are the ones that I recommend.
Things for the road
Frame/ Mini pump
Saddle Bag
Patch Kit
Tire Boot (You can make your own for cheap, but these are still good)
Tire levers (See Multi-Tool, Levers Included)
Multi Tool (Super-Recommend)
Bike Lights
Spare Tubes (Optional for the road)
Bottles of choice
Sunglasses of choice
Gloves of choice (Important! For preventing impossible-to-heal palm scrapes)
Cycling compter
U Lock (no cable locks! they're garbage) <<I Have 3 of these, but then again, I live in Oakland.
Things for home
Floor pump
Tools (Pretty much covered by Multi-Tool, but there's things you may need like cassette tool, chain whip, etc)
Wet and Dry chain lube
Clothing (Optional, I only have the shoes and windbreaker)
Hi-Vis Jacket
Clipless shoes, I recommend SPD for easier walking
Jersey
Padded Shorts, or Bib shorts
Windbreaker
Leg Warmers
Most importantly, you need knowledge of cycling. Look up videos on youtube about safe riding on the road, traffic laws, hand signals, how to repair your bike on the road and at home, how to take a fall, and as much theory that you can)
EDIT: Do not let me trick you into thinking that a multi-tool is a replacement for the big-boy tools that are available on the market. Some of those tools are actually worth the investment. However, be that as it may, do your research first, because there's some overpriced crap out there ^^^Park ^^^Tools.
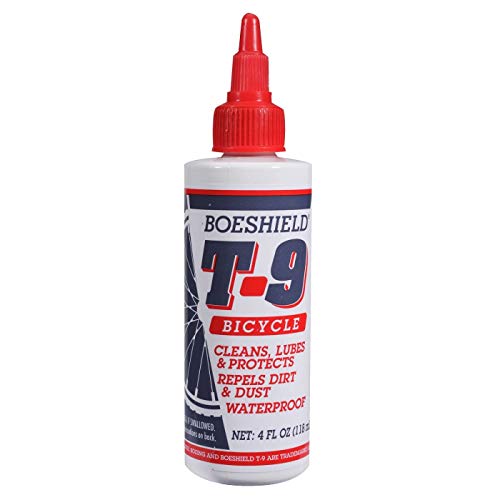
This plus this. After every ride I wipe the chain down with a dry microfiber rags. Nothing on the outside of the chain needs to be there. Twice a week (about 12 hours of riding) I apply some of the T-9, let it sit, and wipe clean. Also wipe off the jockey wheels. In my opinion, the key to a clean drive train is lubing after rides and letting it dry (after wiping excess off), not right before you go out.
^I ^love ^a ^silent ^ride.
Posting pictures of the bike would be helpful. If you decide to do this, make sure to post a few high quality shots of your drivetrain which could show us if there's any critical wear.
However, before you post the pictures, it would be helpful to clean the bike. Get a bucket of soapy water, find a sponge or rag that you don't mind sacrificing and get to cleaning your mountain bike. Dry it off, and then post the pictures (that will make any critical deficiencies more obvious).
As others have mentioned, you'll most likely need to remove the chain. Here's a video from one of the best cycling channels on Youtube, Global Cycling Network (GCN), that shows you exactly how to do that. GCN and its sister channel, Global Mountain Bike Network (GMBN) offer a number of fantastic maintenance videos in addition to a variety of other content. If you're wondering where to get a chain tool, I would just spend a bit of extra money and get a good multi tool like the Crank Brothers multi tool which already comes with one.
Pump up the tires to see if they still hold air. If they do, fantastic. Nothing more needs to be done. If not, you'll need to get new tubes (most likely your mountain bike will need 26 in X 1.9-2.125 in tubes). Here's how to install a new tube.
As a bike commuter, you'll need a number of things to stay safe and make sure your bike stays in your hands. Here are the essentials:
However, staying safe is only the first part. You'll want or need a number of other items to make sure that your commute isn't frustrating. Here are some of the items off of the top of my head.
/r/bikecommuting can be a helpful resource if you have other questions.
You can easily do it yourself. I'd do it on a steel bike.
$100 is a lot for what they'd be doing.
With the right BB, Yes. Take the R-der as well, you can use it for parts. Looks like a square tapered BB.
https://www.amazon.com/Park-Tool-CCP-22-Crank-Puller/dp/B001VS1M20/ref=sr_1_2?keywords=Tool+for+removing+square+tapered+BB&qid=1562026322&s=sporting-goods&sr=1-2
This the tool to remove it
Is this your first bike?
You should really check out the beginner advice thread and the $200-600 thread in addition to this one. There's a lot of helpful advice in there including SIZING. KNOWING YOUR SIZE IS SUPER IMPORTANT SO KNOW THAT FIRST.
Also, if you're in this price bracket and you don't already have the essential bike accessories:
Note there are other options for all of these that could allow you to save money/space/whatever, but you won't go wrong with what I linked. I'd really suggest having these even if it means you go down a price bracket on the actual bike, they'll all come in handy.
New Bikes
Used Bikes
Another great thing about this price bracket is the used market. I daresay it is easy to find outstanding value bikes used in this price range if you know what you're doing. I helped a friend source this for $1100 and we were being choosey! Again, if you need help post in the questions thread or just PM me because I like helping people with this stuff.
I'm a fan of Surly stuff, they make excellent frames. My fixed gear has surly hubs, and they have been holding up wonderfully. I'd say go with the Long Haul Trucker if you want a touring frame or the Cross Check if you want a cyclecross frame. The Long Haul Trucker would be the best for you (imho) since you want to carry some cargo. Be sure to spray some frame saver in the tubes before you build it up.
Snarky answer: learn to fix a flat, man. Real answer: You should know how to fix a flat... at home. Before you go. A road bike tube change takes me five minutes, A motor and whatever else your electric set up brings with it will make the process take a little longer but it is still bike maintenance 101 (i.e. intro to adulting material). For instance, internal hubs? Not something you want to be fiddling with for the first time while baking in a parking lot on a 90 degree day, on a front loader cargo bike that's too big to fit in just anyone's rig, 20 miles from home in a sketchier neighborhood. Guess how I learned that lesson?
Then, when you're on the road, remember: you're on an ebike, weight means far less than a regular bike. Carry a spare tube, or even two, and a nice portable pump. Leave the patch kit at home for when you have time and patience to mess with it and do it right; not when you're out on the way somewhere and lacking a decent work space. CO2 cartridges are super handy but really wasteful. That's an ethical choice for yourself to decide. Fat tire bikes are almost easier since they don't need to be pumped up as much (e.g. compared to a road bike).
Also, I carry an assortment of tools and would suggest that to anyone trying to bike commute. One of these (the M19) folding tools can completely take apart most bikes save for the cranks. If your axles aren't quick release than the folding tool is almost a necessity unless you want to carry a single allen wrench and wish you had more when your crank arm starts coming loose, or your handlebars get out of wack, or your brakes start rubbing. With an ebike I also bring zipties and a leatherman. They have both individually and collectively saved me. Bikes are easy to work on. I feel deeply disappointed in myself when I have to drive anymore. Let bikes set you free!
&#x200B;
Edit: Oh. And get a good bike lock. Not some dinky crap that can be snipped with a pair of pocket sized garden shears. Even if you don't think you'll ever use it. If you ride your bike, you will. If your bike does completely crap the bed, its nice to be able to safely lock it up somewhere rather than have to drag it around with you while you find a solution.
Mount a pump to the frame under the water bottle cage.
I like the Topeak Road Morph
Get a Saddle Bag and fill it with
Optional but handy
Bike Multi Tool
2 CO2 cartridges
CO2 Tire filler
zero complaints with this one, and collapses pretty small
https://www.amazon.com/Bikehand-Mechanic-Bicycle-Repair-Stand/dp/B00D9B7OKQ
To quote one of my recent comments about silencing stabilizers:
---
---
I've spent tons of time researching and modding stabilizers and here's the method I use to make them as silent as possible:
---
Let's Build: KBD75 + Zealios 65g (YouTube)
[stabilizer modding starts at 12:11]
---
What you'll need:
---
---
This is what they should sound like:
https://www.youtube.com/watch?v=mMIC1ZQ8Grw
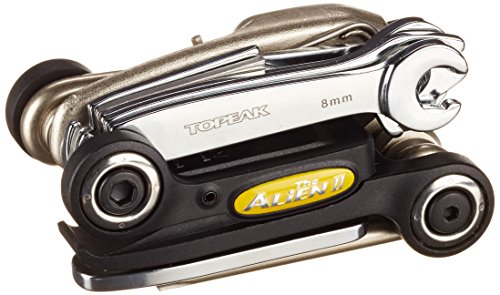
I carry the Topeak Hexus II with me, but I also use it for simple adjustments in the garage because it has everything I need all in one place.
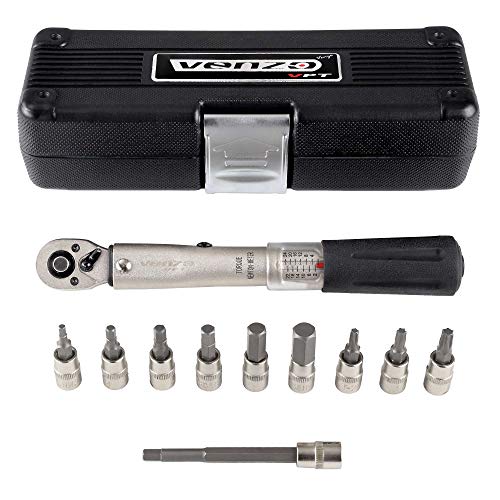
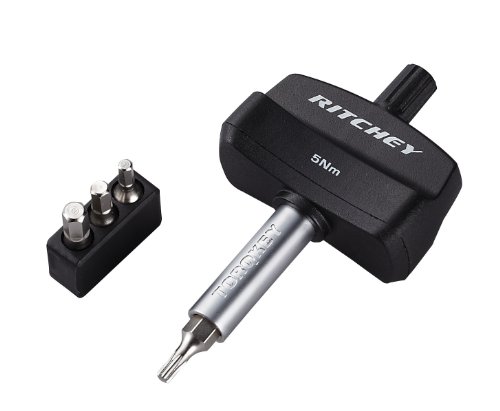
The non adjustable torque keys are great for folks in your position. they're usually less than $20 and give you some piece of mind. Carbon Trek bikes usually come with one that's a 4mm at 5nm. (that's size, and torque) A lot of times the shop keeps these tools when they assemble your bike - it's worth asking them to fork them over. https://www.totalcycling.com/en/Bontrager-5Nm-Preset-Torque-Wrench---4mm-Hex-Allen-Fitting/m-17367.aspx (this says the bits are interchangeable, but all the ones my shop got only had a 4mm that was non-removable)
There's another similar one that's sold branded as Ritchey that is 5nm and uses interchangeable "bits" so you can put a 4mm, 5mm or T25 on there. pretty handy. https://www.amazon.com/Ritchey-5Nm-Multi-Torque-Key/dp/B009F93S9C
If you need a different torque spec, park tool has a small semi-adjustable one that is pretty good with settings of 4, 4.5, 5, 5.5, and 6. http://www.parktool.com/product/adjustable-torque-driver-atd-1?category=Torque%20Tools
any of these is great for stems, seat binders, etc. For bigger things like crank pinch bolts, etc you'd need to get a full on adjustable torque wrench, but honestly, for most of those bolts, the precision isn't as big a deal as it is for your carbon fiber contact point accessories.
Not sure what your budget is exactly, but I went with this:
Bikehand Pro Mechanic Bicycle/Bike Repair Rack Stand
https://www.amazon.com/dp/B00D9B7OKQ/ref=cm_sw_r_cp_api_tDCNAbDC2DC6Z
It’s been solid, I’ve had it for over a year and have worked on all our bikes on the rack. It’s light but doesn’t feel flimsy. In the future I’d love to own something more heavy duty like a park tools one, but for now this is a gem.
Note: I’m not in any way affiliated with Bikehand, just a customer who would def vouch for the repair stand!
You have a loose crank arm there, and what looks like probably a loose bottom bracket too (the part at the bottom of the bike that the crank arms attach to, it spins).
It's very possible that that bottom bracket doesn't need replaced, and just needs taken apart, cleaned out re-lubed and tightened. Then you would clean up those rusty crank bolts with barkeeper's friend to make them shiny again, and put them back on pretty tight.
It depends how expensive the bike is. If it's a $300 or less bike I would bet relubing and tightening the bottom bracket and then just tightening the crank arms would put it back to working like new.
You'd need a bottom bracket wrench to remove the bottom bracket, and a crank puller. For both those tools that's gonna be about $23. These are cheaper ones but you will only use them once so it's fine.
Then you need some marine grease at Walmart for about $4, and some bar keepers friend (at Walmart or grocery store for about $3).
This is a total of about $30 to fix your bike on your own.
You could follow a video on removing the crank arms
And removing and relubing your bottom bracket.
You would take the bolts off your crank arms, pull both crank arms off with the crank puller, and then remove the bottom bracket. You'd clean it out real good with rubbing alcohol or brake cleaner, and then relube it with marine grease, and then tighten everything down. Then you would clean up those rusty crank arm bolts with bar keepers friend and an old tooth brush, and then tighten the crank arms back on. Bike would be good as new for $30. So long as you're patient, careful, and follow the videos. Look around online for things if your not sure.
If you have access to a torque wrench that would be great to follow torque specifications, but you can do without if you follow a video. I mean, your bike will be much safer afterwards than it is now. Fixing it well (instead of perfect) is better than not fixing it at all.
If you are not a d.i.y. fix-it kind of guy, you can go to a bike shop. Not sure how much they will charge. I wouldn't know, I rarely go unless I'm buying a bike. I only wrench at home 🔧
You require a tire lever good sir. This is especially true for the particularly narrow road tires (25-28ish) where it's basically a necessity.
Noticeable stretch. How are you computing this "noticeable" stretch? Are you using a chainwear tool?
Dusty conditions = dry lube. Dry as possible. I recommend Rock & Roll Extreme.
Even with cleaning and lubrication you will replace the chain. And yes, worn chains (those past 75%) will start to wear the cassette, and then the chainrings once the chain goes past 100%. I wouldn't be concerned with derailer cogs.
Buy this grease:
White lightning grease
Buy this general lubricant:
Triflow
Buy this multi-tool:
Alien II It includes all common allen and wrench sizes, a chain breaker, and spoke wrench.
Buy this socket set:
Ice tools 8 x 9 x 10
Get this adjustable wrench:
Wrench
Buy these tire levers:
Park tool levers
With all of that you should have more than enough to do basic maintenance with under $80 worth of tools.
As you get more skilled, you'll need some specialized tools for the bottom brackets, headsets, and cones on your wheels but those will vary by type/bike, and in time you will own multiple bikes so buy the tools when you when you need them.
Basic bicycle maintenance is done with basic tools: hex wrenches, flat and philips screwdrivers, adjustable wrenches.
Multitools are only useable on the go. This Topeak is decent and gets the job done. I always have one in my backpack. Plastic bits are gone, some rust here and there, but it still does what it should do. It's worked fine since I bought it in 2009. Seen tenth of thousands of singletrack mtb miles, rainstorms, river crossings - every outdoor mtb stuff was thrown at it.
I have the Topeak Alien II. This thing has almost everything. Fits nicely in a wedge pack.
https://smile.amazon.com/Park-Tool-BBT-22-Shimano-Cartridge/dp/B001A0AIAG/ref=sr_1_3?keywords=bbt-22&amp;qid=1565128333&amp;s=sporting-goods&amp;sr=1-3&amp;th=1&amp;psc=1
https://smile.amazon.com/Oumers-Bike-Crank-Extractor-Professional/dp/B0716NX7KC/ref=sr_1_8?keywords=bbt-22&amp;qid=1565128333&amp;s=sporting-goods&amp;sr=1-8
It lookes rusted in, consider a bolt and washers to hold the tool in so you can crank on it with a breaker bar. Might save your knuckles that way.
Also, one side may be a plastic cup.
It appears to be a cartridge bottom bracket (either square taper, Octalink or ISIS) from the image. The only way to tell which one, since there appears to be no information on the internet (I searched), is to pull the cranks and identify, then measure it.
You will need a crank puller and a cartridge BB tool.
If the taper on the cranks is screwed up, most likely so is the taper on your bottom bracket. You should replace that as well.
Is your BB a cartridge bracket? Square taper brackets are inexpensive on Amazon, and the Park BBT-22 is less than $20.
Alternately, you can put a piece of wood on the old crank arm and smack the shit out of it with a hammer to wedge it on tighter. Sometimes that works, sometimes it doesn't. Don't do it with the new set you bought though.
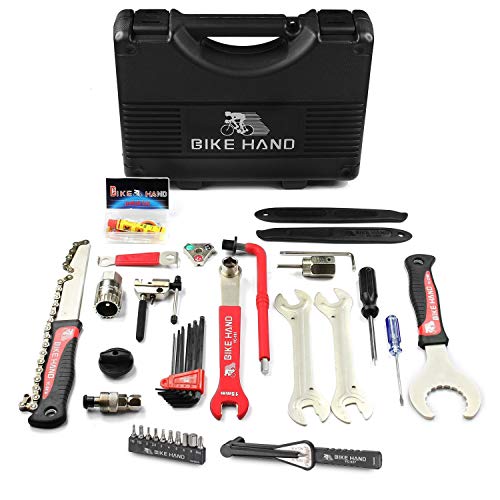
https://www.amazon.com/BIKEHAND-Bike-Bicycle-Repair-Tool/dp/B00CW911XW/ref=sr_1_1?ie=UTF8&amp;qid=1504546888&amp;sr=8-1&amp;keywords=bike+tool+set
This a pretty good tool set for all basic repairs. Use youtube to learn how to use the tools and make any basic repair.
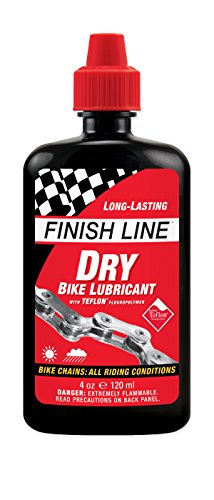
I had the same problem until someone told me to use the "dry" oil lubricant and not the "wet" oil lubricant. The "wet" stuff is very sticky (any dirt will stick to it) and I was told is better for mountain bikes that you need to keep working even when covered in mud and gunk. The "dry" stuff is less sticky, less viscous and better suited to road bikes. My chain and cassette is always shiny now.
I got this torque wrench, I like it as it takes out the guess work.
I would also request some carbon assembly paste, as sometimes the required torque isn't enough without it.
I bought an inexpensive tool kit (not from Park Tool) for $50 a few months ago when I needed a chain whip and a Shimano cassette lock ring tool, which would have cost nearly as much to buy separately, and the kit gave me a bunch of other tools, as well. Some of the tools I already had, some I haven't used, some tools are of mediocre quality (e.g., the pedal wrench and spoke nipple wrenches both work, but they're not well-designed for ergonomics or leverage), and there are some tools that I use frequently which weren't included (notably, a cable cutter). On the whole, though, it was a good purchase that quickly paid for itself in terms of savings over the cost of making individual purchases of all the tools I've used from it.
Park Tool makes tools that cost a bit more, and for that you get the peace of mind that it'll be reasonably well-designed and solidly manufactured. For many tools that you aren't sure you'll need, you can get greater value -- more kinds of maintenance and repair you can do off the bat for less outlay -- by buying them in a cheaper kit and supplementing them with tools it didn't include or better tools for those that you've found to be of inadequate construction or poor design.
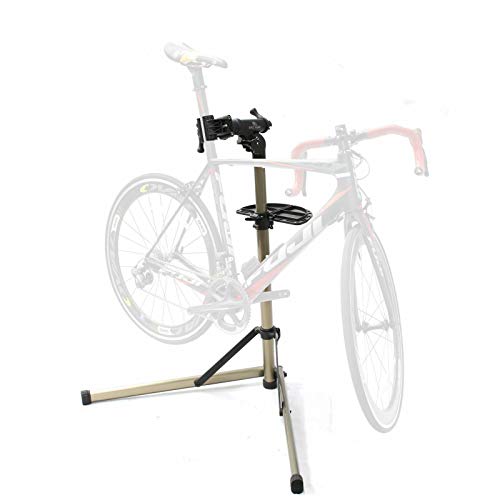
I did bike "maintenance" for years using a clamp nailed to my back porch railing. I say maintenance because it was mostly cursing, bruising myself trying to leverage my bike, drinking beer and spending far too long on the simplest tasks.
I got this stand and it is solid as a rock. Has made any project from simple adjustments to overhauls so much easier. Now it is happy tinkering and drinking beer.
Mine consists of moving the kitchen island cart and plopping down there. Hah!
Finally getting a collapsible repair stand.
Gotcha. True, I can see that price with the unit being marketed towards pro teams' mechanics.
This is the stand I use, and it's been great. https://www.amazon.com/gp/product/B00D9B7OKQ/ref=oh_aui_search_asin_title?ie=UTF8&psc=1
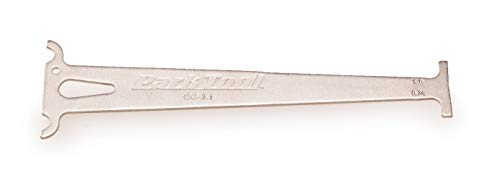
For example: https://www.amazon.com/Park-Tool-CC-3-2-Chain-Checker/dp/B000BR3LHQ/. A $10 chain measuring tool like this could save you much more money in drivetrain components in the future.
On the x-posted thread someone was asking about gear load out... so thought I'd put it here as well..
In the saddle under the seat:
In the snack bag on the top tube:
On my person:
As for clothes at work, I have a locker so stock up once a week on them.. and also keep toiletries at work. HTH!
Everyone knows you need Pedro's.
Agree, Pedro's are the best.
They even handle my Marathons easily.
I have this one and really like it. It lets me transfer all the goods from one bike to another easily.
What I have in mine:
I did something similar a few years back fixing up an old Schwinn Caliente. The first thing you want to do is clean up the frame thoroughly. Take as many parts off the bike as you're comfortable with. Definitely the wheels, chain, seat, rack, bottle cage. This will help you get into some of the nooks that are easy to overlook when cleaning. If you're going to replace cables and housing, that helps with this as well.
After you've stripped the frame down as far as you're comfortable and cleaned it thoroughly, you should scrape off as much of the rust as you can without further jacking up the paint job, and then resealing with a clear coat. When I did this, I found a black paint pen at an auto parts store that had a scraper for the rust. It worked reasonably well. Then, I recommend spraying Framesaver inside the frame to help slow down any additional rust formation.
If nothing else though, the most important stuff is to make sure your tires, tubes, chain, and brake pads are in good shape.
In terms of parts upgrades, the wheels look older, which means they're heavy. That would probably be the most expensive upgrade, but also the most beneficial. Watch out though, on older bikes, the front and rear forks may not be wide enough for most modern wheels. In that case you need to either look for specialty wheels designed to fit older bikes (I've never actually seen these, but I'm sure someone, somewhere makes them) or cold set the frame.
The seat also looks cheap, but I'd ride on it a bit first to see if it's comfortable. And think about if you like that handlebar setup. Those bars almost certainly aren't original to that bike, and you could switch to drop bars, bullhorns, etc. if you wanted to.
For your #2, from what I understand
Also, you can google your bike for it's specifications if you want to find the proper wrench size. They make This, which might be cheaper than taking it to a shop.
Here are some ideas
http://www.amazon.com/Surly-Nice-Rack-Black-Cromoly/dp/B001GSQULS
http://www.arkel-od.com/us/all-categories/touring-bike-bag/t-42-lite-touring-panniers.html#!/more-details
http://www.amazon.com/Brooks-Saddles-Special-Bicycle-Saddle/dp/B001AYMOAY/ref=sr_1_1?ie=UTF8&amp;qid=1367506572&amp;sr=8-1&amp;keywords=Brooks+B17+Special+Saddle
http://www.amazon.com/Topeak-Alien-26-Function-Bicycle-Tool/dp/B000FIE4AE/ref=sr_1_3?ie=UTF8&amp;qid=1367506625&amp;sr=8-3&amp;keywords=topeak+multitool
http://www.amazon.com/Topeak-Road-Morph-Bike-Gauge/dp/B000FI6YOS/ref=pd_sim_sg_10
http://www.amazon.com/Crane-Suzu-Lever-Strike-Brass/dp/B001MS2KHA/ref=pd_sim_sg_90
http://www.amazon.com/Velo-Orange-Hammered-Alloy-Fender/dp/B004JKK1V0/ref=sr_1_1?ie=UTF8&amp;qid=1367506912&amp;sr=8-1&amp;keywords=velo+orange+fenders+hammered
http://www.amazon.com/Ergon-Series-Bicycle-Handle-Standard/dp/B0015QWRM2/ref=sr_1_1?s=sporting-goods&amp;ie=UTF8&amp;qid=1367506936&amp;sr=1-1&amp;keywords=ergo+grips
http://www.amazon.com/Spenco-Classic-Glove-Beige-Crochet/dp/B0025UEWR0/ref=sr_1_1?ie=UTF8&amp;qid=1367507174&amp;sr=8-1&amp;keywords=spenco+gloves
http://www.amazon.com/Keen-Commuter-Cycling-Shadow-Gargoyle/dp/B003Z4KPFI/ref=sr_1_cc_1?s=aps&amp;ie=UTF8&amp;qid=1367507250&amp;sr=1-1-catcorr&amp;keywords=keen+bike
http://www.amazon.com/Gold-Bond-Medicated-10-Ounce-Containers/dp/B001G7QSS4/ref=sr_1_cc_2?s=aps&amp;ie=UTF8&amp;qid=1367507286&amp;sr=1-2-catcorr&amp;keywords=gold+bond
Looks like a very practical bike, though if that saddle height is right the bike may be a bit large. If your legs are more than a little bent at the bottom of the stroke it's hard on the knees and a lot of extra effort. If you have it low to keep your feet on the ground starting/stopping, try standing in front of the saddle when you're stopped, only sitting down once you're going.
Those flat fenders are definitely better than nothing but not actually good; spray from the wheel gets thrown sideways at you. If you do plan all-weather riding, get some good, long fenders, like SKS Longboards. The front fender needs to be lower than 9 o'clock to keep dirty spray off your feet and chaingear.
A lot of U-locks come with fixtures for attaching them to the frame - tidy and convenient.
Since this is your first bike, any time you wonder about adjusting or fixing something, check out http://sheldonbrown.com. It's a treasure trove for maintenance and repair, starting with chain lubing and fixing flats. It's very satisfying and quite easy to become self-sufficient to a some level, leaving visiting the bike shop for more major work.
First things I'd consider getting, in order:
Either get a puncture repair kit with tire levers, or a multi-tool including tire levers.
When you understand your bike and can keep it running smoothly, you love it ever more.
No. WD-40 is a water displacer, not a lubricant. It will actually strip away the oil from your bike parts and leave them rubbing metal-on-metal. Get some real bike lube like T-9.
Former shop mechanic here.
Chainrings are a really difficult part to stock. There's just far too many options out there to try and keep them all on hand.
Even for something like a 32t chainring, there's a large variety of types you'd need on hand. A 32t chainring is available in a handful of different BCDs and bolt patterns, different chain widths for different speeds, ramped and pinned, non-ramped and pinned, middle ring, outer ring, single speed, and probably some other varieties I'm forgetting.
So, your shop would need to stock like 10-20 different varieties of 32t rings just to make sure you're covered. Chainrings come in tooth counts from the mid 20s to the mid 50s. So to make sure that they've got everyone covered, your LBS would have to stock something like 300-600 different chainrings. Which would be insane.
Even to just carry all the super basic, most common ones, they would still have to have at least 50 different rings on hand, assuming only one of each.
That being said, the shop that did the work should have noticed your chainring wear on the first time, or at the very least on the second visit. That sort of thing is generally pretty apparent.
If you don't already have one, invest in a chain checker. Replacing your chain as soon as it starts to wear will extend the life of your cassette and chainring dramatically. A worn chain will eat through those parts real quick if you're not careful.
Working on a bike with a multitool like this one is hard enough, I can't imagine with a knife. Sometimes you have to push or twist with quite a bit of torque and I am not sure a knife would take that kind of stress. It is much better to have regular T wrenches like this but they lack the portability
Besides, I only see 10mm hex on the wenger, you need the 8mm and the torx if you need to hit the brakes.
My anecdotal evidence, I have the crankbrothers specifically for bike repairs and this incredibly awesome victorinox tool for repairs on the go.
You'll probably need:
Park Tools is basically the Canon/Nikon of bike tools; always quality parts and they won't break down on you.
Your freewheel is broken, you need a new one like: https://www.amazon.com/Shimano-Tourney-7Spd-14-28T-Freewheel/dp/B003B8JYPU/
If you want to do the repair yourself you're going to also need a freewheel tool like: https://www.amazon.com/Park-Tool-Freewheel-Remover-Freewheels/dp/B001B6RGXG
And some grease when you thread the new one onto the wheel.
Here's a good guide on how to do that: https://www.parktool.com/blog/repair-help/freewheel-removal-and-installation
I've used this and could not tell the difference to CRK grease. No experience with anything Nano though.
Here's a video of me cleaning and putting the whole thing back together. And, yes, it still works.
The two plastic body pieces were soaked for 24 hours before scrubbing it down. The lube used in the video for the plastic contact points as well as the trackball rollers is Finish Line Extreme Fluoro.
A big thanks to my friend /u/jfgorski for the Alphagrip iGrip! Read his opinion on the device right here, he's been using these things for years and has much more insight than I could ever provide. Also, thanks to /u/ripster55 for letting me post this here.
https://www.amazon.com/Bikehand-Mechanic-Bicycle-Repair-Stand/dp/B00D9B7OKQ
Works well with my road bike and my MTB.
I have used 2 stands. One is a cheap $50 amazon stand the other is a Park Tool stand I found on craigslist. The Cheap stand work, it is taller but less stable. I prefer grabbing the seat post than grabbing the top tube so the cheap stand will rotate to balance the bike. I cannot get the chain horizontal to run though a chain cleaner. It will always settle to an angle. If it doesnt bother you than a cheap stand works. bike hand has a stand that was $90 now $100 that the head is teethed to prevent rotation. I was going to get that one before I found the Park Tool Stand on Craigslist.
Any stand will be usable but some might be less stable than others or give you a headache. There is a point you pay for what you get before it turns into you pay for the name.
I got this one and its worked well for general maintenance, repair, and bike building.
I only have two legs and I rarely fall over.
Seriously though, unless you're being careless they are plenty sturdy. I'd recommend this one:
https://www.amazon.com/gp/aw/d/B00D9B7OKQ/ref=ya_aw_oh_bia_dp?ie=UTF8&amp;psc=1
And I've heard good things about the Aldi stand if you want to go super cheap.
You should definitely get a torque wrench. I've been happy with the Nashbar branded one.
It's not an awful idea. I use a Teflon lube that I think works better. But lithium grease is better than nothing.
Mmm... you brush some krytox on those switch parts, then you rub some extreme fluoro on those stabilizers, you naughty typist.
Fluronated grease like this - http://www.amazon.com/gp/aw/d/B002L5UL92?cache=97a37de83a21196249043fbbf214fbd1&amp;pi=AC_SX110_SY165_QL70&amp;qid=1410415440&amp;sr=8-8#ref=mp_s_a_1_8
If you have hex nuts on your bike, that one might be reasonable.
But it doesn't have a chainbreaker or tire levers. My favorite tool for versatility is: https://www.amazon.com/Topeak-60102538-Hexus-II-Multi-tool/dp/B0037N32VG
There's a $18 on the right sidebar .
It's not the best made, but I think you want tire levers in the long run.
Get a bike repair multi tool (like this, even cheap stuff like this should be fine) and a wrench to remove your wheels (if needed). These multi tools often have a chaintool included. Take a patch kit.
Check your bike before you go, apply some chain oil (NOT WD40) and you should be fine. I went over 5000km before I had my first flat tire and nothing else ever happened so far. Yes, I think I might be stupidly lucky, but for a few days you wont need to bring everything. If the worst happens you can hitchhike to the next train station or bikeshop.
I have one of these little wedge bags that goes under my seat, like this one:
http://www.rei.com/product/722362/topeak-micro-wedge-seat-pack
In it, I keep one of these little tools: www.amazon.com/gp/product/B0037N32VG
It has a lot of things you might need for a quick repair, including a chain-breaker.
I also keep a 3-set of tire levers and the same little patches that mnorri recommends (I think), like these: http://www.rei.com/product/742967/slime-skabs-pre-glued-patch-kit
I also have a couple zipties because you never know when you might need one.
My commute is only 3 miles, so I don't carry a tube, but I probably should consider it for longer rides.
And I had one of these on my last bike. I never had to use it, but it was small and fitted on the back side of my seat tube, just in front of the tire, so it didn't get in the way of anything: http://www.amazon.com/Topeak-Update-Survival-Holding-Clamp/dp/B004ZDL2O6
For my general riding, I actually have a trunk bag on my rack and keep things like a first aid kit, eyeglass case and cleaner, sun block, spare batteries (for my lights), and now that the weather's turning, a rain jacket, and such. But the trunk bag slides of easily so I can take it in stores with me. The little wedge bag just stays on my bike.
Edit: I also carry a small pump, mounted on my downtube: http://www.rei.com/product/784569/topeak-peak-master-blaster-dx-ii-mini-pump
Clearly I'm not one of those riders trying to have the lightest ride possible.
Venzo Bicycle Bike 1/4 Inch Driver - Torque Wrench Allen Key Tools Socket Set Kit 2-24Nm - Small Adjustable
I have this one and it's good so far. I think the nashbat wrench is probably decent quality too
VENZO Bicycle Bike Torque Wrench Allen Key Tool Socket Set Kit https://www.amazon.com/dp/B00811WQT8/ref=cm_sw_r_cp_api_hD4gAb17GQC54
I transitioned into working on my bikes almost entirely by myself (Wheel building/suspension service/bearings excluded) and this is the exact path I went down as well. Here is everything I bought from Amazon:
The same $50 tool kit
Torque wrench
Cable/housing/wire cutter
Chain/quick link pliers
Wet/Dry Chain lubes
Park Tool grease
Degreaser
Blue Loctite
Carbon grip paste
And some additional small things like cables, cable end caps, ferrules, zip ties, etc. A set of needle nose pliers can be handy to help push/pull stubborn cables/housings as well.
Also, to make working on the bike 10x easier, I recommend getting a stand. I use this one because I am space constrained and it folds up nice and small, but there are probably better ones out there.
It seems like a lot of $$ to lay out at first, but it pays for itself pretty quickly compared to taking the bike to a shop every time you need to do something to it. Basically everything you need to do can be found on YouTube as well.
I have this one http://www.amazon.com/VENZO-Bicycle-Torque-Wrench-Socket/dp/B00811WQT8
This looks like it could fit in my shirt pocket http://www.amazon.com/CDI-Torque-Products-TorqControl-Screwdriver/dp/B00IQBIHA0
You're not building a rocket. The torque specs on cockpit components are not about achieving a specific clamping force, they're about not crushing the CF tubes. Extreme accuracy is really not important -- the specs have tons of margin. I really like something like the Ritchey Torque Key (https://www.amazon.com/Ritchey-TorqKey-5Nm-bits-T-15/dp/B009F93S9C) for this. No settings, no readings, almost impossible to screw up, accurate enough for what you're trying to do.
For things where torque specs are actually related to mechanical function (cassette lock ring, external BB cups, SRAM GXP cranks, etc.) any inexpensive 1/2" beam-type wrench will be good enough.
What tools do you have? Those are a one time investment, but can get pricey. I started with this kit and built from there: https://www.amazon.com/BIKEHAND-Bike-Bicycle-Repair-Tool/dp/B00CW911XW/ref=sr_1_5?ie=UTF8&amp;qid=1493144648&amp;sr=8-5&amp;keywords=bike+tool+kit
I'd definitely clean and repack the hubs and headset, replace the chain and all cables, then see where a good clean and lube gets you. You can get chains and cable kits on Amazon for pretty cheap as well.
One of the best investments I made was a full set of tools, and a how-to book. YouTube is useful, but the book works well for me.
I just ordered http://www.amazon.com/dp/B00D9B7OKQ/ref=pe_385040_30332200_pe_309540_26725410_item
due to the good reviews. Will let you know how it goes.
i borrowed my uncle's Bikehand stand this weekend and I think I need to buy my own now. it's amazing.
Bikehand Bike Repair Stand - Home Portable Bicycle Mechanics Workstand - for Mountain Bikes and Road Bikes Maintenance https://www.amazon.com/dp/B00D9B7OKQ/ref=cm_sw_r_cp_api_i_08PBDbXP44YEG
I made one of the pipe-clamp style ones a few years back. Not sure what plans I used, but this guy's youtube video shows more or less how I did it.
&#x200B;
It was....okay. i mean, it worked. But to be honest, for the ~$30-40 I spent on the pipe clamp, pipe, fittings, etc and the time I put into it, I'd have been better off buying a cheap Amazon/ebay stand for $50-100. Which is what I eventually bought. But, that said, the DIY one did work.
Bikehand Pro Mechanic Bicycle Repair Rack Stand https://www.amazon.com/dp/B00D9B7OKQ/ref=cm_sw_r_cp_apip_nNB8kaNDX5Ewy
I bought this one from Amazon.
Venzo Pro Mechanic Bicycle/Bike Repair Rack Stand
Wanted something with a small footprint when setup. So far it has been working great for me but most of the time I've been clamping it on the top tube of my hard tail which is also the balance point. So haven't tested it out clamping other things, like the the seat post.
that looks like the exact same stand I bought from amazon, rebranded as bikehand. It came with the tool tray. Works pretty well, and folds up easy.
https://www.amazon.com/Bikehand-Mechanic-Bicycle-Repair-Stand/dp/B00D9B7OKQ/ref=sr_1_4?crid=3AHQXDOA1095F&dchild=1&keywords=bikehand+bike+repair+stand&qid=1574355588&s=sporting-goods&sprefix=bikehand%2Csporting%2C143&sr=1-4
The stand with that pump is basically a glorified kickstand. It's meant primarily to hold your bike while you pump the tires ... I wouldn't say it's likely to be holding the bike steady enough (or high enough) for maintenance work or making cleaning easier. I think this is a LOT of money for what's on offer here.
I recently purchased this proper work stand for $89.00. It's very sturdy and appears quite well made. It holds the bike securely, has a tray for your tools and nuts/bolts etc... It's height and angle adjustable, folds up compactly to tuck away in a corner when you're not using it.
That leaves you $30 in your budget to find a decent track pump with a pressure gauge ... shouldn't be much of a challenge to find one in that price range.
Just Riding Along.
chain checker will check for pin wear (sometimes called chain stretch. It's one dynamic of wear that can be measure. Lateral slop can't be measured as it were but can affect shifting and performance.
You can spin chain rings and cogs to see if they're straight.
Edit: Take two with some input thanks to u/LukeWarmCage for teaching me some Reddit knowledge. We all learning lessons today...
My same post from before:
I was gonna suggest something similar. I've always been mechanically inclined, taking apart things like RC cars as a kid to see how they worked. But I got into road biking with zero experience working on bikes. I now have 6 bikes and do 90% of the maintenance on all of them myself. I learned most things from books and Youtube, when I would get stuck I'd take a bike to my LBS and make sure to ask them what I was doing wrong. Usually they are happy to offer advice and direct me toward a tool or technique I was missing. The only thing now that I'm not comfortable working on myself still are things involving bearings, especially if they are press fit. I don't have the tools to work on them and don't want to damage something trying to go without. I've been slowly converting my bikes from hubs with open bearings to cartridge bearings because I hate repacking hubs, and cartridge bearings last long enough that I don't mind taking a wheel to a shop for new bearings when needed.
u/dinkinflickin (great name BTW) While by now I have a pretty sizable selection of bike tools and a stand, you can do a lot of the stuff your bike needs regularly with really basic tools: a set of Allen wrenches, screwdrivers and maybe an adjustable wrench. Do invest a couple bucks in those plastic tire levers for fixing flats and get a chain gauge, which is a helpful little tool that tells you when you should think about replacing your bike chain. A worn out bike chain will still work fine for a while, but it is increasing the wear on your gears and they are more expensive to replace.
Things like your shifters and brakes are most likely to need occasional fine tuning. These are also both things that many new cyclists can mess up because they require some feel to get right. I've seen a lot of cyclists who notice their shifters aren't shifting smoothly and they adjust the wrong thing and make the problem worse. Here's GCN's video on indexing a rear shifter. "Indexing" is the term for getting the shifter to be properly lined up with the rear gears. This process is not easy as it takes some trial and error to learn at first, having someone show you how it's done is really helpful. Lastly since your bike is new you are unlikely to have to replace any components for a while, but as cables break in you may need to fine tune shifters. Chains, brake pads, and tires all have a finite lifespan and one of them is likely to be the first thing you replace in the first year or two.
The best thing you can do now IMO is leaning to clean and properly lubricated your bike. The grease and oils on your bike collect dirt and other contaminants and eventually turn into a gritty paste that starts doing more harm than good to the components. Keeping the bike clean and lubricated will reduce wear and protect your bike from corrosion. GCN also has a bunch of videos about cleaning and oiling bikes. Too much oil can be just as bad as too little because it picks up dirt. A chain cleaner like this one makes cleaning your chain much easier as you don't have to remove it from the bike.
Not sure what you mean by strange bottom bracket - it looks pretty standard to me. You need something like this to remove the lockring and a large spanner should be able to remove the actual shell.
As for the cranks personally I would just take an angle grinder and cut the axle near the cup, OR after removing the bolts just take it for a nice ride up a steep hill and with caution knowing that the crank arm will fall out. If it doesn't fall out after your ride go again or literally give the crankarm a good kick with the frame on the ground (has worked for me before).
My first fixed gear! Yeah all you need is a cog and a lockring, make sure the measurements are the same! buy a lockring wrench too and you can do it yourself.
Compatible Cog, Lockring, Wrench(spanner)
Few things. I think that most of the people here pointed out the biggies - rules, regulations, legal necessity stuff, maps, etc. I'm still newish to the city and just got a bike a few months ago. What really really helped me was joining some cycling groups. People are typically very friendly and they know their bike stuff and can help you if you have a flat, etc.
I first joined bicycling groups on www.meetup.com. The only one I've ever rode with was Social Cycling NYC though, really great folks. I also joined the 5 Borough Bike Club (5BBC); I've only been on one ride so far but, again, great people.
There are lots of rides to participate in too. The first Friday of every month, Time's up does a Moonlight Central Park ride. Really cool, I did the last one. There is also one of these for Prospect Park and I hear that one is nice too. Time's up also does a ride called Critical Mass, but I haven't personally went, just heard about it. These are free rides. Some (all? I don't know) of the 5BBC rides are free but there is a yearly membership ($20 and if you join in October, I think, you essentially are buying the 2013 membership and have the rest of 2012 free). However, I'm not sure how much free time you'll have to gallivant around!
Joining an organization like 5BBC or Transportation Alternatives also gets you discounts at bike shops as an FYI. Each organization has a list of participating shops.
Anytime I've ridden in Brooklyn, I've really enjoyed it. There are many more bike lanes than up my way in Queens. Take advantage of that and explore! A ride to Rockaway beach is nice too.
Some gear you might be interested in that I thought was helpful:
26 in one multi tool
On frame pump
Also, I don't know what sort of pedals you have or prefer. However IF you decide to get clips or clipless pedals, some of the bike folks I've met told me a few things. (I have clipless pedals btw) If you've never had clips/clipless pedals, get a pedal that has the the cleat thing on one side and a pedal platform on the other. This way, you don't have to be clipped in if you don't want to be.
I got these.
Also, for the shoes that go with said pedal: I was told for predominantly city riding that you can wear out the cleat on the bottom of the shoe faster if you have the treadless road bike shoe. Also, if you do any walking on hard surfaces with this shoe I guess it wears out quicker. If you buy a mountain bike shoe it has a perimeter of tread that goes around the sole. Keeps the cleat more protected from grinding on the pavement. It will still grind on certain types of ground or flooring though.
Since I already have Amazon open:
This Versus this
I have Pearl Izumi shoes and I really like them.
To narrow down your search: I purchased a Camelbak MULE last April along with a Topeak Alien II multitool. Both of these items were fantastic purchases, and I'm so glad I bought them.
If you're interested in gloves, I bought a pair of Fox Inclines a while back and am happy with that purchase as well.
Congratulations on your new bike! You are going to enjoy it.
Looks like a lot of stuff has been covered already.
As far as pedals, I ride with these Faceoff 13's and they've treated me well. If you can afford a decent pair of riding shoes, you can't really go wrong with 5.10's. If you decide to go clipless later, you can get 5.10's that you can ride clipless or on flats (see the Hellcat's). I recommend a good shoe with a sturdy sole. I rode with Vans for a while and dabbed my foot to catch my balance and ended up dabbing it right into a rock. The Vans crumpled and my toe took the brunt of the force. Not fun. I couldn't walk very well for a while. Good riding socks are awesome, too just to keep your feet from getting really sweaty.
Someone mentioned the Camelbak MULE. That's what I ride with and highly recommend it.
As for a helmet, I've been riding with a Fox Flux this season and I've been really impressed with it. I wear a skullcap under it to help keep my head cool and keep sweat from dripping into my face. You'll want something well ventilated over the BMX helmet for sure.
I do highly recommend a good pair of riding shorts with a comfortable chamois. I have some shorts from Fox, Dakine and Pearl Izumi and the Fox shorts have the best chamois and fit most comfortably.
You'll definitely want to bring an extra tube or two, tire levers and a hand pump or CO2. As far as tools, I take this multi-tool. It's a bit heavy, but it's treated me well. I would also throw some zip ties in your bag as well. They're light, but when you need them, they're worth their weight in gold.
I put together 80% of my bike with this: [1] http://www.amazon.com/Topeak-Alien-26-Function-Bicycle-Tool/dp/B000FIE4AE
A single speed will be great for getting around Madison and will require a minimum of maintenance. The two big things are keeping your tires inflated and keeping your chain lubricated and clean. If you have a floor pump for your tires great, otherwise there are tons of places that offer free air for bikes (bike shops, etc.). A small drop of this or similar on each chain link once a week followed by a thorough wipe down will keep your drive train happy. Do this more often if you're frequently riding in the rain or dusty/muddy/dirty conditions.
Fenders. You probably want them if you're going to be relying on your bike to commute and don't want to arrive at your destination with a mud stain going up your back. Plus they'll keep your bike cleaner.
If it's within your budget, I recommend getting lights that are USB rechargeable. I have a NiteRider Solas 2 tail light which I think I paid $45 for at my local bike store, but you can get it on Amazon for $34. It's a great light, you never have to worry about buying batteries, and mother earth will love you. I generally just bring mine into work with me and plug them into my computer during the work day so they're always fully charged and at peak brightness.
Other than that, any bike shop will have a paper fold-out map of all the bike lanes and routes around Madison. Google Maps can be useful too, though I still haven't figure out how to get the new version to just show all bike routes without putting in start/end addresses.
Make it go completely flat first to make it easy and pry a section of the tire away then just squirt sealant in. Get yourself a couple of these to make it easy.
Decided to do something a little different. This is the first video of this type I've made.
In the order they appear in in the video:
Bag
Writing
Tech
Bike Stuff
I just wanted to remind you to position the saddle parallel to the ground, and to Google some basic bike fitting tips (correct saddle height, and positioning). It's simple to do and will make biking even more comfortable.
As for the tube, you're going to need some tire levers, try prying off the tire & tube from the opposite side of the valve. once you have the new tube in the tire, inflate it a little and attach the tire back to the wheel starting with the valve. work the tire gently onto the wheel, and use the levers to pry / push it all the way on. (be careful when using tire levers, they may pinch the tube against the wheel and cause a puncture in a new tube.) I'm glad you're getting back into cycling, have fun!
Good call. I typically carry some of these...
https://www.amazon.com/gp/product/B000IZGFCE/ref=oh_aui_detailpage_o09_s00?ie=UTF8&amp;psc=1
I also carry a patch kit...
https://www.amazon.com/gp/product/B0016HSA4O/ref=oh_aui_detailpage_o07_s01?ie=UTF8&amp;psc=1
The bike shop should have told you the chain was worn when they replaced the cassette (assuming that it was worn at the time).
It's normal to replace the chain whenever you replace a cassette, and if you want to re-use the chain you need to measure its wear to be certain it's OK to keep the old chain.
Are you sure they never asked you if you wanted to replace the chain the first time?
It seems unlikely that the chain and the cogs would wear out in that time period if they were both good at the start, but an old badly stretched chain could certainly cause a lot of damage to a newly installed cassette.
Steel is more likely to die from rust/corrosion. Most people don't properly apply 'frame saver' to the inside of their steel frames.
http://www.amazon.com/Weigles-Bicycle-Frame-Saver-Inhibitor/dp/B0012GO58Y
Also, a European bottom bracket in a steel frame should be serviced annually to prevent seizing.
I'm in Chicago and I treat my steel frame with JP Weigle's FrameSaver. It's way better than WD40. Just Google it.
Other than that, I tend to just wipe down my bike as often as possible and I never leave it outdoors overnight. I tend to not ride as often in the winter, honestly. It gets pretty damn cold here.
That bike's closer to 20 years old, maybe more. Used in wet, salty conditions, a steel frame can really suffer. This one does not look bad. Steel MTBs are tough.
If I were you, I'd pull the seatpost and bottom bracket out of the bike and spray some FrameSaver into the exposed tubes.
It's a heavy, sticky oil sprayed inside steel frames to prevent rust. Something like this.
Multitool, new tube, pump, tyre levers (three metal oneslike these)) is all you really need to cover all distances. If you get a multitool with a chain breaker you can fix the one issue that can happen that would leave you stranded. Pack a few zip ties for good measure and you are good to go.
A waterbottle is essential on longer routes, and panniers should be a given for stuff you need like a change of clothes and your lunch. A backpack gets very annoying, especially in the summer.
I also use one of these metal clothes pins with a strong spring to keep my right pants leg out of the chain, works wonderfully.
If you live in the states I would treat every road the same. Keep oncoming traffic to your left, and pass slower traffic, moving the same direction as you, on their left. <- edited.
Here is a video that shows you the general idea about adjusting a front derailleur. I would suggest searching youtube to see if you can find a video that addresses your exact derailleur.
Give your chain, chain rings, and cogs a look over. If they appear to have a lot of sand/grit in them brush it off. I would then run the chain thru a cloth with some degreaser on it. Then reapply some chain lube like this stuff as shown in this video.
> I keep seeing people post about how they'll never ride after a rain because of their brakes. Why not?
I am at a loss for this one. Riding in the rain is wonderful.
I would highly recommend spare inner tubes or a patch kit, a tire pump and bike tire levers. I have been unfortunate enough to have both my tires pop while on a long ride. If you plan to go on longer rides get a cage or two and water bottles.
I would inflate the tires to 65-70 for a firmer ride.
How is the chain slipping? Is is dropping down or hopping up a rear gear, or is it slipping forward across teeth of the same gear?
Just based on your language, and how I perceive your knowledge of how everything is working, you might be best served by visiting a bike shop. Please don't take that as a knock against you, but if you want to take it in, you will be well served.
That being said, where's the fun in that? Let's do this ourselves!
If the chain is slipping forward, it may be stretched. Check out Sheldon Brown's article on chains. You can measure the chain stretch using a ruler, since every full link (that's two half-links, the individual swiveling parts) is 1" pin-to-pin. Measure twelve inches and the whole 12" should be pin-to-pin on a brand new chain. If your chain is 1/16" past 12" measuring twelve full lengths, replace it. If it gets more gone, it will start wearing down the teeth of your rear gears, and you'll need a new cassette or freewheel, depending on your rear wheel. That will cause slipping and skipping for sure, even with a brand new chain!
If you replace the chain, you will need to get a cheap chain breaker. There are many kinds at different price points, but I can vouch for that one as I carry it with me.
For a new chain, you have to get one that is the right width. This generally depends on the number of rear "speeds" you have. Up to 8 speeds in the rear is a standard chain. 9, 10, and 11 speeds in the rear require a chain that is thinner to fit in between the close spacing between gears.
You can also get a master link and replace a link in your chain with it - you can then remove the chain and reinstall it (for cleaning and work) without using a breaker. That's just a random one I found on amazon, which happens to be for 10-speed chains.
Measure your chain, check your gears for wear. If you have to replace your chain you just need a chain breaker and new parts. If you have to replace the rear gears as well you need a new set of gears and the appropriate freewheel/cassette removal tool. There a few common types of freewheel tools and just one cassette removal tool. They lock in to splines and allow you to use a standard wrench or socket to remove the tool.
EDIT:
Here's a video about removing a cassette
Here's a video about removing a freewheel
Here's a video about measuring a chain
You may already know this, but thought I would mention it anyway, since you're here asking for advice. If you're upgrading from a square tapered BB and don't already have this tool, don't forget to pick-up a crank puller.
This is a tough bike. I have one that's about forty years old. It doesn't take much care.
Besides tires and tubes, you also need new brake pads. Cheap but very important.
In order of increasing cost/benefit:
Clean the drive train (all the gears and the chain) with rags and a degreaser. Old toothbrushes and dish brushes can help with this. You want to remove all the black, caked grease and clean the components to the bare metal. Once they are clean, let them dry and lubricate them.
Have a LBS replace the brake and shifter cables and housings. You probably have the original ones. Replacing these greatly reduces the risk of snapping a cable or two on the road, something that can render the bike unrideable. It will also make shifting and braking much smoother.
If your LBS tells you your chain is worn out, they are probably right. This is also a cheap fix. It will make shifting smoother and protect your drive train from excessive wear. It also lowers the risk of a broken chain on the road, which again makes the bike unrideable.
Enjoy!
Hi I've been using a chain cleaner I got off amazon with some citrus degreaser and then apply Finish Line dry/wet lube.
Would really like to get one of those nice bike stands like park tool but don't have the money, I just bought one of those bike hooks at the dollar store that goes on the wall of my shed.
Nah, it was quite the opposite. I previously used some of the spray on lube, Tri-Flow, too much of it, and it attracted a bunch of grit that required a good degreasing to get rid of. I found it difficult to put the appropriate amount of lube on the chain with the aerosol spray can. After this eventful ride I used Brake Parts Cleaner to degrease the chain and components and the soapy water and a host to get the excess out. Once it was clean and dry I used Finish Line bike lube as directed and it's much better now.
What is your preferred chain lube? I’ve always used Finish Line Dry Lube but lately I’m finding the muck and grease build-up frustrating to maintain on two bikes.
I ride mostly in dry weather and always on sealed roads although I will come across some road dust from time to time.
Should I change lube or switch to a wax coated chain?
That's interesting, I'm riding an internal hub bike now, similar 22km commute in city.
With my non-internally geared bikes, I'm getting maybe 3500km per chain, but single speed I was getting closer to 11,000km per chain, probably helped by the always-straight chain-line and never mashing gears. Hoping with the reduced tension in the chain on my new internal hub I could push chain life further.
Get a chain checker tool, they're great for figuring out when you need to get a new chain without much fuss.
With achain checker if the thing on the end doesn't slide into the chain, your chain is still good enough.
I would do it in the spring, if you can get away with it but it is a risk. Winter weather is tough on the transmission.
you run the risk of breaking your chain if you don't get it changed. Happened to me on my commute home and walking the bike through the snow was awful. How long is your commute? If you don't have one already, I suggest buying a chain checker. They are $10 or so and will tell you how much wear you have on the chain. I would not go through winter if you are at 50% or less.
https://www.amazon.com/Park-Tool-CC-3-2-Chain-Checker/dp/B000BR3LHQ/ref=asc_df_B000BR3LHQ/?tag=hyprod-20&amp;linkCode=df0&amp;hvadid=312111916046&amp;hvpos=1o2&amp;hvnetw=g&amp;hvrand=14744392110579954068&amp;hvpone=&amp;hvptwo=&amp;hvqmt=&amp;hvdev=m&amp;hvdvcmdl=&amp;hvlocint=&amp;hvlocphy=1016367&amp;hvtargid=pla-493478287143&amp;psc=1
Learn to take care of your bike and be aware that stuff will wear out much faster than you're used to. Lube your chain with actual chain lube regularly (and don't forget to wipe off the excess - too much lube is almost worse than none at all). Pay attention to chain wear (I'd suggest getting an inexpensive chain checker and learning how to use it properly) and replace the chain when it's worn to avoid wearing out the rest of your drivetrain prematurely. Pay attention to tire wear and know how to change a flat. Don't forget your brake pads either. Be prepared to replace cables and housing at least once a year - more if you're riding in nasty conditions regularly.
One of the biggest mistakes that I see messengers (new ones, at least) make is not taking care of their bike. They do no maintenance until something stops working entirely, then come into the shop and are shocked at how expensive the repairs will be because they haven't been maintaining things.
FYI you can get a chain wear indicator to check you chain. this takes the guess work out of when you would need to replace your chain. The tool only measures for wear on the chain so rear cog replacement can still takes some guessing.
link for chain wear indicator.
https://www.amazon.com/Park-Tool-CC-3-2-Chain-Indica/dp/B000BR3LHQ/ref=sr_1_2?ie=UTF8&amp;qid=1499892870&amp;sr=8-2&amp;keywords=chain+checker
link explaining chain wear
https://www.sheldonbrown.com/chain-wear.html
http://www.amazon.com/Park-Tool-CC-3-2-Chain-Indica/dp/B000BR3LHQ/ref=sr_1_4?ie=UTF8&amp;qid=1377578171&amp;sr=8-4&amp;keywords=chain+checker+tool
When you pick up your new chain, also pick up a chain checker. Replace when the chain gets to .75 slack... http://amzn.com/B000BR3LHQ
Please note that the links provided are just quick-n-dirty suggestions. Some of the Park Tool sets would cover a lot of these things, but when building from frameset up... you may want to seek out a shop with the odd tools you might only use once or twice in your life.
----
Aside from the standard tools, like box wrenches, cone wrenches, Allen wrenches (aka hex keys), flathead and Phillips head drivers, Grease... you'll need tools for:
In addition, you may need:
----
I'm sure you could "get away" with less, or perhaps the Park Tool Advanced Kit but there's a reason for these tools. Good luck.
Unsure what exactly your post is asking. Please clarify?
You should check your threads first before considering getting a new rear wheel.
If the threads are alright, go ahead and tighten everything down (as recommended by bikesdirect). First the rotafix method to tighten down the cog. Then use a lockring tool to tighten down the lockring.
If the threads are trashed, you can easily find a wheel that is less than $150 (assuming you mean this since >150 means greater than $150). There are some typical "favorites" on FGB like velocity deep v or mavics.
I'll be purchasing a bike down the road and don't have any tools for it yet. Would this or something like this multi tool be better for general bike maintenance and on the go?
For me, this: https://www.amazon.com/Park-Tool-PH-1-2-P-Handled-Wrench/dp/B003FPONCI/ref=sr_1_2?ie=UTF8&qid=1541802830&sr=8-2&keywords=park+tool+allen+key&dpID=419-T8tUMxL&preST=_SY300_QL70_&dpSrc=srch
&#x200B;
I was too stingy to buy good allen keys for a very long time because I had a ton of really cheap ones, and the cheap ones did work. But every time I use the ones above, I think: "These were so worth it". I say that to myself every single time.
&#x200B;
Not a tool, but since someone else mentioned a tire: 200 miles ago I put on some Maxis Hookworms - best commuting tires I ever had. Wow. I had Vee Chinane and then Vee Speedster before - I got flats every other week, none on the hookworms and the hookworms are much more stable on less grippy surfaces either. Every time I reach a place I think: Wow, those are the best tires I ever had.
&#x200B;
Other tools I use constantly:
- my bike repair stand, i use this one: https://www.amazon.com/Bikehand-Mechanic-Bicycle-Repair-Stand/dp/B00D9B7OKQ/ref=sr_1_1_sspa?ie=UTF8&qid=1541802939&sr=8-1-spons&keywords=bikehand+bike+stand&psc=1
- my chain link tool: https://www.amazon.com/d/Bike-Shop-Tools/Park-Tool-Master-Pliers-MLP-1-2/B00D9NW32I/ref=sr_1_1?ie=UTF8&qid=1541803019&sr=8-1&keywords=park+tool+chain+link+tool
- A good portable multitool with chainbreaker: https://www.amazon.com/d/Bike-Multifunction-Tools/Topeak-Alien-31-Function-Bicycle-Tool/B000FIE4AE/ref=sr_1_2?ie=UTF8&qid=1541803074&sr=8-2&keywords=alien+tool
&#x200B;
&#x200B;
> Topeak Alien II
http://www.amazon.com/Topeak-Alien-26-Function-Bicycle-Tool/dp/B000FIE4AE
https://www.amazon.com/Boeshield-T-9-Waterproof-Lubrication-liquid/dp/B000GE1F9K/ to hinges/metal parts. There's a screw on the inside of the handle for the handle cover and the cover pops right off.
12" pin to pin and you're set. Just throw on some chain lube. That stuff is good all around the house as well.
Tube
Levers
Frame pump (or alternatively CO2 inflator)
Patch kit (optional)
Saddle bag
You can use the levers to mount the tire as well, in fact I don't think I could do it without them on some really tough tires. You basically use it like a wedge. Stick the hook on the rim of the wheel, with the tool under the tire, and lift up.
I don't know how well it'd work with the ones he posted, I'm more used to ones that look like this:
http://www.amazon.com/Pedros-Bicycle-Tire-Lever-Pair/dp/B000IZGFCE/ref=sr_1_3?s=sporting-goods&amp;ie=UTF8&amp;qid=1322857939&amp;sr=1-3
lube for your chain? this stuff is under $8 shipped
http://www.amazon.com/Rock-N-Roll-Gold-Chain-Lube-4oz/dp/B000QU8CGI/
grease for most other parts of your bike? this stuff is $6.25, but if you have more time than money, look into getting some marine grease from a sailing store- it's supposed to be the same price for like 5 times as much
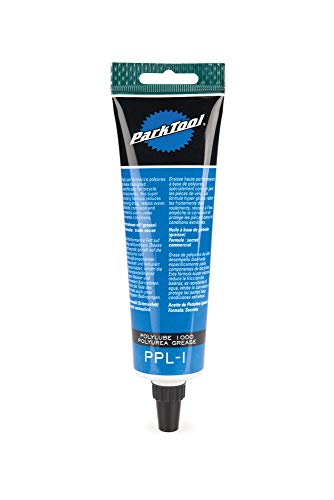
http://www.amazon.com/Park-Tool-PPL-1-Polylube-Grease/dp/B000NORVHI/
Anti-Seize or Anti-Seize
Grease or Grease or My personal favorite, Great wet/winter performance
Chain Lube I use Finish Line Wet. For chains I typically wax.
is this a compatible chain? https://www.amazon.com/Shimano-speed-chains-chain-black/dp/B000NOPPTE
and is this the right kind of grease?https://www.amazon.com/Park-Tool-PPL-1-PolyLube-Lubricant/dp/B000NORVHI
An enclosed pull behind trailer will be much safer and more comfortable for the kid. It will also last longer since they have a much wider weight range. Make sure the baby/kid always wears the appropriate sized helmet inside the trailer! As far as vibration, ask your doctor, but the usual recommendation is to wait until the child is at least 1 year old before riding in a trailer or on a seat. Depending on how much weight the kids and trailer are, it likely won't be a significant wear in the bike chain. Just keep up regular bike maintenance. You can buy a small tool or take it to a shop to measure the wear on the bike chain if you're concerned about it.
Just curious. You clearly use your large chainring more than your smaller chainring. If you are using the large chainring with the larger (easier) gears on your rear cassette that can exaggerate wear and tear on the chainring itself.
The sharktoothing you are starting to see now is an indication that you will probably need to change your chainring on your NEXT chain. Keep an eye out for very sharp teeth, these are a sign of a worn out chainring and can be dangerous to your leg as-well.
Typically changing a chainring requires changing the whole drivetrain: chain, cassette and chainrings, which typically incurs quite a large expense, but it does also give you the opportunity to tailor the drivetrain to the user (do you want easier/harder gears? looking to drop a little weight? want to color-match or bling out your bike?).
If you are starting to do your own drivetrain work, a chain stretch tool is cheap, easy to use and a good addition to your tool box. Replacing a cassette is also pretty easy, and take only one extra tool (which depends on what your lockring is). Depending on your crank, chainrings are also easy to change and either take an inexpensive chainring bolt tool or sometimes just 2 allen wrenches, typically a 5mm and a 6mm.
EDIT: Here is an article with some more info on the topic
There is a tool like this you can buy. When my chain is stretched to the .75 I replace it.
Here is a better tool: https://www.amazon.com/Park-Tool-Chain-Indicator-CC-3-2/dp/B000OZFIMQ
There’s a product called frame saver that will prevent rust on the inside of a steel frame. https://www.amazon.com/dp/B0012GO58Y/ref=cm_sw_r_cp_tai_a12FAbNVVCYBD
Keep it inside if you can. If you must leave it out, try to get a tarp or cover for it. You could also get Framesaver. I've never used it, but you could try it out.
There are products out there specifically made for steel framed bikes that coat the inside of the frame tubes as a layer of protection against moisture and oxidation, which leads to rust; paint protects the exterior of your tubes, frame sealer protects the inside. JP Weigel is the usual go-to, you just dissasemble your bike and spray it down the tubes. There's more info around the web, including this article from John Allen/Sheldon Brown.
If you're looking to up your riding game, everything listed above will save you from any trouble you have on the road. Cycling computer is always neat to have too!
Cygolite Metro 400 and the Hotshot are brilliant. The lights definitely pack a strong punch. I'll tell you right now, unless the lighting in your town sucks ass or you go off road riding, the metro 400 is a great light and you don't really need to go much higher than that.
I don't think I'd waste money buying another bottom bracket. The one that's on there is probably fine, unless the guy that stole your crank sawzall'd the spindles off or something.
If you want to practice installing one just remove that one and clean/regrease the threads and put it back in. You'll need one of these.
If the bottom bracket is loose, you need to remove the crank arm(s) and tighten it. I'm guessing you don't have a crank arm remover or the correct adapter for the BB cups.
Although it'd be extremely helpful down the line to own all the tools you need for this, it'll be a lot faster and cheaper just to take it to a shop and let them figure out what's loose and what needs to be done to fix it. If you want to do it yourself, you need the following:
Use the torque wrench! If you don't, you can over-tighten and crack the BB cups, and press the crank arm onto the spindle too far.
Looks like it's a typical square taper crankset and bottom bracket. In this case you'll need this for the bottom bracket:
http://www.amazon.com/Park-Tool-Shimano-Cartridge-Bracket/dp/B001A0AIAG/ref=pd_sim_sg_1
You'll also need a crank puller to take off the cranks if they aren't on already.
You just need some plastic tire irons, some tires are really hard to just get on by hand, they only weigh a handful of grams and you can easily pack them in a saddle pack. https://www.amazon.com/Park-Tool-TL-1-Tire-Lever/dp/B001B6NFH2
I run a bar of soap and a wet finger along the inside of the bead when I'm trying to install a difficult tire (e.g. Gatorskin).
I also pry pretty hard with the Park Tool tire levers. They're made of durable plastic which
Mine are older and milky white but look close.
http://www.amazon.com/Park-Tool-TL-1-Tire-Lever/dp/B001B6NFH2/ref=pd_sim_sg_1
As others have said get only what you need. However, unless you are going to frequently use the tools it may be cheaper to pay labor at the LBS for easy jobs than buying a tool you'll use once every year or two.
For flywheel you'll need
For the chainrings it's a whole new can of worms. It'll really depend on the crankset you have. Keep in mind though in most situations you can replace just the worn chainring and not the entire crankset. Cheaper and no special tools except an allen wrench. You wont even need to remove the crankarms from the bike.
You linked to a freewheel remover. What you actually need is a cassette lockring tool.
Any crank puller works. I used this one to fix one of our bikes this morning.
Your best bet would be to take it to a bike shop. They likely have a crank arm in stock that would work, assuming they used a normal size and the classic square taper interface. If you can't get the whole bike to the shop, you can probably remove the crank arm using one of these, and take that to the shop:
https://smile.amazon.com/Park-Tool-CCP-22-Crank-Puller/dp/B001VS1M20
They're pretty easy to use, you can find youtube videos that explain it in a couple minutes.
The new crank arm should not cost more than $30 at a shop. Online they are really cheap, and this one is a known good brand:
https://smile.amazon.com/SR-Suntour-Replacment-Square-Taper/dp/B00GHTQ7YQ
Do you really need/want to replace your bottom bracket?
Looks like a square taper crankset. That should be easy to find and replace without touching the bottom bracket. You'll need a crank puller, something like this
>Here, it says that a brake sensor is recommended.
It's a good idea on mostly any ebike, but PAS more then hand-throttle. It's because you really don't have a super amount of control over the motor output and it's easy to accidentally trigger a bike by moving the pedals around and getting read to go at a stop light. That sort of thing.
A torque PAS is more typically going to combine a cadence sensor and torque sensor into one thing. This is done to improve responsiveness as the controller can be aware of pedal movement immediately and give a starting boost. It's hard to balance out responsiveness so that you eliminate the 'laggy' feeling, but not so much that the bike jumps out by mistake.
&#x200B;
>I don't want to use a throttle, but I want to have the temperature sensor installed.
I am pretty sure the temperature sensor people talk about goes into the motor and is independent from the throttle.
https://www.youtube.com/watch?v=Wb8Omk6e7GI
But I suggest getting a low profile thumb throttle unless there is some sort of legal prohibition against it. You can put it on your left side of the bike, which is a nice setup since you won't need your front derailleur controls anymore and it won't get in the way.
It's less useful then on a hub motor (which can help you get going if you are in the wrong gear), but you'll find situations were it's handy to have.
&#x200B;
>Should I keep the nylon blue gear until it fails, or should I replace it with a brass one right away?
Keep the nylon gears. They are very tough and help make up for some of the sloppy tolerances in the bike motor.
If people are regularly stripping them it's more then likely because they are allowing the motor to get too hot. A overheating motor won't get hot enough to melt the gears, but it'll get hot enough to get the nylon soft.
&#x200B;
>How do I figure out which tool I need to remove the existing bottom bracket and cranks on my bike?
The main thing you'll need is a crank puller. Otherwise getting the crank off is a nightmare.
https://www.amazon.com/Park-Tool-CCP-22-Crank-Puller/dp/B001VS1M20/
You'll need a chain breaker tool as well to size your new chain to your bike. Some multi-tools have one built it. They are pretty cheap things.
Bottom bracket tool is probably needed, but it depends on your BB.
https://www.parktool.com/product/bottom-bracket-tool-bbt-22
https://www.amazon.com/BlueSunshine-Bicycle-Bracket-Removal-Remover/dp/B07MFLJJBZ/
You don't necessarily need it 100% if you are creative... https://www.youtube.com/watch?v=GKWWwhRH3cg But it'll make the job a lot easier. Get down and look closely at the BB, though, and make sure that yours is that 20 spline style. Most are.
And watch a couple videos on it. The drive side is reverse threaded which can be confusing.
&#x200B;
>What is the more resistant and weatherproof connector for the battery? XT60 or XT90?
They are both the same connector, more or less. Xt90 is just physically larger and handles more current, but otherwise the same.
I use Xt90s for the battery connector (the S stands for 'anti-spark'). Otherwise xt60's are sufficient for your bike.
Good news bad news. A longer allen tool will get that bolt out, but once it is removed, the crank will not come off unless you use a crank removal tool like this one.
Then you'll lose the lubricant again, unfortunately :) There are dry lubricants that can help, while avoiding attracting dust/grit.
There is a bike lube that I like for stuff like this, Finish Line Dry Lubricant. It goes on as a clear liquid, and dries dry, which is really nice. It's handy for a range of things around the house, it doesn't leave a mess like oil, and it doesn't attract grit.
This is the liquid version, there is also an aerosol can type:
Finish Line Dry Bicycle Chain Lube with Teflon - 4oz Squeeze Bottle https://www.amazon.com/dp/B002IDZXRM/ref=cm_sw_r_cp_apa_i_vivxDbKQY3FYN
Everyone has a favorite chain lube. I use Finish Line. Honestly, it doesn't make too much difference which lube you use, as long as it's one specially formulated for chains. Some are designed for wet conditions, which is good for some people.
For cleaning, pick up some automotive degreaser. Bike-specific degreaser is expensive and isn't really much better.
To clean the chain, you can usually just use a rag and some degreaser. A chain cleaning tool (the ones with three internal brushes) is handy, but not required. Always lube after cleaning, which should be done every 100-200 miles.
If you really want a clean drivetrain, I highly recommend an ultrasonic cleaner. Very effective at cleaning the cassette and chain, with almost no effort. Just remember to relube the chain really, really well after cleaning it.
Just regular Finish Line dry lube.
I've heard of getting the bi-metal cleats from peloton (chat) to using a dry teflon lube very sparingly on the cleats (like apply it with a q-tip) - https://www.amazon.com/Finish-Line-Bicycle-Chain-Teflon/dp/B002IDZXRM/
Just did some lubing on some ambers earlier this week and I used Dupont dry lube with teflon and just used it on the sliders and the housings with a small paint brush and it was set. The switches felt great for me and are very highly recommended if you fork over the money.
Recommend checking out the vintage section at bikeforums. Some tricks:
An oxalic acid bath for a day or so works well for removing rust from steel (but don't use it on aluminum). Flitz polish, which I used for a lot, requires a lot of "elbow grease" but gets a good shine on things – including paint (make sure the decals are below the clearcoat!), but it does strip the satin anodizing off of aluminum. WD-40 removes a lot of dried-on crud that mere soap and water fail to solvate. If a brake bolt is rusted into the frame, drip WD-40 onto it, use a block of wood as a buffer and smash it with a hammer. If the quill stem is stuck/rusted, unscrew the stem bolt a few mm, use a buffer and smash it with a hammer. - this will loosen the expander wedge. Turning the seatpost (keep the saddle attached) in one constant direction while pulling up is the best way to gradually remove it if it's stuck - twisting it back and forth will gouge it in a particularly ugly fashion. Um... get an adjustable (aka "crescent") wrench, I don't think a single nut on this bike worked with my normal wrenches.
That's all I can think of at the moment. Basic bike stuff also applies, like greasing the threads of every bolt and (almost) every metal-metal contact point (the cranks are supposed to be a dry press fit, though!), and lubing all the pivots & springs & whatnot. I like synthetic SuperLube with PTFE for grease, and a dry chain lube with Teflon for lubricant.
I highly recommend Hako Clears.
The tactile bump is very clear and high, giving a topre-like feel and a nice meaty cushion at the bottom.
I upgraded from cherry browns and it's like night and day, especially after I lubed both the stems (with [finish line extreme flouro teflon grease](Finish Line Extreme Fluoro 100% DuPont Teflon Grease, 20g Syringe https://www.amazon.com/dp/B002L5UL92/ref=cm_sw_r_cp_apa_i_0TYtDb4EZ5ED3)) and the springs (with [dupont silicone lubricant](DuPont Teflon Silicone Lubricant Squeeze Bottle, 4 Oz. https://www.amazon.com/dp/B00BCVXUVM/ref=cm_sw_r_cp_apa_i_ESYtDbT85X5A5)).
The extra work is 100% recommended for the smoothest tactile action I've ever felt.
Definitely just need to lube your stabilizers. Apply some of this to both the key inserts and the wire clip and you should be squeak free.
Finish Line Extreme Flouro is what most people (including me) use. You can find it here on Amazon for around $12. Also, with the whole car part grease thing, I would suggest wiping that off. Some greases can eat away at plastics. /u/ripster55 did a whole lube guide and put it on the Wiki, I would suggest taking a look at it.
sure...here you go. finish line comes in the syringe, which makes it easy to apply some to the stabilizer housing so you can brush it. taeha types does a good video using this grease combo.
finish line - https://www.amazon.com/dp/B002L5UL92/
permatex - https://www.amazon.com/dp/B000AL8VD2/
Just got one the other day! I found some grease on Amazon that works great if you run out/don't want to use the included stuff
They're excellent. I'm loving the MX reds. All the keys are boobs except maybe stabilizer keys, but using ripster's guide to lubing and this, the pinging and movement did seem to improve.
Nice looking! What lube did you end up using on the stabs? I think I tried the lube I had lying around on my last build: https://www.amazon.com/gp/product/B002L5UL92/ref=oh_aui_search_detailpage?ie=UTF8&amp;psc=1 and not sure that was the right call...
https://www.amazon.com/gp/product/B002L5UL92/ref=ppx_yo_dt_b_asin_title_o02_s00?ie=UTF8&amp;psc=1
For plastic on plastic ^
https://www.amazon.com/gp/product/B000AL8VD2/ref=ppx_yo_dt_b_asin_title_o03_s01?ie=UTF8&amp;psc=1
For plastic on metal ^
The Permatex isn't a bike lube, but it's fantastic.
here is a link to the lube i got https://www.amazon.com/gp/product/B002L5UL92/ref=oh_aui_detailpage_o00_s00?ie=UTF8&amp;psc=1
If that is this, then no - don't use it for switches.
However this is a good lube for stabs where plastic and plastic touch.
I picked this up off a recommendation on this forum and it has worked for my pok3r: https://www.amazon.com/gp/product/B002L5UL92/ref=oh_aui_detailpage_o08_s00?ie=UTF8&amp;psc=1
Does he have a saddle bag with a tube & tools? I seriously love this little multi tool & don't feel safe riding without it:
http://www.amazon.com/Topeak-60102538-Hexus-II-Multi-tool/dp/B0037N32VG/ref=sr_1_3?ie=UTF8&amp;qid=1323227668&amp;sr=8-3
Tools. Most people don't have proper bike tools, so that would be a great surprise. You can either get a decent multi-tool (get one with a chain-breaker and tire wrenches) or a variety of Park Tools. Here are some Park Tools that I find invaluable: 3-way hex, chain cleaning tools, pedal wrench, and/or a chain whip
This bar tape is amazing 3mm Fizik performance. Tape should be replaced semi-regularly, but most people don't, so it would be a great surprise gift. Black looks good on almost every bike.
Does she have a U lock? The nice and thick U locks can be somewhat expensive so I think it'd be a good gift.
Also a nice multitool is crucial for serious cyclists to fix stuff on the go and to just have an all in one tool for working on the bike at home.
Disc racks can work on non-disc brake wheels. I use a Blackburn EX-1 Disc Rack on my bike. My bike does not have the eyelets by the wheel hub for pannier racks, but strangely it does have the eyelets on the seat stay for them. I found this rack works very well on my bike.
For USB rechargeable lights, I use a Cygolite Metro 500 and a Cygolite Hotshot. Both lights are easily removable so you can take them with you when you leave your bike locked up. There are cheaper versions of the Cygolite Metro which are also quite good (300, 360, 400), but not quite as bright. The Metro 300 is probably enough light for most people, and is what I used first. The only reason I switched is because my girlfriend's bike needed a better headlight, so I used that as an excuse to upgrade mine and give her my old one. Currently the 360 is cheaper than the 300 on Amazon, and is brighter. So there's no reason to get the 300 right now.
For multi tool, I like the Topeak Hexus II. Someone else on Reddit recommended it to me months ago and I'm quite satisfied.
For a full time commuter, I recommend some puncture resistant tires. I use Continental Gatorskins with Mr Tuffy liners inside them. Haven't had a single flat in several months now. Having a flat on your way to work would really suck, especially in crappy winter weather.
I use Ortlieb Front Rollers on my rear rack, as I was worried the Back Rollers would be large enough to cause heel strike. The Front Rollers are very nice. I love how easy they are to put on and take off, plus they're quite rugged and keep everything dry. The Front Rollers are just barely large enough for a 15" laptop, though I can't roll the top down well with it in there.
I use the Topeak Nexus II
http://www.amazon.com/gp/aw/d/B0037N32VG/ref=mp_s_a_1_1?qid=1418326394&amp;sr=8-1&amp;pi=AC_SY200_QL40
That is a loaded question. It depends on the parts you will be torquing since it is highly unlikely you will find one torque wrench that covers all ranges. I personally have a bunch and my favorite brand is the Wera 1-25nm, but they are expensive. I would probably just get the this for lower torque values since it does 2-24nm https://www.amazon.com/VENZO-Bicycle-Torque-Wrench-Socket/dp/B00811WQT8/ref=sr_1_12?s=power-hand-tools&amp;ie=UTF8&amp;qid=1485446361&amp;sr=1-12&amp;keywords=torque+wrench
and then if you want to do cranks and cassettes you may need a larger one.
I have a version of this wrench. Mine I got from Nashbar and it's Nashbar branded, but it's the same wrench. Its been a lifesaver, one of the best thing's I've bought tool wise.
https://www.amazon.com/Venzo-Bicycle-Torque-Wrench-Socket/dp/B00811WQT8
A set as in multiple Allen keys in different sizes. For handlebars, all you really need is a 4mm, or 5mm.
I recommend to purchase a torque wrench whenever you have some extra cash. If you over tighten bolts down, components pay the ultimate price.
I purchased this kit and have been really pleased with it:
http://www.amazon.com/VENZO-Bicycle-Torque-Wrench-Socket/dp/B00811WQT8
Assembled a carbon mountain bike with it and have had no problems. It's worth having quality tools.
I was thinking about buying this one. It looks fairly compact, maybe in the 30cm range.
Yes, get a torque wrench. I have this one and it definitely doesnt feel cheap. Only works in one direction to you cant use it one pedal
I have this one, it works quite well
https://www.amazon.com/gp/product/B00811WQT8/ref=oh_aui_detailpage_o03_s00?ie=UTF8&amp;psc=1
On Amazon US, this seems to be the best deal. I own it and it works pretty fine. It's also a must if you ever want to build a frame up from scratch.
I agree with tylerbcoaching
However, I have this (https://www.amazon.com/Ritchey-5Nm-Multi-Torque-Key/dp/B009F93S9C) they come in different Torque settings. That should work.
I also share your fear. I recently over tightened the water bottle cage bolt on a day old Speedmax. Pulled the the rivet right out of the frame. Called canyon and they wanted 1k to replace the frame. My fault completely, just sucks. The torque wrenches I had did not fit into the Torhans VR cage.
I was just thinking about cycling gifts yesterday - trying to figure out what I should ask my wife for for Christmas. Here is a short list that I came up with:
lezyne travel drive floor pump: http://www.amazon.com/Lezyne-CNC-Travel-Floor-Silver/dp/B005UZMUDA
chain checker: http://www.amazon.com/Park-Tool-4000362-Chain-Checker/dp/B000OZFILW
cygolite 720: http://www.amazon.com/Cygo-Lite-Expilion-720-USB/dp/B00LXTP2FA/ref=sr_1_1?s=sporting-goods&amp;ie=UTF8&amp;qid=1416395043&amp;sr=1-1&amp;keywords=cygolite+720
ritchey torque tool: http://www.amazon.com/Ritchey-TorqKey-5Nm-bits-T-15/dp/B009F93S9C/ref=sr_1_6?s=sporting-goods&amp;ie=UTF8&amp;qid=1416259667&amp;sr=1-6&amp;keywords=park+tool+torque+wrench
leather pouch: http://www.eleven.cc/shop/cycling-ride-pouch/
50mm carbon clinchers...haha...I'm puttin em on there last, and don't even know which to suggest but we'll see what happens
yeah, really. you can get a 5Nm allen key that would be fine, i suspect (this - check it has the right size bit).
Tools,Tire Lever Set, extra wheels,chain,lube,cables. That's what I got.
I got a stand for my birthday recently that was fairly inexpensive as far as I remember. It's not exactly "professional grade" but it's sturdy enough to hold a bike and do some work on it. Little light so it moves around a bit, but like I said it gets the job done. Found it, it's this guy.
Bikehand Pro Mechanic Bicycle/Bike Repair Rack Stand :
https://www.amazon.com/dp/B00D9B7OKQ/ref=cm_sw_r_cp_api_RPJeAb27Z8MB0
It has really worked great for me, I highly recommend it. Can fold down to store away too.
I got one off Amazon it really surpassed my expectations. Ive had two different bikes on it and it did not fall over. Works for me. It appears youre not in US but nobody replied so figured i would.
https://www.amazon.com/Bikehand-Mechanic-Bicycle-Repair-Stand/dp/B00D9B7OKQ/ref=sr_1_4?ie=UTF8&amp;qid=1517619329&amp;sr=8-4&amp;keywords=bike+stand
I have this bike stand,
Venzo Bikehand Pro Mechanic Bicycle/Bike Repair Rack Stand https://www.amazon.com/dp/B00D9B7OKQ/ref=cm_sw_r_cp_apa_LMfKBb6584VV5
I dig it.
I don't use a torque wrench. I know I should but everything on the bike is such low torques (speaking from the perspective of someone who works on cars and industrial equipment) that I just make sure everything feels "right" to me... Haven't broken anything or had anything fail on me out on a ride yet... But that doesn't mean you shouldn't get a torque wrench if you want to do it right. As far as torque wrench set go even the expensive ones are cheap compared to the torque wrenches I'm used to using... So cheap/expensive are relative terms. I'd probably buy something mid range with good reviews on Amazon, personally.
$89 stand I bought on Amazon has served me well, including working on a rather heavy e-bike on the regular.
Bikehand Pro Mechanic Bicycle/Bike Repair Rack Stand https://www.amazon.com/dp/B00D9B7OKQ/
I have this one, which is a fair price:
https://smile.amazon.com/Bikehand-Mechanic-Bicycle-Repair-Stand/dp/B00D9B7OKQ/ref=sr_1_1?ie=UTF8&amp;qid=1498229469&amp;sr=8-1
Got it two years ago and I have no complaints
A decent repair stand. One with quick release clamp and a solid tool tray. Something like this stand would be awesome. It makes doing bike maintenance SO much easier if you have a good stand. I bought a cheap one and I regret it every time I use it.
I have the Bikehand stand as well and overall I'm very happy with it and it's surprising high quality, except for the clamp itself. Mine has not broken yet but if you look on both the Bikehand and the RAD Cycle bike stands you'll see that both of them have plastic (sawtooth) teeth which allow the clamp to rotate when loosened. The clamp itself has no issues but when you're working on the bike and have to put even a slight amount of force on something - even just turning the cranks to get the rear wheel to spin - those teeth will make stress noises. Sooner or later those teeth are going to break. It's a pretty bad design, honestly. Bikehand makes a "pro" version of the stand that has metal teeth instead of plastic teeth but unless the entire clamp area was made of metal instead of plastic I feel that sooner or later something will give. I'm just really careful with my stand. The Park Tool stand must not have that same issue as I've seen videos of people working on their bike in a Park Tool stand and putting all kinds of force on it and the stand seems to take it without any issues.
I bought this one on Amazon and I'm pretty happy with it. I've definitely used better stands than this one, but you can't beat the price. I use it at home for quick jobs like you mentioned and also for cleaning my bikes.
Yup, get the one mentioned above from the seller linked here for $80:
http://www.amazon.com/gp/product/B00D9B7OKQ/ref=oh_aui_search_detailpage?ie=UTF8&amp;psc=1
I use it once a week to clean and tune my bike with no failures.
First. READ UP ON HYDRAULIC BRAKES BEFORE YOU START. DO NOT ALLOW THE LEVERS TO COMPRESS W/O A ROTOR OR BLEED BLOCK BETWEEN THE PADS OR YOU'LL HYPEREXTEND THE PISTONS. OTHERWISE:
You're lucky. If your bike has hydraulic brakes there is probably very little on your bike you can't disassemble with a set of hex keys from 2.5-10mm, possibly a T-25 torx, and a #1 Phillips screwdriver. Depending on your wheels you'll need cone wrenches to set the bearings and depending on your crankset and bottom bracket you MAY need specialty tools. To work on your cassette (I'm ASSUMING CASSETTE DUE TO HYDRAULIC BRAKES) you'll need a cassette lockring tool AND a chainwhip (or other method to hold onto the cassette).
Let's see some specs or photos.
When it comes to assembly, though, especially for the stem and saddle, torque matters.
$7 Park Polylube or $10 Phil's waterproof grease or Marine grease
and
$6 TriFlow or $8 Finish Line Dry
and
$8 lifetime supple of anti-sieze for all metal-to-metal (including threads) which does not move or get frequently disassembled
and
$16 at Sears, $10 at Harbor Freight socket-drive Allen set
0-9 nM torque wrench for $22. A VERY useful range extension over the 0-7 of the Park Tool TW-1. And do not be afraid of cheap beam wrenches! Be afraid of expensive clickers but not cheap beam!
$2 T-25 socket drive (brake rotors)
$15 chain tool
$7 cassette lockring tool
$7 shitty chainwhip (you need something to hold cassette to use cassette lockring tool)
I strongly suggest the above torque wrench (or its equivalent) for all small bolts on a bike. If you want to be safe with the big bolts (mostly on the bottom bracket and crankset depending on styles) you also need:
$25 at Sears, $15-20 at Harbor Freight or auto parts stores high-torque torque wrench (Much less often needed)
EDIT: Spelling fixes and some minor rewording.
That's actually easy to get, i mean the stuff like this.
Welcome to /r/mechanicalkeyboards/ limmy!
I'll edit out the Limmy snark! Thanks for the correction.
http://www.amazon.com/dp/B002IDZXRM/?tag=hyprod-20&amp;hvadid=15468055299&amp;hvpos=1o3&amp;hvexid=&amp;hvnetw=g&amp;hvrand=159926366464748378&amp;hvpone=&amp;hvptwo=&amp;hvqmt=&amp;ref=asc_df_B002IDZXRM
I am mainly a Zealio/Gateron guy and IMO those switches don't need lube on the sliders or stems. I have tried various lubes on Gateron Blacks, Gateron Browns, and Zealios and I did not find any of them significantly "smoother" over stock. The thick krytox on Zealios and Gat Browns made the tactile bump drop drastically, but the switches weren't any less scratchy.
I did just order some MX Clears and I will be using this lube for them. MX Clears in my experience are very scratchy and need some type of lube.
Hey sorry for the very late reply /u/gbchk! I have been really busy with a lot of stuff these last 2 weeks, and hence haven't gotten the chance to properly reply to you.
With regards to a good dry lube, I mentioned in my build log that a Dry PTFE lube should be good for the ALPS switch. I personally used the WD-40 PTFE lube, though any other Dry PTFE lube should work as well. As you can see from the build log, I referenced a [youtube comment] (https://www.youtube.com/watch?v=msOYzgb1IT4) that mentioned another dry lube that you might be able to try, the Finish Line dry film PTFE lube: https://www.amazon.com/gp/product/B002IDZXRM/ref=oh_aui_detailpage_o00_s03?ie=UTF8&amp;psc=1.
Also, I have updated my main comment with the link to the album which showcases how I lubed my ALPS. Hopefully this will serve you well as a guide.
Sorry again for the late reply, and have fun with whatever project you may have now!
Hi. Italian here!
From what i saw, Krytox is usually better, not sure what is Pexon formula but the original Krytox is used to be better but is also pretty expensive, especially to Italy, I would say just go for that Finish Line on Amazon or SuperLube from CandyKeys and you will be fine :)
Ciao!
I can't find Super Lube easily in my area, so I am wondering if this one might be used instead:
https://www.amazon.fr/Tri-Flow-TF23004-Clear-Synthetic-Grease/dp/B000C15MUU/ref=sr_1_1?rps=1&amp;ie=UTF8&amp;qid=1518365758&amp;sr=8-1&amp;keywords=synthetic+grease
edit: Maybe this one would be good too? https://www.amazon.fr/Finish-Line-Extreme-Fluoro-Huile/dp/B002L5UL92/ref=sr_1_1?ie=UTF8&amp;qid=1518366940&amp;sr=8-1&amp;keywords=finish+line+extreme
edit 2: Or this one? https://www.amazon.fr/Permatex-81150-Dielectric-Tune-Up-Grease/dp/B000AL2RI2/ref=sr_1_8?ie=UTF8&amp;qid=1518366744&amp;sr=8-8&amp;keywords=permatex
Argh. I am lost in sea of information about mech keyboards (aka, /r/mechanicalkeyboards Wiki ;)
It is a good idea to apply some form of grease after removing and cleaning the key caps. I prefer a simple teflon grease, something like this.
You could use gun oil for that part. If you don't have anything like that around, use motor oil and see if it starts to cure your problem. If the motor oil works, order something like this https://www.amazon.com/Finish-Line-Extreme-Fluoro-Syringe/dp/B002L5UL92 and change it out when it arrives.
I just found that this lube is cheaper than the super lube, and pretty widely used. As for the stabilizers, this stuff seems pretty good.
Permatex 22058 Dielectric Tune-Up Grease Tube was a suggestion I got from a YouTuber and it works really well so far. A bit expensive but you don't use a lot so lasts forever.
Canada: https://www.amazon.ca/dp/B000AL8VD2/?coliid=I1N71VWMGGSOXK&colid=J58MB1DVXYQQ&psc=1&ref_=lv_ov_lig_dp_it
US: https://www.amazon.com/gp/product/B000AL8VD2?pf_rd_p=2d1ab404-3b11-4c97-b3db-48081e145e35&pf_rd_r=EVNQKENT60XP5CXEPJJ7
&#x200B;
Also for plastic on plastic lube (the stems of the stabilizers, do not use inside of switches) this: https://www.amazon.ca/dp/B002L5UL92/?coliid=I3VPHHQD2B8350&colid=J58MB1DVXYQQ&psc=1&ref_=lv_ov_lig_dp_it
Is there anything to be careful of besides non-conductivity when looking for a grease? I saw this on a Ripster guide and I think I'm gonna order it: https://www.amazon.com/Finish-Line-Extreme-Fluoro-Syringe/dp/B002L5UL92/ref=sr_1_1?ie=UTF8&amp;qid=1466142797&amp;sr=8-1&amp;keywords=Extreme+Fluoro+Grease
would this lube be fine for lubing cherry stabs? or finish line?
Would this work for lubing PCB mounted Cherry style stabs?
(English isn't my first language so i'm sorry if there are some errors)
I just bough a poker 3 and the spacebar is squeaky as hell, so I was about to buy this, but I've read that it will crumble in a month or so and my only other option is this one, but I don't know if it can be used on stabilizers,so which one should i buy?
I use this stuff. Zero complaints. Not good for springs though.
https://www.amazon.com/dp/B002L5UL92/ref=cm_sw_r_cp_apa_i_Jn9DCbV9TRYWD
I use this on my bike, so I had it lying around. It also happens to be recommended for stabilizers too:
https://www.amazon.com/Finish-Line-Extreme-Fluoro-Syringe/dp/B002L5UL92
People also recommend Dielectric Grease, I haven't tried it personally but it's also a good option.
Just stuff like this https://www.amazon.com/Finish-Line-Extreme-Fluoro-Syringe/dp/B002L5UL92/ref=mp_s_a_1_4?adgrpid=57563159993&amp;dchild=1&amp;gclid=Cj0KCQiAn8nuBRCzARIsAJcdIfNPOruNKKQn6_x2lnWydPZhQYU0iGAf611XHL5JNZzrI9QAV-ywZQQaAtgpEALw_wcB&amp;hvadid=274872390383&amp;hvdev=m&amp;hvlocphy=9017492&amp;hvnetw=g&amp;hvpos=1t1&amp;hvqmt=e&amp;hvrand=4441170935943728956&amp;hvtargid=kwd-302453330784&amp;hydadcr=12192_10197807&amp;keywords=keyboard+lube&amp;qid=1574086449&amp;sr=8-4 sorry I don’t know how to do blue text
> Are there any other PCBs that have hotswappable sockets? (That isn't the GK64 because I don't like the non-standard stagger, ortho is fine but a completely new stagger that isn't used on any other keyboard.
Bare pcbs? I know lfkeyboards has a few now. Pricey but unique.
> Can I buy any 60% keyboard case for the XD75RE? I want to see if I can get a wooden case. The reason why I am asking this is because on the product page it says that it's possible to use any GH60 case with the pcb in using their shim conditions and I don't know what that means.
Technically it has the mount points but getting it in there is a clusterfuck that results in either a wobbly board or having to shim and cut switches. IMO its way too much work and you are much better off going with a case designed for the board.
> I want to have the layout that has the longer spacebar keys but this is the only plate that I found: https://kprepublic.com/collections/xd75re/products/stainless-steel-plate-for-xd75re-60-custom-keyboard-mechanical-keyboard-plate-support-xd75re and I'm pretty sure that this is only for the only 1u layout. Is there another plate available that I haven't found yet?
What do you mean longer spacebar? Like 6.25? Not going to happen with this grid layout. Some people use point of sale style keycaps as spacebars which is one 2u or 3u keycap that occupies multiple switches. It obviously makes it harder to press because you have resistance of multiple switches.
> Will this keycap set be fine for the XD75RE? https://novelkeys.xyz/products/blue-grey-xda-keycap-set If not, can you recommend a different keycap set for it?
If you are ok with legends not matching for modifiers its ok. Otherwise seek out ortho specific sets and build on them with something like a numpad or blanks.
> What kind of cable does the XD75RE need? It doesn't specify it on the product page.
mini usb
> Do I need stabilizers if I find a plate for the longer spacebar layout? If so will a standard cherry stabilizer kit cover it? And is this lube fine for stabilizers? (I will probably buy it anyways for future builds) https://www.amazon.com/Finish-Line-Extreme-Fluoro-Syringe/dp/B002L5UL92
XD75re doesnt use stabilizers.
> Is there anything I'm missing? I already know I need a case, plate, pcb, stabilizers (if necessary), lube for stabilizers, switches (I already have a bunch of loose switches), keycaps, and a cable? Sorry if this was really long, this is my first time buying custom parts and I don't want to mess it up.
Make sure the switches are all new and have never been previously soldered because that can harm the sockets.
So I'm thinking of building my own keyboard, although it won't really be the whole building experience because I won't be soldering. I want to get an XD75RE because it uses a hotswappable pcb and an ortholinear layout (which I really want to try out). I have a few questions:
Are there any other PCBs that have hotswappable sockets? (That isn't the GK64 because I don't like the non-standard stagger, ortho is fine but a completely new stagger that isn't used on any other keyboard.
Can I buy any 60% keyboard case for the XD75RE? I want to see if I can get a wooden case. The reason why I am asking this is because on the product page it says that it's possible to use any GH60 case with the pcb in using their shim conditions and I don't know what that means.
I want to have the layout that has the longer spacebar keys but this is the only plate that I found: https://kprepublic.com/collections/xd75re/products/stainless-steel-plate-for-xd75re-60-custom-keyboard-mechanical-keyboard-plate-support-xd75re and I'm pretty sure that this is only for the only 1u layout. Is there another plate available that I haven't found yet?
Will this keycap set be fine for the XD75RE? https://novelkeys.xyz/products/blue-grey-xda-keycap-set If not, can you recommend a different keycap set for it?
What kind of cable does the XD75RE need? It doesn't specify it on the product page.
Do I need stabilizers if I find a plate for the longer spacebar layout? If so will a standard cherry stabilizer kit cover it? And is this lube fine for stabilizers? (I will probably buy it anyways for future builds) https://www.amazon.com/Finish-Line-Extreme-Fluoro-Syringe/dp/B002L5UL92
Is there anything I'm missing? I already know I need a case, plate, pcb, stabilizers (if necessary), lube for stabilizers, switches (I already have a bunch of loose switches), keycaps, and a cable? Sorry if this was really long, this is my first time buying custom parts and I don't want to mess it up.
Thanks for the response; I guess have no choice but to lube them since the man himself suggests to do so! I currently have this lube would it work as the thick lube?
I'm a bit newer to lubing mechanical switches and I reeeeaaallyyy just cant find any good info when it comes to what lube to use for mechanical switches. I plan on lubing both my stabilizers and switches, though I wanna know if the lube I'm planning on using for my stabilizers will work well for my switches aswell.
The lube in question
If this won't work well or will destroy my switches, which lube is recommendable for them?
Lube makes the board quieter bar none. I used WASD keyboards lube the first time around, but I'm not too happy with it, so I'm going to use another lube next with the board, (this)[https://www.amazon.com/gp/product/B002L5UL92/ref=oh_aui_detailpage_o00_s00?ie=UTF8&amp;psc=1] one, once I get all the way fed up with the performance on the WASD lube. I have hope for it yet. But either way lubed and ringed is the way to go for a topre board, the thocks are the most satisfying thing ever.
I'm not too savvy on the lube types. The one that I have is this one. I read the reviews and quite a few mention lubing KBs or lubing ABS plastic, etc.
Here's an image from geekhack in an old thread showing where to put the lube. The amount of lube you apply to each slider is very minimal, think like an apple seed, I usually just place it on the bottom corner and let the slider lube itself in use.
OK lubed all the stabilizers. It's not a instant fix and it's slowly getting better as I type and work the lube around. Probably have about a hour of typing on it since the lube job. Flipped the Enter key back to its proper orientation and so far no squeak or stiffness and the rattling has diminished to almost non existent on all the long keys. The spacebar still has a little but not when hitting it in my natural typing location. Overall I'm pleased with the results. And here is what I used A lot bigger than I anticipated. I'll have enough to lube keyboards for the rest of my life since I only used a pencil tip size dot on each corner of the stab.
I use this PTFE teflon lubricant. It's one of the slipperiest substances on earth, Dupont usually costs 2 - 3 x as much as this stuff I use
https://www.amazon.com/gp/product/B002L5UL92/ref=oh_aui_search_detailpage?ie=UTF8&amp;psc=1
It comes in a handy syringe which makes it really easy to use small quantities. And youi get a lifetime supply.
I usually end up getting a TusqXL nut which is made from a teflon impregnated plastic. But I use this stuff otherwise.
It has much of what you need (allen wrenches & screwdrivers), plus a bunch of things you might not (sockets & socket wrenches). If all you have to spend is $12, you could probably do worse, but if you want a good multi-tool that'll last you a while, you should probably skip it.
At a minimum, i think a multi-tool should have allen wrenches (3,4,5,6mm at least), a philips and a flat screwdriver, and a chain-breaker. It should also have at least one tire lever unless you carry that separately. If your bike has hex head bolts anywhere (usually 8mm, less commonly 9 and 10mm), it should also have those or you should carry them separately.
Some people carry a tool like this one that has pretty much everything. The chain-breaker on that one is outstanding; I used the same one (on a different Topeak tool) as my only chain-breaker for years and it still works perfectly.
My bike doesn't need those extra tools, so for an all-in-one, I prefer only to carry what I need. This one is the first one i bought 7 or 8 years ago and was used regularly until last spring. It has all the tools needed for bikes that only use allen bolts, and the chain-breaker is awesome if you have a separate allen wrench to turn it. The tire levers are pretty solid and will last years if you use them carefully. My only real complaint about it is that the chain-breaker is turned using a 4mm allen head glued into one of the tire levers and doesn't last, so you need to carry a separate 4mm allen wrench or plan to use the tire lever to disassemble the tool so you can use that one.
I carry this one now. I bought it to replace the other one last year after I finally broke one of the tire levers. I really like it; it's more compact than the Hexus II and weighs a bit less, and still has all of the same tools. The weakest part is probably the chain-breaker, but it seems strong enough to handle the occasional roadside emergency.
I have a similar pump, and I've been very happy with it. I really like the flexible hose; it makes the pump easier to use. Depending on what kind of bike you have, you might want the high pressure one (120 psi "pressure drive" vs. 90 psi "alloy drive").
I also have this multitool, which I've also been happy with, except the large hex wrench that fits over the smaller one isn't as secure as I think it should be (it's never fallen off though).
I have one of these and I like it but its sorta bulky. The tire levers on there are pretty handy.
I was wondering if your chain snaps, you could probably just use the tool to link the chain together and ride home with one less link for now?
--
> BTW on Google Maps, it looks like it's going to be about a 35 minute ride to work
It's usually overestimates time, so you can probably go faster.
http://www.amazon.com/Topeak-60102538-Hexus-II-Multi-tool/dp/B0037N32VG/ref=sr_1_5?s=cycling&amp;ie=UTF8&amp;qid=1422413167&amp;sr=1-5
Definitely the best one I have used. It's got a built in chain tool, spoke wrenches, and tire levers that pop out of the handle. It even has a allen key in the tire lever to tighten the bolts on each end that hold the whole multi tool together.
Honestly it takes more time to patch a tube than it does to install a new one, it's the same amount of work. I'd highly caution you that you should learn some basic bicycle maintenance before taking off on a weekend trip because that list isn't overkill...it's bare minimum. It takes one time being stranded to really wish you had learned to replace the simple little things like a spoke or chain link on your bike.
Everything I mentioned can be fixed with a simple pocket tool like THIS
It's not the distance - you're right, 100 miles isn't much in a weekend. It's just generally making the decision to put yourself at risk for being stranded. Loaded touring will put stress and weight on bike parts that normal city riding won't.
But again, if you think it's overkill just go do whatever. Eventually on a trip you'll break something and be far enough out that you'll learn to fix your bike when you get back. I'm trying to help you safely enjoy this trip, if you want to go about it your way go for it....there's just no reason to take the risks you're about to take.
Honestly, I'd say start riding, and the knowledge of common damage/ repairs will come through experience. This will also help on the customer service side of things because you will be able to relate to the customers. Sure, the LBS can train you on some more niche skills (such as installing a bottom bracket for bike build up), but 90% of the issues with bikes you will be able to see first hand (flat tire, poorly indexed gears, etc.), and how to resolve them, if you ride. As for tools, a good multi-tool (I use this one) will have the tools to be able to fix most problems, though the shop will have much better proper tools, which should be used if available.
If you plan on commuting year round, I would consider keeping the Giant. Maybe look into getting new tires that are narrower. Kenda makes some 26x1.5" 100 PSI tires that are popular that the shop I worked at. The shifting is probably better than that Schwinn and should have a lower end gearing for any hills or heavier loads. Tires and tubes should be well under $100 if not $80.
From my experience, Crank Brothers pedals are great, other parts or accessories not so much. This Topeak tool is awesome and has everything you should need including tire levers.
Lump it with the Giant for a while until you save and find a bike that is within your price range and that fits you and your style of riding well.
Like /u/jrm2191 said, Park Tool make some... comprehensive tool sets. Those prices are enough to make me choke, though. Your son's riding a ~$400 bike - I don't know how I would wrap my head around buying an $800 tool set, or even a $300 one.
But the tool sets are a good way to think about what tools you should buy. I'd get a basic tool set, fill in gaps, and upgrade selectively. What I'd do, in no particular order, would look like...
At this point I would start thinking about upgrading the tools that your son will use all the time. The thing that stands out for me is hex tools. He might use Torx screws, but he'll definitely use metric hex tools
Then probably nice meaty tire levers to make replacing tires and tubes easier
If you were looking to spend $300 or that range, then you'll notice you're way under that target. Feel free to start adding on some random nice things, like a portable multi-tool, which will pay off if he has an issue while out on a ride.
I'm running out of things that aren't "consumable" (like brake cables, housing, etc...), so for my last recommendation, nitrile work gloves! (they'll make cleanup a breeze)
There are tons of other things you could get (a bike stand, for instance) but at this point I'm getting a bit out of control. and there are tools I assume you have (e.g. a good screwdriver), but at some point I need to stop.
And obviously feel free to mix and match whatever components you can afford/feel comfortable spending that much money on. One thing that might help would be to talk with him about what kind of work he does on his bike. He might be in desperate need of hex tools, but not treating himself to nice hex wrenches. That could be your quick, easy, cheap answer. Or similarly he might be nervously tightening bolts without a torque wrench, even in places that call for very precise amounts of torque. Again, easy answer regarding what to prioritize.
Best of luck
edit: totals didn't add up right, sorry!
I’ve been happy with: Venzo Bicycle Bike Torque Wrench Allen Key Tool Socket Set Kit https://www.amazon.com/dp/B00811WQT8/ref=cm_sw_r_cp_api_i_EYx4Cb9SHZ6J7
I know some might disagree with me, but I bought this: https://www.amazon.com/VENZO-Bicycle-Torque-Wrench-Socket/dp/B00811WQT8/ref=sr_1_1?ie=UTF8&amp;qid=1493642589&amp;sr=8-1&amp;keywords=venzo+torque
It seems to do a great job. I am not sure of its accuracy, but even if it is slightly off I am okay with that. If I torque something to 5nm, and it is actually 4 or 6 I think thats okay. My main concern before getting it was that I was torquing things that should be 5nm to 15nm because of not having a way to gauge how hard I was pushing. I think it only "clicks" in one direction so it is not perfect for torquing lets say my BB on the drive side that threads opposite. But for daily use it seems to be great and not super expensive. But if you have the disposable income to spend, get the park tools version.
Yeah, I've never seen a preset wrench for the higher Nm that cassettes/hubs are rated for. Admittedly, I've always used a regular wrench for my cassettes and just gone on feel, as I also don't have the expensive full sized wrench. It's one of those things I keep meaning to buy when one is on sale, but I never do.
The preset wrenches are usually rated for 4-6 Nm, which is good for handlebars, stems, etc. For $59, this torque wrench has good reviews, although I have no personal experience. I just saw it while looking for a 9 Nm preset that I could use on my saddle.
I use one of these on my bike, mostly for stuff attached to my carbon fork. Cheap and puts my mind at ease a bit.
$46 with socket set
Got this one https://www.amazon.com/gp/product/B00811WQT8/ref=ppx_yo_dt_b_asin_title_o00_s00?ie=UTF8&psc=1 from amazon. It's a bit cloudy today, I will try to upload better photos tommorow!
Thanks for the help!!
Thanks so much for all of the feedback!
I ended up purchasing VENZO Bicycle Bike Torque Wrench Allen Key Tool Socket Set and BIKEHAND Bike Bicycle Repair Tool Kit with the addition of cable cutters.
Last night I watched this guy assemble a bike which allowed me to see which tools were needed:
How to Build a Bike Series
I will keep everyone posted on my progress. All the necessary parts and tools should be delivered by March, 20th! Stay tuned.
This is the best thing I ever purchased for home (I worked in a shop in college): https://www.amazon.com/BIKEHAND-Complete-Bicycle-Repair-Tools/dp/B005KWRITO/ref=sr_1_3?ie=UTF8&amp;qid=1501081214&amp;sr=8-3&amp;keywords=bikehand
Add in this: https://www.amazon.com/Ritchey-5Nm-Multi-Torque-Key/dp/B009F93S9C/ref=sr_1_26?ie=UTF8&amp;qid=1501081299&amp;sr=8-26&amp;keywords=bicycle+torque+wrench
All you will realistically ever need.
No problem! If you broke your last stem over- torquing it, I would actually recommend you get your fork checked out. Lots of times voids/cracks can propogate without you seeing anything. This is a company that is highly regarded for their non-destructive testing methods- expensive, but a fork snap can end your life (someone just died in the US a few weeks ago from fork steerer failure). Or buy a replacement fork if that's cheaper.
As far as fitting the stem, I would suggest to the mechanic that he measure the internal diameter of the stem with digital calipers, and then measure the outside diameter of the steerer tube. The fork may say 1.25 on it, which he might interpret the wrong way and could be what is causing confusion. That measurement only refers to the bottom OD of the fork at the crown race, NOT the top of the fork where the stem mounts.
I'm going to say this again though- if he can't figure out how to put a stem on a bike, it is probably better to find someone else or do it yourself. Please use a torque wrench though this time and follow all the manufacturer's instructions. You can get torque keys with preset torque values very inexpensively and they will save you so much trouble.
Good luck!
Any tool set that would have what I need to fix this reccomended? Preferably sometihng that's on amazon prime. Here is some I found. Let me know if any of them have both tools I'll need (the right type of coarse, all of there seems to have crank pullers and lockring tool but not sure if they are compatible)
Also if I am gonna re-lube it any recommendation on lube?
http://www.amazon.com/Best-Value-Professional-Bicycle-Tool/dp/B01C6ZQN02/ref=sr_1_29?ie=UTF8&amp;qid=1465090558&amp;sr=8-29&amp;keywords=bike+repair+tool+kit
http://www.amazon.com/FANTASYCART-Universal-Mechanics-Bicycle-44pcs/dp/B0019J6ZLE/ref=sr_1_30?ie=UTF8&amp;qid=1465090558&amp;sr=8-30&amp;keywords=bike+repair+tool+kit
http://www.amazon.com/BIKEHAND-Bike-Bicycle-Repair-Tool/dp/B00CW911XW/ref=sr_1_5?ie=UTF8&amp;qid=1465090417&amp;sr=8-5&amp;keywords=bike+repair+tool+kit
http://www.amazon.com/BIKEHAND-Bike-Bicycle-Repair-Tools/dp/B006WRWEJU/ref=sr_1_7?ie=UTF8&amp;qid=1465090417&amp;sr=8-7&amp;keywords=bike+repair+tool+kit
http://www.amazon.com/Venzo-Premium-Bike-Repair-Tools/dp/B011NJ5WP4/ref=sr_1_14?ie=UTF8&amp;qid=1465090417&amp;sr=8-14&amp;keywords=bike+repair+tool+kit
Hey all -
Been getting more into biking and particularly upgrading/customizing my setup. I'd like to start doing more maintenance and repairs on my own. I purchased Zinn & The Art of Road Bike Maintenance, but my tools are currently pretty lackluster.
I'm hoping to snag something from Amazon (I have a gift card), and was looking at this toolkit. Does anyone have experience with this brand and know about the quality of these tools? Also, does this seem like a good start, or is there something glaringly obvious missing or something?
Sorry not get back to you sooner was really busy yesterday. The 96 model think would have had cantilever brakes as stock, V-brakes were brand new when this came out, and prety sure the Indy forks didn't come out on bikes until 97 model year.
So parts list of stuff to buy
Cassette:
https://www.amazon.com/SunRace-8-Speed-Nickel-Plated-Cassette/dp/B00DI65HGU
Chain:
https://www.amazon.com/X8-99-Bicycle-Chain-32-Inch-Silver/dp/B0013BV540
You might want to buy two you will want to carry a spare chain on tour
Tires:
https://www.amazon.com/Maxxis-Crossmark-Black-Fold-Tires/dp/B00GHTQ7Q4?th=1&amp;psc=1 (might find cheaper elsewhere, but you want the dual compound/DC ones with the EXO casing ideally - there are cheaper options for tires that would work than these but I think it's one area it's not so good to cheap out on)
Shifters:
https://www.amazon.com/SHIMANO-SL-M360-Acera-Shifter-Speed/dp/B001ON6VIW
(or find some vintage 8-speed XT/LX ones from eBay, they are a little nicer)
Brake pads:
https://www.amazon.com/Kool-Stop-Compound-Mountain-Linear-Threaded/dp/B001CLSWKQ
These should make a decent improvement to braking power especially in the wet, you could bring the old pads on the tour as spares/backups if they still work OK and have life left (always want to have at least a pair of spare pads)
New cables:
https://www.amazon.com/JAGWIRE-MOUNTAIN-SHOP-KIT-Derailleur/dp/B01DJGUEE8
You'll need at least new inner cables to install new shifters, and probably a good idea to replace the housing too, though you need either really good cable cutters or a Dremel/rotary tool with a cut-off wheel to cut housing, or get a bike shop to cut it to length. Not suggesting white colour that was just the first link I saw though it might look pimp.
Tools:
You could get a tool kit like one of these
https://www.amazon.com/dp/B00CW911XW/ref=emc_b_5_t
https://www.amazon.com/dp/B00CW911XW/ref=emc_b_5_t
https://www.chainreactioncycles.com/nz/en/x-tools-bike-tool-kit-18-piece/rp-prod40997
Or you could buy a multitool that would be good for bringing on the tour
https://www.amazon.com/Vibrelli-Bike-Multi-Tool-V19/dp/B06XGWMGB9
And extra stuff like cassette tool and chainwhip and tire levers individually:
https://www.amazon.com/Oumers-Freewheel-Sprocket-Lockring-Maintenance/dp/B07GSRJGP3
https://www.amazon.com/Schwalbe-1847-Bicycle-Tire-Levers/dp/B000UAQL6C
That might be the way to go.
That's not everything you'd need to go touring and stuff like the bars and saddle are a lot about personal taste but should be good to get you started.
Apologies for using amazon.com links I'm too used to helping Americans on here but hopefully can get them on the .ca site. Chain Reaction that I linked the toolkit from (would be confident that's the best out of those three kits I have some of the tools from it) in the UK can be a good place to order stuff from
Hey guys I am looking for input on my current build. Tried to post earlier but it got removed without telling me why.
I originally bought the basic parts in fall of 2018 which included:
19" GT Agressor Pro from Dick's Sporting - $295
27.5" Conversion Kit 35MPH from LeafBike.com - $508.13
52v 14s9p-pf 25.7AH Triangle Battery Pack from EM3ev.com - $827.4
Rear Cargo Rack from Amazon - $25.99
SKS Velo Snap-on Fenders from Amazon - $21.65
BikeHand Toolkit from Amazon - $49.99
Shimano HG41 from Amazon - $16.70
Torque Arm from Amazon - $16.50
Park fr52 from REI - $7.15
Tire Liner from REI - $17
Tubes from Walmart - $20
Total $1825.51
Hot Damn! Never actually did the math that is quite a bit more than i thought it cost, I'm a little embarrassed I've been telling people that it cost around $1300 lol boy the shipping and tax just kills you!
Anyways it all arrived without issue (Thank goodness) and I put it together (minus the pedal assist due to a crank removal fiasco) with some difficulty as a number of things required modification to work. That rear wheel is an absolute biatch to install. I have had an absolute blast with it both on and off road since then. Only major gripe is with the controller, hella loud and super weak regen breaking.
Just recently decided to do some additional tweaking with the bike. Went on another spending spree over at Aliexpress. Ended up buying the following parts:
Pedals - $21.45
Longer Handlebar - $8.80
External Bearing Bottom Bracket and Cranks - 32.66
Four Pairs of Brake Pads - 5.29
3-Button switch - $27.49
Handlebar Grips - $2.66
Torque Arm - $8.35
Left hand thumb Throttle - $5.67
Lights DC 12v-48v - 20.89
42 tooth Chain ring - 17.60
Pannier - 30.51
1xSchwalbe MTB 27.5 2.25 - 50
Total $231.44
Already installed new bottom bracket and pedal assist (with some modification lol) and its amazing!
I am about to start getting into the electronics so i figured i would ask for advice before i solder everything up in case you guys come up with a better way to do things.
Anywho I am getting rid of those handle grips with the twist throttle in favor of a left handed throttle, this will allow me to shift on the rear cassette a lot easier. Then its on to replacing the super cheap switch (cruise, regen, reverse) with the Aliexpress switch (cruise, horn, lights, gonna short regen for always on) and add lights. Considering adding another on/off point for security but cant think of a great way to do that... Right now i have the BMS on/off at the battery itself (momentary switch) and the power on the LCD display itself.
Also anyone have a line on a cheap controller with strong regen breaking and sin wave fets? I see the ebikes.ca but looks like that requires cycle analyst v3 for pedal assist which doesnt seem to display information nicely plus itll cost around 265 for both...
Just search "Bike work stand".
Plenty of options. I'm looking at getting this one:
http://www.amazon.com/BIKEHAND-Cycle-Mechanic-Bicycle-Repair/dp/B00D9B7OKQ/ref=sr_1_1?s=cycling&amp;ie=UTF8&amp;qid=1408986564&amp;sr=1-1&amp;keywords=bike+stand
$90. The cheaper ones I saw went for $55. I'm not sure what that converts to in Europe money.
I have one of these, though it's always difficult to say how much of a difference +/- ~$50 makes. Reviews on the lower end one seems to mention issues with the clamp often, but the clamp on this one definitely feels extremely solid. Few of the reviews on this one mention issues with collar at the telescopic bit; I'm about 6 months in and moderate use, and haven't noticed signs of it thus far.
I like these shorts they are not that expensive and have lasted well over a year and going strong. My floor pump looks something like this but I can't remember the brand name. As far as tools you likely just need a screw driver and an allen key for the adjustments. There are some youtube videos that explain the process. You will want a work stand. <-- is the one I got. It is a little bouncy but it works and it was under $100 so I'm happy with it. You may want to throw in a pedal wrench while your at it.
Bikehand pro. I borrowed it from my friend and it's doing a great job holding up Project ChEBorow. I'm ordering my own right now.
Well, if it makes you feel better, me and my partner have had very little bike fixing experience, we've had to learn it all ourselves.
The bike comes 95% assembled:
We ended up getting a bike repair stand which does a great job of holding the bike if you take the battery off first. My partner and i swapped out our tires to some semi-slicks and have since learned how to replace flats on our own. We are still pretty slow -- it takes us 30-45 minutes to take off and reinstall a tire but we're getting faster! This is coming from someone who is not very mechanically inclined either.
They also include a variety of tools (tire levels, etc) that you can use for maintenance, so you don't have to worry too much about going out and buying it yourself -- we had to go to our local hardware store because their toolkits were out of stock at the time.
hey boss man, why is it bad to hard clamp frame tubes? I have https://www.amazon.com/gp/product/B00D9B7OKQ/ref=oh_aui_search_detailpage?ie=UTF8&amp;psc=1 and i put it in my top tube (cross bar). Is this not good to store it that way? Thanks for your help and time
edit: i also only have a single speed bianchi that is super beat up from 7 years of riding (got it for $300 on craigslist back in the day), but i am just curious what is wrong with clamping the top tube or frame tubes for storage and/or workstations
This is what I have.
It works well and is cheaper than something like a Park Tool. It holds up my fatbike with no issues, so seems pretty sturdy.
I picked this one up when I ran into the same problem; works well enough for me.
https://www.amazon.com/gp/aw/d/B00D9B7OKQ
This one is surprisingly good considering the price. IMO you won't find better for a new stand under $100
I realized I need to buy some stuff to maintain my bike, and was looking for some input on what to get for the 'essentials'.
I need a repair stand. I was thinking about this model from Amazon. Seems to have decent reviews. I have a step-through bike so I guess I just hold it by the seat post and that's fine?
I also wanted to adjust my saddle position and the seat post length, do I need a torque wrench for this? I found this one. Should I just get a fixed torque one? Or just use normal hex keys and save my money?
For cleaning the chain and drive train, is it worth getting one of those special chain cleaning tools and cycle specific degreaser or can I just use "LA's Totally Awesome" cleaner and degreaser from Dollar Tree and a couple of floor scrub brushes held together? The Dollar Tree product I have already because I use it diluted as a general cleaner. At full strength it can soften certain plastics and remove some paints so it's pretty strong.
Is there any other stuff that I'm missing that I need for basic maintenance that I'm missing?
Just ordered this, haven't received it yet. But the reviews are pretty good.
https://www.amazon.com/gp/product/B00D9B7OKQ/ref=oh_aui_detailpage_o02_s00?ie=UTF8&amp;psc=1
I've been thinking about getting this one: http://amzn.com/B00D9B7OKQ . The reviews seem good, it is a reputable brand, it folds up, and it looks sturdy enough in the typical problem spots (clamp rotation, etc.)
EDIT: Also, this is /r/mtb, not /r/bicycling.
You probably favor that chainring thus it has more wear. The more wear on the chainring the more space there is between the teeth.
When you put a new chain on it will not align perfectly with the teeth on your worn chainring (or your cassette cogs as your chain "stretches" over time, causing a little bit of a mismatch between chain links and teeth).
Since there is a little bit of a mismatch you will hear pops, creaks and your chain might slip occasionally. You can usually ride it out over time and allow your drive train to re-align itself (it can take a couple hundred miles if it's bad), but it's not a best practice. Ideally when this happens you would replace your cassette with your chain and any chainrings which are too worn. Chainrings tend to last quite a bit longer than cassette cogs.
Also, you can mitigate this in the future by buying a chain checker tool (like this). This tool will measure your chain elongation and when it becomes too elongated you simply replace the chain and avoid additional wear on the rest of your drive train, giving you a bit of added life (though I still replace my cassette about every ~5 chains and chainrings when they need it)
The following will get you out of most mechanical issues:
workstand
mini ratchet
set of hex bits for ratchet
1-10ish Nm torque wrench
10-100ish Nm torque wrench with adapter for 1/4" drive bits
Park spoke keys
homemade bearing/bb press out of plumbing odds and ends
Park chain checker
Park mini chain tool
Park chain whip
Park master link pliers
Park hollowtech crank cap tool
I'm 5' 10" 160lbs
Last 6800 ultegra chain got replaced at 2k miles.
Might have been work before that but if I recall was still good at 1500.
Used this wear checker and replaced when it fell through .75
http://www.amazon.com/Park-Tool-CC-3-2-Chain-Indica/dp/B000BR3LHQ
Chain checker. Or you can measure distance between pins.
Those cogs look fine man, if you suspect chain wear theres a tool for that
Park Tool CC-3.2 Chain Checker https://www.amazon.com/dp/B000BR3LHQ/ref=cm_sw_r_other_apa_i_BMtSCbQXRJKF6
Buy or borrow a simple chain checker, and re-index your gears. In addition, two simple cleaning steps can make things a lot smoother: wipe the gunk off your jockey wheels and clean between the cassette cogs by using a cloth and "flossing" between the cogs. Those steps can really make things work a lot better, especially if they've built up a lot of gunk.
Good luck!
loose bb cup and cone are still made, but thats besides the point.
a lockring spanner would be the best route, a flat head & hammer would work, but you likely damage the lockring
Park lockring tool is the standard for this kind of stuff. I like the Hozan version of the tool myself since it's forget but the park one works fine. Nashbar and other discount shops should have a similar one too.
I've got a park HCW-5 tool. If it's a stubborn ring, the three tooth end can grab three notches at once and I've been able to pop off all lock rings without too much difficulty. It's cheap and effective.
Quick tool question hopefully. Looking to further flesh out my bike tool box with more fixed-specific tools so that I can work on the bike more independently. What lock-ring tool(s) would be the most versatile to pick up? Is this one the go-to? I have a Crew District, with the stock wheelset and have had bike shops swap cogs and freewheels for me up until now, but want to get a bit more hands on with it. Also, the freewheel I currently have on their is an ACS crossfire, fwiw. From what I am seeing, that one needs it's own removal tool, also? Or do there exist more universal options?
If your wheels do not require an expensive tool, and just use the regular wrench, the procedure is very easy. Turn your bike upside down and use your brakes to determine straightness, if you have rim brakes. Then use the wrench to tension the side its out and un-tension the side its in.
this video is helpful
http://www.youtube.com/watch?v=svMMaGMsIMw
The tool I use is really cheap and works fine:
http://www.amazon.com/Topeak-Alien-26-Function-Bicycle-Tool/dp/B000FIE4AE
Get yourself a solid bike multi-tool such as this one, and a portable tire pump. Those will take care of 99% of things that'll happen on your average commute.
It wouldn't hurt to have some spare tubes, but the last time I tried changing a tire on my bike, it snowballed into an $80 repair for a new chain and derailleur, so I've vowed not to do that again.
I never leave home without my Alien 2 multitool. Highly recommended.
http://www.amazon.com/Topeak-Alien-26-Function-Bicycle-Tool/dp/B000FIE4AE
I really like my Topeak Alien II
http://www.amazon.com/gp/aw/d/B000FIE4AE
I picked up this Topeak Alien II but it doesn't have pliers or a knife but I do have an small leatherman which does. I figured a 26-function would cover most of things that could come up but I'm interested in what you dig up.
Edit: You're awesome. Thanks, man!
You can clean up the spoke rust with some steel wool or tinfoil. They'll look nicer at least :)
I rub anything that's prone to rusting (like my cheap spokes!) with an oily shop rag after cleaning the bike. Boeshield is a great anti-corrosion product that also happens to be a good bike chain lube. Drip type > aerosol
So I use my road bike as my means of transportation, I recently bought new tires and forgot to buy new tubes, the bike is a 74 schwinn le tour and the tires are 27 1/4. I was wondering what size tubing to use, also if I was looking to buy chain lubricant do you think this is ok? Thanks for any suggestions/help!
You will also need a good floor pump with a gauge(you should go for a good name brand one from a shop, but in a pinch one from academy or wally world should work) and a pair of tire levers like these(doesnt have to be those exact ones, any shop worth a grain of salt will have some).
And if you need help fixing the flat itself, Youtube is a great resource.
Did you know that some stingrays can swim at speeds up to 30 MPH? Go Stingrays!
I have a Park I Beam multi-tool, a spare tube, 3 Pedro tire levers, a patch kit, and a co2 inflater in a saddle bag I never take off.
Hey nice bike! If I were you I would add a saddle bag with some tubes, tire levers, and maybe get a small pump, and since you're just commuting the whole "it ain't aero" thing doesn't really fucking matter in my opinion ;) I would recommend this and these and this. Also read up on sites like Sheldon Brown for basics, and also I would recommend the GCN youtube channel for repair and maintenance. Also as far as locks go get a U-lock like this for most security and use this locking method. Have fun and stay safe, and feel free to ask any questions to me or any of the other people on this sub!
Shorts with liner, gloves, multi-tool, spare inner-tube, and maybe a pair of glasses, a set of tire levers, pump or C02, and a wicking T-shirt from any retailer.
That's what I started out with at least.
I cannot recommend the Rocket Ratchet enough for all-around, single tool efficiency. It's gotten to the point where I don't actually use the tools in my toolbox even when I'm at home. I just use the ratchet and it's way better. Any multi-tool with a chain-breaker will work, I've just had a really good time with that one.
After that a set of Pedro's. For my money, they're the best levers around. Great durability, can spoke-lock from both sides, and I've never ripped a tube with them, even on bullshit 23 tires.
After that basic patch kits, they'll use them all the time until they throw their hands in the air five years from now and scream "FINE I'LL GO TUBELESS."
Those are kind of the basics, and will allow them to work 90% of the stuff on their bike. The other 10% becomes more expensive and more specialized.
EDIT: oh, and a spoke wrench is the other cheap and highly useful item to have around.
Here's a cheap tool to help you guide the tire on and off the rim, LBS's carry them as well as online obviously
Just be careful not to pinch the tube outside the tire.
The brakes are probably pre bled. You will probably have to cut the cables to proper length though. If you are careful it can be done without needing a bleed, but its a good idea to have a bleed kit. If you ride often, you will probably want to bleed every 3 to 6 months anyways.
Also, you will want some good grease. This park tools stuff is good and can be used for headset and bb.
https://www.amazon.com/Park-Tool-PPL-1-Polylube-Grease/dp/B000NORVHI/ref=sr_1_1?ie=UTF8&amp;qid=1466124475&amp;sr=8-1&amp;keywords=park+tools+grease
Bleed kit like this would get you started if you have Shimano brakes.
https://www.amazon.com/Shimano-Brake-Bleed-Kit-Mineral/dp/B00F4LCS5A/ref=sr_1_2?ie=UTF8&amp;qid=1466124626&amp;sr=8-2&amp;keywords=shimano+bleed+kit
Edit: also, I noticed your comment below about making a headset press from a threaded rod and some washers. I do this. Used it to press in a couple headsets, and a press fit bottom bracket. Worked great and costs like $10.
Go at it! And above all, have fun. I did this earlier this year with a 1977 Raleigh Grand Prix, then again with a 1985 Lotus Challenger SX. It can get shitty at times, but its so worth it in the end. I feel like I tell everyone this, but Sheldon Brown is awesome and you can find almost everything you need to know there—at least enough for what you're doing.
As a side note, you'll need new grease when/if you take the bottom bracket apart, Park Tool's is really great.
Are you saying to use an oil based lube or grease like Park Tools
Bike shops have a chain stretch tool that allows them to easily see if a chain has stretched past its useful life. http://www.amazon.com/Park-Tool-Chain-Indicator-CC-3-2/dp/B000OZFIMQ
http://www.amazon.com/Park-Tool-Chain-Wear-Indicator/dp/B000OZFIMQ
Get a chain measuring tool http://www.amazon.com/Park-Tool-Chain-Indicator-CC-3-2/dp/B000OZFIMQ At 0.75, replace the chain. After doing this 3 times, replace the chain and cassette
A chain wear tool could be a good addition to bullet 2, rather than using mileage.
Rust inhibitor.
I usually just shoot some aerosol lubricant into the holes when I'm doing my spring maintenance routine.
The frames are actually the (relatively) superior part of the bargain with Masi.
The components tend to be middling and the wheels are generally cheap and heavy. All in all, they are very serviceable in stock trim, but to get that price point something has to give.
Make sure you (or a shop/someone with experience) uses something like FrameSaver in order to prevent the steel from rusting internally.
I used a Masi CX to tour the Pacific Coast Highway and could not have been happier with the performance/cost/value of the frame. I swapped out every other part over the course of 6 moths prior to the tour (with the exception of the headset).
that headtube looks right for a person 6ft tall. For bicycle touring, slighter bigger frame is better than a slightly small frame because it makes it easier to adjust the cockpit for comfortable long duration riding
I would powdercoat the frame, which is way more durable than any paint. It's also cheap. ( you can consider powdercoating much of the bike. Frame, fork, waterbottle cages, racks, etc. Disc bike owners can consider powdercoating rims) Here in western Washington (Seattle area) powdercoating runs $75-$100 for frame and fork. If you do go the powdercoat route, buy a can of JP Weigles FRAME SAVER. The powdercoat process heats the frame to about 350-400 degrees which eliminates all moisture in the frame. Frame Saver AFTER powdercoat)
I would start the show by concentrating on the weakest link on a touring bicycle.... the wheels and the drivetrain!
Start watching wheeling building videos on youtube. Subscribe to r/wheelbuilding. Buy a set of Shimano XT 36h hubs and a set of 26 inch rims. (Velocity Dyad, Sun RhynoLite, etc)
back in the late 80's when mountain biking was new I bought a brand new Trek 950 lugged frame mountain bike. 24 years later I toured around the perimeter of the USA on it. The only thing original on the bike was the frame/fork. I upgraded all other components including building the wheels.
videos to watch
"How to upgrade vintage bike with sealed cartridge bottom bracket"
Bottom Bracket differences, why they are critical
American bottom bracket; crank conversion
How to remove install sealed cartridge bearings
How to overhaul a bottom bracket
EDIT! if you still have the spindle (in the bottom bracket) KEEP IT! so you can measure it for the new sealed bearings.
Outside paint, inside framesaver. I used framesaver on my Surly touring frame and leave it outside all the time when I'm on tour. As long as you touch up any paint chips, it's likely to last much longer than an aluminum frame. For me, it's the catastrophic failure that can happen with an aluminum frame that turns me off. Steel bends, Aluminum breaks. http://www.amazon.com/Weigles-Bicycle-Frame-Saver-Inhibitor/dp/B0012GO58Y
A bike-specific multi-tool is nice in case something goes wrong.
I use this one personally.
For a long ride?
I also carry shoe laces and velcro, in case I need to tie something up or down.
here's a list of stuff i have and use frequently that i feel others would probably appreciate: airzound air horn, one of these two mounts, multi-tool, CO2 tire inflator, there's no such thing as too many patch kits, bikeglow safety light, PDW danger zone tail light, lezyne micro floor pump, louis garneau super prestige cold weather gloves
By slip I mean fail to catch (rides on top of the sprockets) until it suddenly snaps into place. Is that what you understood?
Any idea if http://www.amazon.com/Crank-Brothers-Bicycle-19-Function-Silver/dp/B0012Q41HY/ref=sr_1_1?ie=UTF8&amp;qid=1342369989&amp;sr=8-1&amp;keywords=crank+brothers has a chain wear indicator? Just says "a universal chain too"
Crank Brothers multitool is really good. You just can't take wheels off with it.
http://www.amazon.com/Crank-Brothers-Bicycle-19-Function-Silver/dp/B0012Q41HY/
You can get one from Amazon for $15.00
http://www.amazon.com/Park-Tool-Shimano-Cartridge-Bracket/dp/B001A0AIAG
The biggest difference between cranksets is roundness, a more expensive crank is going to be rounder which means there's a smaller difference in chain tension which means it "absorbs" less energy is more silent. Expensive cranksets are also stiffer, but unless you're putting out 3000 watt that isn't really an issue.
That conversion kit looks like a bad idea, it's a bunch of the cheapest components being marketed as "hip".
They're called riser bars, as long as you find a bar with same diameter (probably 25.4 or 26 mm on older road bikes) you can keep the stem and headset.
Park makes super nice tools, and that stand is a great choice. But I'd really consider buying tools along the ride, instead of shelling out big time for this huge set. Since you are a tool guy you probably already have a good part of those wrenches and keys, so it'd be better to move a bit of that budget towards your bike.
For this conversion you'll need these tools:
This totals about half of what you'd pay for the complete set, so I'd go for the complete set if you need all the wrenches, but otherwise you can put an extra $100 into your conversion.
A simple tool to help got the tire off and on when you need to change a flat.
Here is a shot of a tire lever in action...
http://www.amazon.com/Park-Tool-TL-1-Tire-Lever/dp/B001B6NFH2/ref=sr_1_2?ie=UTF8&amp;qid=1372116179&amp;sr=8-2&amp;keywords=park+tool+tire+lever
Park Tool or Pedro. Last forever, can't go wrong.
http://www.amazon.com/Park-Tool-TL-1-Tire-Lever/dp/B001B6NFH2/ref=sr_1_1?s=sporting-goods&amp;ie=UTF8&amp;qid=1335817776&amp;sr=1-1
http://www.amazon.com/Park-Tool-Freewheel-Remover-Freewheels/dp/B001B6RGXG?tag=viglink20261-20
As everyone already said, you need a new freewheel.
I cant tell if thats a 6 or 7 speed freewheel, but here is the 6 speed and
here is the 7 speed part you want.
and you need this to get it off.
There are a million freewheel replacement videos on youtube that you can watch to see how its done. Once you get the old one off ( and it will be a bitch to get off... most freewheels are) popping on the new one is stupid easy.
That's great. I would bet any LBS would make the switch for you if you bought the kit there or you will need these
This
, probably this but different manufacturers have different ones
, And this guy
the tools are Super worth having but I here you're on a budget. Call up you LBS and see what they say.
You have a square taper bottom bracket. It's a common standard, they'll fit. Your biggest concern will be making sure the crank length is the same (probably 175mm, you'll want to measure though) and the same or similar tooth count on the chain rings, although if you wanted to change that up to bigger or smaller rings now would be the time. To know what size your current chain rings are, just count the teeth.
If you do the work yourself, you're going to want a crank puller - there are cheaper versions of this tool, but I've not had good luck with them. You'll also need a 15mm crescent wrench to get the other pedal off, a set of hex keys or metric sockets to get at the crank arm fixing bolts, and a torque wrench to set the torque on the bolts when you reinstall (if you're in the US, an auto parts store like Autozone will loan you the torque wrench). And watch a couple Youtube videos to get oriented, I like RJ The Bike Guy.
Two options to replacing it yourself are to take it to your LBS, and if you do that then probably just best to take them the bike and let them order the part. OR, and this is my favorite, find your nearest Bike co-op. In return for a small donation of time and/or money, they will likely have the correct crankset in their used parts bin for cheap or free, and a fully stocked repair station for you to use and somebody to show you what you're doing. Bike co-ops rock, if you're lucky enough to have one near by.
OK, I'm thinking we do this in stages.
Stage 1 which will allow you to get it riding now and will be perfectly capable of a 4-5mi round trip.
Cable Cutters ($20) stick to the better units but probably no need to go for Park Tool. BBB make a nice one, although I currently have an IceToolz cable cutter because I can't find my good ones.
For the brakes you will need a 4th hand cable stretcher like this Pedros ($17) unit which is a third the cost of a Park Tool unit.
Will also need cables, easiest way is to grab a DIY Jagwire ($24) kit which has both brake and shift cables.
These Vittoria Zaffiro tyres are a good compromise of value, durability and performance. I use these a lot and they're on my training bike. Will also need tubes, and being a commuter, flats are not your friend so these Schwalbe tubes are a good idea. ($60)
Arundel cork bar tape ($20)
A new chain for your bike is probably the only way forward, and this KMC is perfect ($6)
The brake pads on your calipers will now doubt be old, and also a 30yo pad compound, so not overly efficient. Would strongly recommend these Kool Stop Continental brake pads as a starting point before we get to Phase 2 ($10)
Grease for the Bottom Bracket and Headset (and wheel hubs) is also needed, but there's absolutely no need to buy bike-specific grease, so this Valvoline tub as an example would be ideal ($10) .
The chain needs to be lubed, and in dry conditions I like Finish Line dry lube. Others will have their own preferences, but this is a good starting point.
Also should think about replacing the saddle, but this is very subjective and not something that can be recommended in terms of which saddle to buy. Maybe scoot around Craigslist for your area and see what comes up..
In terms of learning the skills, the Park Tool video channel is surprisingly good although heavy on product placement and endorsement although this is to be expected. There are lots of alternatives to Park Tool tools though, including Pedro's, BBB and others. None of the skills associated with your era of bike are all that difficult, and refurbishing this to be usable in your context is completely feasible in your garage.
May also want to consider buying one of the entry-level bike toolkits like this tool kit as a starting point ($40) although this is just an example however is the same kit as others sell just rebranded.
So phase 1 (not including the tool kit) is about $160-ish and watching a bunch of videos.
sorry for the essay, but once I started it just sort of kept going. Phase 2 is removal of existing driveline, and upgrading to a Shimano 2x8sp indexed group with modern dual pivot calipers and modern alloy wheels. But we can cover that later.
I've heard that this dry teflon lubricant is supposed to work well.
Finish Line DRY Teflon Bicycle Chain Lube, 4-Ounce Drip Squeeze Bottle https://www.amazon.com/dp/B002IDZXRM/
I will second or third or whatever the SRAM 9 speed chain.
Why are you replacing your chain btw? If it is skipping or something similar, have you checked with a chain wear measurer thingy? If it turns out your chain does not need to be replaced, that tool would be a lot cheaper than a chain. I use one I got from performance for 3 or 4 dollars.
Also, if you have put a lot of miles on your chain/cassette, you may want to look into replacing the both of them together. A worn cassette with a new chain will wear out the chain more quickly and won't shift as well as you would hope it would. 9 speed shimano cassettes and chains are so cheap you could probably get away with replacing both for about 50 or 60 bucks.
Here's a wheel. It has a quick release axle, but will work well.
You could either buy this tool to remove the freewheel (gears) and switch them to the new wheel or you could buy a new freewheel set.
You need something like a crank puller such as
(assuming its a square taper or similar)
http://www.amazon.com/Park-Tool-Puller-Square-Cranks/dp/B001VS1M20/
to remove the old crank. Depending on the prices of your local bike shop, its probably cheaper to buy the tool and DIY.
It should be a fairly straight forward job, assuming that you are fairly handy. The key thing to look out for is making sure you put the cranks on tight enough, but not overly so that it cracks the crank. Then there are some other minor adjustments that you might need to make. E.g the front derailluer/shift probably need to be adjusted, it might be as simple as to playing around with the cable and limiting screws, or you might need to adjust the height of the derailleur.
If you are new at this, you probably need to spend a good afternoon to swap it over.
So it depends on $$$$ vs time.
One of these helps.
Bikehand Pro Mechanic Bicycle Repair Rack Stand: https://www.amazon.com/dp/B00D9B7OKQ?ref=yo_pop_ma_swf
I suggest using some Teflon Dry Lube. /s
hot damn theyre taking you for a ride. here is a replacement on niagra cycle. if youve got a freewheel removal tool you should be able to transfer everything over. only downside is that it might be slightly out of true when you get it.
From the photos I would say the seller doesn't practice good chain maintenance. The big chainring looks very knackered, there are teeth badly worn. This is usually a result of someone not knowing that chains need to be replaced regularly or putting it off. I can't say for certain from the photos but the cassette and chain probably need to be replaced. There is a cheap tool - any bike shop could also check it for you.