Best ceramic & pottery supplies according to redditors
We found 238 Reddit comments discussing the best ceramic & pottery supplies. We ranked the 117 resulting products by number of redditors who mentioned them. Here are the top 20.
We found 238 Reddit comments discussing the best ceramic & pottery supplies. We ranked the 117 resulting products by number of redditors who mentioned them. Here are the top 20.


It’s called PMC, Precious Metal clay.
It’s 99% pure silver and can either be torch fired or kiln fired. It’s a lot of fun to work with.
PMC
looks like they are a thing
https://www.amazon.com/dp/B07MMDVHQ6/ref=cm_sw_r_cp_api_i_vjhUCb550MKCD
Update:
> Dried at 50% humidity and 70 degrees F for 6 days. A little too dry tbh.
> I didn't defoliate enough and therefore had a LOT of airy buds. Roughly 350 grams worth. Then another pound of quality trim. Didn't count any of that in the 850g total. Started shooting it today, hoping for some quality shatter.
> * Overall extremely happy with this grow. It was my first hydroponic grow. My first grow with these lights. My first grow with this strain. And it went terrific. Had alot of fun.
Grow Journal:
Date| Day| pH| ppm| Temp (°F) | RH (%)| Lighting | Watering Schedule | Lighting Schedule | Notes |
---|---|----|----|----|----|----|----|----|----|----
6/04/18| V3| 6.0| 453| 66.7| 60 | 2 x 200W-Roleadro |3hr Intervals | 24/0 | n/a |
6/11/18|V11|5.8|468|69.6|57|157W x 4 Vero29| 4hr Intervals | 24/0 | Stem/Stretch Problems, PH problems.
6/18/18|V18|5.5|880|71|62|170W x 8 Vero29|4hr Intervals | 24/0 | pH Problems in Remediation, Necrosis on Plant 2
6/25/18|V25|6.1|950|70|62|180W x 8 Vero29| 3hr Intervals | 24/0 | pH/Necrosis problems resolved. Topped. Nute burn.
7/07/18|V37|6.4|850|73|66|320W x 12 Vero29|3hr Intervals | 24/0 | Skipped week due to vacation. Transplanted. Vigorously LST-ing to keep up with growth.
7/20/18|V51|6.4|820|70|62|500W x 12 Vero29| 3hr Intervals | 24/0 | Work trip means going forward I only see my girls 2 days a week. Continuing to top and LST and trim leaves. Flip imminent.
7/30/18|V60|5.8|860|74|55|640W x 12 Vero29|3hr Intervals | 24/0 | Pre-Flip Looking very healthy.
8/05/18|F06|5.7|750|76|54|900W x 12 Vero29| 3hr Intervals | 12/12 | Post-Flip Extremely fast growth. Ran at 1000PPM past week - too hot. Dropping to 750ppm.
8/11/18|F11|5.8|850|74.5|61|900W x 12 Vero29| 3hr Intervals | 12/12 | Stretch!!!
8/19/18|F19|5.8|750|77|65|900W x 12 Vero29| 3hr Intervals | 12/12 | Holy Mother of Stretch
8/27/18|F27|5.9|650|75|70|400W x 8 Vero29, 600W x 4 FOTOP boards| 3hr Intervals | 12/12 | New lights, lots of pistils
9/03/18|F34|6.1|740|78|52|400W x 8 Vero29, 600W x 4 FOTOP boards| 3hr Intervals | 12/12 | Starting to chunk
9/13/18|F44|5.9|810|76|50|400W x 8 Vero29, 600W x 4 FOTOP boards| 3hr Intervals | 12/12 | Very rapid growth. Some foxtailing on seed #2 - seems to be genetic.
9/22/18|F53|5.8|610|72|52|400W x 8 Vero29, 600W x 4 FOTOP boards| 3hr Intervals | 12/12 | Lowered nute concentration to finish up.
9/29/18|F53|5.8|100|70|54|400W x 8 Vero29, 600W x 4 FOTOP boards| 3hr Intervals | 12/12 | Harvest! 850 grams of quality buds for .85 g/W
Medium:
> Germination: Starter Plugs
> Veg: 1/2 Gal Nursery Pots > 1 Gal Nursery Pots > 5 Gal Fabric Pits
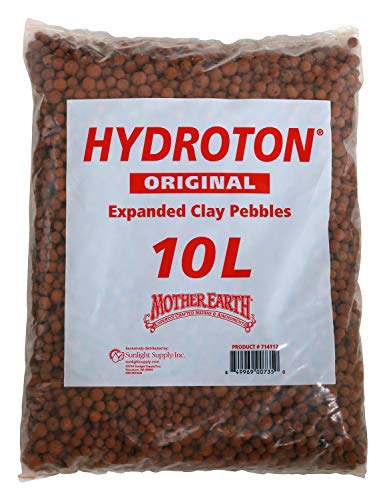
> * Hydroton
Environment:
> Tent: 5 x 5
> AC inside, Venting Outside with 450CFM fan
Nutrient List:
>
> Flora Trio
> Diamond Nectar
> Armor Si
> Floralicious Plus
> Mammoth P
> Hydroguard
> Great White Mycorrhizae
> FloraNectar
Other:
> [DIY LED Album] (https://imgur.com/a/QZYXtt1)
> [DIY Flood Table Details] (https://www.reddit.com/r/microgrowery/comments/8myjvg/finished_my_first_flood_table/)
>* Past Grows: 1 & 2
Always looking for feedback! :)
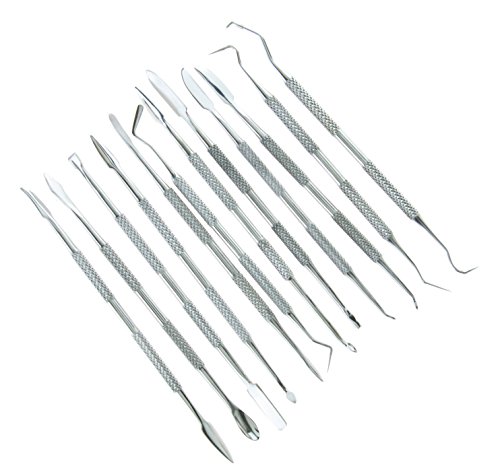
They're actually just wax carving tools and, IMO, this is a much better set.
Its actually Chavant Clay
They are clay/wax sculpting tools
http://www.amazon.com/SE-DD312-12-Piece-Stainless-Carvers/dp/B000SVRSRY/ref=sr_1_6?ie=UTF8&qid=1418578480&sr=8-6&keywords=clay+sculpting+tools&pebp=1418578503800
Hahaha, yes. Sculpt Gel is a product from Mouldlife, in the UK. Here's an info sheet on in it.
In North America there's a product called Skin Tite
and Third Degree
and Brick in the Yard has a Gel-10 cut kit
Brick in the yard also have an amazing youtube channel, if you've not checked it out yet :)
If you're in a colder climate (because in hotter climates it will melt off your face), you could also use gelatine, which is awesome and more affordable. Here's a video on how to make your own movie grade gelatine at home.
This is the plasteline I use using.
These are the teeth, but it looks like they're unavailable right now. There's similar ones on other sites.
I will try to make a video on how I did it over the next week, and upload it to my youtube channel (which has just passed half a million views, HOLY SHIT.)
edit: adding more info. Brick in the Yard also have a bunch of videos on how to do a face cast, if you want a plaster mould of your face (I used alginate for mine). And there's a bunch of brush-on casting silicones which you can use to make a mould of the plasteline, I just purchased some pinkysil, and the resin I used was the trowel-on, but there's heaps of different things you can use.
Let it cure a bit for hard edge sculpting. Use an old razor to slice off little equal chunks. It's pretty sticky and will ruin a nice blade. Cut off very small amounts at once until you get a handle on your skills, think a few grains of rice. When you pas the sculpt time, just smash the blobs onto bases and make mud or sandstone. When it's to far gone, it will just fall off, so rocks can easily be glued back done. Balancing stickyness and hardness is really key.
Go out and grab a huge pile of dental tools for cheap. The little paddle and shovle kind, not the wire picks. I own several real deal sculpting knifes but I go back to that one dental tool I like the best. Amazon has lots, but they are really common.
A good first project is layered sandstone for bases and other base elements to get a feel for moving it around. Then try out gap filling then furtrim and chain mail.
It's a little blurry, but it looks like you need to mesh the greenstuff onto the cloak a little better. It looks like there is a gap between the two?
Having the gap on the shoulders is fine, since it is sitting on top of them, but you want it to blend into the cloak itself, since it is supposed to be part of it.
Do you have a sculpting tool? They help a lot when dealing with greenstuff, especially for keeping your fingerprints off of it.
This is what I use;
https://www.amazon.com/gp/product/B000SVRSRY/ref=oh_aui_detailpage_o05_s00?ie=UTF8&psc=1
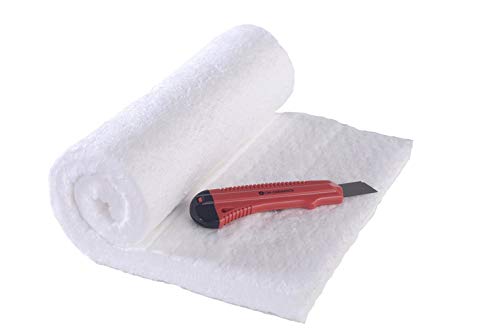
http://www.nutec.com/ceramic-fiber-blanket
$100 on amazon for a 1"x2'x25' roll. https://www.amazon.com/Ceramic-Fiber-Blanket-Insulation-Degrees/dp/B01HLM8PII
Edit: The amazon link doesn't list manufacturer but it's Nutec HPS 8 pound.
https://www.amazon.com/dp/B000SVRSRY/ref=cm_sw_r_cp_apa_wbCYAbCYNG33G
Thanks for all the replies! So let make sure I'm getting this info correct, it's fine to dab with Stainless Steel? I would not be endangering my health by dabbing with these? http://www.amazon.com/SE-DD312-12-Piece-Stainless-Carvers/dp/B000SVRSRY/ref=acc_glance_sg_ai_ps_t_2
https://www.amazon.com/gp/product/B01C7X7D3E/
Wax Carving Tools are one of the best investments I've made.
As well as one of these or these, depending on the vape you use.
I used something very similar to this. This is not the exact same product, but I bought one that's basically the same at a local store. There are lots of good tutorials on YouTube on how to use these things.
Definitely MDMA or speed if you're in the college scene. 20g amphetamine paste (So around 15g dried) for $60 and you can sell that for around $100 a gram as powder or $10-$15 for 80mg in a cap.
So $65 for the tools to make good capsules. From here you can either spend $60 on 20g of speed paste or buy some ecstasy. If you do the 20g of paste you'll likely wind up with 15g of powder, enough to make 187 80mg speed capsules. If you sell for $10 each, that's $1,870. Minus the initial investment of around $140, you're left with at least $1,730.
Seconding the Kemper recommendation.
These are cheap and cheerful too, depending on the scale you're working at. https://www.amazon.com/SE-DD312-12-Piece-Stainless-Carvers/dp/B000SVRSRY/
Only need 2 bricks. and the burner is very affordable, albeit a little unsuitable. its the cheapest way to accomplish what he's trying to do. its like the definition of hobbyist tools.
These and these. Oh and This. I also recommend getting a pasta machine or something like it. Heres one by sculpey.
I'm using some metal sculpting tools, Here's the set I'm using, a lot of sculpting comes down to experience and practice, life-drawing lessons always helped but besides that I've picked up some tips and tricks here and there. note some of these tips only relate to Sculpting with Super sculpy.
For the love of god make a sturdy armature
Thin pieces of sculpy can be cooked in boiling water anything below 8mm for about 15 minutes
when sculpting the eyes/eyelids It's much easier to use solid eyes. I usually roll 2 balls, throw them in some boiling water and then once they've hardened jam them into the eye sockets. It's much more forgiving when the you're trying to tuck in the eyelids around the eyeball and it doesn't give way to your tool
You can use lighter fluid to smooth out Sculpy, get a small sturdy paint brush and dipping it into lighter fluid you can use it to manipulate the Sculpy to get some nice flowing lines and soft edges.
thats the most I can think of off the top of my head.
SE DD312 12-Piece Stainless Steel Wax Carvers Set https://www.amazon.com/dp/B000SVRSRY/ref=cm_sw_r_cp_apa_i_GAPFDbPW0RSP7
Apoxie Sculpt 1 lb. White, 2 Part Modeling Compound (A & B) https://www.amazon.com/dp/B0013UDWXI/ref=cm_sw_r_cp_apa_i_9APFDb4BZREHF
Sand Detailer Finishing Kit, Finer Grits, 24 piece https://www.amazon.com/dp/B0039ZCQAK/ref=cm_sw_r_cp_apa_i_BCPFDbBV5SSGW
SERONLINE 24pcs Ball Stylus Dotting Tools, Polymer Modeling Clay Sculpting Tools Set Rock Painting Kit for Sculpture Pottery https://www.amazon.com/dp/B0776SN7Y5/ref=cm_sw_r_cp_apa_i_JDPFDbTH56VM0
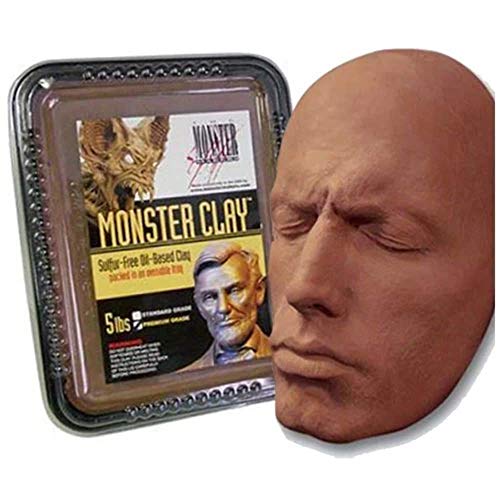
Monster Clay Premium Grade Modeling Clay (5lb) https://www.amazon.com/dp/B0722NKKYF/ref=cm_sw_r_cp_apa_i_dEPFDb1WPY7K2
$20 anvil: https://www.harborfreight.com/15-lb-rugged-cast-iron-anvil-69425.html
$4 ea pliers: https://www.harborfreight.com/11-inch-long-reach-needlenose-pliers-with-straight-jaws-39538.html
$1.25 magnet: https://www.harborfreight.com/4-piece-magnetic-welding-holders-93898.html
Your choice of a $9 hammer: https://www.harborfreight.com/3-lb-hardwood-cross-pein-hammer-69049.html or a $6 hammer: https://www.harborfreight.com/2-lb-hardwood-engineers-hammer-69226.html
$38 torch head: https://www.homedepot.com/p/Bernzomatic-TS99T-Trigger-Start-Swivel-Torch-Head-TS99T/203694961
$19 fire brick: https://www.amazon.com/dp/B007VEOIVA/ref=cm_sw_em_r_mt_dp_U_lUJwCbX49QQN5
$2.30 ea hose clamp: https://www.homedepot.com/p/Everbilt-7-in-Stainless-Steel-Clamp-6799595/202309383
And maybe $5 in metal corner guard.
Less than $100 in materials. Maybe $30 in shipping? That leaves almost $150 in profit for someone. And it's all poor materials. The only thing that's useful out of all of that for a beginning smith is the hammer. Definitely steer clear.
Special thanks to u/Morgan-3D and u/Lps2 for the STLS! I modified the Poseidon/Mod holder to fit my Joytech infinite....had an error when printing and it ended up being a perfect fit for the reverse banger and grommet. Coil holder and second Poseidon stand are awesome, thanks again to everyone here for providing so many tips. Happy Sunday y'all!
Details:
Joytech Espion Infinite & Sai TAF (Awesome Mod, but no Arctic Fox compatibility. The TCR mode is great so I don't feel like I'm missing out too much; I have a backup VooPoo I'll get around to flashing soon).
Usually running Triple Black Ceramic, TCR 366 / 27 Watts / 360 - 430 / Locked @ 0.29 with the Reverse Banger on a halfway decent rig. I get very solid clouds and throaty strong rips all day. I have some ti & quartz buckets to try but I'm so happy with the Triple Black I haven't got around to it yet.
Favorite items are obviously the 3D Prints and Reverse Banger. Loving this wax Carver kit (you can't beat this price anywhere) : SE DD312 12-Piece Stainless Steel Wax Carvers Set https://www.amazon.com/dp/B000SVRSRY/ref=cm_sw_r_cp_apa_i_CMOQCb61J6RYC
Also, this ultrasonic cleaner and portable case with ice packs is a must for me (all recommendations from waxpen & r/saionara):
Ultrasonic: Yesker Professional Ultrasonic Jewelry Cleaner with Digital Timer for Eyeglasses, Rings, Coins https://www.amazon.com/dp/B001DKDAVW/ref=cm_sw_r_cp_apa_i_zNOQCbYCNV3EB
goldwheat Portable Insulin Cooler Bag Diabetic Organizer Medical Travel Cooler Pack + 2 Ice Pack https://www.amazon.com/dp/B01E3MS782/ref=cm_sw_r_cp_apa_i_7NOQCb3RB56GX
Never would have got this dialed in without these subs & HVT! I am barely even using flower anymore.
in a nutshell, you sculpt a cap, make a mold out of it with silicone, then make the cap by pouring in a hardening plastic resin.
Personally I would go with a decent quartz banger. Those glass nails, like the one that comes with your piece, are prone to break - but it is still very usable.
With the piece you linked, you'll need a 14mm female. Here is a very basic article on glass joint sizes and male/female genders - edit: looking for a better reference.
The general rule of thumb for male and female joints is if it inserts INTO a glass joint it is a male - Think penis. If it slides OVER a glass joint it is a female - Think vagina.
For example, the glass dome (and the bowl) on the piece you linked is a female joint because it slides over the male joint (not pictured) on the downstem.
While Ti nails are perfectly fine, I prefer quartz. I think the flavor is better, but this is just my opinion. There are a lot of options out there for nails, try them out and find what suits your tastes.
You can get along just fine with a banger by itself but, to get the most out of it you should learn how to use a carb cap. There is a learning curve with everything but through trial and error you'll eventually get to MLG360no-dome globfather status in no time.
As far as domed vs domeless, the piece you linked comes with a glass dome, which you would need if you used just a regular nail insert such as the glass one that comes with your piece. Here is an example of a domeless Ti nail, and here is one similar to yours with a dome and Ti nail insert.
Notice how the domeless nail has a an opening, or channel, in the middle for the vapor to flow through as you inhale. You don't need a dome to capture the vapor with a domeless nail. This is really the difference between the two types as the standard nail insert is basically a solid dish with no airways on the surface.
There are many styles of domeless nails but hopefully this will give you a general idea about the differences between the two.
I should add that with a domeless nail, you won't need a dome, but you will want to learn how to use a carb cap. Also, as /u/snobord mentioned, the carb caps are going to be different depending on what type of nail you decide to use. If they don't match up or properly restrict airflow, the caps will not work as intended. So be sure to do your research before deciding to pull the trigger.
You'll also need a dabber or dab tool to apply your concentrates to your nail. Personally, I use a Ti dabber with a ball point tip because it makes it easier for me to collect my rosin after I press it. There are a lot of options for dabbers as well and really I think it comes down to personal preference.
edit:
>/u/snobord
>The type of your concentrate is going to affect the kind of dabber you want to use. The ball point wouldn't be ideal for crumble, for example. I personally bought a stainless steel wax carver set from Amazon so I'd have all the bases covered.
Finally, you're going to need some sort of storage container for your concentrates like a wax wallet or something similar. A quick google search should point you in the right direction.
edit:
>/u/snobord
>As for the silicone containers, bought 10ish (don't remember exactly) of them last year, used them one or twice and basically haven't touched them since. The main reason is I pick up from dispensaries and it comes prepackaged in half/one gram packs and the process of transferring it over isn't even worth the effort. This is definitely a matter of opinion though so my point is just that op should try it out before buying a bunch.
Several edits later: If I missed the mark on anything let me know. Op, hopefully if I wasn't able to answer your questions someone more experienced can chime in and get you on the right path.
Good luck, and happy dabbing!
This sounds FANTASTIC! A few questions on it.
Amazon.com: Reusable Clay Mold Making Only Use Hot Water. Eco package (Clear White, 8pcs)
https://www.amazon.com/Reusable-Making-Water-package-Clear/dp/B07M9XS3FX/ref=sr_1_1?keywords=Blue+Stuff+mold&qid=1566159397&s=gateway&sr=8-1
REUSABLE Blue Stuff plastic moulding for all levels.
http://www.greenstuffworld.com/en/reusable-blue-stuff/8-blue-stuff-mold-8-bars.html
Am I correct in assuming both products are pretty much the same stuff and work identically? Any advantages/disadvantages for one over the other?
I also found what looks like a helpful DIY video on YouTube:
(14) Blue Stuff/Oyumaru - How to cheaply cast miniatures or plastic models - new version - YouTube
https://www.youtube.com/watch?v=mVZLXLaidjQ
So, $8.82 for a wax carving set:
http://www.amazon.com/SE-DD312-12-Piece-Stainless-Carvers/dp/B000SVRSRY/ref=sr_1_1?ie=UTF8&qid=1370102302&sr=8-1&keywords=wax+carving+kit
I don't know what to tell you with specifics for Spain, but I can give you some general info that may or may not be helpful to you.
First off, there's this link in the sidebar. It'll give you a bunch of options.
Your hobby knife and mouldline remover will be the same thing. The handles all function the same way. However, I'd recommend picking up some kind of hobby knife set so you get a variety of blade shapes to try and multiple handles to use. #11 blades are the standard, and I prefer X-acto brand, but your mileage may vary. Some larger blade sizes won't fit into smaller handles. Buy in bulk to save money. You can remove mouldlines with the back of a blade, rather than a separate tool.
Any kind of cheap and well-reviewed wax tool / clay tool / dental tool set will work for scupting. Same deal with needle file sets. And with your pin vise. The drill bits will break (for any set), though, and bits can be problematic to replace if you're not sure of exact sizing.
1200C is just under 2200F, which you can get with a cheap pottery kiln. Here's one on Amazon for $530 https://www.amazon.com/dp/B01LYOCRSG/ref=cm_sw_r_cp_apa_i_I3XoDbQG7D500
The expensive ones go much hotter and have higher volume, but for this application, 2200F and a 6" cube internal space are all you will likely need.
Do you not worry about the grass underneath catching from the heat of the bowl? I wonder if putting a couple of these under it would help? Maybe you don't have to worry about grass fires in the UK? I am in Oregon and grass fires are a huge worry here.
I use Aves Apoxie Sculpt; the regular is a grey color. Tutorial hereSame two-part compound idea, but it will thin (and clean) with water before hardening and is a finer grain than green stuff (so it files/sands nicer (smoother). Very easy to manipulate & shape with wax shaping tools
Well, for what? :) The most famous in my kit at work is this silver spoon I use for crumble. It's small, like a child's spoon (not baby), has the handle attached to the side in a curly way that lets it stand up when I set it down. Curls right around the index finger. I'd chop it up into logical bits, then use the spoon to manage the pile and load onto PTFE tared on the scale, then quickly fold the corners together, make a funnel, and deliver the load into the jar. That spoon got me from 600 jars a shift to 1200 jars a shift. Found it on Ebay and won it at auction for $12. On desktop, not gonna search for a pic of it right now, but it's rad.
That spoon, the kitchen scraper, and a flat-bladed dab tool are about it...AH. Ready? THIS combined with what I call 'The Shovel'-- rightmost tool-- can move sugars and sauces at quite the rate too. That linked set, the kitchen scraper, the ear cleaning tool, and my silver spoon finally gained at 49 yrs old are my basic needed toolkit for concentrates.
And this chair.
4th tool from the left http://www.amazon.com/SE-DD312-12-Piece-Stainless-Carvers/dp/B000SVRSRY/ref=sr_1_16?ie=UTF8&qid=1415246554&sr=8-16&keywords=pottery+tools is my favorite for keeping seams down and keeping my fingers out of harms way!
These are the only craft related thing on my Amazon list. I'm a jeweler by trade and would use these in wax carving for models.
Lunar Supplies
Like these?
After trying just about every method of using concentrates, I find that my prefered method is a nectar collector, This one is a great starter kit. This guy makes awesome stands with a 3D printer and sells them super cheap. An enail is outrageously expensive and more for the party session style. Pens just don't get hot enough and it's not an on-the-go kind of set up. Get a professional grade butane torch like this one, and borocite dish like a mini-ramekin. Oh, I almost forgot, I would upgrade to a quartz tip as opposed to the titanium one it comes with. Sorry, I'm at work and keep remembering things to add- essentially, of all the methods, I prefer the nectar collector or honey straw method simply because it give the most control when hitting. Another handy thing to pick up is a set of wax sculpting tools
.
As far as my "recipe", I usually get diamonds or crystals and then top them off with some distillate sauce. This is mostly because I draw really hard and can't help it, so sauce prevents the crystals from shooting straight through the straw.
Overall, I hate to say it, but when learning how to use concentrates, just be flat out prepared for losses and accept the trial and error process. Eventually, you'll find your groove with it. I promise.
Btw In regards to miniature casting, whats a good resin to use with https://www.amazon.com/Smooth-Silicone-Smooth-Cast-Plastic-Compound/dp/B01D9BUSI0/ref=cm_cr_arp_d_product_top?ie=UTF8
Unfortunately there's no magic to it. Carefully sand away (2500-3000 grit) the previous poor touch up job (use the sandpaper wrapped around the credit card trick). Make sure you get rid of all the crappy prior job, then clean it up with isopropyl alcohol. Then start laying in the paint, then the clear coat, making sure you keep it as level as possible so you don't have a bubbled up bit of clear. Then if you have the time/patience you can wet sand and polish to really perfect it (that depends on the severity of the chip/scratch if it's worth it)
A tool like this, or this is incredible for touch up, since the brushes that come in most bottles are too big to be useful. This video shows him using that tool, and how useful it is. I can't recommend it enough.
They are soft refractory bricks. They go by a dozen different names, Kiln bricks, fire bricks, insulating bricks, etc... These are the ones i have but I didn't buy them on amazon. I found a local pottery supply store( If you are in the Mass area I can suggest one) that sold them for $4 a brick.
I think O1 treating process is similar. I heat the steel to 1500F, You can test by seeing if it is non-magnetic (You can see my cheap telescoping magnet on the ground in pic 1) 1084 is non-magnetic at about 1450F or so. Then lower it edge first into the vegetable oil.
This is a great video on the forgeand process but with O1.
One last tip on the forge, don't be cheap on the torch... I had bought the cheap benzo propane torch at first and it didn't get hot enough at all. After trying whatever i could, I finally just bought the benzo ts8000(about $50) and it works wonderfully.
These are just the tools that I use, you don't have to use them but it makes the job easier.
Process:
With this setup, I can cap over 100 caps an hour, each one weighed out to the same weight. Using #1 caps each ends up about 1/2 full, filled with .1-.15g of MDMA.
No problem and as a reminder you can definitely find Super Sculpey, Super Sculpey Firm and Sculpey III at most of those box-store mini-mall art stores you mentioned (Michael's, Hobby Lobby and JoAnn's all carry polymer clay). For the other clays I would recommend Amazon since you said you have an account. Monster Clay - appears to be medium , Chavant NSP Medium , WED clay - Let me know what you think.
You can build a naturally aspirated propane burner like this for pretty cheap. "Naturally aspirated" means the burner pulls in all the air it needs by itself, so you don't need a blower or anything. You won't be able to melt iron with one of these, but it's all you need for aluminum and copper alloys
Next you'll need a body for the furnace. A lot of guys use old rusted-out 20lb propane cylinders. If you do this, you need to take the valve off the top and fill the cylinder with water before you start cutting it up, otherwise you risk having the little bit of residual gas inside blow up and kill you dead. Don't fuck around with this
Now you'll need something to insulate your furnace. You'll see a lot of recipes for homebrew refractories which you should ignore. None of them work as well as kaowool. Line your furnace with 2" of this stuff, and then coat the interior with some ITC-100 or similar. Don't skip that step. You need to have the kaowool coated because it's similar to asbestos and it's extremely bad to breathe the little particles that break off during operation
I think it's this, but I'm not sure. I left a comment asking and he hasn't replied yet:
https://www.amazon.com/Monster-Clay-Premium-Grade-Modeling/dp/B0722NKKYF
I plan to grow larger variant tomatoes such as beefsteak and want to make sure this kind of layout and these components will be good enough for that purpose.
Here is the list of components I'm planning to use:
​
The remaining plumbing components I need I'll pick up from my local Home Depot.
https://www.amazon.com/gp/product/B000SVRSRY/ref=oh_aui_detailpage_o00_s00?ie=UTF8&psc=1
Was actually $6.99 when I bought it, my bad. I guess the price went up on it :( but still, $8.95 for 12 of these aint that bad.
Welcome welcome
I would recommend a few things depending on what you're looking to do.
For helping smooth out the print I regularly use XTC-3D by smoothon- You basically coat your print with the epoxy and it dries smooth. You really need to put it on really thin or else you will lose the details of your print. Once its dried you can sand it further or paint.
https://www.youtube.com/watch?v=ZopV6He4cqE
I also regularly use a dremel to remove excess pieces or grind away parts I cant tear off.
I also picked up these needle files that are awsome for sanding down detailed areas.
http://www.harborfreight.com/needle-file-set-10-pc-69876.html
I also use sculpting tools to help remove stubborn support materials.
http://www.amazon.com/gp/product/B000SVRSRY?keywords=sculpting%20tools&qid=1451425886&ref_=sr_1_2&sr=8-2
Specifically the forth tool from the left
Other than that I just use sanding paper when needed.
Hope that helps and hope you are enjoying the witbox
Wax carvers like these.
http://amzn.com/B000SVRSRY
For the life of me I cannot locate that exact tool.
Here's some great ones though: SE DD312 12-Piece Stainless Steel Wax Carvers by SE http://www.amazon.com/dp/B000SVRSRY/ref=cm_sw_r_udp_awd_vAj1tb03SC6N4
I got it at a local Flea Market / Swap Meet
Thanks!! Yes, i have Fimo and it is easy to work. So, do you think i keep working with fimo/premo? Because I have been looking and amazon does not have single blocks from other brands, they have a lot of stuff like this: https://www.amazon.co.uk/Polymer-Creations-Modelling-Nontoxic-Accessories/dp/B07HB6LTVZ/ref=mp_s_a_1_2_sspa?keywords=polymer+clay&qid=1566162374&s=gateway&sprefix=polymer+clay&sr=8-2-spons&psc=1&spLa=ZW5jcnlwdGVkUXVhbGlmaWVyPUEzQTNXSFlHVUpUNkhKJmVuY3J5cHRlZElkPUEwNTI2Nzk3SE1CSko4U0FaOEJGJmVuY3J5cHRlZEFkSWQ9QTAzNjI4MjY0U0E3S003QzNHMUEmd2lkZ2V0TmFtZT1zcF9waG9uZV9zZWFyY2hfYXRmJmFjdGlvbj1jbGlja1JlZGlyZWN0JmRvTm90TG9nQ2xpY2s9dHJ1ZQ==
And i can't choose the colors. So, maybe, i will just keep buying Fimo.
> https://www.amazon.co.uk/Polymer-Creations-Modelling-Nontoxic-Accessories/dp/B07HB6LTVZ/ref=mp_s_a_1_2_sspa?keywords=polymer+clay&qid=1566162374&s=gateway&sprefix=polymer+clay&sr=8-2-spons&psc=1&spLa=ZW5jcnlwdGVkUXVhbGlmaWVyPUEzQTNXSFlHVUpUNkhKJmVuY3J5cHRlZElkPUEwNTI2Nzk3SE1CSko4U0FaOEJGJmVuY3J5cHRlZEFkSWQ9QTAzNjI4MjY0U0E3S003QzNHMUEmd2lkZ2V0TmFtZT1zcF9waG9uZV9zZWFyY2hfYXRmJmFjdGlvbj1jbGlja1JlZGlyZWN0JmRvTm90TG9nQ2xpY2s9dHJ1ZQ==
Those are mostly "no-name" brands of polymer clay, and are generally low-quality polymer clays --often "too soft" for doing certain things well/easily and sometimes even sticky.
As for which you might keep working with, that would depend on the texture and characteristics you want, the temp where you are and the heat of your hands, what you like to make and how much of it would be fine-detail, how much strength you need in the final piece or parts, etc.
Premo is the one I recommend to all newbies since it's medium-firmness, comes in lots of great colors and special colors, and can do any technique in the polymer clay world very well.
As for "Fimo," you still haven't mentioned the specific line of Fimo you're using...I'm guessing it's probably Fimo Soft though?
.....Fimo Soft is liked by some polymer clayers, but not by me and many other clayers for the reasons mentioned above.
.....Fimo Professional is excellent, but is very firm (before conditioning) and firmer than Premo and definitely firmer than Fimo Soft (although the Fimo Professional Doll Art colors will be a bit softer than regular Fimo Professional colors).
So I'd recommend Premo, and I'd recommend Fimo Professional next.
If Fimo Professional is too firm for you though (after conditioning), I'd recommend Cernit or even Fimo Soft.
Btw, all brands/lines and colors of polymer clay can be mixed together. The characteristics you'll get will be the same proportion as the proportions of the clays you'd used for the new mix and their characteristics.
And new colors of polymer clay can be mixed too, and whole palettes of color can even be mixed from 3 basic colors plus black and lots of white:
in other words, a very true red + blue + yellow, or some clayers use turquoise + fuschia + lemon yellow.
Any "red, blue and yellow" can be used though, even using gold as a "yellow"; it's just that the final palette will be different. So you don't have to settle only for colors you buy!
This page at my site has recipes for mixing up various individual colors, and also mixing up whole palettes of color, if you're interested:
http://glassattic.com/polymer/color.htm
These guys
I just bought These. Now I'm not sure what I would do without them.
I ended up getting this one. I found about 3-4 of the tools useful (still learning how to use them though), but i really like my exacto knife. The thin blade helps a lot and I end up using it about 80% of the time.
It’s precious metal clay (silver). There are several brands on the market. I usually use this brand
Ya I was looking at these actually:
https://www.amazon.ca/SE-DD301-Stainless-Steel-Spatula/dp/B001G0VCYG/ref=sr_1_1?ie=UTF8&qid=1522971536&sr=8-1&keywords=chemistry+spatula
Pick up some dental picks/tools or clay working thingums. These for example.
They'll help with smoothing of green stuff and shaping without leaving fingerprints.
I use these tools and they're awesome. I've seen plenty of other people with the same set. 5 good tools for $9 is pretty tough to beat.
Oh we used this type of clay
And our sculptures are not the pottery type but more playdough type. The clay gets tough overtime but melt under the heat.
Deosnt have to be kaowool. https://www.amazon.com/ceramafiber-Ceramic-Fiber-Blanket-Insulation/dp/B01HLM8PII?SubscriptionId=AKIAILSHYYTFIVPWUY6Q&tag=duckduckgo-d-20&linkCode=xm2&camp=2025&creative=165953&creativeASIN=B01HLM8PII
One option. You can buy smaller quantities from resellers. If you are just starting out go to iforgeiron.com and read up until your heart is content. I think they even sell by the foot there if you want. Just checked and they sell at 8.50 per 12x24 section. Some areas on the forum you cant get to without signing up. but worth the time. Great resource.
Oh I want a mini clay spinner!
Edit: [found one!](http://Pottery Wheel 12V Mini Ceramic Art Craft Machine Clay Tool DIY Making Pottery Work Machine 1500RPM(Rose Gold) https://www.amazon.com/dp/B07KF846QP/ref=cm_sw_r_cp_api_i_PYI2CbZCJG7XW
I use these: https://www.amazon.com/Hakko-CHP-170-Stand-off-Construction-21-Degree/dp/B017ODDPNO/ref=sr_1_3?ie=UTF8&qid=1499887364&sr=8-3&keywords=flush+cut+pliers
And these: https://www.amazon.com/SE-DD312-12-Piece-Stainless-Double-Sided/dp/B000SVRSRY/ref=sr_1_2?ie=UTF8&qid=1499887406&sr=8-2&keywords=wax+carving
There's another one, but not the same brand for $11.97. Here is the link.
Anything I missed?
Put the pipe down Junior...
https://www.amazon.com/dp/B07KF846QP/?coliid=I2G737FLALTX2V&colid=22C1AM1VXJ71T&psc=0&ref_=lv_ov_lig_dp_it
https://smile.amazon.com/dp/B07MMDVHQ6
=]
If it's hot enough to melt a little bit and your insulation is good enough, then you can melt a lot.
I was going to combine this with this for the bucket build, and have holes through the lid for these. Make a stopper for the sight hole and a lip on the lid to minimize oxygen introduction. Should work out pretty OK.
I'm a noob but no one else has said anything:
Material:
For larger figures you'll probably want some sort of clay as opposed to epoxies like green stuff/ graystuff/ milliput. ( https://www.sculpey.com/super-sculpey/9-super-sculpey-firm ) super sculpy firm is the only polymer clay I've used (oven hardening). Unless anyone with more experience pops by I'd say just get some super sculpy and play around with it. Learn what you like about it or dont like, and branch out from there.
Tools:
https://www.amazon.com/SE-DD312-12-Piece-Stainless-Carvers/dp/B000SVRSRY/ref=mp_s_a_1_3?keywords=wax+carving+tools&qid=1573851649&sprefix=wax+car&sr=8-3
I think this is what I have, plenty of shapes and sizes for all your detailing needs. You may also want some files for after you bake the clay:
https://www.amazon.com/10-Piece-Diamond-Needle-Total-Length/dp/B07R3R9461/ref=mp_s_a_1_9?keywords=diamond+file&qid=1573851744&sr=8-9
These work well in my experience. As far as your armature question goes I'd definitely recommend arnatures, I'd just go on amazon and search "copper wire", obviously dont get anything insulated. I think I have 24 gauge wire and it's perfect for what I do on the ~25mm scale, so a thicker gauge may be beneficial to you.
Paints:
Make a thread at /r/minipainting it's a more active sub and has some really good painters.
Again, I'm no expert. The tools/ files I can vouch for, and the clay will be a good starting point if no one else pipes up. Good luck!
Also, I like the drawings!
Edit: I should say that if you're on a budget the files and tools are not required, you can get by with whatever you have around the house. Toothpicks, silverware, hobby knives, paperclips, safety pins, etc.
What a nice friend you are! I am a sculptor (professional stuff and hobby stuff) and while there are lots of items you can use to make little sculptures and junk model, I'm going to suggest a few that are hard to go wrong with. These are general suggestions, the brands are things I've used but there are many others. Paperclay is an air dry clay, fun to use, versatile. It can be sanded smoother, painted, etc. Super sculpey is a clay you bake, won't dry as you work, can be sculpted a bit more precisely (but don't bake with anything that will melt in the oven.) Sculpey can be painted as well. It comes in tiny packages of different colors, but I usually have more success using the Super Sculpey "flesh" color (usually fresher than the tiny packages) and just paint it. You might pick one of the two based on your knowledge of friend's interest? I linked a tool kit with some good basics. I literally use about 3 of these tools on a regular basis, and a few others occasionally. Don't go overboard here. Made a wire suggestion, whatever you want here. Mesh is fun for modeling, it can be part of armature, it can be an external part of the model, it shapes well. Most hobby and craft stores have these items, as well as Amazon. Oh, another thought is maybe a book! There are so many, just search with key words like clay sculpture, modeling figures, etc. Any combo of items would be a lovely gift, you are a sweet friend!
Tools
[https://www.amazon.com/Sculpt-Pro-Pottery-Tool-Starter/dp/B00CTTLZOA/ref=sr_1_11?keywords=sculpting+tool+kit&qid=1573610099&sr=8-11]
Paperclay
[https://www.amazon.com/Creative-Paper-clay-Ounces-White/dp/B001V8E7MW/ref=sr_1_3?crid=3K2BJF9CM3XJE&keywords=paperclay+air+dry&qid=1573610303&sprefix=Paperclay%2Caps%2C180&sr=8-3]
Wire
[https://www.amazon.com/TecUnite-Aluminum-Flexible-Armature-Thickness/dp/B07BQMMF58/ref=sr_1_13?crid=3IALD05H02KIV&keywords=sculpting+wire+for+clay&qid=1573610433&sprefix=sculpting+wire%2Caps%2C182&sr=8-13]
Wire Mesh
[https://www.amazon.com/AMACO-AMA50004D-Aluminum-Wire-Metal/dp/B00114TFAK/ref=sr_1_4?keywords=sculpting+mesh&qid=1573610539&sr=8-4]
A Book I like
[https://www.amazon.com/Fantastic-Figures-Ideas-Techniques-Using/dp/0914881000/ref=sr_1_2?keywords=Fantastic+figures&qid=1573613535&sr=8-2]
I did some more research today and i was planning on using kaowool and ITC 100 or something similar, instead of the sand and plaster. I'm just having a hard time finding where to buy both. I also don't know if ITC 100 is the best option.
Edit: Im looking at this for kaowool, and this for the cement.
This is a good cheap set you can get from Amazon.
https://www.amazon.com/SE-DD312-12-Piece-Stainless-Double-Sided/dp/B000SVRSRY/ref=sr_1_6?ie=UTF8&qid=1483070428&sr=8-6&keywords=sculpting+tools
Also, the small sphere in this set helps.
https://www.amazon.com/COMI-Pottery-Ceramics-Sculpting-Modeling/dp/B01JED95XG/ref=sr_1_1?ie=UTF8&qid=1483070440&sr=8-1&keywords=sculpting+tools+round
You will need a burnout oven if you have a resin printer I suggest using funtodo castable blend. They have instructions for a fast burn out I preheat my oven to 1600 and burnout for 2 hours. If your looking to do just one or two rings at a time I suggest you get a tabletop kiln like this or look on Ebay for a dental burnout oven the burnout equipment is the most expensive tool in the ring makeing process but you can't get around it.
https://www.amazon.com/RapidFire-Pro-LP-Electric-Kiln-Furnace-2200F/dp/B01LYOCRSG/ref=sxbs_sxwds-stvp?keywords=tabletop+kiln&pd_rd_i=B01LYOCRSG&pd_rd_r=dcf4ba4b-9812-46f4-a74f-57ca74be8cb4&pd_rd_w=QILpI&pd_rd_wg=hI0dp&pf_rd_p=d006b618-5fac-44e6-850d-a0fdd19f7847&pf_rd_r=CFMBPQZ8D86JKQ8G96TG&qid=1574356086
Amazon has buckets of it:
https://www.amazon.com/Insulation-Morgan-Ceramics-CM-Ceramics-Instructions/dp/B015GD0QCW/ref=sxts_k2p_hero1?pf_rd_m=ATVPDKIKX0DER&pf_rd_p=2668835602&pf_rd_r=G7JY4AYZ0B9CXTVCRQ28&pd_rd_wg=XUUs9&pf_rd_s=desktop-sx-top-slot&pf_rd_t=301&pd_rd_w=WtzGd&pf_rd_i=Kaowool&pd_rd_r=AGKF6EF750PA2ASYJBN1&ie=UTF8&qid=1478267175&sr=1
Its pretty cheap to get it shipped around the USA.
I need doll-modding supplies!
Like clay or tools or acetone pens or embellishments or brushes.
With practice, I hope to be able to work with some very talented doll artists in my community, as well as crafting custom dolls for people over the Internet.
https://www.amazon.com/HTS-154S5-Stainless-Spatula-Sculpting/dp/B01C7X7D3E
I wanted to do a quick write up of a fun project I just finished today. I hope you dig it!
I needed bases for my Rogue One figures (Seriously, check out Sun and Skull studios - great stuff!) that came in, but what is this? FFG does not sell extra bases? Well, close enough just won't do, so I did what any crafty gamer does, and I got to work. Let's make some bases!
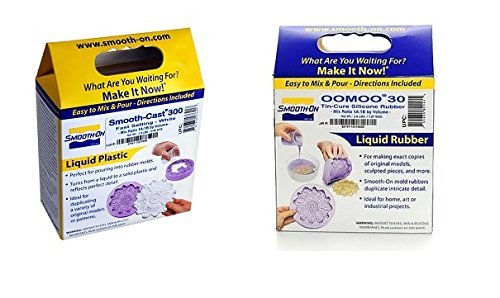
So the first thing I did was get some Smooth-On Silicone Molding material and some Smooth-On liquid plastic. I wanted to make a mold of a bunch of bases at once, so I could replicate them in batches. Once the product came in, I could start the project.
As far as making molds go, this was going to be pretty easy. The technique is referred to as a "Dump Mold" - basically, we have a fairly flat object to duplicate, and a flat surface to pour the mold onto. We don't need to have the mold wrap around to the other side of the bases, because the bottoms of them are flat.
I used Hot Glue to stick the 8 bases I wanted to replicate to a piece of Foam Core board, and then I used the same Foam Core and Hot Glue to form a box. This is what I was going to make my Silicone Mold from.
Once this was done, I mixed equal parts of the two part silicone material in disposable cups. Being sure that the pink and blue materials are thoroughly mixed together and blended into a purple material with no streaks in it. We then poured this into the box we made, and tamped it down to get any air bubbles out of the mix. This has to sit and cure overnight.
The next day, I was able to break apart my box to reveal a well formed silicone mold! A little flash on the edges was just fine here, and wont interfere with the later plastic pour.
With the mold made and cured, it was time to make our actual plastic material. We needed a LOT less of this to make the actual bases, so I was trying to be careful with my pours. We mixed equal parts of the liquid plastic material together and mixed it well. This stuff is clear out of the bottle, but sets up to make a white plastic when it is all done. I could have added coloring agents to change the white into something else, but I knew I was painting these guys regardless after the fact, so the white was fine.
Pouring the plastic was fairly easy, but I was trying to keep all of the plastic in the mold itself, without overfilling and creating a "bulbed out" look that I would need to file down after.
15 minutes later, my perfect replica bases popped out, and are ready to have some Rogue One K-2 units attached to them!
I hope you liked this little walk through. Give this technique a try, it got some great results. :)
If you're willing to put in some trial-and-error, you should look into casting. I've done a lot of it to recreate the one bit I need more of, and once you're used to it, it can really extend your money.
This is the base of what you need. Put it in some boiling water, wait for it to get soft, then push that one piece you need into it. Then let it cool (I put it in the freezer to speed this up). Once the bottom half of the mold sets, heat up another piece, and put it on top. You'll need to apply some pressure to get it into every crevice, then put it in the freezer to set again.
Once it sets, you can remove the original from the center, and fill the mold with GreenStuff (or better yet, a 50-50 mix of GreenStuff and Milliput), and leave it for 5-6 hours with a weight on top of it (to push out the extra). Then pop it out, remove the flash, and you have another piece!
The ideal kit for resin scraping, in my opinion, can be found on Amazon.
http://www.amazon.com/gp/product/B000SVRSRY/ref=pd_lpo_k2_dp_sr_3?pf_rd_p=486539851&pf_rd_s=lpo-top-stripe-1&pf_rd_t=201&pf_rd_i=B003KE3ZFK&pf_rd_m=ATVPDKIKX0DER&pf_rd_r=0NYKVM69MZ4ANCM4RX26
How big are the biggest ones? If they’re around marble size, try checking out hydroton , little balls of expanded clay often used in terrariums, aquariums, and hydroponics. They’re lightweight and and also float, like your mystery balls here. Only difference is they’re not purple.
Oh yeah, I bought this set of wax carving picks about a year ago and get tons of use out of all the tools: https://www.amazon.com/gp/product/B000SVRSRY/ref=oh_aui_search_detailpage?ie=UTF8&psc=1
 
Not many better deals for less than 10 bucks if you ask me. Not to mention buying the one's labelled for uses other than vaping/smoking are always a hell of a lot cheaper than the one's you get in a smoke shop.
Best kit ever for dabs it has a flat scraper what I would do get you an airtight glass container scrap up everything in the middle transfer it to silicon. Fold what's left put it in the ziplock bag, put that in your glass container seal toss it and your scrapper in your freezer for 5-10minutes longer if needed but keep an eye on it. It will scrap off so easily and you will get every last bit you can. https://www.amazon.com/gp/product/B01C7X7D3E/ref=ppx_yo_dt_b_asin_title_o09__o00_s00?ie=UTF8&psc=1
I like these
I'm kind of new to posting on reddit. Wondering if commenting on a 10 day old post is a waste of time; if so maybe send me a message or advise in a reply to this comment.
Anyhow, I noticed that a lot of my Hydroton brand pebbles floated while I was rinsing them last winter. Most were sinking pretty soon though. I just bought a cheaper brand from Amazon and lots of folks on Amazon's site complained about floating. So filled a glass jug halfway with pebbles and the rest water. At first two or three sunk. After 24 hours nine sunk. 48 hours - 11. Seven days - still only eleven.
But the way I use them it doesn't matter. They can all float as long as they just barely float. The water level should be an inch or two below the level the pebbles and as long as the pebbles fill the space all the way to the bottom it works just fine.
Milliput and green stuff both work well for gap filling and smoothing over rough areas. Liquid green stuff is garbage. I find that milliput is more fragile than green stuff, so if you're putting it in areas that are likely to be touched a lot (or you're fabricating detail) I'd use green stuff. But I like it a little more for seam filling just because of how easy it is to sand and carve.
Get yourself a cheap set of tools and remember to smooth it over with watered tools/fingers.
If you are molding by hand I would suggest a set of carving tools.
https://www.amazon.com/gp/product/B000SVRSRY/ref=oh_aui_detailpage_o06_s01?ie=UTF8&psc=1
I'm totally a novice and a software developer by trade, so take what I'm about to say with caution. That said, here goes:
​
I started with a propane forge because it was easier to make, or trying many things to build one. The best thing that I've managed to find as far as instructions or help is this video on YouTube: https://www.youtube.com/watch?v=TS7wumQt0s8&t=123s - I used these bricks from Amazon and so far they're doing an ok job: https://www.amazon.com/gp/product/B007VEOIVA. If I had to give one word of advice it'd be to save your money and not buy the cheap firebricks you'll find at home improvement stores. They kind of work, but ultimately you'll lose a ton of heat and I ended up spending the extra cash to just buy good firebrick because I felt unsafe(I hit my burner with a laser thermometer and it was astronomically hot b/c heat was seeping up into it).
​
Last and certainly not least, I am planning on building a coal forge because I'm having a tough time getting the heat I need to forge weld. So the comment I saw that said to get both ... totally on point. I can see myself using propane when I'm looking to just do something quickly on a weeknight, and when I have a ton of hammer work or forge welding to do I'd switch to coal.
​
Edit: Assuming you're just starting... I have taken one beginning blacksmith class and I'm planning on several more in the following year. Find a blacksmithing association near you and attend the meetings. It's totally worth the time to link up with the pros.
Edit 2: If you're in the US, check this out: https://abana.org/
I follow this cap maker on Twitter and they did a killer BMO a while ago, you should definitely go for it: https://twitter.com/tinymakesthings/status/983197768431710210
What are you using for tools? I got this for 9 bucks: https://www.amazon.com/gp/product/B000SVRSRY/ref=oh_aui_search_asin_title?ie=UTF8&psc=1
Nice. My smoke shop tends to pull 7-10 dollar bullshit.
Yup, I'm a fan of my dentist pick. Another good deal, though not currently in stock:
http://www.amazon.com/SE-DD312-12-Piece-Stainless-Carvers/dp/B000SVRSRY/ref=sr_1_1?ie=UTF8&qid=1382473690&sr=8-1&keywords=dabbers