Best cooking utensils according to redditors
We found 1,045 Reddit comments discussing the best cooking utensils. We ranked the 521 resulting products by number of redditors who mentioned them. Here are the top 20.
We found 1,045 Reddit comments discussing the best cooking utensils. We ranked the 521 resulting products by number of redditors who mentioned them. Here are the top 20.


Lodge is a proven manufacturer, which is really all you need in cast iron. It's pretty straight forward stuff, so you want a brand that has no quality issues with the
forgingcasting.^1 Their preseason is good, but don't expect to cook eggs on it first thing. Cornbread should be OK out of the box with plenty of fat.That said, don't expect the iron the be silky smooth. The biggest complaint I've seen is that it's nothing like their mom's 2 generation old Griswold, which you could "slide eggs off of". I've never seen a brand new Griswold, as neither have most people today, but I guarantee that most of the smoothness came from just using it everyday for years.^2 Buy a good stainless turner. I personally like this one. It's sharp, and it's got a lot of flex but just enough rigidity to keep it from permanently bending, which is perfect for a cast iron skillet.
So, don't be bothered by all the stuff you see online about using flax oil and baking it for 500 degrees for hours and hours. Buy it, rinse it, cook some bacon in it. Just use the damn thing. Pioneers crossed the country through all manner of hell with them hanging off their wagons. They survived that, they can survive the domestic kitchen.
EDIT: ^1 I'm dumb sometimes.
^2 Also, people that know more about this stuff than I do disagree with this statement, as Griswolds and the like were given a smooth finish at the factory, and Lodge isn't. Whether or not a baby's-ass-smooth finish is necessary, I would personally still say is up for debate. It ultimately depends upon what you want to cook in the thing. I may buy a small Wagner to see the difference for myself.
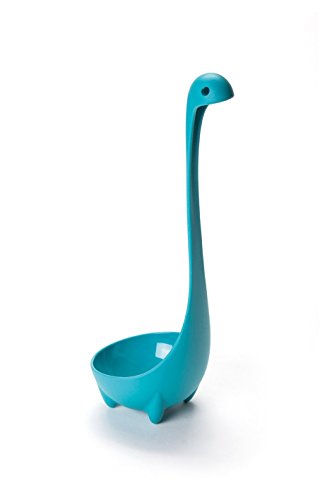
Have you seen the Nessie soup ladle
Yes, it will be fine. Although some may disagree.
I prefer steel spatulas actually; I think they help even out the seasoning that is slowly building. I use mine for scraping off any burnt items as well.
I have a #9 pre 1942 griswold pan that was unseasoned when I bought it, and it has built up an incredibly smooth surface, almost like glass.
I use this spatula (and another one that is the same but a smaller size). Love the wood handles. I sanded the end a little smoother than it was when I got it, and I periodically wipe it down with cutting board oil (mineral oil).
*edit:
I would add that it probably should only be a flat spatula/turner, as a rounded one will create a small point of contact and could possibly harm the seasoning.
I always scoop the pasta out of the boiling water into whatever sauce I've prepared - that way, the pasta can't escape, you can't accidentally burn the shit out of your hands if you over-pour, and you get to keep the pasta water if you want to loosen your sauce.
One of these guys for long pasta: https://www.amazon.com/OXO-Grips-Nylon-Spaghetti-Server/dp/B003L0OOWQ/ref=sr_1_3?ie=UTF8&qid=1511551830&sr=8-3&keywords=pasta+scoop
One of these guys for short: https://www.amazon.com/Hiware-Stainless-Spider-Strainer-Skimmer/dp/B071D8R93Y/ref=sr_1_4?s=home-garden&ie=UTF8&qid=1511551855&sr=1-4&keywords=spider+strainer
I used the dough mix from Detroit Style Pizza Co. and the 10x14 pan from them as well. I would have to weigh the dough mix to figure out what's in it but there is a big pack of flour (not sure what kind but I'm assuming AP would work fine) (EDIT: 3 cups flour but I can't determine how much salt) and a small pack of yeast and sugar. The yeast did not activate so I ended up using my own and eyeballing what was in the packet. Turned out to be about 1 teaspoon of yeast and about 1/2+ teaspoon of sugar.
Dough
Sauce - I use Jersey Italian Gravy Pizza Sauce as it tastes great and saves me time if I don't feel like making it myself
Cheese - I use a 50/50 mix of dry aged, whole milk (full fat) mozzarella and muenster cheese
Pepperoni - I think the best pepperoni on a pizza is the kind that curls up and chars at the edges to form little grease cups.
I will have to look at the label when I get home to find out which brand I used but this oneI used Carando pepperoni and it worked really well. I always refer to /u/J_Kenji_Lopez-Alt's study on pepperoni curl. My slices were about 2-3mm thick.Method
EDIT: I used Carando pepperoni and there were 3 cups of flour in the packet but I don't know how much salt is in there.
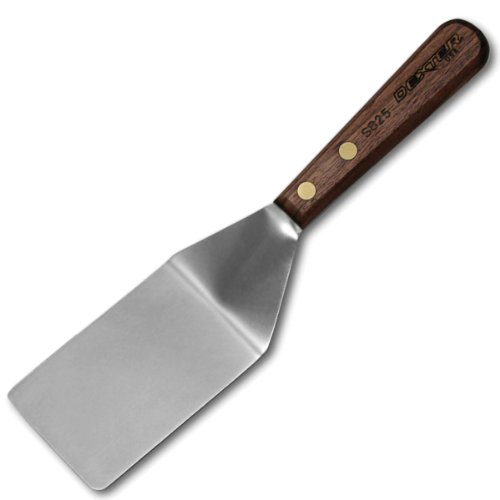
Ask and you shall receive: Dexter-Russell
Some things are a little ridiculous, but a good spatula is not one of them.
Edit: I made an assumption that you wanted a "spatula" like a pancake turner, which I believe is a misnomer. These, I believe, are true spatulas...
Looking at that picture really frustrates me. I tried to see if anyone's found a solution for it and it's basically just... violence. Violence is the only way to get it out.
Or you could get a super long spatula.
I would still suggest breaking that bottle afterwards though.
Just because. (ノಠ益ಠ)ノ彡┻━┻
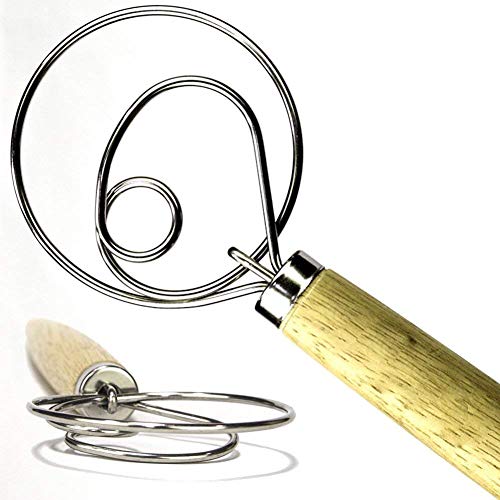
Danish dough whisk. Amazon link.
Honestly? You will screw up once or twice when you first start, but generally, it's a fairly easy process and you'll save yourself a lot of money in the long run by doing it yourself.
Just to give you an idea of how I do it, here are the items I use. If you have Amazon Student/Prime, it'll be even easier:
For me, I mix it in small tupperware (obviously, I don't use this for storing food at anymore). For 2 small packets of Shiro samples (or even a minijar (both of which fit comfortably in the aforementioned palette)), I use a mixture of no more than 3 drops of jojoba oil and use alcohol to mix it into a paste, of which I then place into the aluminum palette.
You don't want to use an excessive amount of the oil because then it will almost never dry and dilute the color. Whereas, alcohol evaporates out faster so you want to use more of the alcohol than the jojoba oil (or whatever binding solution you choose). Once it gets dried down to a certain point, you can press if you choose to, but I never feel I need to when I do it this way because it's generally pretty uniform.
I know dorm rooms are crampy, but you can do this anywhere once you get the hang of it and for cheaper than having someone else do it (especially if you take into consideration the excessive shipping costs--which will be more than the cost of what you'd be using for some of these products alone).
ETA: Added details.
Most likely problem: You are using the wrong spatula.
Once teflon pans went mainstream, a lot of stores stopped carrying proper spatulas for anything but teflon. You want something like this: http://www.amazon.com/Dexter-Russell-2-5-Inch-Stainless-Walnut-Pancake/dp/B002CJNBTO
Why? The sharp stainless cuts the food off the pan, allowing carbon to build up and smooth the surface of the pan. After a period of use the pan becomes smooth and the non-stick properties develop to the point where you could use a plastic spatula, but don't.
Don't use a silicone or other plastic spatula that was designed to protect teflon. Don't use a thick rigid BBQ/commercial griddle turner designed to work on large very flat surfaces instead of a 10" frying pan. Use a thin, flexible, sharp stainless steel spatula that was designed for small pans with metal surfaces.
Fish Spatula!
Get this. I don't even use my long spoon anymore.
>Some amazon reviews make it sounds much less forgiving than The Food Lab and that it calls for all types of specialized baking equipment.
tbh, cooking & baking are pretty simple. You mostly do just 3 things:
Now, based on those three things, you can also do:
lol @ "advanced". But that's more or less what it boils down to...stir & chop stuff up, and make sure it doesn't burn, haha. Why is that important to understand? Because of how actions are managed in the kitchen. The example I like to refer to is Newton & Gravity. When the apple fell on Newton's head & he figured out gravity, he basically spent a long time figuring out the formula for gravity, which in turn provides you with a simple one-line piece of information to learn. So you didn't have to go through all of that work, you simply had to "stand on the shoulders of giants" & benefit from their discovery process. All you're doing is walking through the steps that someone else figured out.
Likewise, in cooking, unless you're contributing a new recipe to the culinary world, for the most part you're simply going to be following someone else's directions. Those directions are important because someone else has already gone through all of the hard work of figuring out how to make a particular recipe awesome, and all you have to do is follow their "formula"! The problem is that many cookbooks are crappy because they have no color pictures & barebones instructions.
With Stella's Bravetart book, she gives you some history, color photos, and solid explanations about what you're doing. YOU don't have to do any of the labor of discovery or make it 200 times to get it perfect, all you have to do is follow her instructions! Regarding specialized baking equipment, yes, some of that will be required. If you want to make Twinkies, for example, you're going to need a canoe pan in order to get the shape right, you know? If you want to make muffins, you're going to need a muffin pan, and so on & so forth.
Equipment-wise:
One of the nice things, however, is that with most baking stuff, you can buy it for a reasonable cost off Amazon & keep it for a really long time. Like, the Norpor Cream Canoe pan is currently going for $27 shipped on Amazon & includes a cream injector tool, which sounds pretty expensive, but a box of Twinkies sells for upwards of $9 where I live, so for the price of 3 boxes of Twinkies, you can make unlimited Twinkies...red velvet topped stuffed with coconut cream & topped with shredded coconut, chocolate-dipped chocolate twinkies with buttercream frosting, white-chocolate & dark-chocolate-striped yellow-cake-mix twinkies with whipped cream frosting, etc. So if you like Twinkies, especially if you have kids or teach a class, you now have access to making really high-quality Twinkies for cheap at home!
That may sound a little funny, but wait until you try something like her English muffins...it will ruin Thomas' for you for life, lol. Being able to not only make your own homemade creations, but being able to make amazing versions of them, is a dangerous skill to cultivate, hahaha. So as far as costs go, aside from raw materials, you will need a base set of baking tools, and then whatever specialized tools you need to for whatever particular type of recipe you're going after. It does pay to invest in better-quality tools, when available. For me, being on a budget, that simply means spacing out the purchases over time to allow both my collection & skill set to grow over time. For example, I'd highly recommend Stella's recommended 9x13" pan here:
https://www.amazon.com/gp/product/B0017Z0E08/
It's pretty pricey for just a pan, but it's not only easy to work with, but also gives amazing results! I'm never going back to regular cheapo pans again! Plus, I always use her foil trick, where you wrap one sheet of aluminum foil horizontally & one vertically, and that way you can (1) lift the baked good out easily after cooking, and (2) never have to wash the pan, because it never gets dirty! Genius! And it's a fairly heavy-duty pan, so I can see myself keeping this for ten or twenty years, easily.
There are two other tools I always recommend for baking. The first is called a Danish dough whisk, which is a flat version of a whisk. It's amaaaaaazing for hand-stirring doughs & batters! Looks funny, but does an amazing job. I have several (a couple large ones & a small one) & they are amazing for everything from pancake batter to blondies:
https://www.amazon.com/Original-Danish-Dough-Whisk-alternatives/dp/B00HQQJ3N6/
Second, there is a crazy-expensive ($25, no joke) spoon that I HIGHLY recommend:
https://www.amazon.com/Creuset-America-Revolution-Bi-Material-Cerise/dp/B00N9SDI40/
This is basically a combination of a spoon & a spatula. It's absolutely incredible to use in a skillet or in a bowl, because you can manipulate large amounts of food (batter, dough, sauces, etc.), but ALSO scrape the pan with it. So if you're pouring say brownie batter into your pan, you can use the spoon portion to pull the batter in, and then use the flexible tip to scrape the bowl clean...no more fussing with a wooden spoon & a spatula! Sounds like a small thing, like a really minor issue, but I can't live without this or my Danish whisk, haha!
Book-wise:
Anyway, recipe-wise, again, everything is pretty much laid out for you. You can dive into any recipe, read up on the section, go through the recipe, and get really great results. I've hit a homerun on pretty much every recipe I've tried the first time out, which is pretty rare when you're cooking stuff for the first time! I'd say Bravetart is actually one of the best baking books to start out with, not because it walks you through the "101" class of baking basics, but because everything is so well-explained that it's really easy to be successful because she has not only done the research to make really amazing recipes, but has also taken the guesswork out of the recipe, which a lot of other cookbooks don't bother doing, which can be extremely frustrating!
Also unlike a lot of other cookbooks, every recipe I've tried has been a homerun, which is pretty great because I feel like a lot of cookbooks are centered around a few really amazing recipes & then the rest are variations or fillers. Kind of like how a lot of music albums have one or two "hits" & then have pretty lame songs for the rest of the tracks, lol. My family, friends, and coworkers think I'm some kind of baking genius when I bring stuff in from her cookbook. /u/TheBraveTart I owe you lunch sometime lol.
I'd recommend against the sharp corners on your spatula. Too much chance they will dig in to the corners and gouge perfectly good seasoning.
But you've got the right idea other than that. This is the spatula I use, exactly in the manner you describe.
I'm with the others saying that is not as big of a leap as you may think to go to all grain. You can totally do a nice all grain saison and save $20 vs buying all that DME.
I would recommend getting the ridiculous sized whisk ChinoBrews always brings up. It really does help prevent those annoying dough-balls.
https://www.amazon.com/Winco-Stainless-Steel-French-24-Inch/dp/B001VZ8S1Q/ref=sr_1_2?ie=UTF8&qid=1525778917&sr=8-2&keywords=giant+whisk
This is my go to spatula, FYI. Works fine with CI. Also, I have multiple Lodge pans, including 2 10.25" which I use often multiple times a day. You'll enjoy them. Also, despite what you've heard you can use soap and scrubby sponges. Basically, the only thing I do differently that cleaning any pan is drying thoroughly and using a very light coating of oil.
https://www.amazon.com/gp/product/B002CJNBTO/ref=oh_aui_search_detailpage?ie=UTF8&psc=1
I'll throw my vote in for a sharpening stone. If he doesn't already have a nice sharpening set, maybe consider getting him something like a nice diamond sharpening stone; I've seen them for $50 or less.
Tools are always nice. Here are some suggestions to think about:
~ microplane grater
~ Japanese mandolines can be fun to have around.
~ Fish spatulas can be a handy tool.
~ Does he have a good quality peeler? Everyone has a "normal" peeler, but I like to have a good quality horizontal peeler, like one of these, to use sometimes.
~ Does he do a lot of baking? If so, maybe some silicone baking mats for his baking sheets, or maybe some parchment paper.
~ Does he like to use fresh citrus juice very much? Does he have a citrus reamer?
~ Does he like to use fresh garlic? Maybe a garlic press?
~ Silicone spatulas?
~ Does he have a pepper grinder for fresh ground pepper?
~ Does he have a set of mise en place bowls or something to use to keep his stuff organized when he's working?
~ Does he have a scale? You can find plenty of options for home-use digital scales that can weigh up to 11 or 12 pounds, and use either pounds, or grams (if he's doing anything metric.)
~ Something like a good quality cast iron pan can be a lifetime investment, because if they're well cared for, he'll be able to pass it on to his grandkids someday.
~ A dutch oven will always be useful to serious home cooks. The enameled cast iron type are very popular, but they come in many different sizes and shapes, so keep that in mind when picking one out.
~ Knives are always nice. Paring knife, utility knife, serrated slicer, etc.
Those are just a few suggestions that popped into mind. Good luck, I hope you find something nice for him.
get a couple of these! http://www.amazon.com/Dexter-Russell--2-5-Inch-Stainless-Walnut-Pancake/dp/B002CJNBTO/ref=sr_1_5?s=kitchen&ie=UTF8&qid=1382129627&sr=1-5&keywords=flipper
as for the spots, I personally would scrape at them with a scotch brite pad until smooth, then oil.
Norpro Silicone Last Drop Spatula, Quantity 1 per order,(Assorted Colors) https://www.amazon.com/dp/B003WLZZRM/ref=cm_sw_r_cp_apa_x7WOAbF7EPJAD
Nessie the Loch Ness Monster Ladle!
https://www.amazon.com/Ototo-OT821-Nessie-Ladle-Blue/dp/B00SRGPELO
Completely unnecessary except it makes me laugh every day when I see it sitting on my stove.
Bummer. I can't recommend the comically large whisk enough over a mash paddle. You will never have another dough ball again if you mash in with a whisk. The smaller, 18" version is on sale for $6.47 right now.
Another option for drastically reducing the possibility of dough balls -- or so I hear -- is to underlet your strike water.
Buy this, use it forever.
https://www.amazon.com/Dexter-Russell-Pancake-Turner-Stainless-Walnut/dp/B002CJNBTO/ref=sr_1_4?s=home-garden&ie=UTF8&qid=1493328450&sr=1-4&keywords=metal+spatula
Is your apartment unfurnished? If so you will need some basic furnishings:
As far as basic living supplies go:
School supplies in college are pretty basic- you don't need much, but depending on your major this could go waaay up or down. But as far as I'm concerned your basic supplies are as follows:
Things to consider:
I know its scary, but living alone is great, and studying in a university is really not a huge deal once you get into the rhythm of things. You'll do great, kid.
I carry [this thermos from OXO] (http://www.amazon.com/OXO-Grips-Thermal-Travel-ounces/dp/B000QJE452/ref=sr_1_4?s=home-garden&ie=UTF8&qid=1411741843&sr=1-4&keywords=oxo+good+grips+thermos) daily and love it. I don't use the 'cup' lid, the normal lid has a push-button stopper which works great. No leakage, keeps it warm, no 'metal taste', easily disassembled for cleaning, fits the AeroPress just fine. They also have [smaller travel mugs] (http://www.amazon.com/OXO-Grips-LiquiSeal-Travel-Stainless/dp/B0001YH1LG/ref=pd_sim_hg_1?ie=UTF8&refRID=0CAC4HWFM05042XHR8XV) and cheaper colored plastic versions which still fit the AeroPress. My first one lasted through 5 years of daily construction site use until I [left it on the bumper and drove over it with a 3/4 ton truck] (http://i.imgur.com/G3u1HaS.jpg).
I've been using this, works great. Looks very similar to OP's, but without the bevel along the edges.
Airless pump bottle (buy online) + cosmetic spatula (either a disposable one or one of those mini silicone ones like this). Scoop into the airless pump without the top and then screw the top on.
Airless pumps are great because they basically have a "floor" that gradually goes up and up like an elevator, the more you use your product, which means that the product is consistently contained and as you use it up, the product merely comes closer to the mouth of the pump. You'll never get to the point of having a layer of thick product stuck to the bottom of the bottle, because physically, that's not how they work.
I wouldn't recommend a conventional pump bottle for this formula though.
Alternatively, spatulas are a thing.
http://www.amazon.com/OXO-Grips-Silicone-Flexible-Turner/dp/B000ND1YTU/ref=sr_1_4?ie=UTF8&qid=1323734835&sr=8-4
Allow me to make a suggestion.
Dexter-Russell spatula for cast iron.
Metal spatulas are totally fine
I use this one, the 5inch size, biggest of the options
I have to agree with cboss911 on one thing. It seems to be either about cooking or seasoning. I'd prefer to cook with my skillets. What good is a seasoned skillet if you don't cook. But if you cook, a skillet will season by itself while you benefit from the food.
But here's how I clean (or don't clean) mine. After making a dish, casserole, bread, or bacon or whatever...I wipe out the pan with a paper towel or terri cloth. Then I warm up the pan again with a little oil spread around with a silicone basting brush while I do the other dishes. Then I wipe it out again. Sometimes I scrape it. If there is anything that needs scraped I use oil and a metal turner to scrape it off. It will eventually smooth the surface especially on rough Lodge skillets. I love my results. I'm not saying other methods are bad, there are many. Find the one you like. I've shared my favorite with you. Happy Cooking! (as opposed to happy seasoning)
Oh! Almost forgot. Eggs should slip right out of the pan as if it were teflon! Don't be afraid to use Pam either. It doesn't hurt anything and sure helps if you are in a sticky situation.
Dude. Cast iron is the way to go! Love my skillet. My only suggestion is to get a metal "cookie turner" or "pancake flipper" as your spatula. Cast iron is not quite as stick-free as teflon, and it can be a bit harder to clean.
I use one of these and it lets me manage eggs, bacon, steak, etc. no problem.
It helps with cleaning the skillet too.
Oh, if you have food stuck to your skillet, just put some water in it and boil it for a few minutes. It'll come right off.
Congrats on the salary, congrats on the cast iron!
This is the spatula I use in my pan. It's awesome, has held up very well too. I scrape the heck out of my pan when I'm cooking in it, and I scrape gunk out of it after I cook too, all with that spatula.
like I said, the main concern is to create an extremely flat surface. I see a lot of people using wood spatulas or plastic spatulas in fear of ruining their surface, but this is the opposite of what you want to do.
When you use a completely flat metal spatula (like this guy) it scrapes over the surface evenly, allowing the microscopic holes to stay filled with carbonized grease (the "seasoned" surface), and removing the the bumps. Having a textured surface, even at a microscopic level, is what causes food to stick to the pan.
If your food is sticking to your pan, in my experience it's because it is not flat. I use this type of spatula every time i cook, and scrape the pan as a first cleaning step.
That being said, seems like there is a lot of tradition in the different ways people keep their pans, and probably more than one way works. This way has just proven to me to be the most efficient, I never have to resurface my pans (baking it with oil), and my food never sticks.
Okay, so a while ago I said I was going to make a gummy bear tutorial and I never did so I thought it was about time I at least made a write up for them. This recipe will get you right around 200 gummy bears.
Tools:
Ingredients:
Decarbing
Pre-heat your oven to 250F - 260F, use the digital theremometer to keep an eye on the temp to make sure it stays around there and does not get above 260F. I like to place my concentrates into the small pyrex dish and decarb in that. Put the dish with your concentrates in the oven for 30 minutes. You can check it around the 30 minute mark and see if it is fully decarbed. Look for it to be pretty clear of all little "carbination" like bubbles. When those are mostly gone you are done decarbing. It will take around 30 minutes. Go a little longer if you want couch lock / sleepy time gummies.
When it is done decarbing pull it out and set it to the side for a minute.
Infusing the coconut oil
Grab your medium sized pot and put a few inches of water in it. get it to a boil then turn the temp all the way down to a very low heat. When the water is ready place your dish with the freshly decarbed oil into the water bath and add the 1 Tbsp of coconut oil to the dish.
Let the two mix for a few minutes until they are nicely combined. It shouldn't take long maybe 10 minutes max.
Grease your molds
At this point if you dont have silicone molds (I do and I still grease mine for precautions) grease your molds so you don't forget to do it before adding your gummies.
Preping fruit juice (or water)
In the second small pyrex dish pour your real fruit juice / water or whatever base liquid you are using for your gummies. I havent tried much besides fruit juice and water but you can experiment with other liquids, but don't do an experiment on a batch with THC in it just in case something doesn't work out.
To the fruit juice / water add 1 tsp of soy lecthin and stir with the fork. Place the dish in the fridge for 5 minutes or so and stir again. Let it sit in the fridge stirring occasionaly until the soy lecthin is fully desolved.
This liquid mixture NEEDS TO BE COLD for the blooming process to work so make sure to keep it cold.
Mixing the dry ingredients
In your small non-stick pot mix the following together: 85 grams of Jello, 5 Tbsp of Gelatin, 1/4 cup of sugar. Completely mix them all together and dont let any of them get wet yet. Stir and stir until they are completely mixed.
Blooming
Take your mixed dry ingredients and pour in your friut juice (water) soy lecthin mixture. Stir it and get everything evenly mixed and make sure there are no lumps. When everything is evenly mixed place the lid on the small pot and let it sit for 10 minutes.
This is called "blooming" the gelatin and allows the gelatin to absorbe the water. The water needs to be cold because gelatin activates at about 120F and after that will start to set when it cools. We don't want it setting right now.
My Full Home Fryer kit
Container and strainer in one
​
Fryer - Easy to clean and use/cheap (Dishwasher safe)
Spider - Do not use the crappy basket that comes with the fryer, use this to remove things instead
Thermometer - Never trust the built in one.
A good metal spatula with rounded corners. Scrapes all of that right off, and works to polish and smooth down the bottom of the pan every time you use it. The plastic scrapers others mentioned are good too, but for tough jobs I like to have a metal spatula around. Other benefits is you can use it on the pan while its still hot.
The spatula has a sharp edge to very effectively get under food. It seems to either "shave" the seasoning like a razor or possibly just mush it flat. Either way, the food comes off easy and my pan is in glass like condition. I also scoop solidified grease with it so well that I almost don't need to wipe the pan.
Here is what I bought
https://www.amazon.com/dp/B003HEOLXI/ref=cm_sw_r_sms_apa_i_NwfZDbTFKF0S1
I just made a huge batch of Spätzle. And I can only recommend getting one of these. All the other contraptions are far messier and bulkier and more expensive. I've tried them all and this simple thing works best.
As for Spätzle: Mix Eggs and Water in a bowl. You need as much water as you got eggs by volume. Add a pinch of salt. Add flour until you have the right texture. What you are looking for is a very wet dough which "climbs" up your dough hooks and yet still drips off. Since this is my grannies recipe this is all by gut feeling. Once you are reasonably comfortable with your dough let it rest for at least half an hour. then check the viscosity again. Add flour if needed.
Then you need to heat up water in a pot. It is absolutely important that the water is hot but you don't want hot steam. If you get hot steam you will steam the dough while you are making Spätzle.
Pass the dough through the contraption. Don't use too much dough at once because you want your Spätzle to cook evenly. Fish the Spätzle at the surface out of the water using something like this.
Drop the Spätzle into a pan with melted butter. You are not looking for a lot of heat. You only want to keep them warm. Ideally you will drop them into a pan of very dark roasted onions. That's how I prefer them. If you've got nutmeg, use some of that. If you feel like granulated garlic, use some of that.
As for cheese: use Emmental or similar cheeses. Do not use weird stuff like Cheddar. I made my last batch with equal amounts of Emmental and not-quite Parmigiano. If you feel your cheese isn't quite melting you can pop the whole thing into the oven at a not too hot temperature. Just enough to melt the cheese.
My girlfriend adds cream before the Spätzle go into the oven.
Be careful with the flour you use. None of the self-raising stuff.
There are variation of Spätzle without adding water to the dough. Those are very eggy indeed and I'm not too fond of those.
I purchased this recently.
https://www.amazon.com/OXO-Stainless-Flexible-Turner-Medium/dp/B00004OCL8
Nice thin, flexible (in one direction) and sharp. It can really get in between what little gap there is between the pan and egg. With a rubber and silicone spatula, I tend to tear up the eggs as it can't "cut" into the crusty egg white and it tends to tear up and tear through the softer egg whites/yolks.
Get a heat diffuser, like this one.
In addition to the great advice here, if you're looking to seriously get into baking, make sure you have the right tools. At a minimum, you're going to want a spatula (this kind, not a flipper/turner), a good-size mixing bowl (preferably multiple in different sizes), a baking/cooking sheet, and a good whisk. If you can spring for more, get a hand-mixer or best of all, a stand mixer will save you an incredible amount of time and effort. There's nothing more frustrating then spending a ton of time mixing something by hand, only to have it not come out right in the end. I've found that with electronic mixing, that frustration diminishes somewhat since it didn't take me 20 minutes and a sore arm to get egg whites to stiff peaks.
A bit more specialized, but useful if you end up baking a lot of these types of things: a pastry blender for pie crusts, a bread knife for bread and cake trimming, offset spatula & pastry tips if you're doing a lot of cake decorating. DON'T get a pastry bag; ziplock bags with the tip snipped off work just great and the cleanup is way easier. Also, of course, whatever baking vessels are appropriate for what you want to make (cake pan, pie tin, muffin tin, etc.)
A random specific recommendation: if/when you decide to make pie crusts by hand (highly recommended; totally worth it), I swear by this recipe (and subsequent tips for rolling out the crust). The recipe is simplicity itself, doesn't use shortening or lard (which gross me out for some reason), and has an incredible taste and texture.
It's a primer Tarte makes, i believe this is it and i also believe she uses a spatula similar to this
You have to be careful while using this product, it will start to bead up if it's worked with too much, which is why it doesn't have the best reviews. At least, this is what Stephanie claims.
https://www.amazon.com/gp/product/B000T7PWWA/ref=oh_aui_detailpage_o00_s00?ie=UTF8&psc=1
I haven't received it yet, but I should get it with then next couple of days. It's not prime, but supposedly it ships and delivers in a few days. I chose this one because I'm a bit cheap and it looks like it will last me. According to the reviews, it seems to me it will last better than the rubber ones? I could update you if you want to see if I think it works? You could also enter "every last drop beauty tool" into the search in amazon or ebay (not too sure about the sellers on ebay, but overall i've had a good experience on ebay so far, better on amazon with a prime student account) so you can decide if you think the rubbery elastic one or stainless steel tool will work best for you and/or your budget. It appears to me that the metal one will fit into the glossier milky jelly and can scrape the last of what I have (several uses left, but the dispenser wont pick up much anymore! I always have this problem with the cleansers I choose and hate wasting bc of how much I pay for the cleanser!!)
I have two glossier MJCs still...
Hope this helps and isn't too messy :)
EDIT: The life hacks seemed a bit much for me so I resorted to this lol... You can search "every last drop beauty tool" into google, I think there are other sites like target, walgreens etc if you don't buy from amazon/ebay! Not sure about the shipping
Years ago I got a fish spatula and I haven't gone back to any of those clunky plastic or metal ones since. It's the only one you'll ever need.
https://www.amazon.com/gp/aw/d/B001VZ8S1Q/ref=ya_aw_od_pi?ie=UTF8&psc=1
This is what i use, comically large
Please help me decide how to spend $250.
I have a $100 gift certificate for my local homebrew store and $150 cash. US Dollars.
Below I explain how I brew and what equipment I have. I'm thinking of upgrading to a better immersion chiller. Or, I'm thinking of buying a stirplate and Erlenmeyer flask. I do step up starters using a jug. I have an general concern a big Erlenmeyer flask will break. I don't have a gas stove so I think I'd boil in a pot and transfer. I mostly do 2 to 3 liter starters.
QUESTION: before I buy a stirplate and flask, or a better chiller, do you think I should buy something else? Critiques are appreciated.
Please take a look at what I have already and help me decide:
How I Brew
All grain. Buy grain at store, they grind for free. Buy hops and yeast from them too. 5.5 gallon (20.8 liter) batches (volume before into fermentor). Ales. Brew in a Northern Californian garage with doors open. Igloo cooler. 60 minute mash. 2x Batch sparge. Single burner. Heat strike water, dough-in, mash. Heat sparge water 20 min before end of mash. Vorlauf. Drain wort into bucket. After first running drained, batch sparge in two phases. Vorlauf into same bucket as first runnings. When last sparge water is mixed in, start heating first two runnings. Add third runnings to boil kettle when done. Boil etc. Immersion chiller on until down to 100F (37.7C), then circulate ice water through chiller with pond pump to pitching temp. Oxygenate with diffusion stone. Pitch yeast. Seal. Rock fermentor. Pour a beer. Clean. Sanitize. Worry.
Equipment:
Comments / Concerns
tl;dr I have $250 to spend, given what I already have, how should I spend it?
Is it like this? That's probably exactly the right size for my BIAB urn. So do you just dumb everything straight in and whisk away?
Get an absurdly large whisk from Amazon and then you can just dump it all in at once and stir. I haven't had any issues with doughballs since I got my whisk. This is the one I have link.
Just go to your local restaurant supply store, they likely have tons of spatulas like this but for cheaper
https://www.amazon.com/HIC-Harold-Co-60106-Dexter-Russell/dp/B002CJNBTE/
Dexter Russel makes some nice ones. Here
I've been using a Lodge that I bought new on Amazon for about the same time. Likewise, I crack and egg on it dry (though it's never really bone dry...it always has a bit of a sheen to it from the seasoning).
I struggled for a while using cast iron until I bought a really nice turner that would effectively scrape the iron clean and eliminate almost all need to wash with soap and water.
I could mill the bottom of my pan smooth, but I don't see any need to whatsoever. There is one annoying little clump of iron that my turner catches on sometimes, so I'll probably grind that off eventually. So if you're shopping in a store, check for that and avoid it if possible.
btw this is the turner I use, which I would consider BIFL if you take care to hand wash and immediately towel dry after each use.
As far as tools, all I need is a nice metal spatula. Wood is good too for certain things but silicone and plastic I find unnecessary.
My tips:
Buy a really old quality skillet and griddle.
Avoid cooking large volumes of tomato and wine and other acidic foods.
No water.
Nothing better for grilling than some nice rigid heavy duty tongs with no padding or silicone tips or any fluff like that.
I like ones like this. I've got a 9", 12", and 16" set and the 12" is my goto - short enough to be super stable, but long enough to keep cool.
>How often do you cook? Do you enjoy it?
Cook once a day, but I reheat or prep lunch and breakfast.
>What decluttering tips you have?
What spatula do you have? I bought this one based on a recommendation on some thread. That thing is pretty annoying, at least it was cheap. The top part is too big to fit into any makeup container. The bottom part is too floppy to scrape up product efficiently, and then the product gets stuck in the little nooks and crannies of the tool itself. Gah!
I have one of these spatulas - a must for sample junkies & non-wasters! https://www.amazon.com/gp/aw/d/B003WLZZRM/ref=mp_s_a_1_5?ie=UTF8&qid=1497635104&sr=8-5&pi=AC_SX236_SY340_QL65&keywords=jar+scraper+spatula&dpPl=1&dpID=41fmZFa16HL&ref=plSrch
This.
You guys don't like it because it's a swan... but what about a Nessie ladle!?
> Stainless Spatula (slotted or unslotted)
I like a slotted metal-core silicone spatula for frying in my non-stick pans, and a very thin solid metal spatula for scraping my cast-iron (something like this).
> Silicone spatula
Yes, preferably a regular size one and mini one for getting into narrow jars.
> Silicone spoonula
Yes, see above.
> Stainless spoon 5. Slotted stainless spoon
I prefer plastic and wood, since they're non-stick safe, unless they're polished ones to use for serving.
> Ladle
Yes, preferably plastic
> Wisk
Yes, both a high-density balloon whisk and a silicone-coated one for nonstick pans.
> Tongs (should they be silicone or stainless? do you use these in your nonstick pans?)
Both. Stainless are easier to use, but I always keep a silicone one around for my non-stick pans.
> Peeler/juliene peeler
I'd say no on a peeler. I've found the best approach is to buy cheap ones and toss them when they get dull. Nothing is more dangerous that a dull peeler that you don't want to part with because it matches a set. I personally use the Kuhn Rikon ones that are 3/$10.
I have a julienne peeler, but it's more trouble than it's worth, and I wouldn't recommend it. If you're doing small quantities it's almost as fast to use a knife, and if you're doing large quantities just get a spiralizer.
> Draining spoon (for pasta)
Yes for slotted spoon, but no need for the "pasta spoons" with the tines for grabbing spaghetti. You're much better off just draining your pasta in a colander.
> Potato masher
I've never used mine. I use my RSVP Potato Ricer instead.
> Measuring cups
Yes, preferably metal dry measuring cups and a Pyrex wet measuring cup. For dry measuring, I like the stainless ones with short sturdy handles (such as the KitchenMade ones). Even though the handles are a bit short, they're incredibly sturdy and won't bend or break, and the handles are short enough that they won't cause the cup to tip. For wet measuring, go with the original-style glass ones, and skip the ones with the inaccurate angled measuring surface.
> Measuring spoons
Yes, again preferably stainless and with the little hooks on the end of the handle so you can lay them down flat on a counter (like the Cuisipro ones have).
I have this Oxo spatula that would work well for something like that. It plays second fiddle to my Dexter spatula, but for things where the flexibility is needed, it is ideal.
http://www.amazon.com/dp/B00004OCL8/ref=twister_B00IKAO4I6?_encoding=UTF8&psc=1
This this a million times this, this is the best spatula for scraping gunk and amazing for eggs/most everything. I am actually going to order some extra right now.
Also your temp most likely a bit too high, for some reason eggs on iron is much lower temp then you are used to. If you are going to quickly fry some eggs over easy/sunny up with low-mid temp then I would suggest preheating the eggs in warm water or at least let them come to room temp. I usually cook on low heat, it takes a bit longer but its perfect no stickiness all day
Would something like this be a good alternative?
http://www.amazon.com/OXO-Good-Grips-Flexible-Spatula/dp/B00004OCL8
Thanks for the suggestion. I think I found it on Amazon. Is this it?
http://www.amazon.com/gp/product/B00004OCL8?keywords=oxo%20spatula&qid=1450406073&ref_=sr_1_6&s=kitchen&sr=1-6
I started with an OXO and had it for years. it was spill proof, kept my coffee hot for hours and hours, the spout was comfy, but the lid mechanism didn't break apart for cleaning. Eventually this became a problem... seals stretched and I would have to find creative ways to keep the breather hole clear of coffee particulate.
g
About a year ago I replaced the oxo for a Thermos.. The lid breaks apart for easy cleaning, and it certainly keeps the contents hot. So hot, in fact, that It took a while to get used to how much hotter the coffee was. after a year or so, its the only complaint I have. Coffee is too hot to drink sometimes.
Both mugs are stainless inside, but the thermos is unibody and the oxo had a plastic top portion.
Good luck!
You need to get in the habit and then once you are eating them regularly, you will likely find you enjoy them and crave them. When I get into a junk food rut, all I crave is more junk food. If I can get my self back to fruit and veg, I actually start craving that.
For fruits, try smoothies. Start out adding something to sweeten them, like a big spoonful of honey, and as you drink more of them, you'll likely need less and less of the honey (I think just the fruit is sweet enough now). I always have a small banana and some strawberries (fresh when in season, but frozen other times). To that I add depending on what's in season or available: blueberries, raspberries (both good for fiber), kiwi, melons (watermelon adds a lot of sweetness), pear, peach, grapes. For liquid I use lowfat, unsweetened almond milk (but I used skim milk before becoming lactose intolerant). You don't need much. Blend it well. Add some ice for a nice crunch when it's hot out. Not too much of anything, even with fruit the calories can add up.
Vegetables. You need to start off with easy things so you'll actually try them. I like to saute (in a T or two of olive oil) sliced zucchini and yellow squash with onion. Finish with a little salt. Love that stuff.
I love soups because I cook once and then can just heat up a bowl for days or even freeze portions for quick meals later. I got an immersion blender and now blended soups are so much easier to make. Some recipes I like:
red pepper soup. I love, love the flavor of this and it's low cal.
Orange soup: butternut squash, carrots, parsnips, yams, onion, yellow squash, ginger, broth. You can roast the veggies if you like or use them raw, and you don't need all of them, just some combo of these. Cook veggies and peeled ginger (lots of ginger) in water+bullion (or stock, I use vegetable stock, chicken would be fine) until everything is tender. Add a jar or two of roasted red peppers. Blend with immersion blender. You can add a little sour cream or creme fraiche when serving for some fat.
Broccoli soup: Saute some sliced onion in olive oil. Add lots of broccoli (mostly the tops, not too much stem), a peeled and sliced potato or two, some broth (water+bullion is fine), and simmer until tender. Season with black pepper and garlic powder (if you like garlic). Enjoy. You can add some creme fraiche or sour cream if you like.
A tasty non-soup recipe.
We make home made mayo all the time with an immersion blender. You have to be careful to use a container that is only slightly larger than the head of the blender. I've got this one and the cup is the perfect size. This way it can create the vortex you need to slowly pull the oil in to the egg and mix it.
Also, we found that safflower oil is a great base. You can add in more flavorful oils that would potentially be overpowering or cause the mayo to be too thick, like extra virgin olive oil, bacon fat, hot sesame, or coconut oil. Usually we do about 1/4th cup of the flavorful oil we want and 3/4ths cup of the safflower oil. You can adjust based on preferences but coconut oil and bacon fat will make extremely thick/chunky mayonnaise. Bragg's raw cider vinegar is also absolutely amazing in mayo, and so is malt vinegar. Oh, also, if you like it spicy grate a shitload of fresh horse radish in there. It's delicious.
I think my favorite so far was maple bacon fat mayo, followed by hot sesame oil mayo.
I just received this one for my birthday and it's been amazing so far.
You can try using a diffuser.
A
Item
Butts are super funny!
I really need spatulas. Like, really badly. I only have one that hasn't broken in half yet and it's too big to fit into cans to scrape all the food out. It's a giant spatula.
Thanks for the contest!
Medium well. Anyone care to join me?
[Kitchen related item] (http://www.amazon.com/dp/B000M8YMEU/ref=wl_it_dp_o_pC_nS_ttl?_encoding=UTF8&colid=ET9F1H0BMZEE&coliid=I1G7OJVIXQWA48)
No soup for you!
Honestly, I basically swear by these spatulas. They are definitely the best and useful for basically everything. I bought two sets and they are my favorite things in the kitchen. I even take them to my inlaw's when I know I'll be baking so that I can use my good spatulas. They are freaking awesome.
Let's do it in the kitchen.
It’s really not hard but once you try it, you won’t go back. The biggest key is to not overcook eggs.
My version is a little different. I trust /u/J_Kenji_Lopez-Alt and Serious Eats on all things related to the science of cooking. For that reason, I will salt my eggs first.
The Approach:
I’d recommend giving this a try before you introduce other ingredients in. But overall its simple, just requires attention, and produces amazing results. Also, if you cook eggs a lot, buy a cheaper non stick. The kevlar coating will eventually wear off, so it doesn’t make sense to buy expensive non-stick pans. A $15-25 pan is all you need, think of it as being a 1-2 year disposable. And no, your cast iron is not AS good. It may be good, but its properties do not scientifally match the non-stick.
I love my Farberware 8” for 1-4 eggs. Anymore and you’ll want to size up to the 10”. And don’t heat to high or use metal utensils, it will strip the coating and you’ll have to replace more often. Silicone spatula is ideal.
Study Sunday!
I could use new rubber spatulas as mine have really seen better days. They're on my house list!
Why the floursack towels? I mean, I have them and like them for cheesemaking, but I would not consider them a kitchen basic.
Don't get sponges in bulk unless you're sure you like them. If you like those ones, great, but otherwise pick them up in smaller quantities locally.
A basting and pastry brush is nice to have, but easy to get around needing too. And I don't know if you want silicone or natural bristle: depends what you're using it for.
A kitchen scale is definitely a good thing to have, especially starting out, when you're really not at all sure of how much of something you should be using.
A ladle is nice for soup, although I'd probably pick up a cheaper one instead if budget was a priority. I would also get stainless steel unless my cookware was all nonstick.
Tongs are important, but I'd get steel tip ones unless you're planning on using a lot of nonstick. The things you want tongs for you mostly don't want non-stick for, I think.
For that sort of spatula, I'd recommond something seamless, like this. They stay better for a lot longer.
Oven mitts are a must.
I have that sheet pan and like it.
The convex design of that grater will give you less food contact, which will make things take longer (and probably makes the slicing side super weird). If you're worried about grating your knuckles, just don't try to grate to the bitter end. Also, if you get an etched box grater like the Cuisipro, you don't need a separate zester. The zester on stamped box graters is, by nature, awful, and one of the reasons Microplanes are so popular.
It's good to have a colander, and that one looks good (fast draining without everything getting stuck in the mesh of a strainer).
Measuring spoons are helpful, although that's another area I'd probably cheap out on if you've got a budget.
That type of can opener opens the lid really nicely at first, but things start to go weird and annoying over time. Also, my TJ Maxx almost always has it for half that price.
The cutting board is good, although if you've got the space for it, I'd get both that one and the size bigger. The smaller ones are easier to wash, but when you need a big cutting board, it's a total life saver.
If you like Corelle, go for it. I have traumatic memories of it exploding violently and often, but I've heard that's atypical. I have and like the AmazonBasics porcelain dinnerware. It's probably easier to break, and it's heavier (although on the lighter end of porcelain dinnerware), but it won't shatter and go everywhere.
I like Pyrex measuring cups better because you can use them to heat things up in the microwave too. I've got one of the Oxo ones as well, and do not find the multiple ways of reading things to be particularly helpful. Also note that a liquid measuring cup won't replace dry ones.
Stainless steel mixing bowls are good. I like to buy mine in person to find the ones with sturdy bottoms. The ones that pop drive me crazy, particularly when I'm kneading bread in them.
Silverware is surprisingly helpful in the kitchen, and those look to have big enough handles to make them more comfortable for, say, lightly beating eggs.
I recommend seeing if you can try out knives before buying, because how it fits in your hand is a matter of preference, and quite personal.
I'm assuming you have a cookware set already? I cannot imagine trying to cook everything in 1.5 quart pan. You also want an angled spatula that's meant for lifting things out of pans, like this one.
OXO Good Grips Flexible Turner - love that thing
https://www.amazon.co.uk/gp/product/B000ND1YTU/
As far as pie crusts go, there are a few tricks that go a long way to making a good crust, but the most important I've found is this: Don't over-handle the dough. It's not going to be a fully cohesive mass until you press it together. Don't add more water to make it one. Add just enough to get it to come together when squeezed.
If you want to focus on fillings, then go to trader joe's and get a pie crust in the refrigerator section. It's a good substitute for homemade. Another option: a cookie/graham crust. There's so many options there, too. You can use traditional graham crackers, but you can also use oreos, gingersnaps, shortbread cookies, etc. Add some crushed pretzels, pecans, hazelnuts, whatever for extra flavor. They're perfect for any cream pies (chocolate cream, coconut cream, banana cream, etc). Also, graham cracker crusts will hold together better and taste better if you bake them for 10 minutes or so then cool before filling.
When using a pudding/pastry cream filling, brush the crust (either pastry or crumb crust) with a thin layer of ganache and chill before filling. This keeps the crust from getting soggy and, let's face it, a bit of chocolate is always a good addition.
As far as cookies: don't over-bake. The most common problem I see is people over-bake them because they don't realize there's carry-over from being in the oven (they continue to cook after you remove them), so they end up with hard, over-baked cookies. Drop cookies are generally the easiest for novices and there's a billion varieties to choose from. Pay attention to the recipe; some cookie doughs need to be chilled before baking, some don't. Bake on parchment, then slide the whole thing off the pan onto a rack after pulling them out of the oven. Don't panic if they seem slightly under-done...remember the carryover.
A few more cookie tips:
Relax and have fun with it. :)
Fish is always difficult, especially lighter, flakier fish like sole or bluefish, especially if they are lower in fat (think of tofu- high protein, low fat= guaranteed to stick to a pan everytime). One thing I would recommend is marinating in olive oil for 10-15 minutes beforehand. You can add herbs and spices to the oil to make a pesto-y mixture and spread it over the fish (just don't add parmesan!). I fry tilapia all the time in a stainless steel all-clad pan, which is arguably much dodgier than using cast iron, and it rarely sticks. My theory is that the fish has a chance to soak in some of the oil, thus making it act like a richer, higher fat fish in the pan.
I use a fish turner, though I'm not convinced that a plain old metal spatula or pancake flipper is inferior. In any case they are much cheaper from a restaurant supply store.
Also since we are on r/frugal, I can't recommend tilapia enough. I go through about a pound a week @ about $7/lb from freshdirect and I never get tired of it.
Blichmann burner. They're expensive but worth it.
Jaded Hydro. Same. Maybe moreso. Most badass wort chiller I've ever seen.
A comically oversized whisk. Doughballs in your mash will fear you
This 24" whisk? or this one?
You're efficiency will likely improve, especially if you double-crush your grains or set your mill to a finer setting, and squeeze your bag.
One trick I've started doing is when my mash is done I heat it up to 170 while stirring before taking the bag out. I seem to get a bit more of the sugars out this way. (I have a thick bottom pot so I don't have to worry about scorching the bag).
Also, buy one of these giant whisks. I used mine for the first time on my last brew and it made stirring the mash so much easier! Much better than a spoon or paddle.
Everything from Dexter Russell.
I have two spatulas of varying sizes and their dough scraper... Obviously the dough scraper isn't used on the CS, but the spatulas are awesome. I also have a chainmail scrubber, but I don't find the need for it on my CS, just my cast iron. I find a plastic scraper, water, and a paper towel will take off anything stuck to the CS.
That's a small, centered-logo Griswold and is just sitting there waiting for me to clean it up. I picked it up for $8 and thought I'd clean it up and give to a friend. I need to restore it first but I haven't begun yet.
"Home is where the mom is" although the kitchen is my domain. And, yes, I 100% love my Dexter spatula.
Second. Get a Dexter Russel with a flat edge and rounded corners:
HIC Harold Import Co. 60106 Dexter-Russell Pancake Turner, Stainless Steel with Walnut Handle, 4 x 2-1/2", https://www.amazon.com/dp/B002CJNBTO/ref=cm_sw_r_cp_apa_i_x91jDbC49X8AR
I usually bake stuff first like bread, corn bread, dutch babies and so on. Also searing meat is good too especially if you're looking to darken up the seasoning. I hope you sprung for a good metal spatula too. Like this one here someone linked to in an old post. It will help slowly smooth out the bottom of your pan.
I have this one (Dexter, $15 on Amazon but totally worth it) and love it. Gets right in those rounded corners, sturdy and not too flexy, and the wood handle is very comfortable. It's all I use on my three cast irons, and it works phenomenally.
The idea here is that a steel spatula will, over time and repeated use, help scrape down the little "peaks" of iron that make the surface uneven—this, combined with filling the "valleys" with delicious polymerized fat, will eventually lead to a glassy, flat surface that requires only a tiny bit of oil to cook foods without sticking (a.k.a. a damned well-seasoned pan).
If anyone is interested in purchasing:
Dexter-Russell Pancake Turner,... https://www.amazon.com/dp/B002CJNBTO?ref=yo_pop_ma_swf
This Dexter is the only spat you will ever want for your cast iron.
Shell out for a good metal turner. Then put water in the pan, bring to a boil and run the turner across the bottom to pick up straw bits of food. Empty out the water and food bits, and wipe down and dry on the stove. Add a bit more fat if you want.
> you're giving people false hope that jobs and higher wages are coming back.
No I'm not. You're STILL missing my entire point. I didn't say a thing about wages or jobs. China has an advantage because they don't have environmental regulations. Now that the costs of manufacturing are comparable, we should absolutely re shore our manufacturing as a means of slowing global warming, regardless of whether or not it gives anyone a job.
Oh, and by the way, I own an American made set of tongs which sell for a whopping $14.25 on Amazon. The best selling foreign made tongs on Amazon go for $12.95. I bring this up to illustrate to you that there isn't a major price difference between Chinese and US made goods because you still can't comprehend my point.
These are the ones I have
Edlund - 9 inch heavy duty... https://www.amazon.com/dp/B00CF1CC3U?ref=ppx_pop_mob_ap_share
Edlund - 12 inch heavy duty... https://www.amazon.com/dp/B002P64OMC?ref=ppx_pop_mob_ap_share
Extremely solid
I use a small ball of wadded aluminum foil held in my tongs.
WOOD
Cool notebook
Teachers Carry All
Love Math
Chinese jumprope at recess
School Sloth Would Be the Best Mascot
Favorite Lunch Snack
Favorite Picture Book Peanuts Rock!
Cute Cool Backpack
Waiting for Dinner
Bonus 1
In school, you're taught a lesson and then given a test. In life, you're given a test that teaches you a lesson.
edit: forgot number 3
In terms of kitchen equipment, cheap kitchen utensils should be fine through college.
I have bamboo kitchen utensils, which are actually quite cheap while still functional.
I'm not really a fan of plastics in the kitchen, but plastic cutting boards and bowls/plates are cheap and durable (make sure they're dishwasher/microwave safe).
One good chef's knife is all you need for the most part. Something like this is enough.
A coffee maker just needs to be able to heat the water and pour it through a filter, yeah the Mr. Coffee maker is fine. Even cheaper alternative: a coffee dripper.
https://www.amazon.com/Winco-FST-6-6-5-Inch-Blade-Spatula/dp/B003HEOLXI
For 5 bucks I'll buy these for anyone as a gift lol
Fish Spatula
https://www.amazon.com/Norpro-Silicone-Spatula-Quantity-Assorted/dp/B003WLZZRM/ref=sr_1_4?ie=UTF8&qid=1526424520&sr=8-4&keywords=spat+daddy
I got this combo kit on Amazon and I am quite pleased. Get a Danish dough whisk while you are at it. You can thank me later.
It's a Danish Dough Whisk
Does she wear makeup? Does she live on her own yet and need things that she uses everyday? While plushes are cute and always appreciated, they aren't the best in terms of utility. The links below are just a few ideas of how things can be cute AND useful :)
http://www.amazon.com/Ototo-OT821-Nessie-Ladle-Blue/dp/B00SRGPELO/ref=sr_1_1?s=home-garden&ie=UTF8&qid=1462821052&sr=1-1&keywords=nessie+ladle
http://www.amazon.com/TONYMOLY-Hello-Bunny-Perfume-Bar/dp/B007CVTANI/ref=pd_sim_121_7?ie=UTF8&dpID=31vXH9N9u7L&dpSrc=sims&preST=_AC_UL160_SR133%2C160_&refRID=13EAJ0816QC0XPSNRVR6
http://www.amazon.com/TONYMOLY-Petite-Bunny-Gloss-9pcs/dp/B00HD6LS1E/ref=sr_1_28_s_it?s=beauty&ie=UTF8&qid=1462820731&sr=1-28&keywords=tony+moly
http://www.amazon.com/Woodland-Animals-Ceramic-Measuring-Bowls/dp/B00S75KDXE/ref=sr_1_4?s=home-garden&ie=UTF8&qid=1462821096&sr=1-4&keywords=animal+measuring
I named mine Pete
LOOK WHAT I JUST BOUGHT FOR 2 BUCKS
I started using a spider strainer utensil for this purpose. It works really well because you can lower like 4-5 eggs safely at a time!
Not sure if this is helpful or not, but you could buy something that isn't meant for only one purpose.
A dutch oven is great for deep frying, and obviously braising, simmering, roasting, and even baking bread.
If you go this route, you will also need a spider and a thermometer
Edit: I know you said you would rather see it in person, I'm just sharing the links so that you know what to look for. You can find these things in most "mega marts"
May I ask, is this what metal wire spider looks like?
Is it safe to use steel utensils on an
aluminium(I mean steel) pots and pans?I like these for my griddle. The pancake flipper is thin and slips under anything, plus it's a little longer which is nice for fish. The griddle turner is solid with a sharp edge for helping food to release as well as scraping/cleaning the griddle. The pointed corners help get right to the edge of the griddle too.
I also like this incredibly thin spatula from OXO. It is great for eggs, cookies, hash browns, etc. It is somewhat flexible though, so maybe not the right tool for burgers and steaks.
Here's a pretty thorough review of many different spatulas. After reading it and watching the video, I'll probably buy a fish spatula as well.
Yeah I swear by this one:
http://www.amazon.com/OXO-Grips-LiquiSeal-Travel-Stainless/dp/B0001YH1LG/ref=pd_bxgy_k_text_y
Seals tight.
get one of these: http://www.amazon.com/Oxo-Good-Grips-LiquiSeal-Travel/dp/B0001YH1LG
Fill with hot water prior to filling with coffee. This will heat the inside metal and will keep the coffee extra hot for much longer.
Coffee stays hot for about 5 hours in this thing if done properly, no joke. And you can beat the living shit out of it. OXO stuff is great.
EDIT: Obviously dump the hot water out once it is heated.
This is the one I commute with, I think I got it cheaper from target... basically I just went to target grabbed travel mugs then went to the section with bikes and figured the one that looked most water tight that fit in a cage the best.
OXO Good Grips LiquiSeal Travel Mug! I've had this for 4 years. Still going strong. The best thing ever. A little steep for a mug on a teacher's budget, and would very much be appreciated as a gift.
I have this one that I originally got and used exactly the way you described, smoothies right in the glass (you do need a wide glass though). It's great for an occasional or small one.
But if you're planning on making a lot of smoothies, either at once (e.g. multiple people), or just to have some in the fridge, a full size blender is so much easier. The Kitchenaid 5-speed is the one that Cook's Illustrated recommends, and it is absolutely awesome. Makes perfectly smooth drinks using fresh or frozen ingredients, destroys ice, doesn't walk all over the counter.
If you like to make soup though, a stick/immersion blender is perfect since it can go right in the pot.
I believe it is this one. The price listed is about what I paid for it too. If you don't feel like ordering it online, I bought mine at Bed Bath & Beyond. I'm sure they will sell it at places like that, and also Target, Wal-Mart, etc.
Fairly Easy Tomato Sauce
Ok, so this is a fairly easy recipe that really is only "difficult" because of the amount of time that it takes. But, in reality, its not too difficult to maintain the sauce for several hours while it reduces so you can be doing something else like watching tv or doing homework or whatever while you're making it.
Prep (some of this can be done during cook time):
4.Wash Basil
Cooking:
tip - if you have a stick blender like this you can blend the sauce after its done for a smoother consistency
Dude, I was reading your comment and cursing how I have the same exact problem and it occurred to me that someone has probably solved this issue! Sure enough! Go on Amazon and look for simmer plate or heat diffuser, looks like it will get you what you need. It’s basically an aluminum spacer between your flame and the pan.
Only $6.50
HIC Harold Import Co. 99134 Heat Diffuser Reducer Flame Guard Simmer Plate, Stainless Steel https://www.amazon.com/dp/B000HM9ZSY/ref=cm_sw_r_cp_api_i_NLbCCbCSPK4VS
My Kovea Supalite heats quite evenly, with a titanium Snow Peak pan (thin enough to go from cold to charring in ~3 seconds on the Kovea), windscreen, and just the right amount of gas... pancakes are no problem.
Otherwise, I'd get one of these; https://www.amazon.com/HIC-Diffuser-Reducer-Simmer-8-25-Inches/dp/B000HM9ZSY/ref=pd_lpo_vtph_79_bs_lp_t_2?_encoding=UTF8&psc=1&refRID=XXNYV4NN3W0SFGMVEMX5
http://www.amazon.com/gp/aw/d/B000HM9ZSY/ref=pd_aw_sims_3?pi=SL500_SS115&simLd=1
You might think about a flame tamer or a heat diffuser
They both do relatively the same thing with each excelling slightly more at their designated purpose. Flame tamers typically have holes while diffusers do not.
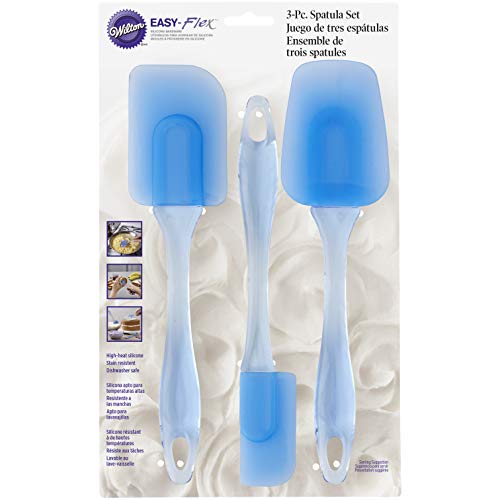
[spatulas!] (http://www.amazon.com/Wilton-570-1121-3-Piece-Silicone-Spatula/dp/B000M8YMEU/ref=sr_1_1?ie=UTF8&qid=1394493409&sr=8-1&keywords=spatula)
Butterflied Medium Well
no soup for you
I like my big juicy steak medium! I'd like to have dinner with you! /u/Sweetiebud3 ! kitchen related
No soup for you!
How is the studying going? Good luck I know you will do amazing! :D
Link So I can bake some cookies for Santa because it's Christmas in April ! :D
This is in my Kitchen Stuff wishlist! I've wanted a set of spatulas for a while now, and I saw these on the bestselling list some time ago.
Game of Thrones:
Someone probably already suggested this, but the GOT coloring book is pretty damn sweet
They also have a book to learn Dothraki
ohh! and this GOT letter opener is super neat, even though it's super random, but if you're anything like me, random is good
Blue Stuffs (right now I'm trying not to sing Eiffel 64):
These lights are pretty damn cool and they're remote control operated
If you're into baking, I HIGHLY recommend these spatulas. They work super well for their price
These headphones are kick ass. They're wireless and don't get tangled up all the time
History:
US president rubber ducks, 'cuz why not???
Drunk History Season 1 and 2. My favorite show ever
If world history is more of your thing, they have paintable terroctta soilder models which are pretty neat
Also thank you for this contest. I discovered some pretty cool shit.
right now, the best that I can do is offer similar in 3 piece sets.
the option, to get exact is to either purchase both and switch handles. Or, to purchase the Wilton set, and replace the handle with the handle on the melted one. Note that I can not offer guarantees that either option will fit correctly
https://www.amazon.com/Wilton-570-1121-3-Piece-Silicone-Spatula/dp/B000M8YMEU
https://www.ebay.com/itm/Prepworks-by-Progressive-Rubber-Spatulas-Blue-Set-of-3/222870320416
Wilton Easy Flex 3-Piece Silicone Spatula Set
If I could also add one extra it'd be a multi-use electric pressure cooker, the kind that doubles as a slow cooker
Ooh, an 11/11 birthday. that seems like it should be lucky or something. Happy Birthday!
Here is my link
I wanted a set of rubber spatulas for Christmas because I bake almost every day and it would be so much easier to scrape out bowls with them. Easy Peasy Lemon Squeezy!
Happy cake day!!!
1 Rubber spatulas that I would use to mix up my cake, or icing colors which I use to die icings for cakes I make!
2 This one is a stretch but portal socks because Simon Pegg did voices for video games...and Portal is a video game!
3 I don't have any books on my WL. :P but.... I'd like to read this bag while I devour it's contents!
4 Mixing bowls. My SO tends to eat his cereal out of the few I have now >.<
5 Gecko food for our gecko! It even has a picture of one on the label!
6 Purple socks or purple nail polish!
7 Portal companion cube!
8 My (not so guilty) pleasure.
9 Pocket knife!
10 The definition of my childhood!
11 Literally for organizing!
12 My favorite hobby is baking!
13 PlayStation 4 could be geeky to some.
14 Made with 100% natural almonds!
15 Green socks!
16 I can wear these adorable leggings!
17 Funny candles!!
18 NSFW beads...
19 Gardening boots!
20 The item I love is this mixer!
I think you will buy these!
We used to have a match! ...But I deleted these spatulas.
So I suppose I'll have to go with snooble.
This is one of my favorite funny pictures.
Match!
God I freaking love this
match :D
yes ma'am
Whelp since we have to use what we have on hand looks like I am having a bunch of Nabisco snack packs and one last back of Pizza Flavored Combos.....not actually too upset about that. Alright, I chose a few options for if I win because I am not very good at choosing things. Everything is $10 or less before shipping: 1, 2, 3, 4, 5, 6, 7, and 8. Thanks for the contest :)
I use metal for most things but for eggs I use these: http://smile.amazon.com/gp/aw/d/B000M8YMEU/ref=mp_s_a_1_1?qid=1418763187&amp;sr=8-1
They're rated to 500 degrees so cooking scrambled eggs won't even get them close to those temps.
Then again Jaques pepin is probably the master of eggs and he uses a fork on a nonstick pan(anodized I'm sure) so who knows.
A Annnnd here we go again
B
C
D
E
F
G
H
I
J
K
L
M
N
O
P
Q
R
S
T
U
V
W
X
Y
Z
https://www.amazon.co.uk/dp/B000ND1YTU?slotNum=3&amp;linkCode=g12&amp;imprToken=tMptUYg.yKDBXTWRBBCG0Q&amp;creativeASIN=B000ND1YTU&amp;tag=seriouseats03-21
What you are looking for is no longer the norm it seems. And you do have lots of very specific requirements. But the one in the link above should fit all your needs.
This, and yes, it’s worth it.
OXO 1071536 Spatulas, Small, BLACK https://www.amazon.com/dp/B000ND1YTU/ref=cm_sw_r_cp_api_i_BVKmDbP266J71
I have the no slot one, like this.
This spatula-thing might be the weirdest. It looks useful to get eyeshadow pans of a palette you're depotting. Last time I used a steak knife and I would like to use something slightly less dangerous next time.
We all know interspecies romance is weird
I'm in Canada, I've never won a contest or been glammed :P
I'm Lana and I absolutely love this community, I look forward to talking to everyone in chat everyday! I don't have any real life girlfriends - or at least none that are interested in makeup. I really love all of you ladies, you're all so inspiring and so friendly! I also really enjoy doing contest makeup or makeup in general on cam with other girls, I always learn something new! ♥♥
Sigh, nothing on amazon.ca or it's either 3x the price ;(
I'd like either a little spatula to scoop out any product (I still need a metal mixing palette but I'll get one eventually) or this NYX lip liner because I only have 1 lip liner and it's clear.
I'm sorry that none are eligible for prime, Canada just sucks :(
I was having the same issue, but then I bought this makeup spatula. I use it to scoop products out of jars and tubes, and also to break up and re-press powders that I've nearly emptied. I've gotten lots of good use out of it.
I got a little spatula like this. I use a candle to warm up the bottom to melt the glue a little bit. Then I use the spatula to slowly work it loose all around the edge. It usually works pretty well.
my tool of choice is the oxo fish turner. super thin. a chainmail scrubber is another must have.
https://www.amazon.com/OXO-1130900-Turner-Stainless-Comfortable/dp/B000YDO2MK
For best results you want to use 120 grit sand paper to smooth the interior surface of the skillet. Higher end skillets are milled but sandpaper works fine.
Sand until smooth to the touch and then season with bacon fat.
Buy a spatula with a flat flipping edge like this: https://www.amazon.com/OXO-1130900-Turner-Stainless-Comfortable/dp/B000YDO2MK/ref=sr_1_3?keywords=spatula+fish&amp;qid=1557451481&amp;s=gateway&amp;sr=8-3
The flat edge keeps the cooking surface smooth. You can also use the spatula to clean off any food bits off the skillet.
In a few weeks eggs will slide out like Teflon.
Fish turners are the best. Ignore the name—you can use them for everything.
I have the Oxo, which is excellent:
OXO Good Grips Fish Turner https://www.amazon.com/dp/B000YDO2MK/ref=cm_sw_r_cp_tai_ljUYCbYVX3K3M
The one you have looks pretty great but I have no first hand experience with it. Maybe I should get one (don't love the wood handle though, because dishwasher)
My favorite lately has been a fish turner. Use it for everything not just limited to fish. My favorite grilled cheese flipper right there!
https://www.amazon.com/dp/B000YDO2MK/ref=cm_sw_r_cp_awd_AI3CwbKXZTECN
Agree wholeheartedly. This is what I use.
Have a cast iron skillet that I loooove and my crockpot.
Wish for one of those fancy fish turner spatulas like cavemanketo has.
http://smile.amazon.com/gp/aw/d/B000YDO2MK/ref=mp_s_a_1_1?qid=1416469380&amp;sr=8-1&amp;pi=AC_SY200_QL40
Here's a slightly cheaper one if you want to save a little cash!
I've been meaning to get a big ol' whisk for a while now, and you just made me check.
The 24" is less than $10CAD up here in Canadistan so that's a no-brainer.
Get a big whisk, and $14 of something else.
$14 on Amazon
https://www.amazon.com/Update-International-FW-24-French-Whip/dp/B002AGX3BK
Converted an old wine fridge from craigslist into a brewpi controlled fermentation chamber
I use this as a mash paddle
LME - Stainless steel mash paddle
DME - Giant whisk
Adding DME to cold water helps ALOT with dissolving. Wooden utensils look nice by stainless is shiny and oh so much easier to clean. IMO its never worth the cost savings to buy aluminum utensils.
For temp control, use a cooler. This is the cooler I use. It is perfect to hold any fermenter I've seen. Fill with 65f water. Put your fermenter in the cooler. Add frozen 16-oz soda bottles to keep water temps at around 65f. Monitor your fermenter temps (using the stick-on fermometer ... just be sure the fermometer isn't under water!). I've found adding 1 frozen bottle in the morning and 1 in the evening keeps temps exactly where I need them..
If your fermenter has a spigot in the bottom - place the fermenter inside a contractor trash bag (the super thick durable kind) before placing in the water. You don't want to risk infection by having the spigot exposed to the water.
For BIAB and All-Grain ... #1 - BIAB is all-grain. It is just easier. The ingredients are the same. The end result is the same (Beer!). The complexity, cost, and time are different. So, I'll just list out a 2-vessel BIAB-in-a-cooler hybrid system.
Total - $255 shipped to your door.
This setup will be a setup that you can use for all types of Ales. You can even do low-temp ales that ferment at 50-55f by adding more ice/colder water to the cooler. Don't think it would be efficient enough for lagering.
Process:
EDIT - you will need an extra 5-gallon pot to heat sparge water.. forgot that. They can be found anywhere for about $20. As always - check craigslist to save even more $$$$. This is the cheapest and most efficient setup I've been able to put together. If you really want to get fancy - then you can add a stainless steel fermenter from Chapman Brewing Equipment for an extra $99. The fermenter is well worth it!
EDIT 2: As always SANITIZE everything at all stages. Also - with all-grain, you'll eventually want to get into water chemistry. Read up on that. AND a good kitchen scale is needed for measuring out hop additions (and later water chemistry adjustments). Kitchen scales can be had cheap. You'll want one that is accurate and can be calibrated.
I think this would be way better.
I used one of those before upgrading to a paint mixer hooked up to a cordless drill which absolutely destroys dough balls & mixes the mash very quickly with little effort. Not sure how a paint mixer would work with biab though.
your process looks pretty good, i have the 15gal ss brewtech and i would get it without the thermo. you are just going to cause problems with the bag. another thing i would get is a giant whisk for mashing and creating whirlpools/oxegenating
also i use this giant colander on top of my 15 gal brewtech kettle to rest the bag in and squeeze with some silicone gloves. the gloves are a must with BIAB.
i used to use a hop bag but ever since going away from it i have found my beers have gained some hop character they were lacking before.
also make sure you are treating your water for chlorine with campden tablets before brewing, and if you want to go one step further you can build your water up from scratch. i fill up 2 6 gallon containers at the windmill express for .25c a gal and add gypsum, cacl, epsom etc from there.
Here you go.
http://smile.amazon.com/gp/product/B002AGX3BK/ref=oh_aui_detailpage_o06_s00?ie=UTF8&amp;psc=1
Use a FLAT EDGE metal spatula. It will scrape off the peaks, and help you fill in the valleys with seasoning. After about a year of light-medium use (like cooking once a week) you will have a non stick pan where water beads up on it and slicks right off.
I love my dexter spatulas, I have both of these: http://www.amazon.com/Dexter-Russell-5-Inch-Stainless-Walnut-Turner/dp/B002CJNBTE/ref=sr_1_2?s=home-garden&amp;ie=UTF8&amp;qid=1405829842&amp;sr=1-2&amp;keywords=dexter+spatula Hand wash them (wooden handle)
> A flat front edge, like it is straight across with no curve whatsoever.
>
> All Clad T106 - slightly rounded
> All Clad T107 - straight
> All Clad T198 - diagonal (this is a fish spatula which is still a good choice because the edge of the spatula itself is straight across, not rounded)
> Here are some good options:
>
> https://www.amazon.com/HIC-Harold-Co-60108-Dexter-Russell/dp/B002CJNBTE/
> https://www.amazon.com/Chef-Craft-12510-Turner-1-Pack/dp/B00B0M5LQK/
>
Thank you so much! I had already ordered the All Clad T107 from Amazon yesterday, so good to know that it has the straight front edge!
My favorite tongs are Vollrath or Jacob's Pride S/S Scalloped Tong w/ Kool-Touch Handle, I think mine is 9 1/2"
And Dexter Russell turner. I have this one:
https://www.amazon.com/gp/product/B002CJNBTE/ref=oh_aui_detailpage_o07_s00?ie=UTF8&amp;psc=1
If you have a gas cook top get at least one cast iron pan.
Your pan is fine. You do probably want one of these. It's your new favorite spatula. You can scrape the hell out of the pan and you won't hurt it, and nothing you cook into it will hurt it either. Scrape it off and try again.
I just use a steel turner like a short order chef would use on a griddle:
https://www.amazon.com/Dexter-Russell-2-5-Inch-Stainless-Walnut-Pancake/dp/B002CJNBTO/ref=sr_1_11?ie=UTF8&amp;qid=1484421202&amp;sr=8-11&amp;keywords=steel+turner
Just scrub up all the stuck on stuff with the turner and toss.
Stainless steel spatula is perfectly fine to use on stainless steel pans and cast iron. If you want a fantastic spatula, I recommend this one. The rounded corners are particularly nice because they want scratch like pointed corners will.
I use this to cook and scrape it clean. My cast iron hasnt seen water unless I am using it to cook with for over a year. The spatualla being stainless also polishes the pan.
Yep, I use this:
HIC Harold Import Co. 60106 Dexter-Russell Pancake Turner, Stainless Steel with Walnut Handle 4 x 2-1/2" https://smile.amazon.com/dp/B002CJNBTO/ref=cm_sw_r_cp_apa_i_S0BUCbCBE1DTR
Lack of perfect uniformity isn't a problem, and it will even out through use. You don't need to use salt every time you clean it, I'd stick to just deglazing the pan with water after use and "scraping" with a stainless steel spatula. The salt isn't uniformly abrasive so it will create micro scratches that then need to be filled in with polymerized fats (scroll down about 80% of the page to the pics here). Using just the stainless steel spatula will give you a better surface over time since it will leave the fat/oil in the micro-grooves to polymerize and scrape off any high points. After that, just wipe with a paper towel and apply a light coat of oil and you're done.
Unless you've got years of crud stuck onto the pan (or it wasn't oiled and it got rusty) reseasoning isn't going to get you much. It forces you to remove any polymerization that has occurred and unless you've got an old Griswold or Wagner that was machined at the factory you're going to have a lot of irregularities to fill in before you're back to a truly non-stick surface.
I was a skeptic and my wife was even more of a skeptic, but cast iron has taken over most of our non-stick kitchen duty.
You can read and learn all sorts of things, but if you're going to do one thing to make your cast iron experience better, then you should buy this:
pancake flipper
it's changed the way i cook. you need a really thin, rigid, metal flipper. Eggs. Burgers. onions. fish. actual pancakes. my cast iron is my favorite kitchen pan. If you're thinking about it, try to grab a cheap one at a garage sale.
Do you mean this Walnut Spatula?
Older cast iron skillets. Wagner and Griswold and the ones to look for, but any U.S.A. made skillet that is machined smooth on the inside will do fine. Just learn to season it and take care of it so you can give it to your grandkids.
My personal skillet is older than my grandparents.
Edit: Use a steel spatula. I prefer this one:
http://www.amazon.com/gp/aw/d/B002CJNBTO?pc_redir=1397965051&amp;robot_redir=1
I thought it was crazy to spend money on a spatula, but then got this one and damn! totally different experience cleaning cast iron.
Also, pan cleaning aside, make sure you let them cook well after you first drop them in. I use medium/high heat on an electric top stove.
Secondly, use a flat metal spatula. I used to use a plastic one that was thick, so sliding it under the egg to flip never went well and I ended up with eggs that looked like yours. After getting a metal one, that problem is gone.
Someone posted a link to this one, which I purchased and really like: http://www.amazon.com/gp/product/B002CJNBTO/ref=oh_aui_detailpage_o03_s00?ie=UTF8&amp;psc=1
If you want good tongs these are the ones to get...
https://www.amazon.com/Edlund-4412-HDL-inch-Heavy/dp/B002P64OMC/ref=cm_cr_arp_d_product_top?ie=UTF8
Get two.
From Season 7: More Tex-Mex Favorites
TESTING NOTES
WINNER:
OXO Good Grips 12-Inch Locking Tongs - $12.09
> Missed a perfect score only because one picky tester thought the pincers bruised cooked asparagus—a minor complaint. Class valedictorian in every other respect.
RECOMMENDED:
> Nonstick-friendly and effective with everything but hard objects. We could get a (tenuous) grip on ramekins, but lobster was a no-go.
> Described as light and natural; one tester remarked, "They just belong in your hand." Sharp, deeply defined scalloping can tear delicate foods.
4 others were RECOMMENDED WITH RESERVATIONS:
4 others were NOT RECOMMENDED:
My gf's parents got me a set of bamboo spatulas and a bamboo cutting board set. It is the best housewarming gift I have ever had. I just searched bamboo on amazon so this is what came up. I can show you what I have but I don't want to get out of bed atm.
Kitchen utensils, because I'm old. As far as a song, "The Medic' by Foxing. Thank you for the contest :)
I need some cooking spoons for my place. I know they are more kitcheny, but they are essential!
STOCK MY HOUSE !
I'm sure it's great, but I've been more than satisfied with this >$5 shipped fish spatula
Don't forget a nice very thin spatula.
This one has worked well for me, even in a cast iron
https://www.amazon.com/gp/product/B003HEOLXI/ref=oh_aui_detailpage_o08_s01?ie=UTF8&amp;psc=1
Yep, quickbreads are things like banana bread, zucchini bread, muffins, etc.
I use the silicon spatula in place of a wooden spoon for mixing. I personally like the red one of these: OXO Good Grips 3-Piece Silicone Spatula Set https://www.amazon.com/dp/B005PP9ACY/ref=cm_sw_r_cp_api_iuAJxbX83524F
It's thick in the center so it's stiff enough to hold up to cookie batter but it tapers down at both edges so it's still flexible enough to scrape a bowl down. The ones that are only tapered on one side will do a better job at scraping bowls but they usually aren't stiff enough to mix with.
I thought this "problem" already had a solution.
Holy crap! I think you replied to another one of my posts and I didn't realize it was you! I've never had a celebrity reply to one of my posts ;) Thanks for the recipe, I've been loving it, now I just need to perfect it!
> If you read the recipe,
READ?!?! Certainly you don't expect me to READ! :)
> you'll see that you're in charge of tweaking the yeast so that the dough is between double and triple the volume by the time you make it,
Is there a good way to tell, I've been kinda eyeballing it, and it seems like it could be 2-3x the volume...
> How soft and how manageable is the dough?
Uhh... I don't really know how to quantify softness and manageability... I don't really have anything else to compare it to, of my friends I am the most studied and experienced... (which is not much!)
I can't for the life of me figure out how to make the pizza round... and when I go to shape it by hand I make holes, make it uneven, and then I tend to get frustrated and bust out the rolling pin (which REALLY makes things not round)... When cooked the dough is more dense than I'd like, I don't really get that fluffly "ny style" crust that I'm after.
> If it's a little stiff, you might try increasing the water by 1%, and, if it's still too stiff, you can't try another 1%.
Why can't I try another 1%? I actually think I increased the water by 3% this last go and it didn't turn out too bad...
> What's your altitude?
5,436 feet
> Btw, I'm not sure if you've come across this in your research, but I find that high altitude baking is an advantage, not a handicap, as it seems to do quite a lot for oven spring.
I am not a baker... if this is considered baking I should give up now. I cannot bake, no mater how hard I try.
There seems to be two things at play with the altitude, first being the dry/arid climate makes the flour dryer and "thirstier", and the second being the lower barometric pressure which allows doughs to "rise easier"?
What about tools? I've been using a rubber scraper to mix my flour into my water... Would a dough whisk help? Maybe this?. I was considering a standup mixer, but a $150 investment is kinda large for something I'll only use to make pizza dough with (I don't make bread... which is my understanding that the only other thing the standup mixer would be good for?)... alternatively a food processor seems to be able to be a dough mixer (and is the same $150 investment)? (Which I could use for making other things)
Thanks for taking the time to reply! I really appreciate it!
Yes on the bread proofing basket!
Couche (cloth for baguette rising)
Lame, for slashing dough before baking
If he doesn’t have a stand mixer, a Danish whisk for mixing stiff dough
I also find an oven thermometer handy, since many ovens run hot
Dough recipe:
16oz tepid water
~5 cups bread flour (Pillsbury)
2 1/4 tsp yeast
1 tbs salt
Dissolve yeast in water, add about 4 cups of flour, and mix to form a sticky dough. Distribute the salt and keep mixing. (I use ['The original Danish Dough Whisk']: (https://www.amazon.com/gp/product/B00HQQJ3N6)
Add flour a little at a time until it's not so sticky and something you can handle, then turn it out onto a counter and start kneading. Add flour a little at a time until the dough is smooth, shiny, and still a little bit tacky.
Divide the dough into about five smaller balls. Put them in an oiled glass pan to rise (Burmese olive oil). Be sure each ball is coated lightly with oil, and cover the pan with plastic wrap.
Let them rise at room temperature until doubled in size, or you're too hungry to wait, or you think, 'oh crap, if those get any bigger, I'm going to have trouble when I stretch them'. (I went with the third option, popping the dough into the fridge to slow the rise down a bit. I let it come back to room temperature before I prepared later).
Just kidding. I wanted to seem Artis-fartis.
Sauce:
I used crushed tomatoes with oregano, basil, parsley and a little bit of black pepper and garlic powder.
Cheese:
Shredded parmesan, chopped up slices of provolone, and low moisture shredded mozzarella. I drizzled a little olive oil over the top before I put it in the oven. (I often use the prepackaged soft mozzarella logs, and that works well in the wood-fired oven, but my family doesn't prefer the softer cheeze, so I went with this mix. The olive oil helps to keep it from burning so readily, I think.)
Cooking:
Brick floor of the oven was about 700F, and I had let the fire burn back to until the air temperature was about 800F. My oven isn't a big one*, so I've been experimenting, trying to find the sweet spot* and found this to be about right.
They say size doesn't matter.
**TWSS
All told, I found the center of the dough to be a little loose, so I had to stretch it carefully or risk tears in the center. The dough developed some big bubbles while cooking, which are fun, but I didn't prefer. I'm thinking a cold rise with less yeast might help with that? I should probably revisit my dough shaping technique in case I'm doing something wrong, too.
Also, when I make this dough for cooking in the traditional oven, I add 1tbs sugar with the yeast and water. For the wood fired oven, it seems the crust burned too readily with sugar, so I left it out this time.
I welcome any tips anyone has to offer.
Nessie I wish I could give you this one ! But the squirrel is cool to!
perpetually angst-ridden ass fucks
Complete set of scrubs
Three chocolate oranges
Bean bag
People seem to love the Nessie Ladle
There's also a colander spoon thing
And I don't think we've met - hi, I'm 82364!
this cute ladle! My husband and I dont have a ladle yet, and we cook all the time. Just thought it was really adorable!
Here you are: http://smile.amazon.com/luc-OT821-Nessie-Ladle/dp/B00SRGPELO/ref=sr_1_12?s=kitchen&amp;ie=UTF8&amp;qid=1427593585&amp;sr=1-12&amp;keywords=nessie+ladle
Instant Pot Chipotle Black Beans (so easy!)
Canned beans, schmanned beans. Nothing is better than cooking your own DRIED beans from scratch! These Chipotle Black Beans are SO easy (and cheap!) to prepare in your Instant Pot and the flavors outperform any can of beans. It’s a win-win.
Full recipe (with notes) found at....https://veggiechick.com/instant-pot-chipotle-black-beans/
INSTRUCTIONS
This is the one I use in my cast irons.
OXO Good Grips Stainless Steel Flexible Turner, Medium https://www.amazon.com/dp/B00004OCL8/ref=cm_sw_r_cp_api_E-HcAbYNKBJ5R
I have one exactly like this, super for pancakes.
Get this ASAP. Best tool ever for cast iron.
Amazon
http://www.amazon.com/Ototo-OT821-Nessie-Ladle-Blue/dp/B00SRGPELO