Best electronic components according to redditors
We found 3,339 Reddit comments discussing the best electronic components. We ranked the 1,705 resulting products by number of redditors who mentioned them. Here are the top 20.
We found 3,339 Reddit comments discussing the best electronic components. We ranked the 1,705 resulting products by number of redditors who mentioned them. Here are the top 20.


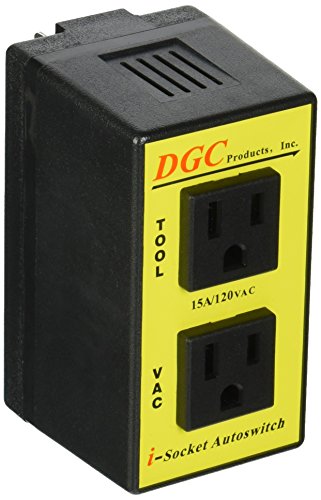
https://www.amazon.com/DGC-PRODUCTS-Intelligent-Autoswitch-Eliminating/dp/B005ELWUWG
Not the one I have but something similar
Buy this and then Buy this other thing and you'll never need Radio Shack ever again.
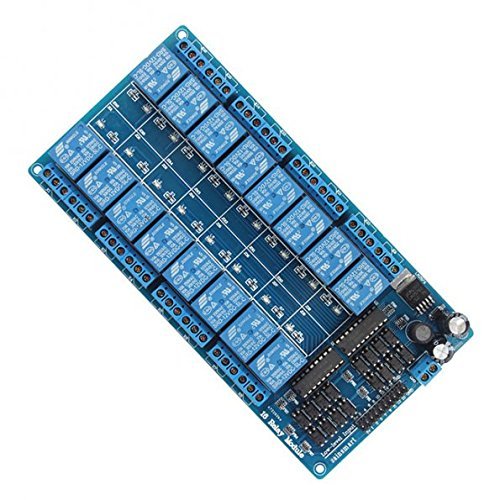
The way I do it is with an Arduino and a 16-Channel Relay Module.
http://arduino.cc/
http://amzn.com/B0057OC66U
If you want the actual sound to play outside, you can do that with a sound board, speakers, and a cheap power supply.
http://www.adafruit.com/products/2217
Then you program the lights to trigger however you want.
A couple of things come to mind:
A) Cool.
B) Instead of drilling through your stencils, I recommend using a finishing nail or an awl and banging pilot divots. This centers and guides the drill bit, and keeps you from killing your stencil, just in case.
3) Try heat shrink tubing. It's not terribly expensive, it's fun to use, and it makes you look clever.
D) In the event that you ever want people to think that you are very clever, get a decent soldering iron. If you have a lot of extra money to throw around, get a fancy Weller station. If not, I recommend the adorable Hakko FX-888. Now that the analog version has been discontinued, it's hard to find on sale, but... they're fantastic. If you want to feel fancy, you could get something like this. Look at all those bits! I don't know either!
It's pretty easy, honestly it's just removing the 4 pin fan power connector and removing screws. When you have a few hours, go ahead and lookup a dissasembly guide on YouTube or Ifixit on your card and go from there.
After disasemmbly, there'll be a bunch of old thermal paste, simply going at it with q-tips and coffee filters will remove it. If it's not really coming off, use a small amount of isopropyl alcholol above 60% and get removing.
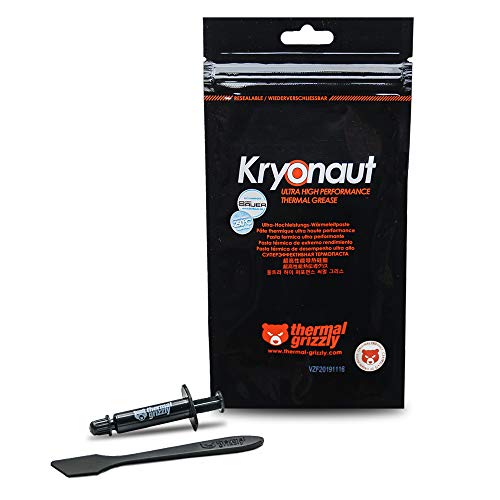
Kryonaut works really well for paste on tight GPU mounting, but any real thermal compounds works that you have lying around.
Reassembly is simply putting in new paste, attaching the 4 pins back and re screwing. A side note, you don't have to take the fans off of the heating block (aluminum fins), but rather just the cooling element off the card.
Good luck!
https://www.amazon.com/Thermal-Grizzly-Kryonaut-Grease-Paste/dp/B011F7W3LU
These are parts I use consistently in my labs
Capacitor kit
Resistor kit
Jumper wires
Bread board(s)
Larger breadboard. Recommended for larger projects but I haven’t used it too much. Best for large IC circuits
Multimeter. This has all the right features
Other things that can be useful:
•Wire strippers
•Pliers
•Electrical Tape
•Tackle Box or tool bag (to carry everything)
•Flat jumper wires
As you get into classes you’ll need specific parts (transistors, logic gates etc) but this should get you started. I use the things I linked in every lab weekly.
Feel free to message me with any questions.
Right here: http://www.amazon.com/gp/product/B0057OC5O8/ref=oh_aui_detailpage_o00_s01?ie=UTF8&psc=1
Mount your powerstrip on top, route the wiring into the underside of the top and route it forward, then mount a low profile surface mount switch on the underside of the top so you can just open the drawer and turn it on and off, you can then route it out the back of the box with just a cord and a plug or you can mount an recessed male plug on the back of the box that you can plug a cord into.
I used an IEC plug for the back of my powerbank project and was pretty happy with how it turned out. I used a locking IEC cord to come out of it which I can put a twist lock plug on for cord drops, etc.
I wanted to show off an arcade cabinet that my brother in-law and I built.
Imgur Gallery
We designed the cabinet in 3d to make sure everything would fit. Then cut out everything using a CNC router. We used wood glue and wood putty to put everything together. For the monitor we used a Dell 17" (we had lying around) mounted portrait. The guts of the arcade are
In all it took us a couple of weeks to design in 3D. My brother in-law did all this work. He also cut out everything and assembled the shell. I did all the internal wiring and software side of things. It is running RetroPie 4.0.2. The only really PITA is that this is a cocktail arcade. Most if not all the games needed a custom shader to correctly implement the rotation and dual flipped screens. A big shout out to hunterk from (libretro.com)[http://libretro.com] forums for helping me with this. It turns out that NES, SNES, Arcade, etc... needed their own shader to correctly display the image to both users. Also, the mame emulator has the ability on some 2 player games, to set cocktail mode. That way, when it is the 2 players turn, the screen auto rotates so they can play on their side.
We were pretty impressed with ourselves when we finished. We built it to give away at a foundation raffle a couple of weeks ago and the winner was very excited to win it.
I'll be glad to answer any questions you guys/girls have about the build. I plan on putting the glsl shaders on my github so others using the RetroPie OS in cocktail mode can use them.
Here you go.
If you don't mind going the DIY route, you could probably come in under $100 for parts for the strips:
Instead of the flat channel, you might be better off with angled channel for mounting the strips above the cabinets, since they'll throw more light on the wall, which is what you'll actually see - https://www.amazon.com/LEDwholesalers-Aluminum-Mounting-Installations-1901-V/dp/B00PJSSD7K/
There's a ZWave RGBW controller but it's more expensive than the wifi one and can take some more configuration: https://www.amazon.com/Fibaro-Micro-Controller-Z-wave-Strips/dp/B00P1N68FW/
If you get the snap-on connectors, I recommend putting a small amount of solder on all of the pads where you'll be connecting them on the strips, so that they make a good connection.
As for the puck lights, you could probably get something like this and wire the distributor to the wifi/ZWave controller, instead of plugging it into the controller it comes with: https://www.amazon.com/Changing-Christmas-Furniture-Ambiance-Lighting/dp/B01N2I47VH/ref=sr_1_2
internal shot
Parts list:
Tools:
STL for 3d printing:
All three files
Wiring diagram:
Terrible MS paint Diagram
And here are the details of my build.
The basic circuit is:
[power brick positive] -----> [switch] --------> [Induction module] ----------> [power brick negative]
Here is the list of purchased parts I used:
The items I had laying around are a mason jar (cleaned with new lid), 18 gauge speaker wire, and ferrule crimps.
The wire is cut to length, stripped ~1/8" (3mm) at each end, a ferrule is crimped on each end, and then inserted into the screw terminal. The ferrule is not mandatory, but it provides a more secure connection that bare wires, and I think its important to include when many people on this sub do not have background working with circuits.
Has he applied for any jobs yet? I was given one of those leather pads with paper inside and a holder for resumes (something like this) except it was from my undergrad university with their emblem. Definitely gives you some confidence for interviews and recruiting sessions. Also you can get him some nice resume paper to go with it. That lasted me for years.
I also enjoyed having one or two of these demotivational posters in my room. Depends on his humor and if he has barren walls like I did.
If you know more details about which raspberry pi he has, you could get some shield extensions. These are boards that expand its capabilities. There are also newer boards with better specs. Also with two boards you can of course make them talk to each other ;)
Depends on his area of interest and your budget, but you could get him some kind of [introductory FPGA kit] (http://store.digilentinc.com/fpga-programmable-logic/) or DE0-Nano.
Tools... so many tools he might be interested in. USB logic analyzers are so cheap these days and go well with hobby boards. Again not sure your budget, so you can go all sorts of ranges here (Open Workbench Logic Sniffer or scanaplus or Saleae Logic 8 or a china clone of Saleae Logic 8). Saleae or the knockoff I think are the better options for the software compatibility. He may be in need of a soldering iron or a multimeter.
Something else unique, you could get him a "gift card" (they don't really sell them) or an IOU to a PCB printing service. Ask him to design his own board and you'll pay $X of the service. You'll want to make sure he knows the price structure on the website because they charge per square inch and it depends on his design how many layers he may need. He makes the schematic and they will print some circuit boards for him. They won't mount the parts, just do the schematic and he would have to hand solder the components.
If he likes old videogames you could get him some old school USB controllers and tell him to install lakka on his rasberry pi, or just get him a new Raspberry Pi3 to dedicate it as an old-school console emulator. It is quite impressive how many consoles they have emulated.
And back to more tools... more micro screwdriver bits than you would actually need. You can get him a starter pack of resistors, capacitors, and other assorted electronics sparkfun. There are also so many buttons, switches, LED screen displays, etc. that he probably wouldn't want to buy on his own. Maybe you could get a container with an assortment of circuit components (resistors, capacitors, transistors, and other sensors). Careful! This can add up real quick. All types of sensors exist... ultrasonic rangefinder, stress, photocell, temperature, etc. etc. endless!.
Joe Knows Electronics is your friend. 800-some piece resistor kits, each group individually bagged and tagged, comes in a nice compact cardboard box, and it's cheap as hell. I've been using their stuff for a while now, and it's good quality stuff.
I've got a relay from amazon connected to some of the GPIO pins, then a simple website I made on the pie that when I press a button on it, it flips the relay. The relay is wired to the door open button and does the same thing as me physically pressing the button in the garage. I also have it monitoring for an amazon dash button press that will also trigger the relay, that is by the front door so I can open the garage on my way out the door if I need.
​
However, this has all been running for 4+ years, I tried to review how I pieced it all together about a year ago and couldn't remember or figure out all the pieces, but it still continues to work, so I can't give much more detail than that sorry.
If it could be used everyone here would use one and save that money. I don't like spending $25 on a fan speed controller either but it needs to be done. The $20 one sucks by the way, it makes your fan hum, get the active air brand it runs quieter or if you really want the quietest get a variac. But that's more money and you're looking to spend less lol. I can help you spend more but not less.
First grow.
This took 2-3 months. Seems like I ran into a number of first-timer pitfalls along the way. Good learning experience though.
Can't wait. So god damn tired of shady, undependable hook ups.
Edit 2:
Photos of my setup.
Edit 1:
Some have asked about my setup. This is about everything. This is my first grow so take my suggestions with a cup of salt but this stuff has worked well for me.
Tent:
Zero complains. Very happy with this. It just fits perfectly into a closet (had to remove the hanger bar though).
http://www.amazon.com/gp/product/B004U6WCMY
Air
Carbon filter:
The inside of my tent stinks. I smell absolutely nothing outside. Don't get caught. Get a good carbon filter. Maybe not this one, but something.
http://www.amazon.com/gp/product/B004FVJK60
Inline fan:
I hand this outside the tent. No need to take up any space or add any heat inside the tent.
http://www.amazon.com/gp/product/B002JQ14F8
Variable xformer for fan control:
This allows me to control the noise and airflow. Every other fan controller made the fan buzz. This thing is quality built. I keep it around 50v.
http://www.amazon.com/gp/product/B006NGI8VS
Circulation fans:
http://www.amazon.com/gp/product/B004RTMD8C
DWC
Bucket top net pots:
http://www.amazon.com/gp/product/B0049XIIGC
Air pump:
http://www.amazon.com/gp/product/B002JPEVMC
Airline:
The black just prevents light from getting into my res.
http://www.amazon.com/gp/product/B001D4XTUU
Air stones:
http://www.amazon.com/gp/product/B0050HJ7Q6
Check valves:
You NEED these. Many airlines are thin enough that if the power goes out or a hose becomes disconnected, capillary action might permit water to back-flow into your electrical air pump and/or just flood your room. Don't take chances when a .50 cent valve will protect you. There are some horror stories in the aquarium hobby about this. Note, even if the air pump is higher than your res, capillary action can pull the water up through the air hose. This is the same principle that allows 100ft trees carry water from the roots to the canopy.
http://www.amazon.com/gp/product/B00977J508
Lighting
Lights:
Word of warning. Start off a good distance between the lights and your canopy. These product more light than you think and I have burned and cooked plants from keeping these too close. They don't product a ton of heat or anything. I think it's just too much light if they aren't a good foot or so away from the canopy. I assumed I could practically lay LEDs on top of my canopy. Not so.
http://www.amazon.com/gp/product/B00FGFLCXS
Adjustable ropes for lights:
Chains work, these are just faster/easier to adjust.
http://www.amazon.com/gp/product/B0098R0600
Tools
Temp/humidity sensors:
http://www.amazon.com/gp/product/B0013BKDO8
pH pen:
I used to do chemical reagent tests (I have tons of aquariums so I had it laying around). Never again. A pen is fucking awesome for dialing in pH every morning. Get one!
http://www.amazon.com/gp/product/B00EQISYQO
Pruning snips:
These are great. Sharp as fuck and solid.
http://www.amazon.com/gp/product/B00004SD76
Training wire:
What I use for my scrog screen and early training before the screen goes in. Also good for random shit that's temporary enough I don't want to waste a zip tie.
http://www.amazon.com/gp/product/B001EXJ652
Nutes/Water changes
Pond pump:
This is another must have! I've been using these for a while now to handle water changes in my aquariums. It's also awesome for mixing nutes before they go into your DWC. I drop one in a bucket without a hose attached and then just dump all my nutes and such in. The pump does all the mixing. Then I adjust the pH a little. Give the pump about 10-20 seconds to mix my pH up or down in and test again. I don't have to worry my pH adjustment isn't probably mixed yet. I makes the mixing process so easy and fast. I also use these to pump out my res once the scrog screen is in place.
http://www.amazon.com/gp/product/B006M6MSL0
Root protectant:
One of my early problems was with brown algae. This cleared it right up after a week.
http://www.amazon.com/gp/product/B00IGFH3FG
Syringes:
No guess work. I know exactly how many ml I'm adding.
http://www.amazon.com/gp/product/B000RB3CV6
Cal-mag:
http://www.amazon.com/gp/product/B000J2CUPW
pH control:
http://www.amazon.com/gp/product/B000BNKWZY
Nutes:
http://www.amazon.com/gp/product/B000COBT54
http://www.amazon.com/gp/product/B000CO7U02
http://www.amazon.com/Educational-Innovations-Bismuth-Crystal/dp/B008MB1MCE/ref=sr_1_1?ie=UTF8&qid=1395445475&sr=8-1&keywords=bismuth
They're often man-made. You can get some decent ones for cheap.
Heat-shrink tubing.
As requested:
Bartop kit - $139.99 link
Buttons - $66 link
Raspberry Pi 3 - $35 link
Raspberry Pi Case - $7.95 link
Power Recpetical - $5.99 link
USB Hub - $11.99 - linl
Zip Ties for cable management - $5.98 - link
External USB Ports - $11.90 link
Velcro Pads for mounting speakers and Raspberry Pi case - $2.98 link
64 gb SD Card - $24.88 link
HDMI to VGA adapter - $7.99 link
20 ft of 3/4 inch t-molding - $6.99 link
Total cost so far including shipping - $361.13
I have a speed controller like that, it makes the fan louder actually. This one is worth it if loud fans annoy you https://www.amazon.com/PHC-Enterprise-Variac-Variable-Transformer/dp/B006NGI8VS
3 plants is absolute max for 2x4 and 3 gal pots are prob enough for that. my 3 plants have filled my 2x4 halfway through flower, 2 is a better number if you want good light coverage, 2 plants with 5 gal pots
getya one of these:
http://www.amazon.com/Variac-Variable-Transformer-300va-Output/dp/B006NGI8VS
those cheap ones will make the fan hum. this makes it super quiet
This is what I have. There is no motor hum at any speed. The only thing to hear is the air that's being moved.
http://www.amazon.com/gp/product/B006NGI8VS
Full disclosure. I didn't pick it up, just saw the image and thought of it as a base. But you can buy them on Amazon:
Bismuth Crystal
If he's willing to throw $3.50 at the problem (and wait a couple of weeks for shipping from China), have him try a set of ferrite cores. You clasp one of these around the mic cord near the point where it plugs into the computer, and it can block out a lot of RF interference.
Ahhh, well since you give me a great link to the molding side of it, maybe I can help you on the controller side.
Fibaro RGBW Micro Controller Z-wave, Works with RGB/RGBW LED Strips
Now, I know what you'll think, because I thought it too - $70 for a dinky Z-Wave LED light controller? WTF?!
But it's actually so much more. Besides DC in (BTW, it takes 12 or 24volts, too) & Ground there's "IN1", "IN2", "IN3", "IN4", "R", "G", "B", "W". And the manual is odd too. You connect the LEDs up, then you have to wire switches into it too, etc etc - I haven't totally figured it out, but it's kinda neat. Also you can get it running on SmartThings. I've just migrated from ST to Home Assistant with a Aeotec Z-Wave stick and a deConz Zigbee stick.
The 4 "IN"s can be used for multiple sensors - which I might have to give a shot.
Anyway, what I've done is hookup 2 light strips to the controller - one is RGB, the other cold white (It's what I have at hand, and I like the color reproduction etc etc, haven't played with many RGBW lights). I typically use a white LED strip with 60 LEDs/meter, and then the RGB is 120 LEDs/meter.
You can control almost an unlimited number of strips with the one Fibaro controller - the secret is to add in RGB LED Amplifiers when the colors start going wonky. Honestly, they're cheap enough I do it between every set of LEDs I intend to connect together.
In testing, I found I like the look for the RGB LEDs closer to the wall, and then the White strip.
So there you go - hope I didn't confuse you there, trying to bang this out and get back to running ethernet throughout the house. Let me know if you have any questions.
Is Grizzly Kryonaut the best thermal paste one could apply on the Thinkpads?
Yep. I blew out all the dust and replaced the thermal paste with this:
https://www.amazon.com/Thermal-Grizzly-Kryonaut-Grease-Paste/dp/B011F7W3LU/ref=mp_s_a_1_3?keywords=thermal+grizzly&qid=1557427684&s=gateway&sr=8-3
Put more on than you think you need as the cooler contact isn’t super tight and it’s none conducive so it’s just fine if it comes out on the sides.
I used compressed air to clean the heat sink and fan. Rubbing alcohol to clean the old thermal paste. Be careful cleaning around the resistors around the apu. They are somewhat delicate. You can really just leave them as they are. GamersNexus never cleans them because it’s pointless and risks damaging them.
I think it’s quieter than when it was new. I can barely hear it when gaming on a X enhanced game.
This is my parts list.... Simple and it works
The enclosure I used: https://www.amazon.com/dp/B07TS6RY85/ref=cmswrcpapaiAyhxDbV7EHBCN
The 5A power supply (5A and you don't have to use a mosfet): https://www.amazon.com/dp/B01461MOGQ/ref=cmswrcpapaiGzhxDbQWPT5QR
I used a glass slide tube for inside of the coil. You will have to rewrap the coil on the IH to fit around the slide, not hard at all: https://www.amazon.com/dp/B001FWYAWQ/ref=cmswrcpapaiMAhxDbTK5P2YY
The actual IH: https://www.amazon.com/dp/B01GDVVANA/ref=cmswrcpapailChxDb0DGE3TM
The 5v switch w/ wiring harness (you don't need any extra wires this way): https://www.amazon.com/dp/B075QBJVTS/ref=cmswrcpapaifDhxDb7HTYE19
A Unibit would be a good thing to have to get the 3 holes drilled in the box. A hotglue gun and a screwdriver and your set....
So, after using this phone for about 2 years now, it is starting to feel a little sluggish. I have been browsing this place for a while and figure I will try this out just for kick.
Keep in mind, this phone has already been repasted using https://www.amazon.com/Thermal-Grizzly-Kryonaut-Grease-Paste/dp/B011F7W3LU Thermal Grizzly Kryonaut Thermal Paste. A very generous dosage too. Just to make sure it met, but really it wasn't a huge improvement over stock. Just a little better.
After about a year of this, while it didn't really degrade in performance, it wasn't all that satisfying, to begin with. So I decided to order https://www.digikey.com/product-detail/en/panasonic-electronic-components/EYG-T3535A05A/P121364-ND/6217292
Just to try it out. Everyone else seems to be using Thermal Grizzly 0.5mm pad, but I decided to do this mostly cause it is cheaper and has 4 total applications that I can still share after a bit.
And result comparison is here, really, not too bad at all! https://imgur.com/a/MurKeke
The device is noticeably snappier and faster. Really don't notice the occasional sluggishness from before. I am very happy with this!
If you have a cheap way of getting this pad I still recommend it. I haven't compared it with thermal grizzly directly on the same phone but I can't imagine it to be much worse. Keep in mind Digi-key charge quite a bit of shipping. So unless you have shipping arrangement that is cheap. You should look for something like this elsewhere.
Treat yoself
hey man, about to build my first heater tomorrow, I have a list of parts I ordered based on several threads and stuff you and others recommend I came up with this:
https://www.amazon.com/gp/product/B0060U92FS/ref=ppx_od_dt_b_asin_title_s00?ie=UTF8&psc=1
https://www.amazon.com/gp/product/B071NCKQFW/ref=ppx_od_dt_b_asin_title_s00?ie=UTF8&psc=1
https://www.amazon.com/gp/product/B01G00GHQY/ref=ppx_od_dt_b_asin_title_s00?ie=UTF8&psc=1
https://www.amazon.com/gp/product/B00VNSO3OM/ref=ppx_od_dt_b_asin_title_s00?ie=UTF8&psc=1
https://www.amazon.com/gp/product/B003TUMDWG/ref=ppx_od_dt_b_asin_title_s00?ie=UTF8&psc=1
https://www.amazon.com/gp/product/B01GDVVANA/ref=ppx_od_dt_b_asin_title_s00?ie=UTF8&psc=1
aside from wires, a box and tools (Ill get tomorrow from work)
am I set or do I need anything else, also if any of those things I bought incomatible?
You should use the continuity tester of any multimeter to check the wires before replacing them. You can connect one lead to where the heated bed wire plugs into the motherboard, and the second to where the other end of that wire is on the heated bed. Do that to check all four wires while jiggling them around to check for internal breaks.
If all four wires going to the heated bed are well connected you probably have a bad thermistor. This is that little black thing mounted to the center of the heated bed that measures the temperature of the bed. You can connect an ohmmeter to either side of the little black thing to see if it gives the correct amount of resistance (in the neighborhood of 100k ohms)
I had to replace mine, you just need any 100k ohm glass bead thermistor, it doesnt even have to be the same exact type as the one on the board. I used this one:
https://www.amazon.com/gp/product/B01N4KY6TR
it has leads and a plug that i plugged directly into the motherboard and just taped it to the bottom of the heated bed with kapton tape and works perfectly.
Good luck!
http://smile.amazon.com/SainSmart-4-CH-4-Channel-Relay-Module/dp/B0057OC5O8/
Not just from prusa, pick and choose. URLs for examples.
Digital caliper, 12" https://www.amazon.com/gp/product/B000EJUBBU/ref=oh_aui_detailpage_o02_s00?ie=UTF8&psc=1
Extra brass nozzles.
Hardened steel nozzle, 0.4mm to 0.6mm for printing abrasive exotics (wood, glow in the dark, carbon fiber etc)
Print removal tool https://www.amazon.com/gp/product/B00VB1U886/ref=oh_aui_detailpage_o02_s01?ie=UTF8&psc=1
Locktite blue bolt-fixer (Walmart, Home Depo, Lowes etc) to stop bed sensor from moving.
High temp anti-seize for nozzle threads https://www.amazon.com/gp/product/B0053ZS1Z8/ref=oh_aui_detailpage_o02_s01?ie=UTF8&psc=1
Raspberry Pi 3, 5v Pi 2A Power wart, Micro SD card, & Webcam for octoprint monitoring.
Relay board for Pi/octoprint to power up & down printer remotely. https://www.amazon.com/gp/product/B0057OC5O8/ref=oh_aui_detailpage_o04_s02?ie=UTF8&psc=1
1lb of silica gel to keep filament dry.
Filaments, various.
Fire extinguisher rated for electrical fires.
Dedicated smoke alarm.
From personal experience:
LEDs? Yes. Absolutely.
Headlights and wipers? Yes, but the motors on the wipers would be interesting.
7 inch touch screen? There's one built for the Pi already.
Buttons? Yep. pygame could be written to handle all of that. I'm sure other languages could be used, that's just what I'm most familiar with.
10-15 relays? Yep. I personally use a 16-port mechanical switch for a project here at home. You can narrow that down to just a few pins if you know how to program an i2c.
5-10 analogues? Probably. Not sure how many GPIO are left over after using 16 for a relay.
Phone connecting via bluetooth? Not my area, dunno. I suspect so.
Will the Pi handle all of that simultaneously? Heh... easily. The stuff you're talking about is very very simple. It's a lot going on, but the processing power it requires would be hardly nothing at all.
I still would absolutely recommend against it. At least put the headlights on the 'on' position on the relay so if the pi dies, the headlights are auto-on. Take the wipers off of the Pi. That going bad in a rainstorm or snowstorm could be hell.
Sure! You'll need a relay to handle the higher voltage from wall outlet, or from the wiring in the strand itself. I have a 4-channel version of this that works great: http://www.amazon.com/SainSmart-2-CH-2-Channel-Relay-Module/dp/B0057OC6D8
If you want a finished solution, Belkin makes WeMo devices you can control from an iPhone or Android, or setup trigger with IFTTT: http://www.amazon.com/Belkin-Automation-Switch-Apple-iPhone/dp/B0089WFPRO
link
It’s more fun to make your own. Also, the switch is cheaper and probably less prone to failure.
Or if the thing is delicate or expensive (let's not over-volt that old unregulated tube power supply), use a variac.
> AFAIK most fans with speed regulators won't actually be much quieter on the lower setting as it just uses a variable resistor (a rheostat) to control the fan speed. Often they even have an extra buzzing noise. The only good way to alter a fan speed is to alter the AC voltage it receives. To do this you need a variac (variable AC), You can find them for 50 quid but you have to wire them up yourself.
I agree. My rig got much quieter with this variac https://www.amazon.com/PHC-Enterprise-Variac-Variable-Transformer/dp/B006NGI8VS
> I think using a USB cord with a ferrite core for my phone will reduce that buzz.
It's what they are designed to do and they are cheap enough that it's worth a shot. You would add one to the end of the cable that plugs into the PC.
You seem to be misunderstanding a few things, so it'll be easier just to give you low down.
First, why do you want to switch power supplies? This is definitely an "upgrade", but unless your power supply is broken, it isn't necessary. The psu that comes with it is sufficient, and thousands of people use it. The easiest things to do to make sure it's totally safe is to mount a fan on it (if your model doesn't already have a fan), and attach a fused socket.
Adding mosfets have nothing to do with the amount of power drawn from your PSU. Without a mosfet, what happens is power goes from your PSU to your mainboard, to a mosfet on the board, to the connector on the board, to your hotbed. The on board mosfet and onboard connector are points of failure.
When people "add a mosfet" what they're doing is separating the power. Instead of PSU->Board->board mosfet->Connector->Hotbed, it goes PSU->Off board mosfet->Hotbed.
This allieviates heat and failure points on your board. You use the wires you would be connecting to your board as basically trigger wires, attaching them to the input of the mosfet board, and then the mosfet acts as a relay and the power basically flows straight from your psu to your hotbed.
Also, do not add a mosfet to your hotend. Anyone who tells you to do so doesn't know what they're talking about. Your hotend only draws 3 amps, and it may cause temperature fluctuation by design. It won't help anything, and can only make things worse.
You do want a mosfet for the hotbed though, which draws about 11 amps cold, 9 amps hot. Going back to what I was saying before, and to answer why you don't need a current limiting resistor, you don't want to limit any current. It doesn't matter if you add a mosfet or not. It's a function of ohms law. If your bed has a resistance of 1 Ohm, and you give it 12 volts, it will be drawing 12 amps. That's it. If you add a mosfet, it's job, as stated previously, is so the ~10 amps bypasses your board.
Now, if you do want to get an atx psu, 500 watts absolutely is not required. Looking back at ohms law, we see that the 1 Ohm, 12 volt, 12 amp hotbed will be drawing 144 watts. The 4 ohm, 12 volt hot end will be drawing 3 amps, and 36 watts. So your bed and hotend need 180 watts and 15 amps, your board and 5 steppers will take a few more amps, and therefore wattage. 500 is overkill, but more definitely doesn't hurt anything.
If that's the route your going, what you should do is look up the correct way to connect a mosfet, and then run your bed on a single 12 volt rail, and then run everything else on the second 12v rail.
I combined this power supply with this switch combo bolted down inside an ammo can as my charging setup and charger case. If you have a drill and a Dremel, you can easily do the same. That supply gives you 30 amps of 12 volts with three separate outputs. So you could run 3 of those Accucel chargers at max power, in theory.
I just spent the last week buying and printing upgrades for my new A8... I'm also new to 3D printing. Its been printing great so far.
Purchased;
Mosfet: $10 https://www.amazon.com/gp/product/B06XP4YZ9N
GT2 Belts: $9 https://www.amazon.com/gp/product/B01F0G4144
30A PSU: $20 https://www.amazon.com/gp/product/B00D7CWSCG/
Power Socket w/ Switch & Fuse: $5 https://www.amazon.com/gp/product/B00ME5YAPK
Printed;
Extruder Buton: https://www.thingiverse.com/thing:1935151
T Corner: https://www.thingiverse.com/thing:1672959
Anti Z Wobble: https://www.thingiverse.com/thing:1858435
Y Belt Tensioner: https://www.thingiverse.com/thing:2149867
X Belt Tensioner: https://www.thingiverse.com/thing:2354736
Z Endstop Fine Adjustment: https://www.thingiverse.com/thing:1776429
Not OP, but do you mean the perfboard or teensy?
https://www.amazon.com/dp/B00P1N68FW/
I spent a little time looking into lighting one room in my house solely with LED strips last year. I was primarily looking at cheap, 5-meter strips on Amazon, and thinking of controlling them with something like Fibaro's Zwave controller. Some things might have changed in the last year, but probably not much:
LED strips (generally) aren't as efficient as LED bulbs. It's hard to pin down numbers on this, and I may be wrong, but that's the impression I got after a lot of reading.
Low-voltage DC wiring over long distances has significant problems: Voltage drop and current limits are a function of the length and diameter of the wire, respectively. A 3 volt drop is insignificant for 120V AC power, but is 25% of 12V system. Power (watts, which will correspond to lumens) is a function of voltage and current. If you reduce the voltage by a factor of 10 (120 to 12) you lose 90% of the power you can shove through a given wire. You can compensate by using thicker diameter wire (expensive) or running higher voltage DC power (24 or even 48 volt).
You already touched on the price and length issue: With LED strips, you generally determine the length of the strip by the length of the wall or ceiling you want to run the strip along (even if a meter of LED strip provides enough light for the room, you don't want a single meter of LED strip in the center of the ceiling - that would just look weird).
I do have some LED strips in my house - they're fantastic for above and below cabinets, and I also have a couple strips above my workbench - it's almost impossible to cast a shadow on my workbench now.
Edit: I forgot to mention Wife-Approval-Factor - my wife absolutely refused to have "exposed" LED strips anywhere in the main living areas. And she has a point - they're not the most aesthetically-pleasing light sources. That limits you to indirect lighting (which you already specified) and means fewer lumens go to lighting the whole room, and you have to figure out tasteful way to hide the strips.
Anyway, that's my ramble on LED strips. Hopefully some part of it was useful.
Good luck with your new house!
You should redesign this and remove that as you call it 'fancy switch' and get a proper home automation system. I use Vera a vera Lite
Then you can do so much more. For example I use this on my RGBW light strips.
As for the power yes as other have said you need to use the existing outlets to power a 12 volt power supply. I use these for that.
Now that you have the Zwave hub then you can start to automate many other lights in the house.
Check out r/homeautomation/ for more ideas
Hanging LEDs strings around the screened patio (using this). The plan is to use smart lighting controls with LED strips around the ceiling in every room, but the screened porch is the testbed. The one thing I'm not sure on is how to camouflage the strips. My idea is to paint them white. My concerns are that will be even worse on non-white walls, the light won't look right and/or the paint will cause them to over heat.
Also much gardening between rain and unpacking.
LEDs were from https://www.ledworldlighting.com. Any controller would work, but the Z-wave I used is the Fibaro. http://www.amazon.com/gp/aw/d/B00P1N68FW/ref=mp_s_a_1_1?qid=1451773341&sr=8-1&pi=SX200_QL40&keywords=fibaro+rgbw&dpPl=1&dpID=41tT0RMfMlL&ref=plSrch.
Sorry for the long links I'm on mobile.
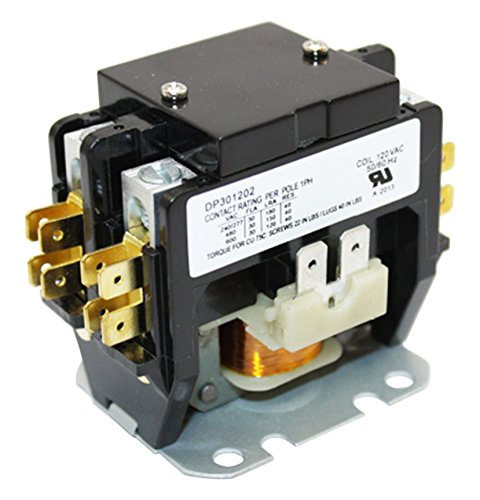
The Wemo Switch can be wired to directly control the relay/contactor which should be more than enough.
You would just need to grab an enclosure and whatever plugs/outlets and a few bits of spare wire.
There are cheaper WiFi switches but I personally like the Wemo switches, you can set rules (like Auto-Off) or schedules and it works with IFTT for more advance stuff.
WeMo Light Switch, Wi-Fi enabled, Works with Amazon Alexa https://www.amazon.com/dp/B00DGEGJ02/ref=cm_sw_r_cp_api_8JkBybZJS8X0H
Packard C230B 2 Pole 30 Amp Contactor, 120 Voltage Coil https://www.amazon.com/dp/B001KGSJ74/ref=cm_sw_r_cp_api_1IkBybGQNQV6G
I threw something together that i think would work for your circuit
Honestly though i wouldnt do what your doing and run amperage through a keyswitch, for one its not really safe and two depending on what fridge you use + powering a RPI you could easily surpass the typical 10A the switches have when the compressor comes on and spikes. You may be able to get away with it though, but im a fan of using contactor relays to prevent this. It will add another $10 to the build but its a mechanical relay that can control your hot line via a key switch, and only put a few milliamps through the switch at any given time, this switch would control the 5V power supply which would power the RPI, basically identical to how an electric brew panel would work.
https://dl.dropboxusercontent.com/u/2798684/BrewPiCustom.png
Obviously others should chime in if theres something glaringly wrong...i just threw it together in 5 minutes.
This is the power supply i bought to power my RPI in my electric brew panel
http://www.amazon.com/gp/product/B008LT2PGY?psc=1&redirect=true&ref_=oh_aui_search_detailpage
Cut a micro usb cable, wire to the power supply and plug into the RPI's usb port...easy.
This contactor is way overkill, im sure theres better/cheaper solutions im just posting what i know would work since its what ive used...others probably can chime in on this
http://www.amazon.com/Packard-C230B-Pole-Contactor-Volt/dp/B001KGSJ74/ref=pd_sbs_328_1?ie=UTF8&dpID=31caQKUqB6L&dpSrc=sims&preST=_AC_UL160_SR160%2C160_&refRID=0RJ3XDZRY4G14DRRN5K0
Hi! I built a Beavis Board about six weeks ago. Not terribly difficult to make at all. I purchased these on amazon from Joe knows...
Resistors
Capacitors
Transistors
The problem I have is that some of transistors aren't right for the layouts, the capacitors aren't film, and I couldn't find an assorted IC box.
If I had to do it all over again I would catalog all the parts needed for every project on the projects guide or see of there was a list of items the Beavis Board came with and take that to Tayda or Mammoth. It's a lot of work but will be better in the long run.
I'm definitely interested if anyone else has purchased assorted boxes and how that worked out.
I actually didn't tally up the cost as that wasn't really of a concern to me, but I'll try my best to provide links to the things I bought for this. Feel free to add it up for me!
I also bought various tools, like crimpers, Dremel kit, drill, etc, but I don't consider those to be project-specific as I'll have them for the foreseeable future. Let me know if there's anything you see that you think I missed!
I've used assortment packs like this before:
Joe Knows Electronics 1/4W 86 Value 860 Piece Resistor Kit
by Joe Knows Electronics
Link: http://amzn.com/B003UC4FSS
Also search for Elenco
I'm currently struggling with the same problem with my project.
You'd probably want to put a DHT11 in each pot attached to GPIO on the Pi.
The soil RH (relative humidity) could be used to determine whether to power a 12v pump or solenoid valve (if gravity fed).
Relays are super easy to set up and control using a Pi and relatively safe at 12v. The difficult question here is how to direct the water into whichever pot requires what amount of water. A naive approach is one pump per pot but that could get costly... hmm
I'm using this pump
I'm using this relay
Here's the code to read digital Celcius and RH from the DHT
I'm also considering adding an additional 'misting' nozzle to help control my super-hot (not ideal) environment :
Soil > Tempenature : 37.0 Humidity : 77.0
Feel free to follow up in PM if you have any questions.
for a beginner, I would not recommend you do this. but if you will anyway, I suggest this: http://www.amazon.com/SainSmart-101-70-101-4-Channel-Relay-Module/dp/B0057OC5O8/ref=sr_1_4?ie=UTF8&qid=1462302659&sr=8-4&keywords=3.3v+relay
This is the relay board I'm using. I'm going to use two separate arduinos to turn each one on (using "or" logic). I don't have a lot of experience using diodes, what exactly would I use? And do you mean literally I do:
Arduino1->Digital out->diode->Relay input1, then
Arduino2->Digital out->diode->Relay input1
Arduinos overlap quite a bit of PLC functionality. Instead of 24V, everything will be 3.3V or 5V. A PLC typically scans the ladder for inputs then executes everything "at the same time". In Arduino code, variables update immediately.
You'll probably want to look at Adafruit and Sparkfun for LCDs and buttons, as well as relay boards. Amazon carries some selection, but Adafruit and Sparkfun (for the most part) design and manufacture their own boards, so their support is a lot better. Note that if you use a lot of relays (>4), you'll need an external power supply to switch them all on at the same time since Arduinos can't provide enough current to drive tons of relay coils. The one I linked uses an external 12V supply, but I don't know if it's included.
Seems like it would be pretty simple - find a cheap/quiet air compressor, run the line through a normally-closed solenoid (found this for 11 bucks), and control the solenoid w/ the arduino. If the solenoid is higher than the 5V the arduino can supply, have the arduino power a relay or a power transistor, I use a 12 channel one of these to power solenoids for dispensing water and it works well. Sounds like y'all already have the code set up to do something similar, but give a shout if you need help with that part too
http://www.amazon.com/i-Socket-IS110M-DGC-PRODUCTS-Autoswitch/dp/B005ELWUWG/ref=pd_cp_hi_0
Start small. It'll save you money, let you get your feet wet, and help you learn how to grow better, and then you can buy bigger.
My "starter package" is:
https://www.amazon.com/gp/product/B00SWGYYWO
https://www.amazon.com/gp/product/B01I4NY8KW
https://www.amazon.com/gp/product/B00F8ZQYHA
https://www.amazon.com/gp/product/B0098R0600
https://www.amazon.com/gp/product/B004Q2ER5C/
https://www.amazon.com/gp/product/B006NGI8VS
https://www.amazon.com/Smart-Pots-5-Gallon-Soft-Sided-Container/dp/B002JUOWB2
https://www.amazon.com/FoxFarm-FX14053-12-Quart-Organic-Potting/dp/B001I49Q98
https://www.lowes.com/pd/Garden-Treasures-15-31-in-Rust-Plastic-Plant-Saucer/50445000
https://www.amazon.com/gp/product/B004PS4B08
So for about $420 (heh), you can get your foot in the door and start growing. This is a nice setup too, you can probably save $100 by shopping around, buying used, or doing-it-yourself. I've left off a few odds and ends like dryer duct, Fiskers for trimming, weed fabric pins for low-stress training, pitcher for watering, Mason jars for storage, but you can likely find those or suitable replacements around the house without spending money.
I also have a Raspberry Pi 3 ($43) with Sense Hat ($37) and metal case ($15) in each of my grow tents to log temperature/humidity and other things. I'm interested in eventually using the GPIO functionality to water my plants too. Not critical, but definitely a nice thing to have, especially if you're the hacker type. If you go this route, you might look at raspiviv.com too.
https://www.amazon.com/gp/product/B01C6FFNY4
https://www.amazon.com/gp/product/B014HDG74S
https://www.amazon.com/gp/product/B0722L338Q
I'm glad I bought a good intro setup because I still use it now that I've upgraded. I now have a 3' x 3' GG Shorty tent with HLG 300 LED for flower, a 2' x 2.5' GG Shorty tent with two 400W Roleadro COB's for veg, and my "intro package" is now my germination/cloning tent (and drying tent too since several people suggested that too). Being able to have three tents (germination -> veg -> flower) working simultaneously is increasing my output quite sharply. I'm doing this to help a relative with cancer, so you may not need to go quite as crazy as I did.
You mentioned using 35+ gs (~1.25 oz) a month. You probably aren't going to be able to grow that much given the constraints of tent size and light wattage (plus being a first-time grower! You'll learn a lot!). So once you get used to it, you'll probably want to buy more stuff. Marijuana isn't addictive, but growing marijuana absolutely is.
Once you've got your hardware, the variable cost is seed (~$10), soil (~$5), nutrients (~$20), and electricity (~$30). From that, I'm going to estimate you can grow ~1.5 ozs (you can do more as you learn more though). So you're looking at ~$40/oz after you've made the initial hardware investment.
Hope this helps. Depression, cancer, and everything else can just go suck it.
Awesome controller. I've been thinking about getting this one. It looks very similar to yours. How was your experience with that vendor?
I have a speedster and it sucks donkey balls. As soon as you start turning it down, the fan starts a really annoying humming.
Does yours run smooth at lower speeds?
Variac speed controller
https://www.amazon.com/PHC-Enterprise-Variac-Variable-Transformer/dp/B006NGI8VS
a duct silencer/muffler
https://www.amazon.com/VenTech-VT-FS-6-Muffler-Silencer/dp/B00HWILBSS/
insulated duct and google how to insulate/wrap a inline fan for cannabis
Well you say that, but you just obliterated a resistor by hooking it up to the mains...in any case, I won't lecture you.
A dimmer could work yes. The reason they work without blowing up or dissipating tons of power is AC magic, and we can leave it at that. You could also use a variable transformer such as a variac.
When air is moving we dont think that there is an electric motor turning it but not getting the benefit of the air since we redirect it. A little noise to make sure there isnt a fire is a fine exchange. If it is too loud this way try moving it in the attic away from any walls.
This is the fan set up I use and once its mounted it stays quiet.
http://www.amazon.com/gp/product/B006Z1JLY4/ref=oh_aui_detailpage_o00_s00?ie=UTF8&psc=1
http://www.amazon.com/gp/product/B006NGI8VS/ref=oh_aui_detailpage_o03_s00?ie=UTF8&psc=1
The transformer made all of the difference. I keep it set at about 75% of maximum.
I found a small piece on amazon for $7.95 http://www.amazon.com/Educational-Innovations-Bismuth-Crystal/dp/B008MB1MCE/ref=pd_sim_sbs_indust_1
I agree with the guy saying to repair the existing one. Just cut out the chewed portion of wire, strip the insulation back about an inch, slide on some heat shrink, make a western union splice (can be done with no solder), slide heat shrink back onto the bare metal and heat.
If you choose to buy a replacement, make sure you measure the diameter of your existing plug and match it to the one you buy, there are several different size barrels.
If you don't want to use a PS/2 to USB adapter, you have a couple of options. One somewhat difficult and one very easy. For both, you'll need to open up the keyboard with a tool like this.
The more difficult way is to use Soarer's Converter software running on a Teensy 2.0. This involves soldering the Teensy to the appropriate pins on the Model M's original controller and flashing the Soarer's Converter software to the Teensy.
I did this with an IBM Model F (AT) and it works great: https://imgur.com/a/ge80k
The easiest option is to purchase a replacement controller from Phosphor Glow. For this, you'll open up the keyboard, remove the original controller and put the new one in. No soldering involved unless you opt for the kit instead of the fully assembled and ready to go board.
I did this on one of my Model M keyboards: https://imgur.com/a/NY78q
To start off you can buy a Teensy 2.0 and follow Hasu's guide. If you need help in the future a PM is welcome.
Thanks. the case and blue keycap are both 3d printed. total cost not including the case and cap is $60 or less. The backlight is not RBG, but I think I've seen some that are.
Big Switch
Teensy 2.0
10mm LED
Switches: any two MX switches will work. NovelKeys has a big selection.
Hey guys! While I wait for the rest of my planck parts to arrive I figured I'd build a little 3x3 macro board using my keyswitch tester. I have a teensy 2.0 I got from here. I've soldered the three rows of diodes/grounds together, but I have no clue as to what to do next, is there a guide I could follow or something? The closest thing I've found online is this but it doesn't go into very much detail about the wiring and i have no idea how it carries over to a board this small.
I don't know anything about the LIFX, but if you have (or plan on getting) a zwave controller, I'd go with the Fibaro LED Controller. With that, you could easily use any led strip you wanted.
a tube of kryonaut is only ~$12 on amazon. Its worth it for such a low cost. I did it and my delta dropped by 5-10C. Kryonaut is one of the top pastes. AC is outdated similar to how people still get the Evo 212.
https://www.amazon.com/Thermal-Grizzly-Kryonaut-Grease-Paste/dp/B011F7W3LU
That's probably the best non-electrically conductive thermal paste. Like I said though, you'll only see a couple degrees difference. Delidding would drop it 10-20C degrees though.
May want to check this out just in case.
Then this.
I highly recommend Thermal Grizzly Kryonaut. This one:
https://www.amazon.com/Thermal-Grizzly-Kryonaut-Grease-Paste/dp/B011F7W3LU/ref=sr_1_1_sspa?s=electronics&ie=UTF8&qid=1542359958&sr=1-1-spons&keywords=thermal+grizzly+kryonaut&psc=1&smid=A3EM7MU9GFCYC4
Best thermal paste I've ever used. Better than Arctic silver or mx4.
> So yeah, your argument doesn't quite hold water.
Except for the part where it does.
https://www.amazon.com/der8auer-Delid-Die-Mate-Heatsink/dp/B01N6T4LD9/ref=sr_1_1?ie=UTF8&qid=1537819549&sr=8-1&keywords=der8auer+Delid+Die+Mate+2
https://www.amazon.com/Thermal-Grizzly-Conductonaut-Performance-Grease/dp/B079HDBYY3/ref=sr_1_2?ie=UTF8&qid=1537819615&sr=8-2&keywords=Conductonaut
https://www.amazon.com/Thermal-Grizzly-Kryonaut-Grease-Paste/dp/B011F7W3LU/ref=sr_1_2?ie=UTF8&qid=1537819691&sr=8-2&keywords=Kryonaut
These are just a few I'd recommend, but definitely do your research and see which one is best for your needs.
Thermal Grizzly Kyronaut
IC Diamond 7 Carat
Coollaboratory Liquid Pro
Apex on battery.
I have all Dell and Intel software enabled and up to date except for Dell Support Assist(unistalled because it was re-installing SmartByte), SmartByte, Killer Network and Rivet services are all stopped and disabled.
CPU/GPU was re-pasted with this.
Current CPU UV, your mileage may vary.
GPU OC/UV @0.700mV, 2nd lowest performance state.
GPU OC/UV Highest Performance State @0.813mV, it says @1733mhz but in reality GPU sits @1721mhz, this will greatly reduce GPU temps and since the heatsink is shared that includes the CPU as well.
Extra Sauce when playing plugged. Helps with random shutdowns and BSODs.
At all times even on battery, my own preference.
This is all on the latest BIOS, i've always updated it.
My max CPU temps hover between low 80c to mid 70's depending on game while the CPU sits @3.9GHz and GPU barely hits 72c at a room temp of ~34c. Tropical humid weather may simulate yours since you are indian?(wild guess sorry if your not and it's offensive D:).
Bonus round:
My laptop came with the AUO panel and it's OC'ed to 108hz LCD Reduced.
I barely use the Realtek's sound drivers, mainly use a wireless headset and bluetooth for speakers, to cope with the DPC latency issues.
Download HWInfo64 and keep an eye on the m.2 ssd and the PCH temp. Those can alter performance plugged or unplugged.
m.2 ssd heatsink link if needed.
This is not necessary but i had to do this, Dell's fault. MAY VOID WARRANTY.
If i can help with anything else, lemme know.
​
Edit: some fixes and clarity.
Yeah, I believe I'm one of the earliest people who got Blade 15 lol. Here the links for what I used
https://www.amazon.com/gp/product/B011F7W3LU/ref=oh_aui_detailpage_o05_s00?ie=UTF8&psc=1
https://www.amazon.com/gp/product/B00UYTTLI4/ref=oh_aui_detailpage_o04_s00?ie=UTF8&psc=1
Hey I got you... Trust me I've fucked up more hotends than you'll ever think possible... Thermisistor is the wire on your left and it may be broke but seems to be intact. Now your thermocouple/heater cartridge is not intact(its the cylinder with 2 wires sticking out of it. Still inside ths heater block)
Here are a few things you can do to remedy the situation.
Here is a link to my hot end troubles it might be useful.
FYI I'm a firm believer in be able to fix everything yourself. I believe that this philosophy is very applicable in 3d printing. Otherwise you'll just be throwing money at problems witjout every getting to the source of the problem. Hope this helps. Let me know if you have more questions.
If this isn't a problem from you previously modifying anything related to the thermistor, i would just replace them. Mine was reading 999 and I bought a few off amazon for about $8 iirc and it fixed the problem.
https://www.amazon.com/dp/B01B41K7OM/ref=cm_sw_r_cp_apa_Wn7WBb1NMNEWR
I just did the same thing while making a different upgrade. I'm trying Muffler Sealer to put it back in (hasn't arrived yet).
Edit: also replacing my thermistor with this one.
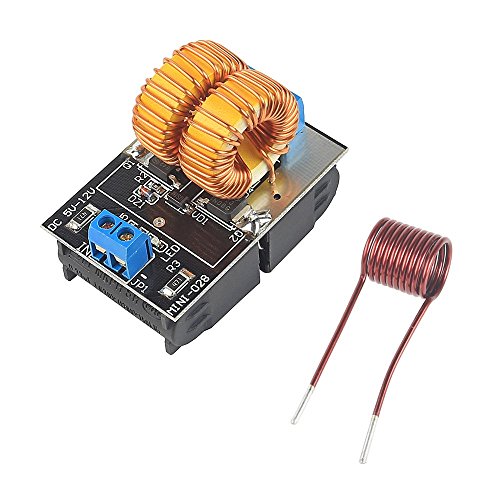
Lowest price with prime shipping here. I'd avoid the ones with red wiring around the inductors (double donuts on top) as they require soldering in my experience.
Big shout out to the /u/beasthoss guide in the sidebar. Worked like a charm first time. Induction heating really makes the already awesome dynavap experience even better. All parts used are listed below for anyone interested. I did use some t-taps I had laying around but no solder.
Induction Heating Module
Power Supply
Glass Adapter
Momentary Switch
Project Enclosure
Drill Bit
Edit for parts list.
Use this as an opportunity to stock up on a few different spare parts. I recommend always having those tubes, nozzels, heaters, thermistors, and possibly even one set of spare cooling fans. I did one purchase a little over a year ago, was like $40, has saved me from having downtime on several occasions.
ALRIGHT! Sorry for just getting back to you I've been trying to reply and mobile and kept accidentally deleting what i typed while trying to format my response. So had to move to the Laptop.
Anyways when I say you should repaste I'm referring to the action of removing the heatsink from the CPU and GPU clearing the provided "thermal paste/grease" (thermal paste or grease depending to who you talk to is a thermally conductive paste that is meant to be between the CPU/GPU and the heatsink to fill the airgap and conduct heat to the sink better.) from both and applying new paste. Here is also a video guide on how to apply thermal paste it doesn't pertain specifically to your laptop but gives you a good idea on how its done.
Now when it comes to your device I took the liberty of looking up the service manual and found a video guide on how to disassemble down the the motherboard here. If you've never done anything like this before it can be a little daunting, but if you have a friend with some experience it shouldn't be more than a few hours project and the outcome should be considerably better than before.
If you are going to go this route there are a few thermal pastes that everyone recommends and everyone has their own opinions but as I stated before any of these will be better than what you originally had so buy whatever fits your budget.
Artic Silver 5
IC-Diamond
Thermal Grizzly Kryonaut
Prolimatech PK-3
There are plenty of others but any of these will do you good, with a major recommendation to the Silver 5 due to bang for the buck.
After all that and you decide that maybe you don't want to do a repaste (and even if you did repaste I'm still recommending this) you are going to want to get a laptop cooling pad. The reason is due to the nature of laptops and how compact they are sometimes depending on the surface they are laid on they do not get enough air to cool properly, dropping your performance into the shitter. I have a similarly spec'd laptop to yours (Lenovo Y50 4700hq and 860m) and I use the Notepal XSlim its not the best but it does the job and for $18 I can't complain. There are others but buy what feels right to you.
Sorry for the long winded post I hope this helps you some, and I hope you can get your laptop performance back as you have a more than capable laptop. Let me know if you need anything else!
Looks like TG Kryonaut is about $10 on Amazon, but they're all beingsold by random sellers and not TG or Amazon, or some other major retailer. Not sure if legitimate? Newegg only has the 11 gram Kryonaut, and I don't need that much. Bit perplexed on what to do!
EDIT: Newegg apparently has the 1.0 gram too! But it's sold by random people, as well. Just confirmed from TG's site that "MemoryC" is an authorized seller, so I'll probably buy from them on Newegg, even though it costs a few dollars more. Should guarantee the legitimate product!
Hi
I would not adjust your Bios settings without giving the CPU better cooling.
I used Grizzly Kryonaut Thermal Grease Paste. https://www.amazon.com/gp/product/B011F7W3LU
with
Fujipoly smart Extreme X-e Thermal Pad 11.0 W/mK https://www.amazon.com/Fujipoly-mod-smart-Extreme-Thermal/dp/B00ZSJQX0E I put 2 layers of 1mm thermal pads on the heat pipe from above the CPU to halfway to the fan.
For the thermal pads I followed the general idea in this https://imgur.com/a/uAzmc#CsPVeRf
My pads are close to this pattern:
https://i.imgur.com/CsPVeRf.jpg
I used larger pads directly over the CPU. The pad over the Fan discharge is intended to stop air from leaking around the copper cooling fins but the joint already had tight tolerances in my laptop so I used those pads around the CPU instead.
I followed the instructions on this post to adjust the bios:
https://www.reddit.com/r/GPDPocket/comments/6s7zck/my_unlocked_bios_working_settings_dptf_limit/
Although I set my temp limits at 80C instead of 85C. Not that it matters with the cooling I have I can't get the CPU above 70C even running the Prime 95 stress tests for 30 minutes.
I hope this helps. You don't need the exact brand of paste or pads I used, I just included them in case anyone was curious.
I also tried 2 other kids of pads but they don't stick to a surface so I did not like using them. (Phobya Thermal Pad XT 7W/mk and Fujipoly 17.0 W/mK pad)
I should give credit; the thermal pad post was by ZiggyDeath and the BIOS settings were by neoak.
I am please with the way my system has worked out. I hope you are pleased with yours.
Have a good one.
Jon
Any prefered store?
There used to be a 1.5gr seringe, but the 4 grams one is at less than 5£, so a better deal than the 1.5gr for around 3£:
https://www.amazon.co.uk/Compound-Performance-Heatsink-Interface-Material/dp/B0045JCFLY/ref=sr_1_1?ie=UTF8&qid=1509718075&sr=8-1&keywords=arctic+mx4
Kryonaut:
https://www.amazon.co.uk/Thermal-Grizzly-kryonaut-Compound-Compounds/dp/B011F7W3LU/ref=sr_1_1?s=computers&ie=UTF8&qid=1509718131&sr=1-1&keywords=kryonaut
Noctua:
https://www.amazon.co.uk/noctua-NT-H1-Noctua-thermal-compound/dp/B002CQU14A/ref=sr_1_1?s=computers&ie=UTF8&qid=1509718185&sr=1-1&keywords=nt+h1
Just lay a 5-6mm long bead with the thickness of a rice grain, and dont spread it with the spatula(if included) and off you go.
The NVidia reference card for the 2070 Super has a good cooler and runs cool and quiet.
The Noctua LH-L12 you found is the right one. This cooler has been discontinued by Noctua and is out of stock worldwide. There was one in stock at Amazon.de a few days ago but now it's gone. If you did get one, you'd remove the top fan and mount a A12x15 fan in the case fan slot directly above it. Alternatively, you'd attach the A12x15 fan directly to the top of the cooler in place of the stock top fan. However, I'm not sure that the clips that came with the cooler would work on the slimmer fan.
It is strongly recommended to add a Noctua fan with size depending on the cooler used. It is OK to reuse the stock case fans to cool the graphics card. You could remove the case fan which comes installed over the motherboard and move it to the open case fan slot over the graphics card next to the fan already installed there.
The NVMe SSD selected uses MLC NAND and has 600 TBW endurance. MLC is superior to either QLC or TLC.
The power supply calculator shows that this build needs 414W of power, so 600W should be sufficient.
Please don't use liquid metal as thermal paste in a PC like this one you will be moving a lot. It stays liquid and conducts electricity. It could create a short and destroy electrical components if it leaks out. The Noctua cooler comes with good thermal paste. Kryonaut Thermal Grizzly is another good option. When applying thermal paste on the 3900X don't use the pea or X method. Be sure that the paste is evenly spread across the entire top of the chip. There are three chiplets in the 3900X and none of them are in the center.
The motherboard comes with a WiFi antenna. I'd use it to start and consider upgrading if needed.
With the change in currency, VAT and your discount I couldn't be sure that I got the budget right. Is it OK?
I'm glad to help. Let me know if you have any other questions.
> 750 GOLD TX750m
Not worth the money. Go with the Corsair RMx 650 or Seasonic Focus Plus Gold 650. Don't pay more than $90 for either. Your PSU honestly isn't the weak link though. Your GPU will only pull about 300 watts fully overclocked, and your CPU around 200. 50 watts for the rest of the system is a bit tight but doable, especially because very rarely will both the CPU and GPU see full load at the same time.
Delid your CPU, get a replacement copper IHS, use liquid metal under the IHS, and kryonaut on top of it.
https://rockitcool.myshopify.com/collections/all
https://www.amazon.com/Thermal-Grizzly-Kryonaut-Grease-Paste/dp/B011F7W3LU
Total cost will be about $80 for everything you need but it will drop 20 degrees or more off your load temperatures.
https://www.amazon.com/Thermal-Grizzly-Kryonaut-Grease-Paste/dp/B011F7W3LU
It is only one gram of thermal paste but I doubt you’ll need more to reapply, luckily they’re cheap
I recommend https://www.amazon.com/Thermal-Grizzly-Kryonaut-Grease-Paste/dp/B011F7W3LU/
Grab some grizzly kryonaut: https://www.amazon.com/Thermal-Grizzly-Kryonaut-Grease-Paste/dp/B011F7W3LU/ref=sr_1_1?ie=UTF8&qid=1486543826&sr=8-1&keywords=grizzly+kryonaut
But in the meantime you should download Intel XTU and undervolt your CPU. Theres a few videos online on how to do it and it will drop your temps. a -.100 undervolt is a good place to start.
Here is a great forum on disassembly and repasting. Do what you feel most comfortable with.
http://forum.notebookreview.com/threads/alienware-17r4-15r3-disassembly-repaste-guide-results.797373/
This is the video I personally used for repasting, he uses Liquid Metal. I DID NOT
https://m.youtube.com/watch?v=Ujffb2gIsS0
This is the method I chose to go with using above video.
I used IC Graphite Thermal Pads along with copper shims in a stacked formation. !!!Side note!!! I did use the slightest of thermal paste to stop the graphite pad from sliding around on the CPU/GPU. Like a smudge of a smudge. Then I under volted CPU by 110. I personally have not had a heating issue since, but this all just a suggestion.
This is what I used
https://www.amazon.com/Innovation-Cooling-Graphite-Thermal-Pad/dp/B07CKVW18G/ref=mp_s_a_1_2?ie=UTF8&qid=1541335540&sr=8-2&pi=AC_SX236_SY340_FMwebp_QL65&keywords=ic+thermal+pad&dpPl=1&dpID=417eWA82WvL&ref=plSrch
Copper shim
https://www.amazon.com/gp/aw/d/B00OUJQX8K?psc=1&ref=yo_pop_mb_pd_title
This is what most people suggest**
https://www.amazon.com/Thermal-Grizzly-Kryonaut-Grease-Paste/dp/B011F7W3LU
Hope some of this helps
Any would work, but I recommend Kryonaut Thermal Grizzly.
I use:
https://www.amazon.com/dp/B002VKVZ1A/ref=cm_sw_r_cp_awdb_t1_5JYIBb8H9QJ08
With this thermal paste:
https://www.amazon.com/dp/B011F7W3LU/ref=cm_sw_r_cp_apa_uLYIBb6FD9PMT
The heatsink is large but it's super quiet. That whole family of heatsinks has good reviews.
You don't need arctic silver 5, your CPU cooler should include some paste and it will be just as good as AS5. If you want to buy a premium paste, people are buying this to save a couple degrees on their temps. Its up to you if its worth the extra money for a couple degrees.
An excessive amount is really really bad. You can see reductions in temps by up to 20° C or more by switching to something like Kyronaut. But I doubt Kryonaut will be as stable for 5-7 years in preventing hot spots, the way their lower performing but higher durability pastes would. Also, who would apply thermal paste to PC's in their environment lol
I can't speak for you but for me I have less throttling and better performance on the 7700! If I can I recommend this, it's $11 :D
https://www.amazon.com/Thermal-Grizzly-Kryonaut-Grease-Paste/dp/B011F7W3LU/ref=sr_1_1?ie=UTF8&qid=1519969387&sr=8-1&keywords=thermal+grizzly
Valid concerns but trust me it’s a breeze to do. Given how hot your CPU gets you will benefit from a proper delid. Granted though you are still within safe temps. The temps are highish but they aren’t abnormal compared to most others. Higher temps do lessen the life of the CPU but we are talking a very small time span compared to the market life of the chip. I’d say you and 99% of all PC builders will have build a second or even third computer before silicone degradation even reaches minimal levels. If that makes sense. Yeah high temps kill it but it’s like saying the three cigarettes you smoked in high school took two minutes off your life when you live to be a hundred anyway. Analogy might be to the extreme but I wouldn’t worry about it.
With that said here’s some links that will help you.
Delid tool and re attachment tool:
https://rockitcool.myshopify.com
Plastic razor blades to remove stock glue (what you mentioned not knowing what to do with, yes remove it the easiest way I’ve done it was using these and a small amount of isopropyl alcohol):
https://www.amazon.com/dp/B01D6EXLR0/ref=cm_sw_r_cp_apip_nvYleOEGfw2EO
Silicone “glue” for IHS re attachment. To be honest the very first delid I did was a 3570k using wood a vice and a hammer and I didn’t reglue it. It’s still alive too. I would personally just use a very small amount on the four corners. Just enough to stick. You are correct in your concern about the stock glue causing the IHS to not make perfect contact with the die. Remove the stock crap and use minimal amount of this and it will be a non concern:
https://www.amazon.com/dp/B0002UEN1A/ref=cm_sw_r_cp_apip_2g9BJXXKzhp9F
Lastly, your liquid metal for the die to IHS and your TIM for the IHS to Kraken. You can use any but it’s probably safe to say Grizzly is currently the go to stuff:
https://www.amazon.com/dp/B011F7W3LU/ref=cm_sw_r_cp_apip_6QNoes1d24uyu
https://www.amazon.com/dp/B01A9KIGSI/ref=cm_sw_r_cp_apip_lBeHQg1WHWPGP
All in all it’s easy and it’s worth it. If you have any questions whatsoever message me or reply here. There are some good videos of walkthroughs (I think one really good one is on rockitcool’s website but I’m not sure). I can find them for you but tomorrow as I’m currently in bed and using a half open eye lid to write this.
Info about water cooling? AiO loop or custom? If AiO, any idea which one? Brand? etc. Additionally, you may want to consider a better thermal paste like Thermal Grizzly Kryonaut.
Cheap option, get this (might be a tight squeeze, requires removing the side panel fan): https://www.amazon.com/Cooler-Master-RR-212E-20PK-R2-Direct-Contact/dp/B005O65JXI
Best option, get this (also requires removing that side panel fan, but might be a tiny bit easier to fit in as it's 2mm shorter): https://www.amazon.com/Noctua-NH-U12S-Premium-Cooler-NF-F12/dp/B00C9EYVGY
unless you don't want to remove the side-panel fan at all, then get this, still great cooling: https://www.amazon.com/noctua-Premium-Cooler_Retail-Cooling-NH-C14S
It would also be helpful to know your motherboard model to check the compatibility list. But I'm fairly certain these coolers should fit regardless.
They include decent thermal paste, but the FX8350 is one of the hotter chips and it might be worthwhile to squeeze a few extra degrees out with this paste: https://www.amazon.com/Thermal-Grizzly-Kryonaut-Grease-Paste/dp/B011F7W3LU
Good evening bud,
I had the same issues last week. 3D Mark Time Spy would never finish. The computer would restart every time on test number 2. I used hwinfo64 to monitor the temperatures which were close to 100C.
Bought https://www.amazon.co.uk/Thermal-Grizzly-Kryonaut-Compound-Compounds/dp/B011F7W3LU/ref=sr_1_17?s=computers&ie=UTF8&qid=1526925000&sr=1-17&keywords=thermal+paste, repasted, and issue was fixed. Max temperature now is 86C.
Give it a try. You won't void your warranty, unless you damage a part. If you can't do it on your own, call the tech support and ask a technician to do it. Be sure to supply them with your own thermal compound and not let them apply a ton of it.
https://www.amazon.com/COOLOOdirect-20x20x1mm-Silicone-Conductive-Northbridge/dp/B074K4CKG1/ref=sr_1_1?ie=UTF8&qid=1527081227&sr=8-1&keywords=memory+chip+thermal+pad
and this thermal paste is expensive, but really good
https://www.amazon.com/Thermal-Grizzly-Kryonaut-Grease-Paste/dp/B011F7W3LU/ref=sr_1_2?s=electronics&ie=UTF8&qid=1527081312&sr=1-2&keywords=thermal+grizzly
https://www.amazon.com/gp/aw/d/B011F7W3LU/ref=mp_s_a_1_1?ie=UTF8&qid=1518663086&sr=8-1&pi=AC_SX236_SY340_QL65&keywords=grizzly+thermal+kryonaut&dpPl=1&dpID=41IkGIpkjtL&ref=plSrch
Might want to up your PSU if you are thinking going VR.
Im not sure how much juice a VR rig pulls, put youre already around 60% PSU cap.
Also, this is the best non metallic TC ive seen on a couple studies:
https://www.amazon.com/gp/product/B011F7W3LU/ref=ox_sc_sfl_title_3?ie=UTF8&psc=1&smid=ANNSJU9W28Y9J
Same price.
Oh, and of the Tis, I like the Gigabyte one the best mainly because of the I/Os.
Here is detailed guide how to repaste it: http://forum.notebookreview.com/threads/alienware-17r4-15r3-disassembly-repaste-guide-results.797373/.
If you're not confident and don't want to use thermal paste with electrical conductivity, then use Grizzly Kryonaut (http://amzn.to/2tqVFgm) instead of Conductonaut.
But first I recommend to run any 3D benchmark for 30+ minutes (3Dmark FireStrike, Heaven, Valley etc.) to find out if you don't have any stuttering, before doing the repaste. Because if you do have stuttering, then you probably will need to replace your motherboard..
Thanks for the suggestions! The Maxiwatt hot end looks impressive! I may have to try it out sometime. I just have a couple more questions:
I could be wrong, but I believe you are talking about the heatbed thermistor. What makes you think you have a short in it?
The tape is holding it against the bottom surface of the bed. It's not attached in any other way. You can buy 5 for $9. Not sure if you will need to change the firmware configuration for these thermistors.
I used this one:
https://www.amazon.com/gp/product/B01B41K7OM
It wasn't the exact same connector, but it fits fine. Same thermistor, no need to change settings.
Go ahead and buy some spare thermistors. I hear they go bad pretty quickly. I bought them in bulk :)
https://www.amazon.com/gp/product/B01B41K7OM/ref=oh_aui_detailpage_o02_s00?ie=UTF8&psc=1
No, I don't think it would topple easily.
Case: https://www.amazon.com/dp/B07S7RM4CT
Switch: https://www.amazon.com/gp/product/B07BFVC568
Glass insert: https://www.amazon.com/gp/product/B07DW4JKQK/
Heater: https://www.amazon.com/gp/product/B01GDVVANA
PSU: https://www.amazon.com/gp/product/B003TUMDWG
Well if you must know, Its a cremation box, usually sold for $20-30 on ebay. The Heating module and coil costed 13.00 from https://www.amazon.com/gp/product/B01GDVVANA/ref=ppx_yo_dt_b_asin_title_o05_s01?ie=UTF8&psc=1 The Button costed me 9.99 here https://www.amazon.com/gp/product/B075QBJVTS/ref=ppx_yo_dt_b_asin_title_o05_s01?ie=UTF8&psc=1 and the power supply costed me 11.11 https://www.amazon.com/gp/product/B07NR6FPN9/ref=ppx_yo_dt_b_asin_title_o05_s00?ie=UTF8&psc=1
With shipping and Best offer accepted, i think im doing justice here. These were the best prices i could find at the time from MULTIPLE vendors. I have a Portside Mini in the mailbox tomorrow and THIS box has NEVER failed me in the last few months since built. It is a work in progress yes. It can be expanded and definitely worked on to make it much better. I would of taken $50 which is what they USUALLY sell for but i started it at 75.00. Im sure it will cost me about 7-10 to ship when wrapped properly. Not loony at all.
I went through maybe 5 of the coils before I found one that worked.
I knew my power supply was fine, as testing it during use was fine, but once I tried to use it with the vape the coil module would shut down.
I know that there are tons of these on Amazon, but this one - https://smile.amazon.com/gp/product/B01GDVVANA/ - is the only one that worked for me. It may be the same make, model, vendor, whatever.....but I plugged this one in and it worked right away with no issues.
If you're having problems, I would think its the module. They are cheaply made and pretty hit or miss.
I had this same issue a couple months ago. My thermistor on the extruder was busted (specifically one of the tiny wires to the very tip was snapped, but still making poor contact). 8 bucks on amazon for a pack of 5, ten minute swap, no issues since.
This is what I bought: https://www.amazon.com/dp/B01N4KY6TR/ref=cm_sw_r_cp_apa_i_Kg9qDbKNPFPMQ
Thanks for the input. Is 100K standard for most printers? I couldn't find anything in the manual except a tiny picture of it and I cannot read what it says on the thermistor. I found this one on Amazon but I would prefer not to buy the wrong thing as I'd have no other use for it but my printer.
I grabbed these for my Ender when I had a similar issue. Always great to have a few extra on hand.
https://www.amazon.com/dp/B01N4KY6TR/ref=cm_sw_r_sms_awdb_t1_Fc0UCb9KK5K1E
Confirmed that the thermistor is broken. Must have been crushed while doing the nozzle replacement. Seriously done with this thing.
Edit : replacements were cheap on Amazon. Ordered these: https://www.amazon.ca/gp/aw/d/B01N4KY6TR/
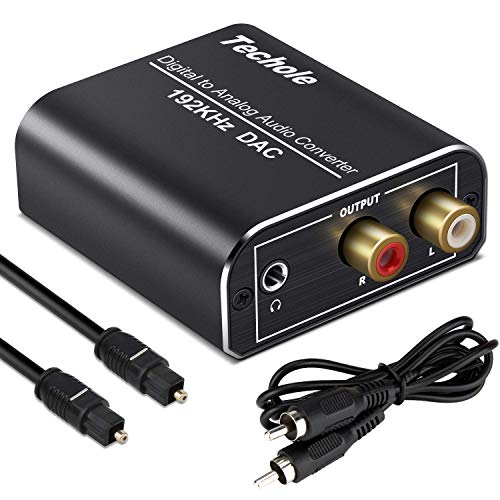
What you're looking for is a headphone amplifier or a DAC, though I'm not seeing very many headphone amps with TOSLink (optical) built-in. You could use a converter to go from TOSLink to RCA and then use a headphone amp to go from RCA to your headphones. I found this guy on Amazon, but I don't know anything about it and cannot in any way vouch for its quality: https://www.amazon.com/Digital-Optical-Converter-Headphone-Amplifier/dp/B003XCHCLC
Alternatively, if you hook up a home theater system most receivers have a 1/4" jack on them (but that's a lot of expense if you're just trying to get a headphone connection).
EDIT: Ah! After a bit of searching, I think I found exactly what you need: https://www.amazon.com/PROZOR-Digital-Converter-Supports-control/dp/B06XDLCHY7/ref=sr_1_2_sspa?ie=UTF8&qid=1538502346&sr=8-2-spons&keywords=toslink+to+RCA&psc=1
At $22 it's not going to be all that great, but it will get you the connection you're looking for. This will probably sound about as good as the output from your iPod, but it won't compare to a proper headphone amp. If you want a high quality setup, you'll want a high quality DAC paired with a headphone amp.
What headphones are you using?
Another option would be pretty much the same thing I mentioned except for having a volume control. https://www.amazon.com/PROZOR-Digital-Converter-Supports-control/dp/B06XDLCHY7
If you search PS4 amp on Amazon you get several results across multiple price points. This for example looks solid but has some reviews you may want to inspect before purchase.
The one I wrote in my original post is one that I own and know works wonders. Unfortunately I haven’t used any of these amps to report and recommend, but more than happy to look around.
You'll need an SPDIF DAC like this one Then you can hook up your wireless headphones to the DAC.
You are looking for something along these lines:
https://amazon.com/Converter-192kHz-Techole-Aluminum-Converter-Headphone/dp/B07MPF4F68/ref=sr_1_4?crid=27BU29OQEP1Y&keywords=toslink+to+rca+converter&qid=1563574281&s=electronics&sprefix=tosl%2Celectronics%2C160&sr=1-4
​
https://amazon.com/ROOFULL-Digital-Converter-Toslink-Optical/dp/B07142SV1D/ref=sr_1_3?crid=27BU29OQEP1Y&keywords=toslink+to+rca+converter&qid=1563574281&s=electronics&sprefix=tosl%2Celectronics%2C160&sr=1-3
​
Or, if you are insane & wealthy:
https://www.berkeleyaudiodesign.com/alpha-dac-reference-series-3
​
p.s. I believe you will need something like this if you don't have it already:
​
https://amazon.com/JSAUX-Shielded-Gold-Plated-Compatible-Smartphones/dp/B07D8M5DML/ref=sr_1_2_sspa?keywords=RCA+male+too+3.5&qid=1563574516&s=electronics&sr=1-2-spons&psc=1
​
https://amazon.com/AmazonBasics-3-5mm-2-Male-Adapter-Cable/dp/B01D5H8JW0/ref=sr_1_1_sspa?keywords=RCA+male+too+3.5&qid=1563574516&s=electronics&sr=1-1-spons&psc=1
Just need something like this:
https://www.amazon.com/Converter-192kHz-Techole-Aluminum-Converter-Headphone/dp/B07MPF4F68/ref=mp_s_a_1_5?keywords=optical+dac+to+mini&qid=1573778798&sr=8-5
Take optical out of TV into that, then headphone jack to Bose aux input.
Would this work?
Digital to Analog Audio Converter-192kHz Techole Aluminum Optical to RCA with Optical &Coaxial Cable. Digital SPDIF TOSLINK to Stereo L/R and 3.5mm Jack DAC Converter for PS4 Xbox HDTV DVD Headphone https://www.amazon.com/dp/B07MPF4F68/ref=cm_sw_r_other_apa_i_MoO3DbFK1BRJ2
I use something like this to go from the optical audio output on the PS4 to my older amp via an RCA cable. So PS4>Optical Audio cable>Optical to RCA conversion>RCA cable>Amp
Nothing directly. You'd need to set up a 2 pole contactor with a 120 volt coil and connect your conventional 120 volt smart switch to that. Since you already didn't know such a thing existed, I highly recommend you call an electrician to install and wire the panel.
One of these - https://www.amazon.com/dp/B001KGSJ74/ref=twister_B07C1X6SHD?_encoding=UTF8&psc=1
​
It uses 120vac to throw the coil for the main load. From the comments, only a tiny fraction is necessary.
"The Actual, Factual, and measured Coil current at 110VAC is .04 amps or about 4 watts.The Coil does not draw .5 amps or 55 watts."
​
Given that Sonoff had issues in 2017 about insufficient solder on the POW power lines, I'm glad I sent mine back.
https://esp8266hints.wordpress.com/2017/03/01/itead-recall/
​
I think there's other Tasmota compatible relays. I'll see if I can dig it up.
​
Here's one that would work: https://www.amazon.com/gp/product/B001KGSJ74
See my other post for more detailed instructions.
It depends on the component. Resistors and caps usually either work or not, and even really cheap sets tend to be within rated tolerances. I just buy the cheapest sets of those that have the values I want.
Transistors and ICs will depend on what you're getting. Common and still produced values are cheap and easy to get. Again, just buy whatever's cheap and gets you what you need. Watch out for fakes or seconds when buying out-of-production parts like 308s or 3007s. Best to get those from reputable places (smallbear, Mammoth, etc), because they're expensive and it's easy to get burned. I'd really look at the values you're getting when ordering ICs and possibly transistors in bulk. Those parts are usually really specific to a build and buying a lot of values might leave you with a bunch of unused parts.
The Joe Knows sets are good, if a little expensive. They tend to be well sorted, which is nice, but not something I'm willing to pay more for. Like this set of resistors is going to be just as good and is significantly cheaper than the equivalent Joe Knows set. There's certainly nothing wrong with the Joe Knows stuff though - if it has the values you need at the right price, go for it.
You can also score some great bulk deals on ebay and alibaba, but you'll be stuck waiting for overseas shipping a lot of the time. I'd go Amazon for an initial order and then shop around when you refill.
Have no fear! You have a simple task ahead of you.
If I was doing this, I would use the following:
This bad little boy can handle 250 VAC at 10 Amps (which is going to be way more than you need). It has 4 relays, so you could control up to 4 drills or other widgets if you needed to. Each relay has a NO (normally open), NC (normally closed), and C (common) Contact.
This little bad boy is how you control that relay. You can write a very simple program on your computer that you put on this device (I am talking like 3 lines of code) that will turn a digital output on for 7 second, then off. Hit the reset button and it does it all over again! The digital output on this board will get a wire stuck over to the input on the Relay board above.
How this all works: Take a simply extension cord (unplugged, obviously) and open up the insulation. There are usually 3 wires in it, black, white, and green (these can vary, so be careful and choose correctly). Take the Black or White wire and cut that bitch. One end of the cut wire can be stuck into the common terminal of the relay board. The other end can be stuck into the NO (normally open) terminal. What this will do is that when the Arduino board sends 5 volts to that relay, it will switch. This will connect the Common and NO terminals together, allowing power to flow through it to the drill. On the drill end I would just zip-tie or rubberband the trigger so it goes on when the relay changes.
CAUTION 120 volts or 220 volts (depending on where you live) can be very dangerous!!! That relay board will have open terminals. Because of this I would HIGHLY RECOMMEND that you put it in some kind of plastic case. I would also run electrical tape over the pins on the underside of the board to make sure you can't zap yourself.
When I get home I can draw you up a wiring diagram if you like and I could give you the basic code you would need.
Good luck!
I didn't have a relay picked out yet, I'm kind of in the brain storming stage right now. I came across this board on amazon and thought it might do the trick:
https://www.amazon.ca/SainSmart-101-70-101-4-Channel-Relay-Module/dp/B0057OC5O8/ref=sr_1_21?ie=UTF8&qid=1486504628&sr=8-21&keywords=usb+relay
It says it has a Standard interface that can be controlled directly by microcontroller (Arduino , 8051, AVR, PIC, DSP, ARM, ARM, MSP431, TTL logic)
Maybe i'll give it a go.
I would replace your discrete components with an Arduino Pro Mini. You can connect three output pins to some relays, and drive the LEDs with a 5V power supply. You'll probably want to put a resistor in series with each LED, instead of one resistor for the whole string, to minimize risk of damaging them: (5V-3.4V)/.025A = 64Ohms, so use somewhere between 50 and 75 Ohms for each LED. Alternatively, you could run the whole thing on 3.3V and skip the resistors, but those power supplies aren't so common. In that case you'd want the 3.3V Arduino. PM me if you need help programming the Arduino, it's pretty easy.
Non-mobile: Here's a relay
^That's ^why ^I'm ^here, ^I ^don't ^judge ^you. ^PM ^/u/xl0 ^if ^I'm ^causing ^any ^trouble. ^WUT?
The relay setup and wiring is not hard but it can be a bit confusing at first until you figure out the GPIO wiring and setup. With my setup I can control a power strip that the Pi (via Octoprint menu entry) can turn on or off via the relay as well as having LED lighting inside my enclosure controlled that can also be controlled from Octoprint. If you want to give it a go just pick up a relay and some connectors to wire it to the GPIO pins. Feel free to hit me up once you have the hardware and I can share my wiring and Pi GPIO config with you so you can get going quickly. I like the 4 channel relays since they are only a few bucks more than the 1 or 2 chan versions and it allows you to add devices in the future. They are under $10: https://www.amazon.com/gp/product/B0057OC5O8/ref=oh_aui_search_detailpage?ie=UTF8&psc=1
Yeah, the arduino can supply only a couple mA from each IO pin, that pump likely needs 500-1000mA to run.
You can also use a relay for a more simple setup, like this board for example, it will let the arduino switch high current loads like the pump easily.
I'm not clear what you mean by I/O board? If it's just the gpio header on the pi itself, it's 3.3v but at 10mA, maybe 12mA? Enough to drive a signal, but not enough to energize a coil. (If you do have a separate board, you'd have to either lookup the specs for it, or let us know which one so we can figure it out.)
So you'll need something to use that to push a relay. Typically a darlington pair, an optoisolator, or a trip to Amazon.
I'm cheap and lazy, so I regularly use either these, which are 3v modules, or these which are awesome, but do need 5v drivers (I usually use an MCP23018 between the pi & the relay board - you'll find a shedload of documentation for this on the googles, but I'll shout-out adafruit's docs specifically). For the sainsmart ones, when they say 12V, they mean you'll need a separate 12V supply to push the relays themselves, they're not expecting 12V from the pi.
These will get the pi to drive n/c & n/o dry contacts you're used to, but I note you also asked about triggers - relay boards won't help protect inputs, so be warned that the inputs are also 3.3v and have very little tolerance (5v will kill them, let alone 24V. Anything you put in the IO lines goes straight into the CPU, so be gentle).
A couple of projects you might want to look into if you want to let someone else worry about the interfaces;
For a display I am using this: i2c 7-segment display, and if you are grabbing the display you can't use the Spark Core relay board because they use the lines that are setup for i2c to control relays instead.
So the total bill of materials for my build is:
I don't believe you can get a local spark cloud server going, but the beauty of it is that you don't have to. You can just use their cloud service for free and be able to read variables and run registered functions securely and remotely without any issues. How I have it set is so that the spark core by default won't control the temp but can be given a command to set the temp and then it will just hold that temp until a new command comes in. So far it has been holding my fermenter to within a degree and switching between temps nice and quickly. I am very pleased, but still want the BrewBlogger integration so I can setup what temp I want at what time and to record and graph the temps. By next week I should be pushing some code up to github, so I'll PM you then and give you a link.
You could easily run BrewBlogger off of a Pi if you didn't have another place to run it, but it's just a PHP website that would need a scheduled task to run to fetch temps.
SainSmart 2-Channel Relay Module https://www.amazon.com/dp/B0057OC6D8/ref=cm_sw_r_cp_apa_i_mgsFDbSR97ZA7
And the pi needs to have the pin initialized as an input / output pin. It must be getting a slight amount of current when just powed on but not initialized?
proportion based control sounds like its going to be cost prohibitive, only other idea i can think of is something like this. its designed for woodshops, when you turn on a tool it will also switch on your vacuum, since its designed for high power tools it might not turn on for a small load if you have just a machine or two on in your cluster but if everything gets running it can bring your fans on, still AC based though. this particular one looks like it has some quality issues so this exact unit might not be the best but i think you'd understand the idea of it.
Get a variac or step-transformer based fan speed controller, use with a voltage controllable fan like a ruck.
No extra sound, no increased wear.
Something like This.
Anything less will probably still cause the humming and the fan damage.
This one
Damn yeah that must be loud. I have that fan as well. Highly recommend. Get a variac controller to run it as well. So you can turn it down.
PHC Enterprise SC-3M Variac Variable Transformer, 300 VAC Max, 0-130V Output, 3 Amp https://www.amazon.com/dp/B006NGI8VS/ref=cm_sw_r_cp_api_l3Gjzb63MZW1C
I think you're right. Would this model be compatible with my 120V, 1000W bulb? What would happen if I went up to 130V on the variac?
I soldered my ergodox PCBs with my hakko set to 650 F (about 340-350 C). Just don't keep the iron on the switch solder posts any longer than necessary. Basically, if you don't have a perfect joint in 3 seconds, you did something wrong. The traces are small enough on keyboard PCBs that you probably don't even need that high of a temp, but I think it helped to make nice shiny joints when using lead-free solder.
The same temps worked with a separate de-soldering pump that I have that is similar to this one. I haven't used the integrated kind that you linked to before. Over 400C, you are risking burning up small traces and delicate components, but you are probably okay if you work fast. If you really wanted to control temp on that cheap desoldering iron, you could plug it in through a variable transformer.
Soldering components to a huge, thick PCB ground plane on my tesla coil kit, on the other hand... that was more of a challenge. I dialed it up to 750F (400C), and should have been using extra flux.
Personally I got a 301 and wish I would have gotten a 304... wish I would have made my ET a probe and not a dial gauge. I run it with artisan, but it’s nice knowing if something happens with the comp you can still roast if you want to. I also feel like there is a little lag in the computer so I glance at the thermometer from time to time.
I got an extra motor without the case as a backup ($20)
And https://www.amazon.com/gp/aw/d/B00XKDEVIQ?psc=1&ref=ppx_pop_mob_b_asin_title
Works like a charm
I went to 3 hardware stores before I realized there are inside and outside threads on the regulator to the propane tank... so you’re good there, I’m just dumb I guess
Lastly I highly recommend getting one of these
https://www.amazon.com/gp/aw/d/B006NGI8VS?psc=1&ref=ppx_pop_mob_b_asin_title
Happy roasting :)
This.. I have really been enjoying look mum's cem 3340 tutorial:
https://www.lookmumnocomputer.com/cem-3340-diy-simple/
I would strongly suggest getting a resistor and capacitor kit off ebay or amazon.. They're like 15$-20$ each. That will get you a few of a huge range of resistors and caps:
https://www.amazon.com/Top-cofrLD-Resistors-1640pcs-resistors-Assortment/dp/B00WE1FQ8Y/ref=sr_1_14?s=industrial&ie=UTF8&qid=1541720878&sr=1-14&keywords=resistor+book
https://www.amazon.com/Joe-Knows-Electronics-Value-Capacitor/dp/B007SVHFXO/ref=sr_1_5?s=industrial&ie=UTF8&qid=1541720924&sr=1-5&keywords=capacitor+kit&dpID=41%252BFAHpNRVL&preST=_SX342_QL70_&dpSrc=srch
The worst part of these projects is waiting for parts. So Building up a little surplus of this kind of stuff will make your wait time much lower..
That's probably one of the better kits I've seen.
With that being said, no matter what kit you get, get a variety/assorted pack of resistors and capacitors. For example: http://www.amazon.com/Joe-Knows-Electronics-Value-Capacitor/dp/B007SVHFXO/
Check Ebay and such to get these cheap.
For straight ham stuff, I've used mostly Gigaparts and DX Engineering recently.
Recently I've discovered electronic parts "starter kits" like these,
that can get a ham a good start on an well-stocked lab:
http://www.amazon.com/gp/product/B00E9Z0OCG/ref=oh_aui_detailpage_o01_s00?ie=UTF8&psc=1
http://www.amazon.com/gp/product/B007SVHFXO/ref=oh_aui_detailpage_o02_s00?ie=UTF8&psc=1
Adults are just outdated children. You can tell from looking at my wishlist-I want a rock. Bismuth to be exact. It's ridiculously pretty and it comes in rainbow colors!
No problem :)
Bismuth crystal.
The Science of Booze.
This book, which takes a look into the Kennedy murders.
you can buy this on amazon.
http://www.amazon.com/gp/product/B008MB1MCE/ref=as_li_ss_tl?ie=UTF8&camp=1789&creative=390957&creativeASIN=B008MB1MCE&linkCode=as2&tag=tc-22-20
http://www.amazon.com/Anytime-Shrink-Sleeve-Tubing-Assorted/dp/B008WWC6FU/ref=sr_1_2?ie=UTF8&qid=1370903152&sr=8-2&keywords=shrink+wrap
Electrical tape or heat shrink.
I find it funny but understandable that the things that break and don't get fixed are the things that can be fixed for <$5.00 if people only knew what to buy or what to use. It's easy to know you need a new chair, but it's harder to know it's wobbling because of a small loose screw. So the little things fall into the category of not broken enough to need a new dishwasher but inconveniently broken. There's nothing Sugru can do that you can't find a better solution for in the adhesive aisle of a hardware store.
Do you mean how to connect the 2 sets of 4 wires and cover it so it looks clean?
I do this - The 4 wires are all soldered together and then individually taped with electric tape or covered with heat shrink and then the whole thing is covered with heat shrink tubing.
If it's useful, I too just got started, and built a similar drone. When it came to charging, I had to read a ton of stuff. Here's what I did (all non-referral Amazon links. you may find cheaper on banggood if you want to wait forever):
ISDT Charger
12v Power Supply
Balance Charger
To connect these up, it may be useful to have some extra XT60 plugs since the power supply won't have XT60, and neither does the balance charger.
With these optional parts, I was able to make a nice looking (and more safe) charger from the power supply, along with a 3d print available here
Voltmeter
Power plug
I found this to be a pretty fun project, and wasn't as expensive as some options I saw on HobbyKing or everywhere else. To be fair, it wasn't the cheapest option either.
just to expand on my other post because I didn't have all the links at the time. Hopefully this helps others too. Feel free to add to this if there are better solutions than these.
MeanWell RT-65B power supply keep in mind that the -12v rail is only good for 500ma. check your modules in modular grid to make sure you don't need more than one of these power supplies. it's super easy to wire the power supply to a busboard but if you don't feel comfortable doing it you'll have to get something like a Zeus power supply.
Vector rails TS-600 is the best value if you are building a large case or want to build more later or if you want to sell your leftovers on Reverb or whatever. You can use these screws to attach the vector rails to the case or the spacer strips.
Rail nuts these are the square nuts that slide into the rails (only for vector rails) they require M2.5 screws 6mm is a good length unless you have some thick acrylic panels on your modules or something like that. you can alternatively use threaded strips but they will cost a little more and I'm not a fan. Not all modules have their panel holes in the appropriate place and sometimes it causes a problem because the threaded insert holes are fixed in one place.
Panel mount plug w fuse you'll need to do a little wiring on this one. match the fuse value to the power supply overall amp draw. Don't go too much over. the fuse is supposed to blow if too many amps go through the case. Having too large value of fuse defeats the purpose.
I like this busboard and they also have the cheapest (Warning! see edit) 3U sideplates although I don't see why you can make your own or maybe even go without them. MDLRCASE actually has some great values on the larger cases too if you decide not to DIY. If you are in the USA shipping is quite an expense though.EDIT: the 3U side plates do not work for vector rails, they are the wrong spacing. They only work for the rails which they sell which are different. So, if you are using vector rails, don't buy these. The busboards are still cool)
If you decide to go for the flying bus cable
build notes:
Each 3U (height of one eurorack space) is approximately 5.25" (133.35mm) but the modules are mostly less than 130mm tall. so you can build the height of a 3U rack so the the interior dimension from wood to wood is 5 1/4" exactly and you'll be fine.
Don't cut wood until you have your rails and spacers or at least rails and a blank panel or module installed so that you will know the exact width you will need for the rails.
Be aware of the depth of your modules and factor the space for the power supply and busboard. don't make the case too shallow or some modules may not fit. Modulargrid is your friend for this and the power draw.
There will be wall level voltage inside your case, so make sure you route those cables neat and secure them well. Cover them if possible and don't let stray screws and stuff fall in there. If they do, power off and get them out. Use blank panels to cover unused spaces. Obviously power off and unplug when installing modules.
You could wire it to a switch. The maker select comes with one like this for example.
Another option is to switch the power supply to an ATX one ( Computer power supply). Then you can either way a switch to turn it off and on, or use something like a raspberry pi to turn it on through wifi which is awesome.
Maybe replace that whole part
https://www.amazon.com/gp/aw/d/B00ME5YAPK/ref=sr_pogo_speakers_display_on_website_1?sr=1&amp;pi=AC_SX236_SY340_QL65
I was thinking about this last night. If you're just using one handset just use this rather than a switch on the front side of the switching power supply. It actually eliminates a component and just turns the whole system off rather than letting the supply run.
I just bought one of these: https://www.amazon.com/Fibaro-Micro-Controller-Z-wave-Strips/dp/B00P1N68FW
Really pleased with it so far.
This is pretty much the best option for LED strips. You can set up 4 different sets from this one z-wave device.
https://www.amazon.com/Fibaro-Micro-Controller-Z-wave-Strips/dp/B00P1N68FW
Nice to hear. what do you think is going bad in the relays? Some of the lighting is actually on some heavy duty relays. The relays that power the 120 are actually powered by 120 themselves, Something like this Those relays obviously would last a lifetime for a small load around 15 amps. Pretty cheep solution with a little more work to have a z-wave relay control another relay but if It makes it last longer lol.
Edit: whats your set up like? What components are you using?
Sure. Here's the contactor:
https://www.amazon.com/Packard-C230B-Pole-Contactor-Voltage/dp/B001KGSJ74/ref=sr_1_2?crid=OIUJ07IZNPPX&amp;keywords=30+amp+contactor+120v+coil&amp;qid=1550624331&amp;s=gateway&amp;sprefix=30+amp+contact%2Caps%2C210&amp;sr=8-2
And here's the box I used:
https://www.homedepot.com/p/GE-60-Amp-240-Volt-Non-Fuse-Metallic-AC-Disconnect-TFN60RCP/100674085
It's an AC disconnect box but I just removed the disconnect switch and drilled a couple of holes to mount the relay. The ground bar is useful. Use 10awg romex for wiring it. I also used an inexpensive ($12) internet connected smart light switch that's compatible with google home and alexa to actuate the relay coil. Total cost around $30.
That timer switch is not large enough to be capable of running that pump. It will fail quickly and void the warranty.
A contactor is your solution.
You want one of these (or something similar).
The coil connections go to the switched power coming from your smart switch - one to the phase, one to neutral.
Each phase wire (I think US colours are normally red and black, don't touch the earth) should go through the contacts.
Edited to remove BBCode...
If you are having trouble with z-wave signal maybe wifi would be better. Hook up a sonoff to a contactor. You could do it for less than $20.
https://imgur.com/a/q00X4SF
https://www.itead.cc/smart-home/sonoff-wifi-wireless-switch.html
https://www.amazon.com/Packard-C230B-Pole-Contactor-Voltage/dp/B001KGSJ74
I use this one from amazon. It has a 120v coil so it is easier to control. I use a contactor the pool pump and one for the pool cleaner pump controlled with a dual relay z wave micro switch. But any z wave switch that you can mount will work. Many pool pump panels have a place for a switch to mount. Mine is inside the panel and works great.
I tried my first project controlling a high power and current fan and it went great, until it didn't.
Basically I hooked up an Arduino Nano to control a 5v relay that controls a high power relay/contactor. The contactor controlled a 120VAC 15A fan, and turned it on or off when a window was open or closed. It worked perfectly and I called it a night.
Next morning I found that the magnetic sensor fell off the window (sending the "Turn the fan on" signal) and the fan was on as expected. But when the sensor was reinstalled the fan remained on when it shouldnt have. Even resetting the arduino did not interrupt the current to the fan.
This lead me to believe that the 5v relay has failed in the ON position, because this is the only way the contactor and fan would still have power.
Can anyone suggest a more reliable 5v input relay that can provide power to the electromagnet inside the contactor? I've looked at SSRs as being more reliable, and https://www.digikey.ca/product-detail/en/ixys-integrated-circuits-division/CPC1706Y/CPC1706Y-ND/3077519 is one that I think is appropriate, any other suggestions?
5v relay
(https://www.amazon.ca/gp/product/B073HX1DK2/ref=ppx_yo_dt_b_asin_title_o00_s00?ie=UTF8&amp;psc=1)
Contactor
(https://www.amazon.ca/gp/product/B001KGSJ74/ref=ppx_yo_dt_b_asin_title_o00_s00?ie=UTF8&amp;psc=1)
I bought most of the kits from Small Bear Electronics (the exception was the resistor kits). They are one of the only sources I've found for capacitor kits, transistors, op amps, pots, etc and they have some great stuff available.
Link to kits here
Spent about $100 but it took a lot less time than ordering all the items separately on Mouser.
I also bought a resistor kit from Joe Knows Electronics on Amazon.
Link to resistor kit here
I would also recommend buying a component tester, it's one of the best purchases I've made. It makes it feasible to pull all the components off of your breadboard and sort them quickly so you can reuse them. Also very handy in double checking a component value when you're building a pedal without looking at the color coding, etc.
Link to component tester
Good idea! For anyone who wants to have a set of organized resistors I would recommend this kit. Only $18 in Amazon.
http://www.amazon.com/Joe-Knows-Electronics-Value-Resistor/dp/B003UC4FSS
I'm a big fan of this kit, mostly because the resistors already come in individually labeled bags, but its a bit more expensive. Amazon
For the organization reason I just got this. Chocked full of values I'll probably never need, but now I have them and at least a way to keep them all organized!
I ordered this pack last night.
Wow Thanks for the descriptive response!
I'm not very great at electronics, but here is the exact switch I'm using.
As for power source, I'm probably going to use 110 VAC to power the 4 ch relay board. http://www.amazon.com/SainSmart-101-70-101-4-Channel-Relay-Module/dp/B0057OC5O8
This is the solenoid I will be using
Thanks! Your post really helped me think it through. Just need to put it to work lol.
Not much to see yet. So far it is an R-pi, a few DHT11, a relay module, one (or maybe more) cheap PIR motion detectors, and a toggle switch.
I'm using Monkey webserver, and playing with some cgi scripting. I started piddling with HTML5, and I want to try to make it as nice as I can, but I am not a web developer, so I am having to slog through some of this. If it goes well, I might make a post in here or in /r/HomeAutomation
This.
I got one of these recently and it seems to work fine. Fairly cheap, super easy to use.
Exactly, yes! Everything that requires precise timings, instant response, and/or 5 volt logic would be on the Arduino and the Pi would just handle user interactions.
You could just get an Arduino Uno 3, that's kind of the standard Arduino board especially for people just learning. I just prefer the Mega because it is beefier and has way more GPIO pins. But the Uno 3 has enough to run three relays and your IR sensor easily (which has both 3.3 V and 5 V logic, meaning it can work with the Pi and Arduino respectively).
Speaking of relays, I really like the SainSmart ones and have never had an issue with them. This four-relay module is only $10:
https://www.amazon.com/SainSmart-101-70-101-4-Channel-Relay-Module/dp/B0057OC5O8/ref=asc_df_B0057OC5O8/
Only thing is, and you might know this already, these things are pull-down rather than up. Meaning instead of pushing a 5V signal straight from a digital GPIO pin on the Arduino straight to the relay, you have to use a transistor to basically invert the signal. When the Arduino activates the transistor, it allows the pin on the relay board to go to ground which turns it on. Also, don't forget to always wire so the power off side is your closed side for all valves and such! The last thing you want if a board dies is to have the relay that controls your solenoid valve to default to power on, dumping all your liquid!
It definitely is overwhelming at first, but once you get really confident it opens up a whole new world of fun engineering!
I ended up buying this relay module so I can actually switch both the lamp and the printer from the Pi.
Yeah, if you're not very experienced in electronics better stay with something already tested, specially for anything mains related!. Probably you could use one of these arduino relay boards, they're fairly cheap and are opto isolated to keep things safe.
The 120V part is the easiest and the most dangerous, so pay attention to it. A relay module like this acts like an SPDT switch ("changeover/three way switch") - or more like 4 of them. The light are wired up to the relays just like you'd wire up an ordinary room light to a switch.
The arduino just connects to the little pin header on the bottom and is completely isolated from the high voltage.
r/Arduino will be able to help you write the code (you'll only need the basics for this). IDK why the post was nuked, but you can make a new one asking about the optocoupler tapping of the speaker - it will require a bit of poking around to get an idea what sort of thing is going on in the speaker wires.
Hi Shadow, thanks for the response, the relay I'm using is this one from Amazon.
I connected the relay to the 5V power rail that's hooked up to the Arduino. The ground for the relay is connected to the ground of the Arduino. The signal wires are directly hooked up to the Arduino digital outputs (5,6,7). I have a photo of the circuit, but I must admit it's not the best picture.
http://i.imgur.com/tDr0nTw.jpg
Another thing I noticed, was that this occurred even when I disconnected the Arduino and just ran a 12V source through the component, it was worse when it was connected to the Arduino.
arclight: yeah, i'm liking the idea of the board though. But I ended up buying http://www.amazon.com/gp/product/B0057OC5O8/ref=oh_details_o02_s00_i00?ie=UTF8&amp;psc=1
[Here's a relay] ( http://www.amazon.com/gp/aw/d/B0057OC5O8?qid=1427254414&amp;sr=8-6&amp;vs=1#)
Wiring is pretty intuitive.
12v DC > Relay 1 blue connector 1
Motor positive wire > Relay 1 blue connector 2.
Connect Arduino ground and digital IO (set to output) pins to the pins associated with the relay that you chose, raise the DIO pin to High, and the relay will connect the motor to the power supply.
Technical note: These relays trip at 15-20ma, so there shouldn't be any issues using a DIO pin. If you choose a different relay, MAKE SURE the relay input draws less than 40ma, otherwise you may damage your Arduino. This relay board is also protected by diodes, so your Arduino is shielded completely from the 12v.
I considered that and opened up my piano to see how much effort that would take, but I found that because it's an upright and due to how the strings are positioned some of them are not at all easily accessible. :( On the bright side, I found these which will serve my purpose; now I just need to figure out how to control this from a raspberry pi. Thanks for the suggestion however!
Here's the relays I used. The reviews have some good documentation on current requirements and such. I ran 12V to the Vin of the relay boards, as well as to the common terminal of all 32 relays (since the goal was to supply 12V to an ematch when the cue was triggered). The positive end of the cue terminals were connected to the NO terminals of the relays. This means that normally, the ematches are disconnected. When a relay is triggered (by setting an Arduino pin to ground, thus triggering one of the active low relays on the board), the match on that relay is connected to the 12V source. Since the negative terminals on the channels are already grounded, boom.
E-match will detonate with around .5A of current, though most people recommend 1A per match to be sure. This is how we determine how many matches can be fired from one cue; we divide our 12V source by the resistance of all of our matches in series (typically around 2 ohms each) and ensure we can still supply 1A of current. Once the matches detonate, the circuit is broken. Does that clarify things?
I was thinking this for relays, but wanted something smaller.
I plan on switching at least 14 turnouts, which would require two of the boards shown above.
Mosfets are definitely where I'm going now.
Yeah, I have ordered the resistors and breadboard, and will not repeat the 3v to 5v "solution" again.
But I'm curious where the failure is, exactly. Inside one of the components?
There's no documentation with the SainSmart 16 relay board, so I don't know if there are snubbers on the coils, but I'd be surprised if there were.
The opto-isolators are in place, so I wouldn't think the logic circuitry would be jeopardized by surges from deactivated coils.
The board I bought is a 12v (since the solenoids are 12v), here's a link to it: SainSmart 16-Channel Relay Module https://www.amazon.com/dp/B0057OC66U/ref=cm_sw_r_awd_FCvSub144A8GM
I can lend you 2 of these:
https://www.amazon.com/SainSmart-101-70-103-16-Channel-Relay-Module/dp/B0057OC66U/ref=sr_1_6?ie=UTF8&amp;qid=1501860037&amp;sr=8-6&amp;keywords=sainsmart+relay
SSRs aren't hard to wire up and are a lot cheaper. I bought 20 of them on ebay for ~$20. If it's 12 V relays work well too. Amazon has a card that can control 16 relays for $40.
The hoist shares the ground and one of legs that powers the motor also powers the arduino. Ill try and sketch up a circuit quick. The relays I am using are [these] (https://www.amazon.com/gp/product/B0057OC66U/ref=oh_aui_search_detailpage?ie=UTF8&amp;psc=1) which as far as I can tell have diodes and are optically isolated.
Ya one minute I tried start_music_and_lights and they just turn on. I tried all 3 of the testing commands on the website and the lights turn on and nothing happens. I have pins 0-7 connected on my pi 2b and the 2 5v pins are connected to the relays 5v pins and 2 ground pins are connected to the 2 ground pis on my relay. The relay has an external power source of 12 volts
This is the relay I am using. https://www.amazon.com/gp/product/B0057OC66U/ref=ppx_yo_dt_b_asin_title_o00_s00?ie=UTF8&amp;psc=1
I have been using an all-in-one Sainsmart Relay to control my garage door via the Pi.
Ok so looking into SSR's a little more I think I found one I can use. would this be what I want to use to turn on and off the 100W ceramic heating element and the fogger?
From what I can tell its rated 5v but can't find anything about running it at a different voltage. This is the relay I have Link. I just tested it with 12v instead and it works with that as well but at the moment it is working again on 5v as well and I can't tell if it will make a difference with the higher voltage.
Using your Arduino you can wire a relay and control it from your phone or computer
The switch will be connected directly to the pi's GPIO, which will control a relay. The electrical wiring in the walls will be connected to that relay which is connected to the light. I'll be using a 2 channel relay, something similar to the link below. There are also 8 channel relays, so you can control 8 devices with only 1 Pi. I plan on using an 8 channel relay for a Pi controlled thermostat. Also, prices are much cheaper on eBay if you're willing to wait a few weeks for shipping.
http://www.amazon.com/SainSmart-2-CH-2-Channel-Relay-Module/dp/B0057OC6D8
But yes that would also work if you want to wirelessly control the relay, you just have to be connected to your WiFi.
> How did you have the relay connected to the GPIO?
Through this board, which seems to be properly (opto) isolated.
> how were you powering the whole setup?
USB of the Raspberry Pi to a wall wart.
> sounds like latch-up
If you still think it could be a latch-up (given the board I'm using), how would you recommend preventing it?
your standard issue songle. https://smile.amazon.com/gp/product/B0057OC6D8
i took an old 5v straight wired micro usb cable and lopped off the usb end (the other end is part of the power supply not usb-a) and split the +5v into two legs, one powering the esp8266 (it's a nodemcu board) and the other leg providing power to the relays. ground is common to the entire system.
i haven't tested these (https://smile.amazon.com/gp/product/B07CQKMPDP) in the cold but one of them has been the heat "switch" for my esp8266 basement thermostat.
Probably the best way would be with a relay. They're electromagnetic operated switches and as a bonus the two circuits aren't connected so they can't interfere with each other. I bought a 4 relay version of this board and I can control it directly from an Arduino with only a couple of wires.
https://www.amazon.com/DGC-PRODUCTS-Intelligent-Autoswitch-Eliminating/dp/B005ELWUWG/ref=pd_lpo_sbs_23_t_0?_encoding=UTF8&amp;psc=1&amp;refRID=FVMQBANEJ0W8RTYCYA24
You could also consider a plug in booster on a switch that activates when the microwave draws power, although you would need to make sure the phantom / always on draw of the microwave is sufficient. We use these often in woodworking to activate a vacuum / dust collector when we turn on a tool. https://www.amazon.com/DGC-PRODUCTS-IS110M-i-Socket-Autoswitch/dp/B005ELWUWG/ref=sr_1_1?ie=UTF8&amp;qid=1473977713&amp;sr=8-1&amp;keywords=power+tool+vacuum+switch
Nice find, but I'm thinking by his description it would be more likely the frequently bought together recommendation of this device
If anyone is looking for a prebuilt solution, there is the DGC Products i-Socket Autoswitch https://www.amazon.com/dp/B005ELWUWG/ref=cm_sw_r_taa_x4IrybDSFY6M0
I think this is the item you're asking about but on a larger scale?
https://www.amazon.com/DGC-PRODUCTS-IS110M-i-Socket-Autoswitch/dp/B005ELWUWG/ref=pd_ybh_a_17?_encoding=UTF8&amp;psc=1&amp;refRID=P4YQY28K22KYZ01G1V7T
Yes! I know exactly what I wanna do. acquire a cheap shop vacuum and add this neat little device. http://amzn.com/B005ELWUWG basically you plug your saw and dust collection into it or in my case vacuum and when I turn my saw on this turns the vacuum on and leaves it on for a few seconds after I am done using the saw.
Would you recommend having an electrician come and do this capacitor switch?
Also, would this transformer not work for this? Thanks!
Electronix Express Variac Variable Transformer, 300 VAC Max, 0-130V Output, 3 Amp https://www.amazon.com/dp/B006NGI8VS/ref=cm_sw_r_cp_api_rxDcAb0C6JSJD
I️ used this for my vortex 6in.
That is my exact setup for my veg tent, other than I use a 400w MH. It was my first tent, but I wanted a continuous cycle, so I got a bigger tent for flowering.
The actual draw on that 700w model is 334w so that would probably be the one to go with, and probably won't need any supplemental lighting.
After buying the fan speed controller, while it does work, I found out that apparently it isn't the right kind for the type of motor the fans use. This is a little more expensive, but is supposed to be better on your fan motors.
I see. Then you might consider looking for a variac like this. I only bought one once so other redditors may know better about brands.
congrats OP! I really enjoyed mine but just had too many amps and ended up selling it.
Grab a variac for some really great vintage chunk (very very different than the actual variac mode on the amp BTW)
This one I made using the variac mode on the amp but an actual variac will soften/loosen everything even more.
https://www.youtube.com/watch?v=9Ea9KKuA_y0
I got this one
https://www.amazon.com/PHC-Enterprise-Variac-Variable-Transformer/dp/B006NGI8VS
If you want ultimate silence, do NOT get a fan controller - get a variac instead.
If your grow space is small, get a variac controller and turn down the fan speed. I have mine at 30%-ish and it’s nearly silent.
Cheaper fan speed controllers are noisy. You get what you pay for.
if the sound is caused by the speed controller, switching to a variac will solve that issue
https://www.amazon.com/PHC-Enterprise-Variac-Variable-Transformer/dp/B006NGI8VS/ref=sr_1_1?ie=UTF8&amp;qid=1482124376&amp;sr=8-1&amp;keywords=variac
Most any dimmer that works on "chopping" the AC cycle can cause buzzing. You'd have to go with a pretty fancy and more expensive one that could generate a cleaner signal if it bothers you.
Something like a variac would give you clean power with no possibility of buzzing.
http://www.amazon.com/Variac-Variable-Transformer-300va-Output/dp/B006NGI8VS
It would be pushing this one right to it's full rating, but this one should work.
Edit- Here's a 5 amp with a little more capacity to be safe:
http://www.amazon.com/Variac-Variable-Transformer-500va-Output/dp/B006NGI2RS/
The iPower fans seem to be junk. Here's the one I bought: a 6" Hydrofarm, 400CFM (actually an ActiveAir brand fan). Much better than the 175 the ipower 6" was pushing.
It's loud at full blast, and probably more than you need. This is good though, because you can get a speed controller to turn it down. The fan gets much quieter even at 75%, and I run mine at less than 50% to cool my small cab w/aircooled 400w HPS. You can get this speed controller if you don't mind a slightly annoying electric hum from your fan (I have this and sleep in the room with it at night), or you could get the more expensive variac controller that eliminates this hum (and probably helps your fan last longer too).
The centrifugal inline fans are much more powerful than the axial booster fans, and will force air through a carbon filter easily, so get one that is sized correctly for the fan. (heres mine, sized for that hydrofarm/activeair fan)
I keep a steady 78º-79ºF in the cabinet (2.5'x1.5'x4' grow space) with 75º-77ºF ambient room temps, and the air exhausted right back into the room (central air keeping the room at 76ºF helps).
Don't forget a speed controller! https://www.amazon.com/gp/product/B006NGI8VS/ref=ox_sc_sfl_title_2?ie=UTF8&amp;psc=1&amp;smid=ATVPDKIKX0DER
this one's highly recommended and people say it helps reduce the humming on the inline fan compaerd to cheaper speed controllers.
I'm sure the apollo tents are fine, I've heard slightly better reviews for the vivosun tents. This one's about $12 more than yours i think. https://www.amazon.com/VIVOSUN-Horticulture-Hydroponic-Obeservation-Growing/dp/B01DXYMQ9M/ref=sr_1_2?s=lawn-garden&amp;ie=UTF8&amp;qid=1478889774&amp;sr=1-2&amp;keywords=vivosun+48
The Mars 300 is chill for the price, you probably want to want to get a second one if you're going to have multiple plants in that tent. People say 1 mars 300 per plant should get you good results, almost pushing it with two full plants under a single mars 300.
Also if and when possible, try to invest in a good pH meter. everyone recommends bluelabs! https://www.amazon.com/Bluelab-Ultimate-Solution-Measuring-Temperature/dp/B008R7OWJS/ref=sr_1_3?s=industrial&amp;ie=UTF8&amp;qid=1478889906&amp;sr=1-3&amp;keywords=bluelabs+ph+pen
I didn't PH at first and my plants were dying on me... turns out my tap PH was above 7.0 ph. the PH pen saved grow!
Yes I actually just ordered the fan and filter so I actually dont have it running yet but this fan will be cooling my hood. Im planning on setting it up like this. Ill have the filter hung up in the corner top of my tent, then Ill attach the fan to it, then the hood, then have ducting taking the exhaust outside of my tent. This fan has a low and high speed., 239/333 cfm I believe. You can also get one of these that can help you control your speed as well. Im planning on getting a 4in filter (thats all i need, its cheaper and lighter too) and getting a 4 to 6 in duct converter (just a few buck at home depot)
http://www.amazon.com/Variac-Variable-Transformer-300va-Output/dp/B006NGI8VS
Aside from the recommendation to shuck the drives (I'd transfer data off them one at a time before doing so), you could just put a box fan in front of all of them and run it on low. Or, any smaller "desktop" fan you might find in a local store or online. Anything like that should provide sufficient airflow to keep them cool enough as long as it's right in front of them.
It would follow the KISS principle, and it would only cost ~$15-ish
Oh, and if you want to be able to smoothly dial the speed of a box fan down to any arbitrary point (if "low" is still louder/faster than you want, which has sometimes been the case for me in the past), then what you want is a variac transformer between the box fan and the outlet. A little pricey to pair with a cheap box fan, I know, but I use that with one and it's quite nice since the box fan moves air while being almost totally silent, with no coil whine. You could do the same with a smaller turbine-style fan if you wanted something smaller.
Ig the initial investment will be worth in the future. I scoped this one but I'm not sure how many amps that td-100 pulls
This was in the recommended item list too
I bought one of these a few years ago, and it's stood by me. I've had to restock a few values, but this has gotten me close enough for 95% of my projects. Same for their resistor kit. I got the digital logic kit as well (lots of transistors and diodes) but it hasn't been as useful to me.
Sorry about the links, I'm in the US so the prices will be in USD but that shouldn't be a problem. I really hope you find this hobby as intriguing as I do, I started a year ago making little flashlights and what-not and now I'm making motion detectors and all kinds of cool gadgets. If you'd like some guidance or help, don't think twice about PMing me! Best of luck.
Well, breadboards run pretty cheap... And size matters here. Sometimes a smaller board is better, but a large board gives you more room to work with. So I'd recommend getting both! A small board will be nice for smaller projects, but larger boards will be nice for more in-depth prototyping that require more room to work with. And he can always use a small area of a large board when he doesn't need it all... but a large board won't fit into a small boat or airplane if that's what he is doing... So, at a good price, both can be beneficial.
Other than that, he'll need jumpers (male/female), and maybe a ribbon cable. Ribbon cables need a T-board (or equivalent) to connect to the breadboard with, but jumpers just plug into the GPIO pins. With a small breadboard, jumpers are favorable, as they only take up as much space as one pinhole, and they come in many different colors and lengths. A larger board can accommodate a ribbon cable and T-board more readily... a T-board can take up a LOT of space on a small breadboard REALLY quickly.
Word to the wise: if you buy a ribbon cable and T-board, you are going to want to know what type of Pi he has. The original versions had fewer GPIO pins than the B+ and the A+ versions. This means that a larger ribbon cable wouldn't work with the original Pi's. If he has an A or B, a 40 pin cable/T-board wouldn't work as they're designed for the newer B+ and A+. If you need help identifying which board he has, we can help you with a photo or a description of the board...
Also, a resistor kit and a capacitor kit would be good to have, if he doesn't already have them. Most projects require that you use resistors/capacitors somewhere, and the kits usually come with several of the most used resistors/capacitors, which should tie him over for some time.
Then you should get him an LED set. LEDs are nice because they can be used as a "proof of concept" tool. Since everything into and out of the Pi is digital, all you are doing is giving an item voltage. So it doesn't matter if you're using a buzzer, motor, servo, or LED... they will all work interchangeably. He can use an LED to prove that his code and wiring works when the light comes on... then, when it all works, he can swap the LED for a buzzer or something, and everything should still work, just with sound instead of light.
You could also buy him some sort of case, but these aren't always necessary. I don't use on on my Pi, and it works just fine... I just have to make sure I'm not shorting it on anything, or breaking it in some stupid way. These vary so much in design and price, I'll let you search for them instead of providing a link... just remember, like the ribbon cable, cases will obviously depend on the model he has.
Personally, I would stay away from potentiometers and photoresistors since the Pi only has digital inputs. Both of these items would need to be attached as analog items to work properly, and that means buying extra boards for correct functionality. The Raspberry Pi can not natively read analog inputs, so these items would only be frustrating to him since he can't use them without extra parts.
This should get him started in coding and prototyping. If he's looking for motors, servos, or speakers, you can get him those too, but they're not necessary to tinker with a Pi.
There are also kits that offer these items, but they're usually more expensive than they have to be, and they may or may not have everything you're looking for. Also, there are other places to shop for these types of things, but I use Amazon because it was the quickest and easiest place to search for examples of all of these things for this post. If you're smart with your shopping, you can get all of these items for ~$100, and might be able to have them shipped before Christmas... but you're going to have to hurry.
EDIT: Added links since you said you knew "nothing" about these items. This should make searching easier since you can actually see what I'm talking about...
This is a good starter CAP Kit
And in a pinch for work I needed some resistors, so I drove over and bought this KIT
for $8.
It is nice to have a range of stuff laying around, but you will never be able to stock everything you may ever need.
I dont stock many trannys (maybe 5 varieties), but I do have a few drawers of IC's.
Time for a new addition to your wishlist! Bismuth
I'd have to say the weirdest thing on my list is this bismuth crystal I just think it's super neat, also one could say its pretty California.
Also, bismuth is very cheap. It seems like it would look awesome in a display case.
Bismuth is pretty cool.
http://www.amazon.com/Educational-Innovations-Bismuth-Crystal/dp/B008MB1MCE/ref=pd_sim_indust_1?ie=UTF8&amp;refRID=13DYYME1DPBPMTE7TFWC
You could also get some ferrofluid, it's this awesome magnetic liquid.
http://www.amazon.com/Ferrofluid-bottle-GREAT-SCIENCE-PROJECTS/dp/B00126P1NW/ref=pd_sim_indust_3?ie=UTF8&amp;refRID=1DE658YEG7SG10M6TQ8R
On Amazon! It's surprisingly cheap.
> edit: yeah, it's available on Amazon Canada/US (and other places too, I assume)
There are much cooler elements you can buy on amazon.
They have everything. (Sure, it's unrefined and only useful for geiger counter calibration, but still.)
Not sure if this is what you mean...
https://www.amazon.com/Kilogram-Bismuth-Metal-99-99-Pure/dp/B01MR0MLFA
https://www.amazon.com/Educational-Innovations-TRTV2282-Bismuth-Crystal/dp/B008MB1MCE
He would skip sections at a time. He'd just go, "Eh, you probably won't need this." On the bright side, he was more than willing to go over the skipped material with whoever was curious. He even offered to teach calc 2 to a woman who was taking a semester off to care for her son. He's a great guy.
You know what, how about a bismuth crystal?
Pros:
Cons:
http://www.amazon.com/Educational-Innovations-Bismuth-Crystal/dp/B008MB1MCE/ref=wl_it_dp_o_pC_nS_nC?ie=UTF8&amp;colid=2QQ95AS53U57B&amp;coliid=I2J2971B3PS6MI
BISMUTH CRYSTAL.
I am so fascinated by crystal growth patterns. My boyfriend took me to NYC for my birthday last year and had to drag me from the crystal exhibit at the Museum of Natural History because they were closing :( I can't wait to go back.
Lifetime lowest price on Amazon: https://thetracktor.com/detail/B008MB1MCE/us/
On This Guide it only shows it being done to the Power which I found weird. You did it to the "Hotbed" one next to that as well?
That guide also suggests getting this Heat Shrink but that is included with the connectors?
Thank you very much for the information, that is very helpful!
Here is how NASA would splice that wire :). All you need is a decent soldering iron and a little bit of solder. Do it outside, especially if you are using lead based solder. A little heat shrink tubing and you can have that cord back in working order, even if it's a tiny bit shorter :).
There should be two wires inside that cord though: one for positive, and one for negative- make sure not to let these wires touch each other!
at first I just let them go however they wanted, as I was swapping between my HD598s and my M50Xs. However, once I decided to use my HD598s 100% of the time for my computer, I initially just threw a few zipties to hold them together, and then I eventually bought some shrink wrap like this, and used a heat gun/lighter to do a nicer job combining the cables. You could sleeve it like this for unique colors/better look
Oh I'm still talking about 3s - in fact this is the exact battery I'm using, but to each their own.
What kv are those motors? Also, how wide are your esc's? The size of the heat shrink depends on the size of your stuff. I believe I used this heat shrink for my esc's, but mine are pretty small. If you want to be safe I recommend a set of heat shrink such as this or this.
I personally don't use braided wire but I've herad that this one isn't too bad.
Make sure to get that power supply! It'd be a very sad thing if you get can't charge your batteries but have everything else done.
Here is my Intro
Ill add a pic once I get out of class!
No Diggity
And on the off chance that I win, either Red Diggity or Blue Diggity
Edot: Of course I forgot haha
For hiding the mustard and ketchup cables, I would recommend getting a Silverstone cable extension. You can get them in every colour, and they're compatible with every PSU. You just stick them on the ends of your PSU cables to extend them, but with a nicer colour
Like this 24pin
Unless you want to buy a new CPU cooler, there's not much you can do to hide the exposed cables of the stock one. My only idea would be to buy some Cable heat shrink wrap and cover it that way
Thanks for the help! I don't have a background in Mech Engineering (?), but I think I understand those instructions. Would this kit of shrink tubing do the trick?
AmazonLink
This is a Grasshopper GHB2 battery. Had a tear at the negative end and at the positive end. I could not find 12650 battery wraps as previously guided, nor can I find 13mm inner diameter when not flat PVC material/battery wraps.
I tried a few 18650 wraps to no avail, then tried some 13mm heat shrink tubing I have for computer wires.
This is a link for the heat shrink wraps I used. I cannot find what material they are made out of and I know that 18650 wraps are usually (or always) PVC wraps.
https://www.amazon.com/Anytime-Tools-Shrink-Sleeve-Assorted/dp/B008WWC6FU/ref=cm_cr_arp_d_product_top?ie=UTF8
Does anyone know if this material is good to use as a battery wrap?
Sorry for the late reply. First of all, take all of this with a grain of salt. This is my first build, so I am by no means an expert. You should definitely look in to all this on your own rather than blindly trust my purchases.
Here are the tools I got in my Amazon order:
I hope this helps.
You should get some ferrite cores. Put one on each end of the cables (your charger and your audio cable).
It's most likely engine noise entering the charging cable, but it could also get picked up by the audio cable.
You can try different schemes. It may be placebo, but I think they do best when they have one wrap around the core, like shown here.
I did the same thing for some DDRGame pads and can confirm this works. Here is the pinout information you will need: http://pinouts.ru/Game/cobalt_flux_pinout.shtml
Just a note, I have been having some problems with the board cutting out mid-play, but I think it is because of static. I bought these ferrite cores to help and now the pads work (as long as you play without shoes for some reason): https://www.amazon.com/UF-50B-Noise-Suppressor-Ferrite-Filters/dp/B009ENG6TI/ref=sr_1_1?s=electronics&amp;ie=UTF8&amp;qid=1469024572&amp;sr=1-1&amp;keywords=ferrite+core . Still trying to figure out why the USB cuts out when I play with shoes though... think I have to ground the entire pad D:.
Use a USB extension cable, like this, and clip a ferrite choke on each end. Route the USB such that it doesn't cross, or ideally, come anywhere near any power cords or transformers, and place the dongle as far away from the PC as you can.
It'll help a bit, but it's still a $15 piece of hardware, and as such, won't be perfect.
is it an HDMI monitor? If you have audio cables you can try clipping a ferrite bead on it.
If you get a lot of buzzing and there's no interference than it's mostly likely a failing speaker.
Expensive? Not sure if the diameter matches, but here’s a pack of 5.
Sounds like RF noise from the 19V converter getting into 12V power. Maybe buy something like this for both the power leads to your laptop and the camera.
amazon? ebay?
link link
I'm not sure this will solve it 100% but it's worth a try. If not return it or go to a shop near you and ask for this and if its possible to test it out and return it.
Maybe looping the wire around a ferrite bead may help?
Way cool! Thank you. I couldn't figure out the proper name for them. I just ordered some off of amazon ;) Link.
Sure no problem. You can probably find them a tad cheaper on ebay but I got them from Amazon. You might be able to use the Jamma harness you have already if it didn't melt. But I'd just a buy a new one. If you need help wiring up after you get the stuff let me know. I'll snap few more pics of how I go it wired up.
Power Supply
Jamma Harness
Module Plug
Actually, the parts are pretty standard, so it doesn't really matter where you buy from.
I bought them from various sources (electronics markets, amazon, and some local shops), so my links are just to be seen as examples:
Printed upgrades:
There is one small error in the assembly videos: The bed mounting plate (the H-shaped thing) is mounted upside down in the video. The bar that goes across the axes and connects both outer plates should be under the plates, not above as in the assembly videos.
Power Switch - in case anyone else wants one.
Just a chopped up power strip wired to switch with a fuse on the inside. Then the Pi, monitor, and speakers plug into the strip.
Here's the switch I used: http://www.amazon.com/URBEST%C2%AEInlet-Module-Switch-Socket-IEC320/dp/B00ME5YAPK/ref=pd_bxgy_147_2?ie=UTF8&amp;refRID=1J71V15ZGET9SM4S253H
I'm guessing that the wiring diagrams you're finding are for a double pole, double throw (dpdt) switch (or similar). It appears what you have is actually a lighted switch that's single pole, single throw...I wouldn't use it in this application.
You can get a new one on amazon for <$10 or you can get another pop-in plug at your local hardware store. Since you're dealing with mains, you should leave nothing to chance, though. I suggest going out and buying a new switch which has a wiring diagram on it. For safety's sake, get a dpdt.
PSU: https://www.amazon.com/gp/product/B00D7CWSCG/ref=oh_aui_detailpage_o04_s01?ie=UTF8&amp;psc=1
Fused Switch: https://www.amazon.com/gp/product/B00ME5YAPK/ref=oh_aui_detailpage_o04_s01?ie=UTF8&amp;psc=1
Mosfet: https://www.amazon.com/gp/product/B01HEQVQAK/ref=oh_aui_detailpage_o04_s00?ie=UTF8&amp;psc=1
The PSU has a built-in fan that kicks on and off when the PSU gets warm. I don't plan on printing things with any crazy high temperatures, so these upgrades were probably a bit overkill, but I'd rather have components that are a bit more trustworthy than what comes with a $150 kit.
As a fellow Mac user, who also has a prusa mendel; I would highly recommend you use OctoPrint + a Raspberry Pi 3. This may not be a just starting out configuration but it makes life a lot easier in controlling the printer.
I use Slic3r for Mac configured to talk to the OctoPrint server through an API call, and I can send gcode to my printer across the network from the Slic3r application. With the RPi camera installed I can keep an eye on my prints without having to be in the same room.
Also you may be happier with:
https://www.amazon.com/gp/product/B00D7CWSCG/ref=oh_aui_detailpage_o05_s00?ie=UTF8&amp;psc=1
https://www.amazon.com/gp/product/B00ME5YAPK/ref=oh_aui_detailpage_o05_s00?ie=UTF8&amp;psc=1
This PSU is a bit cheaper than your standard ATX PSU, it may be a good choice if you're looking to try this hobby out as cheaply as possible. It is a more difficult way of going because you will need to print something like:
http://www.thingiverse.com/thing:199089
To keep live 120VAC from being exposed on your bench.
Path of least resistance to getting started:
Slic3r > Repetier Host or PronterFace or Cura > Printer
The best way I've found (easiest):
Slic3r > OctoPrint
Seeing as I have the same printer and host OS configuration, feel free to DM me and I'll answer any questions you may have.
Hi everyone! If you liked the electronics enclosure you can download the design files here -
And here's the part list!
QUANTITY | COMPONENT NAME | LINK / COMMENT
:---------:|----------|----------
1 | 7I76-5I25 PLUG-N-GO KIT | http://store.mesanet.com/index.php?route=product/product&amp;product_id=215
1 | DROK LM2596 Analog Control Step-down Regulator Module | www.amazon.com/gp/product/B019RKVMKU
1 | DC Fan (120mm x 120mm x 25mm 24V) | www.amazon.com/gp/product/B01FBPQMXW
1 | Mesh Dust Filter for 120mm Fan | www.amazon.com/gp/product/B01M0A2UH0
3 | DIN Rail | www.amazon.com/gp/product/B015E4EIOK
1 | IEC320 Inlet Power Socket | www.amazon.com/gp/product/B00ME5YAPK/
4 | KL-5056 Stepper Motor Driver - 32 bit DSP Based | www.amazon.com/gp/product/B00O6DC8PW
1 | Emergency Stop Button Switch | www.amazon.com/gp/product/B0094GM004
25ft | 4 Pin Cable | www.ebay.com/itm/20M-4-Pin-5050-3528-RGB-LED-Strip-Light-Wire-Extension-Connector-Cable-Cord-Line-/282110056592?hash=item41af11d890
1 | Antek Linear Power Supply - 500W 30V 16A Peak 25A With Passive Filters / EMI-RFI Filters and Suppressors | https://www.ebay.com/itm/PS-5N30-500W-30V-16A-Peak-25A-Stepper-Motor-Antek-Linear-Power-Supply-/371664502398?hash=item5688ee3e7e
3 | Wall Outlets from Home Depot | Find ones you like / feel are safe enough using
16ft | Led Strip Lights | www.amazon.com/gp/product/B01GJ3O0J8/
1 | Misc. Hardware | Nuts, Bolts, Standoffs, Crimp Connectors, Spare Fuses, 2 Extra Limit Switches
2 | Ogrmar SSR-25 DA Solid State Relay with Heat Sink | www.amazon.com/gp/product/B074FT4VXB/
1 | 18 AWG Gauge Stranded Hook-Up Wire Kit | www.amazon.com/gp/product/B00N51OO7Q
~30pc | Heat Shrink Tubing | www.amazon.com/gp/product/B00OZSL8UE
1 | Shop-Vac | www.amazon.com/gp/product/B00EPH63K0
7 | Uxcel 16mm Thread 4-Pin Panel Mount Wire Connector | www.amazon.com/gp/product/B016FCZ5SS
2 | 8 Circuit 20A Terminal Block | www.amazon.com/gp/product/B000S5Q2VS
Best of luck! Feel free to PM me or comment with any questions or feedback!
I ordered an A8 and I get it this Sunday. Can you give me some more detail on the 4 things you suggest upgrading?
I looked at flashing the Marlin but do I need any extra cabling to perform the flash?
Do either of these fill the prereqs for the upgrades you mention? I ordered them as they came in a package deal with the printer.
https://www.amazon.com/gp/product/B00ME5YAPK/ref=ppx_yo_dt_b_asin_title_o02_s00?ie=UTF8&psc=1
https://www.amazon.com/gp/product/B01HEQVQAK/ref=ppx_yo_dt_b_asin_title_o02_s01?ie=UTF8&psc=1
Which power supply should I order? Did I forget to mention anything? I am trying to make sure I buy all of the stuff so I am ready to build on Sunday. I am gonna get a Raspberry Pi 3 for Octoprint as I only currently have a zero W and a Pi 4 available for use.
It's called the Teensy 2.0. You can get them from ebay, amazon, directly from pjrc, but I got mine from Mouser. It is fully programable with the tmk or qmk firmwares.
Teensy 2.0
Teensy 2.0 pinout
TMK flashing
Here is mine I followed this guide. When I bought mine it was only $14 on Amazon. If you start with the Jellycomb Numpad, you don't have to buy switches or a case... Just the Teensy 2.0 and the diodes.
There may be other options, this one is very easy to get you started.
nope, just something like this
Karlsson Robotics is the only legitimate seller.
edit: Looks like Sports Internet Solutions is also an official distributor.
https://www.amazon.com/gp/product/B00NC43256/ref=ox_sc_act_title_1?ie=UTF8&amp;psc=1&amp;smid=AFBMYHRQ9KU5H
https://forum.pjrc.com/threads/23601-Official-Distributors
Likely to get a fake from any other seller.
Also, it's a dollar less buying it directly from PJRC.com. $16 + $4 postage.
https://pjrc.com/store/teensy.html
and a teensy 2.0 ... just the base one .... it has a female MINI usb, right? not a micro?
http://www.amazon.com/gp/product/B00NC43256?psc=1&amp;redirect=true&amp;ref_=ox_sc_act_title_3&amp;smid=AFBMYHRQ9KU5H
Specifically, for North Americans.
https://www.amazon.com/Fibaro-Micro-Controller-Z-wave-Strips/dp/B00P1N68FW
Check this guy out.
https://www.amazon.com/Fibaro-Micro-Controller-Z-wave-Strips/dp/B00P1N68FW
https://www.amazon.com/Fibaro-Micro-Controller-Z-wave-Strips/dp/B00P1N68FW
What voltage do they need. 12 volt maybe 24 volt.
MY guess is you could hack in one of these
Qubino makes one, as well as Fibaro
Firago..Fibrago? Has a Zwave controller for RGB(W?)
Edit: Fibaro!
I agree with everyone else, any speakers you want and connect it to the dot. what kind of light strip do you have? Or are you looking for one? Amazon has the Sylvania one on sale right now.
https://smile.amazon.com/SYLVANIA-ZigBee-Starter-SmartThings-Assistant/dp/B00R1PB80I?sa-no-redirect=1
Great thing is you can buy a cheap Chinese Led strip to extend it for cheap, just make sure it's a 5 pin strip.
If you are looking for a zwave controller I would go with the Fibraro micro controller:
https://smile.amazon.com/Fibaro-Micro-Controller-Z-wave-Strips/dp/B00P1N68FW?sa-no-redirect=1
Of course you would then need a hub. I personally use smartthings but if you are more technically inclined and want everything to stay local you can use it with HASS, you'll just need to pick up a zwave/zigbee stick.
I use one of these for the LED's behind my TV.
https://www.amazon.com/dp/B00P1N68FW/ref=sr_ph_1?ie=UTF8&amp;qid=1495035763&amp;sr=sr-1&amp;keywords=fibaro
connects to smart things, can be auotmated.
I haven't had the greatest success though in controlling it via voice (i use echo).
For some reason when i try to rename the device in smart things, it no longer connects.
However having it part of a 'routine' works very well.
Turn on/off at certain times or as part of a macro like "good night" or what not.
I think he may be referring to this one... Fibaro RGBW Controller
PS: Do you have a link for the Fibaro dimmers? I'm looking but don't seem to see them, only a black box - no switch.
Sorry if there are formatting errors and such I am on mobile.
Basics
You should really consider a better HUB/products if you want this level of automation. You are going to want an offline hub such as Vera or Homeseer (what I use). Homeseer I know will interface with the echo Vera should. Hubs like wink/SmartThings end up not working when...
Similarly, you should NOT get a nest (or EcoBee). I have a nest and while I love the design it is fickle. I would instead recommend a z-wave thermostat. With a z-wave thermostat you can do almost everything nest can (no auto scheduling).Already Purchased&nbsp;
You should seriously consider a different HUB
Dimmers and Wall Switches
Here is a good place to start. Lutron dimmers are fantastics although they can be a bit pricy (I don't think you mentioned a budget...). Other options include the GE 12724 for dimming if you want to go z-wave over Lutron. And, the GE 12722 for regular on/off. Or Homeseer is releasing new switches soon that look fantastic (Also z-wave)!
Here's some more info. 1 2 3 4
Garage Opener
Chamberlain is great!
Security
If you cannot change/return your system that fine but I would recommend a DSC power series system as they almost universally integrate with automation systems Homeseer has a plugin as does Vera.
Audio
Sonos is fine. It can be controlled via Homeseer/Vera (Think announcements). Or you can get an Echo Dot and connect it to the sonos connect via an audio cable. GET a WHA controller (Check the Outdoor speaker section for recommendations)
Front Door Cam/Doorbell
Either Doorbird a doorbell and camera (expensive) or a normal doorbell with an IP camera with motion record. The integrated solution is better but of course more expensive. If you end up with IP cameras you should consider Hikvison they seem to make the best cameras for the money.
Outdoor Light
Just install the smart switch of your choice.
Fan's
Not sure sorry. :-( GE has a fan controlling switch but I doubt it would work as you mention remotes...
Under Cabinet Lighting
Hue lightstips, Aeon lightstrips or a WIFI / Z-wave LED controller with regular strips. (Will edit later with links)
Outdoor Speakers
The Daytons are fine you could also go with Yamaha NS-AW150. For integration you could connect them to the MONOPRICE 6 Zone Controller and AMP. You could also connect the Sonos CONNECT to the monopice and have outdoor audio + sonos audio and send audio to any other zones you have!
&nbsp;
PM me or comment if you need any more info :-)
&nbsp;
*Will edit and add more info when I get to a keyboard.
Thank you so much! This is very useful information. My plan was to use one of the following 2 z-wave controllers, but whether I can use 1 or if I"ll need more will depend on the actual power requirements of these strips.
Fibaro
Qubino
I'm going to email the seller to see if they can clarify the power information.
edit: The seller responded and they said 85 watts is correct. Ultimately doesn't matter since I overlooked the fact that they are not outdoor rated! Any recommendation for quality affordable strip lights? I'm looking at something like this now.
LEDENET RGBW
You could look at something like this
https://www.amazon.com/Fibaro-Micro-Controller-Z-wave-Strips/dp/B00P1N68FW/ref=sr_1_1?ie=UTF8&amp;qid=1503774345&amp;sr=8-1&amp;keywords=zwave+led
or
i have several of these in the office they work well
https://www.amazon.com/gp/product/B00MGTVORQ/ref=oh_aui_detailpage_o01_s00?ie=UTF8&amp;psc=1
Did you know Amazon will donate a portion of every purchase if you shop by going to smile.amazon.com instead? Over $50,000,000 has been raised for charity - all you need to do is change the URL!
Here are your smile-ified links:
https://smile.amazon.com/Fibaro-Micro-Controller-Z-wave-Strips/dp/B00P1N68FW/ref=sr_1_1
---
Never forget to smile again | ^^i'm ^^a ^^friendly&nbsp;bot
http://www.amazon.com/Fibaro-Micro-Controller-Z-wave-Strips/dp/B00P1N68FW/ref=sr_1_1?ie=UTF8&amp;qid=1452027496&amp;sr=8-1&amp;keywords=led+zwave+controller
I'm using cheap LED strips off of Amazon.
I have one strip controlled by a Fibaro RGBW controller.
The others are controlled by Raspberry Pis, with custom scripts to handle fades, strobes, etc.
They are very bright when it's dark out. We could see them very clearly from about 2/10ths of a mile away. I have one setting that looks like strobes from a police car. I haven't tested that one outside yet though. The plan is to use it if someone comes around licking door handles.
The picture I posted is from the blue being set at 100%.
Oh, and a video of police mode inside.
I use a Fibaro RGBW microcontroller to control mine (under cabinets). It can be added to a simple momentary switch in the wall as well so you get the benefit of controlling it via a wall switch, and/or through your home automation system (it's a z-wave device so it works with both devices you named). The micro controller is a bit more expensive, but then you can spend a lot less on the actual RGBW strips.
https://www.amazon.com/Fibaro-Micro-Controller-Z-wave-Strips/dp/B00P1N68FW/ref=sr_1_1?ie=UTF8&amp;qid=1479334032&amp;sr=8-1&amp;keywords=zwave+rgbw
Hallelujah - I'm stoked on that RGBW light controller. Wish it was cheaper than that but that controller + 32 feet of light strip is still cheaper than 6ft of Phillips FOH strip.
Edit: I ordered a RGBW controller - I'll update when I receive/install it. (Wed 19th)
Edit 2: I don't like that your charge more for Amazon :( I understand it costs you more but I still don't like it.
Other Z-Wave LED strip controllers include Fibaro Qubino RGBGenie.
I didn't realize the Hue line included LED strips. I apologize for any confusion.
Here's what I would do.
Maybe try out another case like the NZXT S340 Elite, it's not worth getting a case like that, this is very opinion-based, so take this with a grain of salt.
Definitely don't get a 2x4gb, get 1x8gb, so you can upgrade later on.
Get this compound paste
https://www.amazon.com/Thermal-Grizzly-Kryonaut-Grease-Paste/dp/B011F7W3LU
Thermal Grizzly Kryonaut is pretty much the best. Gelid GC-Extreme is the best bang for your buck
whew, alright, here we go.
at a budget like that, I'm gonna say money is no object, and I won't recommend my usual save-a-buck-here-and-there type stuff
ditch the arctic silver paste, go with this http://www.amazon.com/dp/B011F7W3LU/ref=wl_it_dp_o_pC_nS_ttl?_encoding=UTF8&amp;colid=23R7QMLQ9U6KE&amp;coliid=ISZDLEI3Q9A7F
it's not too much more, but I've seen it work WAY better on everything I've used it on.
since we've stated the obvious, go ahead and get a 1080. If you want to wait for the rx480, do so, however, I'm almost 100% certain it won't come close to the 1080 in power.
850w should be enough for dual 1080s, eventually. But, I'd go with 1000w just for futureproof sake.
I can't vouch for the phanteks cooler, I'm sure it's fine, but I'm going to recommend the corsair hydro h100i anyways.
if you are going with 32gb anyways, why not just go with 64gb, and set up a ramdrive? some ramdrive software is free, there are a few motherboards that supposedly make it work "hassle free", such as the http://www.amazon.com/dp/B017RI8UYA/ref=wl_it_dp_o_pC_nS_ttl?_encoding=UTF8&amp;colid=23R7QMLQ9U6KE&amp;coliid=I2WPSNU5EG8LYJ&amp;psc=1
I can't comment on that board yet, as it's not arrived, but It is what my next build will have.
Thermal Grizzly Kryonaut Thermal Grease Paste - 1.0 Gram https://www.amazon.com/dp/B011F7W3LU/ref=cm_sw_r_cp_api_i_ZaCtDbBTQED30
Seems to be in stock?
If you are opening the machine then you might as well get the best TIM you can. Thermal Grizzly Kryonaut is the best non-metal past you can get. A tube costs 11$.
https://www.amazon.com/Thermal-Grizzly-Kryonaut-Grease-Paste/dp/B011F7W3LU/ref=sr_1_1?ie=UTF8&amp;qid=1510699103&amp;sr=8-1&amp;keywords=thermal+grizzly+kryonaut
The best non-conductive paste would be Thermal Grizzly Kryonaut.
https://www.amazon.com/dp/B011F7W3LU/?tag=pcpapi-20
But it doesn't make financial sense for most people.
9/10 you'll do just fine with the thermal paste that comes with your cooler.
Grab some Thermal Grizzly Kryonaut instead of AS5.
Definitely not. Get a fresh tube.
Thermal Grizzly Kryonaut Thermal Grease Paste - 1.0 Gram https://www.amazon.com/dp/B011F7W3LU/ref=cm_sw_r_cp_api_i_bymqDbDWFA1CX
First off if you OC you gotta make sure the cpu stays cool, meaning you cant use a stock intel cooler; they're complete crap. You also need to get a good thermal paste. Right now, this is the best thermal paste on the market and will give you much lower temps compared to a cheap standard paste. I should also note that the 8700k is known to just have a cheap thermal paste below the heat spreader, so to attain 5ghz with decent temps, you need to delid and replace the crap thermal paste with some of that liquid metal paste.
After all that you basically just gotta get a stable voltage going to the cpu and you should be good.
Clean it off with high % Isopropyl Alcohol and a lint-free cloth like a paper towel.
Then apply Thermal Grizzly Kryonaut thermal paste.
Paste: https://www.amazon.com/Thermal-Grizzly-Kryonaut-Grease-Paste/dp/B011F7W3LU/ref=sr_1_3?keywords=kryonaut&amp;qid=1568576449&amp;s=gateway&amp;sr=8-3
Upstairs room during a hot east coast summer, 22-25C ambient. NZXT H510 Elite case (kinda mediocre, kinda regret it, waiting on more case fans in the mail, haha)
3700x on stock settings, except for a -0.1v offset. Wraith Prism with a fan curve at 50-60% all the way up to 80C when it's allowed to kick up
Idles around 46C, games from 60C to 70C, about 78C on a lengthy Prime95 stress. Plenty of headroom below the 95C throttle and the Prism is only barely audible when my room is absolutely silent
Is this the Thermal Grizzly you would recommend for the Kryonaut? https://www.amazon.com/Thermal-Grizzly-Kryonaut-Grease-Paste/dp/B011F7W3LU/ref=sr_1_3?keywords=Thermal+Grizzly&qid=1567536059&s=gateway&sr=8-3
>thermal grizzly kryonaut
Is this it?
you will need rubbing alcohol to clean the paste. Then try this
&#x200B;
https://www.amazon.com/Thermal-Grizzly-Kryonaut-Grease-Paste/dp/B011F7W3LU
This is correct, the top tier solution would have been to remove the pre-applied grease and use something more premium, like Thermal Grizzly
It won't fix image retention. You'll need to unlock your bootloader and flash a modified kernel to change colour settings with KCAL.
That said, Amazon.
https://www.amazon.ca/dp/B011F7W3LU/ref=cm_sw_r_cp_awdb_t1_1xJUBbFY0RVY4
Or you can use a thermal pad:
https://www.amazon.ca/dp/B00ZJSCQF0/ref=cm_sw_r_cp_awdb_t1_QyJUBbJGKG9PK
I've used both of the above. Currently using the pad.
One reddit user suggested:
https://www.amazon.ca/Thermal-Grizzly-Kryonaut-Grease-Paste/dp/B011F7W3LU/ref=mp_s_a_1_1?ie=UTF8&qid=1537037644&sr=8-1&pi=AC_SX236_SY340_FMwebp_QL65&keywords=kryonaut&dpPl=1&dpID=41IkGIpkjtL&ref=plSrch
You can get a bigger monitor for $65. You can also put some better thermal paste in your Laptop if you think it's throttling due to heat.
> Kryonaut
is 1 gram enough for a Ryzen 5 and my Vega56?
https://www.amazon.com/Thermal-Grizzly-Kryonaut-Grease-Paste/dp/B011F7W3LU
I use Thermal Grizzly Kryonaut
Buy a 1 gram tube of Thermal Grizzly Kryonaut. It's the best thermal paste there is, and you'll have cooler temps than with the stock paste AMD puts on. Just get some alcohol and wipe that crap off lol /s.
It's not really the end of the world to use stock paste though. There's usually a square of grey stuff on the bottom of the heatsink, which would be the thermal "solution". Thermal paste (solution) is just used for filling in the minuscule cracks between the heatsink and the shield on the CPU to help transfer heat. If you do ever clean it off and apply your own, just be sure to use a pea sized (or less) amount. You don't need as much as you'd think.
This is by far the best you can get... https://www.amazon.com/Thermal-Grizzly-Kryonaut-Grease-Paste/dp/B011F7W3LU and even though the coolers come with thermal paste installed it doesn't hurt to have some on hand in case you need it. Since you are using the stock cooler you shouldn't have to remove it after pre-testing before installing like you would if you were installing a large AIO unit.
Here you go brother
Let me know if you have any questions
Artic 5 is just as good you can't go wrong with either
https://www.amazon.ca/Thermal-Grizzly-Kryonaut-Grease-Paste/dp/B011F7W3LU/ref=mp_s_a_1_1?ie=UTF8&amp;qid=1537037644&amp;sr=8-1&amp;pi=AC_SX236_SY340_FMwebp_QL65&amp;keywords=kryonaut&amp;dpPl=1&amp;dpID=41IkGIpkjtL&amp;ref=plSrch
Sweet! Thanks!
[here's the USA version for anyone else searching](thermal grizzly kryonaut thermal grease paste - 1.0 gram https://www.amazon.com/dp/B011F7W3LU/ref=cm_sw_r_cp_apa_kzvNBbYDSBMDG)
Hmm.Correct me if I am wrong but the PCB for the armor cards are the same as the gaming X PCB from what I heard. The only diffrence is the cooler which is cheap on the armor cards therfor thats why your getting worst thermal. I am not sure about putting thermal pads on the vrm but I heard that it may or should have decrease the temps buy 3-5C at best. Some GPU manufacture dont put thermal pads over the VRM and the temps are indeed affected. But what I would reccomend you to do is to replace the thermal paste with Artic MX-4 https://www.amazon.com/ARCTIC-MX-4-Compound-Performance-Interface/dp/B0045JCFLY or Thermal Grizzly Kryonaut https://www.amazon.com/Thermal-Grizzly-Kryonaut-Grease-Paste/dp/B011F7W3LU/ref=sr_1_1?s=electronics&ie=UTF8&qid=1536473479&sr=1-1&keywords=thermal+grizzly&dpID=41IkGIpkjtL&preST=_SY300_QL70_&dpSrc=srch,that should help reduce the temps by 2-4C. But you can still try no one getting high quality thermal pads over the vrm no one is stopping you. I hope you can share with me the results!
Dang that's pretty hot, you need to take both your heatsink and gpu out of the system and see if you have caked in dust or if the fan stopped running. If you have a stock cooler on the cpu you'll need to disconnect the fan from the heatsink and pick out the caked up dust. While you have the heatsink out of your system, be sure to get some good thermal paste https://www.amazon.com/Thermal-Grizzly-Kryonaut-Grease-Paste/dp/B011F7W3LU
Actually a photo of the inside of your case could be helpful. With angles of all fans inside the case.
Nothing particularly wrong with it besides SLI issues you would encounter. Although I would spend thermal paste money on some Thermal Grizzly Kryonaut, you are getting less but its the best thermal paste on the market.
https://www.amazon.com/Thermal-Grizzly-Kryonaut-Grease-Paste/dp/B011F7W3LU
Use this paste
https://www.amazon.com/Thermal-Grizzly-Kryonaut-Grease-Paste/dp/B011F7W3LU/ref=sr_1_1?ie=UTF8&amp;qid=1493834424&amp;sr=8-1&amp;keywords=kryonaught
try dusting first this is the cheapest/easiest solution. If the problem persists then replace the paste (tons of guides online but I would recommend getting a parts tray or something before doing this as there are going to be quite a few screws).
High performance: https://www.amazon.com/Thermal-Grizzly-Kryonaut-Grease-Paste/dp/B011F7W3LU
Best value: https://www.amazon.com/ARCTIC-MX-4-Compound-Performance-Interface/dp/B0795DP124/ref=sr_1_1_sspa?keywords=mx-4&amp;qid=1555675360&amp;s=electronics&amp;sr=1-1-spons&amp;psc=1
Both options are non-conductive so you don't have to worry about it causing a short. If you stumble upon something known as liquid metal (popular for enthusiasts) I would not recommend it considering that stuff is mostly gallium and can cause a short.
If it's only been 1 year since you've used this cooler, then I don't think that thermal paste is your issue, unless it's really bad stock thermal paste.
Get this and pray to God that it's the reason behind your super high temps: https://www.amazon.com/Thermal-Grizzly-Kryonaut-Grease-Paste/dp/B011F7W3LU
Just inserted the AIO with new thermal paste ( https://www.amazon.com/Thermal-Grizzly-Kryonaut-Grease-Paste/dp/B011F7W3LU ) and im still experiencing high temps. Will try to now reapply my old air cooler. Hopefully this does something.
Yeah definitely try those two first. Worst thing that will come from undervolting will be a unstable system and a BSOD. Then just give up the voltage a little bit till your stable. If your careful look into repasting it with something like thermal grizzlys kryonaut. Worst case that can happen is you put too much on or bend the heatpipes. Maybe lookup some tests and benchmarks to see if people actually gained a significant difference in Temps to make it worth it. If your careful it's not too risky.
Grizzly!
Sorry for the late reply, got a bit busy last night and worked on this for a few hours.
I will explain my changes in detail in a reply to this post. Since I went over the 10.000 character limit reddit provides per post.
So I tried to get the black & orange vibe as best as possible, without overdoing it.
I've included custom cables, the price is a slight estimate. To get the best possible looks on them, I would recommend to go the extra mile and measure the cables their length and adjust accordingly. This will make your build pop the extra mile and just look super crisp. More details down below!
I'll also provide my standard list of videos that explain certain hardware terminologies & guides. As well as stress test software!
PCPartPicker Part List
Type|Item|Price
:----|:----|:----
CPU | AMD Ryzen 9 3900X 3.8 GHz 12-Core Processor | £599.94 @ AWD-IT
CPU Cooler | be quiet! Dark Rock Pro 4 50.5 CFM CPU Cooler | £72.38 @ Amazon UK
Thermal Paste | Thermal Grizzly Kryonaut | £6.15 @ Amazon UK
Motherboard | Asus ROG Strix X570-F Gaming ATX AM4 Motherboard | £257.89 @ Amazon UK
Memory | G.Skill Trident Z Royal 32 GB (2 x 16 GB) DDR4-3200 Memory | £348.59 @ Amazon UK
Storage | Samsung 970 EVO Plus 2 TB M.2-2280 NVME Solid State Drive | £410.42 @ Amazon UK
Storage | Seagate Barracuda Compute 4 TB 3.5" 5400RPM Internal Hard Drive | £89.99 @ Amazon UK
Video Card | Asus GeForce RTX 2080 Ti 11 GB ROG Strix Gaming OC Video Card | £1265.41 @ Amazon UK
Case | be quiet! Silent Base 801 ATX Mid Tower Case | £129.99 @ Amazon UK
Power Supply | SeaSonic PRIME Ultra Platinum 750 W 80+ Platinum Certified Fully Modular ATX Power Supply | £187.76 @ Amazon UK
Custom Cables | 24pin ATX, 8+4pin EPS, 2x8pin PCIe | £101.80 @ Octix
Case Fan | Fractal Design AL-14 PWM 103.85 CFM 140 mm Fan | £29.32 @ Amazon UK
Monitor | Acer Predator X34P 34.0" 3440x1440 120 Hz Monitor | £899.99 @ Amazon UK
Monitor | Acer Predator X34P 34.0" 3440x1440 120 Hz Monitor | £899.99 @ Amazon UK
Monitor Arm | NB North Bayou Monitor TV Wall Mount Bracket | £29.90 @ Amazon UK
Cable Sleeve | Cable Management Sleeve – Rantizon 19.7" | £7.99 @ Amazon UK
Mousepad | Sidorenko Gaming Extended Mouse Mat - 900 x 400 mm | £10.99 @ Amazon UK
| NAS |
NAS | Synology DS918+ | £503.99 @ Amazon UK
Storage | Western Digital Red 8 TB 3.5" 5400RPM Internal Hard Drive | £213.35 @ Amazon UK
Storage | Western Digital Red 8 TB 3.5" 5400RPM Internal Hard Drive | £213.35 @ Amazon UK
| Total | £6355.64
| Generated by Kiwiandapple |
Is 1 gram enough? this
To be honest, I stopped using Afterburner. I was noticing weird power and heating issues. Now I just use the Adrenalin in-game menu (Alt-R) to change Wattman settings and other things if I want to. And the in-game overlay to monitor temp and FPS (Ctrl+Shift+O) Generally I haven't even been overclocking anything. Just using Chill. IT makes a "boopy-beep" noise when it is enabled. If you use Chill...make sure to disable vsync. I had the same issue as you with certain games when using Afterburner and messing about with some overclocking and power tweaks, so it might be worth uninstalling it, and doing a full clean of your AMD drivers with DDU then get the latest version. I've lerned that Afterburner doesn;t really work well alongside Wattman on the Adrenalin drivers.
DDU download on Guru3d
Make sure you are using Vulkan as the API in game, and try lowering the resolution scale to 90% also. This will look blurry, but it might tell you if your GPU is just being pushed too much to handle things.
I also use a program called AIDA 64 which has a desktop gadget which gives me on screen display of all my temps, fan speeds, CPU/GPU speed, memory use etc. This can be displayed on my second screen. The AMD overlay works just as well for the GPU at least. Note: the FPS counter only seems to display when in fullscreen mode.
So in summary.... try getting rid of Afterburner and reinstall your AMD drivers. Keep Ambient Occlusion off. Consider re-pasting your GPU. Its probably out of warranty by now anyway and it really helps.
Video on re-pasting
Thermal Grizzly on Amazon
Thermal Paste Cleaner on Amazon
Good Luck!
I learned to OC in the late 90' ( OK, not coiled foul). In early 2000's I started using thermal diodes on CPU, RAM and GPU. This will help you see the temps and either increase heatsink and fans or reduce your OC. A good thermal paste like Thermal Grizzly, Noctua NT-H2 or Artic MX-4. Which one you should use depends on surface. Some will damage aluminium, some have enough metal particals that can short your circuits if slopped over.
http://thermal-grizzly.com/en/
https://www.amazon.com/Thermal-Grizzly-Kryonaut-Grease-Paste/dp/B011F7W3LU/ref=mp_s_a_1_6?keywords=thermal+paste&amp;qid=1573504592&amp;sr=8-6
https://www.amazon.com/Noctua-NT-H2-3-5g-Pro-Grade-Compound/dp/B07MXFTNZY/ref=mp_s_a_1_2?keywords=thermal+paste+noctua&amp;qid=1573504735&amp;sprefix=thermal+paste+noc&amp;sr=8-2
https://www.amazon.com/ARCTIC-MX-4-Compound-Micro-particles-Durability/dp/B0795DP124/ref=mp_s_a_1_3?keywords=thermal+paste+noctua&amp;qid=1573504735&amp;sprefix=thermal+paste+noc&amp;sr=8-3
I Hope this helps you.
Thermal Grizzly Kryonaut Thermal Grease Paste - 1.0 Gram https://www.amazon.com/dp/B011F7W3LU/ref=cm_sw_r_other_apa_i_wdBXDbV91T8HH
It's $12 on Amazon for 1 g: link
It's obviously good, but HY880 is just £10 for 30g. Which is great if you experiment or switch parts around when you upgrade. You can buy one tube and have enough for a long time. Or you can get 3g for just £2 link
Other than that there are other factors than thermal conductivity, like thermal contact and longevity.
I agree that $7 is mostly irrelevant when building a computer, but personally thermal grease is something I always have lying around for miscellaneous uses.
this is the right thermal paste right? https://www.amazon.com/Thermal-Grizzly-Kryonaut-Grease-Paste/dp/B011F7W3LU/ref=sr_1_1?ie=UTF8&amp;qid=1522445826&amp;sr=8-1&amp;keywords=thermal+grizzly+kryonaut
thermal grizzly kryonaut is the best but overkill - https://www.amazon.com/Thermal-Grizzly-Kryonaut-Grease-Paste/dp/B011F7W3LU/ref=sr_1_1?ie=UTF8&amp;qid=1520182266&amp;sr=8-1&amp;keywords=thermal+grizzly+kryonaut
Arctic Silver 5 is a good old standard - https://www.amazon.com/Arctic-Silver-AS5-3-5G-Thermal-Paste/dp/B0087X728K/ref=sr_1_1?s=electronics&amp;ie=UTF8&amp;qid=1520182299&amp;sr=1-1&amp;keywords=arctic+silver+5
Here's the link for Kryonaut: https://www.amazon.com/Thermal-Grizzly-Kryonaut-Grease-Paste/dp/B011F7W3LU/ref=sr_1_1?s=pc&amp;ie=UTF8&amp;qid=1481491380&amp;sr=1-1&amp;keywords=thermal+grizzly+kryonaut
Just tell the technician you have your own thermal paste you'd like to use. If he says he can't do it, then call tech support and have them approve it. I was told any technician can use thermal paste supplied by the enduser.
https://www.amazon.ca/Thermal-Grizzly-Kryonaut-Grease-Paste/dp/B011F7W3LU/ref=sr_1_3?keywords=thermal+grizzly&amp;qid=1574942898&amp;sr=8-3
Amazon, mate :)
You should probably invest in some real thermal paste. This is good. In fact, it's the best thermal paste around. You can buy isopropyl alcohol at your local grocery store cheap. It's a liquid solution that will not damage your CPU when you use it to remove the thermal paste.
Sure, that's fine, you can always add extra cooling later.
Just be careful when removing the AM4 stock cooler, make sure to run a CPU stress test and remove it by twisting. The stock cooler can sometimes pull the CPU out of the socket and bend pins. Consider removing the stock paste with 99 percent alcohol and using a non curing thermal past like Kyronaut
Thermal Grizzly Kryonaut @ Amazon UK that one yeah?
What i did was use a molex splitter with fan adapter and placed a 120mm fan on top of the hestsinks of the cpu/gpu so it ran full speed. You can get it to balance nicely so it wont drop and smack off the heatsink since they are different sizes. I unplugged and removed the dvd drive and had the hdd off to one side (as far as the power and ide cable would allow.
I then transferred around 500GBs in one go via ftp. Note that I also reapplied new thermal paste on both heatsinks after getting the stock gunk off. No problems at all and i highly reccomend doing it this way, just leave the room as the noise can be irratating, and it takes an age to transfer. Just make sure the xbox is in the open - i cracked my window and sat the xbox as close as i could to allow fresh cool air to aid cooling.
The US. Is this correct?
https://www.amazon.com/Thermal-Grizzly-Kryonaut-Grease-Paste/dp/B011F7W3LU
Good nigh all! so got my Thermal Grizzly Kryonaut , i just re-pasted my laptop and the thermals are great with out limiting Turbo Boost, see below. Like i said before, im not pro at this but this temps came from FFXIV Shadowbringers Benchmark Running at Max Settings. I hope this helps anyone. ( It did not let me paste the Images so see below:
&#x200B;
Stock Settings Temps No Turbo
[Imgur](https://i.imgur.com/U9lI412.png)
Stock Settings Temps Turbo On
[Imgur](https://i.imgur.com/zCvB1Vt.png)
New Temps After Repaste Turbo Off
[Imgur](https://i.imgur.com/0zHliKT.png)
New Temps after Repaste Turbo On
[Imgur](https://i.imgur.com/BMNsUln.png)
New Temps Turbo Off with Undervolt
[Imgur](https://i.imgur.com/Z83Dwpo.png)
What are you talking about? The difference in cost most definitely not negligible. $4 cheaper for 4x the product?! It's really up to him if he thinks the extra cost is worth 1c cooler. If 1g is enough for 2 or 3 repastings then master gel is good for 8 or 10.
https://www.amazon.com/gp/aw/d/B011F7W3LU/ref=mp_s_a_1_1?ie=UTF8&amp;qid=1522958883&amp;sr=8-1&amp;pi=AC_SX236_SY340_FMwebp_QL65&amp;keywords=kryonaut&amp;dpPl=1&amp;dpID=41IkGIpkjtL&amp;ref=plSrch
https://www.amazon.com/gp/aw/d/B019BZENY8/ref=mp_s_a_1_1?ie=UTF8&amp;qid=1522958808&amp;sr=8-1&amp;pi=AC_SX236_SY340_FMwebp_QL65&amp;keywords=master%2Bgel%2Bmaker&amp;dpPl=1&amp;dpID=315Br21UytL&amp;ref=plSrch&amp;th=1&amp;psc=1
Thanks for the reply - I actually didn't know about liquid metal/aluminum reaction! Luckily I don't think this contains gallium, but I'll have to do some research to make sure. Thanks for the heads up, you possibly saved my heatsink!
Here's what I bought. I just did mine and it's almost mouse fart quiet now.
https://www.amazon.com/gp/product/B011F7W3LU/ref=ppx_yo_dt_b_asin_title_o00_s01?ie=UTF8&amp;psc=1
https://www.amazon.com/gp/product/B00ZJS8RWQ/ref=ppx_yo_dt_b_asin_title_o00_s02?ie=UTF8&amp;psc=1
I used this video to disassemble and these photos to know where to apply the paste/grease and pads. Note that in the picture gallery, that guys is using liquid metal. The product above is not liquid metal, so you don't have to use the nail polish protection.
https://www.youtube.com/watch?v=Sg386lHY5Bk
https://imgur.com/gallery/420nWq8
https://www.amazon.com/gp/product/B011F7W3LU/ref=ppx_yo_dt_b_asin_title_o00_s00?ie=UTF8&amp;psc=1
Is this not the right one?
Use this one it's currently the best: https://amzn.com/B011F7W3LU
How about 5 for $9?. Or 10 for $10. You may have to change your firmware to use a NTC 3950 100K thermistor (very common).
If you bought one of thos $10 clones I think it would be better just buying the cables to your regular direct drive extruder that came with the printer, I bought one these thermistors and I also bought this heater cartridge. There is also this one that comes with 5 thermistors and 5 12v heater cartridges for $12.
It's possible that you forgot to switch the jumper back from USB to VREG. That would explain why the printer is only turning on the lcd and thermistor when plugin in the usb cable.
H and L makes sense, it would seem it uses normally-closed switches instead of normally-open ones, but it's the same basic principle. H stands for High signal, L for Low. As far as your endstop is concerned, if you want to try plugging them in backwards, you can, but I don't think that'll change anything, as your models seem to be bare switches, so there's no polarity. You could try using a multimeter to test continuity of the switches though. It's also possible that the RAMPS board itself isn't registering it correctly. If you want to test that, you could always pick up another RAMPS online, plug the wires and drivers in exactly the way they're currently plugged into your printer, then swap it with the old RAMPS board on the Arduino. The RAMPS itself just routes power and signals, and has no firmware of its own. This means your firmware won't notice if you've changed the shield on top of it to one with the same layout. I've linked the specific model of RAMPS I use on my prototype printer, which has minor improvements that don't change how it interfaces with the board (specifically, the fuses are a bit bigger, which helps with some problems surrounding running the heatbed and higher powered steppers). You can also change the stepper drivers to these, or another daughterboard that uses the A4988, without any changes to the firmware. It's quite possible the driver boards fried at some point, either with a trim pot adjustment shorting them out, something to do with that second potentiometer changing a setting (from what I can tell that was used to manually set something that's since become completely automatic on these driver boards), or some other issue, as they can be a bit fragile. Luckily, they're cheap, haha.
In response to your earlier question about putting an SD card in, if you want to, go for it. It won't hurt anything. It'll get rid of that error message, for sure. I don't think it'll do anything else of importance, but there may be some quirk of that specific SD card board I don't know about, so there's a possibility it'll be more compliant with one in there.
Oh, okay, I just thought of something. When you're running the machine, is the bed hot while it's turned on? the M105 command you see the machine continuously running is it probing the bed and hotend to see what their temperature is. It says B: 120, which means it thinks the bed is heated to 120C. If the bed isn't heated at all, it may be reporting a fault, which could make the machine not respond to your commands. If you want to test this, next time you turn off the board, unplug the bed's thermistor from it, and turn it on. See what the B value returned after M105 is then. If it's still either reporting 120, or some other crazy number, you may need to replace it with something like this. That may not be exactly the right thermistor, and may report weird temperatures like 60 or 10C at room temperature, due to the tables being slightly mismatched, but it should work well enough for testing, and later on, if the firmware gets changed, it'll be a known variable, so that's not an issue.
I know I've linked a few things to buy, so you may be thinking "bah, I don't want to sink money into this thing if it's this old anyway," but it's worth mentioning I'm only going to link modern components. If there ends up being a point where you just want to throw your hands up and give up working on this i2, every one of the parts I'm linking you is something used by some of the most recent printers around while still being compatible with your current device, so you're not just throwing cash away on legacy tech. Also, in the event that this thing just won't work as it's currently built, I'll happily print out and send you the components necessary to build a totally new one that reuses as many parts as possible from your current i2. Pretty much all I do is design printers, make prints for other people, and give support/advice when it comes to working with them, so I've accrued tons of spare parts that're compatible with a wide variety of things, and you'd not be the first person that's received a box of most of the components necessary to rescue a semi-functional printer out of my spare parts bin and printed out using the end of a few spools I can't use for anything major.
The old thermistor broke. I used alleged drop in replacements that I found on mpselectmini.com. These are the ones I used. https://www.amazon.com/dp/B01B41K7OM/ref=cm_sw_su_dp I should note that the thermal runaway occurs without even setting a temperature, it just starts heating and that's that. Someone on FB said it could be a bad driver, but I am not sure how I would go about testing that with a meter or scope
Yes That is the one I got.
https://www.amazon.com/Anycubic-Thermistor-Wiring-Printer-Heatbed/dp/B01B41K7OM
Get this pack of Thirmistors now. having that break on me really sucked and it seems to be a problem for others also. I would say the next big thing I did was a new knob. A world of difference.
I personally love this little printer. I don't do much to it but it's there when I need to print parts to fix the other ones.
Something like this is all you should need. The problems arise when switching to the cartridge style thermistors that come with E3D hotends. They're supposed to be more durable and accurate, but require tweaking the firmware. The ones I linked to should just plug right in without any extra changes.
Yes -- they work well and are pretty simple to make. Here is the heating module. It runs on 12 Volts DC and the rest is really just how you package it. A lot of people put a glass tube inside the coil which is probably a good idea. Add a pushbutton or something to turn it on and off. The little heater can draw about 6.5 amps, so that's what the above discussion was about. Lightweight switches won't handle the 6.5 amps. I've run it off three 18650 batteries in series and it works fine - a little slower to heat, but my battery pack only puts out about 3 amps.
The heating module converts the 12 Volts DC to about 70 Volts AC at 200KHz to power the coil. I'd consider it a shock hazard when it's powered on. Never tested it, but I bet if you touch it right, it'll bite you. So, good idea to put it all in a nice box or something.
Seems common to use a glass slide for a guitar for the glass piece, but I've found that the replacement glass for a cloutank M3 is a better fit. The glass slide works, it's just bigger than it needs to be.
Haven't used a torch with the Dynavap in eons. It doesn't seem to need cleaning as often, either. 😊
&#x200B;
ETA: The diagram says 20A minimum for the switch. I'd say 10A is plenty. My measurements say you're unlikely to ever draw 7 amps.
Module: SainSmart 5V~12V Zero Voltage... https://www.amazon.com/dp/B01GDVVANA?ref=ppx_pop_mob_ap_share
Power Supply: LEDMO Power Supply, Transformers,LED Adapter, 12V, 5A Max, 60 Watt Max, for LED Strip https://www.amazon.com/dp/B01461MOGQ/ref=cm_sw_r_cp_api_i_OKGHDbACFYZQB
(You May want to find a 10a one instead)
Momentary Switch: yueton DC 36V 2A 16mm High Round... https://www.amazon.com/dp/B0131XF9KS?ref=ppx_pop_mob_ap_share
Box: Pinfox 2 Pack Black Waterproof... https://www.amazon.com/dp/B07M5SZNR9?ref=ppx_pop_mob_ap_share
The heat up time is how I calibrated it - ya I like it that way
I put a small rock at the bottom to adjust the height - see this guys post https://www.reddit.com/r/Dynavap/comments/d7pcew/make_sure_to_calibrate_your_home_made_induction
Without the rock it heats FAST - Too fast. I could try a smaller rock when I get around to it
Supply: https://www.amazon.com/dp/B01461MOGQ
IH module: https://www.amazon.com/dp/B01GDVVANA
I don’t have WiFi so I’m not going to google search, but I’d be willing to bet google or amazon would have the car plug adapter for mobile ih.
As far as 18650, all I know is it can be done, and without TOO much effort.
With the box I’ve made, I’m going to add a bottom compartment that can be latched on to the bottom, and hold 4 18650’s which should be tons of use.
My best recommendation is YouTube, google, amazon/eBay for parts and going to the forum f***combustion , google search that forum, they have a huge thread on induction diy, as well as vapcap stuff, and there is a user there named pipes, he will sell you ready to go fully built portable and tabletop setups that are legit and very reasonably priced. Building my own I saved maybe 40 bucks, however his are better than what I’m able to cobble together, and for a true portable I’ll be going to him for his Portside mini as it’s the best.
Good luck my guy, I’m in the same boat.
Just order an induction driver with coil, a psu, and a switch of some sort.
SainSmart 5V~12V Zero Voltage Switching ZVS Induction Heating Power Supply Module + Coil Power Supply heating power supply module https://www.amazon.com/dp/B01GDVVANA/ref=cm_sw_r_cp_api_i_rWzBCb6KE502R
Out of stock but that’s what I got, there are other sellers it’s all the same unit.
EPBOWPT AC 100-240V to DC 12V 6A... https://www.amazon.com/dp/B07DNW1CNB?ref=ppx_pop_mob_ap_share
This psu works just fine for me, AND it comes with the adapter you will NEED to plug this all into the wall
ESUPPORT Heavy Duty 20A 125V 15A...
https://www.amazon.com/dp/B00ZWWZ0GK?ref=ppx_pop_mob_ap_share
This switch is for cars, and rated at 20a.
It’s overkill, but my understanding is a higher amp rated switch removes the need for a mofset which I didn’t wana really wore up. You can also use a momentary switch, so it’s only on if you press it down, but the spring keeps it set at “off” but they aren’t rated at 20a and you will need a mofset.
I just got a wood box and used my drill stuff to make the holes, and hot glue to seal the box so I can open it op fairly easily for repairs and upgrades
I'm using this exact one:
https://www.amazon.com/SainSmart-Voltage-Switching-Induction-Heating/dp/B01GDVVANA
I mean, it's working.... not combusting, nice heating, as if i was heaing low on the cap with the torch... Maybe it's also too deep into the coils.... or it's wrapped badly... OR both..
https://www.amazon.com/SainSmart-Voltage-Switching-Induction-Heating/dp/B01GDVVANA/ref=mp_s_a_1_3?keywords=induction+heater+12v&amp;qid=1571071385&amp;sr=8-3
love the dynavap, lotsa flavor, lotsa mileage outta the flower.
this is the heater i went with:
https://smile.amazon.com/gp/product/B01GDVVANA/
I must have on accident, I was fiddling around with the screw because I couldnt get it correctly because the wire didnt want to stay in the hole and must have came out a bit to be pinched by it, and I heard a crack and looked, and all was left was copper on the wires
&#x200B;
Guess I need new one now, https://www.amazon.ca/Happisland-Thermistor-Wiring-Printer-Heatbed/dp/B01N4KY6TR/ref=sr_1_7?crid=32XZGNIRBJ19S&keywords=100k+thermistor+printer&qid=1558652602&s=gateway&sprefix=100k+ther%2Caps%2C155&sr=8-7
Are these any good/ the same and hopefully not catch my house on fire?
Here’s the links to the things I bought.
Heater cartridge
SEFUSE
HeatBlocks, Nozzles, Heatbreak
100K Thermistor
Not sure if I was lucky or if it is an old image but these I purchased off Amazon actually had the white connectors already attached which plug directly into Mini's board.
https://www.amazon.com/gp/product/B01N4KY6TR
Just removed the old one entirely and replaced it with one of these. Splicing anywhere along the area that travels up and down as well as left and right is going to wear the spice after time. If you do have to splice or solder any of these wires make sure the point of the splice is somewhere inside the Mini's structure and not with the Bowden tube so there is no constant flex on it.
I recently went through exactly this same situation. I was ready to upgrade to a microswiss all-metal hotend and the catastrophic failure of the print leaving gunk all over my heater block forced the issue. In my case, I opted to replace everything I could including the thermistor and heating element. They are both very inexpensive and you should have a spare laying around anyway in case you need one in a hurry. So...how to clean your heating block...
Fire. Seriously. I used a combination of blowtorch and solvent to remove all the gunk (and mine was a LOT worse than yours...it basically encapsulated one entire end of my heater block, entombing the thermistor, heater and associated wiring).
I used your typical propane torch, holding my heater block in a vise or vise grips. I'd heat it up then quickly wipe away the melted PLA with a clean cloth. Heat, repeat. Then I'd soak the whole thing in some solvent (acetone, MEK, etc). Repeat until clean. Pay careful attention to the tiny setscrew that holds the heater in place...work it free with a hex wrench while it is hot...chances are you got some PLA stuck on there, too. Obviously be super careful when you do this. Ventilation, fire-extinguisher handy, your mom on speed-dial.
When you replace the thermistor and heating element you'll need to do some soldering. This is pretty unavoidable. Those elements come with very long wires attached to them and the Wanhao/MP print heat doesn't need that length. Clip it short, make good solders and use heatshrink over your joints. For the thermistor I simply cut out the center section of the wire and spliced the connector back to the component at the length i needed.
Now, when you put it all back together you will have the option of re-wrapping the heater block with cotton and Kapton tape. People seem split on if this is necessary, but since I'd battled heat creep before I didn't want to introduce any more heat up the block...so I opted to do it. It's a bit tricky if you get the non-punched cotton strips like I did. Luckily I had hole punches handy to make the provision for the hotend and nozzle to get thru the insulation. If you don't have these tools (or don't quite know how to do it), i'd shop around for pre-punched sets.
good luck. Let me know if you need any more help.
here are the parts i used:
https://www.amazon.com/gp/product/B071K8Z9KF/ref=oh_aui_detailpage_o00_s00?ie=UTF8&amp;psc=1
https://www.amazon.com/gp/product/B01N4KY6TR/ref=oh_aui_detailpage_o01_s00?ie=UTF8&amp;psc=1
https://www.amazon.com/gp/product/B076NW3GNH/ref=oh_aui_detailpage_o02_s00?ie=UTF8&amp;psc=1
https://www.amazon.com/gp/product/B01E1HANLS/ref=oh_aui_detailpage_o03_s00?ie=UTF8&amp;psc=1
I misread your post and posted a bad reply, deleted.
I agree with /u/LosinCash, it's probably the thermistor. It may not be properly contacting the heater block, pull it and check it's into the hole properly.
Also be careful those wires are brittle and easily broken. Another thing to watch for is that the wires don't contact the heater block.
Here's a link if you need some new ones:
https://smile.amazon.com/gp/product/B01N4KY6TR/ref=oh_aui_search_detailpage?ie=UTF8&amp;psc=1
You don't need a whole hotend unless you planned to upgrade it anyway for running hotter plastics (All metal hotend like the E3D)
EDIT: Oh yeah - the screw that holds the thermistor does NOT screw down on it!! It's GLASS. The washer holds the wires to keep it in the hole.
PuterPro
What about this?
ASUS Gaming z170 something or other mobo (I can get the model later if needed)
Vizio 40" from 2015 > TOSLINK and RCA audio out.
Schiit Modi 2 and Magni 2 Uber
Old Sansui A-5 Stereo amp.
I am using basic cables all around, HDMI, Optical, and RCAs. Once again I have no noise issue when running direct from my PC TOSLINK to the Modi, but if I run through the TV there is noticeable hiss.
I also have a cheap DAC/Amp like this:
https://www.amazon.com/PROZOR-Digital-Converter-Supports-control/dp/B06XDLCHY7/ref=mp_s_a_1_8?ie=UTF8&amp;qid=1540561437&amp;sr=8-8&amp;pi=AC_SX236_SY340_FMwebp_QL65&amp;keywords=dac+amp
It is probably the best option right now but it clutters up my desk with the cable layout. It will work if I have no other option though.
I just wish the Sansui and the Modi shared a connection type. If I could just buy a splitter that would send the signal to both, I'd be fine.
can you tell me what you think about this please??https://www.amazon.com/PROZOR-Digital-Converter-Toslink-Adapter/dp/B06XDLCHY7/ref=sr_1_4?ie=UTF8&amp;qid=1543191372&amp;sr=8-4&amp;keywords=dac&amp;th=1
Use DAC for headphones. You’re GF is going to love that crisp sound.
Here’s the one I used. It’s a 192 khz 24bit DAC amplifier with volume control.
https://www.amazon.com/dp/B06XDLCHY7/ref=cm_sw_r_sms_c_api_B.9-BbE4PRTYF
Tested on Pacific Rim 4k *fight scene, ohh boy it’s so good.
I used to use bluetooth headphones with my pstv and the sound was decent but I recently switched to a toslink converter and the sound quality is much much better. I think most tvs have an optical audio out.
The one I got has no volume control which is a little annoying but you can get a headphone volume knob or this model has one built in.
Gives probably the best setup possible for rhythm games on pstv, music also sounds 10x better.
https://www.amazon.com/PROZOR-Digital-Converter-Supports-control/dp/B06XDLCHY7
Im not good at how to look at how good my dacs is on the motherboard. Here is however the link of it. It does have optical out.
I do have an external [dac](PROZOR Digital to Analog Converter 192kHz DAC Supports Volume control Digital Coaxial SPDIF Toslink to Analog Stereo L/R RCA 3.5mm Jack Audio Adapter https://www.amazon.ca/dp/B06XDLCHY7/ref=cm_sw_r_cp_apap_zzfHEXmPKizcD) which i bought for my ps4. Is that good enough?
I know i said a big ass speaker wont work but I would still like to look into it. Maybe its big enough that it might actually fit in my small ass desk.
Well a good route could be Fiio D3 for a cheapo DAC with optical in, which I find cleans up a lot of the noise especially when compared to USB DACs. Spend a little more on the amp, which impacts the sound more than the DAC.
PC>optical cable>Fiio D3>RCA>Schiit Magni
Should be under $150 including cables/shipping.
Edit: just saw what you were running. You really don't need much for your headphones. Honestly if you're having problems with a "noisy" source all you'd really need is an optical DAC to clean things up. Your source should provide more than enough power to power your audio technicas.
PROZOR Digital to Analog Converter 192kHz DAC Supports Volume control Digital Coaxial SPDIF Toslink to Analog Stereo L/R RCA 3.5mm Jack Audio Adapter for PS3 XBox HDDVD PS4 Home Cinema Systems AV Amps https://www.amazon.com/dp/B06XDLCHY7/ref=cm_sw_r_cp_api_SFY-yb216G0JC
Cheap and well reviewed.
would this work? https://www.amazon.com/PROZOR-Digital-Converter-Supports-control/dp/B06XDLCHY7/ref=redir_mobile_desktop?_encoding=UTF8&amp;dpID=419qZ0dihuL&amp;dpPl=1&amp;keywords=dac%2Bamp&amp;pi=AC_SX236_SY340_QL65&amp;qid=1501564594&amp;ref=plSrch&amp;ref_=mp_s_a_1_7&amp;sr=8-7&amp;th=1
Just to confirm:
ps4 connected to Optical to RCA analog converter
https://www.amazon.com/dp/B06XDLCHY7/ref=cm_sw_r_cp_api_i_2Sx1DbEX2GJC1
Then: RCA to XLR cable run from converter to speakers
https://www.amazon.com/dp/B077L3PG45/ref=cm_sw_r_cp_api_i_IVx1DbM7QG40N
https://www.amazon.com/PROZOR-Digital-Converter-Supports-control/dp/B06XDLCHY7/ref=sr_1_5?ie=UTF8&amp;qid=1505762354&amp;sr=8-5&amp;keywords=dac+amp
My dad passed down his Martin Logan Vantages and his Krell kav 400xi amplifier to me. Growing up with him I was used to listening to them with a pretty high end source (he had a high end record player and CD player.) He kept the sources, so this is my current setup:
XBox sends sound to TV via HDMI, then through the optical audio out on the TV to a DAC (https://smile.amazon.com/gp/product/B06XDLCHY7/ref=oh_aui_detailpage_o07_s00?ie=UTF8&amp;psc=1), which is connected directly to the amp.
I typically am just streaming Spotify, but I often hear distortion in songs where previously there was none. It just doesn't sound too good. I don't really own CDs; streaming music is what I do. I know I won't get the same high-end sound as a CD or a vinyl, but what would be your recommendation for a source that will stream to the krell amp?
Thanks!
You've got two basic options, an HDMI Audio Extracter or a Digital to analog audio converter. The converter will probably be cheaper.
Note: I haven't used these particular products and have supplied their links as suggestions of products to look for. They SHOULD work for your intended purpose, but I can't guarantee anything, read reviews, but they should get you headed in the right direction if they themselves aren't what you need.
What I had purchased was- https://www.amazon.com/dp/B07MPF4F68/ref=cm_sw_r_cp_apa_i_rqJqDbYT542E8
are you recommending a 1/4 stereo to RCA connector and connecting that into the headphone jack?
Even sitting across the room, the Klipsch is much louder and fuller. The sub handling mid bass may be the reason?
Another thing that threw me for a loop is that unlike my old TV, the new one doesn't have analog audio out, so I can't simply plug in another set of desktop speakers like I used to. Are you pretty much forced to use a receiver on modern sets, or would something like this be a workable solution?
Considering just returning the whole set and grabbing some wireless surround system that goes on sale next few days.
I don't have a perfect solution for you. Your best bet would most likely be to convert the console optical to analog (rca or 3.5) and use a regular mixer. I also couldn't find a mixer with optical out, so you would then have to convert back to optical, which is kind of lame (unless your transmitter has a 3.5 input).
If you wanted to go this route here is a cheap optical/rca and here is a "cheap" mixer
So it looks like there's no analog audio out? No 3.5 mm out, just the S/PDIF optical out?
In that case you could buy an inexpensive adapter and an analog cable to run the audio to the projector. This should be everything you need for $15:
https://smile.amazon.com/dp/B07MPF4F68/
Might work if you get this: Digital to Analog Audio Converter-192kHz Techole Aluminum Optical to RCA with Optical &Coaxial Cable. Digital SPDIF TOSLINK to Stereo L/R and 3.5mm Jack DAC Converter for PS4 Xbox HDTV DVD Headphone https://www.amazon.com/dp/B07MPF4F68/ref=cm_sw_r_cp_apa_i_om5QDbD3PC444
You'll need to go digital out from the TV then convert to the RCA red and white in to video 1 on the receiver.
For stock it shouldn't matter. You shouldn't hit thermal limits.
That said, I would probably replace it because every chip these days thermal throttles. If you are hitting the limit, you might not realize without directly monitoring the temps. So either do research to know stock cooling won't limit you at all, or just replace the paste for 10 bucks and don't worry about it.
For 10-15 bucks, you can put on better thermal paste and get better cooling with the stock cooler. Best stuff: https://www.amazon.com/Thermal-Grizzly-Kryonaut-Grease-Paste/dp/B011F7W3LU
Benchmarks: https://docs.google.com/spreadsheets/d/1E1pEJdwf3-DVD3PgcObiiQv7hA9UVkOgFP6OHyTTp4g/edit#gid=0
Thermal paste: https://www.amazon.com/gp/product/B011F7W3LU/ref=ppx_yo_dt_b_asin_title_o01_s00?ie=UTF8&psc=1
Pads:
https://www.amazon.com/gp/product/B00UYTTLI4/ref=ppx_yo_dt_b_asin_title_o01_s01?ie=UTF8&psc=1
I stacked 3 layers of thermal pads. I hope this helps!
You can use an optical to rca or 3.5mm converter. That is if your PS4 had optical audio out. I can't remember if the slim model does.
I used to use one to connect up a high quality headphone amp for my sim racing setup.
Digital to Analog Audio Converter-192kHz Techole Aluminum Optical to RCA with Optical &Coaxial Cable. Digital SPDIF TOSLINK to Stereo L/R and 3.5mm Jack DAC Converter for PS4 Xbox HDTV DVD Headphone https://www.amazon.com/dp/B07MPF4F68/ref=cm_sw_r_cp_apa_i_4L7UDbTX1DTDP
Neither. Get this
Also, you only need to clean it once a year if you actually CLEAN it properly. Not just blowing dust off the surface.
One google search got me these.
https://mdcomputers.in/thermal-grizzly-conductonaut.html
https://mdcomputers.in/thermal-grizzly-kryonaut.html
https://www.amazon.in/Thermal-Grizzly-Kryonaut-Grease-Paste/dp/B011F7W3LU
https://www.amazon.in/Thermal-Grizzly-Kryonaut-Grease-Paste/dp/B00ZJS8Q6S
You do, but I'd advise against dishing out a crazy amount for it. A Hyper 212 evo should be more than enough. Also, get some Kryonaut since it makes a pretty big difference compared to your average AC MX-4 paste.
Both are non-conductive and both are not very good. If you can spring for Grizzly Kryonaut , get it as it's the best on the market right now. If you want to spend a little less for more compound, the tried and true NT-H1 is great. These are also both non-conductive.
capacitor pack
https://www.amazon.com/Joe-Knows-Electronics-Value-Resistor/dp/B003UC4FSS/ref=mp_s_a_1_2_sspa?keywords=resistor+assortment+kit&amp;qid=1573074991&amp;sprefix=resistor&amp;sr=8-2-spons&amp;psc=1&amp;spLa=ZW5jcnlwdGVkUXVhbGlmaWVyPUEyWE1WMVFCTEZKTjJZJmVuY3J5cHRlZElkPUEwNTk4MjU1MTlSRUhHTFdDWDZUMyZlbmNyeXB0ZWRBZElkPUEwMjY5NzI5Mk1BM0tKRFhPNzlMTCZ3aWRnZXROYW1lPXNwX3Bob25lX3NlYXJjaF9hdGYmYWN0aW9uPWNsaWNrUmVkaXJlY3QmZG9Ob3RMb2dDbGljaz10cnVl
I trust you are capable of typing the word "breadboard" into Amazon's search bar yourself.