Best engine tools according to redditors
We found 124 Reddit comments discussing the best engine tools. We ranked the 46 resulting products by number of redditors who mentioned them. Here are the top 20.
We found 124 Reddit comments discussing the best engine tools. We ranked the 46 resulting products by number of redditors who mentioned them. Here are the top 20.

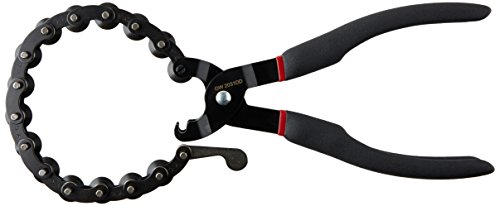


I'd sooner use a cutter made for exhaust pipe. It's just as quick as a Sawzall, and more compact than traditional plumbers pipe cutters.
GearWrench 2031DD Exhaust and Tailpipe Cutter https://www.amazon.com/dp/B000M93OUM/ref=cm_sw_r_cp_apa_op6Jyb34E653M
All of this is fantastic advice. Spot on. I'd like to add a few items for examining ads, looking at the bikes themselves, and tips to avoid being stuck with a lemon.
Good luck looking for bikes. I hope this helps.
With one of these
probably just used this
https://www.amazon.com/GearWrench-2031DD-Exhaust-Tailpipe-Cutter/dp/B000M93OUM/ref=sr_1_4?ie=UTF8&qid=1549053420&sr=8-4&keywords=exhaust+cutter
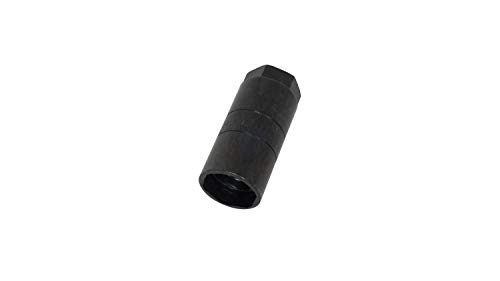
www.amazon.com/dp/B01MSJEBBO
$13 and stops all the burning.
You can do them without rolling if you have small hands, I use a Thexton419 which is a pretty worthwhile investment if you own one of these cars. I know a lot of people take loose the torque mounts, roll it forward and jam a 2x4 between the block and the firewall, though.
Flywheel Turner?
No, this tool makes them SOOOOOOOO FUCKING EASY
There a tool you can get where you remove the two dogbone motor mounts and install this tool in place of one that has a threaded rod and crank that allows you to roll the engine forward to allow better access to the rear bank.
Thexton 419X GM Engine Moving Tool https://www.amazon.com/dp/B000IHNZPC/ref=cm_sw_r_cp_api_i_FsMQCbC9H5C7M
The problem is, if you overtorque and snap that, you are in a world of hurt. My first response was to get a 180 ft/lb torque stick, but even then spinning some engines with an impact can do bad things, so I would not risk that.
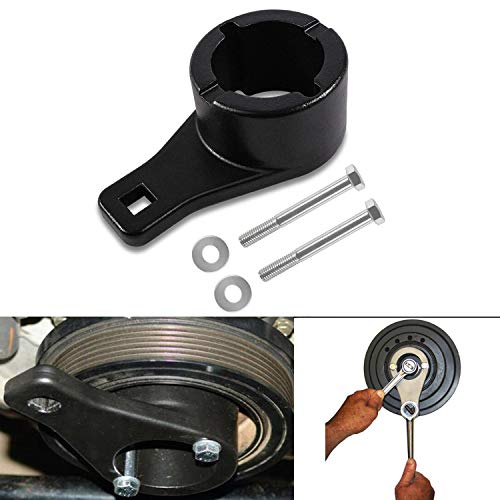
The pulley holder costs $62 and most 1/2" torque wrenches will go to 200 ft/lbs. (Or rent it, maybe a parts store has one to lend)
So I would get pulley holder, snug it down with a breaker bar and verify final torque with a torque wrench.
https://www.amazon.com/Schley-SCH64300-Toyota-Harmonic-Holding/dp/B0051XDBBG
Its for the giant pulley on the front of an engine. The bolt holding the pulley on is speced for 170lb/ft of torque. In my case, the engine just spins trying to take off the bolt, because its on an engine stand and the pistons & rods are out of the block. Basically you hold the pulley in place and crank on the main bolt until its loose.
https://forum.ih8mud.com/attachments/img_0560-jpg.468306/
The correct tool would look something like this but the car is so old nobody can confirm if anything they have works on my Supra.
Quarter turn and you're done.
https://www.amazon.com/GearWrench-2031DD-Exhaust-Tailpipe-Cutter/dp/B000M93OUM
Not an expert, but
I'd focus on the drive train issues first, get all those tires working, might be a lost cause before going any deeper, but others will have to help with that, I take that kind of stuff to my mechanic.
Brake pedal could be that it's low on brake fluid, or one of the brake calipers is stuck.
My quad has a foot brake like that and a hand brake, but the foot brake only brakes 1 tire. That tire has two brake calipers on it's roter, one to the foot break and one to the hand brake. So the hand brake is all 4 wheels, and the foot brake is 1 wheel. There is a master cylinder on my hand brake and another on my right rear tire (foot brake). If my foot brakes master cylinder runs low or springs a leak, my pedal goes through the floor like in your pic but I'll still have brakes on the hand brake. It's like a double/emergency braking system. If my hand brake goes out I can down shift (engine brake) and lay on that foot brake to brake and not hit a tree...
___
Fuel wise, it's likely carburetor being old. The carburetor should have a primer on it that injects gas into the carb when you press/pull it. Those generally have a diaphragm in them (rubber) that tends to go bad over time and cause a fuel leak.
If you can find a diagram of the carburetor that would help emensely.
Really though, you should take the whole carburetor off, take it apart and give it a bath in carb cleaner (no plastic/rubber in there) and clean all the jets out.
Also, they make rebuild kits for most carb's that come with all new jets, and pilot screw etc. See if you can find one. I typically just replace them all, easier and then I have spares.
Also, inspect the carb's vent hose and make sure it's intact and not clogged. Check the fuel line too, for damage/rot.
You should also remove the gas tank and clean it out. Take the petcock off and inspect the filters and valve, then clean the whole gas tank out so there's no dirt/bad gas in there.
Then check/change the spark plug(s). Before running it though, I'd check the valve clearance on the valves, guides on that online.
Once all that's done, it should run good and not leak gas.
Then you can address your other issues.
Pending how old it is, there are some parts I might replace just because:
If the current ones are working, call them spares.
Starters and solenoids are cheap, voltage regulators OEM are expensive, but you can buy a few after markets pretty cheap to have spares.
Tool wise, I can recommend at least the following:
Then your typical ratchet sets, air tools, impact guns, etc.
And socket extensions (long ones) because getting to some things is a royal pita.
I modified one of these, but thanks for the offer.
http://www.amazon.com/gp/product/B000F5ECUY/ref=oh_details_o01_s00_i00?ie=UTF8&psc=1
What's the tsb? I've never had a problem with the 5 valve heads.
Does it use the special crank pulley holder tool like newer hondas? I never had any success with an impact gun, always had to use the crank pulley tool with one breaker bar wedged in the suspension, with a second breaker bar on the bolt. Seemed to give in to constant force not the impact gun.
I got this reader seven years ago (no app). And I would say if it comes to price, focus on erasing over lookup features - I've always just Googled my codes and it worked fine.
It looks like this is the successor - well rated, but not cheap. The emissions status is a good feature, too. Looking around... this one is what I would buy today.
http://www.amazon.com/Thexton-419X-Engine-Moving-Tool/dp/B000IHNZPC
You unbolt the "dogbone" motor mount(s) on the top of the front of the engine bay and put this in its place. You turn the tool in the move the top of the motor forward. If you get your hands on this tool just make sure you don't pull the motor so far forward that you smash the ac lines into the radiator fan.
Oh boy...
Compression test it. Google it. Cherokeeforum.com, naxja, etc. This isn't really the place to get any kind of tech advice. Not even close.
I don't really feel like getting into all of this tbh... but for starts oil leaks don't = burning stuff. That makes no sense. Oil leaks, blowby, and burning oil are all just part of the life of a 4.0. Burning coolant is no bueno. It will wipe your engine eventually.
Compression testing is the first step to see what your engine is doing internally.
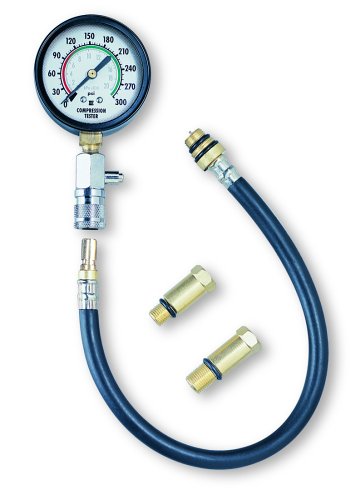
Don't buy the HF compression tester. It sucks balls. Trust me.
this one is actually very good for the money. I trust it. Seemed to work fine on my civic, gmc, xj, and snowmobile.
Even if your engine is totally fine, you need to address the heater control valve and VCG - but it's a good idea to comp test as well.
I bought this one recently: https://www.amazon.com/gp/product/B007XE8C74/
I'm sure the local parts stores have something, too.
I got a 02 ss. I removed the dog bone mounts in front of the engine. Put it in neutral used this tool http://www.amazon.com/Thexton-419X-Engine-Moving-Tool/dp/B000IHNZPC. Much easier.
I suggest this as it can scan ABS and SRS codes and live data monitoring. I have this in my work truck at all times, just in case.
Autel MaxiLink ML619 CAN OBD2 Scanner Code Reader +ABS/SRS Diagnostic Scan Tool, Turns off Engine Light (MIL) and ABS/SRS Warning Lights https://www.amazon.com/dp/B072XH9GLW/ref=cm_sw_r_cp_api_i_TLgoDbWN50SAF
I’m not a fan of the phone adapter ones myself, but I’ve heard some people like this with similar options
BlueDriver LSB2 Bluetooth Pro OBDII Scan Tool for iPhone & Android https://www.amazon.com/dp/B00652G4TS/ref=cm_sw_r_cp_api_i_5OgoDb6XGEKRR
You can get the lower tier options that can only read/erase codes but have no SRS/ABS ability for under $50.
Autel AutoLink AL319 OBD2 Scanner Automotive Engine Fault Code Reader CAN Scan Tool https://www.amazon.com/dp/B007XE8C74/ref=cm_sw_r_cp_api_i_K2goDb06ZB4RZ
Are you going to be doing it?? If so buy your timing kit on amazon this is the one I bought and has all required pieces for super cheap. Verified all pieces were identical to my focus ST kit including the length of the crank pin you insert In the rear of the block so don’t be afraid of it being so cheap lol.
There’s a strand of videos made by BaxRok2 on YouTube titled timing up Mazda ford 2.0/2.3/2.5 he’s doing it on a stand with a non turbo motor but the procedure is almost completely identical. Watch those videos a few times for confidence.
Only difference in his videos is your cam holder is shaped totally different like an L since we have a HPFP on the ecoboost engine and the harmonic balancer on the rover is also diff than any of the ones in any of the ford cars so it doesn’t line up with a m8 bolt like he shows in the vid. That tool kit comes with a special arm/holding tool thing that aligns the balancer in place to install the crank sensor. Also bought my replacement phaser from ford rather than Range Rover. Called in the part number on the phaser/camsprocket and got it for 65$ rather than Rovers price of 180$
The intake phaser pin popping out and failing like that is the same issue for all ford 2.0 eco boosts, Mazda speed models, and Mazda CX-9
Ask me any questions if you want i love to help when I can I’ve done this job too many times now to count lol
Bests Q Engine Timing Tool Kit for Range Land Rover JLR 2.0 Si4 Evoque Freelander Discovery https://www.amazon.com/dp/B07R23PS2K/ref=cm_sw_r_cp_api_i_k8LFDb083JWZD
From what I hear, miata engines seem to be pretty solid even at high miles. That being said, it depends on how the owner drove and maintained the car. When you're looking to buy, ask the owner if you can run a compression test on the motor. They're pretty cheap for what they can tell you.
https://www.amazon.com/dp/B007XE8C74/ref=cm_sw_r_cp_api_i_ECgRCbP2DKDKH
Price has gone up but what I like about this one is it translates the code so it saves a google search
Most chain auto part stores should be able to scan for free (or sell you one), or you can get one here.
Do yourself a favor, and one to your mechanic, and just use a crank pulley holder. I did mine about a month ago and without this tool it would have been a lot harder (one breaker bar attached to this tool held by the ground and another breaker bar with a massive pipe and two guys pushing it). Granted you still need a 8' or more long solid steel bar.
Btw. Your breaker bars will scare you when you this. This bolt is just really tough to break.
https://www.amazon.com/Schley-SCH64300-Toyota-Harmonic-Holding/dp/B0051XDBBG
With something like this. https://www.amazon.com/Innova-3612-Compression-Tester-Piece/dp/B000EVU89I
Often you can rent or borrow these from shops or DIY garages. For the testing itself; any youtube tutorial will do. I personally like to watch chrisfix.
https://youtu.be/PNhuDCVIydw
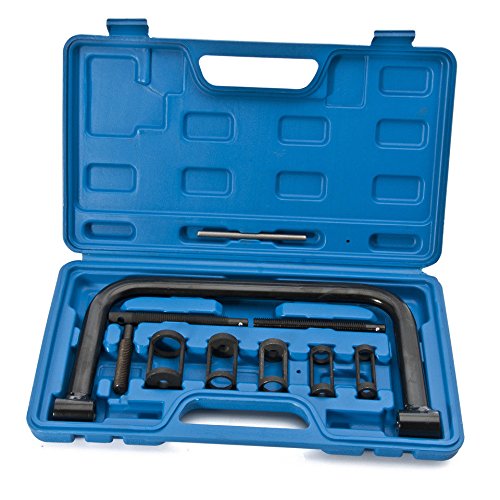
1 and 3 are the big indicators here. Sounds like your valve seals are indeed fried. Mine were toast before I rebuilt my engine. The SOHC valve seals are possible to do without removing the head. You would need an air compressor and a compression tester hose.
Remove the valve cover and rocker shafts, then screw the compression tester hose into each cylinder’s spark plug hole, attaching the hose from the air compressor to it. The air will hold the valves shut while you remove and replace the valve springs and seals. Use this style of valve spring/keeper tool for best results.
Buy one of these.
OTC Tools 5911A Drain Plug Pro Magnetic Remover https://www.amazon.com/dp/B01MSJEBBO/ref=cm_sw_r_cp_apa_HWLTBbTW5M73W
I would also recommend a generic bluetooth adapter like the elm327 if all you want to do is be able to read/erase codes and you don't plan to use it very often. For something a little better, I'd recommend this one: https://www.amazon.com/Autel-AutoLink-AL319-Scanner-Automotive/dp/B007XE8C74/ref=sr_1_4?ie=UTF8&qid=1539451895&sr=8-4&keywords=autel+obd2+scanner
It can read/erase codes as well as view the emissions ready monitors.
Nice, that bike is lucky to have you. Yeah, since you are taking it apart that is the way to go. If you were lazy and a gambling man you may have got them loose with some taps and some heat and ran a quart of ATF in your oil but you are doing it right. The stem and valve seat on that one might be a little scary when you get it apart if it's that stuck.
A lot of valve spring compressors don't fit on motorcycle engines too. The kind you hit with a hammer I hear mixed reviews. I welded a socket I cut a section out of to a large c-clamp to come up with something similar to this thing https://www.amazon.com/OTC-4572-Large-Spring-Compressor/dp/B000F5ECUY. Also I think the dingle berry hone is better for a quick deglaze than the 3 stones on your bores, that is if you don't have a machine shop do it. Good luck.
If there is any clicking noise, most of the time electricity isnt causing the problem.
Get yourself something to measure the voltage (Even a lightbulb 12V 21W is enough > Look it up on youtube).
If its ok, replace the motor.
But nyfdup is right. Also check the wiring for the trunk on the left side :) Its easy and if its broken, even you can see it.
If volage AND wiring is ok, replace the motor. Its a very common thing.
BUT! be aware, your wiper doesnt lose that easily
You need a special tool to break it free without destoying the glass..
Tool like that > Amazon
It's not a terrible job. I just recently did this on my IS300 that also has the 2JZ-GE and you can do it in a day if you take your time.
You need to gauge your mechanical ability and tools-on-hand vs. taking it somewhere. If you can follow instructions and have some basic tools you can do this with the purchase of some extra.
Stuff you need:
All parts minus fluids can be had for under $300 with good quality.
Tools will be about $200 assuming you rent the torque wrench and puller.
Expect at least 1 bolt to get stuck and/or stripped.
You'll save a few hundred bucks but you need to weigh your time and ability vs taking it somewhere.
I have this exact same car (97 outback 2.5L) and I've had multiple late 90s subarus over the years, and it can be very annoying to complete the drive cycle or know if the emissions check of the ECU is working as intended or just taking its sweet-ass time doing its checks. As /u/bobbysenterprises mentioned:
> What exactly is considered a drive cycle seems to be protected closed source information.
is fairly accurate. basically you need a combination of low speed driving, stop and go, idling, high speed driving, acceleration, and deceleration. You could probably complete the cycle in an hour or so of just aimless driving, with the intent to try and lot of varied driving.
Here's a tip, invest in an OBD2 code reader that can tell you the system readiness state, I have one of these which can do this (as well as read/clear codes, etc). At least this way you can drive around, check the readiness state, and know if its working or not. Here's a slightly fancier version with a color screen
You can get the proper tool for a whopping $15.
Lisle 13250 oil pressure switch socket
The one I have looks like it has been discontinued/not made anymore/not stocked through amazon anymore. This one appears to be the same with maybe a few added things and bigger
Autel AutoLink AL319 OBD2 Scanner Automotive Engine Fault Code Reader CAN Scan Tool https://www.amazon.com/dp/B007XE8C74/ref=cm_sw_r_cp_api_t0CIAb8VWPT5Z
this
Start here:https://www.amazon.com/Autel-AutoLink-AL319-Scanner-Automotive/dp/B007XE8C74
Here's paperwork for all the possible waivers...might you qualify for one?
https://dnr.mo.gov/gatewayvip/v-owner/Forms.htm
Edit to add: you can get a cheap code reader for $30 or less on Amazon or at Harbor Freight Tools.
Example - https://www.amazon.com/Autel-AutoLink-AL319-Scanner-Automotive/dp/B007XE8C74/
with that, you could look up the specific code your self, and then google it and the make and model of your vehicle and see if that suggests a cure. Failing that, you can use the tool to force the CEL off. When you do this, certain of the internal tests that your car does can not be done for a while, until you drive enough that various self-tests are automatically done (which may turn the CEL back on). This tool can also tell you how many sub-systems are in test ready mode. For a 2007, I believe you are allowed to get the emissions test done with one test in not ready mode. See slide 8 of this powerpoint...
https://www.ewgateway.org/wp-content/uploads/2017/10/2015-Oct-GatewayVehicleInspectionPgm.pdf
I have an older car that is always setting the CEL, but I can force it off and then drive it just enough that all systems except one are ready to self-test, at which point I can get it to pass inspection before the CEL comes on again, and I'm good for another two years.
The rules got more relaxed last month...
https://www.ky3.com/content/news/Local-shop-weighs-in-on-new-inspection-law-512616921.html
...but I don't think that does you any good.
Happy motoring.
Sorry for the incoming text, but worth knowing:
Taken from cb750c.com
---
I successfully replaced all the valve seals in my 1100 without removing the head. I used the smaller of the two Lisle ‘plunger style’ tools pictured here: http://www.amazon.com/Lisle-36050-Keeper-Remover-Installer/dp/B0012S61IO. I sent an email to Lisle telling them what I wanted to do and asking which tool I should use and they recommended the one above. I’m not sure why the smaller of the two tools is not available as a stand-alone product but it doesn’t’ seem to be – it’s only available in the kit. There were several tool options that purported to do the same thing but since I didn’t know for sure that it would work, I purchased the cheapest one I could find and it worked just fine.
Replacing all 16 seals took about two hours (not including engine and cam removal of course) and that was being very careful and inspecting each bore carefully. If I did it again, I would expect that it would take less than an hour.
Here’s the method I used:
(Here's a link to a video on how the tool works - not my video, or the tool that I used, but it will give you an idea of how it works: http://www.youtube.com/watch?v=ZFTaeu4GIPo)
I lowered the desired piston and pushed 20 ~30 cm’s of clear plastic tubing into the cylinder (trying to get it to ‘ring’ around the piston crown), then raised the piston until it stopped. Some folks have used rope for this trick. I couldn't find any suitable rope in the garage so I used he battery hose (which I don't need any more since I have an AGM battery). Since you're not actually pressing on the valves when you use the tool, you don't need a lot of pressure on the piston pushing up on the plastic tubing - only enough to keep the valves from falling down.
I cut the bottom off a 35mm film container and split the side and used it as a valve bore protector.
Plugged everything in sight with rags
I removed the bucket and shim with a magnet and inserted the bore protector.
Using the removal section of the above tool, press down on the valve retainer with moderate pressure to remove the retainer and keepers, both of which will be grabbed by the magnet in the tool It’s hard to convey what ‘moderate’ means – but in this context, it means significantly less pressure than required to put the keepers back in.
Using a small pair of needle nose pliers, remove the keepers from the tool and insert back into the retainer (the strong magnet in the tool necessitates the use of the needle nose pliers most of the time)
Remove the springs - taking care to ensure the spring seats don’t come out too – they sometimes stick to the oil on the bottom of the spring and need to be re-inserted.
Using a pair of long needle nose pliers with serrated noses (if that’s the right term?), carefully remove the seal. If you have a small set of valve seal removal pliers, this would be a breeze (next time I do this job, I’ll have a set). In my case, this was the most time consuming part of the job, not because it was so difficult, but because I took my time to avoid damaging the valves and guides, or losing the valve seal springs. On the seals that I found installed in the head, the small wire ‘spring’ that wraps around the base of the seal to ensure a tight fit with the guide, was so small, it was barely visible (admittedly I can see worth crap), but I had to be extra careful when I pulled the seals out, that the wires came out too (probably not a good idea to have any floating around in the valve train). In almost all cases, the wire came out by itself first, before the seal came out. In my case the original seals (don’t know if they were original to the bike) were not brittle, in fact they were the opposite, gummy even. Fortunately, they weren’t so gummy that I had to scrape any of them off the guide, but I did have to go fishing for a few pieces that were mangled due to us of the needle nose pliers
Press a new, oil dipped Viton valve seal over the valve
Using an appropriate sized deep socket, press the valve seal over the guide. Only thumb pressure required. It’s obvious when the seal ‘clicks’ on.
Reinstall the springs, taking care to ensure the tightly wound coils are facing down (toward the piston).
Place the retainer with the keepers in it back on to the springs
Using the installation section of the above tool (inserts into the removal section), press down hard to seat the keepers into the valve and retainer. It took me a while to figure this part out. I thought that it wasn’t working, then by playing with a loose valve I have, I figured out that I wasn’t pressing hard enough. I’ve used this type of tool before, but it was on an automotive engine with a single spring, and it was a while ago - It takes a lot more pressure on th tool to seat the keeprs the 1100F engine. I put a folded cloth in my palm (cause it would hurt my hand if I didn’t) then laid my body weight on my hand/arm to get the required pressure (while keeping the tool in line with the valve. There is an audible click when the keepers install – it’s very satisfying! It seemed to take a lot more pressure to seat the exhaust keepers than the intake keepers. Doesn’t make sense as the springs are the same (I think). Perhaps just a better angle for pushing on the intake side when the engine is sitting flat (i.e. top is sloping towards the front)
Using the removal tool on the newly installed retainer, give the retainer a mild whack with a plastic hammer (less than a whack really) to ensure the keepers are properly seated.
Remove the bore protector
Dip the bucket and shim in oil and place in the head
Repeat for 3 remaining valves for that piston
Take large swig of beer (you don’t want to do this too many times before completing all valves)
Release piston, remove tubing, then move to the next piston
Notes
Having the head on the engine makes this tool easy to use. Because of the pressure required to install the keepers using the tool, it might be tricky to use on the head while it's sitting on the bench. Might just be a matter of blocking off the head so it doesn’t move. All head movement issues aside, using this tool would be much, much, much faster and simpler than dinking around with the old tried and true “C” clamp method, but if that’s what you trust, go for it.
Even if you wouldn’t use this tool to install the keepers, it makes removing them so easy; it would be a welcome addition to any tool box.
In closing…..
So, I’m still fixing things and haven’t put the motor back in the freshly touched up frame (contemplating cam chains now) so I can’t comment on how everything has worked out – that’s yet to be seen, but I don’t’ expect any problems at this point, at least, I don’t expect any problems related to the valve seal job (lord knows: there tons of other shit that will fail in the project yet). One could argue that it’s a bit nuts to have the engine out of the frame and not take the head off. I don’t necessarily disagree! It's just that this motor is new to me and I don't have a good feeling for what needs to be done to it to freshen it up. I did compression and leak down tests and they booth looked exceptional but it smoked on startup like it was a prop in a war movie – a pretty clear indication that the valve seals were gone, but everything else seems good. I didn’t want to remove the head and all the work that goes along with that only to find that there was nothing wrong. After I put a few miles on this engine, I may decide that I want to get into the engine after all – but I’ll make that call when I actually ride it and have a feeling for how it’s running. I can look at motor disassembly next winter if things are worse than they appear.
I have a low mileage 900 that runs really nicely but it too blows some smoke. I wouldn’t ever even consider changing the seals if that means having to crack the head, but now that I know this method works, when I get a chance, I’ll eagerly pull the motor, touch up the frame and bit, swap in new seals, and shove the motor back in.
Hope this is useful.
https://www.amazon.com/Powerbuilt-648796-Cranks-Pulley-Removal/dp/B0000TMLWQ
https://www.amazon.com/Powerbuilt-648796-Cranks-Pulley-Removal/dp/B0000TMLWQ
https://www.amazon.com/Powerbuilt-648796-Cranks-Pulley-Removal/dp/B0000TMLWQ
https://www.amazon.com/Powerbuilt-648796-Cranks-Pulley-Removal/dp/B0000TMLWQ
https://www.amazon.com/Powerbuilt-648796-Cranks-Pulley-Removal/dp/B0000TMLWQ
https://www.amazon.com/Powerbuilt-648796-Cranks-Pulley-Removal/dp/B0000TMLWQ
https://www.amazon.com/Powerbuilt-648796-Cranks-Pulley-Removal/dp/B0000TMLWQ
https://www.amazon.com/Powerbuilt-648796-Cranks-Pulley-Removal/dp/B0000TMLWQ
https://www.amazon.com/Powerbuilt-648796-Cranks-Pulley-Removal/dp/B0000TMLWQ
What mechanic did you take it too ? Has he never done timing belt before, It will not break you need this "link below" to loosen the bolt, it holds the crank steady while you break the bolt loose, you still might need two ppl. But you will most likely need that tool for sure,
​
https://www.amazon.com/Toyota-Crankshaft-Damper-Holding-Harmonic/dp/B07Q1W36L7/ref=asc_df_B07Q1W36L7/?tag=hyprod-20&linkCode=df0&hvadid=351635609994&hvpos=1o2&hvnetw=g&hvrand=10078747982902108018&hvpone=&hvptwo=&hvqmt=&hvdev=c&hvdvcmdl=&hvlocint=&hvlocphy=9010924&hvtargid=aud-801381245258:pla-782479832855&psc=1&tag=&ref=&adgrpid=76361197332&hvpone=&hvptwo=&hvadid=351635609994&hvpos=1o2&hvnetw=g&hvrand=10078747982902108018&hvqmt=&hvdev=c&hvdvcmdl=&hvlocint=&hvlocphy=9010924&hvtargid=aud-801381245258:pla-782479832855
For those of you attempting this, this tool will make it MUCH easier. Magnetized removal means no keepers flying about, and installation of the new retainer and keepers is a breeze
https://www.amazon.com/Lisle-36200-Keeper-Remover-Installer/dp/B000P0ZJIS
I ordered my own [obd code reader](http://www.Autel.com/ AutoLink AL319 OBD II & CAN Scan Tool https://www.amazon.ca/dp/B007XE8C74/ref=cm_sw_r_cp_apa_i_URbTCbT4J3KBS) and I will let you know the code in a few days!
http://www.amazon.com/Lisle-36200-Keeper-Remover-Installer/dp/B000P0ZJIS
It was a bit of work, but the compression check is super simple and if the compression is bad then you don't need to fix anything else until the compression is fixed. I got my compression tester from Amazon https://www.amazon.com/gp/product/B000EVU89I/ref=ppx_yo_dt_b_search_asin_title?ie=UTF8&psc=1
I did one last fall in my NA without a lift, but I don't think I would have been able to do it without a trans jack. I borrowed this guy from a co-worker and it worked great. You will also need a 2 foot breaker bar, 6 point (don't use 12 points) 1/2" sockets, about 1.5 feet-2 feet of 1/2" extensions, and at least one u-joint. A flywheel holder will make your life easier when removing/re-torquing the flywheel bolts and a seal puller will help removing the front/rear trans seals and the engine's rear main seal.
Here are the steps off the top of my head:
https://www.amazon.com/gp/product/B01MSJEBBO/
thanks for your reply, after a little reading it seems like I can buy a 20ish$ OBD code scanner and plug it right into my car and it will show me the error code that's triggering the CEL and then I can have a good understanding of what's wrong. Does that sound correct?
Here's one I was looking at https://www.amazon.com/dp/B007XE8C74/ref=sxbs_ktp-hero_tr_2?pf_rd_m=ATVPDKIKX0DER&pf_rd_p=3534580262&pd_rd_wg=uKQxz&pf_rd_r=BBVVSJGBH52KF1WSEDXT&pf_rd_s=desktop-sx-bottom-slot&pf_rd_t=301&pd_rd_i=B007XE8C74&pd_rd_w=dvjDn&pf_rd_i=obd2+scanner&pd_rd_r=26c51c71-7792-430b-bcb7-610ff86f1c72&ie=UTF8&qid=1524224619&sr=2
Seems like it can also clear the CEL.
I'm new to the car game so trying to learn and do as much as I can on my own. Around here mechanics and dealerships are notorious for playing you especially when they sense you're a newbie. It seems like to me everything is pretty easy to do on your own, even with some youtube videos changing your own brake pads doesn't seem to difficult.
Funny enough, my oil pressure sender just went wonky the other day too. Anytime the Jeep is running it just pegs to max PSI regardless of rpm. I have a new sender on its way BUT I HIGHLY RECOMMEND that you get an oil sender socket as it can be a pain in the ass to replace without one! I ordered this one
Crank pully tool. Also study the multitude of youtube DIY videos. https://www.amazon.com/dp/B00I3RLMIG/ref=pd_lpo_sbs_dp_ss_1?pf_rd_p=1944687722&pf_rd_s=lpo-top-stripe-1&pf_rd_t=201&pf_rd_i=B0000TMLWQ&pf_rd_m=ATVPDKIKX0DER&pf_rd_r=1FDGDXD5W1A56WCD145N
http://www.amazon.com/INNOVA-3612-Compression-Tester-Piece/dp/B000EVU89I/ref=sr_1_1?ie=UTF8&qid=1463577640&sr=8-1&keywords=compression+tester
Price History
ReviewMeta: ★★★★✮ 4.4/5 from 1576 valid reviews
CamelCamelCamel - [Info] │ Keepa - [Info]
_
We don't Horse around here.
^(Info) ^| ^(Developer) ^| ^(Inquiries) ^| ^(Support Me!) ^| **[^(Report Bug)](/message/compose?to=The_White_Light&subject=Bug+Report&message=%2Fr%2Famazondealsus%2Fcomments%2Fc8hkkh%2Fautel_al319_obdii_scanner_car_code_readercode%2Fesmvahs%2F%0D%0A%0D%0A%0D%0A%0D%0APlease+explain+here+what+you+expected+to+happen%2Fwhat+went+wrong.)**
Autel AutoLink AL319 OBD2 Scanner Automotive Engine Fault Code Reader CAN Scan Tool https://www.amazon.com/dp/B007XE8C74/ref=cm_sw_r_sms_c_api_i_6-JhDb94A6D6C
If you still don't trust the marking, they make chain alignment tools but you might have to temporarily remove the chain guard.
As said though, the swing arm markings will be fine though. Maybe use a metal ruler to make sure the adjuster blocks are equal distances from the end of the swing arm. There is a risk that you will in fact be less accurate with your method because you'll have to distort the tape measure and judge where the center of the bolts and nuts are.
'02 3.0 Auto here, same symptoms, crazy needle at idle after its warmed up, fine when driving. I replaced the sender which was harder than you'd think, it needs a non-standard size socket with a recess for the plug. It's also in a difficult spot to see/access, back of the engine, passenger side. You need to look straight down in the right spot to see it.
Still have the crazy needle. Hoping an oil change will clear it up. I've read a faulty cam synchronizer can also cause these symptoms.
> Any tips as to how to accurately measure the distance between pivot and tip of the swingarm
This isn't really the important measurement - you want the chain to be straight, and there's a few alignment tools for that:
https://www.amazon.co.uk/d/Car-Tools-Equipment/Laser-5051-Motorcycle-Chain-Alignment-Tool/B004499M20/
https://www.amazon.co.uk/Sealey-MS005-Motorcycle-Chain-Alignment/dp/B008H144EC/
https://www.amazon.co.uk/Motion-Pro-08-0048-Chain-Alignment/dp/B000GTVOJQ
How did you realise the markings were off? I don't really understand what your response is that would involve a loose nut.
https://www.youtube.com/watch?v=B8WTTfkyW8g
I've never done it before myself but it doesn't seem like it would be too difficult if you've wrenched on your car before. However, it does look like it would be a day job doing it this way.
If you're willing to buy a tool I'd get this: http://www.amazon.com/Lisle-36050-Keeper-Remover-Installer/dp/B0012S61IO and then follow this video: https://www.youtube.com/watch?v=qEe8C5u1LWg it would be a much faster way to do it.
If you have the tools ahead of time (unlike me), I would say it's definitely doable in about an hour.
You'll want a wiper assembly tool like this one:
https://smile.amazon.com/Amon-Tech-Windscreen-Remover-Removal/dp/B01HJBM2WG/ref=sr_1_2_sspa?crid=39LZHU7SU7KN6&keywords=wiper+arm+removal+tool&qid=1557626963&s=gateway&sprefix=wiper%2Caps%2C158&sr=8-2-spons&psc=1
I got mine from my local O'Reilly because I was determined to get it done that day. Otherwise, I would have planned ahead and ordered it.
Then to cut the ends off of the drain, I had to get a long-handled set of needle nose pliers from Walmart like these:
https://www.walmart.com/ip/8-Nose-Pliers-Sbln8p/34771013
I ended up just kind of pulling and tearing those little flaps off. My hands are too big and I couldn't even reach the driver side with scissors. It was so frustrating, but only because I was unprepared... The wiper assembly doesn't just come off, so I let it soak a few times with the PB Blaster. I honestly thought I was never going to get it, so I was pretty ecstatic when it started budging. YouTube is a good resource for this part if you're unfamiliar. Good luck! Let me know if I can help further!
https://www.amazon.ca/INNOVA-3612-Compression-Tester-Piece/dp/B000EVU89I/ref=mp_s_a_1_5?keywords=compression+tester&qid=1563192308&s=gateway&sprefix=compression+test&sr=8-5
Or pick something up from your local Canadian Tire.
Okay, I've gone through this before. Luckily I had access to a shop. The 1/2" snapon impact couldn't get it, but the 3/4 did. You probably don't have a 3/4, so here are some ideas.
2 - There's a special Honda crank pulley tool. Use this with lots of cheater bars.
https://www.amazon.com/Powerbuilt-648796-Cranks-Pulley-Removal/dp/B0000TMLWQ
3 - Find a shop and tell them you just want the bolt broken loose. They might hook you up for free or charge you only a little bit of labor if they have better tools. If they get it loose, just have them snug it back in. The engine rotates clockwise so the bolt can't loosen, it'll only get tighter on your way home, no worries about it coming out.
Good luck.
Would it be one of the tools in this kit? I came across this timing chain adjustment tool kit while looking at how to do a timing adjustment.
​
Here's the link to the Cruzetalk thread. And this is the link to the kit on Amazon.
And Re: the vacuum line yes, that line on both ends with the rubber boots is good. I saw that they crack easily but mine are both pliable and the rear was REALLY hard to remove (had to check it out) so it was snugly on there. I checked all the small vacuum lines and the boots all look good, they all seem to be in the right places. There is a line in the very top right corner (look for the green connector) that goes from there to the right side of the intake that is somewhat brittle, but messing with it didn't seem to affect the engine performance at all.
I have to think this is all pointing towards timing considering what you've said and what I've read about O2 sensors and vacuum leaks. I will order up the compression tester if you think that is worth it .. seems like I may need a special fitting for the 5.4l Triton engine and it seems like it might have narrow plug holes? I see that OTC and others sell a specialty adapter but others on Amazon seem to just have a long hose with adapters anyhow.. so would those work?
http://www.amazon.com/INNOVA-3612-Compression-Tester-Piece/dp/B000EVU89I?ie=UTF8&psc=1&redirect=true&ref_=ox_sc_act_title_1&smid=ATVPDKIKX0DER
I had this same issue a while back. I used two different items. I tried using a gear puller, but it wouldn't fit below the motor pinion. The claws were too thick. I ended up using a Windscreen Window Wiper Blade Arm Puller to get it going. Then I switched to the gear puller. I forgot what size the gear puller was, but here it was something like the one I linked below. Some heat couldn't hurt as well.
https://www.amazon.com/Pro-Grade-18212-4-Inch-Adjustable-Puller/dp/B002O16UGQ/ref=sr_1_4?ie=UTF8&qid=1523555996&sr=8-4&keywords=gear+puller
https://www.amazon.com/Windscreen-Window-Puller-Remover-Removal/dp/B01HJBM2WG/ref=sr_1_1?ie=UTF8&qid=1523555789&sr=8-1&keywords=windshield+wiper+blade+puller