Best fasteners according to redditors
We found 1,176 Reddit comments discussing the best fasteners. We ranked the 772 resulting products by number of redditors who mentioned them. Here are the top 20.
We found 1,176 Reddit comments discussing the best fasteners. We ranked the 772 resulting products by number of redditors who mentioned them. Here are the top 20.


Continuation thread (See first comment below for beginning)
Is That a Node in your Server Rack?
...”or are you just happy to parallelize me?”
Now onto the build for the server nodes themselves. These are pretty simple; again I went with the K.I.S.S. method of building here, and using the original HDD Caddies for the DS14MK2, I surface mounted the SBCs using these awesome double-sided adhesive standoffs. This allowed me to get the R-Pis and the like, very very closely surface mounted. This was an important element, since there’s barely enough space width-wise for anything too thick (that’s what she said).
It took me a few iterations to find just the right location within each caddy to mount the SBCs, but I finally got it down to a not-so-exact science. Each caddy/tray now comes with a naked (ripped off the plastic shell) 48vdc -> 5vdc Gigabit Active PoE Splitter, which conveniently has a micro usb charging end for the R-Pi power.
Additionally, some of the nodes also have a “UPS” battery backup system — ahem, basically it’s a USB Powerbank 3200mAh, which gets power from the PoE splitter, and then gives that power to the R-Pi’s. Nothing fancy.
Oh, some of the nodes also have a real fancy Movidius Neural Compute Stick from Intel. Cause, you know. Neural Networks and stuff.
Note: everything in the caddy gets mounted with heavy duty double-sided adhesive tape. This makes it easier to replace/reposition/remove certain parts if needed later on.
Reference Photo
Reference Photo
Reference Photo
Lots of people do this. It works fine. Google "Lego Computer Case" to see all sorts of awesome inspiration. It's not, however, cheap - unless you've got lots of lego kicking around already, anyways, that you don't mind dedicating for a case.
​
Grounding isn't a problem; all the components are very well grounded to the PSU through connectors (be it power connectors, and/or PCI slots). People like to get all worried about that here, but it's an absurd worry.
​
Heat isn't a problem, unless things go horribly wrong: say a fan fails, and for some reason the CPU doesn't throttle and hideously overheats, then while you're destroying the CPU you may also discolor/deform some lego. Just be sure you've got air flow through the case, of course, so you don't cook your gear. This has nothing to do with building materials, though, just case design.
​
Some tips:
How you will mount the motherboard: Adhesive motherboard standoffs. Stick them into the motherboard, peel off the backing, stick the motherboard to the case. Done. I use these in wooden cases/shelf computer systems regularly, and they're awesome.
​
Fan mounts? Some double sided foam tape or Technic shafts(those + cross section shafts) through the screw holes in the fan, holding the fan in position on the shafts with those couplers that slide tightly along the shafts.
​
Use the existing IO shield (if you care about that) and sandwich it in place between thin lego pieces.
On the topic of wire nuts, what is the general feeling about the Wago Lever Nuts? I bought some, and they seem pretty awesome. They also seem well reviewed. Does anybody have bad experiences with them? Or are there any potential mistakes to avoid?
Edit: The reason I'm asking in relation to this post is that it seems like the lever nuts could potentially be much safer and less error prone. But I am not an expert, so I'd like to know what more knowledgeable people think.
If you're routinely opening the panel, I'd suggest getting threaded inserts like this that allow you to use machine screws rather than wood screws. If you take wood screws in and out enough times, you'll make the hole useless. The ones I listed are sized for inch threads, but you can find metric equivalents.
Also, as someone else mentioned, I'd seal the case with something to protect the wood.
I've owned the Ender 3 for a few months now and have made a number of upgrades, both purchased and printed. Here's a list of what I have purchased and printed, sorted by importance/usefulness.
 
Purchased Parts:
 
Printed Parts:
 
Future Upgrades:
Spool Roller - One issue I've found is that the stock spool holder requires excessive force from the extruder to unwind filament. A replacement spool roller with bearings should reduce the friction significantly and produce more even extrusion.
Metal Extruder - A common problem with the Ender 3 is that it fails to maintain proper tension on the extruder gear, which leads to failure to feed and poor extrusion. An all-metal extruder has been known to fix the issue.
http://www.amazon.com/Bolt-Thread-Checker-Inch-Metric/dp/B003FJW0GK
Howdy, new /r/HappyBuckmarkOwners member!
Some Buckmark pointers:
If you're feeling adventurous:
My home was built in 1898 and I've got a tv hanging on the wall with no problem.
You have to use plaster wall toggle anchors, not those plastic ones they sell at ikea.
for the television I tediously searched for studs, they do exist in there, and attached a thick piece of plywood to them. Then I screwed the tv mount to the plywood. Been holding strong for 5+ years.
Nice! I left the middle parts solid and used a cordless drill to make the holes. I figured since I'll never take them apart, they won't become stripped. I've also seen serrated brass nuts pressed/melted in with a soldering iron. It creates a durable threaded hole:
M3x5mm(L)-5mm(OD) Metric Threaded Brass Knurl Round Insert Nuts 100pcs https://www.amazon.com/dp/B00Y20YLKY/ref=cm_sw_r_cp_api_-S2-BbYAV507F
#4-8 drywall anchors make the best rimfire snap caps
The GPU is simply mounted to the wood with a screw like it would be in a case, there's a little support that I covered with silicone on the back end.
For the motherboard I used these and these.
Ok, so there is a LOT of bad advice in here. I will tell you what I would do as someone who has installed over 80 tvs in the past two years on a variety of building types.
Earlier I made a practice station for a set of 6 locks, but it was uncomfortable to hold in my lap while I watch TV. So I made a couple of these small holders in an hour or so. There is a brass insert for the screw, so these will last forever, and the screws will turn easily.
I would recommend making these before you try to duplicate the big rig.
I used the E-Z Lok 1/4-20 brass inserts. You can use thumb screws or knurled screws (as shown in the picture). Thumb screws are available at nearly any hardware store.
The special tool I used to screw in the brass insert is shown here, but some people may want a driver bit.
I rounded off the edges using a router table, but a sander can be used. The slot can be cut with a table saw or a small dovetail or gent's saw.
I didn't apply a finish yet, as I wanted to use them for a while. I can do that later. I used oak for these holders.
The parts can be purchased here. here. here or here and the T-handle wrench I used is available here.
Some tips:
Let me know if you have any questions.
get the screw in type or toggle anchors and they will be plenty strong. people hang TV's using these, even without studs.
if you can get one stud, they should provide enough resistance against the "pull out of the wall" force, even if the other side is only held in by drywall anchors.
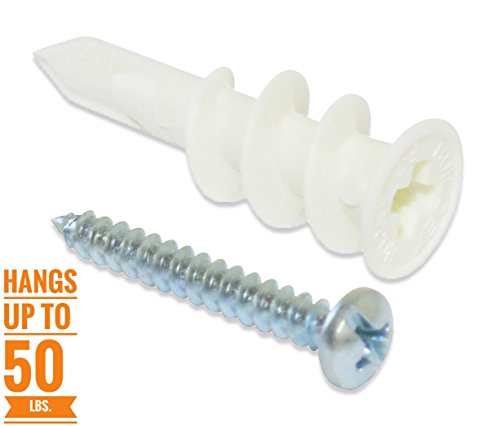
Don’t listen everyone freaking out about finding studs. If you have actual drywall and not plaster, then anchors are perfectly fine. I’ve had a 42” tv mounted to drywall for 8 years using 6 of these anchors because I’m German, and I like engineering overkill. Each one holds 50 lbs.
Just make sure you screw into studs next time, or use properly rated drywall anchors.
https://www.amazon.com/TOGGLER-SnapSkru-Self-Drilling-Glass-Filled-Fastener/dp/B0051IB6HW
Disclaimer: I work for the company that makes those, they are really awesome though.
you can find these amazon or ebay.
https://www.amazon.com/uxcell-2mmx4mmx0-5mm-Motherboard-Insulating-Washers/dp/B01ARADX88/ref=sr_1_1?s=hi&ie=UTF8&qid=1486171775&sr=1-1&keywords=insulation+washer+0.5mm
https://www.amazon.com/gp/product/B07CKH3HT8/ref=oh_aui_search_detailpage?ie=UTF8&psc=1
The other one linked is really pricey for what you get, this one is 2.5x as many for less. It's the kit I've got, it works really really well. Order this at the same time
I use them for tons of my prints now, put a small M3 screw into the knurled brass fitting and hold the screw with needlenose pliars in one hand. In the other, press your soldering iron into the hex hole in the top of the screw (should be a short screw). This will heat up the knurled fitting and help you put it in straight.
Here's a couple photos of a couple of project boxes I made
Have a look at the bulldog extruder. It has a much higher clamping force on the filament. It does require you to have Marlin or T3HD firmware installed.
https://www.amazon.com/gp/product/B07FDSHVCN/ref=oh_aui_detailpage_o02_s00?ie=UTF8&psc=1
It just works. There are a few gotchas that can be quickly resolved.
This should also allow you to easily print TPU
We use these to hang TV and speaker mounts (obviously one side in a stud). The bolt can be unscrewed and re-inserted without losing the end in the wall which is nice. I'm not sure if these can fit with your mounting bracket for the mirror though.
TOGGLER SNAPTOGGLE https://www.amazon.com/dp/B0051IARUE/ref=cm_sw_r_cp_apa_i_bHowDbY7PZCQ3
I was recently approached by a guitarist to build a Meathead Deluxe clone. I had never heard of this pedal before, but after some research I realized it was quite an iconic pedal. Its the same pedal used by Troy in Queens of the Stone Age.
This pedal, simply put, is a modern voiced Fuzz Face. It uses silicon transistors that are biased wide open for a rich crunchy grind. It is bigger and much more aggressive than your standard Fuzz Face. To quote the original designer of the pedal, "If you want a true vintage sounding Fuzz Face and purchase a Meathead, you wont be a happy bunny. The Meathead is supposed to break things."
I decided to use this build as an excuse to experiment with a few new build techniques. Screenprinting graphics is fairly cumbersome for just one off builds and I wanted a way to apply professional looking decals simply and effectively. Other DIY builders on the forums have been using Waterslide Transfers with impressive results... It was totally worth it. Its a very simple process and I think it looks very nice and tidy. I coated the transfer with a clear-coat once it dried for added durability. I would highly recommend this process to any pedal-builder. For better results, I think I need to wipe down the surface of the decal while it dries. I had a few water spots on the surface while it was drying that caused some minor dimples in the finish on this build.
I also wanted to find a better way to mount veroboard builds inside the case. With PCB builds, I typically design them to mount to the back of the pots and anchor in place that way, but its not always easy to do this with vero builds. I have seen some other guys use plastic standoffs in their builds and decided to try this for myself. These require a 1/8" hole to properly mount, so you will have to find a fairly empty "cut" to drill out in order to use these, but I think they worked pretty dang well. It makes the build look much cleaner in my opinion.
After the build was complete, I tried it out on my Bass. It was noticeably more aggressive than any of the fuzz faces i have tried in the past, but still sounded very musical. That being said, this is definitely a Guitar pedal. It sounds incredible higher up on the neck, but starts to lose some definition at the low E... Forget about even trying to play drop C with this on Bass haha.
The schematic I used can be found here
Sound clip can be found here
Picture of the cute little circuit
Gut shot here
(The photos are missing a resistor... Smallbear sent me 820K instead of 820R resistors so I had to wait another day for this to re-ship.)
Any kind of foam cut cut around the mounts/usb in the bottom of the case would help with that. I've heard sorbothane is really good but it's a bit pricey. Another popular solution that isn't foam is the shelf liner stuff usually used for kitchens.
You could use some of these and these
No OP, but they are called Threaded Inserts.
Available probably at any hardware store or [Amazon](E-Z Lok 400-4 Threaded Insert, Brass, Knife Thread, 1/4"-20 Internal Threads, 0.500" Length (Pack of 25) https://smile.amazon.com/dp/B00207NF6W/ref=cm_sw_r_cp_apa_i_2HLmDbKA5T2RF)
Depending on how much weight you're talking about hanging it's usually best if you can find a stud to directly screw into.
In absence of that being an option, self drilling drywall anchors are the next best option. You could use something like THESE to go directly to where the old smaller anchors it appears you have were at.
https://www.amazon.com/Hillman-370054-Toggle-16X3-Inch-50-Pack/dp/B000BD8MFQ
This would be my guess
I have this and it's pretty good.
There are others, but this one works very well.
Nut & Bolt Thread Checker (Inch & Metric) https://www.amazon.com/dp/B003FJW0GK/ref=cm_sw_r_cp_tai_4lnUCbTMAM5TT
Looks like the brass threads are something like this:
https://www.amazon.com/Z-Threaded-Insert-Internal-Threads/dp/B0026GZU0Q/
3/8" - 16 looks like the right threads, check with your faucet manufacturer though.
Tool this:
https://www.amazon.com/Z-LOK-Drive-Tool-Optional/dp/B00209X86W/
​
This is neat, but it does assume you have some tools to make the handles look good. You're resawing the wood with your table saw and getting accurate length cuts with a chop saw. These tools are expensive to own and take up a lot of space.
I think it would be really cool to have a wood laser to put a design on the handle, or I guess you could paint them with chalk paint and change them as you see fit. I will probably do this because I need some better labeling on my keezer.
I recommend Sorbothane (amazon link). It does a really good job at absorbing sound, and will make a world of difference in a aluminum tada case.
These are cheap, or you can order these and make whatever you like!
No problem!
If you plan on doing more than one, it's cheaper to buy them from amazon. Here's a 10 pack for $7.
I used this one https://www.amazon.com/gp/product/B0084EXBFA/ref=ppx_yo_dt_b_asin_title_o00_s00?ie=UTF8&psc=1 I pasted all of it to the case, then used an exacto knife to make it fit well.
Here's an amazon link if you want to make your own for the inserts.
Taken from /u/janisco 's DIY page on his website that linked here.
It goes inside/in the bottom of the case. It's sandwiched in between the case and pcb. Link here- https://www.amazon.com/gp/product/B0084EXBFA/
I've been meaning to shoot a typing video so people can hear the difference. I have it installed in the exact same case you used for your build and it sounds 100X better.
$30 on Amazon, no work required.
http://www.amazon.com/gp/product/B003FJW0GK/ref=oh_aui_search_detailpage?ie=UTF8&psc=1
I'll chime in... had my kit for about 2 weeks now and will share my experience:
Tools
If you don't have some of these, I HIGHLY recommend them.
Assembly isn't too hard, and the directions are pretty good. My main complaint with the directions is that sometimes they don't explain what's important and not important all the time. I spent a lot of time building, taking apart, and rebuilding the base y-axis frame because I thought I did something wrong (it wobbled) to find out that you fix that wobble as one of the last steps.
The 100mm distance that you're required to thread double nuts early in the assembly is absolutely critical by the end of the build for many different reasons. It would be nice if prusa included some kind of printed spacer to make that step foolproof.
Again, assembly is straightforward. I took a span of 3 days to finish mine while dedicating a few hours each night to do it.
Upgrades
A couple of things can be improved on the printer. The printer isn't terribly noisy, but you can make it damn near silent with a few upgrades.
E-Z Lok 400-6 Threaded Insert, Brass, Knife Thread, 3/8"-16 Internal Threads, 0.625" Length (Pack of 10) https://www.amazon.com/dp/B0026GZU0Q/ref=cm_sw_r_cp_apa_i_xrhzDbXQKTEEM
These are far better than t nuts, granted I don't know if this is the right size. Search for knife treaded insert of the size you need.
DONE!
I've looked into the same thing about a year ago and came to the conclusion that sorbethane was really good for this. Something like https://www.amazon.com/dp/B019GBG97Q/ref=asc_df_B019GBG97Q5260449/?tag=hyprod-20&creative=395033&creativeASIN=B019GBG97Q&linkCode=df0&hvadid=198070661729&hvpos=1o2&hvnetw=g&hvrand=13695881069556684324&hvpone=&hvptwo=&hvqmt=&hvdev=m&hvdvcmdl=&hvlocint=&hvlocphy=9028725&hvtargid=pla-320231501911
The mounts themselves are nice, but I do recommend getting better wall anchors, the ones they give you are shit. I ordered and used these.
I use the washers from the link below. If you want to pay 3 or 4 bucks more and get prime shipping click the other listings and select the one with prime. Not sure if they are the best buy they seemed to work fine for me.
https://www.amazon.com/dp/B01ARADX88/
based on the url I'm betting he was referring to these.
One of the other posts recommended something like this which would also be a good choice.
Most electronics if imperial use 4-40. Aka #4 diameter 40 threads per inch.
If you are a metric guy M2 M3 M4 are 2mm, 3mm and 4mm respectively. Here is a stand off kit that has a lot of size screws stand offs and nuts for metric since you are canadian. Hilitchi 360pcs M2 M3 M4 Male Female Brass Spacer Standoff Screw Nut Assortment Kit https://www.amazon.com/dp/B013ZWM1F6/ref=cm_sw_r_cp_apa_zDjyxbVD15PA6
AV installer here. A single stud is just fine for a tilt mount it will hold the weight and then some. And frankly you don’t need the 4 additional bolts. Bolts a drywall don’t mix you need drywall toggles and one on each side. The toggles are simply keeping the mount from rotating the strength is on the stud.
These are what I’m talking about:
https://www.amazon.com/TOGGLER-SNAPTOGGLE-Zinc-Plated-Channel-Fastener/dp/B0051IARUE/ref=asc_df_B0051IARUE/?tag=hyprod-20&linkCode=df0&hvadid=312360540451&hvpos=1o2&hvnetw=g&hvrand=10502080946968211216&hvpone=&hvptwo=&hvqmt=&hvdev=m&hvdvcmdl=&hvlocint=&hvlocphy=9060467&hvtargid=pla-641936376392&psc=1
Huey from Top Clack has used this and did a typing video. It cut down the sound quite dramatically.
I had mine go out on two different Bronco's I just went to Pull-A-Part and ripped another one from there, took it apart and replaced the little plastic spacers. They have the spacers at autozone, and i did have to grind them some but they worked great. I also suggest getting some Wago clips for the wires, it makes the install and removal a lot easier.
​
https://www.amazon.com/Wago-221-412-221-413-221-415-Assortment/dp/B018MGMFDI/ref=sr_1_3?ie=UTF8&qid=1542299192&sr=8-3&keywords=wago+clips
​
https://www.amazon.com/Dorman-747-412-Window-Lincoln-Mercury/dp/B002ZTIKF6/ref=sr_1_1?s=automotive&ie=UTF8&qid=1542299151&vehicle=1990-54-633-646--30-11-8-1773-1017-8-2--142-1-0&sr=1-1&ymm=1990%3Aford%3Abronco&keywords=plastic+window+motor+replacement
Switch out the wire nuts for wago lever nuts..they take up a lot less space
Wago (25) 221-412 (25) 221-413 (25) 221-415 Lever-Nut Assortment Pack
https://www.amazon.com/dp/B01ARADX88/ref=cm_sw_r_cp_api_1kZOzbQM0QCEJ
I used these and they're the perfect size for the screws in the screw in stabilizers. They're for motherboards so this is their intended purpose.
I make and install curtains for a living, this is my time to shine!
First things first, other posters are correct that you’re going to need to patch the drywall and use drywall anchors for your next attempt. Do not use any of the screws or anchors included with the curtain rod, you need to get the right hardware for your wall which probably means longer screws as well as better anchors. These are the kind of drywall anchors we use.
I assume you’ve got premade curtains, which comes in standard lengths. The previous tenants probably did the same, so it’s very likely that all the drywall in that specific rod height is majorly compromised. Is there any way you can hang your rod higher or lower and hem your curtains? Anchoring your rod into undamaged drywall (or even better, try to find the studs or header on either side and top of the window) and attach your brackets into that.
Lastly, do you have enough brackets holding up your curtain rod? We always include a center support bracket if the rod is wider than 60 inches. This helps distribute the weight better and keeps your curtain rod from sagging.
Hope this helps! I could give you a few more tips, but I’d need to see the kind of curtain hardware you’re using and the window you’re trying to hang it onto.
Did a similar process for the lightsaber tap handles.
We use THESE when installing heavier drapery rods that can't be attached to a stud. Very sturdy, easy to work with, and removable in the future.
I've had this issues with a towel bar last summer. What I think you'll end up finding out when you disassemble the unit is that the screws that hold the bar into the wall have shifted or moved.
It's a big issue with towel bars because the weight of the towel(s) cause it to deform over time.
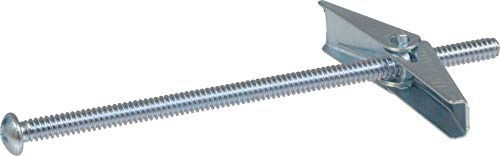
I fixed it by unscrewing both ends of the units and removing the screws that hold the bar to the drywall and reinstalling it with toggle bolts (see: http://www.amazon.com/Hillman-Group-370054-16X3-Inch-50-Pack/dp/B000BD8MFQ/ref=sr_1_2?ie=UTF8&qid=1453079586&sr=8-2&keywords=toggle+bolt). The toggle bolt will make sure that it won't shift over time, and it's super sturdy!
If it was critical, a professional would probably have that bolt called out in a drawing somewhere. If not, these come in handy - essentially an organized version of trying different screws until you get the right one. Completely legitimate method - just be careful to not cross thread.
In my opinion, 90% of the standing desks are pretty much identical. They're all sourcing no-name, Chinese made legs and electronics (the legs are literally all over Alibaba). Even the tops are likely sourced from a handful of the same companies.
I bought legs from Automonous.ai and handmade a top (I'm into woodworking so it was a fun project for me). The legs looks like nearly everything that every other standing desk company is offering.
If you're half-way mechanically inclined: buy the legs from wherever you can find a good price. Go down to ikea and buy one of their tops. Screw the legs to the top.
The only thing you'll need to watch is making sure you don't strip the screw from the wood. I, personally, put in some threaded inserts to reduce the chances of rip out. Something like this: https://www.amazon.com/E-Z-Threaded-Hex-Flanged-Internal-Threads/dp/B002KT43MU/ref=pd_sbs_328_2?_encoding=UTF8&pd_rd_i=B002KT43MU&pd_rd_r=STWHEH78NZ223Y0N8MPY&pd_rd_w=5TO6r&pd_rd_wg=1zLyj&psc=1&refRID=STWHEH78NZ223Y0N8MPY
3/8"-16 Internal Threads, 0.625" Length
If you google around, the hardest thing about the insert is getting it straight, which, if you don't have access to a drill press, is problematic. As madmatt suggested, a way around this is to drill a slightly bigger hole than needed, add some JB Weld and then add the insert into your handle, place on your faucet, straighten and let cure.
NOTE: You need to close the top of the insert so weld compound isn't getting into the inside of your thread -- you can superglue a circle of some aluminum sheeting or similar to the back hole to close it up. And, generally, just be careful -- you want to weld the insert into the handle, not to your nice shiny perlicks.
Why wouldn't you ever be able to disassemble it? If you back the screws out to disassemble it, the holes will still be good. Depending on the hardness of the wood and how rough you are with it will determine how many times you can re-use the holes -- and even if the threads chew up the wood, it's really easy to just drill out the hole and glue a new hardwood dowel in and then start the process again by predrilling holes into the dowel.
Alternately, a threaded insert will let you screw something into the wood once and from that point forward you're screwing into metal. It'll last a lot longer, but you'll have to get different screws to attach the pedestal to the surface.
Great questions.
Yes, I found these great brass knurled thumb screws https://www.amazon.ca/gp/product/B005RTF0NQ/ref=ppx_yo_dt_b_asin_image_o03_s00?ie=UTF8&psc=1 and threaded inserts https://www.amazon.ca/gp/product/B00207NF6W/ref=ppx_yo_dt_b_asin_image_o00_s00?ie=UTF8&psc=1 for the pivots. I thought about a soild pin but that may interfered with anything larger than a letter.
The inner top corners and bottom back panel are angled to give swing clearance from the outer box.
I played with lots of wood blocks and inner catch ideas but settled simply on 2 small brass nails that I insert/remove to mount the outer box to the wall. The are definatly strong enough to prevent it from "over opened".
I ended up spending a lot o time finding the right pivot point but found a place where its nicely balanced. Its stays shut when its shut and open when its opened.
I really do hope someone makes new/updated sliders and housings - it would be a game changer!
No problem at all - we are all here to help out and tweak the shit out of our boards :-) These are also available on Amazon.com but I bought one of these and two of these. I actually like the thicker one better and its more useful considering the size and length. If you do end up getting them, feel free to make a post or send me an update as I'd like someone else's take on Sorbothane!
I use a combination of these into the stud and or in the void for everything from my mounted Tv's to a bike rack.
For the stud portion of your mount:
FastenMaster Headloks
https://www.amazon.com/gp/aw/d/B001OEJULG/ref=mp_s_a_1_1?ie=UTF8&qid=1497897416&sr=8-1&pi=AC_SX236_SY340_QL65&keywords=lag+screw+spider&dpPl=1&dpID=317en472JRL&ref=plSrch
And these in the void between studs:
Toggled SnapToggler
https://www.amazon.com/gp/aw/d/B0051IBBUE/ref=mp_s_a_1_1?ie=UTF8&qid=1497897314&sr=8-1&pi=AC_SX236_SY340_FMwebp_QL65&keywords=toggle+bolts&dpPl=1&dpID=410A7FjjAcL&ref=plSrch
Can't speak for the Heavy-6 but I used a single layer , 0.125" thick, 4.5" x 12" sheet on my norbaforce.
I would recommend starting with a fairly thin sheet like this: https://www.amazon.com/gp/product/B019GBG97Q
And trimming to the correct size. You can always add another layer on top if needed.
Yep, that's the one (it's partially put together on my kitchen table right now). I'll tell what I bought and let you decide what to get (I overbought since I have nothing to start with). Keep in mind that I am completely new to the RC hobby and this is my first quadcopter build.
laptop screws for the motors
nylon spacer kit
Nylock nuts for the props
Velcro straps
XT60 connectors to make power lead
Wire to make power lead
zip ties
heat shrink
Like I said I overbought but I think this will work for me (for example my batteries have an XT60 connection).
Some other stuff I got because I'm a newb and want my quadcopter to light up the sky:
Helping Hands Magnifier -> this works very well
Learn to solder kit -> it helped me
Pretty lights
Start figuring out a clamping solution. The kit doesn't come with anything to hold your work in place. In my experience the double sided tape is awful. If/when the tape fails you'll break a lot of parts on your machine.
I'd recommend setting up your waste board with these inserts and buy a bunch of these clamps
I got that advice too when I asked around during my own tap handle project and after checking around a bit more, I don't think it is correct, at least not for these inserts which are a little different that the ones in that video.
OP /u/darthKOTOR correct me if I'm wrong, but it looks like you are using these inserts, and the manufacturer makes a drive tool that very clearly is designed to insert them with the slots facing out. (Though the method OP uses with the bolt and two nuts drives them much better).
I took a photo at the time illustrating how different the two threaded inserts are. On the right, just one from Home Depot like in the video you linked, and the left is the E-Z Lok brand. Note how different they are. I can definitely see the HD type variety having the slot pre cut the threads like in the video you link, but in the E-Z lok brand, the threads don't even cross the slot in the same way so they don't really work like that.
You don't need studs. I installed mine in drywall using these they are amazing and super easy to use. All I need is a little spackle to patch up the holes when I leave.
If you want something snapcap-like to stick in the chamber of a .22LR so you can dry-fire without hurting the firing pin or chamber, get a box of 4-6-8 X 7/8-Inch Plastic Screw Anchors.
It takes the same 10s of shots to ruin the rim on them as "real" .22 snapcaps that cost an order of magnitude more, it's soft enough that even if you really fuck up nothing will get hurt, and they'll usually even feed from a magazine.
I got the nylon mounts from Amazon
That kit might be a little bit of overkill, but I figured I'd use the parts. Sadly, I used 8/10 of the 6mm spacers, 4 screws, and 4 nuts. Maybe I'll use the rest on a different build eventually.
I have some build pictures here. You can see what they look like (Picture 8 is a great one).
These type of plastic anchors might be a solution to pressure dings from hard turns or knees or however they originate. The anchors would distribute the pressure down into the foam, instead of the pressure only being at the surface. Pressure dings can lead to delaminations.
Does anybody make surfboards using polyisocyanurate closed cell foam?
https://smile.amazon.com/Hillman-370326-Ribbed-Plastic-100-Pack/dp/B000H5WVCS?sa-no-redirect=1 these look good, I will probably get them
I'd make the dealership deal with it since they fucked it up in the first place.
But if your dead set on figuring it out yourself head to your local hardware store. I'm talking like your local joint like an Ace or something small along those lines, not a big box store. Pair up with one of the staff and take their thread checker out to the vehicle and figure out what size threads your looking for. Alternatively bring in an existing dash bolt that fits and check it in store. Then buy the hardware you need.
These work great and are easy to use, just screw in the anchor then the provided screw
https://www.amazon.com/Drilling-Drywall-Plastic-Anchors-Screws/dp/B01FCZ8I3I
I think this is very similar to the insert used on the original build.
I have a few boxes of misc nuts and bolts, which happen to include M3x20 (it's a fairly common size)
Something like this: https://www.amazon.com/Hilitchi-210pcs-Stainless-Socket-Assortment/dp/B014ONCP88/ref=sr_1_1?ie=UTF8&qid=1468998197&sr=8-1&keywords=m3+assortment
if you cant find studs, look into using these.
https://www.amazon.com/TOGGLER-SnapSkru-Self-Drilling-Glass-Filled-Fastener/dp/B0051IB6HW/ref=sr_1_15?ie=UTF8&qid=1468292016&sr=8-15&keywords=wall+anchor
I once had my Super Star Destroyer and an older X-wing and Tie on there.
I haven’t done it, but some people apparently put these in their gun to act as snap caps when dry firing.
The Hillman Group 370326 Ribbed Plastic Screw Anchor, 4-6-8 X 7/8-Inch, Yellow, 100-Pack.
The advantage to using these would be that The majority (all?) of “real” 22LR snap caps will eventually get dented from Firing pin strikes to the point that they are no longer serving the intended purpose. These screw anchors are disposable, so you just toss them when the rim becomes dented from your firing pin.
>Sorry I can’t check my build immediately for exactly which standoffs I used; but here is the link to the set I bought on Amazon: https://www.amazon.com/dp/B013ZWM1F6/ref=cm\_sw\_r\_cp\_api\_i\_Ux7sDbQAW6TGZ
>
>I’ll try to check tomorrow and see if I can be more exact!
Tks !!
You can. It would be more affordable going that route. Rather than getting a kit online which you will probably never need to use the whole kit in the long run. https://www.amazon.com/Hilitchi-360pcs-Female-Standoff-Assortment/dp/B013ZWM1F6/ref=mp_s_a_1_4?keywords=pc+standoffs&qid=1565024872&s=gateway&sr=8-4
They aren't drilled into a beam, I used anchors with the hooks. They're great and will ensure the hook wont go anywhere!
Sorry I can’t check my build immediately for exactly which standoffs I used; but here is the link to the set I bought on Amazon: https://www.amazon.com/dp/B013ZWM1F6/ref=cm_sw_r_cp_api_i_Ux7sDbQAW6TGZ
I’ll try to check tomorrow and see if I can be more exact!
You can use larger anchors like these:
https://www.amazon.com/HomeDone-Drywall-Anchor-30-Pack-Self-Drilling/dp/B01KVTW7H8/ref=sr_1_6?s=industrial&ie=UTF8&qid=1510633742&sr=1-6&keywords=drywall+anchors
OR Toggle Bolts like these:
https://www.amazon.com/Hillman-370054-Toggle-16X3-Inch-50-Pack/dp/B000BD8MFQ/ref=sr_1_4?s=industrial&ie=UTF8&qid=1510633819&sr=1-4&keywords=toggle+bolts
Get this or something similar: https://www.amazon.com/Hilitchi-210pcs-Stainless-Socket-Assortment/dp/B014ONCP88/
Theres a bunch of mods that require various sizes of m3 screws, having a variety pack around great.
screw set.
Probably could use either. The recommended ones fit right into the heat sink fan, another set might sit over the fan and need to be a little longer?
Above is a simple kit.
You need these or these.
Just go directly into the sheetrock and I like to use the "screwable" anchors like these:
https://www.amazon.com/Drilling-Drywall-Plastic-Anchors-Screws/dp/B01FCZ8I3I/ref=zg_bs_6906598011_3?_encoding=UTF8&psc=1&refRID=XG17A75N5E2MX0RSWBGE
They're super easy to install and no need to drill.
Those are good bolts, you need to hold them so they don't spin while being tightened. Use a manual screw driver, not electric. You might find toggle bolts easier to use. The trick is to tighten them enough to hold but not so much that they crush the plaster. Patch the old holes and drill the new ones at least 50mm away. The weight is limited by the strength of the plasterboard. I wouldn't want to do more than a few kg on a ceiling. If you drill and bolt straight into the metal studs it can hold way more.
Maybe you've already thought of this, but it's possible you're hitting a screw or nail. I know you said the stud finder doesnt say metal is there.
Do you face the same issue if you move the installation up/down 3 inches? Are your curtains light enough to use these drywall screws?
(not moly screws.... Dont ever use molly screws).
Edit: still trying to figure out formatting in Reddit
These might work TOGGLER SNAPTOGGLE BB Toggle Anchor, Zinc-Plated Steel Channel, Made in US, 3/8" to 3-5/8" Grip Range, For 1/4"-20 UNC Fastener Size (Pack of 50) https://smile.amazon.com/dp/B0051IARUE/ref=cm_sw_r_cp_apa_i_0Z2IDbA64HQE7
Plaster also has lath behind it which was used as something for the plaster to grab onto. Thin pieces of wood that span the studs. If you use the zip anchors I posted above then they would grab the lath from behind using the wood as an anchor.
Tough call though cause if you somehow don't hit the lath your plaster is going to pull right out in a big chunk when you mount the object.
If you often play guess the thread one of these is pretty handy.
https://www.amazon.com/Bolt-Thread-Checker-Inch-Metric/dp/B003FJW0GK/
If not, go to the hardware store and get some metric and see fasteners in that diameter range to test fit.
Most likely a coarse thread.
I do a lot of offgrid dc electronics projects and was looking at printing some of these: https://www.thingiverse.com/thing:2668159
In the description they claim the [little brass standoffs] (https://www.amazon.com/dp/B013ZWM1F6/ref=cm_sw_r_cp_apa_i_fqHBDbGZPT11F) can do 15-30A (also if you read the comments). Have you looked into/tried anything like this vs your suggested spacer?
You have to really watch those cables under your Mini. They can bump into the belt easy.
I just printed the following; you will also need some screws.
https://www.thingiverse.com/thing:2302588
https://www.amazon.com/dp/B014ONCP88/ref=cm_sw_r_sms_c_api_l3BkzbJ4XBJ9Y
https://www.amazon.com/uxcell-2mmx4mmx0-5mm-Motherboard-Insulating-Washers/dp/B01ARADX88/ref=sr_1_1?s=hi&ie=UTF8&qid=1486171775&sr=1-1&keywords=insulation+washer+0.5mm
If they sell out before you order them, I could send you some of mine.
Questions about liner material and lube...
For liner material, what acoustic differences am I going to find between: neoprene, sorborthane, and rather generic looking "foam" rolls? They're all pretty much the same thickness, about 2-3 mm.
For lube, I'm looking at: Permatex dielectric grease, krytox 205 grade 2, trybosis 3204 and trybosis 3203. What would be good for stabs, what would be good for linears, and what would be good for tactiles? And if possible, is there anything that's a good "all-arounder"? Aka, something that could easily work for both stabs and switches.
Those are garbage. Throw them away. Get something like these instead.
https://www.amazon.com/dp/B01FCZ8I3I/ref=cm_sw_r_cp_awdb_t1_inmwCbW1JC7Z6
You don't really need to find studs for mounting the lighthouses, although that is the simplest installation. Since the lighthouses are fairly light, drywall anchors similar to these will be more than strong enough to hold them if the ideal location doesn't happen to be near a stud.
Here are some on Amazon, Prime-eligible. I'll probably get a larger batch too, but these are relatively cheap to play with and they get here fast. :-)
I've found them a bit hit and miss, I used them on drawer handles, which may not be the ideal use case. One of 5 has already come loose. I tried to fix by shoving PLA fibres after it and melting a rim around, but no joy.
The surface area of the grip part is very small on the ones I have, and also the lines down the edge run lengthways, where if they have been crossways they'd have been like knurling adding some grip.
I got mine on amazon and ebay. https://www.amazon.co.uk/M3x5mm-Metric-Threaded-Insert-100pcs/dp/B00Y20YLKY/ref=sr_1_6?ie=UTF8&qid=1539132205&sr=8-6&keywords=threaded+inserts
I've started to (where possible) build little enclosures for nuts instead. It's a lot more hassle and less fun.
Any tips on the inserts welcomed (I bought a bloody load of them)
I'm not sure if there are other manufacturers or not, but E-Z lock makes those - here on amazon. Those looks like their inserts for "soft wood" whereas they have knife thread inserts for hardwood. Reviews seem to indicate that the softwood ones do well in hardwood anyway and are about 1/4 of the price.
I've used these to replace plastic anchors holding a couple of towl racks to the wall. they have a larger diameter than the plastic anchor hole and so far have held up well.
I'm not sure of the brand of the insert but it's the kind with knife threads. I made a simple inserter tool with a 3/8" bolt.
Get some nylon standoffs like these - whatever size you want, but you need the ones that are male on one side, female on the other. Most quad stores sell these as well, I know Hobbyking sells them in bags of 10 for a buck or two.
The male ends of the screws are just wide enough that they'll jam into the little tracks you see in the FC well of the frame coming in towards the center diagonally from each corner. A little bit of glue will keep them there. Mount your FC on those.
If you use some medium sized standoffs, you can make use of the space under your flight controller to tuck away your wiring.
You can mount it directly, but should use stand offs. https://www.amazon.com/dp/B00R4ZT1FY/ref=cm_sw_r_other_apa_i_dxvPDbXGHQF41
If I were you I'd go with something like this:
https://www.amazon.com/dp/B07GYRQVJF/ref=cm_sw_r_cp_awdb_t1_uBS2Db90R31CG
As there isn't studs, anything that protrudes from the wall is applying alot of pulling force to any of the top screws. The wider mount keeps it close to the wall and gives you a much larger surface area to mount the hell out of the tv.
Id also use something like these:
https://www.amazon.com/Drilling-Drywall-Plastic-Anchors-Screws/dp/B01FCZ8I3I/ref=mp_s_a_1_4?keywords=drywall+anchors&qid=1574619039&sprefix=Drywall+an&sr=8-4
These are to give a bit more reliant hold to the drywall, not fantastic, but with enough of these (like 8-10 of them) with a static tv mount, you should be fine.
This all does depend on the weight of the tv and any angle you have the TV mounted at though.
I screwed these into the top:
E-Z Lok Threaded Insert, Brass, Knife Thread, 1/4"-20 Internal Threads, 0.500" Length (Pack of 25) https://www.amazon.com/dp/B00207NF6W?ref=yo_pop_ma_swf
Then I put 1/4 inch hex bolts through the holes in the legs into those inserts in the top. If the wood expands - which it would do widthwise, not lengthwise - the bolt has room to move within the hole in the leg so that it doesn't crack.
https://www.amazon.com/Hillman-370326-Ribbed-Plastic-100-Pack/dp/B000H5WVCS
Long thread incoming
We're working on resorting our hardware now, but the goal is:
If you're looking to sort your current hardware, it will take a while. This took me two weeks of 3-4 late nights in the lab after finishing my work for the day, and that was just our random bin. Still have washers to sort, as well as the fasteners already in our rack of drawers.
That being said, I'd highly recommend getting a thread checker to accurately distinguish between different fasteners. BoltDepot.com has a lot of info on fasteners as well as printable fastener sizing charts (really useful for sorting washers).
Best of luck!
Shelf liner gets recommended a lot
Sorbothane is the good stuff though: https://www.amazon.com/Isolate-Sorbothane-Acoustic-Vibration-Damping/dp/B0084EXBFA/ref=sr_1_12?s=hi&ie=UTF8&qid=1481766863&sr=1-12&keywords=sorbothane+sheet
I've been working on this table project for a little while now, and now just need to fasten the legs to the table tops. One issue that that these raw oak slabs were never planed more than the rough cut from the tree, so their fairly uneven, and even bow a little (don't think it shows in the pictures, though). For that reason, I need a way to level the legs so that the tables don't rock once their finished. Shimming the plates with washers should be easy enough to get the table level, but I'll need machined threads to run the fasteners into and out of (and then into and out of again) so that they'll still hold once it's all said and done. I've looked at a few different options for this problem, but aren't convinced any of them are ideal. T-nuts would work, but I think they might pull out since they won't be held in from the top of the table surface (not interested in that industrial look). These threaded inserts and these similar ones would seem to do the trick, but the reviews raise questions about the strength of the material in dealing with hardwood, as well as problems with the material stripping while trying to place them. Anyone have any suggestions/advice?
TLDR: Looking for fastener solutions to affix table legs to the underside of an oak slab that will allow adjusting to level the table.
yeah, since asking, I've realized I will likely need to just do that.... also: thread checkers... holy cow. something like this... I could keep this in the shop no problem. at first, I thought you were talkingg about the boards I've seen - hadn't seen one like this before... too cool.
These switches in most cases (I won't say all because I don't know) work without the network. If I unplug the hub it's connected to it will still turn off/on/dim at the switch.
Before I paired it with my Wink after the install I turned the switch on/off dimmed my lights worked great.
When I flipped my breaker on and off it remembered the last setting the switch was on even. (I'll test all this again tonight and edit if I'm telling you wrong)
If you're asking about reliability I'm not sure, these switches are all pretty new. My Leviton one has a 5 year limited warranty but who knows how long it will really last, which would be a shame considering how expensive they are!
One thing I did do in my house when I wired these up was bought some Wago Lever Nuts (https://www.amazon.com/Wago-221-412-221-413-Lever-Nut-Assortment/dp/B018MGMFDI/ref=sr_1_1?s=electronics&ie=UTF8&qid=1479411696&sr=8-1&keywords=Wago+Wire+Nuts) that way if I sell my house I can pull my switches easily and don't have to worry that I may be cutting my wires too short. But also if my switch does blow up at least it will be easy to replace.
Sure thing!
A lot of these were purchased on Amazon for this build, but I do a lot of electronics tinkering, and I usually grab this stuff from Aliexpress and just wait the 3-6 weeks for it to arrive in the US. I had one Pro Micro on hand, but needed two, so I just got the 3 pack from the Amazon seller below:
Pro Micros
https://www.amazon.com/gp/product/B01HCXMBOU
Bumpons
https://www.amazon.com/gp/product/B01ACPT2LU
M3 Inserts
https://www.amazon.com/gp/product/B00Y20YLKY
Female Micro USB Breakout Boards
https://www.amazon.com/gp/product/B0183KF7TM
RJ9 Adapter Kit (these can be gotten cheaper, but I needed them fast)
https://www.amazon.com/gp/product/B072HXNW3F
RJ9 Coiled Cord
https://www.amazon.com/gp/product/B076J83H83
Silicone Hookup Wire (good looking and easy to work with)
https://www.amazon.com/gp/product/B073RD76QD
Female Headers (just snap off and sand the broken edges)
https://www.amazon.com/dp/product/B01DLX6RSQ/
More details in the imgur album, but here's a quick synopsis:
After having my kegs stuffed in a fridge with picnic taps, I decided it was time to build up a proper keezer. I already had kegs, lines, CO2 tank and regulator. So it was a relatively inexpensive project, aside from the freezer itself.
Here's the build list:
Already had:
The build:
Most of the build was pretty straight forward. Make a box, drill some 7/8" holes in the box, etc. Adding the insulation foam was kind of a pain and got little foam pebbles ALL over the place. The aluminum tape really helped to keep the foam from breaking off inside the kegerator, and makes the rough cut edges look nicer. And on a functional side, should seal off air gaps and make cleanup easier.
I ended up picking up some blind nuts that have the same thread pattern as the taps. They were about 5 bucks on Amazon for 10. You simply drill a hole in whatever you want to make a tap handle out of and thread in the nut. I took some leftover pine and walnut scraps and glued them up. The nuts are a challenge to get in straight, which took a few tries.
The drip tray was a challenge, mostly because the drip tray itself was not perfectly square. I measured the tray and mistakenly assumed it would be square. But once I built the box it was obvious it bowed out a little on the sides. Some amount of cursing and smashing with a hammer later got it close enough. I attached the whole assembly to the front with construction adhesive after roughing up the paint with some sandpaper.
$6.56 for a pack of 100 :D
oops they're not plastic
I use these 2 options for my 3D printed taps. Id do a few tests to see what diameter hole gives you the best fit. Make sure you leave enough body around the holes so you dont crack the handle.
​
AJS Beer Tap Handle Standard Ferrule and Hanger Bolt : I use a 3.9mm ⌀ x 23mm hole with at least 3 walls and glue.
​
E-Z Lok 400-6 Threaded Insert, Brass, Knife Thread, 3/8"-16 Internal Threads, 0.625" Length : I use a 7.4mm ⌀ x 17mm hole with at least 4 walls and glue.
I would suggest if you use screw in stabs to use a set of paper washers. I used the following with my build. https://www.amazon.com/gp/product/B01ARADX88/ref=ppx_yo_dt_b_search_asin_title?ie=UTF8&psc=1
This stop's them from shorting out the board. Its not always a issue but having to desolder ever switch makes 7 bucks worth the piece of mind.
use threaded inserts instead of trying to thread into the print it's self. I use these: https://www.amazon.com/gp/product/B00Y20YLKY/ref=oh_aui_detailpage_o01_s01?ie=UTF8&psc=1
Just look on Amazon for threaded inserts in what ever size you want. I am using the ones I posted along with nylon screwed so I'm not conducting electricity from what ever I am fastening down. I do have stainless steel ones I use too for parts that need a stronger fastener.
Check out this post from 3Dhubs on threaded inserts: http://www.3dhubs.com/knowledge-base/how-assemble-3d-printed-parts-threaded-fasteners
I suggest these instead. Winston Moy makes some good points about using these in the added video.
https://www.amazon.com/gp/product/B002KT43MU/ref=oh_aui_detailpage_o06_s00?ie=UTF8&psc=1
https://www.youtube.com/watch?v=kcdAnUnX59s
Well, I bought these, I'm going to pursue setting them up in the next couple of days.
To kind of separate my post from your questions here are just some recommendations when kegging.
if i think of anything else, i'll update or make another post.
EDIT:
here's a post i made a while back of one that I made. You can see some more on the bottom left that I made as well. https://www.reddit.com/r/Homebrewing/comments/4mz9tk/i_enjoy_making_tap_handles_and_made_this_one_for/
Hex drive threaded insert:
https://www.amazon.ca/gp/product/B002KT43MU/ref=s9_acsd_top_hd_bw_bCvuKgN_c_x_w?pf_rd_m=A1IM4EOPHS76S7&pf_rd_s=merchandised-search-11&pf_rd_r=1J9NGMDV17VNYSRTXD0J&pf_rd_t=101&pf_rd_p=14a4ac83-e830-5b74-a48f-8a1412c67169&pf_rd_i=11849271011
Connector bolt:
https://www.homedepot.ca/product/paulin-1-4-20x1-5-8-joint-connector-bolt/1000155731
​
Make sure whichever ones you get have matching threads
You're going to need this power cord for the imax b6 charger, for whatever reason they don't sell the power cord with the charger. http://amzn.com/B009VDPNXQ
You should also get this battery for your transmitter http://amzn.com/B00JERJZSS
Definitely invest in a voltage checker, this thing is invaluable in the field, if you discharge your batteries beyond a certain point they go bad, I've had two die on me so far because I let the voltage get too low. http://amzn.com/B00EXPPF80
You need some kind of power distribution board, to distribute power from your battery to the rest of the craft, something like this http://amzn.com/B00GQOZZUY
You will need these servo wires to connect your receiver to the kk2 http://amzn.com/B00P6JJFIS
These nylon standoffs will be really handy when you mount your flight controller and PDB (power distribution board) to the frame http://amzn.com/B00LGB2N1Q
Random stuff from the hardware store: Liquid tape, electric tape, big zip ties, little zip ties, velcro
That's probably not everything but you will be flying a lot sooner with all of this stuff
Is there a reason why something like this: https://www.amazon.com/Hillman-370054-Toggle-16X3-Inch-50-Pack/dp/B000BD8MFQ/ref=sr_1_5?ie=UTF8&qid=1510756607&sr=8-5&keywords=toggle+bolts
won't work?
These can hold a remarkable amount of weight.
Here is the mobile version of your link