Best faucet parts according to redditors
We found 384 Reddit comments discussing the best faucet parts. We ranked the 233 resulting products by number of redditors who mentioned them. Here are the top 20.
We found 384 Reddit comments discussing the best faucet parts. We ranked the 233 resulting products by number of redditors who mentioned them. Here are the top 20.


I recommend the Oatey Set-Rite
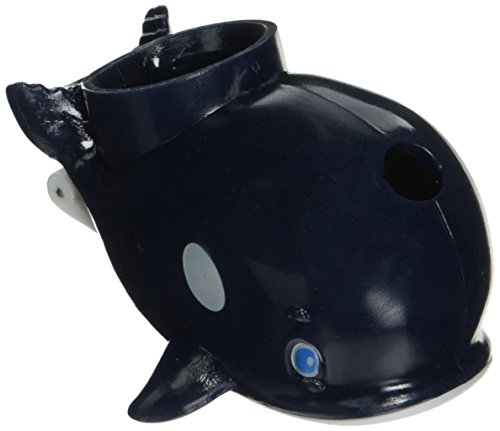
http://www.amazon.com/JOKARI-Jokari-Whale-Faucet-Fountain/dp/B0019TUKV0/ref=pd_sxp_f_pt
Something like this has been around forever, I had one as a kid. It works great.
Here you are. Years ago Chick-fil-A gave away something like this in their kid meals. We used it for years. These things are honestly pretty handy.
if you’re interested in buying one
you can get a sink hose nozzle adapter if you would like to use a hose:
https://www.amazon.com/Multi-Thread-Garden-Adapter-Female-10513/dp/B008M6KFD6/ref=sr_1_7?crid=8K7470NSMC5P&keywords=sink+hose+adapter+to+garden+hose&qid=1567541768&s=gateway&sprefix=sink+hose+adapter+%2Caps%2C335&sr=8-7
When I wash my face, water runs down my arms, it splashes out of the sink and it goes everywhere. I laid towels around the basin, stood on a bath mat... And I was still getting water everywhere. Which means eventually, my bathroom cabinet was going to warp or the subfloor would get damaged. (Which is actually a problem we already have had, from the previous owner having the same problem.)
This turns out to be an engineering problem. My face is above the faucet because I'm taller than the sink. The water flows downwards because the faucet points downwards. I have to scoop water in my hands upwards to my face, but my hands are not great scoops, and most of the leakage/splashing is draining down my forearms. By redirecting the water, I can keep my hands mostly out of the equation and limit the splash/leakage.
My sibling has a Jokari Whale Faucet Fountain for my niblings when they're brushing their teeth. It just slips onto the faucet and creates a bubbler. It tolerates warm water well, comes off easily -- very useful for shared spaces -- and is easy to clean. I turn on the faucet, then just lean my face into the stream to rinse.
And for six bucks, I no longer have water everywhere!
https://www.amazon.com/gp/aw/d/B0019TUKV0/ref=mp_s_a_1_2?ie=UTF8&qid=1518914695&sr=8-2&pi=AC_SX236_SY340_QL65&keywords=whale+faucet&dpPl=1&dpID=41JRcWhhQZL&ref=plSrch
I posted this the other day but a Reddit user suggested I paint it black to have it absorb more heat so I figured I'd post up the finished product. If anyone is interested here's the materials I used, just cut the rubber hose attached to a new clean insecticide sprayer, attach adapter, put on your hose and boom, camp shower with fairly decent water pressure.
https://www.amazon.com/gp/aw/d/B002SAO7XQ/ref=yo_ii_img?ie=UTF8&psc=1
https://www.amazon.com/gp/aw/d/B001GZZFXA/ref=yo_ii_img?ie=UTF8&psc=1
https://www.amazon.com/gp/aw/d/B0039EEN0M/ref=yo_ii_img?ie=UTF8&psc=1
I suppose I should have done that initially, lol.
3x - https://smile.amazon.com/gp/product/B007VZ2O0Q/
1x - https://smile.amazon.com/gp/product/B007JRDT96/
1x - https://smile.amazon.com/gp/product/B007IJ1GVI/
1x - https://smile.amazon.com/gp/product/B007VZ2O1U/
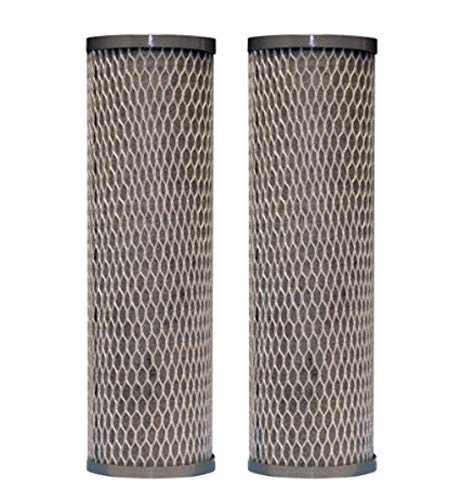
Then just whatever copper/PVC/PEX fittings you need to make it happen. I guess a bit over $100 but the filters drive that cost up a little and last ~3 months each so each pack is a half years worth.
I plumbed mine with a bypass too so I could bypass the filters for maintenance or if I had problems of if I'm doing a lot of outside watering (power washing).
EDIT: Pic here https://imgur.com/7ukQ9p4.jpg
I shut off the water going to the outside hose bibs and cover them with one of those styrofoam covers. The screen in the front door is replaced with the glass insert and I make sure all of the windows are shut tight and locked. The winter equipment is swapped with the summer stuff in the shed, and that's about it.
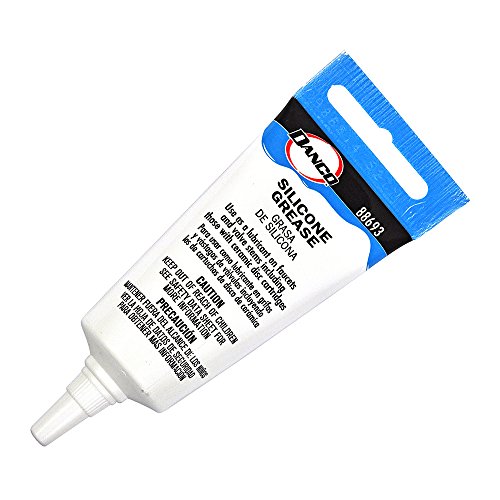
I agree, I've used this thicker silicone grease for all my eyedropper conversions.
The glass ones do get kinda loose. I bought the wooden stems. You can also get an o-ring that will hold the loose ones tighter. This is how I fixed my Arizer Solo stems from being too loose for $10
First off, here are the O-Rings that I bought. $10 including shipping.
$3 from Home Depot http://www.homedepot.com/p/DANCO-10-O-Rings-10-Pack-96727/100232944#.UhusnBs3vuR
UPDATE: /u/Ericdoesntknow & /u/CrispyChipz have informed me that these O-Rings are for sale at Home Depot, and on top of that they're cheaper! If anyone has a link to them please send me the link, if I can remember to run to Home Depot I'll grab the UPC # and post that with a link .
Here are the pictures
Let me know if you have any questions.
http://www.reddit.com/r/vaporents/comments/1eyvo0/this_is_how_i_fixed_my_arizer_solo_stems_from/
Moen (that is a Moen Chateau shower valve) makes a one and two inch stem extension kit for shower valves using a 1225 cartridge, they also make an adapter kit so you can use new trim with older valves; replace your cartridge while you are at it. When looking for new trim, search "Moentrol trim" on Google.
https://www.amazon.com/Moen-137347-Handle-Extension-Kit/dp/B001DO6TZC
https://www.amazon.com/Moen-145058-Adapter-Kit/dp/B002C59VTC/ref=cm_cr_arp_d_product_top?ie=UTF8
https://www.amazon.com/Moen-1225-One-Handle-Cartridge-Replacement/dp/B0006290R6
https://www.moen.com/customer-support/faq
I can't find the original thread right now, but someone recommended this for this issue: https://www.amazon.com/JOKARI-Jokari-Whale-Faucet-Fountain/dp/B0019TUKV0
You could do things like you're planning but I would add in a water-valve to cut the water in addition to the power (you want to cut both so the washer doesn't run while it's dry). I would also use Home Assistant instead of IFTTT, since it will be faster and won't rely on your internet being up to work. If you go with ZWave device, you'll need some kind of hub, which Home Assistant can act as (with a ZWave USB stick).
However, unless you want to tie this particular issue into a large home automation system (getting text messages when the leak sensor is triggered for example), you might be better off with something like this, which is an all-in-one system for exactly your use-case: https://www.amazon.com/Automatic-Detector-Shut-Off-Stopping-Detection/dp/B0742N3KHF/
Personally, I'd go with that kit, otherwise you're looking at:
That's already 3x the cost of the kit, not including your time to learn what you need to in order to get HA running & doing what you want it to.
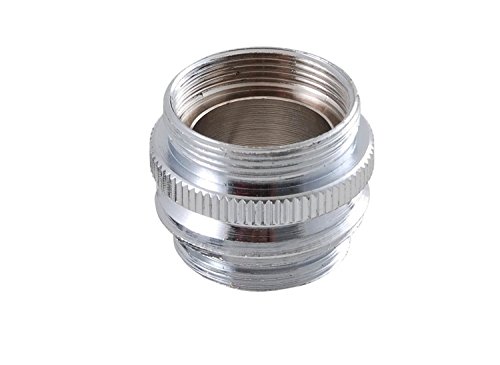
You will need to remove your aerator and replace it with a 15/16 thread x make hose thread faucet adapter.
Like this one.
https://www.amazon.com/gp/aw/d/B00BHZLR4K/ref=dp_ob_neva_mobile
From there you can leave that on and install a new aerator on that too allow for easy switch outs.
Heres some from planet vape.
Here is some from Amazon if you would rather go that way.
or here is some from home depot (which is carried at most stores)
good tidings
They make adapters to do exactly what you're looking for. It requires removal of the aerator on your faucet and then screwing the new adapter on on. Here's a link to one on Amazon.
https://www.amazon.com/Multi-Thread-Garden-Adapter-Female-10513/dp/B008M6KFD6/ref=sr_1_9?crid=B1MW83MF9BEW&keywords=faucet+to+hose+adapter&qid=1563902791&s=gateway&sprefix=faucet+to+hose%2Caps%2C158&sr=8-9
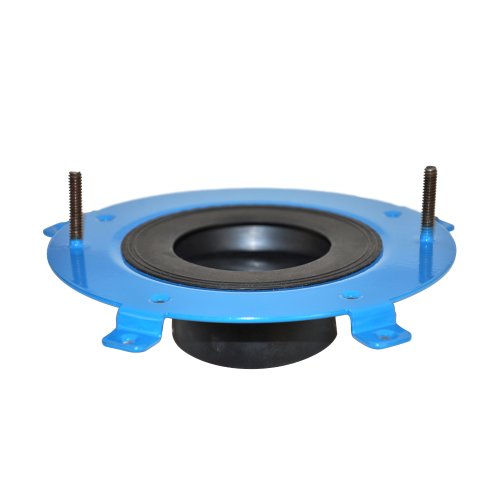
There are flange extension kits for just this kind of a problem:
https://www.amazon.com/Toilet-Extension-corrects-elevations-ranging/dp/B0025VS1US
Just a new seal may work in this case:
https://www.homedepot.com/p/NEXT-by-Danco-Perfect-Seal-Toilet-Wax-Ring-10718X/204817386
Very easy 2 minute repair.
Pull off the metal cap on top which covers the vacuum breaker. It pulls straight off - might need a pliers. There will be a plastic piece that you need to tighten a little I think with a Phillips screwdriver.
If that doesn’t fix it then you need a new vacuum breaker kit called a Prier Mansfield Breaker Repair Kit model 630-7500 that has a replacement for the inside plastic pieces.. Runs under $10 and most hardware stores sell them.
https://www.amazon.com/Prier-630-7500-Breaker-Service-Original/dp/B00164C5IO
http://www.amazon.com/Set-Rite-Toilet-Flange-Extender-Kit/dp/B0025VS1US/ref=sr_1_14?ie=UTF8&qid=1415849009&sr=8-14&keywords=toilet+flange
This also works to repair broken flanges.
I had one and it was great! Got it as a joke, but it quickly became a legitimate thing I used a lot. It makes getting a sip of water after brushing your teeth easy, totally recommended.
Here it is on amazon.
https://www.amazon.com/JOKARI-Jokari-Whale-Faucet-Fountain/dp/B0019TUKV0/
And if you're looking for a fancier one, I recently replaced my whale with this;
https://www.amazon.com/Kwik-Brass-Faucet-Attachment-Fountain/dp/B00CH4TYXQ/
The cool thing about that is that it works like a normal faucet normally, but you pull the little thing on the side out to swap it to a fountain. And after you turn off the water, the button automatically goes back in so you don't spray yourself in the face tomorrow, haha
https://www.amazon.com/JOKARI-JKRI009-Whale-Faucet-Fountain/dp/B0019TUKV0/ref=sr_1_fkmr1_3?ie=UTF8&qid=1537735072&sr=8-3-fkmr1&keywords=faucet+gargling+fountain
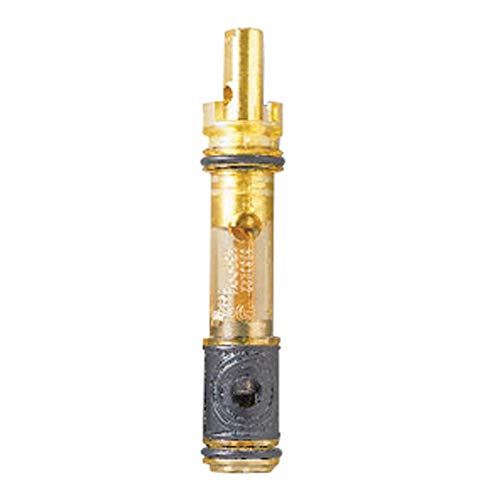
That's a Moen shower cartridge. It's either going to be a Posi-Temp cartridge or a single handle cartridge. The set clip is what you see pictured at the front of the valve where you see kind of a raised piece on the top front of the valve. Shut the entire house water off before removing said clip, then you need what's usually called a "Moen Tool" in our trade. Moen 104421 Cartridge Puller for 1200, 1222 and 1225 Single Handle Cartridges https://www.amazon.com/dp/B00083EC6C/ref=cm_sw_r_cp_api_pZqbzb2N5HVJA
Pull that sucker out and match the cartridge at a box store.
I assume the cartridge would be this one. Moen 1225 One-Handle Bathroom Faucet Cartridge Replacement, 8.5 x 2.5 x 1-Inch, Brass https://www.amazon.com/dp/B0006290R6/ref=cm_sw_r_cp_api_t0qbzbB59YRF0
Best of advice if you don't know much, call a plumber. Could save you a headache and a bunch of wasted time, or possibly a ruined shower valve. Shouldn't be more than a $150 fix.
Looks like a Proper/Mansfield sillcock that needs a new vacuum breaker, the parts are less than $10.
https://www.amazon.com/Prier-630-7500-Vacuum-Breaker-Service/dp/B00164C5IO
I bought one of those, but my threads are buried in the faucet, so the flange on the one i got prevents me from using it! do you know of one that is a bit longer? FTR i got this one https://www.amazon.com/LDR-530-2050-Aerator-Adapter/dp/B00BHZLR4K/
https://www.amazon.com/WaterCop-Z-Wave-Shut-Off-Actuator-Prevention/dp/B07C91B69P/ref=sr_1_16?keywords=zwave+switch+water&qid=1555101934&s=gateway&sr=8-16
pretty sure zwave works with home-assistant
I actually just ordered this for a utility sink in my basement.
https://www.amazon.com/gp/product/B008M6KFD6
here ya go
Here are the materials I used if anyone is interested.
Pen: http://www.amazon.com/Nemosine-Singularity-Fountain-Demonstrator-NEM-SIN-01-EF/dp/B008LXW6XW/ref=sr_1_1?ie=UTF8&qid=1462826541&sr=8-1&keywords=nemosine
O-Rings: http://www.amazon.com/010-Buna-N-Ring-Durometer-Black/dp/B000FN0V6A?ie=UTF8&psc=1&redirect=true&ref_=oh_aui_detailpage_o01_s01
Silicone Grease: http://www.amazon.com/Danco-88693-Silicone-Grease/dp/B000DZFUPC?ie=UTF8&psc=1&redirect=true&ref_=od_aui_detailpages01
I've been selling a lot of these since I brought them in.
That's a old Delta faucet -- the spout seals with 2 large o-rings. It shouldn't screech when you move it.
If you were to get a rebuild kit it would probably fix the problem. Wouldn't hurt to lube the o-rings with some food-grade lubricant.
Just clean it, spraypaint it, and cover it with one of these:
https://www.amazon.com/Frost-King-FC1-Outdoor-Faucet/dp/B001FG3C1C
They're cheap as hell from every hardware store and they'll keep the weather from screwing up the connection.
GIT GUD SON!
Seriously, attention to detail will drive your beer from ok to good.
Control will take it to great.
Water: This is most of your beer, if your water sucks your beer will suck. At the least use a carbon filter or campden tabs to kill the chlorine/chloramines coming through from the tap. Below are links to a filter setup. Plumb the outlet to 1/4" OD tubing. This will slow down the flow a lot. Slower flow = better contact time = better water. Get this much done on the cheap, if you want to play with RO and pH do it later. Get this level of consistency down first.
Filter body: https://www.amazon.com/Hydronix-HF3-10CLWH34PR-Housing-Pressure-Relief/dp/B01CFOGH32/ref=sr_1_4?ie=UTF8&qid=1494856726&sr=8-4&keywords=10%22+filter+body
Filter:https://www.amazon.com/DuPont-WFPFC8002-Universal-2-Phase-Cartridge/dp/B007JRDT96/ref=sr_1_2?ie=UTF8&qid=1494856764&sr=8-2&keywords=dupont+carbon+filter
Make sure you are getting a good boil. Target 1gal/hour of boiloff. This will help your drive off undesirable compounds in the wort and up your hop utilization.
Hops: Make sure they are fresh, frozen, and under vacuum (if you can't manage vacuum double ziplock making sure to push out as much air as possible)
Yeast: Manage your pitch rates, use the calculator over at brewunited. If you don't have the resources to manage yeast starters stick to dry yeast and learn how to rehydrate them. More and more strains are emerging on the dry market and the dry yeast offers a great deal of consistency.
Ferm Temp: This one will make you a hero. This one is not as expensive as it seems. It is May, dorm fridges should be flooding CL, snatch one up for cheap, pick up an ITC-308 from amazon for a temp controller, and also pick up a 17W seedling heat mat. If you are careful all this could be had for less than $100.
Post Ferm: Once the beer is done fermenting minimize contact with oxygen. Since you are focusing on pale ales reducing the oxygen contact with the wort will easily improve your quality. Check out the sterile siphon starter over at brulosophy and note how they have it directly hooked up to the keg post instead of dropping the tube through the open top.
Feel free to PM me if you have further questions.
He needs some of these bad boys
The tool you’re after is a Moen cartridge puller
Moen 104421 Cartridge Puller for 1200, 1222 and 1225 Single Handle Cartridges https://www.amazon.com/dp/B00083EC6C/ref=cm_sw_r_cp_api_i_igz1CbWMN6GX1
I was thinking of something like this. Not sure it’s big enough, but it may work
Instead of wax ring, I recommend this:
https://www.amazon.com/dp/B005K89RQU/ref=cm_sw_r_cp_awdb_t1_AVfNBbJ25ZBK4
This way if you miss-align it at all, you won’t risk not having a full seal.
https://www.amazon.co.uk/Jokari-US-5013-Whale-Faucet-Fountain/dp/B0019TUKV0
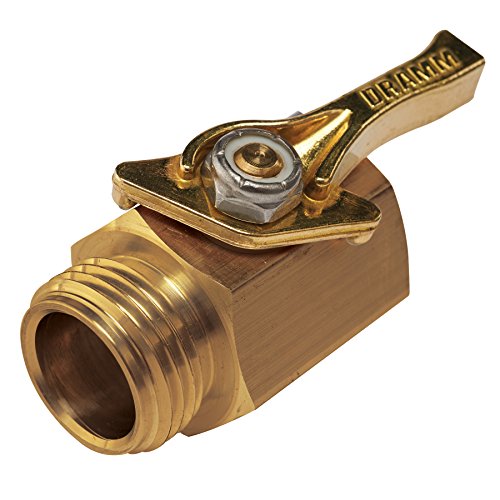
Buy this Dramm shutoff valve and this Dramm water breaker nozzle and you will be golden. I used this on a farm where they had them for many many years of heavy use. The shutoff valve is heavy brass with a stainless steel ball valve. You will have these for the rest of your life.
EDIT: I don't work on that farm anymore but I have 2 sets of what I have linked above at my house. One for the hose in the front of the house and one for the back of the house. I wouldn't live without them. I also have a number of friends who have purchased this at my suggestion and are so damn happy not to have to keep replacing their crappy nozzles.
https://www.amazon.com/dp/B000DZFUPC/ref=asc_df_B000DZFUPC5417172/?tag=hyprod-20&creative=394997&creativeASIN=B000DZFUPC&linkCode=df0&hvadid=167133658256&hvpos=1o5&hvnetw=g&hvrand=16677472986038636588&hvpone=&hvptwo=&hvqmt=&hvdev=c&hvdvcmdl=&hvlocint=&hvlocphy=9009715&hvtargid=pla-312855021118
This. After having so many of the zinc nozzles split open, it's nice to have something decent that feels like it will last forever.
I would combine it with a nice ball shutoff valve, ideally this one. Not cheap, but it'll probably outlast you and you'll feel good using it. (E.g., nice big solid brass handle -- compare to crappy plastic knob on Gilmour shutoff, painted to look like brass, that you know is eventually going to crack & fall off.) Check out the Amazon reviews.
If you ever get an opportunity to get a "water breaker" (basically the head off a watering wand, which is exactly how I got mine -- look for people throwing these out; head is probably still fine, just unscrew), this makes a good addition. You can screw this on to your shutoff instead of the brass valve and get a nice gentle spray onto newly planted beds or other delicate plants, while at the same time delivering lots of water.
edit, do you mean 3/8" nominal Cu pipe or 3/8" OD Cu tube?
You can likely use something like this for 3/8" OD Cu tube.
http://www.amazon.com/00084-060604-Compression-Tee-Reducing/dp/B00C04VY40/ref=sr_1_4?ie=UTF8&qid=1452542194&sr=8-4&keywords=3%2F8+1%2F4+reducing+tee+compression
then use a small piece of 1/4 tubing to connect the reducing tee to a valve
http://www.amazon.com/LASCO-17-0995-4-Inch-Compression-Brass/dp/B008E33VA6/ref=sr_1_1?ie=UTF8&qid=1452542253&sr=8-1&keywords=1%2F4+compression+valve
If for some reason you have lots of money and want nicer products you can pick these up from Swagelok or McMaster-Carr instead of generic stuff from Amazon.
I think a 3/8" Cu pipe has an OD of 1/2" So you can just get a 1/2" compression fitting and use that instead of the 3/8" fitting:
http://www.amazon.com/Aviditi-90809-2-Inch-Compression-Reducing/dp/B00AZEOUBG/ref=sr_1_2?ie=UTF8&qid=1452542716&sr=8-2&keywords=1%2F4+1%2F2+compression+reducing+tee
Whale Faucet Fountain https://www.amazon.com/dp/B0019TUKV0/
Pretty sure this is what you're after
LDR 530 2050 Faucet to Hose or Aerator Adapter Lead Free https://www.amazon.com/dp/B00BHZLR4K/ref=cm_sw_r_cp_api_mVAKzbPBW7GZP
A 0.28 second Google Search would have shown you they have...
GAME CHANGER
https://www.amazon.com/gp/product/B00BHZLR4K/ref=oh_aui_detailpage_o02_s00?ie=UTF8&psc=1
Connect this to a faucet in your hose (preferably the sink by the tub, so you can drain there) and connect your hose connection on the wort chiller tubing to it.
If he already has a 1/4" copper line add one of these valves on it than a short piece of copper than a 1/4" compression Union than a refrigerator flex all done
http://www.usplastic.com/mobile/item.aspx?sku=58305&gclid=coijvmtn_80cfqgoaqodjj4g6q
Or this compression valve on the copper than a refrigerator flex from the valve to the fridge
https://www.amazon.com/gp/aw/d/B008E33VA6/ref=pd_aw_sim_60_3?ie=UTF8&dpID=411vX%2Bz8GDL&dpSrc=sims&preST=_AC_UL100_SR100%2C100_&psc=1&refRID=0N8EMNKP16V290SCHRW2
http://www.amazon.com/gp/product/B000HHQAQY/ref=oh_details_o09_s00_i00?ie=UTF8&psc=1
Since you said you're interested:
After many hours of research and planning, I have concluded the cheapest, and, strangely enough, easiest solution for a basic setup, assuming you are starting with nothing, is simply to get one of these. Unscrew the aerator from the kitchen faucet, screw on that part, and attach the water hose to the other end.
Again, assuming you're starting with nothing like me, all parts combined when going with other solutions would cost approximately $40 and up, including using 3/8 tubing and fittings. And that's for the absolute bare bones food safe setup.
I didn't have a garden hose, so that was the most costly expense. I decided to go with this one. Those two parts put me at $24 and some change, plus another $7 for shipping. For about another 50 cents, which would put me over the $25 total, I could get free shipping. So I got some desoldiering wick.
Total project cost: $27.xx
Estimated time to install: About 5 minutes (rounding up for estimated time spent goofing off)
Final note: There were several people reporting sharp edges on that adapter. If you get it, my advice is to wear thick leather gloves, and attach the adapter to the hose first. Then wrap it in several layers of duct tape so when you need to attach/detach it from the faucet, you won't need gloves and it won't cut up your hands.
This is what I use. I've been using it for about two years with zero issues. It seems to be an unlimited supply but I just ordered a new tube just in case i lose my first one.
https://smile.amazon.com/gp/product/B000DZFUPC
I second buying a Perlick. I bought a kegerator on CL and cleaned the hell out of it, but it still had a cheap faucet on it. It poured ok but everyday it got sticky and was hard to engage the first few times per day. Don't even waste your time trying to clean the original faucet. Just get a Perlick and be done with it. <$30: https://amzn.com/B0063G7DIM
Obviously replace ALL hoses (co2 and liquid) as well as clamps. That should be less than $10-12. I have a $10 fridge thermometer that works well, but it's not a necessity. Toss a baking soda fridge pack in there as well to handle any smells.
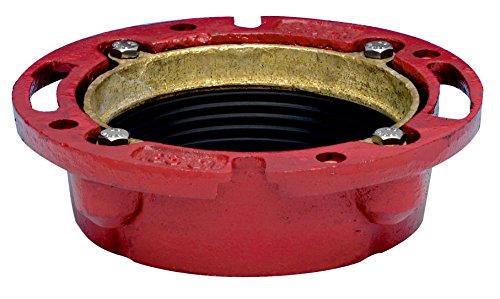
these are old leaded flanges, my experience with cast iron and leaded flanges is rather limited due to my age and region. but the best way would be to replace the lead with newer cast iron if that's possible, or buy new flange plates that bolt to the existing floor.
this is a cast iron toilet flange that are much newer and the standard for cast iron applications :http://amzn.com/B001REGQXI
and this is more of a temporary flange you can use to repair what you have that will bolt to the floor: http://amzn.com/B000FHBGEC
You can make the same thing for less money if you have some plumbing knowledge.
Housing: https://www.amazon.com/dp/B007VZ2O0Q/ref=wl_it_dp_o_pC_nS_ttl?_encoding=UTF8&amp;colid=3GPTD5IY4PUZ3&amp;coliid=I29TBOOJZKNKD9
Stage 1: https://www.amazon.com/dp/B007VZ2O1U/ref=wl_it_dp_o_pC_nS_ttl?_encoding=UTF8&amp;colid=3GPTD5IY4PUZ3&amp;coliid=I3UH3UQDY1YG9G
Stage 2: https://www.amazon.com/dp/B007IJ1GVI/ref=wl_it_dp_o_pC_S_ttl?_encoding=UTF8&amp;colid=3GPTD5IY4PUZ3&amp;coliid=I2WPUSYXAAJ6PS
Stage 3: https://www.amazon.com/dp/B007JRDT96/ref=wl_it_dp_o_pC_nS_ttl?_encoding=UTF8&amp;colid=3GPTD5IY4PUZ3&amp;coliid=I2DR3294UM5E6K&amp;psc=1
Just run them inline with whatever piping you're comfortable with, pex, galv, or copper will all work. 2 galv nipples between the three units and then an adapter to your other line will probably be cheapest.
Perhaps not an ideal fix, but a much cheaper solution would be a “flange extender”.
https://www.amazon.com/Moen-104421-Cartridge-Puller-Cartridges/dp/B00083EC6C
They sell them at home Depot and Lowes too. Most major box stores should have them
Do you know if I can upgrade the handles I have to tap handles or are they threaded differently? Would I need an entirely different tower to put them on or can I just replace?
This is what I have
I wouldn't mind moving to these or something similar
Not sure if this will help your situation or not, but a few weeks ago I pulled a toilet out and the flange was super rusted but glued into the drain pipe so I didn't want to start messing with it. I saw this ( https://www.amazon.com/10672X-HydroSeat-Durable-Toilet-Flange/dp/B00KBBAN5K/ref=sr_1_9?keywords=toilet+flange+repair&qid=1566179731&s=gateway&sr=8-9 ) at home depot and gave it a shot and so far it's been working really well - basically takes the old flange out of the equation and can make it easier for non-plumbers to make a repair.
Fully extend the legs in the up position.
Apply some lubricating grease - lightly.
Use something similar to this: https://www.amazon.com/dp/B000DZFUPC
Lower and raise a few times. See if that helps.
If it doesn't work, Ryan is always stalking the forum and can sell you a new frame.
P.S. Also, don't just google "lubricant". At least not from work.
I'm a big fan of these ones. They are a squishy foam and work great. Totally reusable.
https://www.amazon.com/dp/B005K89RQU/
I'm pretty sure this is a whole lot cheaper, and we've used them for years.
Use foam ring: https://www.amazon.com/Sani-BL01-Waxless-Toilet-Gasket/dp/B005K89RQU
Any major difference between these faucets and these ones? It looks like the cheaper ones are 525's. Are they just as good at not sticking?
Thanks! I think you may have put me on the right track. I went to the front hydrant and it had a different top, which tells me the back had been replaced before. It said Mansfield.
So I found this
https://www.prier.com/images/stories/documents/documents/Mansfield%20Stem%20ID%20Flyer.pdf
Looks like series 400 or 500 hydrant.
So I THINK this is what I need.
https://www.amazon.com/Prier-630-7500-Vacuum-Breaker-Service/dp/B00164C5IO/ref=sr_1_1?crid=31OZ7N0SI11GP&keywords=prier+630-7500+vacuum+breaker+service+parts+kit&qid=1562258968&s=gateway&sprefix=Prier+630%2Caps%2C127&sr=8-1
That being said, the white plastic piece looks a little different from the one I took a picture of..
Thanks for the follow up, I'm most likely going to pull it out and just replace that last section.
I hadn't bought anything yet, I was basically looking to find a flange that might fit. I think one of the clamp on cast iron flanges might work but after pricing out a full replacement again (with PVC not ABS this time) the price difference isn't really worth the time I'm putting into trying to get around the replacement.
What I was looking at though were the PVC push in designs, had the ID fit. Or this style https://www.amazon.com/dp/B001REGQXI
But I have help coming to help pull out that heavy cast iron tomorrow to get started on this. Also planning on starting drywall this week as well if time allows, can't wait to at least have walls back up
There's Water Cop, which looks pretty decent: https://www.amazon.com/WaterCop-Z-Wave-Shut-Off-Actuator-Prevention/dp/B07C91B69P
I'll probably pick that one up myself when I get around to doing some plumbing here in a month or two.
or here for four dollars less! #
If you want a buy-it-for-life shut-off valve, the Dramm brass valve is the way to go:
https://www.amazon.com/Dramm-114960-036434-Heavy-Duty-Shut-Off/dp/B000HHQAQY/
Just don't drop it on your bare feet or there will be lots of cursing.
I had this when I was a kid. As far as I remember, it works pretty well.
Yeah, they sell foam domes that attach to your hose bib and insulate it against the cold.
To take off the handle
To pull out the cartridge
DANCO Multi-Thread Garden Hose Adapter for Male to Male and Female to Male, Chrome, 1-Pack (10513) https://www.amazon.com/dp/B008M6KFD6/ref=cm_sw_r_cp_api_i_lxD5CbBNCCHWR
I use this to fill up the kids’ splash pool. Maybe it could work? Depends on your sink.
Otherwise, I’ve taken a big pitcher and slowly filled it. Not fun!
Thanks for the input. I do plan on using one of those repair flanges. I am hoping to find a wax ring with some sort of flexible flange/gasket. That will give me a little hope of sealing it property.
Something like this one maybe
Your pic looks a lot like my basement and we have a valve on the inside for the backyard faucet
We don't have an accessible valve for our front-yard faucet so we use a cover like this http://www.amazon.com/Frost-King-FC1-Outdoor-Faucet/dp/B001FG3C1C/
If this is your pipe, you may want to wrap it up so the pipes don't burst.
http://www.amazon.com/Frost-King-FC1-Outdoor-Faucet/dp/B001FG3C1C/ref=sr_1_1?ie=UTF8&amp;qid=1416350603&amp;sr=8-1&amp;keywords=spicket+cover
I recently purchased this Moen handle to replace my current knob. I realized today that the new handle does not fit the cartilage due to the size difference. Do I have to replace the cartilage with a cartilage that is compatible with the Moen handle (Moen 1225 Cartilage) and if so will it be easy to do?
Pictures of new and old handle: https://imgur.com/a/X2XmDxt
Thank you!
I used this instead. Works great!
https://www.amazon.com/dp/B005K89RQU/ref=cm_sw_r_sms_awdb_t1_mwZMBb1BZ7K5X
Fair enough. Is a flange like this not good enough? I've heard great things about this flange and figured that'd work well until we redo the bathroom.
I think I'll probably keep the pipe and do everything else about like you said. Also, would using plywood on top to bring the flange flush to the tile work or should it be mortar?
I spent some time in a mobile home where the plumbing is not well insulated. The pipes, especially the outdoor faucets, are susceptible to freezing unless additional measures are taken. We would cover the outdoor faucets with a foam cover for insulation, and use heat tape. The latter plugs into an electric outlet and has a thermostat to know when it needs to turn on to heat the pipe and keep it from freezing.
Those two items would provide decent protection at a reasonable price, but it wouldn't cost a ton to have a plumber replace the outside faucet with a length of pipe going into the basement where the shutoff valve would be more easily accessible. This is your permanent solution...
Is it a Moen? Looks a little like it. They require a special tool that fits over the top. https://www.amazon.com/dp/B00083EC6C/ref=cm_sw_r_sms_apa_i_gGoYDbYXC7A6T
(Disregard this, definitely not correct)
Sorry I'm late to respond, but if you want to reply to someone, you need to click the "reply" link under their comment. Then add your comment as a reply to them, it will notify them you replied, and they'll know the reply is for them.
This reply is probably a bit long, lol. But I'm bored, so I go into some detail, and give some suggestions on tools n' such you can use for various things. You don't have to use them, obviously.
===
====
I do my mashing in a 5gal stainless steel pot, and I do my fermenting in these 5gal buckets (foodsafe from Home Depot). I use these lids, as it has an extendable spout which is the perfect diameter for a No. 7 size drilled rubber stopper, which I stick the airlock in.
For the actual mashing process. I do the following. So, not far off from what you do, except the starting temperature, since going above 161F can damage some of your enzymes and slow things down. These steps haven't failed me yet.
I mix up the yeast culture as soon as I hit the 150F temp of the mash, by pouring the yeast (1tbsp) into 2cups of warm water with a pinch of sugar, a pinch of DAP (aka diammonium phosphate), and a pinch of Magnesium sulfate (aka epsom salt, I bought at walmart in a large jug). Then I just let it sit while the yeast rehydrates and starts doing it's thing. When the mash is down to around 80F, I pour that mash into a sanitized 5gal bucket, then when it hits between 75F to 70F, I pour the yeast mix into the mash in the bucket, close the lid, put in the stopper+airlock, and leave it alone for about 3 days, before I check on it.
When I check on it, if it has slowed down significantly, or is stuck. I do the following:
That usually accounts for all the stuck fermentation issues.
===
===
Hope this helps!
marry a weed sprayer with a sink sprayer
Assemble the brand new never used weed sprayer, but instead of using the wand, splice in a sink sprayer.
Heat water on the stove to about 110 °F, pour it in the sprayer and pump it up. You will probably want a wash cloth for this and a draft free environment. Maybe a second bucket of warm water to wash with, leaving you most of the spray to rinse off with, but it's optional.
You need to take a navy shower with this rig, but it will get you clean.
If you use this in the cabin's shower stall you'll have to get some RV antifreeze to pour into the plumbing traps before you leave.
I use something similar to this. The water comes up the way it does at a water fountain. I can wet and rinse my face without getting water everywhere.
http://smile.amazon.com/Jokari-US-5013-Whale-Faucet-Fountain/dp/B0019TUKV0/ref=sr_1_2?ie=UTF8&amp;qid=1451980618&amp;sr=8-2&amp;keywords=faucet+fountain
Just today I am carrying my Vista modded to an eyedropper. You would love it!
Then you'll have that gorgeous slosh like this dude
I just looked, the bolts go under the subfloor, and it's pretty tight.
https://i.imgur.com/ls9tjvy.jpg
It's even tighter on the other side, unfortunately. Should I consider one of the flanges that you can put on top of the current flange, like this? Or wouldn't that solve my issue? Looks as if I could shave off the current bolts and then put that on top.
They can be, for $10. That's what we have and it's awesome.
Ha, I know what you mean about the Aluminum tape. It just doesn't hold up as well as duct tape. I stuck with the aluminum, but covered it up with some gaffers tape.
I'm also considering switching to an outdoor faucet cover, particularly for shorter trips. It's much more voluminous but weighs <1 oz and is supposed to insulate much better.
This is what we use at the greenhouse/nursery where I work to solve that problem:
https://www.amazon.com/Dramm-12353-Heavy-Duty-Brass-Shut-Off/dp/B000HHQAQY
Attach it to your hose end and then attach the water dispenser of your choice to the end.
They have I have seen them before in a resaturant or bar or something (I was drinking so it was the best thing ever for a good while), but I just gave a quick look and they have similar thing on Amazon http://www.amazon.com/Hands-Toilet-Flusher-Pedal-Adapter/dp/B0018RVWZ6
Is this correct? https://www.amazon.com/Danco-Multi-Thread-Aerator-Adaptor-10513/dp/B008M6KFD6
Thanks, that's exactly what I did. Purchased a repair kit on Amazon: https://www.amazon.com/gp/product/B00164C5IO/ref=ppx_yo_dt_b_asin_title_o05_s00?ie=UTF8&amp;psc=1
Looks like it's sold out in a lot of places.
Would this Danco 88693 Silicone Grease work?
I have this alternative to that. It works great! I don't have to have a skeevy cup in my bathroom to rinse after brushing anymore.
Silicone lubricant is the way to go! I purchased this one.
[Here] (http://www.amazon.com/gp/product/B001HOEU5Y/ref=oh_details_o05_s00_i00?ie=UTF8&amp;psc=1)
It looks like its not available anymore, but you just need to search yourself and find this exact same O-ring.
Note the 1 star reviews. That would be my luck.
It looks like a [moen] ( https://www.amazon.com/gp/aw/d/B000XHHYUO/ref=mp_s_a_1_1?ie=UTF8&amp;qid=1479632311&amp;sr=8-1&amp;pi=SY200_QL40&amp;keywords=moen+chateau+lavatory+faucet&amp;dpPl=1&amp;dpID=417Pdjj%2BoBL&amp;ref=plSrch) but not sure a out it. If you take the handle off (hex key in the front) and send pic I can tell for sure. Moen will give you a new [cartridge] ( https://www.amazon.com/gp/aw/d/B0006290R6/ref=mp_s_a_1_1?ie=UTF8&amp;qid=1479632591&amp;sr=8-1&amp;pi=SY200_QL40&amp;keywords=1225b&amp;dpPl=1&amp;dpID=31QEcM0Ab7L&amp;ref=plSrc) for free if you bring the old one in. [Delta repair kits] (https://www.amazon.com/gp/aw/d/B000BQW9RK/ref=mp_s_a_1_3?ie=UTF8&amp;qid=1479632446&amp;sr=8-3&amp;pi=SX200_QL40&amp;keywords=delta+repair+kit&amp;dpPl=1&amp;dpID=41kTyvFeigL&amp;ref=plSrch) almost as cheap.
Are you thinking of those things that are connected to your sink to rinse things that are too big to fit completely under the faucet?
This is what I am imagining:
Kohler GP1021724-CP Sidespray for Kitchen Faucets, Chrome Finish https://www.amazon.com/dp/B001GZZFXA/ref=cm_sw_r_cp_api_e44Czb5VBKPJV
in addition to the other comments which I agree with. If the flange is set to low, the top of the flange is flush with the finished floor, consider using a foam seal.
https://smile.amazon.com/Sani-BL01-Waxless-Toilet-Gasket/dp/B005K89RQU/ref=sr_1_11?crid=103A0VGTP9JFY&keywords=sani+seal&qid=1570785552&sprefix=sani+seal%2Caps%2C129&sr=8-11