Best hand caulking guns according to redditors
We found 51 Reddit comments discussing the best hand caulking guns. We ranked the 25 resulting products by number of redditors who mentioned them. Here are the top 20.
We found 51 Reddit comments discussing the best hand caulking guns. We ranked the 25 resulting products by number of redditors who mentioned them. Here are the top 20.


I have this one and had a nearly identical experience as OP. For $9 I didn't have very high expectations, but the 800+ reviews convinced me to give it a try. Glad I did, too.
If you can caulk it cleanly- Go for it... Skip the alex plus- too many pops later. Use Dynaflex - Good stuff. Caulked thousands of feet of trim with this.
Caulk like a pro
Edit for product links
Here is a video tutorial. Sashco makes fine products- Hopefully they did as I instructed. I did not watch the tutorial.
http://www.sashco.com/diy/caulking-101/
EDIT #2 Thanks for the gold kind soul
I posted this above but...I'll third that. Best gun I've ever used, and I have a few powered ones. More than one person has told me it's the best they've ever used, and I found myself borrowing it more than once.
https://smile.amazon.com/Dripless-Inc-ETS2000-Composite-Caulk/dp/B0002CKG1O/
I used primarily foam. I bought the foam guns and it made it SO MUCH easier. And cheaper, because no more half-used cans. You can also use silicone caulk.
https://www.homedepot.com/p/GREAT-STUFF-PRO-24-oz-Gaps-and-Cracks-Insulating-Foam-Sealant-341557/202892471
https://www.amazon.com/Foamnseal-Polyurethane-Foam-Dispensing-Tool/dp/B00F2ZGTJE
As for tips, just be methodical. Run a line of foam anywhere you're not sure. It's fast and cheap and won't hurt anything. Look for lights, wiring holes. Really anything that breaks the solid drywall and framing. I also ran along the drywall/framing edges, but some people choose not to.
You don't want air movement - so anyplace that air could move - seal it up!
You want a Dripless ETS2000.
I switched over to the Dripless brand last year, and it really took some getting used to, after yeaaaars of applying a bead and hitting the release to stop it from dripping, I had to unlearn that muscle memory... But ever since I’ve gotten used to this guy, I’ll never go back to a conventional “dripless” caulk gun.
If Amazon isn’t your cup of tea, and you’re in the US, they’re available in store at Sherwin-Williams.
Put tape down first, and pull it off while the caulk is still wet to get a nice smooth edge.
Cutting the end of the caulk tube at a 45 degree angle and the right size for the bead you're going for is crucial. Too small and you won't be putting enough caulk in, too big and you'll be pulling too much off as you try to smooth it and wind up making a mess.
Use either a caulk tool, or a damp finger to get a nice clean bead.
Keep plenty of paper towels on hand to keep your finger/tool clean, and a few damp ones to keep moistening your finger/caulk tool (damp, not dripping).
It's similar to mudding drywall in that almost anyone can do it, but it is an art form to make it look great.
> Amazon is basically people collectively deciding they are too lazy to drive to the mall
Its not that I'm too lazy to drive to the mall -- its that the mall (or no store really) carries the lower volume but better made and more functional product. And ordering it direct uses that small firms crappy shipping and service.
So Amazon is win/win in many case.
A simple example. This caulk gun is incredible. https://www.amazon.com/gp/product/B000DZFCTQ/ I didn't know it mattered until I got one over the $5 home depot crap. But you can't find a good model like that anywhere locally...or you are driving/calling all over and checking every local trade supply shop.
Basically anything you want to buy where the producer isn't able or willing to pay for the placement. Competitive items like supplements are a huge one, with the better brands often getting pushed out the money the big players will pump at retailers for shelf space.
Combine that with Amazon having better customer service and an easier return process that many retailers...
(And I do buy local when I can, especially if its an independent shop.)
Push the tab in. that releases the pressure, and lets it stop caulking.
or get a dripless caulk gun. somthing like this. They have a rod that only advances when the trigger is squeezed, and don't usually drip. They're much nicer than the cheap stuff at the hardware store.
I had a big issue getting my caulk bead to look smooth, I bought one of these types of tools and it worked great. I just couldn't seem to apply the right pressure - might have helped if I were sober the times I attempted to use caulk, but whatever.
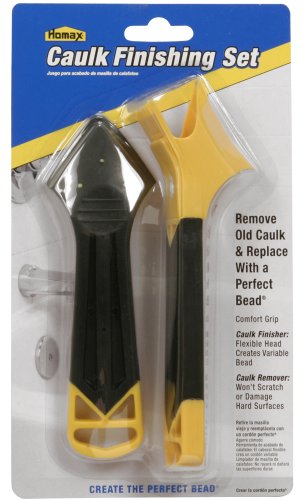
I just re-calked around my tub using a "Seen On TV" tool.
I had bought it years ago because I have never been happy with the results smoothing with my finger. It came out absolutely perfect. Even the corners.
Pro-Caulk-Complete
What I used was the blue spreader. Each blue spreader has several sizes on the corners.
I used the smallest because of the tiny space between tile & tub.
The black calk removal tool is garbage and I didn't even try it.
I thought I'd mention it. It might be something you might want in your tool box.
>can I just add new caulk on top of the old cracked painted stuff while the tub is filled with water and call it a day?
No you can't. If you try to add caulk on top of that, it'll look like absolute shit.
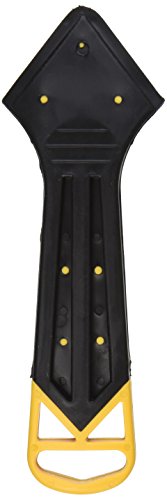
Use this to remove the old caulk: https://www.amazon.com/ALLWAY-TOOL-CT31-Caulk-Tool/dp/B004BGAER8/ref=pd_lpo_vtph_60_bs_t_1?_encoding=UTF8&psc=1&refRID=0KXKZVQRM0Q7PMYDZSTD
If it's really hard to remove, you can use some of this to losen it up and make it easier:
https://www.amazon.com/3M-Caulk-Remover-8-oz/dp/B000H5VNG8
​
When you recaulk, make SURE that you use caulk rated for bathrooms (it'll say on the tube). It needs to be silicone caulk. Not latex. If it's not specifically rated for bathrooms, it WILL get mold on it.
​
>I am worried this won't be enough though. I have never seen a tub with just drywall above it like this. So my next question is what are my options if caulking is not enough?
​
It should be enough if you're not showering in the tub, or bathing kids in there. A grown up isn't going to splash the water up that high.
If you want to waterproof it more, and then tile, without making a height difference, use this:
https://www.amazon.com/CUSTOM-PRODUCTS-LQWAF1-2-Redgard-Waterproofing/dp/B000NZ73SE/ref=sr_1_1?s=hi&ie=UTF8&qid=1535824995&sr=1-1&keywords=redguard&dpID=51Zf43NjFPL&preST=_SY300_QL70_&dpSrc=srch
​
It's a paintable waterproof membrane. Just paint it on (two coats) and it'll form a layer of 'plastic' protrecting the drywall. Then you can tile right on top of it. Use actual tile set and NOT mastic glue for the tiles. Mastic will grow mold.
​
Powdered boric acid alone will do just fine. Below is an optional (and tedious) method.
Just to add to this, don't skimp on the gun because the cheaper ones can break easily and end up being as bad as the one time use cans. I've heard good things about this one: http://www.amazon.com/GREAT-STUFF-PRO-Dispensing-Gun/dp/B0002YOMJE/
And if you don't feel like spending ~$50 on a gun, just buy the "one time use" can and spend the time to clean it the nozzle as has been described in the other comments here.
I am using Great Stuff Pro foam in a can. This stuff is different from the smaller cans of Great Stuff, because it does not come with a straw to attach to the can, but the cans are larger so you get more total foam out of each Pro can.
I purchased a "pro" gun from a seller on Amazon called AWarehouseFull, which cost me a few bucks less than buying the Great Stuff model, but the two work identically.
As for how much foam I have used so far, I have done everything shown in the picture (about 4 joist bays), plus the rest of one side of my attic, which I would estimate was another 10 or so joist bays. I am still on my first can. I'm guessing the first can will not last all the way through the rest of the attic, as it feels quite a bit lighter now that I am done with one side of the attic. Even so, I'm already quite impressed with how much foam I've gotten out of just this one can so far.
I highly recommend using a pro gun of some sort if you're going to be using Great Stuff. The smaller cans that come with a straw are a pain, because they are a "one and done" and have to be used all in one sitting before everything hardens up in the straw. The straw cans also dribble foam as you are in between sprayings, which makes a huge mess. The pro gun has zero dribble when you aren't pulling the trigger. There is also an adjustment knob to control how thick of a bead of foam you want to spray.
If you do go the pro gun route, be sure to buy the cleaner! If not, your gun will foul up and become unusable.
If you decide to attempt this, get an applicator gun. You can adjust the spray from a tiny bead to a garden house, it has superior control, the cans are larger, and you don't waste an entire can if you don't finish using it that day.
Also, give this article a read. You didn't specify if you needed to insulate the underside of your roof or not.
i'm not a fan of buying kits or any sort of bargain tool sets. you get what you pay for and those i have found are usually not worth thier weight.
​
start with the basics. for pliers and screwdrivers i'd go for Klein Tools. thier 11-in-1 screwdriver is usually all I needed when going to figure out a problem in a tenant's apt. they even make precision screwdrivers. a pair of linesman plier and needlenose are both super handy. an adjustable wrench is a great tool to have. always helpful to not have to go digging for the right size. pump pliers are prefect for any stuck valve or even to get your garden hose on and off. i'd also get a voltage tester. if you do anything with electrical wiring before you zap yourself you can test if the power is on or off.
​
for a tape measure you can't go wrong with a classic Stanley. there's lots of options in this department. stanley also makes decent saws. for general purposes the SHarptooth will work. hack saws are for cutting any sort of metal. a general socket set is also good to have. if you're working with any sort of wood you'll need a good block plane. same goes for for chisels. if you're nailing on trim you'll need a nailset so you can hit the head of the nail and not the wood around it.
​
there's lots of types of utility knives available too. Stanley still makes thier classic model. Dewalt recently released a snap-off blade knife that's all-metal. i have a half dozen already, they feel good in your hand and it's easy to get a new sharp edge. Milwaukee makes flip-open utility knifes that are pretty handy too. or you could go for a classic Olfa. that metal tail doubles as a paint can opener.
​
a good pair of Aviation Snips will do a lot for you. they're great for cutting sheet metal, siding, metal fencing or even some plastics.
​
i buy all my Squares and Levels from Empire Tools. start with a torpedo level. they're the most handy and most often used in my kits. from hanging paintings to leveling your stove to building a workbench.
​
i've had lots of hammers, currently use Stiletto ones but a good Estwing will last you a lifetime. they also make the best small pry bar.
​
good paintbrushes are easy to find. Wooster makes a few. just make sure you clean them well after each use and store them either in the original packaging or wrapped in newspaper so you don't ruin the bristles.
​
clamps are always handy in and around the house and shop.
​
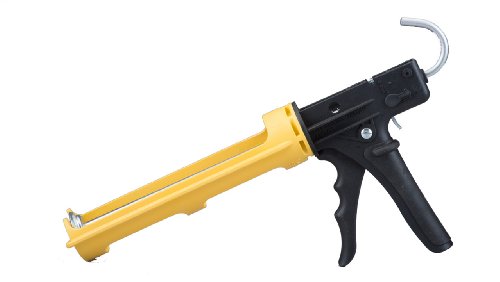
a good caulk gun like this Tajima is last you a lifetime.
​
if you're doing any sort of furniture making get yourself a kregjig. it's a pocket hole jig. worth every penny!
​
want to get fancy? get a stud finder. ditch the battery ones and go for a Studpop. it finds the screws or nails already holding up your drywall.
​
don't know if you're considering cordless power tools. personally, i'd get into the Milwaukee M12 line. you can start with a basic set and expand from there. it's one of the largest lines of 12V tools and they're as powerful if not more powerful than some 18V tools. i know a plumber who uses them exclusively because every power tool he needs is run of the same battery. you can always add tools or bigger capacity batteries as you need them later from their full line.
​
let me know if you want more info or ideas or need help sourcing particular tools. my brother used to run a tool and hardware store so i've been looking for the best of the best for years.
​
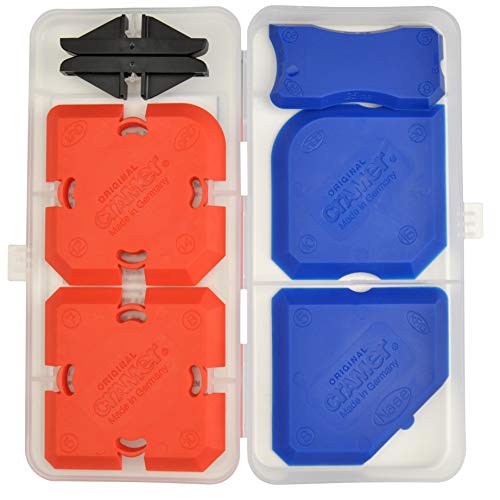
I always notice that American silicone/caulk is applied a bit messy and slap dash..
The Germans do it best and having worked with a few Germans they use Cramer fugen silicone tools..
It's possible to make silicone look like it's been machine applied..
With all kinds of profiles
Cramer Fugi 5 Kit Grouting & Silicone Profiling & Applicator Tool Kit https://www.amazon.co.uk/dp/B07H8K5W8D/ref=cm_sw_r_cp_apa_i_-njwCbZYV8D75
Some.pictures here https://www.google.com/search?q=perfect+silicone+fugen&biw=414&bih=699&tbm=isch&oq=perfect+silicone+fugen&gs_l=mobile-heirloom-serp.3...5828.15318.0.15706.24.20.0.4.4.0.227.2527.5j14j1.20.0....0...1c.1.34.mobile-heirloom-serp..11.13.1188.Ig5UFvs8_5Y
Also YouTube search Cramer fugen..
I did cut and cobble in my attic with fiber-faced polyiso. It was fussy and time-consuming, but it made a huge difference, and turned one of the coldest rooms in the house into the warmest. I liked it versus fiberglass batts because it provides air-sealing and insulation in one step.
My technique was to measure between the studs at the top and bottom (don't assume they're perfectly parallel), record the measurements, and cut each piece outside with a chalk line and jigsaw. Leave about a 1/4" gap on each side for expanding foam.
As far as the foam goes, I'd recommend picking up a foam-dispensing gun if you've got a large job ahead of you. It allows you to
As someone who did the basement (and part of the attic) but stopped two years ago, I can say it was well worth it to get a dedicated gun.
They are very simple however, basically a spring-loaded, long 'plunger' that seals at the tip.
Not sure why you'd pay extra for the $50 one other than it is 'Great Stuff' brand. I've been happy with this $27 one ($32 after shipping).
Yes the cans are a bit more $ and the additional can of solvent adds to the cost, but as long as you are doing a lot of this kind of work at once it makes a lot of sense.
You'll never get it mm perfect with no sealant. Just get a good colour matched sealant, and definitely don't get one that is a glossy finish and it will look fantastic.
Give it a go yourself - worst case it's a piece of piss to remove so you can't go wrong.
Get something like this (smaller, cheaper kits probably available but £8 isn't bad) - it makes the application easy to get absolutely perfect.
https://www.amazon.co.uk/dp/B077RRXVMV/
I've had experience with this plenty of times, and it is definitely a pain. If you really don't have room to reach in, take a paper backed piece of fiberglass (use new if the existing stuff in your attic is too crumbly), roll it tight, and stuff it into the gap between the baffle and the top plate of the floor below. Try to get it a little past the top plate if you can. You want the paper to face to the outside/soffit so it can serve as a somewhat effective air barrier. If you have a long-barreled foam gun (like one of these: https://www.amazon.com/DRIPLESS-FG600XL-Polyurethane-Dispensing-Standard/dp/B06XWHWPY5/ref=sr_1_3?ie=UTF8&qid=1522949373&sr=8-3&keywords=long+barrel+foam+gun ) - try to foam the piece of rolled up fg to the baffle and top plate. Air seal those top plate penetrations while you're at it.
https://www.amazon.com/Homax-5860-2-Piece-Caulking-Smoother/dp/B000H5VX2W
Caulk it. If you want to make your life easier and make the job look professional, buy one of these $5 gadgets...
Homax 5860 2-Piece Caulking Tools, Smoother and Remover https://www.amazon.com/dp/B000H5VX2W/ref=cm_sw_r_em_apa_i_adHLDb2A0G7VC
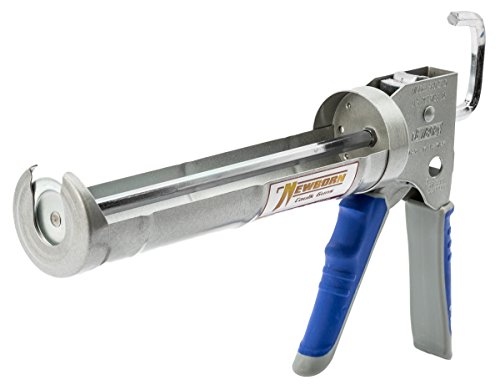
I use a Newborn one from Amazon. Get one that has a high thrust ratio, that will help your weakling arm. The rubber handle also helps your hands.
Can you say what a decent caulk gun is, and why that's one? I've been through a few, like most people probably have, and never really been satisfied.
This is the one I currently use, and is probably the best I've had so far, but still runs for the first 1/3 of the tube for silicone or acrilic latex.
It's caulking, not cocking... it's when you apply a thick liquid sealant using something like this: https://www.amazon.com/Newborn-930-GTD-Drip-Free-Caulking-Cartridge/dp/B000BQS5GO/ref=sr_1_2?ie=UTF8&qid=1473985043&sr=8-2&keywords=caulk+gun with inserts that can vary from silicone to driveway sealant...
There may be better answers, but I used caulk on a recent project. If you're finding caulk to be messy, I recommend buying a higher-quality caulk which will be more viscous (I like the AlexPlus 60 year one, not the regular 40 year one), and a better caulk gun. Using better product means almost no drips or mess. I applied the caulk to fill the hole, and then wiped over it with a damp rag so it kept the trim's profile.
I'm liking the idea of silicone caulk for a temp fix since I'll be using it elsewhere. Just ordered caulk gun http://www.amazon.com/gp/product/B000BQS5GO/ref=oh_aui_detailpage_o00_s00?ie=UTF8&psc=1
I'll clean it with a wire brush, dry it with air comp. or hair drier and let it set for a day before running any water, hopefully its even dry now since house is vacant. Thanks again, and I'll post an update!
RemindMe! 1 week "sewer update post"
Get yourself the best caulk gun money can buy:
https://www.amazon.com/dp/B0002CKG1O/?coliid=I23KHK4DH0YA78&colid=1QHLIPBFWAIV0&psc=0&ref_=lv_ov_lig_dp_it
A really functional worksurface. like really functional.
https://www.amazon.com/Disston-30140-OmniTable-Portable-Bench/dp/B072MMSMNC/
The best markers out there for general use. the cap alone makes them great.
https://www.amazon.com/RevMark-Industrial-Markers-Pack-Starter/dp/B07B4HW3P7/
Would something like this get the job done after the hole is made:
Mortar Gun
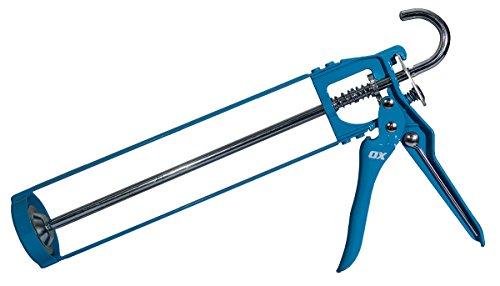
Even with the seal open, cheap ones will bend if you’re squeezing hard enough. These aren’t the ones we use but it’s a similar design. We use NP125 silicone caulk, but it’s in extreme outdoor conditions and it doesn’t have to get painted, although, krylon spraypaint will stick to it.
https://www.amazon.com/OX-Tools-oz-Standard-Caulk/dp/B073FNMGFF/ref=mp_s_a_1_15?ie=UTF8&qid=1542995315&sr=8-15&pi=AC_SX236_SY340_QL65&keywords=caulk+gun
Are you sealing the top plate gap to the roof sheeting? I'm thinking about a 4-5" space. The Dow product is great, and it's not super expansive, but I think you would have to spray each area twice to cover the area I think your talking about. The kits are sold by volume, the kit you posted covers 202 board feet. You would end up covering 6"x 4" space 60-80 feet long. About 10 cubic feet or 120 bdft. Buy extra tips potentially, that sounds like a slow process.
Something like this will be cheaper long barrel gun
http://www.amazon.com/gp/product/B00F2ZGTJE?psc=1&redirect=true&ref_=oh_aui_search_detailpage is the better gun - 100% coated, i let shit dry on it and it falls right off when i need it next. Never clogged, dozens of cans of use over a year
http://www.amazon.com/gp/product/B00F2ZGTJE has worked fine for me so far.
These work better.
There's a bunch of slightly different ones. Something like this:
HD Caulk Tool
Amazon Allway Tool 3in1
1-piece tool
Drip less
Dripless 10oz Industrial Ergonomic Composite Caulk Gun https://www.amazon.com/dp/B000DZFCTQ/ref=cm_sw_r_cp_api_ciVAybMS6WT8W
Yeah, I get it. It's hit or miss. I like these.
I have always used this for caulk, but anything that is 100% silicone will be fine.
You don't really need the caulk tool, IMO. That tool might not work well for your situation anyway as it is meant for surfaces that meet at 90 degrees, which doesn't quite apply to your situation. All you need to smooth the bead is a wet finger and a bar of soap. Did your finger in water, run it over the soap and then use the finger to smooth the bead. You can do it with just water too. Have a paper towel handy to wipe off the excess from your finger.
I think I get about 40-50 ft with a 3/16 bead out of a 10oz tube, maybe more, maybe less. I would imagine two tubes would do everything. If it were me, I would buy 3 and return the last if I didn't use it - sometimes it is nice to have the extra on hand just in case.
You can use painters tape, but you don't need to IMO. Also, you don't need as much caulk on the bead as you think you do.
Also, unless you intend on caulking a lot more, save some money and get a cheap gun. It will work just fine. All you have to do is remember to hit the back little level to take pressure off the cartridge when you are done running the bead so it doesn't drip. You probably don't even need those caps for storage.
Buy a Tajima, I have a few and they are absolutely worth the few more bucks: Tajima CNV-100SP Convoy Super Rotary Caulk Gun with Auto Flow Stop, Extra-Long 10-1/2-Inch Barrel and 1/10-Gallon Capacity https://www.amazon.com/dp/B0017O9112/ref=cm_sw_r_cp_api_i_oAf9Ab7GEN7JM
also not better.
https://www.amazon.com/Spray-Foam-Insulation-Saw-29/dp/B00G2G0XT4
^^