Best lighting reflectors according to redditors
We found 188 Reddit comments discussing the best lighting reflectors. We ranked the 69 resulting products by number of redditors who mentioned them. Here are the top 20.
We found 188 Reddit comments discussing the best lighting reflectors. We ranked the 69 resulting products by number of redditors who mentioned them. Here are the top 20.


So a few months ago, I gave myself a budget of $5000 for everything I’d need to be a One Man Video Army. Besides an empty Lowell hard case and a pair of headphones, I had nothing in the picture above before commencing the buying spree. The grand total ended up coming to around $5500 or so but I’m pretty stoked to have stuck fairly close to my initial budget.
Here's a detailed list of everything in the picture above:
ITEM | WHAT I PAID | COST NEW | LINK TO BUY NEW
:-- | :-- | :-- | :--
Panasonic GH5 w/Rode Videomic Pro, 2 SD cards and batteries|$1,000.00|$1,500.00|B&H
Lumix 12-35mm 2.8|$550.00|$900.00|Amazon
Mitakon 25mm 0.95 Prime|$300.00|$350.00|B&H
Sigma 50-100mm 1.8|$750.00|$1,100.00|B&H
Tokina 11-16 2.8|$250.00|$400.00|B&H
Viltrox EF-M2 Speedbooster|$150.00|$200.00|B&H
Manfrotto 502 Video Tripod|$400.00|$400.00|B&H
Tripod Bag|$25.00|$25.00|Amazon
Panasonic XLR Adapter|$300.00|$400.00|Amazon
Sennheiser Wireless Mic System|$450.00|$600.00|Amazon
LowePro Camera Bag|$75.00|$75.00|B&H
Neewer 3-Light LED 660 Kit w/Fovitec stands|$350.00|$350.00|Amazon
Kessler Slider w/tripod head|$400.00|$900.00|B&H
Hoya 43mm Filter Kit|$35.00|$35.00|Amazon
Hoya 58mm Filter Kit|$40.00|$40.00|Amazon
Feelworld F570 Monitor|$200.00|$200.00|Amazon
Zoom H6 Recorder|$250.00|$400.00|B&H
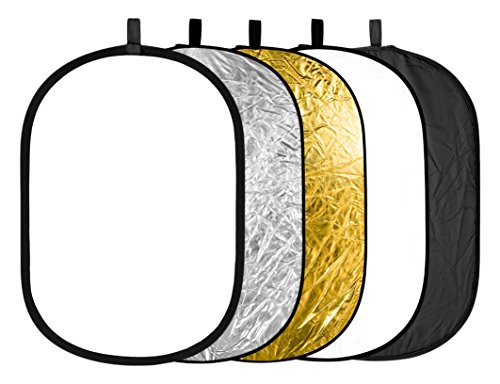
Neewer 5-in-1 Reflector|$20.00|$20.00|Amazonn
Given my budget, there really wasn’t much debate over what camera would best suit my needs. I’m doing a lot of paid corporate and event video work, but I also shoot films and documentaries. So the GH5 made the most sense given its quality, versatility, and value. I can transport and operate all of this stuff without the need for additional crew, which is especially nice when a client doesn’t want to pay for that.
I’ve shot a few films and several paid gigs with this set already and it’s working out well so far. Happy to answer any questions over why I chose one thing over the other. We all have our preferences with equipment :)
My vote: buy a flash. You'll have to go used, but you can find a good flash for under $100 if you're patient and look in the right place. As far as specific flash units go, I can't speak for what Canon flashes go for used. As an example with Nikon however, you can buy quality Nikon flashes used for between $85 and $180 on Craig's List or eBay. The SB-26/SB-28 will be at the lower end, whereas a more modern SB-600 will be towards the higher end. Don't worry if it's not completely modern - so long as it has decent power and you can easily use it in manual mode, you're all set.
A single on/off-camera flash can do wonders for portraits, and are extremely useful for parties, events and similar "live" situations where you don't always have good lighting. Here are just a few examples of what you can do with 1-2 normal flashes:
Portraits
----------
Events
----------
Macro
----------
Pretty much everything above was shot with normal, Nikon flash units, with a few exceptions. Most of these shots take minimal effort, and are easy to replicate, once you know how. Flash will open up a whole new world of photography to you, once you understand it. Here are some of my previous posts on flash photography to get you started:
You should also check out David Hobby's Strobist Blog to learn more. This man has been hacking flashes and accessories for decades, and there's much to be learned about flash photography on the cheap. Also be sure to read through his Lighting 101 set of tutorials.
If you have a little more money later, consider buying yourself a Flashbender to go with it - they can be found new on Amazon.com for between $30 and $40, depending on the specific model you buy. Bigger is better for diffusion, but the smaller ones are definitely easier to deal with in a crowded situation. FWIW, I've got both of the Flashbenders linked above. However, you can make a simple bounce card with a 3x5" or 5x7" index card and a rubber band to experiment with. Don't knowck it - it costs mere pennies, and pro photographers have been doing it for decades.
When it comes to softness, the two things that matter are the size of the source and its distance from the subject. Increase the size of the light and decrease the distance it takes to get to you, and you'll have a softer result.
Someone might tell you to clip diffusion gel on the barndoors of your light, but this will not increase your source size significantly enough. It helps if the source is bigger than your face. Like a 4x4 foot source size within three feet of your head, for example.
The idea is to shoot your light through diffusion material that will scatter it more broadly (enlargening its size relative to you) OR to shoot your light off of something (like a white wall) and have it bounce back onto your face (OR do both, that's called a booklight). Making the size of the white wall area you are hitting your light into as big as possible and as close as possible to you will help to ensure you are creating as soft of a source as possible. The problem with the bounce method is it becomes hard to control the light, or to cut it off of the rest of the room -- you will lose contrast.
For Vlogging ideally you might want a light that you can attach a large softbox to (Example). The softbox will enlarge the source size but also control unwanted spill from the light. If you add an eggcrate to the softbox, it will prevent the source from spilling and spreading beyond its influence on your face (Example, and the effect of different eggcrate degrees in terms of shadow sharpness but also background spill.)
In lieu of that, you could try obtaining a collapsible photoreflector with a spring clamp and a kit stand. Remove the white side/silver side fabric zippered around it to reveal a diffusion panel. If you shoot your light through that you will have an enlarged source. Back the light up from the diffusion until the entire beam of your light fills the entire reflector evenly, and be sure you have that diffusion as close to your face as possible (almost touching your lens), as close as you can before it starts showing up in the shot. From where you are standing in front of the camera your diffusion should be filled evenly with light for optimal softness, no hotspots! The closer you get your face to the final source (in this case the diffusion frame), the higher the likelihood that you're giving the light an opportunity to"wrap" across your face, with feathered, gradually dissipating shadows.
In lieu of a photoreflector, you can shoot through a large bedsheet or similar dense white fabric. You'll notice without a soft box this lighting technique will cause residual light to spill around the room, and your shot loses contrast (As with the bouncing method.) You then should add black "siders" to either side of the gap between the light and the diffusion. On sets we use solid black fabric flags or floppies or frames (sizes ranging from 2'x3', 4'x4', 6x6, 8x8, 12x12, 20x20, etc, but at home you can use black art card or black fabric (duvetyne, or commando cloth) on stands.
But this can go on and on. However you do it, remember the two key components. Source size and distance to the subject.
The other issue is modeling a face with light in a flattering way. That's more important than softness. Right now it looks like you have two lights at 45 degrees from your front (traditional key side and fill side), left and right. This flattens out the lighting on your face since they are both at similar exposure levels. I can tell this by seeing the two left and right catch lights reflected in your pupils.
Gain more modeling and contrast by varying the output of the key and fill. In fact, I'd start with a single source, your key, and see at that point if you need fill. Position the key on one side of the camera, a little above eye level (for example, but this isnt a rule) and start with just the light (keep the diffusion out for now). Keep moving the light toward the center axis until you get the desired amount of light hitting the opposite side of the face (this is called the cheek patch) Make sure the opposite side of the face gets light in your eye and highlights a patch of the cheek, accentuating the contours of your cheekbones by allowing the light to fall off into darkness thereafter.
At this point, walk in the diffusion (whether it's the bare photoreflector or a bed sheet [a frosted shower curtain works as well! -- the denser the fabric, the more the light scatters, the softer it is]) in between the lamp and your face, and bring it as close to your face as possible.
Observe the results. If you need more light to wrap around the dark side of your face, inch the lamp and the diffusion closer to the center axis.
If you just need a whisper of light on the darker side of the face, using a large bounce board (you can use bead board insulation from home depot, or art card) on the other side to "return" your key light might do the trick instead of an additional light.
Use that second lamp instead for a key-side edge, or a fill side edge (three-quarter kicker), to carve you out of the background. I'll leave out what that crap means. Point is, do some tests!
I'm with this guy. Be very careful.
Get a reflector. What's a reflector? This is a reflector.
How do you use a reflector? This is how you use a reflector
https://www.amazon.com/gp/product/B01I09WHLW x 2 - Speedlights - $56
https://www.amazon.com/Neewer-Wireless-Speedlite-Receiver-Universal/dp/B00A47U22U - Wireless Trigger - $19
https://www.amazon.com/CowboyStudio-Photography-Light-Stands-Cases/dp/B001WB02Z4 - Light Stands - $29
https://www.amazon.com/Neewer-Professional-Universal-Speedlite-Umbrella/dp/B00JJJR7PY - x2 - Cold Shoe - $22
https://www.amazon.com/gp/product/B0132I34K4 - Octobox - $23
https://www.amazon.com/Fotodiox-Premium-Shoot-Through-Translucent-Umbrella/dp/B005ODKMOC - Shoot though umbrella - $14
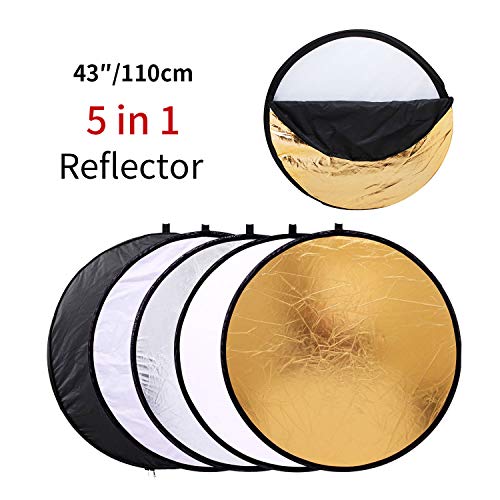
https://www.amazon.com/Neewer-43-inch-Collapsible-Multi-Disc-Reflector/dp/B002ZIMEMW - 5 in 1 reflector - $20
That brings you for a full starting light setup that can be used for headshots and starting boudoir for $183. And you even have flexablity in there to use a 1 light setup with reflector or use 2 lights. You would want a few sandbags to keep the gear stable, but I am not including those in the price.
Now for a background setup
https://www.amazon.com/dp/B00E6GRHBO/ref=psdc_3444601_t1_B00MTF6ZVC
Is a good basic stand but hard to fit under your budget with the above lighting gear.
https://www.amazon.com/Neewer-Studio-Collapsible-Backdrop-1-8x2-8m/dp/B00UWL02PU is also an okay starting backdrop, Grey can be turned into white or black. I will warn you that you will need a fabric steamer to get the lines out, but that is pretty much the same however you go with cloth. Another more expensive choice is to go with seamless paper, I love working with paper, but it is an ongoing expense to use it.
Now if you are going to make this her studio all the time, they make http://www.homedepot.com/p/EUCATILE-32-sq-ft-96-in-x-48-in-Hardboard-Thrifty-White-Tile-Board-HDDPTW48/205995949 that you can use to make a great background. Or to me the better option if you are going to use a room as a full time studio, paint the walls, put down hardwood or laminate, and you have a great studio setup.
Reflector, $17, free shipping with Prime
It depends on the look you're trying to achieve in your photo. Invest in a reflector/diffuser and it will help solve a lot of problems when it comes to harsh shadows etc..
Here's an okay enough video: https://www.youtube.com/watch?v=xIEYhDYeC_A
Edit: I think I just got what you're trying to say. If you the photographer should be in the shadow while shooting or if your subject should be in the shadow while you shoot in the light. If your subject is in the shadow the light on them will be more diffuse (softer shadows). If you're in the shadow and the subject is exposed to light, the subject will be more exposed with harsher shadows. I still stand by my previous recommendation with an addition of a UV lens and a lens hood because it still all depends on the look you're trying to achieve in your photo. These tools just help you have better control of the light that enters your camera and how it falls on your subject.
Based on the description, there doesn't seem to be any glass (other than the light bulb). The front white panel is a fabric diffuser similar to those used by photographers.
My dental work is finally done. Complete. Finished. I'm not going back for a while. Good riddance.
So, my church has been trying to get into streaming for the last year. Just a basic type of stream with a single camera pointing at a couch, with some live music and a reading of that week's sermon. The church board allocated $3000 to the project, their blessing, and then nothing happened for months.
A couple weeks ago, they tried their first stream. The camera "broke" so they streamed on a cellphone with a bitrate resembling pre-2000 internet videos. The next week was the same thing. Then, they got the camera "working" but the framerate was low, the image was stuttery and it was blurry like it was zoomed in and not in HD. The audio was also really echoy, and the lighting was just light coming from the pastor's office window.
I'm a media guy, and while my specialty is mostly in radio/audio tech, I've done work with streaming and video production in the past. Knowing that the budget would be tight, I came in with a list of recommendations to vastly improve the quality of the streams and to teach basic broadcasting procedures. What I walked into was a bit of a trainwreck.
The church administrator was tasked with acquiring the streaming equipment. After a false start with a video camera that couldn't stream video, he ended up getting a DSLR camera. The image quality is actually quite nice, but it has to be fully charged before the stream, whatever. He bought a USB 3.0 video link cable for the camera, which actually works brilliantly, but nobody involved knew that a USB 3.0 cable goes into a USB 3.0 slot. They were putting it into USB 2.0 slots and wondering why the video was absolutely terrible.
My church has an absolute wealth of microphones of all different styles for many different purposes. Instead of buying a cheap XLR interface or splurging on a USB soundboard, the admin bought a Blue Yeti. Aside from being useless as a room mic, it not only cost more, but the audio quality is vastly worse than even the cheapest stage mics we have on hand. I'm sure one of the pastors can find a use for this (I know that they record stuff for people), it has no place anywhere near someone's streaming setup. I have to lend/give my current XLR-interface from home to rectify this.
Speaking of audio, the office they chose to stream in has a reverb problem. I get that they don't want to spend a lot of money or convert the room into a studio (I mean, it is a pastor's office), but the echo is too distracting for the average person. If the audio sucks, nobody is going to want to watch this thing. I get to talk with the property team this Sunday to get some hooks installed along the walls to hang some old, heavy blankets from. They can hide them away when they're not filming, and it will make a massive difference to the echo issue. If we somehow don't have blankets on hand, that's probably the easiest donation to ever ask for.
When the blankets go up, I need the office window covered, because the natural lighting is absolutely terrible. It makes everyone look flat, kinda washed out, and casts shadows on people's faces. I'm gonna try to wrangle up the ~$150 required to get a basic 2-box lighting kit that can be stored when not streaming.
So, they decided to stream with OBS, which gets my approval, but there are issues. They're using a 4-year-old laptop, which surprisingly isn't the limiting factor here. Nobody knew what they were doing with settings, so they were streaming in 733p and outputting at an even worse resolution. They also couldn't figure out how to remove the camera overlay that showed up on the screen, so they had zoomed in to crop that out, and tried streaming like that. Despite using the USB mic, they were only taking in laptop microphone audio. They turned the program on, figured out how to get the camera to feed, and then hit stream. I have no other explanation.
Simply said, I am taking over this project. Everything I said here is fundamental to basic broadcasting, and is the cheapest professional-quality setup I can currently imagine that won't be total jank. I hope there's budget left, but I think the entire $3000 was spent on the streaming couch, camera, usb mic, the camera cable and other nonsense.
I've got a lot of work to do. I told people involved in the project that I'm experienced with streaming and broadcasting production and offered insight throughout, which was ignored. I can't believe how out of hand this whole thing got.
Get a foldable bounce for super simple fill or shoot in shade and expose for the skin
http://www.amazon.com/Neewer-110CM-Collapsible-Multi-Disc-Reflector/dp/B002ZIMEMW/ref=sr_1_1?ie=UTF8&qid=1324168094&sr=8-1
$13, with gold, silver, and white. I rarely use anything but the white, personally, but there are some occasions here and there where I've been very thankful to have the options. Not really a huge investment there, also folds up, and if you're a professional, well, it certainly helps you look the part. Perception is a huge part of the business.
Here ya' go
Just a few more to add to the list:
18% grey card
Neewer TT560 flash
Neewer 43-inch 5-in-1 reflector
Tiffen Circular polarizer
7 ft. light stand
47" Speedlight Umbrella Softbox
Continuous lighting kit
New camera bag
[EDIT] Added more things to the list, as I think of things I'll continue to expand it.
Good comments from u/thnikkamax - I'll add that for location shooting, a popup reflector or even a sheet of foamcore can make a big difference - if you can get someone to hold it. Watch some youtube videos showing how to hold and angle a reflector; and grab it yourself and look at the subject while you lift it, angle it, play with different heights and angles. Then tell the assistant "hold it like this". Usually up pretty high, and angled up, gives a natural look. Distance from the subject can control how much it fills in shadows. Some popups have a choice of white, silver, and gold - all have different looks. Gold is often good to blast hard light from the back on hair and shoulders.
There are a lot in this photo that is great, but you don't want to know what you've done right, correct? Maybe that's how I am :P
Things to consider.
Otherwise, great shot. Keep shoot! I'd love to see more of your work.
Cheers.
You have to bounce the light elsewhere using reflectors.
Reflectors
These can reflect the light where you want or diffuse and deflect the light.
Also, ND filters help considerably if you’re shooting with a DSLR or Mirrorless such as the A7III
Buy a reflector and bring a friend! Hold it high and shine the sun back onto one side of there face =) Lighting is what makes a photo amazing, this is an easy way to create great lighting =) If you buy a reflector also try to shoot somewhere in the shade and not in direct sunlight.
http://www.amazon.com/Neewer-43-Inch-Collapsible-Multi-Disc-Reflector/dp/B002ZIMEMW/ref=sr_1_1?ie=UTF8&qid=1414167413&sr=8-1&keywords=reflector
Why not get something like this? It's sort of like a portable ceiling, in a way.
u/pastramiswissrye is totally right in that lights, sound, lenses, and media are all more important than the best camera.
My personal favorite camera in that price range is the Panasonic G7 and a good 12-35 lens. The G7 is like the little brother to the GH4 as it does 4k and just is missing some of the more pro features and is $600 for the camera. The lens is another $600 but you could just use the kit lens and upgrade your lens later.
Continuing with what Pastrami said, you should have good audio, lights, and media storage, in addition to the camera and lens. For audio, the rode videomic pro is a good all-around shotgun mic that you can put on a boom pole for good short film on location sound, however you will need someone to help hold your boom pole.
For lights, a good reflector will help you use the sun as a light when shooting outside on location for a short film. If you are in a studio, this four socket CFL light kit will go a long way to help. I personally use one of them and they are great for the price. Just pop in four cfl bulbs and you are good to go. If you would prefer LED lights which are smaller and don't heat up as much, but are pricer, you can get this LED studio light kit.
On the media storage side of things, you are going to want to pick up a few of these 64GB U3 SD cards for use with your G7 or any other new camera you get. Especially if you plan on shooting in 4K.
If you are going to shoot in 4K, your file sizes are going to go way up and you are definitely going to need to get more hard drive space on your computer. You may even have to upgrade your computer to handle 4K video editing. It all depends on what you have and what you want to do.
On the editing side, I personally use Final Cut Pro X on my Mac. It is $300 but a great piece of editing software, used by pros. If you are on a mac but don't want to spend money, just use iMovie, it will probably do what you need it to do unless you edit in 4K. On the windows side, some people use sony vegas, some people use AVID, some people use premiere pro, there is a bunch of them out there and you kind of just have to choose one. (I have never used any of them)
Like he said, there is no canon r6i. I assume you mean T6i, but you still need to do some more research. I hope this helps!
No problem. :)
Ok, so flash is pretty easy. My setup might be a bit outdated, but here is what I use currently:
I have 3 of those flashes, they're really pretty great if you aren't too snobby about brands. I believe Yongnuo has flashes now with the transmitter built into them, but I have never used those and the only time I've seen them in action it didn't go super well. I'm sure they're fine, I just can't recommend them.
So basically you put the controller on your camera. You put each flash you want to use off camera on the transceivers. The controller lets you adjust each flash's settings remotely and triggers them. It's awesome.
If you generally don't know what you're doing with flash for the reception, it's generally best to bounce the light off the ceiling. Point the flashes roughly upward and fire away. At receptions with a defined dance floor you can get pretty great results by placing them in a couple of the corners. Your light might come back kinda yellow. If you don't want to worry about using gels on your flashes then just keep an eye out for it and adjust the white balance in Lightroom after the fact.
Aside from flashes you will want some modifiers to place on them. When I was starting out the two that I used are these (these aren't the exact ones, but they're close):
So there are probably better modifiers to use, but these are cheap and they work pretty well at diffusing/directing light. The softbox is great for portraits and I frequently would use the flash bender to direct light gently over a wide area, like when the toasts are going on or the bridal party is entering the room or the dance floor. When used correctly you should get pretty great lighting and avoid hard shadows.
Anyways, how I shot those photos. You're generally right. I love shots like that (probably too much), and so I do them all the time. The general idea is the same for all of them, soft light in front and a bright light in the back. Using the specific equipment I listed above, my usual MO is to put a bare flash behind them, typically on the ground (using these)or on a stand as low as possible to the ground. Point it at the couple and slightly upward (photo 1 is the exception, it was pointed essentially straight up to make the gazebo light up like that).
Set up a flash in front of them. In most of those photos I used the flashbender modifier on the flash pointing at the couple to direct but diffuse the light. It helps it look a bit more natural. Generally you want to position it in a way that the shadows aren't too distracting, so do it slightly off to the side to get more natural lighting. Obviously I messed up in a few of mine but it is what it is and most people don't even notice. We're always our own harshest critic.
Next is the settings. This is honestly the toughest part in my opinion. You need to expose for the background you want and then use the flashes to achieve the lighting you want on the subjects. I don't know how to describe this, but the easiest way is with photo #6 on my website. I exposed the photo for the city behind the couple and got the look I wanted, THEN I added flashes and whatnot. General rule of thumb is the light behind the couple should be one step brighter than the light in front. That way you get the glowing backlight effect.
Thanks for the compliments on the photos! I hope this helps. I'm sorry if I did a bad job of explaining things, just ask me to clarify anything you don't understand.
EDIT: All this being said you don't NEED off camera flash. I've shot entire receptions using on-camera flash. The most important thing to remember is you just want to diffuse the light in some way. When you're using flash on camera you typically achieve this by bouncing it at the ceiling. Practice this at home, it usually works pretty well!
THIS ONE.
But honestly, Lightroom has the biggest effect if you ask me.
In the box:
Ray-Ban 3025 Aviator Polarized sunglasses
Zippo Slim circa 1960
Nite-Ize S-Biner with County Comm Titanium Widgy Pry Bar / Ti split rings
The camera pictured is my beater/backup, a Nikon D7000 with a Nikon 35mm F/1.8G AF-S DX lens. These were all taken with the camera I use on assignment - a Nikon D800 with a Nikon 24-70mm f/2.8G AF-S lens, an SB700 speedlight and a Rogue Small Flashbender.
I leave the D800 at home when I'm not working, but I keep the D7000 in my car or on my person pretty much all the time. Everything else here goes almost everywhere with me.
I am still relatively new here but have seen you guys give so much I can't help to think you are Santa Claus or something! I admire you!
Rasta, I heard you have an unhealthy obsession with Bane.. Let's just say I kind of got escorted away from my Uni for wearing my bane suit for an outdoor showing of TDKR!! :)
Gee I am making this so long! I think I could use a safety razor after some time I have spent on wicked_edge! this one particularly!
Also as a photographer I could use a reflector so badly! I just started doing fashion portraits instead of my regular street photography/landscapes and this is a must! I like this one for the price! (<$20)
And the magic words:
C'mon...gimme.
Things to Google and read about in depth:
Good luck!
Consider a reflector. Small and cheap way to add some light for a photo.
Neewer 43-inch / 110cm 5-in-1 Collapsible Multi-Disc Light Reflector with Bag - Translucent, Silver, Gold, White and Black https://www.amazon.com/dp/B002ZIMEMW/ref=cm_sw_r_cp_api_CZKwzb1X89KQ5
Maybe a few of these
Five of these, though you should sometimes, (I think usually), use China balls instead of the reflector.
Just one of these
Any of these you need that are either Rosco or Manfrotto. I think buying individual ones instead of large packs is smarter.
Clothespins, aluminum foil, and white sheets are all helpful and you can get them at Target.
That's all I use personally, but a lot of professionals, such as Rodrigo Prieto, use these, so if you have a thousand dollars to spare. On the other hand, short of occasional Arris in larger spaces, Roger Deakins tries to use mainly incandescents indoors, often with China balls, or China balls that have had half of them spray painted black.
Inside rigging is easy, but outside, sticking a two-by-four in the hole of a cinder block can work well.
Dont forget to get extension cords, power strips with circuit breakers, and maybe some plug in dimmers, though for incandescents, you should always dim by changing the bulb wattage and for those halogen work lights, they get way orange when you dim.
Also, I didn't include China balls because I could link you to ten dollar ones, or you could get them for a dollar each at Chinese gift shops, dollar stores, whatever.
https://www.amazon.com/Neewer-43-inch-Collapsible-Multi-Disc-Reflector/dp/B002ZIMEMW/ref=sr_1_4?s=photo&amp;ie=UTF8&amp;qid=1480092542&amp;sr=1-4&amp;keywords=REFLECTOR
I've used these for several shoots with great success. for 20 dollars build quality is great and i dont see them falling apart anytime soon. Unless youre going to be shooting a loooooot of portraits i wouldnt spend more.
/u/jamesseventwenty - with a £200 budget, I recommend a [£99 gimbal for your phones] (https://www.amazon.co.uk/Zhiyun-Smooth-Q-Stabilizer-Smartphone-Black/dp/B06XNNV5NJ//ref=as_li_ss_tl?ie=UTF8&amp;linkCode=ll1&amp;tag=hybrcamerevo-21), a [£79.99 Neewer bi-color LCD panel] (https://www.amazon.co.uk/dp/B01NAGWKPF//ref=as_li_ss_tl?ie=UTF8&amp;linkCode=ll1&amp;tag=hybrcamerevo-21), a [£14.45 light stand] (https://www.amazon.co.uk/KONIG-Photography-Professional-Studio-Photolamps/dp/B0119T634M//ref=as_li_ss_tl?ie=UTF8&amp;linkCode=ll1&amp;tag=hybrcamerevo-21), some [diffusion fabric] (https://www.amazon.co.uk/Neewer-Seamless-Diffusion-Photography-Lighting/dp/B06XSBDWXX/ref=as_li_ss_tl?ie=UTF8&amp;linkCode=ll1&amp;tag=hybrcamerevo-21) and a [set of reflectors] (https://www.amazon.co.uk/Neewer-Portable-Collapsible-Photography-Reflector/dp/B005M09B4E/ref=as_li_ss_tl?ie=UTF8&amp;linkCode=ll1&amp;tag=hybrcamerevo-21).
With this setup, you can simulate two decent lights with the LED plus the reflector - or with sunlight and the reflector - and you can have crew hold the diffuser up as a scrim to soften the light (or you can build your own DIY scrim, as seen [here] (https://youtu.be/tyrcM1TJMSo)).
Here are a couple of examples shot with gimbal mounted phones and good lighting:
Hope this is helpful and good luck with your video!
Guaranteed she doesn't have this, it's brand new:
Rogue FlashBenders
Of course, she would need to have an external flash unit with a bounce head to make it worthwhile.
https://www.amazon.com/gp/product/B002ZIMEMW/ref=od_aui_detailpages00?ie=UTF8&amp;psc=1 Just a cheap example. There are a variety of sizes/shapes so pick the one that makes sense for your kit. The idea is to reflect/bounce light onto your subject if you need better exposure or if you want to soften the light. Ones like this are multipurpose.
I'm a woodworker who makes bowls and smaller pieces and such. I need to upgrade my lighting and background. (I have access to a pretty good camera/ use my iphone when in a pinch)
The way I see it, these are my 3 options:
You can buy LED lights if you aren't interested in strobes, but you never know.. maybe you'll really take off! Before I got my strobes, I used these from Promaster for lighting smaller areas and they worked like a charm (keep in mind they can get a little hot - don't cook the baby!). But if you're interested in something a little more professional:
The strobe
I personally use a single AlienBee B800. You may be able to photograph newborns with a B400 (a bit more affordable, but pumps out a little less light) version since it won't require you to light many large areas.
The modifier
Then you'll need a modifier to put on it so you can spread that light around the set cleanly. I prefer to go with Fotodiox products, as they are cheap and affective. I own the Fotodiox 36" Octabox.
Then of course, you'll need decent light stand to put them on.
Depending on how you position your strobe, you may also want to get a little reflector disc so that you can bounce light into areas that are too shadowy in your shot. You can also just do this with a regular ol' white foamcore board.
It's not, I promise.
LED flashlight for your actor - $8
Basic bouncecard to bounce the flashlight light into your actors face - $13
LED battery powered light to illuminate your foreground or background - $44, including a battery and charger
There you go. Basic lights for a basic forest scene for $65. Add 1/2 CTB gel to your LED light to simulate some moonlight. It can absolutely be done, just get creative.
If you can afford it, other than the case sucking - this would work great. Gives you options for silver, white, gold, black or shoot through white. I have had mine for a couple years, the case/bag sucks, but it works great.
http://www.amazon.com/Neewer-43-Inch-Collapsible-Multi-Disc-Reflector/dp/B002ZIMEMW/ref=sr_1_1?ie=UTF8&amp;qid=1398661374&amp;sr=8-1&amp;keywords=reflector
Hot hands gloves. They are by far the best gloves I have ever worked with when dealing with hot lights. Very durable and comfortable, with little to no heat transfer to your hands. Expensive but worth it.
a couple of cheap 5 way bounces Great to tape in to the corners of small rooms so you can bounce lights off them. also I live off these on no budget or fast moving exteriors
Just had my first paid shoot last night with some old high school friends. I'm not too psyched with how it ended up whatsoever, but they like the pictures and I only charged $20 for the whole thing.
Anyways, I'm pretty happy with my compliment of lenses and I'm looking to start investing in some more auxiliary gear.
Should I get this 43'' reflector, or will the 24'' get the job done for portrait shots?
Will this wireless remote get the job done?
Lastly, next time I get paid I'm going to invest in a speedlight. What are some decent entry-level ones?
Edit: My bad, Canon Rebel t3i
I have 2 pieces of advice that most new photographers tend to ignore (they usually worry too much about camera gear instead.)
Your friend has a clothing brand and you should think of how it should be portrayed. If its streetwear, then shoot in urban situations. if its bikinis, then the beach is perfect, etc. Once you have an idea of how you want to portray the clothes, think of which lighting situations would match it, such as hard lighting for a more dramatic look, or sunset for the golden hour look. Most of the time, the client will know what they want. Ask your friend to make a mood board, which is basically a collection of photos of how he wants the lookbook to look like.
Get things ready before the shoot (this can be weeks to days, to hours before the shoot depending how much work needs to be done). This includes location scouting, weather prepping, lighting testing, equipment packing, hair and make up, posing references, props, etc. Have EVERYTHING ready almost to the point that you can start shooting right away once you get to the studio/location. If you are shooting in a studio, have the lights, backdrop, props, anything else you need, be ready. Don't waste time you could be shooting the model/product when everyone is ready but you aren't. If you are shooting on location, be prepared for the weather. Bring a 5-in-1 reflector if you want to have options on controlling light, such as a scrim/shade/silver/gold reflector. I can't get into any more details since every shooting situation is different which requires different tools, if you do know what situation you will be in and what you're going to shoot, then I might be able to tell you what you need.
TL;DR
DO NOT SHOOT BLINDLY. Prep everything and plan for the shoot. If you know what to shoot and how to shoot it, you will have a much better and easier time getting the shots you need. And it will show in the end product.
Hey, I'll try and answer as best I can, but others may have better or more accurate descriptions than me.
But as for what makes a camera better? I would say control. The more functions you can control on a camera, the better. This is why DSLR filmmaking is so popular currently, because they have access to functions that many cameras don't have. Focus, Aperture, White Balance, Lens choices, etc. Being able to access all of these gives you more options as a filmmaker, which is what we all want, creative freedom, we all hate when we are limited by technology.
Now many people talk about shooting Film vs Digital, or whether or not you are recording in RAW format for digital. A lot of this has to do with preference vs quality of camera.
So I would say that a camera that is easy to control is the best. Hopefully I mostly answered that, if you want a more specific answer, just let me know and I'll try my best, otherwise hopefully someone else jumps back in here and describes it better.
I would recommend a small light kit, you can spend as much as you want on film lights, but don't feel ashamed to buy a few lights from Lowes or Home Depot. Lighting is a very important piece to making movies. I would also look into getting some reflectors, there are some really cheap ones on Amazon. I have found these to be helpful when shooting outdoors, since lower end lights are almost unnoticeable in the sun.
Here is the one that many early filmmakers ignore, Audio. Grab a nice microphone and get some good sound with your video. The Rode NTG 2 is a pretty good mike. It's cheaper while still getting good sound. The ME 66 is a bit more expensive, but it's a hotter mike and gets better sound. Both are really good options. To go with your mike, if you have a little extra spending money, I would completely advise getting a Blimp. This Rode Blimp is great! If you want to shoot outdoors in the wind at all, this is the best option, otherwise you may have to re-record all the voice over in post.
~
This post is getting a little long here, so I'll throw a summary at the end with a couple more items.
Camera: Get a Camera, Lenses, Case, Tripod.
Lighting: Get a couple Lamps, Reflectors, Filters, Light Stands.
Audio: Get a Microphone, Boom, Blimp, XLR Cable, Recording Device, Headphones.
There is always more, but these would be a good starting point. Not everything I recommended is needed to get started though.
I carry this 5 in 1 deflector / diffuser thing. Its definitely useful.
I often hold it myself with 1 hand or have the model hold it. As a diffuser its a bit more difficult but I sometimes use that as a diffuser for my flash. Good thing to have in your kit and it's relatively light and costs almost nothinf. It sits in the front pocket of my camera backpack.
Now we're entering the realm of studio lighting!
1600w in CFLs is about 88,000 lumens :)
I would ask for gift cards, i.e. Amazon and B&H, or money. You can save these up and get nicer equipment or build your own rigs. But a nice Tripod can make a huge difference. But honestly, it all depends on what you film. Such as me, I often shoot on locations so lenses with a faster aperture do more than a set of studio lights. Here are my recommendations for basic stuff to ask for Christmas:
CN-160 LEDs - about $30 (http://www.amazon.com/NEEWER%C2%AE-Dimmable-Digital-Camcorder-Panasonic/dp/B004TJ6JH6/) and of course some NP-F970 Batteries go along well for about another $22 (http://www.amazon.com/Halcyon-Replacement-NEX-EA50UH-DCR-VX2100-HDR-FX1000/dp/B008X9L6ZS/)
Extra batteries - The off-brand batteries work well. I have two and they are great
Extra Memory Cards - I highly reccommend Lexar as my SanDisks don't work insanely well anymore.
Stabilizer Rigs - The Mantis Rig Is A Great Rig for everything (especially starting) and is only $33 (http://www.amazon.com/Mantis-Folding-Rig-Fotodiox-Transformable/dp/B00AUKBV7G) Or if you want to get a glidecam-style I suggest the Laing P-4S stabilizer which is like $275 and includes a bag and weights (http://www.amazon.com/Quick-Release-Plate-Laing-Stabilizer/dp/B00G3TCYQK/)
And My Best Piece of Lighting Equipment - A Reflector which you can get for like $20. (http://www.amazon.com/Neewer-43-Inch-Collapsible-Multi-Disc-Reflector/dp/B002ZIMEMW/) There's plenty of different sizes, too.
It looks like he's just made some reflective cards with card stock and foil.
You can do this with foils or paper. Maybe even buy a reflector and cut it up/stick it on index cards.
Aw dude trust me. I love shooting against the sun, that's why I have 2 flashes and a reflector so I'm ready for anything.
Check out this link. It's 40 bucks for 5 different reflectors and a stand so you won't need someone holding. Careful on windy days tho, it may fall over. You can combat that with a sandbag.
Amazon Reflector Kit
Something like this:
https://www.amazon.com/dp/B002ZIMEMW/ref=cm_sw_r_cp_api_i_mSc4CbNSK5KMC
If you have a tripod you can then use it to reflect the light right onto your subject so you can have the light source behind them but still have them lit well!
I would recommend getting something like this. https://www.amazon.com/Flash-Diffuser-Reflector-Kit-Positionable/dp/B01LZRBOME/ref=zg_bs_3109909011_6?_encoding=UTF8&amp;psc=1&amp;refRID=2E181RY1A0V589V7XBA1
Yep, LED lights are your best bet- they are small last long on battery power, do not emit heat, and depending on the one you get they can come with a temperature(as in color temperature- blue and yellow) dial as well as a dimmer dial. Something like these:
http://www.amazon.com/Dimmable-Digital-Camcorder-Panasonic-Samsung/dp/B004TJ6JH6/ref=sr_1_2?ie=UTF8&amp;qid=1346276906&amp;sr=8-2&amp;keywords=camera+light
First I would get a 10 dollar bag of reflectors though- use them the right way and they are more valuable than a light.
http://www.amazon.com/NEEWER%C2%AE-60CM-Light-Collapsible-Reflector/dp/B004ATJDVY/ref=sr_1_4?s=electronics&amp;ie=UTF8&amp;qid=1346277225&amp;sr=1-4&amp;keywords=light+reflectors
EDIT: Sorry I'm kinda lazy and didn't shorten the link these better
Seems like a decent kit, a tad expensive maybe for what you actually get though, but I'd invest in some grippage either way so you can shape the light. While softboxes do provide nice large, soft sources, they result in a lot of spill. Maybe get a couple sets of these and rig them with these if you can with extra stands. If you can get your hands on some duvetyne and blackwrap you could also probably make some DIY solid flags and barn doors. Basically, to make it look good, you'll want to sculpt the light, not just turn them on and point them in the right direction.
If you do end up using that kit, also be weary of using the provided fluorescent globes as they'll probably have a green shift to them. Easy to correct this if they're your only light source with a FLT filter for your lens but if you're going to be competing with daylight you should have some minus/plus green gel on hand to match them. As far as I know, those kinds of fluorescent globes can't be dimmed (if they are they start flickering) so if you want to be able to control the light output that way you should use incandescent (if you can find any) or halogen globes, some hand squeezers (dimmers) and some CTB/CTO gel in various strengths.
Zoom isnt a bad investment, but you might be right. Honestly, don't go gear nuts. Even with the advice i gave above which i think is a way to spend two grand thats not what id do. Id use what I already owned and find some other people and beg borrow and steal as much as i could. Spend that 2 grand on a actual movie, and try and put every dollar on the screen.
I totally get the concept of wanting to have gear for multiple shoots. But I think you will learn a lot from just jumping right in. Shoot a short for 50 bucks with your friends over a weekend. then shoot another for a hundred bucks, and build on that. After that use all you learned with the rest of the dough to make something longer. I know it sounds crazy, but you can do it if you budget and write the script around things you already own and have access to.
More than anything a project you believe in will last longer than any piece of gear.
But if you are dying to buy something start with some simple paper lanterns mixed with a reflector you can get some good looking stuff, great soft light, and you learn some basic lighting skills. You will still need a few stands. But you can get away with a lot with these because they are light. Use practical lamps and natural light to fill out your scenes.
http://www.amazon.com/Hanging-Lantern-Cord-Off-Switch/dp/B007RPRYF0/ref=sr_1_2?ie=UTF8&amp;qid=1452219709&amp;sr=8-2&amp;keywords=china+balls
http://www.amazon.com/White-Chinese-Japanese-Lantern-Diameter/dp/B0026XVQ3Y/ref=sr_1_1?ie=UTF8&amp;qid=1452219709&amp;sr=8-1&amp;keywords=china+balls
http://www.amazon.com/Neewer-43-inch-Collapsible-Multi-Disc-Reflector/dp/B002ZIMEMW/ref=sr_1_1?ie=UTF8&amp;qid=1452219787&amp;sr=8-1&amp;keywords=reflector
I think lighting is important if you are planning to conduct interviews with lots of people as sometimes natural lighting may be quite risky. This link is for two softbox lights for £50. I haven't used these but I plan on buying them in the future and they are reasonably cheap and have good reviews
https://www.amazon.co.uk/Abeststudio-Continuous-Lighting-Photography-Softboxes/dp/B01F59NSX6/ref=sr_1_5?ie=UTF8&amp;qid=1502643124&amp;sr=8-5&amp;keywords=softbox+lighting
At the very least I would get a 5 in 1 reflector kit just to get even lighting for interviews. Only £11
https://www.amazon.co.uk/Translucent-Collapsible-Reflector-Photography-Situation/dp/B002ZIVKAE/ref=sr_1_1?ie=UTF8&amp;qid=1502643168&amp;sr=8-1&amp;keywords=5in+one+reflector
Then I would get either the Zoom h1 and the Rode Videomic or just the Rode VideoMic Pro with the +20db setting on (both come to around £140). However you may be able to get away with your mic on a stand right above or below the interviewee. You'll have to do more researching as I don't know about microphones for interviews.
As for other things I think that would mainly be it.
Requiem for a Dream!
It is truly a great film- amazing cinematography, haunting score, superb character development and connection. It definitely can be depressing, but I think the film's themes about loss, desperation, and unfulfilled dreams are just so poignant.
I really could go on and on and on about this film- and I actually have in other contests that ask about favorite movies, hehe. But I won't bore you this time! ;)
Seriously though, if you haven't seen this movie yet. Watch it. Watch it right now! =D
Here's my $5 item: some China Glaze nail polish
And here's my $20 item: These awesome reflectors! I'm a newbie photographer, and these reflectors would help me out so much with the work I'm trying to become skilled at. =D
Thank you so much for hosting this contest, by the way! As amazing as it would be to gift a $20 item to someone, I feel like it's really fun to spread the wealth! My vote is for four $5 gifts! Thanks again! =)
If you have not done lighting before, you should really practice first, and you should simply buy before renting. If you don't know how to use basic cheap equipment, you'll have even more problems trying to use higher end equipment.
I would buy instead of rent, it's about the same price and if you learn how to use it properly you'll get the same results. The reason pro equipment costs a lot is not because it makes your photos better, it's because it's more reliable, quick, etc. Lots of pros don't always use pro equipment.
Neewer TT560 - $40
Flash stand with umbrella - $33
43" reflector - $13
Total: 86
Stand the model in front of a white background, put the Flash and umbrella at a 45 degree angle from the subject, hold the reflector on the opposite site to use as a fill. Use photoshop to turn the background pure white.
If you want to go super budget, buy 3 canlights from home depot ($7 each), buy 3 150w equivalent dailight CFL bulbs ($13 each), and a piece of white foamcore board ($1) for a total of about $70 depending on the pricing close to you. Use one can light as a key, use the foamcore board as a fill, use a 2nd can light as a background light, and the third as a backlight for the subject. You will of course need something to clamp the lights on. If you are doing full body shots you can use a white shower curtain as a diffuser for the key canlight.
Here's a lighting tutorial that you can use to get some ideas too. This site has a lot of tutorials you can check out. Ignore the pro equipment, it can almost all be swapped with DIY or cheap equipment.
http://www.amazon.ca/gp/aw/d/B003Y2KC7W But looks like the price went up for that size. Look at the other stuff by Fotodiox, pretty inexpensive.
In last week's 'ask anything' thread there was a discussion about studio lighting for film in which I mentioned picking up a cheap 5500k CFL continuous setup -- this one -- and there was a question of how well the florescents would play with film. I said I'd post some shots from my first test roll, so here are a couple of frames:
one, two
Thoughts/notes:
Hopefully this is of interest to some!
Terrible translation on my part but I think the proper English term is reflector. Something like this.
It's great for the following (and I quote from their site):
1 Translucent surface for softening
2 Silver for the contrast you look for
3 Gold for warm tone and health
4 White to fill the shadow
5 Black to block out stray light
It's probably one of the most versatile products you can buy for such little money. Translucent is great for days with hard edged shadows. Gold gives you sunshine. Black can create shadows when there are none. (removing light is also shaping light)
Can do nothing but recommend it to you
Hello /r/Photography!
I wonder if I can turn to some professionals and camera enthusiasts for some assistance..
I am primarily a retoucher, I have been retouching for over 5 years but I have always had a problem with getting the rights to show the before and after images so I decided to get a professional camera and get into photography myself.
if you are interested my portfolio can be found here: http://www.lulielens.com
Since I have been looking at images for a long time I already know what kind of look and style I would like to get, but I am completely clueless on the topic of camera gear and equipment (though I am looking to change this).
First here are some example images I like in terms of lighting:
Example 1
Example 2
Example 3
Example 4
Example 5
Here is my semi-final list. Could you equipment pros let me know if they will work properly together, or if I missed anything else you think I might need (to start with).
I have a Canon 5d mark ii with a 100mm/2.8f lens.
Thank you for taking the time to help!
this will do the job
no problem. btw I use these
December 8th, and a boy! Congrats! :D
$20
$40
https://www.amazon.com/Westcott-301-Basics-40-Inch-Reflector/dp/B000NFIW98
I love these. Works terrific for bouncing or diffusing natural light also
I've been meaning to write up a guide for this...
If you Google around for cheap light kits, you'll see a lot of "clamp light" builds. I recommend skipping those. Knockoff LED panels have gotten good enough that I think you're better off buying them instead. The clamp lights, to me, are more pieces and trouble to set up, tear down, and travel with than they're worth and they look extremely amateur, which is a problem if you're doing corporate work.
Before you begin, the key to remember is that the smaller the frame, the more cheaply it can be lit. Shoot tight to make your cheap lighting go further and look better.
First, use the sun. Position your subject as if the sun is your key - around to the side a bit so you get some light wrapping. Then bring in your popup light modifier and stand and set it up to diffuse the sun. This almost always looks great and is very cheap and easy to set up.
Next, get a bucket of CN160s and some knockoff Sony NP batteries. Shoot a few of them through your diffusion ring to get a bright enough key, then bounce the rest of them off of white foamcore to get nice fill lights and to fill in the room.
$200 or so will get you pretty well set up - less depending on how many LED panels you want. It's hardly the BEST kit, but it's an excellent, effective, and compact CHEAP kit.
Check out amazon for reflectors. There is a couple 5 in 1 (white, silver, gold, translucent, black) for less than 20 bucks that are pretty good quality. I Got this one two years ago and its held up great although you might want something a touch smaller in size.
When you bounce off a wall, you're simulating a much larger light source (the whole wall). Outdoors where there is nothing to bounce off of, try putting something large and translucent (a scrim) between your flash and your subject. Look at http://www.amazon.com/Neewer-110CM-Collapsible-Multi-Disc-Reflector/dp/B002ZIMEMW/ref=sr_1_3?ie=UTF8&amp;qid=1371494710&amp;sr=8-3 and http://www.amazon.com/Fotodiox--1-4872-Premium-Reflector-Collapsible/dp/B003Y2EOBW/ref=sr_1_5?ie=UTF8&amp;qid=1371494710&amp;sr=8-5 and http://www.amazon.com/Fotodiox-10BG-57-DIF-KIT-Collapsible-Diffuser-Lighting/dp/B003Y2KSF8/ref=sr_1_6?ie=UTF8&amp;qid=1371494710&amp;sr=8-6
Or just make your own with some PVC pipe and white ripstop nylon. I'm sure you can find plans online for gratis.
The strobe illuminates the entire surface of the scrim, which then acts like a big sexy window light. This is what you want. If it's really sunny out, you can use one scrim to create portable open shade, and another to bounce the sun under it for fill light, and then you don't need a strobe at all. Just two or more minions to hold reflectors for you.
This! Because everyone could use a little bounce in their lives. :P
I'm a novice, but I've always liked doing portrait like shots, especially in sunlight, and would love one of these to try out.
"that was easy"
A picture of myself not so easy :(
http://www.amazon.com/Neewer-110CM-Collapsible-Multi-Disc-Reflector/dp/B002ZIMEMW/ref=wl_it_dp_o_pC_nS_nC?ie=UTF8&amp;colid=DERATFVJ39H3&amp;coliid=I3T241PV8QSZA5
You need something with a lot of zoom range, and the ability to slow motion down dramatically, without jumpy frames. The cheapest way to do this is with a DSLR.
Canon cameras do 60 frames per second, but only at 720p (which might be fine for what you're trying to do).
The GH3 can do 60 frames at 1080p, which is great, but you're going to blow your entire budget on the camera alone.
My recommendation is a t4i, and a kit lens, and an additional zoom. The low speed of the lens (meaning not good in low light) shouldn't be a problem if you're filming out on the golf course during the day.
I think the most important purchase you're going to make is a tripod that can let you get VERY low to the ground. I recommend the Manfrotto 055xPROB, sold here: http://www.amazon.com/dp/B000UMX7FI/ref=cm_sw_r_tw_dp_yKzTrb1FF869D
If you don't want to futz with separate audio systems, get a Juicedlink box, mount it under your camera, and run your lavalier mic into it.
Also, you must invest in a light-reflector. They are very cheap, and will make your videos look a thousand times better, by filling in the strong shadows that the sun makes. Seriously there is no reason for not buying one of these: http://www.amazon.com/dp/B002ZIMEMW/ref=cm_sw_r_tw_dp_YMzTrb0GDSEDR
Follow my advice. All this stuff will keep you under-budget, and gives you some expandability if you're happy with it. Let me know if you have any more questions.
Good luck!
I just recently started using this one. Maybe not the highest quality, but I do photography just for fun right now, so there's not much point in shelling out $50 or more for a nicer one. It does the job and it's easy to carry.
Try this. Better than a homemade one, and only $10.
Foam boards. Large one is about $5 at Stales/Office Depot. Or cash in your change jar and go buy a $10, 5-in-1 reflector on Amazon
What rates have you charged for nightclubs and guest lectures? Rates vary by market.
Figure out your hours and hourly first. Sounds like 14 hours total to me. Lights are easy to figure out. Lastly beyond your hours do you charge for your licensing? Either through print sales or DVD sales?
BTW: my recommended lights for this are Yongnuo 560IV. Stick them on a stand to light the room. No umbrellas during the party, but umbrellas for groups. One extra 560 on the camera to control the others and fill. A Joe Demb Flip It is the most amazing tool. http://www.amazon.com/Demb-Classic-Flip--Articulating-Proportion/dp/B0089NBPO0/ref=sr_1_fkmr0_1?ie=UTF8&amp;qid=1464016999&amp;sr=8-1-fkmr0&amp;keywords=joe+demb
That would definitely work for food or any other product/still life photography. Only thing with the box is that you're limited to solid color backgrounds, unless that's what you want. With a reflector like this you can diffuse/reflect light and compose the background however you want.
Hey guys, I have a really specific request for aid in equipment - I need a tripod-like device to hold a 41" Neewer circular reflector. Some like this but that's a 39.7" bar and my reflector is alas an inch and a half too long. (I assume it needs to be smaller than the cross bar, unless I don't hold it at the sides?)
This is the reflector I'm using that one needs to hold
Anyone got any recommendations?
The colors and tones are very nice!!
Overall I think positioning the model in a manner that increased the amount of light on their face would be beneficial. A typical roll of thumb for portraits as well is trying to prevent things from doing through the models head. The background here while nice and blurry is still distracting and doesn't particularly add anything to it. If the background isn't adding meaning to the picture itself then it should be used to help compose the image. Here you could have potentially used the background to frame the model.
The pose itself seems a little awkward, if I had to put words to it I'd say that your model looks disembodied due to the tight framing cutting them off (there's a reason headshots are typically centered!).
All in all the edit is great!! The background lighting works very well, and if you'd like to add some light on to the subjects face in a back lit situation look into using a reflector or even a cheap flash with a softbox modifier!
I've never used those but you could try taking a few shots to see how they come out. Or use one of these: https://www.amazon.com/Neewer-43-inch-Collapsible-Multi-Disc-Reflector/dp/B002ZIMEMW. Also read this: https://digital-photography-school.com/reflectors-secret-weapon-amazing-portrait-photography.
If you want spend for branded quality that is and is rather robust (even though it will be in the office and not traveling with you for diff film sets) go with the aperature branded products
However if you want some good budget lights and can buy some bell and whistle add ons to help with your set up later, go with Neewer 660 LEDs here and their 5 in 1 reflector kit here
Personally I love Neewer as they have a solid product and if you take care of it, as you should for all of your equipment, it will last.
My recommendation: a multi-way light reflector
generally around $15, yet so freaking practical
You might want to try a Rogue Flashbender. That can help you either bounce and diffuse the flash in a particular direction. I have the biggest one, and it's another tool I use when I'm in a space with high ceilings. If the flash washes your son's skin tones out, you might want to try putting a tungsten gel on your flash. That might help give him a little color, or at least warm him up a bit.
Is it an actual light or a reflector?
To me it looks like one of those reflector photographs and movie maker uses.
Edit: like this: https://www.amazon.ca/Translucent-Collapsible-Reflector-Photography-Situation/dp/B002ZIVKAE
I've used softbox kits outdoors for fill on actors' faces, but a simple reflector/bounce will be far superior outdoors. If you increase your budget to $45, you can buy one of each. $32.99 softbox kit https://www.amazon.com/dp/B07L3FVXGN $11.99 reflector https://www.amazon.com/dp/B07JJ4JZXP
I would recommend a softbox lighting kit and reflector/diffuser to go along with your camera purchase as well! Lighting will make a huge difference in even your phone camera photos.
No prob. And a fill is just like something white you can bounce light off of and onto your subject. Like a white board, stretched out sheet or something to that effect. Or you could buy one if you plan on getting into portrait photography.
Having a hard time seeing if that would help you out much with the shot you want to get but i figured it couldn't hurt to mention. :P
I just have the classic, and it seems to work very well. I'll agree with what they're saying, though: that you need to make sure you're balancing the flash with the ambient. It's especially important with backlit subjects, like sunsets, because you'll end up with a really "flashy" (slightly nsfw bikini photos) look if you're not careful. Try to use your flash just to fill a bit, and not to generate shadows, and in general try to make sure that your couple is facing in a direction so as to make the sun your key light.
If they have the ceremony with the sunset in the background, try to use the flash to balance the exposure a little, but realize that if the whole photo is perfectly balanced the pictures will look strange (though some couples will love how they "pop").
Are the flash attachment reflectors useful?
Things like this:
http://www.amazon.co.uk/Rogue-FlashBender-Small-Positionable-Reflector/dp/B003UOIMBW/ref=sr_1_6?ie=UTF8&amp;qid=1422190550&amp;sr=8-6&amp;keywords=flash+reflector
Are there any recommended ones?
At first I wasn't digging the flash, but it's growing on me. I do feel like you could drop the highlights just a hair. His forehead is glowing a little too much for my taste.
Side rant, as a bass player that uses ampeg equipment, setting an ampeg head on a hartke cabinet is pretty much the worst thing ever.
Also, have you ever tried one of these:
Rogue FlashBenders ROGUERELG Large Positionable Reflector https://www.amazon.com/dp/B003UOIMAS/ref=cm_sw_r_awd_ZKORub1DGZ221
Agreed, OP should get one of these
Thanks a bunch!
Every photo since 2013 makes use of these speedlites : http://www.amazon.ca/Neewer-Speedlite-Panasonic-Fujifilm-single-contact/dp/B004LEAYXY They are regarded as the best speedlites for their quality/price ratio.
I also bought these reflectors : http://www.amazon.com/Neewer-43-Inch-Collapsible-Multi-Disc-Reflector/dp/B002ZIMEMW
I had the silver one positioned at a 45 deg. angle acting as a key light, reflecting the sun coming out the window.
I'm playing with some umbrellas and softboxes these days, but I'm achieving a lot already with my speedlites and reflectors.
Good luck!
I suggest starting with something like this: www.amazon.com/dp/B075JFZ94Z/ref=cm_sw_r_cp_api_i_x-YNDb770TQDE
And just get out there and test stuff out. This should be more than enough to make the effects you want.
You can also look into getting diffusers and reflector kits. Here is another good starter piece for that: www.amazon.com/dp/B07JJ4JZXP/ref=cm_sw_r_cp_api_i_raZNDb7YET0V0
Get a circular reflector set. Those can be had for as low as 15-20 EUR/USD per set.
All those items are pretty cheap. The reflector is 15 bucks on amazon. [The foam core is also about 15 bucks]
(http://www.officedepot.com/a/products/334961/Office-Depot-Brand-Sturdy-Board-Foam/) (and get a black version for your flag). And yes, foam board is used for bounce. It gives off a spread-out, diffused light that's good for a lot of situations.
You're biggest problem will not be the microphone, but what you're recording your audio onto. I found out really quick that the audio recording of a DSLR, regardless of microphone, is terrible in quality and with plenty of static noise. I use a Tascam DR-05 to record audio, in combination with either a RODE VideoMic or a lavalier (there are some really cheap ones that do an ok job for low budget productions). The Tascam DR-05 also has a pretty good mic built in , so you could probably start with just that. Remember to record the audio with your Tascam (or recorder) AND with your camera, so that you can easily sync them in post. Always remember to record a minute of silence in the room BEFORE filming so that you can have a room tone (or world tone, if outdoors) sample that can be for adding a more natural ambient sound for portions you may silence in the video.
I would also recommend you pick up:
a three point lighting kit for indoor shooting (like this one: http://www.amazon.com/Fancierstudio-Lighting-Hairlight-Softbox-9004SB2/dp/B0047FHOWG/ref=sr_1_4?s=photo&amp;ie=UTF8&amp;qid=1450430338&amp;sr=1-4&amp;keywords=three+point+lighting+kit),
a variable ND filter for outdoor shooting (like this one: http://www.amazon.com/58mm-Variable-NDX-Fader-Filter/dp/B00QVOQWM4/ref=sr_1_7?s=photo&amp;ie=UTF8&amp;qid=1450430377&amp;sr=1-7&amp;keywords=variable+ND+filter)
a reflector, for bouncing off light outdoors... (like this one: http://www.amazon.com/Neewer-43-inch-Collapsible-Multi-Disc-Reflector/dp/B002ZIMEMW/ref=sr_1_1?s=photo&amp;ie=UTF8&amp;qid=1450430475&amp;sr=1-1&amp;keywords=reflector)
Extra batteries of course.
You'll find these tools useful for getting higher quality audio and picture, there are lots and lots of tutorials on YouTube that will help you learn very quickly how to use your equipment. On a final note, I don't think the Rebel SL1 was a good choice of camera. If I had to pick a Rebel camera for video, and was limited in buget, I would have gone for a Rebel T4i or T5i, in combination with magic lantern. Another important thing to remember, is make sure your SD is AT LEAST class 10 (I recommend Sandisk Extreme pro 95/mbps 32 or 64gb), and NEVER use a mini sd card with an adapter (I've had bad experiences with this).
Best of luck to you, and happy filming!
Which lighting would look more natural, flash with a softbox pointed at the subject or a flash with a deflector attached "bouncing" at the subject?
---
I was thinking about getting a film camera and the N8008s seems like a good choice, but I don't have any Nikon lenses, can anyone recommend a good cheap 50mm that would work on it? It's ok if its manual.
---
In your opinion do you think a used GoPro Hero 2014 for like $60-$70 is worth it mainly for casual timelapses and some underwater footage?
Possibly a camera bag, or if she likes to collect cameras you could always pick up a fairly decent working film one for ~100-200 or often times less if you look harder. Twin lens reflex cameras are always pretty sexy. I got a yashica-mat for around 100 dollars (if you care to see it). Or maybe a reflector if she does a lot of portrait work
Edit: I have a Lowepro SlingShot 202 AW, I like it but I hear mixed reviews from other people. I'm a big guy and I do a lot of walking around/trudging through foresty areas and I've never had a problem with comfort, size, or moving around like others have.
The light is way too harsh on her face, causing some pretty dark shadows. As someone else mentioned, a reflector would have helped a lot, like this
You don't want to have your model facing the sun so much that she squints. Also, I think the color of her shirt isn't the best for her skin tone and surroundings. There's not a lot of contrast between her and the background. On the plus side, I do like the natural pose.
I was using Profoto gear that my school provided. I'm not sure of any resources for studio classes outside of college, but I know they exist. Most major cities have photography or art communities that offer classes and workshops for the general public. But you don't need fancy lights to shoot product natural light and a diffuser will work wonders.
(Not the original commenter, but I thought I could help out a bit)
I'm sorry if I come off as mean or anything. I'm really just trying to help you become as good a filmmaker as you can be. Don't be discouraged and I urge you to just keep making films (practice practice practice).
Let me know if you have any questions.
The soft-box I used is about the size of her, so it's not huge, I think 24"x24". I think you could even use a bounce of the rim light as key - if you've got an assistant, just get a huge reflector with a cover. Maybe use the silver or white side to differentiate between the twilight light and it.
I'm trying to up my portrait photography game.
The baby is lying beside a full-length window (sliding glass door). I made a light reflector out of tinfoil, to try and prevent the shadows from becoming too deep--would an actual light reflector (like this one--I'm not looking at spending a lot) look much different?
Shot on a canon DSLR D-60 with a 24mm pancake lens.
Any other feedback would be appreciated!
You could always just get reflectors, they are super cheap on Amazon. It looks like this set on Amazon is just $20:
http://www.amazon.com/gp/product/B002ZIMEMW/ref=oh_aui_detailpage_o03_s00?ie=UTF8&amp;psc=1
The only issue is that you'd need a stand to hold the reflectors which is more pricey or you'd need someone else to help out and hold your reflector. There are special reflectors that can be held with one hand and your camera with the other hand but if you are using a big lens then I would think it would be difficult to use both at the same time.
The wide crop works well for leading your eyes for sure and would say looks better. It looks like some of the detail is back in the flowers, but still not very high. I believe that is due more to it being bright outside and just having detail bled out from the sun. Thinking about that did remind me, that if you have a light reflector with a translucent/shoot through (something like this: http://www.amazon.com/gp/product/B002ZIMEMW) you could have someone going around shading the plants for you so you have even lighting, but this could cause it to be too dark? You'd have to see, but the use of another reflector and then you could throw controlled light back in or use a flash to get the lighting desired.
Audio is everything.
Also, buy this: https://www.amazon.com/gp/product/B002ZIMEMW/ref=oh_aui_search_detailpage?ie=UTF8&amp;psc=1
I purchased that reflector when I started shooting seriously about 5 years ago, and I still use it regularly. It reflects, it diffuses, it flags, and it fits in most bags.
We keep one of these in every camera bag. Comes in handy whenever you need a reflector or to white balance.
https://smile.amazon.com/gp/product/B005M09B4E/
Sorry for the delay. Here you go:
Lights
reflector
reflector holder -not necessary but very useful if you don't have a helper.
Camera: canon t6 refurbished $350
audio: rode ntg2, an xlr cable, cheap boom pole
You can get the mic used for about $200, spend another $200 for a tascam dr-60
A 5 in 1 reflector kit from neewer for another $20
A few clamp lights and 3200/5600k bulbs
An okay tripod for now
And a cheap shoulder rig
That all should come out to around $1000 and should definitely be enough to get you started. Some of the stuff is a bit cheaper and you’ll need to replace as you move on and understand your needs better but there’s not much quality equipment to be bought if you need a whole package for around $1000