Best power oscillating tool accessories according to redditors
We found 65 Reddit comments discussing the best power oscillating tool accessories. We ranked the 21 resulting products by number of redditors who mentioned them. Here are the top 20.
We found 65 Reddit comments discussing the best power oscillating tool accessories. We ranked the 21 resulting products by number of redditors who mentioned them. Here are the top 20.


I've done a number in my house - at least two dozen.
Go get a diamond coated grout removal blade like this, but I use the True Value hardware store brand (Master Mechanic, I think) for about $10 bucks. Use the grout blade to grind out the box outline, then pop it out with a putty knife or painter's tool. Then switch to a wood saw blade for the wood lath. The less you grind on the wood, the longer the blade will last. I am on my second grout blade - and the first wasn't diamond coated.
I keep a shopvac hose where I am cutting, but that's up to you. Dust is created, but it isn't really thrown about like a circular saw.
When cutting the wood lath - I make the horizontal cuts first., Then when cutting vertically, if you cut all the way through a piece of lath on one side, it will want to vibrate and be tough to cut on the other side. So make a half cut, leaving a bit of material to keep it from vibrating, and go back and do the other.
A lot of good suggestions for pens, I think the many different Chinese pens from Wing Sung and Moonman are good options, and you can price them to match what you want. I think the Moonman 80s, both standard and mini sizes, are also good options. Nib sizes are generally 0.5mm, but you can swap in Parker 45 nibs if you want, so could grab an accountant nib and put that in the Moonman for a very fine line.
Bot I think the biggest thing is to take the advice of /u/DontTakeMyNoise and read up on nib tuning. It is a simple thing that will make your fountain pen life much better. I would skip the brown paper bag though, and just get micro-mesh or a micro-mesh nail file. It just works better. For example, https://www.amazon.com/MICRO-MESH-SOFT-TOUCH-SANDING/dp/B000H6EC4C would do all the smoothing you would need, and in general, this https://www.amazon.com/Pink-Lizard-Sanding-Polishing-Bending/dp/B01ING00ZM would be all you need to finish polish a nib. Be sure if you look at nail buffers that the one you get has a 12000 grit side.
As a cheap student, you have lots of time to learn this, and it will give you more joy out of the pens you have. I would still recommend some of the others here, the Wing Sung 601, 698, the Moonman 80s are all great pens, and the Wing Sung 3008 or 3009 4 packs are amazing deals for their price. But make the ones you have work well too.
Oh but they do!
https://www.amazon.com/Double-Outlet-SQ1000-D-Oscillating-Multi-Tool/dp/B071J8TJVK/ref=mp_s_a_1_4?keywords=oscillating+tool+box+cutter&qid=1569617738&s=gateway&sr=8-4
I wanted to stain the entire dresser, that's why I sanded the whole thing down fully. Unfortunately, and after doing all that work, I realized the drawers weren't in good enough condition to be stained. The two small drawers had a separate piece of wood with flower engravings on them that I pryed off. The piece underneath of that wasn't solid wood. As I was sanding away the wood glue used to help keep the top piece in place I ended up sanding through the veneer. Also, the rest of the drawers had relatively large holes in them from the old hardware.
I sanded the large surfaces with a belt sander. That was quick and easy. For the contours I used both a dremel contour sander and a dremel multi-max. That part was a pain in the ass.
I used a Minwax wood finish stain. Classic Gray #271
Here's the answer
for polishing plastics to optical clarity
It's hard to beat micro mesh pads for cleaning up a stem.
https://www.amazon.com/dp/B000H6EC4C/ref=cm_sw_r_cp_awdb_kgQzzb3WXJ24T
Oy vey. I drank the Festool Kool-Aid a few years ago and it's a very polarizing brand in some parts (largely due to the price tag; think Apple products). I own a pretty sizable chunk of Festool tools and they all have their pros and cons. I don't swear by them as the end-all be-all tool but as a tradesman and someone that both works in the field and is short on time, they fit my "process" quite nicely. Anyways, without further adieu:
I own the Domino DF 500 Q and love it. That said I think if your dad is drooling for a Domino you should consider the Domino XL DF 700. It's a lot of cash ($1,400) but it'll do pretty much anything your dad needs (and they also make an adapter that lets him use all of the DF 500's bits to make it that much more versatile)
So assuming you do spring for that there's over half your budget right there (gotta love the green kool-aid) but there's literally no other tool like it on the market and I think it's truly worth its weight in gold.
With that taken care of and assuming you're not sick of riding the Festool wave I'd highly consider a dust extractor. They make numerous sizes but I'd offer up the CT36 as a recommendation or even the CT26. I own the CT48 and it's a bit cumbersome and if I had to do it over again I'd opt for a smaller one. If you go for the Festool CT26 you're looking at $650 but I do think the dust extractors are great tools.
Okay, so you've got your Domino and your CT26 and are $2,075 of your slotted $2,500. Now it really gets to personal preference. At this point I think I'd suggest the ETS EC125 with the 150mm Hard Sanding Pad.
I love the EC125 and a reason is because you can put the larger 6" pad onto it and have both the 5" / 6" sander (they both use the same motor). Lots of bang for your buck there and I personally feel the EC125 is the best sander I've ever used (save for some of the pneumatic sanders).
So of your $2500 you're $4 over budget should you opt for all those tools. BUT WAIT - most places will let you "bundle" the Domino w/ a dust extractor and take off 10%. Just go to a place like Hartville Tools and look for "package deals" and you can find them for the packaged price. Here you go: Festool Package
Anyways, hope that helps you out. If you have any questions just let me know about any of their tools. I don't own all their tools but I do own a handful and I'd be happy to give you any knowledge I might have that can help you.
get some micro mesh pads, soak it in a mix of water and oxiclean and then go at it with those pads in ascending grit order. Then dab a cleaner in the oil and rub it in. Remember a dab will do you. Keep oiling it every so often to keep it nice.
I don't know the ins and outs of pipe restoring, but this website has all the info you'll need:
http://rebornpipes.com/
/u/Flatticus, /u/scriptonic and /u/federalmng are the best restorers I can recall on this sub (sure I'm missing others though). Hopefully one of them will see this.
The stems on quite a few pipes are heavily oxidised. The only way to fix that is by sanding them back as far as I know. There's a solution that is used to help in the process, I know it's on rebornpipes but I can't remember it (can't get the right product in Australia so I didn't make a mental note of it).
Some other good products for the stems are:
A good quality polishing cloth (also available on 4noggins) will be great too, but you might have a bit of trouble polishing them up to a nice shine without using some oil or wax.
Sorry I can't be of more help. Try messaging the runner of rebornpipes or the other users I mentioned. Good luck! And please post updates.
Aside from the increase in tension caused by larger strings the second most important variable is the state of your frets.
If the surface of your frets are chattered/scratched/rough that means when you bend a string you're forcing it over all of those little peaks and valleys in the surface of the fret material which adds resistance and makes bending feel difficult and rough and not nice at all.
Compare that experience to bending over freshly polished frets and you'll never go back.
If you've never had the guitars frets cleaned up you can do this task yourself with some masking tape and a set of sandpaper/pads that go to a really high grit count. The highest grit count pads in those sets feel like leather.
Mask off the fretboard if you're worried about sanding any material there and just start from the low grit up to the high buffing out all the wear and tear on the frets, focusing your attention on long strokes along the length of each individual fret (so the scratches you're introducing follow the path of a bent string...) and keep going until they shine like mirrors.
I like to finish mine with some metal polish and a polishing wheel on a dremel to really bring out the mirror finish (with the fretboard masked off and the body protected, of course).
Keep in mind this is a reductive process (you're removing material...) so if the fret tops are already very worn and flat rather than round you're probably going to want to just do the whole process and do a full fret level+crown+polish which really just means buying a few more tools so you flatten all frets so they're perfectly level with one another, then restore their rounded top (crown), then polish them as above.
Stainless steel frets will also resist the wear and make it so you don't have to do this nearly as often.
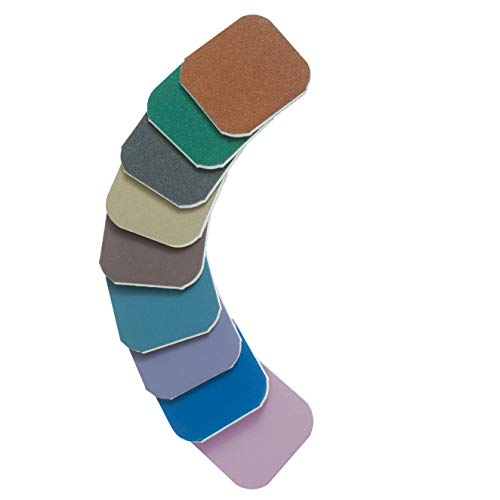
These two things and some tape are all you need for beautiful headlights. You go through the levels from coarse to fine sanding in alternating directions, vertical with one pad then horizontal with the next. You only need to use 4 or 5 pads, I went through the whole set the first time and found the last couple to be too fine to do much. Clear coat after they're sanded and dry and your good to go for years to come.
2 inch by 2 inch Micro Mesh Soft Touch Sanding Pads
https://www.amazon.com/dp/B000H6EC4C/ref=cm_sw_r_cp_apa_i_TuITCbWP205TA
Meguiar's G17804 Keep Clear Headlight Coating
https://www.amazon.com/dp/B01M4RVVX6/ref=cm_sw_r_cp_apa_i_6wITCbNGG9B7W
kind of like this? https://www.amazon.com/SQ1000-S-Oscillating-Multi-Tool-Single-Outlet/dp/B01GKKE2W0
Use Acetone (like goo off) with:
If you have a multi-tool:
https://www.amazon.com/Dremel-MM600-Multi-Max-Rigid-Scraper/dp/B001IZT520/ref=sr_1_3?ie=UTF8&qid=1491324466&sr=8-3&keywords=multi+tool+scraper
If you have a Reciprocating Saw:
https://www.amazon.com/Scraper-Scraping-Attachment-Reciprocating-Multi-Pack/dp/B002GP7GBI/ref=sr_1_1?ie=UTF8&qid=1491324593&sr=8-1&keywords=reciprocating+scraper
If you don't have either, you can pick them up from a harbor freight for fairly cheap.
I agree with the sandpaper but then you can follow it with these pads called micro mesh that go from 1,500-12,000. It should be pretty smooth after that.
I noticed that the writing edge has a slight curvature to it. Did you use a squishy surface like a "pad" to do the grind or something with a solid surface like a stone? I've found that pads don't make the writing surface fully flat and you might want to try with a solid grinding surface in case you want to try on a steel nib in the future. I've found my results to be far better on my whetstone compared to my micromesh pads
very easily it could damage the tile. You could get one of these or if you want you could us a multi tool with one of these
Here are things from my wishlist (past and present)
Wera Screwdrivers
https://smile.amazon.com/dp/B0085NTQJK/
Oscillating blade set:
https://smile.amazon.com/dp/B0109SELWA/
Clamp multimeter:
https://smile.amazon.com/dp/B00NWGZ4XC/
Kreg Jig Jr.:
https://smile.amazon.com/dp/B000J43A7W/
Angled Long Nose Pliers:
https://smile.amazon.com/dp/B00N3VSS4S/
Groove Lock Pliers:
https://smile.amazon.com/dp/B000FK1R0W/
11 ft wifi endoscope:
https://smile.amazon.com/dp/B01MYTHWK4/
non contact voltage tester:
https://smile.amazon.com/dp/B001UAHZAM/
claw nail puller:
https://smile.amazon.com/dp/B0015YPJMY/
Workmate portable work bench:
https://smile.amazon.com/dp/B000077CQ0/
Cable snake fish tape:
https://smile.amazon.com/dp/B000BP7WBO/
9 Outlet metal power bar:
https://smile.amazon.com/dp/B00F8ZQY5M/
Spade drill bit set:
https://smile.amazon.com/dp/B00099E7WE/
36" bubble level:
https://smile.amazon.com/dp/B000UKMWMO/
> The Lathe:
Sounds like you've got this well under control.
> The Tools:
There are very split camps on tools: replaceable carbide tips vs traditional tools. Personally I think both have a place, but I do feel it's best to start with traditional tools to learn the how and why tools work the way they do. My personal opinion is always to spend the real money on good tools. They don't have to be expensive, but the right tool of the right quality (sharp, of course) will make all the difference in the world. Every try to dig a post hole with a hand trowel? :)
Also don't feel bound by just one brand or type of tool...most of us have lots of tools!
You can go with carbide-tipped tools such as Easy Wood Tools, Simple Woodturning Tools, or other brands. You can make your own for a fraction of the cost to buy.
There are a few of good entry-level HSS sets out there for about $80, such as this frequently recommended set of Benjamin's Best. I also like Hurricane brand tools which I feel are excellent entry-level HSS tools for the money. Either of those would serve you well through the learning curve and a good ways into your turning career.
If you wanted to pick just two higher-end tools, I feel Crown's Pro PM are good for the price. I own several, they're nice, but the handles are a bit short for my knuckle-dragging frame! All you really need for the projects you listed is a skew chisel and a spindle gouge.
Lastly, you could buy some of the popular "buy it for life" tools like Thompson Lathe Tools or D-Way Tools. These are widely considered the upper end of turning tools with each tool running between $55-200 (handles sold separately). Many people who get serious about their hobby end up with these tools because the harder tool steels are more durable.
> The Bench Grinder:
The Rikon 80-805 is the most common good deal for a grinder. Occasionally some other Asia-import will pop up on the scene for a little while, but the Rikon is pretty predictable about going on sale. Also, it comes with two decent wheels to get you started; not all import grinders come with decent wheels.
Eventually you might want to invest in CBN wheels to replace the frangible wheels that come on the grinder, but that's probably down the road for you.
Lots of people use that grinder, I've not heard anything outright bad about it (although some people prefer one with more HP).
> Drill Press?
A cheap drill press will get you there just fine.
The most common alternative is to purchase a 4-jaw chuck, such as the Nova G3 (which requires the appropriate insert), and also a set of pen drilling jaws and a drill chuck for the tailstock. That lets you drill blanks entirely on the lathe (and with better accuracy than a drill press IMO).
The downside is that the 4-jaw chuck, insert, jaws, and drill chuck collectively will cost damn near $200, which is a lot more than a cheap drill press. The upside is that the chuck is exactly what you will need if you decide to get deeper into turning and want to try bowls, boxes, and other things. Many of us already owned or planned to own a chuck, so the only real cost addition was the pen drilling jaws and the drill chuck.
> Pen turning attachments
If you plan on using something else for the finish, make sure you buy what you need.
I honestly dont make them myself, i have just watched a bunch of videos. But this guy is amazing at resin work. He recomends Micro Mesh and i know it would be perfect for this. Bit pricy though, but it will SHINE!
In case anyone wants to buy it here's the link
https://www.amazon.com/dp/B00QL51DRW/ref=cm_sw_r_cp_apa_PzXWzbVDTHAJ0
Do you mean something like this?
Afraid I didn't take any, but these are the sanding pads I used.
https://www.amazon.com/MICRO-MESH-SOFT-TOUCH-SANDING/dp/B000H6EC4C
Other than that, it's nothing fancy, just some light pressure and fast movement.
It's normal. Happens on more expensive watches too. Yes, you can try to polish them out, but you may need something more aggressive than cape cod. (I've used small jeweler's polishing pads like these to great effect https://www.amazon.com/dp/B000H6EC4C/ref=cm_sw_r_cp_apa_i_q8RMDb9WW3A5Q)
I reccomend you be more aware of your watch and try to not bump it if these concern you.
Well what you will need to do is determine the depth of the flooring+ the subfloor. After you remove the toilet there will likely be enough room around the flange to measure this, if not then if you can tell me when the house was built/about when the bathroom was last remodeled I can probably give you the info for the subfloor. Also what kind of flooring that is and when it was installed.
I like to set my saw about 1/64" shoter than the depth I want to cut. This way I make my cut and then just finish it off with a box knife. From there the easiest thing to do is cut a small square in the middle of the piece to be removed. This will allow you to stick your hand down with a tape measure and find the joist on each side. Add 3/4" to this measurement to put you in the center of the joist. From there mark it all out and have at it. After that just cut the new piece of wood and screw it down. Make sure to use subfloor screws. They are reverse threaded for the last 1/4" to push the subfloor against the joist as you screw it. This prevents squeaking.
One problem you might run into is that the damage appears to go all the way to the wall. Check this wood to see if it's actually damaged or just cosmetic. If it's still solid leave it, if not you will need to cut up to the wall. For that I reccommend buying one of these it will allow you to make flush cuts. Even after the project you will find a million uses for it.
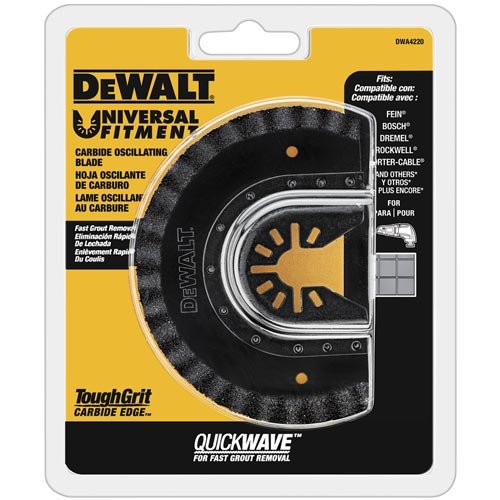
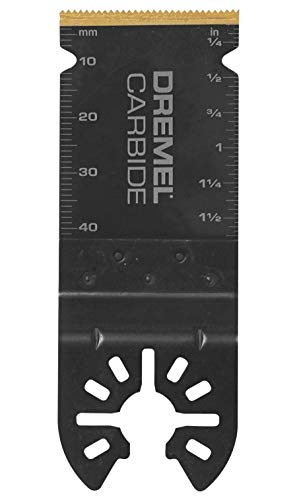
If you have an oscillating tool, the proper blade will make short work of removing the old grout:
https://www.amazon.com/DEWALT-DWA4220-Oscillating-Fastcut-Carbide/dp/B00FRMZVMI
https://www.amazon.com/dp/B01GKKE2W0/ref=cm_sw_r_cp_awdb_t1_BiUgDbZ2QED14 others are available. I've heard of a two gang one too.
I think that's up to the individual brand cause I've seen the little holes on the black ones. But if you are doing a lot of these, they make a oscillating saw attachment to easily make the hole.
https://www.amazon.com/Qbit-SQ1000-S-LV-Oscillating-Multi-Tool-Low-Voltage/dp/B074ZP362W/ref=sr_1_3?keywords=low+voltage+hole+saw&qid=1566675700&s=gateway&sr=8-3
I'm not a fan of buffing the peen job. Too easy to heat the pins and collars. Worse case is they get hot enough they melt into scales.
Even if get a little warm, they pull into the scales, loosening up the pivot pin. Now all the work to make a tight pivot is lost.
Also the washers/collars are thin metal. Often a collar loses a little metal. That leaves a collar that is not a true circle.
What I do like is MicroMesh. If not familiar, it is sort of like sand paper from 1300 to 12000. Just kiss the media to the heads for about 30 seconds on each head. Leaves a very crisp looking pin, with no distortion. If scales are scratched, do the complete scales.
If any delicate adornments on the scales, you might not want to do the scales.
Edit-they make a kit that has liquid polish to be used at 12000 and a soft polishing cloth. On the phone, so can't find the complete kit right now, but here are the pads alone
http://www.amazon.com/gp/aw/d/B000H6EC4C
I'd remove the old grout and replace it with a quality grout that matches the material specifications. A multitool has a great grout removal bit and the tools aren't expensive.
https://www.amazon.com/DEWALT-DWA4220-Oscillating-Fastcut-Carbide/dp/B00FRMZVMI/ref=sr_1_1?crid=1NLC0YQMPX7OZ&keywords=grout+removal+multitool&qid=1572191084&sprefix=grout+removal+multi%2Caps%2C180&sr=8-1
Take the time to sand down the nubs with progressively finer grits. I find these are convenient, http://amzn.com/B000H6EC4C
I also noticed a difference when going from no panel lining to simple pen lining, http://amzn.com/B00GRKPNUE
but similarly, there was a step up when going from pens to wash.
Edit: I also just came across this video; https://youtu.be/hOqkJA4G7HI?t=35m57s
http://amzn.com/B01871I5HS or super thinned enamel paint.
It's $5 at Gouletpens https://www.gouletpens.com/goulet-micro-mesh/p/GP-10014 but I got some from Amazon https://www.amazon.com/MICRO-MESH-SOFT-TOUCH-SANDING/dp/B000H6EC4C/ref=sr_1_2?ie=UTF8&qid=1502855608&sr=8-2&keywords=micromesh
If it's one of the vibrating type, there are blades that work. I have some that came with mine that say metal/wood. I've used it on only a few nails, but it does work.
No idea what's in the UK.
like this
Looks like oxidization, and the smell is a normal part of that process.
Soak it well with alcohol (cover any logos/painted areas on stem with vaseline), then start to sand off the oxidization using micro-abrasive pads. You can get a set from amazon that works well. For bad oxidation, maybe start with some 600 grit paper and then go to the pads. Once you work up to the highest grit, and the oxidation is all gone, the stem will look and smell new.
They are a great tool for restoring old, oxidized pipes.
But if you don't want to do that, then I'd just return the pipe if possible.
So I figured it out. If you add 2 items that are "Prime Day Deals" and it takes both to get you over $100, then it will apply the double discount. So doing the 36-accessory kit you bought, which was >$100 to start, I could only get it to a single discount. But if you start with something like the $88 11-accessory kit and add another Dremel "Prime Day Deal Item" (look for blue banner) to put you over $100, say the $23 Accessory Kit, then you will get double the discount. I see those 2 things combined (once going to checkout, $112 in just the cart) as $75.40 in checkout. I hope you get this in time to cancel your old order and get the extra deal!
Here is the mobile version of your link
Yes it is very possible; I just picked up this set of sanding pads up off Amazon and they work wonders. The smoothest grit actually polishes the plastic. I would very much recommend them!
So, I also try to avoid progressive sanding. My process is to use a heavy cutter to remove parts from the runner, a fine cutter to take the nub down almost flush. I trim the leftovers flush with an X-acto knife, with a little scraping if needed. To get rid of the scratches, I use a 12000 grit micro mesh sanding pad.
I use the same combination of scraping/micro mesh for removing mould lines.
The results are clean enough that airbrushing isn't needed.
http://www.amazon.com/MICRO-MESH-SOFT-TOUCH-SANDING/dp/B000H6EC4C
Used Micromesh https://www.amazon.com/MICRO-MESH-SOFT-TOUCH-SANDING/dp/B000H6EC4C/ref=sr_1_1?ie=UTF8&qid=1483716043&sr=8-1&keywords=micromesh
You're only going to 600 grit. You can use [Micro mesh] (http://www.amazon.com/MICRO-MESH-SOFT-TOUCH-SANDING/dp/B000H6EC4C) sanding pads starting from there.
These pads will give you a very glossy finish by themselves you could use carnuba wax as a protective finish but even though carnuba is very hard (for wax) it won't give you the same durability as a CA finish.
I usually and to 220 or 320 then start layering on the CA. Give that 10-15 minutes to cure then start in with the Micro mesh for a super glossy, durable finish.
You use things called abralon pads. They come in various grit, each one labeled nicely on the back. Heres an example on amazon: https://www.amazon.com/Mirka-Abralon-Bowling-Sanding-Discs/dp/B00CDX82BQ
Any pro shop should have them or you can buy yourself a set. To get to the perfect surface you usually use a spinner in the proshop (again, most proshops should have a ball spinner), but doing it by hand is also effective enough just before competition.
The PSI micromesh sanding pads work fine, and you can definitely get great results with them, but I've had much better luck with this style. Definitely worth trying when it comes time to replace your current pads.
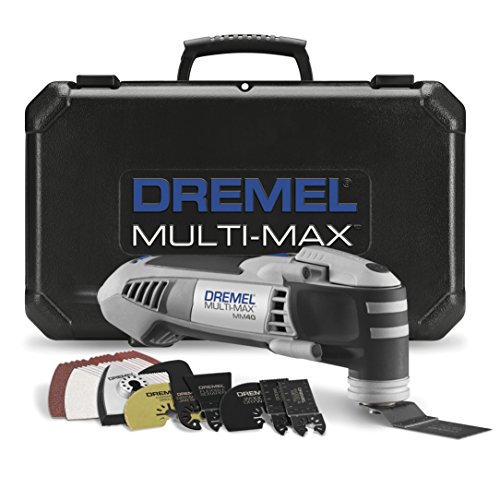
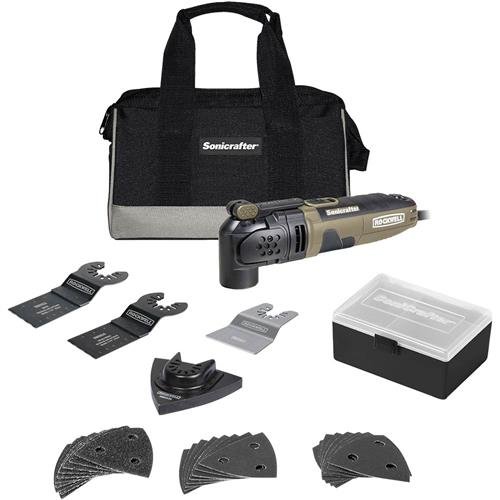
I got the same deal with the Multi Max.
https://www.amazon.com/Dremel-Multi-Max-Oscillating-Quick-Lock-Accessories/dp/B010T0G9I2/ref=sr_1_1?s=hi&ie=UTF8&qid=1468349840&sr=1-1&keywords=multi+max
Upped my order to $100 and got $20 off. Not sure how you got $40!
I absolutely love my Dremel. I've used it for so many different projects in my house.
In some circumstances, I don't know what I would have done without it honestly.
[This is the one I bought.] (http://www.amazon.com/Dremel-Multi-Max-Oscillating-Quick-Lock-Accessories/dp/B010T0G9I2/ref=sr_1_1?ie=UTF8&qid=1462119971&sr=8-1-spons&keywords=dremel+multi-max&psc=1)
Here is the desktop version of your link
I tend to want to stay away from vapor polishing.
I prefer prime and sand. If you don't want paint though: Get what's called "micromesh". They're little sponges that comes in small/large pads, sticks, files, and other shapes and range from like 1000 grit to silky smooth 12,000. You just soak them in water then sand your way up through the grits. You can get a honest to goodness mirror finish on your parts that way.
I got this set and they're great
order these you won’t regret it
Would these be considered better for nibs than the ones Amazon sells for $10? If so I'll order these instead.
Thanks! :-)
The micro mesh can be a bit hard to find...any specialty wood working store should carry it, but it's available online.
http://www.amazon.com/MICRO-MESH-SOFT-TOUCH-SANDING/dp/B000H6EC4C
http://www.amazon.com/MICRO-MESH-SANDING-SHEETS-INTRODUCTORY/dp/B000H6HIK2
http://www.leevalley.com/en/wood/page.aspx?p=62127&cat=1,42500
A cheaper method would be to start with a very fine steel wool, and then use a nail buffer, which is essentially a nail file with micro mesh on it...the "shine" side will be the finest. Both of these could likely be found in Walmart, etc.
sorry, I now understand my own words 😂 but I meant a different electric tool. It’s perfect for corners like this because the tool is thin and it’s working by oszillation. You can cut tiles and wood easily.
https://www.amazon.com/Chicago-Pneumatics-68303-Oscillating-Multifunction/dp/B0085GEJ7Q/ref=mp_s_a_1_4?ie=UTF8&qid=1536261118&sr=8-4&pi=AC_SX236_SY340_QL65&keywords=multitool+electric+oscillating&dpPl=1&dpID=51dnvFKi7CL&ref=plSrch
Well this was my first foray into that world so i'm not so sure I could give great advice on what to buy, but some basics are pretty universal.
For this project I used
-Rotary Tool
-Dremel Multimax (cutting out the basic shape of the scale)
-Sand paper up to 220 grit
-Tung Oil
-Hand Drill
-Table Saw (to cut the piece thinner, DO NOT RECCOMEND super dangerous almost cut my finger off, get a planer instead or buy wood that's already a good thickness)
-Things like screwdrivers obv
​
For my stone stuff i'm gonna use a tile cutting table saw (much less dangerous, spins slower and has water on it) and some other stuff probably, not too sure yet but I'll figure it out I guess.
​
The ultimate takeaway is; basically just get cutting/shaping tools for your rough stuff, drill your holes straight and true, sand it all down with increasing grits, soak it in some oil or coat it in something, and bada bing you have some fancy new scales.
The best way to cut a nail flush with the wall with very little damage to the walls and cabinets is with an oscillating multitool.
​
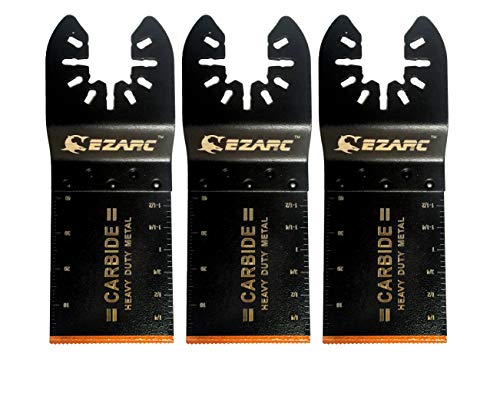
You should give our bi metal oscillating saw blades a try. You can find them on our website or on Amazon.
​
According to Amazon, they are the highest rated oscillating tool blades. They are rated higher than all the top name brand companies on Amazon.
​
​
Again, let's divide these into three groups:
Use some micromesh like this: MicroMesh and then some nice plastic polish after you go through the grits to keep them shiny.
Granted I haven't done this on any dice but I've removed scratches from plexiglass and acrylic this way and its pretty good all said and done.
If you live in the states its going to be a ton easier to get ahold of, but they sell these bigger ones for 20$, which work really well to cut into 4 squares
living in Canada im pretty much stuck getting the smaller ones for 40$ unless I can stand waiting the longer shipping times for the larger ones from the states.
a single bigger set will definitely last you a few sets of keys especially if you cut it into 4. Its also worth noting they last a really long time if you can use them with water, sometimes when using them on wood with an oil finish, i cant use water without ruining the finish so they tend to get kinda clogged up and dont last super long, but with plastic and using water to lubricate they will last you a very long time.
Chinesium blades.
I had really good luck with light sanding, and then burnishing with the aluminum handle of an x-acto knife.
I've also had SUPER smooth results with the wood-fill using sanding/polishing sponges. (https://smile.amazon.com/MICRO-MESH-SOFT-TOUCH-SANDING/dp/B000H6EC4C)