Best power tool accessory jigs according to redditors
We found 250 Reddit comments discussing the best power tool accessory jigs. We ranked the 85 resulting products by number of redditors who mentioned them. Here are the top 20.
We found 250 Reddit comments discussing the best power tool accessory jigs. We ranked the 85 resulting products by number of redditors who mentioned them. Here are the top 20.


There's a tool for that
Woodworking - the barrier to entry can be intimidating at times but in reality you can build a good amount of projects with a saw and some screws. Lots of people make impressive things using just a Kreg Jig and Skilsaw
If you enjoyed the process of making this and see real value in the higher quality results compared to buying flatpack particleboard furniture...
For you next one you night consider buying specialty plywood that comes with a nice hardwood veneer on one side (oak, maple, walnut, cherry, etc). You could also buy a cheap pockethole jig and build a hardwood face frame for the front (for fun). But as long as it's not getting really beat on, the veneer edge banding lasts pretty well.
Even cheaper on amazon + clamp
https://www.amazon.com/R3-Promo-Pocket-Classic-Clamp-Pack/dp/B01G3VP3N8/ref=mp_s_a_1_3?keywords=pocket+hole+jig&qid=1557363005&s=gateway&sprefix=Pocket+hole&sr=8-3
GC here who specializes in decks/rails.
First, get yourself this Pocket Hole Jig (this things is worth every freaking penny), and get some blue kreg 2-1/2" pocket screws from home depot/lowes.
Then add one more layer to your current picture. So you should have 2x4 on bottom, then 1x2, then pickets, 1x2, 2x4 on top, then optional 2x6 for something a little nicer. Doing it this way allows you to place the bottom 2x4 first, then assemble the pickets/1x2s as one unit that you can place on top of 2x4, with final 2x4 on top. Use the pocket hole jig on the ends of the 2xs to attach to posts. this will create an amazingly strong railing. attach pickets to 1x2s using 3 or more 15/16 guage trim nails.
Pic 1
Pic 2
Pic 3
If you zoom in on pic 2 enough on the top, you can see the pocket holes. I filled these in with plastic plugs made by kreg, if its being painted, you could also use their pine ones which make an almost invisible seam.
Also, I HIGHLY recommend using KDAT (Kiln Dried After Treatment) wood. if you don't, the wood will expand/contract after installation causing all of your joints to come undone. its also paint ready as soon as youre done. no need to wait until it dries. Find a specialty retailer for good woods, I'm particular to Madison Woods, pricey, but worth it.
I bought a special tool called a pocket hole jig which essentially drills a diagonal hole into the wood that hides the screw. I had never heard of it until this project, but it's pretty handy.
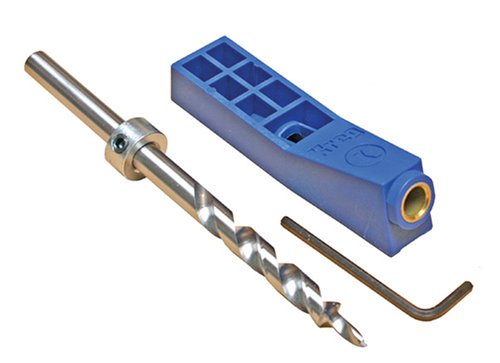
http://www.amazon.com/Kreg-MKJKIT-Mini-Jig-Kit/dp/B00065WPP2/ref=sr_1_2?ie=UTF8&qid=1375465882&sr=8-2&keywords=pocket+hole+jig
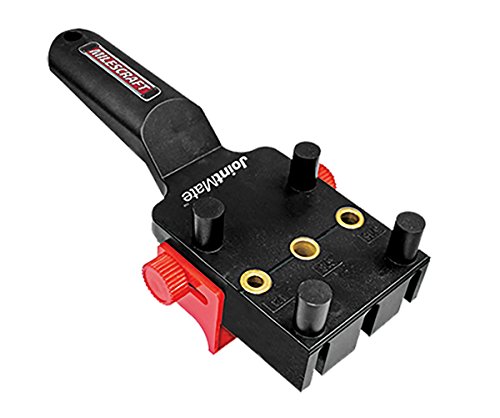
TIL about dowel centers! Thanks for that! I just recently did my first project with dowel joinery and this jig that made it MUCH easier than many tutorials looked using other tools. https://www.amazon.com/Milescraft-1319-JointMate-Handheld-Dowel/dp/B01M8L1WVN
I'm surprised that you used tape instead of actual drill stops. Granted, dowel holes don't need super precise depths.
Girlfriend got me a Kreg K4MS Jig Master System for Christmas!
You can get a smaller version of the Kreg jig for $40. http://www.amazon.com/Kreg-R3-Pocket-Hole-System/dp/B000J43A7W/ref=pd_cp_hi_2
Takes a little more finagling, but I've used mine a ton. Once you've gone pocket screw, you don't really ever want to go back - it is so easy!
I'll probably get run out of town for saying it, but, if you're going to do more of this kind of a project, get yourself one of these or one of these.
No pocket screws aren't as strong as joinery, but for these kind of projects they're fast and work well enough and they'll last longer than the plates/L brackets you used.
You need to invest in a Kreg Jig and fix that jenky-ass book shelf! :P
I have it. The bit sucks. It'll make a hole but it won't be very clean. The jig mechanism is alright but is not as intuitive to set up like the kreg. The screws it comes with are Philips head instead of the typical Robertson. Not that it matters much since you will run out of the ones you need pretty quickly.
In all reality most of my pocket holes are made in 3/4 or 1-1/2 inch material and ive found myself using my kreg mini instead of breaking out the whole jig. Clamp it down, and go to town. It comes with a way sharper bit also. I never use the HF bit anymore even if I'm using the HF jig.
If youve never used the Kreg jig before then I'd say go for HF and save some cash. Id recommend shelling out 10 bucks for a Kreg bit though. So you're slowly creeping up on that higher price.
If you know what you'll be missing then spring for the Kreg. Like I said, 99% of the time I'll just use the mini since it is super simple to set up and get a move on with the project.
Edit: a good middle ground is the kreg R3. My dad has it and it is a sweet little unit!
No, it's a jig for creating pocket holes. I own it, and it works really great. Lets you put in hidden screws that pull pieces together just about anywhere.
http://www.amazon.com/Kreg-R3-Pocket-Hole-System/dp/B000J43A7W/ref=sr_1_3?ie=UTF8&qid=1396413078&sr=8-3&keywords=kreg+jig
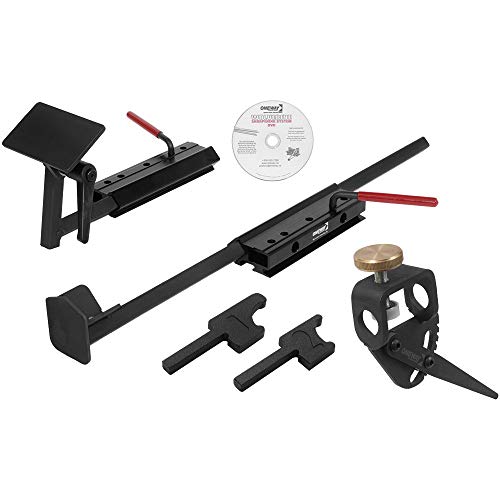
You're probably looking at an initial outlay of $200-$300 for a proper sharpening set up. This will get you a 1/2HP + slow speed grinder and a the wolverine jig with varigrind attachment.
Here are some links:
The Wolverine system comes with detailed instructions on how to set it up and a DVD with further instructions for sharpening.
If you find that you enjoy turning and expect to do lots of it - invest in a CBN wheel or two (CBN = cubic boron nitride). They will last essentially forever and do not require flattening. They are also less dangerous than aluminum oxide wheels... alox wheels are somewhat prone to breaking apart. Since the CBN wheels are better able to dissipate heat (being solid metal), you're much less likely to get burned while sharpening. CBN wheels are expensive though; you can expect to spend north of $100 per wheel.
Edit to add: see the wiki over at r/turning: https://www.reddit.com/r/turning/wiki/index
There is are sections to cover both the bench grinder and various sharpening jigs.
https://www.amazon.com/Wolverine-Grinding-System-VARI-GRIND-jig/dp/B01JAPC6D4/
http://d-waytools.com/gouges/bowl-gouges/
http://d-waytools.com/gouges/spindle-gouges/
http://d-waytools.com/neg-rake-scrapers-2/
http://d-waytools.com/handles/
https://woodturnerswonders.com/collections/rikon-grinders
It really depends on what you want to start building? Any ideas of what your first 5 projects are? For woodworking, I'd get the following.
a) Circular saw. It will make fast work of cutting sheet goods, it's possible to rip boards with decent accuracy, and you can cross cut as well. Super versatile because you can make several jigs and use different blades for hardwoods, plywoods, and even tile. For light, occasional work, you won't notice a difference between a $50 Skil model and a $120 DeWALT model. Just don't drop it.
b) Jig saw. You can also cut plywood and hardwoods with a jig saw, but the results will not be as good. The benefit of a jig saw is that you can make circular (or any shape really) cuts. You can make a low more artsy stuff with a jig saw.
http://www.amazon.com/PORTER-CABLE-PCCK602L2-Lithium-Tool-Combo/dp/B00CM7Z2KW/
I'd suggest a a drill and impact driver set. You can get away with just a drill and use it to drive screws as well. However, with the combo sets, I was able to pick up an impact driver and a flashlight with a carrying case that uses the same batteries for about $20 more than just a drill and 2 batteries alone. The impact driver will allow you to drive 3-1/2" screws into studs like butter.
http://www.amazon.com/Kreg-R3-Pocket-Hole-System/dp/B000J43A7W
This bad boy has made furniture makers out of many that wouldn't be able to in the past. You'll need a good clamp to use with it. Just search YouTube for videos about building stuff. Ana White uses pocket holes on every thing and she makes decent stuff.
"A woodworker never has enough clamps." Everyone knows this.
http://www.amazon.com/Jorgensen-3724-HD-24-Inch-Heavy-Duty-Steel/dp/B00005R1HY
http://www.amazon.com/Irwin-Quick-Grip-Clamp-Set/dp/B00A9KMARW/
I have 6 of the 24" clamps, 8 of the Irwin Quick Grip clamps, and a handful of spring clamps. I've been able to build just about anything with that many clamps... but I've wanted more. If you use the pocket hole system, you'll want to clamp pieces together before you drive the screws.
I went to a Habitat for Humanity ReStore and picked up an old particle board desk that is about 300 lbs for $20. That's what I use. Otherwise, you can build one from 2x4s with the tools above and build your skills.
Squares, Drill bits, Driver bits....
I usually pick up something new for every project I start.
That's about $500 worth of tools and is the barest of bare bones I'd suggest someone to start with if they want to build bookshelves etc. The most important thing you can have is knowledge and YouTube/Reddit is the best place to get it if you don't have a woodworker to physically teach you.
I liked this bike shelf. But it costs more than $1200, and I wanted one that could hold two bikes.
Bought myself a $20 pocket hole jig and some pine boards, and had a double decker together in an afternoon.
Edit: another pic
http://www.amazon.com/gp/aw/d/B00009K77A
I spent $40 on a pocket hole jig specifically for this project. It was more expensive than I wanted, but in the end, I think it was worth it for the results it provided.
It sets you up to drill the pocket holes at the right angle, at the right depth, for whatever thickness wood you're working on
There are a couple ways to do this.
If you want to do it quickly and don't really care about how the details look, get a Kreg jig (I use this one) and put it together with pocket holes.
If you want something that looks nicer than pocket holes, use a sliding dovetail for the top joint and a lock rabbet for the bottom.
Are you going to put a back and/or a face frame on this? As it appears now, you're not going to have a very strong piece. Adding either or both would add strength.
I would avoid those plates, they never seem to hold things tight enough, and they leave sharp corners everywhere, but if you insist on using them get some flat head (that refers to the shape of the head, not what kind of screw driver you use) or oval head screws.
There are a couple of ways I would approach this, depending on how you want it to look at the end. If you don't mind some screw heads in the top, attach a piece of lumber crosswise underneath, like picnic tables are built. Glue everywhere wood touches wood, and screw down through the top into the crosspieces. Depending on the tools you have available you can do anything you want with the crosspiece, angle the ends, round the corners, its up to you.
If screws in the top is a concern, then I would recommend a biscuit joiner. They're not the cheapest tool in the world, and they aren't a tool you'll use every day, but nothing beats them when you want to join two pieces of wood without visible fasteners.
If that's too much money you could consider a pocket hole jig, some woodworkers swear by them, some swear at them, personally I'm not a huge fan but they are cheap and if you glue the joints too it should work fine for your job.
Whatever you choose, get a sanding block and be prepared to sand those joints smooth. Some methods (biscuits) will make smoother joints than others, but they still need sanding to remove the tiny bump that will inevitably remain between the boards.
Edit Oh also, for clamping (which will only really be required if you do the biscuits), tremendous pressure is not required unless you are trying to straighten one of the boards when you clamp it. Put some cardboard or plywood on the edges to protect your tabletop, tie a rope around it loosely, then use a stick to twist the tied rope and put pressure on the joints. Leave the stick in and put something heavy against it to keep it from un-twisting. You'll probably want several of these for the length of your table.
I would say the bare minimum of power tools are going to be a circular saw, jigsaw and drill. Combine the circular saw with a straight edge (i.e. a very straight piece of wood/metal) used as a guide and you can cut out all of your panels.
Then onto the speaker holes. After laying out where the holes will be, drill a hole big enough to fit the jigsaw blade close to the edge of one of the speaker layout lines. Then use the jigsaw to carefully cut out the rest of the hole. This part will take practice to make the best cut. After that, I believe the holes for the rear connections would be all that's left before prepping for construction.
At this point, you have your panels cut and you need to decide where the crossover will live. I'm assuming you have everything to solder the crossover up so I won't address that. But definitely try to plan the placement so you can still reach it somewhat within the box.
Now for the final requirement: Clamps...Lots of clamps. Particularly [bar clamps] (https://en.wikipedia.org/wiki/F-clamp) since they will have the reach to span the length of the box sides when you glue it up.
Of course, this is bare bones. You could always substitute a table saw for the circular saw and a router+circular jig for the jigsaw and get much better results, but I'm not sure how deep you wanted to get into woodworking.
Buy this dowel jig.. Easy and inexpensive.
Agreed, but you'd at least one this guy it comes with the proper bit.
If he was planning on making more than one I'd suggest the full jig, it makes things a lot easier and you don't have to measure every time to get the proper depth... well worth the hundred bucks IMO
hell, with the 40 brackets he used he probably could have paid for the jig and screws...
If you have clamps already, I really like this one:
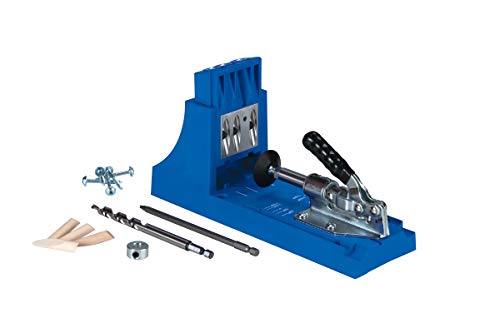
http://smile.amazon.com/Kreg-K4-Pocket-Hole-System/dp/B001DYFISG
If you're going to use it semi-regularly, being able to set it once and then make 20 similar holes is very handy.
If it's just a one-time project, then one of the smaller ones work, too.
literately 2 seconds in google.
https://www.amazon.com/Deluxe-300-Blackout-Case-Trimming/dp/B00H27XAAG
> Alternatively you could go with a hand drill that has a level built in to keep yourself straight, but that is a little more prone to error I'd say.
A good suggestion. The error can be minimized with the us of a "guide", such as a doweling jig.
I understand the reservation, but I think ultimately, you're going to want an impact driver, and it's cheaper in the long run to buy the combo pack for the extra $100. But, if your budget is set at $250, then you probably can't afford it right now. I will say, however, you will end up blowing past that $250 pretty quick. with every project, there is going to be something you're missing that you "have to have". for example, at some point, you're going to need a kreg system to drill pocket holes. So, just know that it's a never ending cycle.
At the time I thought this was an "experimental" cabinet. I had never built a cabinet with drawers before. I used the cheapest slides available, these things.
Don't do what I did. It's not a good place to save money. Instead, spend a little more and get some sexy ball-bearing ones.
My drawers open and close fine, but they have a cheap feel to them, and I suspect that they won't work as well in the long run. Additionally, they were a massive pain in the ass to get adjusted correctly.
Also, I used 3/4" (ish) pine ply because I couldn't find maple at my local home depot, but doing it again I'd look harder and use maple. Again, I wanted to use the cheap stuff because this was my first cabinet, but it was a silly place to save money.
The sweat that goes into making your own cabinet, even a cheap one, is well worth spending a little more on better materials.
That being said, I'm proud of mine. Which reminds me-- I should probably empty them out and put a few more coats of poly on there.
All of the cuts were made with my Festool track saw (it would have been easier with a table saw, but I don't own one) and the "handle" holes were drilled with a forstner bit and the joinery was done with the Kreg Jr. pocket jig and screws.
It probably would have gone just as well with a nail gun and glue, if you don't mind putting a little putty in the nail holes.
EDIT: I just posted a gallery of my process pics. It's not super comprehensive, but I'll be happy to explain anything that doesn't make sense.
Best tip:
Get a chop saw from harbor freight
And a jig from Amazon if you're doing more than 20 rounds. It will change your life for the better.
The other commenter is right on - this is the Jon Sine Desk.
A few things I’d note:
Hope this helps. Happy to help with any additional questions you might have as you get into it. The project was a lot of work but has a very rewarding end result :-)
What is your budget?
A Kreg Jig would be a nice gift for someone starting out, although most people in this sub would turn up their noses at the sight of one.
Edit: also clamps, you can never have enough clamps. If you have a harbor freight nearby these are really cheap and work well enough.
It would not give you a square corner, sorry I wasn't clear about that. You would either have to square out the mortise or round off your tenon, as other posters have mentioned. I am not aware of any router bit that would give you a square cornered mortise.
As far as that video, what he's doing looks completely fine. If you have a festool router and guide (or are willing to shell out ~$600) go for it. Most major brands selling routers will also offer edge guides for their plunge bases as well, of course. This is definitely a reasonable alternative.
The advantage of a template is that all your mortises come out identical to each other. This is really helpful in saving time fussing around fitting your tenons.
EDIT - If you don't feel up to doing it with a chisel something like this can be helpful in squaring out corners.
Are you talking about the spacing of the drill holes or the the angle in which they are drilled? Either way, use a jig to solve both.
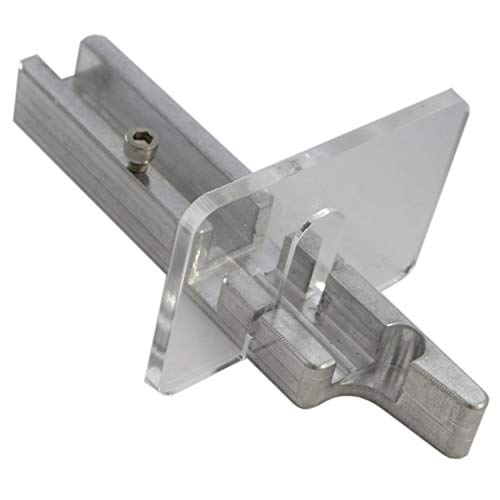
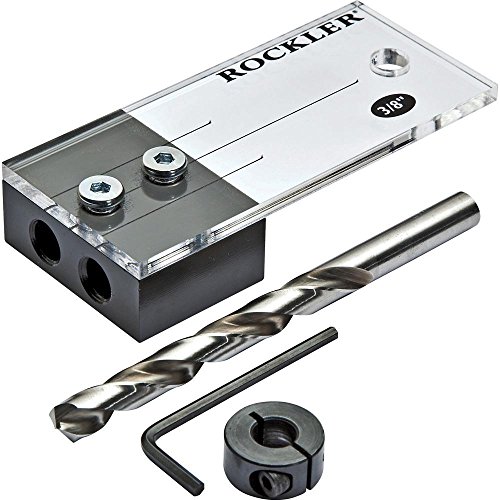
For the spacing, I would get a 12" strip of wood, drill the hole 10" from the end, and glue a small block of wood on the end grain of one side to act like a lip. Then press that lip up against the board and use it to make sure the drill holes are consistent. That probably made no sense, but you can make something like this and have the clear part be 10" long so you have the right distance https://www.amazon.com/Rockler-Dowel-Drilling-Jig-Kit/dp/B00GBYX8C6
To make sure it is perpendicular to the face of the board, you can use a small block of wood to make this on your drill press, then just use it when you drill the actual hole. https://www.rockler.com/big-gator-v-drill-guide-metric
POWERTEC 71118 Double-Cut Profile... https://www.amazon.com/dp/B074MN2CPL?ref=yo_pop_ma_swf
POWERTEC 71083 5-1/2" L x 1-1/8"... https://www.amazon.com/dp/B075K4CTYM?ref=yo_pop_ma_swf
I got you, fam.
Here are things from my wishlist (past and present)
Wera Screwdrivers
https://smile.amazon.com/dp/B0085NTQJK/
Oscillating blade set:
https://smile.amazon.com/dp/B0109SELWA/
Clamp multimeter:
https://smile.amazon.com/dp/B00NWGZ4XC/
Kreg Jig Jr.:
https://smile.amazon.com/dp/B000J43A7W/
Angled Long Nose Pliers:
https://smile.amazon.com/dp/B00N3VSS4S/
Groove Lock Pliers:
https://smile.amazon.com/dp/B000FK1R0W/
11 ft wifi endoscope:
https://smile.amazon.com/dp/B01MYTHWK4/
non contact voltage tester:
https://smile.amazon.com/dp/B001UAHZAM/
claw nail puller:
https://smile.amazon.com/dp/B0015YPJMY/
Workmate portable work bench:
https://smile.amazon.com/dp/B000077CQ0/
Cable snake fish tape:
https://smile.amazon.com/dp/B000BP7WBO/
9 Outlet metal power bar:
https://smile.amazon.com/dp/B00F8ZQY5M/
Spade drill bit set:
https://smile.amazon.com/dp/B00099E7WE/
36" bubble level:
https://smile.amazon.com/dp/B000UKMWMO/
Neat! I already have a Kreg R3 Jr. but now I wanna print this just to have another one!
Ok, plenty of tips. Some are because I'm stupid and learned the hard way and others are specific to this project.
http://www.amazon.com/Kreg-K4-Pocket-Hole-System/dp/B001DYFISG/ref=sr_1_4?s=hi&ie=UTF8&qid=1418682780&sr=1-4&keywords=Kreg+Jig&pebp=1418682786524
http://www.amazon.com/gp/product/B000NQ17PI/ref=oh_aui_detailpage_o05_s00?ie=UTF8&psc=1
http://www.amazon.com/Kreg-K4-Pocket-Hole-System/dp/B001DYFISG
its this thing. I just bought it for other furniture projects and everyone seems to love it as an alternative to biscuit or other joint methods
For most hobbyist level users an r3 jig will be plenty good enough. Unless you are making cabinets all day you don't need the full size jig.
You'll probably want a c-vise grip, kreg makes one or you can get an r3 deluxe kit that comes with it, but harbor freight has one that's just as good for like $6.
I have both the k5 and r3 kreg jigs. I probably actually use the r3 more and there is nothing the k5 does that the r3 can't, the k5 is just faster if you need to drill a hundred pocket holes for a cabinet or something.
Use a hole saw for terminal cups. It's really difficult to cut a hole that small with a jigsaw and have it precise enough for a terminal cup.
TBH, most of us don't use terminal cups. Drill a hole, push the wire through, put a dab of caulk/silicone on the inside. Straight connection=lower resistance=more power. Plus, easier and cheaper.
As for cutting the subwoofer holes, using a jigsaw is certainly a skill you have to develop. It can be done, but honestly, it requires a lot of practice. Once you develop the skill, you can do some pretty cool stuff.
For instance, except for the straight side cuts, I made this with a jigsaw, including cutting out the logo. Triple layer baffle, you can see how close each hole is (sorry for the bad picture, this was from years ago). They were all cut separately, freehand, from precisely measured and drawn lines.
Unless you want to put the time in practicing, best bet is a router with a circle jig. Find perfect center, drive in a nail, pop on the jig, plunge and spin, perfect hole.
If there is clearance on the bottom for the plates this is a good option. Otherwise, if you have a drill you could get a small Kreg jig for doing pocket holes and use that for the but joints.
amazon link
You're willing to spend over $100 on the multple 3/4" plywood sheets for the build but you can't spend $20 on the jig to put it together?
Any of those and one of these and you're in business.
https://smile.amazon.com/gp/product/B00H27XAAG/ref=ppx_yo_dt_b_search_asin_title?ie=UTF8&psc=1
Check this out http://www.amazon.com/gp/aw/d/B00065WPP2/ref=mp_s_a_1_1?qid=1419211383&sr=8-1&dpPl=1&dpID=41E7C63NTJL&ref=plSrch&pi=AC_SX200_QL40 . its not a super fine woodworking tool, but its simple and will allow you to join boards cleanly.
Here's what you need :-)
http://www.proxxon.com/en/micromot/27006.php?list
Fast and straight cuts. That or the larger FET saw are brilliant.
For smaller pieces, /u/WhipPuncher suggested this on another thread (I'm ordering one):
https://www.amazon.com/gp/product/B00VXPWV0I/ref=ox_sc_act_title_1?ie=UTF8&psc=1&smid=A3QWCV2337YR2W
Perfect for cutting smaller parts at exactly 90 degrees.
For sheets, if not using the proxxon saw, I cut with one of these:
www.bnamodelworld.com/scribers-templates-hobby-tools-supplies-tamiya-models-tm-74091?zenid=59b5bb3cedd99caccc3c1ff12f342ab8
A scriber will not create a ridge along the cut (although the cut itaelfnis thicker) compared to a hobby knife. I clamp an engineer's square to the sheet and cut along the edge.
These will really help if you start to get into the hobby more:
http://www.amazon.com/gp/aw/d/B00009K77A/ref=mp_s_a_1_1?qid=1383050908&sr=8-1&pi=AC_SX110_SY165_QL70
http://www.amazon.com/gp/aw/d/B00009K77D/ref=mp_s_a_1_2?qid=1383050908&sr=8-2&pi=AC_SX110_SY165_QL70
It's called a pocket hole jig, pretty awesome for putting together sheet goods like plywood and MDF. Here's a link to the exact one I use: https://www.amazon.com/Kreg-K4-Pocket-Hole-System/dp/B001DYFISG/ref=as_li_ss_tl?s=power-hand-tools&ie=UTF8&qid=1479227901&sr=1-4&keywords=kreg+jig&linkCode=sl1&tag=beerrevidude-20&linkId=72358611c9542c75cabc9db98d64e696
Spend a few bucks on a pocket hole jig. You want to avoid screwing into end grain on most places. A basic jig will be about $20 and will work just fine.
A square clamp is also handy, but not necessary.
Sand the pieces before assembly will save you some trouble of sanding in the corners.
Wood glue will add a lot of strength, spread it evenly, screw the pieces together. Then use a rag with a little white vinegar to wipe off any glue that presses out before it dries.
Kreg MKJKIT Mini Kreg Jig Kit https://www.amazon.com/dp/B00065WPP2/ref=cm_sw_r_cp_apa_xvrIAbVMZ9N52
Can-Do Clamp https://www.amazon.com/dp/B000LJNJNU/ref=cm_sw_r_cp_apa_6xrIAbVATMDX4
I'm in about the same situation as you. I'm making really small/simple stuff right now. ex, a planter box outside, a super simple and plain book case. Thus far, the most useful thing I've found is a Kreg Pocket hole jig. it's like $20-40 and it makes joining lumber at right angles soooo much easier. Dowel joints and biscuits are a pain and I'm in the same situation as you as far as buying a router and table or a table saw. Plus I'm in an apartment so space is a huge issue and storing a table based tool is just not feasible.
https://www.amazon.com/Kreg-R3-Pocket-Hole-System/dp/B000J43A7W/ref=sr_1_1?ie=UTF8&qid=1465410628&sr=8-1&keywords=Kreg
Check out a pocket jig kit. They are about $40 on Amazonhttps://www.amazon.com/Kreg-R3-Pocket-Hole-System/dp/B000J43A7W?th=1&psc=1
Add a drill, some wood glue, and a few clamps and you can build a nice flat desk that shouldn't buckle or warp. bottem of my desk.
Good luck
From what I have seen they are good for breaking down stock. Not super precise. I have the square cut and it work nicely.
You can't rent a pocket hole jig, but they run about $20 for the cheapest one. You'll also need to get a locking clamp situation, and you can get some ideas on clamps here. The one Kreg hocks is most ideal, and it runs around $30.
I don't know if Home Depot rents circular saws, but you can check. Considering that their rental tools are always beat to crap, you may be better off getting the cheapest Ryobi they offer, which is about $40.
I know this flies in the face of this subreddit, but if your goal is to have something like that stand for pretty cheap, I'd just buy the stand you posted or get something similar you like from Ikea. There's an entry level cost to building anything. I know, it sucks. You can fit this whole design onto a half sheet of MDF, the sides and top just won't be as thick, and it will run you around $19. But I'd still get a full sheet so you can make that circular saw jig. I'll tell you, though, that making a piece of stable furniture out of MDF is going to be a task in and of itself since it's basically a big sheet of compressed and glued sawdust.
You're better off doing it with plywood and screws, and there's a cost to be had with the screws and whatever paint you use.
Hopefully that helps! Maybe! Possibly!
You really don't have a lot of choice in order to support a desk that tall, the leg joints will have to be the strongest part of the desk. L Brackets won't work.
You don't need fancy joints, but you do need strong ones and you will need bracing on the legs. You could get a Pocket hole jig like this This allows you to join to panels fairly easy and strong (use glue also).
You could build a desk like this without the drawer only using the pocket joints.
In all the speakers I've built, I didn't just cut a circle but actually cut a rabbeted circle around the edge for the lip of the driver to sit in. I think it looks much nicer but you could certainly do without it if you don't mind the look.
I cut mine circles with a router and one of these though you could pretty easily build your own jig if you didn't want to buy one. Cut the rabbet first and then cut the through hole after that. With this setup, it'll take you 2 minutes to cut a perfect speaker hole of exact dimensions at exactly the spot on the board you want it. I can't imagine trying to do that without a router - it'd be a freaking nightmare.
As for making your cuts, a jigsaw isn't going to produce very pretty cuts. A circular saw with a straight edge will do the job far better. That setup would effectively give you a tablesaw except upside down.
If you're strapped for cash, doing this one time only, or just trying to figure out if you're into the whole building thing, maybe get one of these. It's not a high quality tool, but it'll cut. I'm sure HF has some routers that would work with the jib above, but make sure the bolt hole patterns are supported. Oh, and never go into HF without a 20% off coupon - they're in every newspaper and magazine all the time.
Edit: Also use the router + a round over bit to round over the sharp corners on the box!
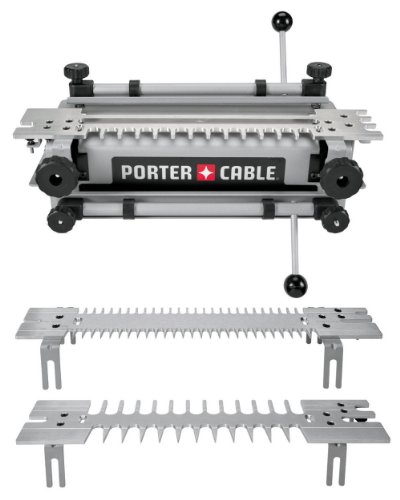
I researched this recently, and unless you've got $300 or more for a Leigh super jig, the Porter Cable 4216 is apparently the best, most user-friendly, and most versatile dovetail jig available.
Edit: I'd be interested to hear any other opinions since I know I'm going to want to get one eventually.
dowel centers.
https://smile.amazon.com/Milescraft-5343-Dowel-Center-8-Piece/dp/B0055HPJ22/ref=sr_1_1?ie=UTF8&qid=1475080117&sr=8-1&keywords=dowel+centers
I made a built in bookcase for my wife as my wedding present to her. It spans a whole wall and has a desk portion. (she is a children's book designer and has so many books it's ridiculous)
Bookcases are pretty straightforward. If you want to have adjustable shelves, I highly suggest getting a jig like this: https://www.amazon.com/dp/B005FKX6D8/ref=cm_sw_r_cp_apa_496fzbE4TAVCM
If you're trying to do this to save money, then maybe I'm not pointing you in the right direction, lol. It is a "one time use" tool unless you plan on making more bookshelves, but for me it was indispensable because I literally made a wall of shelves, ceiling high.
I love woodworking and can talk about this forever. I'll stop here. If you have any questions, I'm happy to help.
I bought this one about 6 months ago and love it.
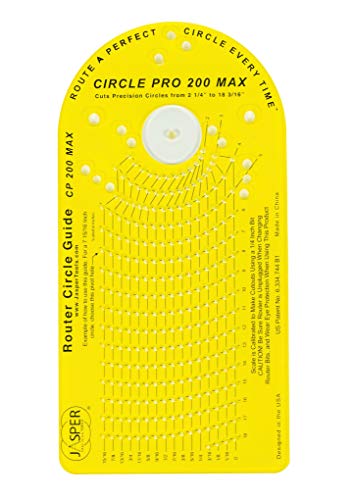
Jasper 200J Model 200 Circle Cutting Jig for Plunge Router https://www.amazon.com/dp/B00009K77A/ref=cm_sw_r_cp_api_r1oezbKFHXNVB
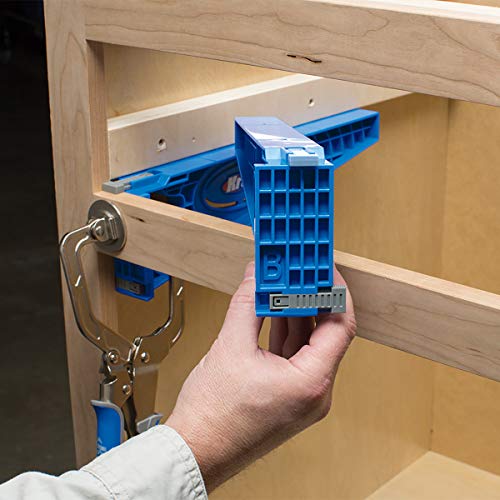
So most slides are 1/2 wide. When making the drawers account for 1/8 in on the top and bottom. So the drawers dont get stuck on each other. I made that mistake my first time and hated myself. Also make a jig so the drawer slides sit flat or Kreg makes a decent one. Kreg Tool Company KHI-SLIDE Drawer Slide Jig https://www.amazon.com/dp/B01L2T0IDQ/ref=cm_sw_r_cp_apa_i_v1EwCbRXWCG25
jasper jig
Anytime you use a jig to create your dowels, I would suggest getting dowel centers as well. They fit in your dowel holes to allow you to precisely mark the other piece that you will be attaching to. Like these:
https://www.amazon.com/Milescraft-5343-Dowel-Center-8-Piece/dp/B0055HPJ22
Kreg pocket screws would work: http://www.amazon.com/Kreg-R3-Pocket-Hole-System/dp/B000J43A7W/ref=sr_1_1?ie=UTF8&qid=1419825381&sr=8-1&keywords=kreg+pocket
Or you could drill holes from the outside of the frame and countersink screws in that way.
What made you get that jig compared to the Kreg Jig K4 Pocket Hole System? I know the Pocket Hole System costs about $50 more but it seems like it would be easier to use.
I've had good luck with Porter Cable and Bosch routers. For speaker building I recommend getting some type of plunge router with a jasper circle jig.
http://www.amazon.com/Jasper-200J-Circle-Cutting-Plunge/dp/B00009K77A
I do a lot of car and home audio, and that jig is one of my favorite tools. Perfect circles everytime.
I use doweling jigs all the time. THIS is basically what I have. I also use the aforementioned Dowel and Tenon Center Set.
I used one of these. The original plan was to use through dovetails, but I never got them quite right. After a few failed attempts, I tried box joints. The instructions that come with the jig aren't great. I had to make up my own procedure. After a bit of trial and error, the box joints came out quite nicely.
https://www.amazon.com/Milescraft-5343-Dowel-Center-8-Piece/dp/B0055HPJ22
Regarding your drawer mounting difficulties - check out these bad boys:
https://www.amazon.com/Kreg-Company-KHI-SLIDE-Drawer-Slide/dp/B01L2T0IDQ/ref=sr_1_1?ie=UTF8&qid=1503757687&sr=8-1&keywords=keg+drawer+slide+jig
Best $22 you'll spend.
Wood is always the best material! Here's what I've learned so far on how to make non-ugly wood-based things:
-1) Plan, plan plan plan plan plan plan. Take measurements. Draw. Scratch your head. Go to the store and measure the wood you'll be using. Draw some more. Swear a bit. Nothing will save you if you don't plan out your design well.
0) Measure thrice cut once - Don't get antsy with your cuts. Make sure you have the right measurement, then make sure again. Mark your cut with a pencil and mark the WHOLE length of the cut, not just the beginning. Use a triangle and a clamp as a saw guide. Cut a SMALL notch in the wood and ensure you're on your mark. Make sure before your cut you know which side of the cut your saw blade is supposed to be on or your length will be off by the width of the saw blade.
That's all the suggestions I can come up with for now. It shouldn't be difficult. Scout out your wood supplier beforehand so you can see what you have to work with. You can probably find legs like those on the table in the picture at Lowes pretty easily. A nice top shouldn't be hard to find there either. You can either screw the legs directly into the top if you find a thick enough one or get some thinner boards for side pieces and form a frame to put the top on.
Circular saw and a Kreg jig will go a long way to help her make a bookcase.
I'd get a corner chisel, he may have one already but they are great for making the cutouts for hinges on doors and are easy to misplace.
hey OP, i'll try to answer a few questions for you if i can. i've got a handful of years of experience building custom cabinets, but am no doubt not the foremost on education in this field :)
working with wood is a lot different than working with steel, but it shares some common similarities, as i am sure you know already :)
in all simplicity there are 4 main components of a cabinet, i will use the following as reference in my reply:
a) the main cabinet or box.
b) the face frame
c) the back
d) any removable shelves/doors/etc
1) joinery
when building cabinets, etc i always start with the box
tools required: router, straight cut bit at T" or in this case 3/4", clamps, straight-edge, wood glue, compressor and brad nailer
most material used in cabinetry is usually 3/4" thick, so T=3/4"
once you have all your box material cut to size (there is an easier step you can do, i'll explain in a bit), you'll want to mark all side pieces at proper measurements of non-removable shelves at top of shelf - T. (this usually consist of a top and bottle, but in your multiple cases you'll have a few boxes with hard-fastened shelves in between)
the next step is cutting groves into your side panels for the non-removable shelves to set it.
set your free hand router up so it's cutting 1/2 the depth of T, in this case it will be 3/8". find out how far it is from the fence to the edge of your bit, practicing on a piece of scrap wouldn't hurt.
run the router along the fence cutting groves in each location.
you probably don't want the bottom of the cabinet to hit the floor, i always raise my bottoms so the bottom shelf is flush with the top of the face frame, so make sure to measure twice! :)
anyways once you've done this, you'll have a nice grove to fit your cross-shelves into
glue and nail accordingly.
as far as the intermediate up and down structures, such as the middle in http://i.imgur.com/TG9hwh.png?1, you don't require such groves.
ok moving right along, let's jump to face frame joining
tools required: miter saw, screw gun, pocket hole jig, wood glue, clamps
after you've got your box, you'll be ready to build your face frame
since you don't have a ton of money (who does?) to buy an expensive face frame joiner, Kreg has a nice pocket hole jig which i've used regularly for a while now. http://www.amazon.com/Kreg-R3-Pocket-Hole-System/dp/B000J43A7W
cut and rip your face frame components to size, turn over and clamp the jig, drill your pocket holes.. once this is done for the outer-frame, clamp and screw them together using wood glue and some pocket hole screws, kreg provides a few in the kit to get started, and Lowe's will well the kit and the screws you'll need to complete your project.
once you've done the outer frame, move into the inner frame, etc and rinse & repeat.
it's best to do this on a flat level surface you can clamp the two pieces down so they won't move, but don't worry if you're a fraction off from being flush and sticking up a hair, you can fill that with putty and sand down to flush later.
once you've built your face frame and cabinet boxes, you're now ready to glue and nail them together.
2) what wood to use.
a) for cabinet boxes and shelves
if you're going to stain it, you can probably find a decent price on red oak at your local lumber yard, this should range from $40 to $50 a sheet, depending on area
if you're going to paint it or just don't care if you stain it and doesn't have to look fabulous, you can use a cheaper paint-grade Birch plywood, often available from $20 to $40 per sheet and location
b) face frame wood you can use some select grade pine (usually stains and works well even with red oak plywood, of if you find it cheap enough (improbable) some red oak which is usually really pricey)
3) structure
if you groove the main non-removable shelves like i suggested, you won't have a problem.
if this unit were being mounted to the wall you could add some extra "nailers" but that won't be necessary in your situation
i think i've gone over the basic questions you've asked so far. if i've missed something and if you have any questions on anything feel free to ask so i can elaborate more.
it's a really interesting project you have and i'm sure you'll have fun with it.
once again, feel free to reply to me and i will answer as best i can :)
EDIT: oops, i forgot to mention the backs :)
when you're routing the groves in for your shelves, you'll want to provide a grove for the back material as well.
this isn'tnecessary, but it will provide a clean look when viewing the finished piece from the side, as you won't see the 1/4" back material.
a simple 3/8" grove 3/16" deep the length of the sides will suffice
when you mount the back, you can use 1" or less brad nails or a pneumatic stapler if you have one available.
and mount the back BEFORE you mount the front face, frame, as mounting the back is a sure way to square up the unit
you'll mount 1 side first, then 1 bottom to square.
All the boards on the top look mis aligned. It looks like just used one screw from the top so they will all turn (and always keep turning is my guess...unless they are glued, but then they are glued crooked :) )
I came to say invest in a pocket jig
It would have helped in a lot of places on this project, and this model has a countersink height (which many people have mentioned)
It a Kreg jig.
Amazon Link
What I ended up doing is resizing a bunch of 223 before I chopped them, I used the 300 resizer and took out the primer punch, worked pretty good. This trimmer may be a good idea, I've been looking at getting it for myself, you can read the reviews and decide if its for you. And heres a jig if you dont want to make one.
For powder/bullets, I use AA1680 and Palmetto Projectiles 208gn for Subsonics. Dont use them for Supers. Also, if you're running a progressive and loading lead coated projectiles, you'll need an expander die of some sort to prevent the brass from cutting up the lead projectiles.
Also, sub/xpost to /r/300BLK
Yeah this one
There's a smaller one for $40 that's supposed to work well too.
the legs are joined to the "apron" pieces with pocket hole screws. then there are pocket holes facing up in the apron pieces to attach the table top from underneath. A pocket hole jig is typically required to drill the holes for these types of joints; it's very easy to use, and leaves you with no visible fasteners.
The better/proper way to join the legs to the apron pieces would be using dowels or mortise and tenon joints.
Here ya go: http://www.amazon.com/gp/aw/d/B00065WPP2?pc_redir=1405319666&robot_redir=1
Totally worth the money:
A drill that will actually drill holes. I bought a POS drill (50 bucks) and it had no power to it. I finally dropped 250 on this and well worth every penny:http://www.amazon.com/gp/product/B00DG7SYYI
If you're doing any type of wood working and you want to join peices of wood securely and have it look nice look into the Kreg Pocket Hole Jig:
http://www.amazon.com/gp/product/B000J43A7W
I also purchased this guy to help clean up the massive extension cable that I have in my garage. Totally worth it as well:
http://www.amazon.com/gp/product/B00005A1K1
Also invest in a good pair of safety glasses and dust mask.
If you have a router, I highly suggest a circle cutting jig. I have this model. I fussed around with hole saws and bought a cheap 6" one for my cornhole set like the other commenter, but when I finally decided to pay $36 for a piece of plastic, I kicked myself for not doing it sooner.
Agreed.
I really like Nick Ferry's article on building a straight edge for long circular saw rip cuts here.
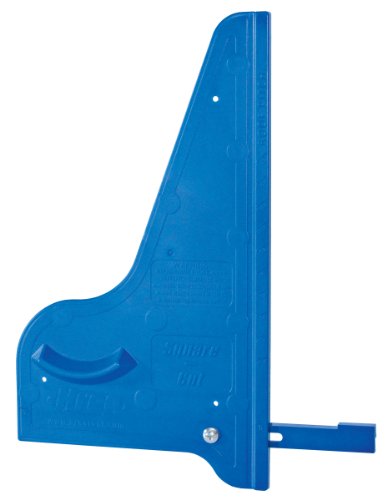
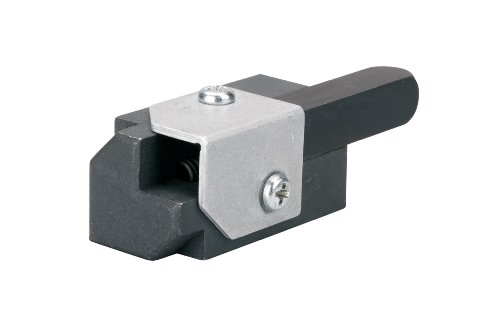
As for straight cross cuts, I'm quite happy my Kreg Square Cut, it works really well and was only about $12.
http://thompsonlathetools.com/
They use a very high quality steel that holds an edge like nothing else.
this is a great set up for a 8" slow speed grinder like rikon
https://www.amazon.com/Wolverine-Grinding-System-VARI-GRIND-jig/dp/B01JAPC6D4/ref=sr_1_1?ie=UTF8&qid=1484924940&sr=8-1-spons&keywords=vari+grind&psc=1
yea - the jig just allows you to cut the perfect hole needed. There are tons of them and I'm sure even more jigs for each type as some are much more advanced than others.
Here is an example of a dovetail jig that you can create perfect joints w/your router.
Option 1 seems to have the best reviews. Be sure to get you the 300 jig too: https://www.amazon.com/Deluxe-300-Blackout-Case-Trimming/dp/B00H27XAAG/ref=pd_bxgy_469_3/135-5428015-4716215?_encoding=UTF8&pd_rd_i=B00H27XAAG&pd_rd_r=aa380259-9506-4da9-9224-2d189605f108&pd_rd_w=Lmo2Q&pd_rd_wg=EnWqH&pf_rd_p=a2006322-0bc0-4db9-a08e-d168c18ce6f0&pf_rd_r=CNR25PKW06T92AWPTCC3&psc=1&refRID=CNR25PKW06T92AWPTCC3
Ok, here are some plans for you: Modular shelving plans
If you have any questions, let me know.
These require the use of a pocket hole jig. If you don't have one, get one. This one is the most basic kit.
http://www.amazon.com/Kreg-R3-Pocket-Hole-System/dp/B000J43A7W/ref=wl_it_dp_o_pC_nS_nC?ie=UTF8&colid=11849T9OC3D6G&coliid=IUHIVR4L8ZJCO
The easy but expensive way is to use a bracket like this. Expensive not only because you have to buy one for each joint, but it also doubles the number of fasteners you need. And since you're being wise and using stainless steel fasteners only on your cedar fence, that cost adds up.
Cheaper would be to drill pocket holes into the end of each rail. Put the pocket holes in the face side that will be covered up by the pickets. This does two things: the pocket screw is angled into the meat of the post rather than the side and here you can get away with using cheaper coated screws because they'll be somewhat protected by the picket and if they do bleed, the picket will be in front anyway. Plus it's a much cleaner look.
I like the Kreg K3 for basic homeowner tasks. It's especially great for this because it's easy to move it to the long rails. Pair it with a cheap face clamp and you're set. Throw a little polyurethane construction adhesive in the joint (mostly to keep the water out).
This is how I built my fence. 3 years later and the rails are as tight as ever. I have every confidence that they'll make it to 15 years just fine. Or, rather, if something breaks on this fence, it won't be the rails.
Kreg Jig
https://images.app.goo.gl/33v15m1s64PCHVhN8
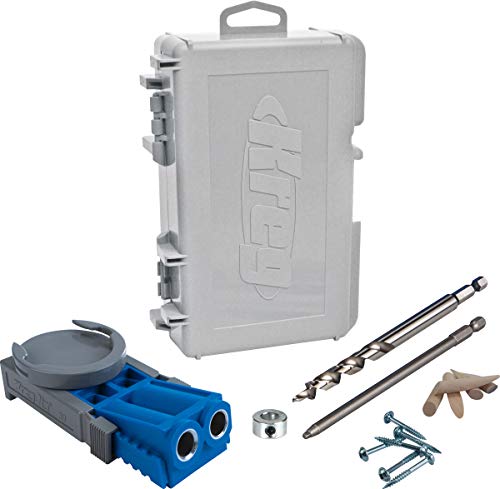
R3-Promo Kreg R3 Jig Pocket Hole Kit With Free Classic Clamp Pack-In https://www.amazon.com/dp/B01G3VP3N8/ref=cm_sw_r_cp_apa_i_SSKqDb5H5E0S1
Yes! A few options...
Hope that helps!
You could use wood glue and pocket holes for extra strength on the corner along with the metal brackets.
Kreg R3 Jr. Pocket Hole Jig System https://www.amazon.ca/dp/B000J43A7W/ref=cm_sw_r_cp_apa_i_mG9iDbCNN2HRF
>d say unless I already had the jig, for this project I'd make do with finish nails or brads and have a plenty strong joint once glued.
It will take longer than the more expensive option, but you can a block that you clamp to the board with the drill bit for under 20 bucks. Its a single hole, but handy for fixing stuff. Also, there is another jig that has a better system than the kreg IMO out there... Armor something. Adjustments are single and easy. I have had mine for several years and used it some. I like, but finding myself using a mix of techniques for different reasons. Mostly because I can't hid the pockets or I'm going for a different look. Also exploring different joinery.
This a box of screws would be pretty cheap to build it.
https://www.amazon.com/Kreg-MKJKIT-Mini-Jig-Kit/dp/B00065WPP2/ref=sxbs_sxwds-stvp?keywords=kreg+jig+drill+guide+block&pd_rd_i=B00065WPP2&pd_rd_r=e7de3652-f32f-4107-8fc5-29fda08a97ff&pd_rd_w=WpBs2&pd_rd_wg=jqJxf&pf_rd_p=a6d018ad-f20b-46c9-8920-433972c7d9b7&pf_rd_r=SNJX6VEMAQQYQE2J1DA9&qid=1562688841&s=gateway
it sounds like you are installing a add-in option for what usually come as flat pack cabinet/shelves such as closet systems or DIY cabinets. the spacing for those usually are bored with a 4mm (maybe5mm) at 22mm apart. if you can research a company that does those type of installs the may be able to refer you to a tool and jig supplier.
See if this is what you are looking for.
Get a pocket hole jig and you'll get the same thing without having to buy brackets.
Kreg MKJKIT Mini Kreg Jig Kit https://www.amazon.com/dp/B00065WPP2/ref=cm_sw_r_cp_api_i_8ZSHDbRY2XENK
I purchased this set: R3-Promo Kreg R3 Jig Pocket Hole Kit With Free Classic Clamp Pack-In https://smile.amazon.com/dp/B01G3VP3N8/ref=cm_sw_r_cp_apa_i_Lm5FDbMGPSQMT
Originally found a much more expensive one at a big box store but upon research learned this did everything I needed.
Looks good. Try using this:
Kreg Jig K4 Pocket Hole System www.amazon.com/dp/B001DYFISG/ref=cm_sw_r_other_awd_z9z8wb79TPCTJ
I don't think you need much more out of a pocket hole jig than that. Unless you're a production shop that is making a ton of cabinet face frames, I think a pocket hole jig should be unintrusive, flexible, and convenient.
Actually, I think this one is better because you get much more flexibility in how you can use it. It's easier to make holes at weird angles to the edge, and to fit into tight spaces.
Like this set, https://www.amazon.com/Milwaukee-2691-22-18-Volt-Compact-Impact/dp/B001F7BIMG/ ?
Will the Kregg drill bit fit?
Something like this?
sorry about the delay, I couldn't find it & then I forgot.
I'm guessing you have already found a solution, but you are welcome to this https://smile.amazon.com/Kreg-MKJKIT-Mini-Jig-Kit/dp/B00065WPP2?sa-no-redirect=1 minus the bit.
Kreg MKJKIT Mini Kreg Jig Kit https://www.amazon.com/dp/B00065WPP2/ref=cm_sw_r_cp_api_i_RBZ4Cb55MTRYJ
https://youtu.be/zxMqtmoOVbY
Obviously drill the holes on the inside facing edge
Personally I’d get the Wolverine with the Varigrind:
https://www.amazon.com/Wolverine-Grinding-System-VARI-GRIND-jig/dp/B01JAPC6D4/ref=asc_df_B01JAPC6D4/?tag=hyprod-20&linkCode=df0&hvadid=312003160272&hvpos=1o2&hvnetw=g&hvrand=2180103716113203092&hvpone=&hvptwo=&hvqmt=&hvdev=m&hvdvcmdl=&hvlocint=&hvlocphy=9021493&hvtargid=pla-570995660073&psc=1
For $140 you get 2 base units, the platform, the V arm, the Varigrind jig, and a couple of setup blocks.
With the holdfast system it looks like $100 (plus shipping?) gets you 1 base unit, their slide arm, and their fingernail jig. Spend the extra $40 to get another base and the grinding platform.
How does this one look? https://www.amazon.com/35-241-35-550-Aluminum-014-Inch-Cutting/dp/B000BRBZYC/ref=sr_1_1?s=hi&ie=UTF8&qid=1492919701&sr=1-1&keywords=Thin+Slot+Miter+Box
Your right, the slot is really wide. Will the thinner slot really made that big of a difference? I wish I could get that mini table saw, it looks like its out of my budget. Been looking around since I posted this and I also found this: https://www.amazon.com/gp/product/B00VXPWV0I/ref=ox_sc_act_title_1?ie=UTF8&psc=1&smid=A3QWCV2337YR2W
Wow! Thanks for an awesome reply. Unfortunately I'm not in a position where I can spend much money so I'll have to see if I can find some flea markets near me to buy some stuff at. All this stuff is great info that I need to look at better when I have time where I don't need to be asleep. But while I'm here I want to ask you one thing: What do you think of the Kreg jig? I'm using it to hold on the back of some floating nightstands and also used it heavily on my desk, although on my desk they aren't really load bearing whereas on the nightstands all the weight is going through that backplate first.
Thanks again for the awesome reply :)
Wolverine Grinding System with VARI-GRIND jig https://www.amazon.com/dp/B01JAPC6D4/ref=cm_sw_r_cp_api_bsm8ybSZQ071B
This is it. Just got mine set up earlier this week.
I'm in the same boat. Apparently Lowe's has sales all the time on the Kreg jig.
The Kreg R3 Jr. seems to be the best option for broke asses like myself. It will probably be what I purchase to finish some of the projects I have around the house.
For future builds: http://www.amazon.com/Kreg-K4-Pocket-Hole-System/dp/B001DYFISG
Pocket holes are a great way of fastening boards together like this. This guy does some nice pieces using a pocket hole jig:
http://www.diypete.com/how-to-build-a-farmhouse-style-coffee-table/
Take your pick:
Home Depot
Lowes
Amazon
I used this system - http://smile.amazon.com/Kreg-R3-Pocket-Hole-System/dp/B000J43A7W/ref=lp_552488_1_2?s=power-hand-tools&ie=UTF8&qid=1422105125&sr=1-2.
I really liked it as it also allows you to set your depth and distance and just go - all of my pocket holes were made in one sitting. I used it with an Irwin 6" Clamp (http://smile.amazon.com/IRWIN-Tools-QUICK-GRIP-6-inch-546ZR/dp/B00002244S/ref=pd_sim_hi_1?ie=UTF8&refRID=0BGS8N79X833JZTM4W81)
not sure how large the logs are but I'd drill a hole in the each side and insert a short length of dowel into each piece to bridge the gap. It will be a bit of a challenge to line the holes up such that outside of the logs stays in alignment once the dowel is inserted. Typically this done by drilling one side and inserting a dowel center so that it can leave a mark on the piece so that you know where to drill. If not wanting to buy one a spot of wet paint, or lipstick or whatever, could be sandwiched between the pieces so that both sides get marked in the same spot. Do your best to drill perpendicular to cut the edge of the logs.
I would highly recommend a Kreg Jig. This little thing is super useful for making quality furniture. If you dont want to get that I would recommend clamps. You always need clamps.
I bought this doweling jig a few years ago and it worked great on the side table projects that I completed. If you're only needing it for one project, though, then just make a jig like David Picciuto's (look it up on his YT channel).
Kreg Pocket Jig is a little guide that lets you drill and secure a board to another board using pocket screws. This means that if you have two sides of an arcade cabinet, in your awesome arcade shape, you'll be able to affix boards to the inside face of the sides easily. So basically you'll be able to easily and sturdily connect your two sides together, making your frame.
Text will not do the job here, you should look up Kreg Jig on youtube and watch it in action, it will be worth a thousand words.
My assumption is you're going to make shaped sides from plywood (with a jigsaw or similar), then connect them with trusses, using pocket screws, then cover the trusses with plywood. That will give you your cabinet, though the screen and electronics mounting won't be trivial, and I (unfortunately!) can't help you with the electronics.
I strongly suggest looking into the Pocket Screw jig systems. There are many jigs available from makers like Kraig (expensive) to Harbor Freight. (cheap but functional if you are careful) Amazing for both carcass and face frames. Lost of videos on the Tube about this.
Built custom oak cabinets in a professional shop for several years and we used a Kraig Jig. The sweet thing is that once you glue up and screw down the joint, you can take the clamps off and use them on the next setup.
(Links for example only - NOT affiliate) https://www.youtube.com/watch?v=jvzaGtMsQyY
https://www.amazon.com/Kreg-R3-Pocket-Hole-System/dp/B000J43A7W/ref=sr_1_3?ie=UTF8&qid=1482774269&sr=8-3&keywords=pocket+hole+jig+kreg
Is this the sort of thing you mean? Just clamp it in place and screw it together?
The picture looks like it has an allen key too, what is the purpose of it?
Hold down clamp aren't available at Lowes as far as I know. Your best bet is either a local Rockler store which is the manufacture of that one that you linked to or Amazon.
Direct link here:
Rockler Deluxe Hold Down Clamp https://www.amazon.com/dp/B002MMMSTU/ref=cm_sw_r_other_awd_R27Jwb6GCXTVV
Incra version:
INCRA Build-It Hold Down Clamp https://www.amazon.com/dp/B000W07PEM/ref=cm_sw_r_other_awd_t37Jwb4V8DJX3
The t track you'll need:
Shop Fox D2725 36-Inch T-Slot Track https://www.amazon.com/dp/B0000DD1O9/ref=cm_sw_r_other_awd_v47JwbX3GA2F9
i like this one: https://www.youtube.com/watch?v=QALncuFuEgk&t=297s
https://www.amazon.com/Milescraft-13190003-JointMate-Project-Black/dp/B01M8L1WVN/ref=sr_1_2?s=hi&ie=UTF8&qid=1522471176&sr=1-2&keywords=milescraft+dowel+jig
If you want any of the shelves to be adjustable then I would suggest a Kreg Shelf Pin Jig. There are others on the market that might be cheaper but I personally have the kreg and like it. Any non adjustable shelves (probably at least 1 fixed per side on the hutch for strength) I'd do dados. For the backing of the hutch you'd be fine with glue and some brad nails. For the top of the hutch I'd use biscuits and glue probably. For the hutch to the desk top I'd just use a couple dowels for alignment and let gravity do the rest. You'd want the hutch to come off for transport anyway.
Moving onto the desk itself I'd go mortise and tenons for the sides and apron. Dado in and float the panel. With the split in the apron for the drawer you'd have some options either don't go full height for the drawer leaving some material at the top and or bottom or just drill/counter bore screws in the ends connecting it to the desktop.
Another consideration for the base is getting it into the room after it is built. The desk you have in the picture was most likely built in the room it was residing in with it being over 3ft deep at the center and with a full back its going to be hard pressed to make it through most doors. So if you were making a desk like this in a shop to be moved indoors check your door widths you need to get it through. You could leave some of the bottom back open and make it through most doors.
As for material, if they want it painted white anyway it may be worth checking into using melamine for the top and shelves. Its easier to clean and the surface may be more durable than painted plywood. Its also decently easy to iron on edge banding after its cut. Legs, apron and sides would be fine as pine and plywood thought.
As others have stated this is a pretty ambitious project and I wouldn't want to start it without at least a table saw and probably a router as well. Biscuit joiner and doweling jig would both be useful but not necessary.
+1 for pocket holes.
http://www.amazon.com/Kreg-R3-Pocket-Hole-System/dp/B000J43A7W/ref=sr_1_1?ie=UTF8&qid=1449595585&sr=8-1&keywords=kreg+jr
For a router. This seems to be the basic model to make through dovetails:
https://www.amazon.co.uk/PORTER-CABLE-4216-Super-Jig-Dovetail/dp/B000HGL59M/ref=pd_sbs_60_1/262-3073480-8111056
(Cost £172.63)<-- was hoping for something a lot cheaper.
Hey man, looks way better than anything I could build at 15. But since you're asking for some constructive criticism, I'll give a few suggestions.
The one thing I really don't like is the screws on the bottom legs. There are lots of different ways to do this, with varying levels of difficulty.
First would be just counter sinking the screw then filling the hole with wooden buttons. You can pick up a usable set of counter sink bits at harbor freight for $7
Second might be pocket holes. You can get a jig for ~40 bucks. Honestly, this might not be the best option for you. For the price, you could get a lot of other more useful tools.
Third might be a [mortise and tenon joint] (https://www.youtube.com/watch?v=aBodzmUGtdw&amp;t=3s). You can make these by hand with a decent hand saw and some chisels, and square. But it its very hard to do without a vise, which is pricey. Also takes a bit more effort and skill. You can also make them with power tools.
You could have made the cutouts for the seat slats a little cleaner. If you get a combo square and chisels. You don't need fancy chisels. These are decent starter chisels if you learn [how to sharpen] (https://www.youtube.com/watch?v=Ki8tt-VjwqI).
Use a Dowling jig
Use a router + a circle cutting jig.
Something like this would work if you're looking for a commercial solution. It's also possible to build your own. Not much too them.
I have the Milescraft 1319 JointMate - Handheld Dowel Jig and like it. I can't comment on other jigs, as this is my only experience with one. But it's pretty versatile and straight forward. I've used it on a number of projects and haven't had any issues.
Like this? http://www.amazon.com/Kreg-KMA2600-Square-Cut/dp/B003ARSYQM
Router Circle Jig
A jasper jig is exactly what you need... Harbor freight probably has them too.
http://www.amazon.com/Jasper-200J-Circle-Cutting-Plunge/dp/B00009K77A/ref=pd_sxp_f_pt
You could always buy a Jig. Something like this
Edit: To be clear, I'm not recommending this specific Jig, just pointing out that such a tool exists
CNC is going to be the most accurate. You can also get a circle jig for a router.
I found the T-track on Amazon - https://www.amazon.com/gp/product/B0000DD1O9
Mitering the edge trim would have looked better for sure. I guess I was just really lazy when I finally got to that part. I didn't have a miter saw yet at the time and have never gotten around to getting a decent miter setup on my table saw. I didn't used biscuits - just glued and clamped. My trim was cut a little proud of the thickness of the top and I just carefully ran over it with a flush trim bit on the router later to even it out.
Amazing work sir! It turned out fantastic.
EDIT: Check out the Kreg Jig . $40 and well with it! Also on Amazon.
The casual user can get by just fine with the $40 Kreg pocket hole jig. I do a decent amount of woodworking and it works well.
http://www.amazon.com/gp/aw/d/B000J43A7W/ref=mp_s_a_1_1?qid=1458056617&amp;sr=8-1&amp;pi=SX200_QL40&amp;keywords=kreg+jig&amp;dpPl=1&amp;dpID=41auGxMjmXL&amp;ref=plSrch
Sure thing, here are the links
36 inch T-track https://amzn.to/2NRuLWD
UHMW runner https://amzn.to/2CahmE8
https://www.amazon.com/gp/aw/d/B01JAPC6D4/ref=sxts_1?ie=UTF8&amp;qid=1537288905&amp;sr=1&amp;pi=AC_SX236_SY340_FMwebp_QL65
Wolverine jig, has the platform and varigrind. Just no special skew jig. Though that's not really needed.
https://www.woodcraft.com/products/rikon-8in-slow-speed-grinder?gclid=CjwKCAjwxILdBRBqEiwAHL2R85OnPOBhTVT2F05KAlKZHjtDuKZ2jRAp9SDT1C8ITuOLXgpHUOs3bhoChW8QAvD_BwE
Woodcraft has the grinder on sale. To start with the wheels it comes with are just fine honestly. And if you wreck them getting the hang of sharpening with it then get new wheels. Or a new wheel.
Total comes out close to 300.
They might like something like this:
http://www.amazon.com/gp/aw/d/B000J43A7W/ref=redir_mdp_mobile/186-2134268-4492466
while i don't have a 300blk (yet) i have been doing my research and have decided to go with 556 brass when it comes to reloading for it. if this is the route your gonna go, you're probably gonna want a swaging die, 300blk jig and sizing die set. you might also pick up a case gauge and OAL length dummy brass. all this so you can resize 556 for 300blk. i'm looking here for 556 brass, but i'm open to suggestions for a better deal elsewhere. 1000 brass for $80. $0.08/ea
my reasoning is this. Rumor has it that 556 has thicker brass, which leads to a slightly smaller internal capacity. if you're loading subsonic rounds, you'll most likely be using Trail Boss as your powder. because the loads for subsonic are quite small, you want the largest grain powder you can find as it will fill the case and lead to a more even burn. so a smaller case capacity would further improve this.
&#x200B;
you could also just buy bulk 300blk brass. 1000 brass for $130. $0.13/ea
Kreg Jig.
edit: more specifically the Pocket Hole System