Best power tool replacement parts according to redditors
We found 72 Reddit comments discussing the best power tool replacement parts. We ranked the 43 resulting products by number of redditors who mentioned them. Here are the top 20.
We found 72 Reddit comments discussing the best power tool replacement parts. We ranked the 43 resulting products by number of redditors who mentioned them. Here are the top 20.


A Swisscard for $25. It's like a Swiss Army knife, but it goes in your wallet.
I've had mine for six years and it's great.
(Now that I'm poking round Amazon, this thing for $10 looks like a better deal.)
any hardware store should have them. M4x8
https://www.amazon.com/Makita-911106-8-P-H-SCREW-NHP1310/dp/B01N66M5GW
Just a few thoughts, having done a bunch of 80% lowers (both -15 and -10) myself:
Having gained experience in the process of finishing them, 80% lowers, both the concept and the company, are definitely my preferred way of obtaining AR-type rifles, especially here in the DPRK.
Democratic People's Republic of Kalifornia.
I really appreciate this. However, I didn’t realize it was in doubt. Any way, I bought thisKlein Tools ET920 USB Power... https://www.amazon.com/dp/B07GXZHPVR?ref=ppx_pop_mob_ap_share USB meter and you can see when a fast charging switches over to fast charging.
After some quick googling:
Tools
The 11-in-1 card tool.
United Cutlery card tool
Victorinox Swisstool
Victorinox Swisstool Lite
Tool Logic SVCII
Tool Logic ICC1B
Tool Logic T1BCC
Knives
Cardsharp knife
Nemesis Titanium Card II knife
Snody Crisis Card Gen II
Titanium Charge Card
Utility
Fresnel lens
Diamond Sharpening Card
Eon Classic flashlight
Note that, aside from the 11-in-one tool, none of these products are endorsed by me. Links are provided strictly for educational purposes.
Edit: Formatting
get a 1/4 hex drive impact driver ( every power tool mfg makes these ), you can use all different types of tips in it and can get a set of these so u can use any socket.
Clean setup Please do not solder power cables!
This wire thickness is probably too thick to solder and a bad solder joint could result in the cable insulation melting or even catching fire!
Please replace that cable or fix it with a luster terminal and electrical tape.
https://www.amazon.com/Hitachi-338600-Luster-Terminal-Rp350Ydh/dp/B07DSRSG2J/ref=sr_1_1?keywords=luster+terminal&qid=1568654367&s=gateway&sr=8-1
Monitors will not draw a lot of power but still!
*Trust me, i'm an engineer.
i use these, though i haven't used anything to adhere it - https://www.amazon.com/gp/product/B01ISNX7LO/
A few amazon recommendations:
XR Charging port cover: https://smile.amazon.com/gp/product/B072Z41BT9/ref=ppx_yo_dt_b_asin_title_o06_s00?ie=UTF8&psc=1
This one stays on pretty well. I pretty much only put it on if there's a possibility of a rain shower on my way.
XR Power Button cover: https://smile.amazon.com/gp/product/B01ISNX7LO/ref=ppx_yo_dt_b_asin_title_o09_s00?ie=UTF8&psc=1
These don't stay on as well as the Charge Port covers, but they get the job done for possibly rainy ridge, and they're cheap enough to not worry if one falls off during a spill.
Cheap but effective handle: https://smile.amazon.com/gp/product/B00RPBA606/ref=ppx_yo_dt_b_asin_title_o07_s00?ie=UTF8&psc=1
This is the handle I ended up going with. It works well, though it does slide a little down the rails. So it's not always level when you pick it up. (It was on sale when I bought it.)
For a more crafty person, I'd just get some paracord and use one of the guides in this subreddit to create your own handle.
I road my XR on the beach back when I first got it without any issues. Personally, I would suggest coving your charge port and the power button prior to riding on the beach. The sand gets clogged in the charge port as well as getting inside the button causing it to get stuck. There are two covers that are made for other things but fit perfectly for these onewheel vulnerabilities.
UPDATE:
Cover for charge port:
https://www.amazon.com/dp/B072Z41BT9/ref=cm_sw_r_cp_awdb_t1_d7-7BbKSZX2Q6
Cover for power switch:
https://www.amazon.com/dp/B01ISNX7LO/ref=cm_sw_r_cp_awdb_t1_V9-7Bb42GR9ZJ
I use this one, don't know why is doesn't say duratool though.
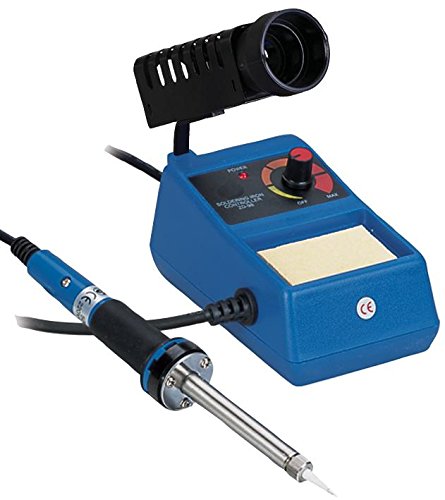
48w Solder Station Adjustable Soldering Iron Kit https://www.amazon.co.uk/dp/B01186R3AE/ref=cm_sw_r_cp_apa_ncmRybJ50X0VR
How interested would you be in fixing this yourself? With a few tools and a little elbow grease you could stop the progression of the rust relatively cheaply. If the metal is not too far gone I'd say it could be "fixed" for under $100. By fixed I am referring to stopping the rust from getting worse. So long as the rusted area is not structural, and by your description it is not, as long as there are no holes you are fine to just stop the rust from getting worse. I'd say if you've got access to a few tools, remove the rust and ask a shop to look and see if it should be good to use a rust preventative paint/coating.
As far as repairing the metal itself, the only real fix is to cut it out and weld new metal back on. Which is considerably more expensive, though if you do some of it yourself you could save quite a bit of the cost.
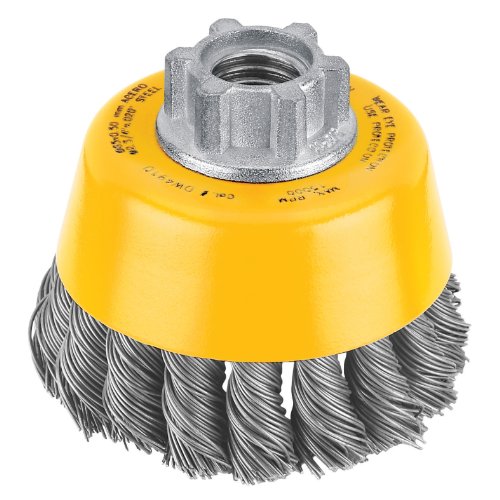
If you just wanted to stop the progression of the rust, use an angle grinder with one of [these] (https://www.amazon.com/DEWALT-DW4910-8-Inch-11-Knotted-020-Inch/dp/B00004RHAL/ref=sr_1_1?ie=UTF8&qid=1469088859&sr=8-1&keywords=wire+cup+brush) to remove all the rust and bring it to bare metal. Then get some [por 15] (https://www.amazon.com/POR-15-45004-Gloss-black-Preventive/dp/B00H2VVL0S/ref=sr_1_1?ie=UTF8&qid=1469088930&sr=8-1&keywords=por+15) and coat the area well. This should be sufficient to stop the rust from spreading. If you went this route I would advise doing dome research and just using this over any accessible rust prone areas you can find, though that would just be extra insurance.
Anything with a temperature control should be decent enough for doing through-hole soldering work. I use this.
Electronics snobs will look down on it but I'm not about to spend hundreds on a professional grade one!
For the soldering iron any cheap adjustable iron will do as long as you're not planning lots of projects, I have this and it works fine for soldering switches. For the solder I personally use leaded 0.7mm, but anything up to around 1mm will work fine; I'd still recommend using leaded solder though. The desoldering pump you're getting is fine as long as you're not planning on doing a lot of joints as it's not the best quality. A mat would be useful as well as a fan to get rid of some of the fumes. As for screws I assume the case will come with them, if not you'll need 6 x M2 4mm screws in order to mount the PCB.
Essentially, this is very similar to what I have, and it works great.
https://www.amazon.ca/1000W-Voltage-Induction-Heating-Module/dp/B01HI5ZVUI/ref=sr_1_2?ie=UTF8&qid=1537908199&sr=8-2&keywords=1000W+induction+coil
I have been running it with this
https://www.amazon.ca/gp/product/B075K1SQ44/ref=oh_aui_detailpage_o00_s00?ie=UTF8&psc=1
As one of the commenters below stated, I am going to try the flyback diode in series with this possibly along with a small fuse, even if it blows every time I would rather it not take the power supply with it.
I made a Boombox out of a pair of coaxials I had laying around
pic
Amp
spectrum analyzer
6.5s
solar panel
buck converter
battery mount
I have a surplus of m12 tool batteries as well as some coaxials laying around I figured I’d make a portable speaker
With solar panels most output well over 18 volts. Which is fine for that amplifier but not for the battery. With a buck converter it takes it down to a more useable voltage for the lithium batteries.
If you wanted to run something like this on grid power you would need something like this I had planned on getting a 12 volt power supply like the one here later for home use but since with one 9AH lithium battery I have well over 12 hours of listening before the battery needs to be recharged/ swapped out.
Edit: also using this to monitor solar output
> To use an example, 12 months ago ToolShed had a Dewalt drill for $190 that was retailing at Mitre 10 for over $300. I went into Mitre 10 to see if they would honour their price match - 15%. The manager ended up losing his shit at me and calling both ToolShed and Dewalt because 'they're not allowed to offer it at that price'.
Not a good look, for sure. I imagine that DEWALT may dictate retail prices to position themselves in the market, or co-ordinate specials or sales across retailers which is probably why M10 was so pissed.
They don't want their brand used as a loss leader/maintain premium status or whatever and IMO that is anti-competitive.
Guessing in that situation ToolShed either jumped the gun on a special price, or got hold of some parallel imported/excess/cheap stock and dumped it. Every time we did that when I worked online retail, other retailers would complain to the distributor who would then shout at us about it.
The distributor model has its upsides and downsides, but it can be anti-competitive in some cases, especially when owned by another entity in the chain. Unfortunately manufacturers generally don't want to deal with multiple downstream distributors and exclusivity is the norm.
> Also, we can't import power tools from the US because they don't work with our power supply so options are limited in that regard.
Plugs are different, leads can often be swapped and most modern power supplies can handle the different input voltage (e.g. 100-240V
https://www.amazon.com/N078832-Replacement-Miter-Supply-DWS780/dp/B07KNMLL11)
Thank you. I used a knotted cup on the paint that wouldn't come off. That is the only thing I used on the legs. It didn't damage the surface. Test it on an area that wont be seen before you go at it all over. After the paint was gone I wiped it all down with mineral spirits. I used two coats of Rust-Olium primer and let it dry for a couple days. The label says 1 or 48 hours for top coat. The paint is Rust-Olium Smoke Gray. Light coats otherwise it will run and you have to take the surface back to metal. I learned this on the motor. I would not clear coat it in the end. It caused orange peel in some areas that I had to repaint. Good luck on the restoration!
So this is what I've done over the course of a few years:
From there you can make a Thien baffle out of scrap 1/2" plywood or whatever you'd like. You'll want a 4" elbow (around $10) and a 4" coupler (around $6). I'd also suggest building a sort of cart for your new Frankenstein dust collector and this is a good one to strive for.
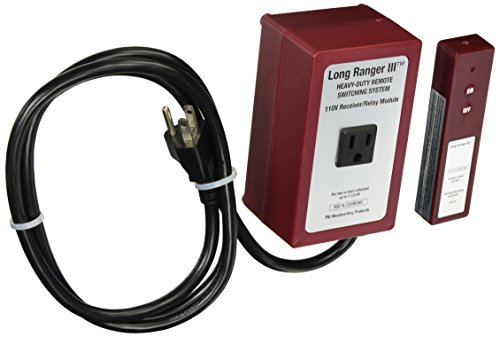
Finally, you'll want a Dust Collector Remote and this one I've had for a while and works great for $60.
So, for all of that you're looking at right around $500 w/ around a $100 to play around with. Maybe spruce up your cart w/ some fancy casters or grab some connectors (I like the Dust Right ones from Rockler to further streamline workflow)
That takes you right around to your budget. I think the HF model with the Wynn filter and Thien baffle is a great investment. I love mine.
Harbor Freight, some kind of Thien separator or a chip collector ( I use the Rockler one), remote on/off switch
IMHO, these two things should be included with every new OW. This will better protect the few parts of this board that are still vulnerable to rain. Even with these on, I'm not sure if I have the guts to take my OW out in the rain. I guess I will do it while the warranty is still in effect and save it for dry weather after the year is up.
https://www.amazon.com/gp/product/B01ISNX7LO
https://www.amazon.com/gp/product/B072Z41BT9
I am really sorry but there isnt any adapter available to reduce the size on the Grinder. Therefore you are going to have to purchase the correct brush wheels. Check out the link below and see if you find this suggestion useful. [5/8" brush wheel]
(https://www.amazon.com/DEWALT-DW4910-8-Inch-11-Knotted-020-Inch/dp/B00004RHAL/ref=as_li_ss_tl?_encoding=UTF8&pd_rd_i=B00004RHAL&pd_rd_r=E03J2MCDXTJWK2B7Y0P5&pd_rd_w=iYcPc&pd_rd_wg=AuoiU&psc=1&refRID=E03J2MCDXTJWK2B7Y0P5&linkCode=ll1&tag=sid101-20&linkId=956ec1d43870219e457f0bd6c9fba61f)
You'll burn that out. It's rated for 15A, the HF 2HP DC is 20A. The thing you linked is meant for shopvacs. Now this can handle 20A load.
http://lumberjocks.com/topics/33651
Maybe this one?
https://www.amazon.com/PSI-Woodworking-LR110-3-110-Volt-Collector/dp/B00004S9AI/
The thing I’m uncertain about is the locking washer set you use if the disk doesn’t screw to the 5/8” post.
I was looking at this but the fact that the bottom piece (the one without holes) isn’t completely flat on one side seems odd; it has a raised collar on both sides. Most of the aftermarket flange kits have this. It’s making me question what I know about how these are supposed to work.
Podoy Grinder Flange Angle Wrench Spanner Metal Lock Nut for Compatible with Dewalt Milwaukee Makita 193465-4 Bosch Black & Decker Ryobi 4.5" 5" 5/8-11 https://www.amazon.com/dp/B06XNJVWQZ/ref=cm_sw_r_cp_api_i_y92ODb7DQG14P
It pretty much is a large immersion blender. I worked at a pizza place in my home town where we had a power drill with a special attachment for mixing sauces. Link for visual. It literally is just a metal rod that you can attach to a drill that has some stuff at the bottom that can mix liquids in large food grade buckets. We made sauce 5 gallons at a time so stirring all the seasonings, tomatoes, paste, and water together would have taken a long time without it. Also super useful for mixing up 5 gallon batches of ranch.
https://www.amazon.com/dp/B01NCB4ZTN/ref=asc_df_B01NCB4ZTN5170212/?tag=hyprod-20&creative=394997&creativeASIN=B01NCB4ZTN&linkCode=df0&hvadid=167133658256&hvpos=1o1&hvnetw=g&hvrand=8368876374343976431&hvpone=&hvptwo=&hvqmt=&hvdev=m&hvdvcmdl=&hvlocint=&hvlocphy=9033326&hvtargid=pla-315351608098
Been eyeing this one at my parts supplier. Nice and deep, molded bottom, good sized pockets.
Other than that, its just woodwork to frame all the parts into one piece, where there are a ton of better resources than me on the subject. Keep in mind just settling on handcranking the box is loads of fun on its own.
Feel free to pm me if have any more questions on it and good luck if you actually decide to go for it!
Well this is the one that I purchased. It arrives today, so I'll let you know if it works or not.
http://www.amazon.com/PSI-Woodworking-LR110-3-110-Volt-Collector/dp/B00004S9AI/ref=sr_1_3?ie=UTF8&qid=1462218271&sr=8-3&keywords=20+amp+remote
here is a pretty good value
$40 isn't half bad IMO.
Nice photo. I see you already have the fender and a handle, so ?I would say your next stage of upgrading would be some dummy xlr plugs, and some covers for the power button for some waterproofing. You are right on the dont push yourself part though, thats how most people get hurt. I forced myself to do the first 50 miles in sequoia, and now I am at mile 300 with cruze. Heres the links to those plugs and covers.
https://www.amazon.com/gp/product/B072Z41BT9/ref=ppx_yo_dt_b_asin_title_o07_s00?ie=UTF8&psc=1
https://www.amazon.com/gp/product/B01ISNX7LO/ref=ppx_yo_dt_b_asin_title_o02_s00?ie=UTF8&psc=1
The box is a Long Ranger Dust Collector Switch. The woodshop I used to belong to had one so I knew where to look. It looks like it was designed in the 70's (complete with 9 volt battery remote), but it works.
You can buy those plugs in bulk on the cheap when getting them thru camera-accessory vendors on Amazon or w/e you prefer.
uxcell 5 Pcs Clear White Silicone Waterproof Rocker Switch Protect Cover Round Caps https://www.amazon.com/dp/B01ISNX7LO
NEUTRIK NDM DUMMY PLUG FOR MALE XLR CHASSIS CON. (10 pieces) https://www.amazon.com/dp/B00LVENU4C
OWs are supposed to hold up really well from non-submersion, but that comes with some big gotchas.
I rode mine all winter thru the rain and I know quite a few people use their OW in the snow. Still I’d recommend you at least look into the Badger Kit if not buy it & apply it if you want some peace of mind.
ps: the badger kit/waterproofing in-general is what people are referring to when they say they’ve “badgered” their OW. It’s not some obscure slang for messing it up.
Make sure you have the right tools/accessories to go with your table saw.
So that looks like a lot right? Well the good thing is the majority of the features are included with almost all table saws. I bought one of the nicer ones from Lowes and it includes all of the hardware listed above other than the crosscut sled. First project I did was build a crosscut sled. Then the ppe, flattening the wood and body position/cleaning the shop are my responsibility.
Almost all of this occurs before you make the cut. By the time you get to actually cutting, you just make sure to use your tools and your head.
I was originally planning on gluing and finish nailing the top to the rails but once I had it resting and I passed some wood through I ended up just leaving it.
It is quite heavy with the router mounted to it and there isn't any side to side play against the wing or fence system so it doesn't really have anywhere to go especially with the fence in place.
When I install the bosch I will probably do pocket screws or something from underneath as an extra precaution.
I do want to get a safety switch (http://www.amazon.com/Rockler-Safety-Power-Tool-Switch/dp/B001DT13B2) to mount over there instead of reaching down to hit the switch on the router.
https://www.amazon.com/Rockler-Safety-Power-Tool-Switch/dp/B001DT13B2 I would go with something like that. if your work binds or something, you don't want to take a hand off it to shut off the saw. That switch lets you hit the off button with your knee instead. Just wire the female lead off that into a single gang box for 2 outlets.
My only concern is that you'd have to remember your saw is still switched on when that is off, and that could be dangerous, too.
I’m not sure the reason why 1/4 is the standard for impact drivers but they do make adapters for 3/8 and 1/2” sockets.
MILWAUKEE ELEC TOOL 48-32-5033 3 Piece 1/4" He x Adapter Set https://www.amazon.com/dp/B00FUQPJAK/ref=cm_sw_r_sms_c_api_XN-NBb5WXYM5Q
Impacts also come in 1/2” drives for bigger applications
Milwaukee 2763-20 M18 Fuel 1/2-Inch High Torque Impact Wrench with Friction Ring (Ba... https://www.amazon.com/dp/B00GFUA6O4/ref=cm_sw_r_sms_c_api_XP-NBbVEE22A4
That looks exactly the same as this one I bought off amazon and it's £11 cheaper. I don't have a problem with it but it's the only soldering iron I've ever owned so I can't really compare it.
Non-mobile: here is a pretty good value
^That's ^why ^I'm ^here, ^I ^don't ^judge ^you. ^PM ^/u/xl0 ^if ^I'm ^causing ^any ^trouble. ^WUT?
This :-) If the birthday is still a bit away, Aliexpress is a good source for large kits that can be used for all sorts of projects; $22, $26 (Mega, Ultrasonic...), and single compatible UNO or Nano cost $2.60/$1.70 or so.
.
I build simple car-robots with students, and while you can get a whole set for around $15, they aren't too expensive if you buy locally either (e.g. 1, 2); It's rather easy to hook up, and even with just 10 lines of programming it's ready to drive around objects by itself.
Here's a kit similar to the ones from Aliexpress, but from a German seller; http://www.ebay.co.uk/itm/Starter-Kit-fur-Arduino-UNO-R3-RFID-mit-Modulen-Sensoren-1602-LCD-Display-Ras-/181965808319?hash=item2a5e01e2bf:g:Jz4AAOSwepJXVUFe - so should not take too long (When I order from the UK to Germany it usually takes a week tops).
Also consider picking up a NodeMCU Wifi board, lots of fun for home automation, robots, remote controlled gadgets... (1, 2)
Does he have a soldering iron? Many try to avoid it, and you usually get away with it :-) I tried avoiding soldering as much as I can, until I got a decent soldering iron. Now it wasn't just easier, but also fun. It's actually easier then trying to splice wires, building complex circuits with jumpers, searching for loose connections... While something like the Hakko fx-888d is great, even a simpler soldering station with adjustable temperature will do to get started 1 2