Best rubber raw materials according to redditors
We found 100 Reddit comments discussing the best rubber raw materials. We ranked the 47 resulting products by number of redditors who mentioned them. Here are the top 20.
We found 100 Reddit comments discussing the best rubber raw materials. We ranked the 47 resulting products by number of redditors who mentioned them. Here are the top 20.


While I’m waiting on my Lumina to come in, I figure I’d do a cheaper, experimental tactile build.
Keyboard: Duck Sidewinder Gray
Stabs: GMK Screw in Stabalizers w/ Walker Mod (no adhesive sticker)
Switches: Holy Razers
Butyl Rubber
Keycaps:
I needed something to scratch my itch while I wait for my Lumina, so I decided to pick up the Duck Sidewinder and screw around with some mods. I have a bunch of halo’s and Outemu Ice V2’s lying around, so I decided to pick up some Greetech switches to mess around with. After lubing them up with Krytox 205, I had a good set of holy razers, and I’m pretty happy with them.
I’ve used butyl rubber to deaden the sound in my keyboards before, but this is the first time using it on the spacebar. I actually like the added weight in the spacebar, and I had no idea if I would or not.
As far as the caps go… Truth be told, I’m not much of a fan, but I was hoping the dark blue would bring out the blue tones in the case, and I think it did pretty well. I’ll keep them on for bit and see if they grow on me. It's just hard to find a good set of caps that are colemak compatible. Currently I'm waiting on these.
I’m pretty excited to have this as my daily driver for awhile :)
Picture of the setup
Im using a 20 gallon long glass tank with this surrounding the sides and back, its a perfect fit. A day night timer hooked to a non heated light. I dont use heating that sucks the humidity out of the air by using a heat pad for both hides regulated by thermostats one for each pad. Substrate I use is coconut husk, this one lasted me a whole year and people say it wont mold as easily compared to other non coconut fiber substrates. The tank itself uses a screened sliding locked lid. I cant speak for how to lock down other types of lids for tanks. The screen however I covered most of it with 3 layers of foil followed by tape around the edges of the foil to keep it attached and sealed better to the screen. A hole for the non heated light was made and I used a cut up piece of a zipblock bag along with tape to cover over the hole for humidity reasons. Finally the hides are medium sized from reptile basics, I remember when he could easily fit in the small one, was such a tiny noodle and of course a simple plastic water dish big enough to soak in and aid in humidity.
For times when he is in shed though, I lightly spray down the substrate and sides and back of the tank once a day. I think just spraying the glass walls and keeping that large surface area wet is good enough though.
Other items include thermometer, fake plants, gram scale, and one ball python
oof. Do your camera a favor and pick up some thin adhesive rubber and put on your plate between the camera. then you won't need to tighten so hard AND you won't get those marks.
Amazon Rubber pads
There’s some give, and it makes noise when it flexes. I did not like that at all, but liked everything else.
So I used 1/16th” contact neoprene I already had around, applied in a few spots and it’s totally solid and quiet now. Foam grip tape or similar would probably also work. Rubber furniture sliders would need a lot of trimming but the thin felt type might work.
https://i.imgur.com/U0SgUmi.jpg
Aside from the strips you can see inside of the grips, I also put small pieces inside the bits that go above and below the Switch to try to reduce any chance of visible scratches on the front.
The kit is very high quality otherwise—the fitted case a la Skull & Co is killer—and the grip does feel nice enough. I’m not huge on the finger grooves they put in the back for smaller hands, but the wrist position is better than anything else I have tried (Mumba, JetTech, Orzly, Hori). That’s a big deal for me because I have RSI issues and code for a living.
TL;DR: it’s worth the trouble of finding and shimming with tape or neoprene to make it good.
I've heard of a few people doing this with a good bit of added comfort. I recently rigged a Dr. Scholl's on one of my AIWB holsters to try it out but wasn't too pleased on appearance nor comfort. I also found having the rubber backing against your undies makes it far more difficult for a heavier set person to remove or add a holster back into the pants.
YMMV but what has worked for me (and others mentioning in this post) is adding some foam-backing. I've used this for several months and it has greatly helped. I'm not saying it looks great but it does beat the look of picturing someone stepping on your pelvis all day) /s.You can tackle just the pressure spots or go for a larger coverage area (sample pics). After you stick it to the holster I went around with an xacto blade and trimmed excess + scored the material a bit to push further into the crevices.
Alternatively, some of stated you can buy a 'kneeling board' and cut those up to provide a similar effect. Or check your local upholsterer and ask kindly for spare scraps of foam. Lastly, some foam wedges do exist direct from manufacturers like Mastermind Tactics and NSR Tactics though I'm a big fan of DIY so you can easily create additional replacements should you need to.
If Dr. Scholls doesn't make you happy -- just know you have other options to consider. Hope this of help to OP and/or others!
XCEL Neoprene Sheet Tool Box... https://www.amazon.com/dp/B01G44LUKO?ref=ppx_pop_mob_ap_share
I bought this and cut it to size
I had this exact same issue on my Stealth board. The rattle almost sounds like someone's taped a ruler to the front end of your board. The problem is caused by the accessory cable rattling in the front of the board.
When you remove your front truck, you'll see that Boosted put in a bunch of foam to prevent any rattle, but it's not enough. I solved the problem by purchasing this adhesive foam insulation and putting a couple extra layers around the accessory cable. I also put some between the deck and the rear cables to stop additional rattling back there. Now when I ride the board there's no rattle whatsoever.
I'm not jumping at the chance to remove my front truck again, but let me know if you really want me to take photos to show where I installed the adhesive foam and I'll do it.
This is actually a great suggestion, and I would add that you can use drawer liner (ANY on amazon will do, I literally picked the first link in a google search as an example: https://www.amazon.com/gp/product/B01G44LUKO/ref=s9_acsd_newrz_hd_bw_bFi2V_c_x_w) as a relatively cheap and easy way to get a lot of thin foam to put in boards. Obviously you want ones that are less static-y if possible and that's harder to suss out from the descriptions but you should be able to find something.
Piggy-backing on the other comments about pinging being the result of hitting the top of the housing on the way up (clacking), there are ways to silence it, such as using Zealencios and any cherry-profile keyset. In fact, the keyset itself can affect the sound as well.
So I would assume it’s hitting the body when you press down... probably needs to be repaired, but I would try putting some thin padding behind it to see if you can stop it from making any noise....
I don’t know if this stuff is too thick but it’s worth a try...
adhesive rubber sheet
If you ever find yourself at a craft or hobby store try looking for some 1/8” EVA foam sheets like these to use as padded dividers between consoles. Works wonders :)
All the posts I could find recommended 3M "bumpon" feet, which work great, but I wanted something slim. I found some of Ripster's glorious work but the only place I found selling "egrip tape" was charging ~$70 USD these days. Stumbled upon these furniture pads on Amazon and they're a whopping $11! One pack is a lifetime's supply... or is it. ;)
I'm very happy with them, and they're very slim (1/16 of an inch). Probably going to use this stuff on all future keyboards and wrist rests.
I wanted to share my first experience with switch swapping. I was nervous because so many people said the Leopold was hard to desolder and this was my first time soldering any thing. But it all went really well, so I wanted to share in case any one else is thinking about it plus some info that might be useful to you veterans as well.
One part of keyboard customization I don't see addressed much is deadening the ping and case sound. Some people add foam to the bottom, but I found going between the PCB and Plate reduces sound a LOT. This baby is stuffed like a turkey and sounds amazing.
I've also seen a lot of people saying how great the Engineer solder sucker is. While the build quality is nice I'm not sure its worth $25, and most of the performance was because of the silicon tip. So I just added one to a cheap sucker and it worked great. I was worried about the temp as it says it isn't rated up to 350c but it worked great with barely any discoloring, and for like $1 you get 3ft so it basically lasts forever.
​
Links -
Neoprene $12 1/8" - https://www.amazon.com/gp/product/B001FVG3CM/ref=ppx_yo_dt_b_asin_title_o03_s00?ie=UTF8&psc=1
Soldering Station $37 - https://www.aliexpress.com/item/STM32-T12-Soldering-Station-Electronic-Soldering-iron-OLED-1-3-Digital-station-solder-iron-tip-welding/32994824865.html?spm=a2g0s.9042311.0.0.7ba64c4dVrNrn3
Solder Sucker $5 - https://www.banggood.com/Sucking-Vacuum-Desoldering-Pump-Solder-Sucker-Remover-Tool-p-932434.html?rmmds=myorder&cur_warehouse=CN
Silicon Tube 5x7mm $1 - https://www.aliexpress.com/item/1-Meter-Food-Grade-Transparent-Silicone-Rubber-Hose-2-3-4-5-6-7-8-10/32986897358.html?spm=a2g0s.9042311.0.0.7ba64c4dVrNrn3
DSA Caps $35 - https://www.aliexpress.com/item/dsa-profile-Dye-Sub-Keycap-Set-PBT-plastic-retro-beige-for-mechanical-keyboard-beige-grey-cyan/32965815374.html?spm=a2g0s.9042311.0.0.7ba64c4dVrNrn3
Super Lube $5 - https://www.amazon.com/Super-Lube-21030-Synthetic-Grease/dp/B000XBH9HI/ref=sr_1_5?keywords=super+lube&qid=1556304495&s=gateway&sr=8-5
​
I realized I really don't like the DSA keycap profile but this was a really nice set, pretty thick and great dye sub printing, way more crisp than my Enjoy PBT Cherry profile set I've been using.
​
I didn't have any lifted pads or issues at all despite me being a total noob. Using a 2.4mm chisel tip and my solder sucker combo worked really well. Just stuck the flat tip on flat side (top/bottom) of the soldered stem, let it heat up for about 5-6 seconds and then sucked. At 350c on my soldering Iron most guides said this was too long but i didn't have any issues, and going quicker left a lot of residue.
Also with the silicon tip I didn't have to move the soldering tip and place the sucker over the stem (doing this fast before the solder cools down is a pita) because of the silicon I just pressed it on top with the soldering iron still heating and sucked all at once. DEFINITELY worth the $1, made the process so much easier.
I also used Super Lube for all my lubing. This is what a lot of people use for the stabilizers as its really thick but then use expensive stuff for the switches. I just used a very small amount (scrape your brush off and then wipe it on so you can barely see it but its shiny). Worked great, no ping from the springs and very smooth and a $5 tube will last forever.
​
I want to do another now! need to decide on what type of switches I might like more than these super light 35g box reds. Maybe some speed switches? And I'll want to do a good solid metal case.
Overall I'm just super happy the whole thing worked without any problems. I get to use my really good Leopold plate/base/pcb (i really like the led under caps/num lock to let you know its on) with switches I like more!
​
If any one has any questions or needs help doing their first switch swap let me know, I'm 1 for 1 haha.
So far my speak is the only one I’ve ever had the issue with, I usually just try and keep conscious of my fingers.
I was thinking about cutting something like this down to fit the back, mainly to add some grippiness to them, but I feel like getting a clean consistent cut that fits like I’m envisioning would be difficult with just a straight edge and xacto knife. Plus there’s the issue of getting it to stick without too much mess.
Even good electrical tape will leave a gooey mess after long enough, especially under the heat of your fingers, and I can’t think of any temporary adhesive solution to get my silicone idea sticking.
I've done this in the past on other sites, but could you give us suppliers of where you get bulk items? For example: Rubber Bushings (o-rings), washers, grip tape, etc.... I wasn't familiar with your store - did you sell these items? I'm not making a shop but I tell people regularly where to get o-rings in bulk and other items and was wondering if yours were the same. For example: bushings, tape - "creamy goo", washers
Wouldn't recommend buying a sheet of rubber really, unless you're looking to do this more than a few times. Sheets can cost more than just buying the fullsoles on Amazon.
You just need to trim the sole then, rather than cut from a sheet. I see a lot of Vibram Newporters going on Chaco sandals. We also use this one, which I've always seen as Aquastealth. Soletech also sells the full sheets,
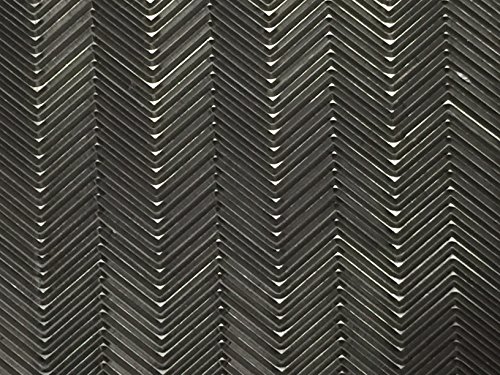
notably Herringbone, which I like for leather soled sandals, would likely be fine on flipflops. Another cheap 4mm sheets. Soletech isn't really well regarded in the shoe repair industry, so I wouldn't use recommend them. But for a home project, probably not a big deal.
I have a roll of foam tape left over from sealing windows. So I used a leather hole punch to make a self stick circle that filled the hole. Granted I had this stuff laying around.
like this? https://www.amazon.com/Durometer-Smooth-Finish-Backing-Thickness/dp/B000MAEX88/ref=sr_1_1?qid=1562959999&refinements=p_n_feature_seven_browse-bin%3A3071283011&s=industrial&sr=1-1 What do you use to mark and cut it?
​
Thanks man. It sound like you know what you are doing.
Go to Home Depot [or any home improvement store] and look for high quality 3/4" plywood. I normally go for the 2' x 2' pieces, and they're about $15 to $20. I don't care, as this is good stuff, and usually void free. You can have them rip it down to your desired size, but I do that myself.
Round the corners off [I have this metal flange that's the perfect diameter... maybe 2"]. DON'T round the edges, but sand it a lot [at least up to 220 grit]. Seal it with a good quality poly [I use Helmsman spar urethane, as it's really resistant].
Them, get some rubber [this stuff might be a bit too thin], some spray adhesive, and glue that stuff down. The more glue, the merrier, but make sure it goes on smooth. Trim the excess. Wait a few hours [preferably overnight], apply pallet tape and mount it.
Good as a real pallet. It might cost a bit to make, but it's still like 25% of an aluminum one.
Have you thought about getting a bunch of foam padding used for arts & crafts and stacking/trimming it to shape the wrist rest how you want it?
Something like this I just found on Amazon: https://www.amazon.com/gp/aw/d/B01JSWJTNY/ref=pd_aw_sim_263_2?ie=UTF8&psc=1&refRID=VY9TK8BG80P6968YPFPK&dpPl=1&dpID=71NffsSX7nL
If you have an x-acto knife or a scalpel and some adhesive (for stacking and attaching to the palm rest) you could probably make something pretty decent-looking and comfortable.
A mellow-style base would be great. A little more ambitious than anything I'm considering. I was thinking I'd use a 1/4" thick foam rubber sheet (http://amzn.to/2qjgUz1) as a seal to attach the enclosure to a board with mild concave (e.g.: http://bit.ly/2pN70Wd)
Doesn't Sorbothane contain plasticizer that can damage plastics? I use it in all my metal keyboards but avoid any contact with plastics. Am I being over worried?
I use neoprene sponge foam rubber for my spacebars and it works great.
This tape is really cheap but is also pretty thick. It went by Creamy Goo, Black Jesus, and a couple other names from different companies:
http://www.amazon.com/gp/product/B00EE9LKRA/ref=oh_aui_detailpage_o06_s00?ie=UTF8&psc=1
I was thinking some 1/16" thick self adhesive rubber to attach to the mount so your flashlight looks stock. Of course you wouldn't need 33' here but it'll give you an idea of what to look for at the store.
I found this, but it's a bit expensive. Here
http://www.royalconstrictordesigns.com/ball-python-care-sheet
http://ball-pythons.net/forums/showthread.php?127203-Ball-Python-%28Python-regius%29-Caresheet
hideboxes http://www.reptilebasics.com/hide-boxes
insulation covers 3 sides of tank https://www.amazon.com/gp/product/B001GAD5G4/
substrate https://www.amazon.com/gp/product/B0157O1CM8/
iv been bitten once and it doesnt hurt, id rather be bitten then scratched by a cat
i used foil and tape (outside only) to cover 90% of the screen top
Would you be able to find which tape in particular u used via amazon? Would this be acceptable? https://www.amazon.com/Neoprene-Rubber-adhesive-strip-thick/dp/B00EE9LKRA
Let me also say that it looks great, you did a fantastic job!
https://www.amazon.com/gp/aw/d/B001GAD5G4/ref=mp_s_a_1_18?ie=UTF8&qid=1510665212&sr=8-18&pi=AC_SX236_SY340_QL65&keywords=CLEVERBRAND+INC.&dpPl=1&dpID=41Z-j9IlmYL&ref=plSrch
Price has gone up. They also sell strips in 3/8, 1/4, 3/4, etc inch width which are cheaper
Used this stuff to line the drawers. It's good as a liner and not much else haha
I waited a a couple of years to rewire. For like a year the bed didn't work though. It was able to print fine but with a lot of warping and falling off the bed.
How I rewired the bed was I unscrewed the leveling screws and took the aluminum off. (I saw a lot of people take off the entire bed which is a lot more work. I disoldered the wires and routed them through a whole i drilled in the back. Then covered it with a protector and resoldered it. To add a little touch of more heat instead of adding a secondary heater I added a foam with one side adhesive (like this https://www.amazon.com/Adhesive-Padding-Weather-Stripping-Thickness/dp/B071R4DR1R). Assembled it and now the bed reaches up to ~90C.
Have you tried covering any of the glass with foam or anything?
this is what I used on my 20g long but you should be able to use it as well.
Cover the top with foil?
Something like this, only thinner. They’re Cherry profile (the only profile GMK makes) and I don’t plan on taking them off.
Very cool! I've been looking for jewelry storage solutions recently because my old ones are struggling (I have one of those little towers, but they're ineffective for stud-type earrings).
​
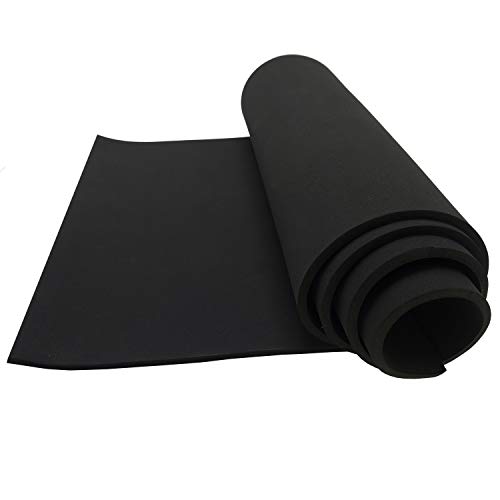
Would you say the sponge you used is similar to this type of foam?
Would this one be fine?
Would this work well?
https://www.amazon.com/Neoprene-Durometer-Smooth-Backing-Thickness/dp/B00KL8JVGU
well hey I've spent the last month or so obsessively researching shoe soles looks like this is my moment to SHINE
halfsoles.com sells half soles (duh), meaning a heal piece and a forefoot piece. They've got several varieties of Vibram sole, some with pretty aggressive lugs. If you go that route, the middle of the boot will be uncovered, which will make it flexible to walk on. You could glue some vibram protania protective rubber sheeting (1mm thick, halfsoles or amazon) to the middle to protect it. Or, you could find a sheet of smooth rubber at whatever thickness (google rubber soling sheet), cut it to size, and glue it to the bottom, then glue on a front and heel half sole.
Or, you can buy a full vibram lugged sole. Southern Leather Co has a bunch. The logger sole I believe has a raised heel, and the montagna block unit sole.
You can also buy soles or sole sheets on ebay, I've found a bunch there. You can even get a sole that has tread on the front, but smooth on the back (see the montagna full sole on the page I linked), and glue on a separate heel unit with the height you want. You can also build up layers of rubber between the heel piece and sole with heeling sheets.
Also, you can get a sheet of smooth soling rubber, glue it to the bottom, build up the heel to the height you want, and then glue on a textured rubber sheet with some traction, like soletech herringbone (4mm thick, IIRC) or vibram cherry (comes in 4mm or 6mm).
If you buy a sole unit, get a few sizes to large so you can trim it to fit the shape of your boots.
Another idea is to find a pair of boots at a thrift store that have a sole like you want (and is big enough), cut the sole off, grind the surface to remove the crap, cut to size and glue that on. Might be harder to get right, but cheaper.
As to how, the answer is really toxic glue. halfsoles has good instructions on how to attach soles to shoes. They also sell Barge cement, which is a great glue. Shoegoo works, too. If you get Barge, make sure you get the ORIGINAL formula in the yellow can. The new stuff lacks toluene, which means it won't kill you brain if you huff it, but by all accounts it works about as well as craft glue. (halfsoles sells the original formula, as well as the new one in a smaller package).
Keys to using cements like barge and shoegoo:
-roughen the surfaces (sand the leather of your boot)
-spread a THIN layer on both sides
-LET THE LAYER DRY for abut 10-15 minutes, until tacky. THEN press firmly together, rolling it on from one end (don't mess up as it's hard to remove at this stage). Bang it with a mallet all over if you can. Then, tie the sole on with a fuckton of string to keep pressure on it, and let it dry for a few days.
Make sure you glue in a well ventilated area- next to a window with a fan facing out and a crossbreeze going, or outside. Otherwise you're going to be loopy by the end of it. Toluene is good for shoes but not for brain.
Other links I have sitting around that you may find useful:
http://www.leatherandgrindery.com/Shoe-Repair-Materials-shoe-repair-wholesalers-shoe-repair-supplies
a shop in the UK with a good selection of soles and soling sheets
http://stores.ebay.com/Nordshoe
ebay shop with lots of soles, sheets, tools, and miscellaneous stuff
http://www.diyfootwear.com/
sells some sheets, the wrong kind of glue, and has instructions for gluing soles on, and removing old soles.
Or, if you're super lazy and have the money, you can take them to a cobbler or shoe repair place and have them stick on a sole of your choice. Vibram also has a mail-in sole repair service with a decent catalog of soles. Not sure if they would put soles on a shoe that never had them in the first place, but I don't see why not.
Do it with some [cable clamps](Install Bay BCC12 1/2-Inch Cable Clamp, Black (100-Pack) https://www.amazon.com/dp/B0049MV0YA/ref=cm_sw_r_cp_apa_i_o46hDbJ3P0D7Y) should be fine if you do that a couple times or to be safe add some sort of [foam sheet](Xcel Large Neoprene Foam Sheet - 54" Wide x 12" Length x 1/4" Soft/Medium for Cosplay, Costume, Padding, DIY, and Gaskets, Made in USA, Easy Cut Technology https://www.amazon.com/dp/B01JSWJTNY/ref=cm_sw_r_cp_apa_i_856hDbWMWPBJP) with the cable clamps or silicone the hell out of it but its messy but works.
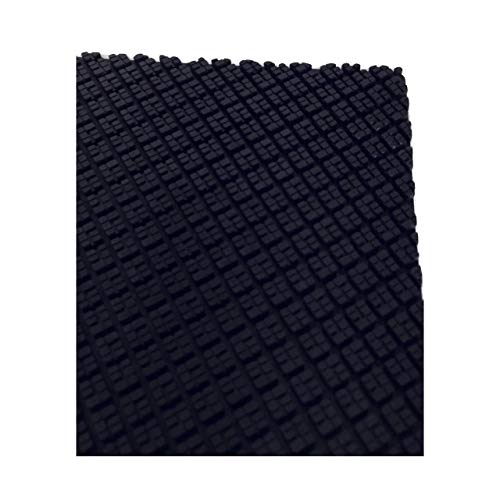
Buy these rubber sheets and cut a strip out to line the inside of the throttle and enhance the grip around the bar.
Ninepeak Rubber Sheet, 6 Inch X 6 Inch Square, Black - 0.02 Inch, 0.04 Inch, 0.06 Inch. Thick https://www.amazon.com/dp/B0723FBSL5/ref=cm_sw_r_cp_api_i_jtaiDbKRHV1A6
Something like this placed on strategic places? (be sure not to cover the IR leds though)
https://www.amazon.com/Neoprene-Rubber-adhesive-strip-thick/dp/B00EE9LKRA
I've used https://www.foambymail.com and was decent. I got a few feet off a roll which would more than do you for that job, but shipping might be killer since you only need a little. Whatever you do go 1/8" thick, you can always double up but you can't cut that stuff in half!
This on amazon might do what you need as well: Neoprene 1/8"
Buy
($6)Wires:For the MOFSET mod
($1o)MOFSET
($6)Wire spades:For the MOFSET mod
($8)Assorted M3 Bolts:You need some for a few mods and for the bolts you will inevitably strip on this
cheapwonderful machine($13)Longer assorted M3 Bolts:For a few mods
($9)M4 Bolts:For one of the mods
($9)Metric allen wrench set:Had to order one of these since metric tools aren’t common round these parts
(~$20) PLA of preferred choice- You’ll run out of the sample bit quick so go ahead and order a roll or two to be prepared. You will note some upgrades require ABS so a small spool of that to your order will also help.
($6)M3 Lock nuts:Critically needed for a simple mod
($10)Threaded rod and nuts:Please note that this item seemed difficult to find online. I recommend going to your local hardware store and getting two 5/16” rods of at least 16” in length. They should have an assortment of threaded rod in various lengths available. Also note that the pitch of the threading matches the nuts you buy. Further instructions regarding this can be seen in Azza’s Z-Axis braces below.)
($6)9mm Wrench for the nozzle: Don’t wait for your first clog, go ahead and have this on hand to remove/change the nozzle. Note to only tighten/loosen the nozzle when heated.
Below is the order of printable upgrades I recommend but I suggest you mix in a few other prints along the way because this is a hobby after all and you should be having fun. It helps to have your quality as tuned in as much as possible for some of these so be patient and keep trying if you need to.
Print
Spool holder- temporary : Until you can mount your spool on top of the enclosure or any other personal preference.
Belt tensioner- print x2
Z-brace
Shielded stop button
Cable relocator : It’s a pain, but if you spend the time to do this and turn your extruder motor 90 degrees then you can get the full Z height without ruining your cables. It does involve opening all the cables to the PSU and feeding a few extra inches back through the cable chains.
Cable shroud : Looks nice if you do the cable relocator.
The following need to be printed in ABS:
M3 Bed Nut retainer: 10/10 upgrade. I know they look worse than the nice metal stock ones, but these help keep your bed level longer.
CiiCooler
Glass bed Holder
Now that the first major round of printed upgrades is done it’s time to shift to a few more supplies to pick up to really fine tune the machine.
Buy
($5)Radial fan: For CiiCooler
($5)Glue sticksThis and a glass bed is magic
($25)Borosilicate glass 8” x 8”
($26)Y-Carriage plate upgrade: This has been a nice upgrade as I now only need to relevel the bed every couple weeks instead of every print. Check out this guide for a ‘how to’ as well as a free upgrade by shifting your Y pulley over.
($15)rechargeable dehumidifier: For keeping in the bin with your opened filaments
($9)Extruder gears: Might be able to hold off on these, but will need eventually. If for some reason you have a Maker Select with metal X-axis blocks (V1 and V2, but not V2.1) then this is a must. You can follow this guide for a how to.
($28)Metal extruder plate and lever: Not needed, but nice.
($14)Noctua 40mm fan: Not needed, but makes the printer a lot quitter. A LOT quieter.
($50)MicroSwiss All Metal Hot End: The destruction of my PTFE tube by this point pushed me to doing this upgrade. If needed you can follow this guide for replacement. Remember to tighten/loosen when the nozzle its hot.
($6)Ceramic cotton: Tore off the stock one when replacing for the all metal hot end by accident. At least its thicker than stock
Now that the printer is in its final form, its time for the enclosure which is a stacked Ikea Lack hack.
Print
Spool holder
Pi Case
120mm fan cover
Fan grill
120mm fan PSU modification: I edited this to fit upside down since my PSU is mounted on the underside. This was nice since I blew the 40mm fan anyways so it made everything a lot quieter than before.
IKEA Lack filament guide
Webcam holder: This is one I designed specifically for the webcam I happen to have lying around. The camera mount piece can be changed out no problem though for what ever webcam you have or buy. The SketchUp file is included on Thingiverse for such purpose.
Buy
($20)2x Ikea Lack: Luckily there is one right down the street from me. I am located in North America though, so we do not have the STUVA, if you live literally anywhere else you may check in to this as an alternative.
($80)Plexi glass for enclosure: Could be cheaper alternatives, but it looks cool
($9)Foam pads for feet
($42)Raspberry Pi3: For OctoPrint. I also suggest using a different USB cable than the stock one provided by Monoprice or you will have issues.
($9)2x 120mm fans: Used for the power supply cooling and enclosure
($6)Rocker Switches so that the enclosure fan can be on for PLA, but off for ABS
($15)Dimmable LED lights
($10)8mm LED light connectors
Total:
$250 printer + $452 upgrades/parts + ~$80 PLA/ABS to date
Thanks! Acoustically, I think the Hyperspheres made the biggest difference. I went with a really inexpensive liner ($10) so it was worth doing it. No ping whatsoever. I did two layers as the liner I purchased is a bit thin. Doing it again, I would've gone with something a little thicker like this.
Applied a piece of these right under the joycons on the carrying case. So far it's working pretty good. It gives it a nice snug fit. Would recommend this mod.
Questions about liner material and lube...
For liner material, what acoustic differences am I going to find between: neoprene, sorborthane, and rather generic looking "foam" rolls? They're all pretty much the same thickness, about 2-3 mm.
For lube, I'm looking at: Permatex dielectric grease, krytox 205 grade 2, trybosis 3204 and trybosis 3203. What would be good for stabs, what would be good for linears, and what would be good for tactiles? And if possible, is there anything that's a good "all-arounder"? Aka, something that could easily work for both stabs and switches.
I bought the mat there : http://www.smartimports.net/hhkb-hg-embossed-vibration-absorption-mat/
And used that foam : https://www.amazon.fr/dp/B078T96YPY/ref=cm_sw_r_cp_apa_i_sZM4DbXT72515
I hope you'll like it as much as I do (I kept a second one 😉 )
I'm not fixing that for me, but if i was, I would use one of the sticky pads
maybe something like this
https://www.amazon.com/Adhesive-Stripping-Non-Slip-Furniture-Thickness/dp/B06ZY83SZJ/
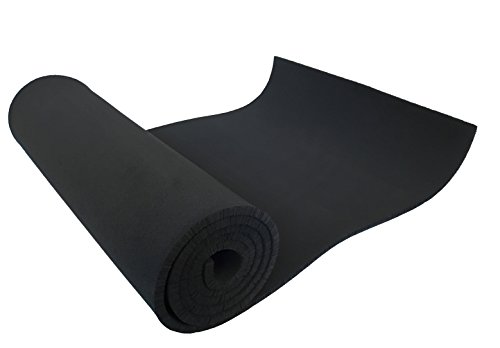
I think im going to buy some cellular/sponge neoprene... like this... https://www.amazon.com/Sponge-Neoprene-Thick-54-Wide/dp/B001FVG3CM
Something like this? Right now the Sorbothane is just getting very sticky, I have a feeling I probably shouldn't have peeled the layer of thin plastic cover that prevented the stickiness?
Get a can of spray adhesive, and a sheet of rubber from mcmaster carr or grainger or amazon... Cut sheet to fit, spray both surfaces with adhesive, wait for it to become tacky, lay the rubber on the surface carefully.
Safetywalk will eat floors. Not good.
Well, 3m velcro is what I have used. If thats not working then you need to try something else.
Is it purely attached with velcro? No screws?
I use dense black neoprene foam simular to this [Neoprene ](Sponge Neoprene 1/8" Thick X 54" Wide X 1' https://www.amazon.com/dp/B001FVG3CM/ref=cm_sw_r_cp_apa_i_Gz1BCbGD9JT3C) with double back tape on both sides. I have thicker stuff but it was free from work. I use a pwm ddc pump so it only ramps to max speed when the fans are also ramped up.
If you are using a d5 vario, does turning down to 2-3 quiet it down?
Yeah that's probably the ticket. I know where I live in the PNW USA finding old wet suits is really common. I'm assuming you're in Canada, so might be a little more tricky? This is probably way overkill (would want something 3 mil or 1/8") but is a good option.
Yeah... leaning towards this stuff.
https://www.amazon.com/Adhesive-Padding-Weather-Stripping-Thickness/dp/B071R4DR1R
Can't think of a reason it wouldn't work in the same manor.
Here you go
https://www.amazon.com/dp/B00EE9LKRA/ref=cm_sw_r_cp_apip_ZNsqdyFwU3DHA
Repost - original taken down due to URL shorteners
​
Keycaps: Dye-sub PBT keycaps
Lube: Krytox 205g0
Switches: Milky Gateron Yellows with TX Film
Stabilizers: Plate-mount GMK stabilizers (clipped and lubed with 205g0)
Sound dampening: Neoprene
​
Filmed and recorded using a Galaxy S10 in 4k