Top products from r/Metalfoundry
We found 25 product mentions on r/Metalfoundry. We ranked the 38 resulting products by number of redditors who mentioned them. Here are the top 20.
1. PMC Supplies LLC #6-8 Kg ProCast Foundry Clay Graphite Crucibles Cup Furnace Torch Melting Casting Refining Gold Silver Copper Brass Aluminum
Sentiment score: 1
Number of reviews: 2
Rated to withstand temperatures up to 1560°F - 2912° F (850°C - 1600°C)Designed for melting gold, silver, copper, brass, aluminum, and more metalsIdeal for use with propane melting furnaces/forges
 Show Reddit reviews
2. #3 4KG Foundry Clay Graphite Crucibles Cup Furnace Torch Melting Casting
Sentiment score: 1
Number of reviews: 2
Clay Graphite Foundry Crucible, #3- 4kg.Designed for Melting Gold, Silver, Copper, Brass, Aluminum and More!Torch Application - Designed to use with Fuel/Gas and Medium/ High Heat Induction Furnaces and KilnsNot for use in Coal Foundry
 Show Reddit reviews
3. Ameriflame R361-510 Heavy Duty Single Stage LP Gas Regulator with CGA510 Inlet
Sentiment score: 0
Number of reviews: 1
Easy-To-Read Dual Scale 2.5-Inch Gauges, L.P. Gas 60 and 400 PSI/KgCGA510 Inlet, Maximum Inlet: 300 PSIGLarge Brass T-Handle For Smooth, Accurate AdjustmentsForged Brass Bonnet and Body
 Show Reddit reviews
4. 4Kg Crucible Pouring and Lifting Tong Set Precious Metal Casting Tool
Sentiment score: 1
Number of reviews: 1
 Show Reddit reviews
5. PORO-Lay Mold-Lay 3D Printing Filament - 1.75 mm 0.75kg
Sentiment score: 0
Number of reviews: 1
0.75kg / 0.55 lb of 1.75mm MOLDLAY filamentExcellent for making mold negativesPrints at temperatures of 170 – 180° CMade in Germany
 Show Reddit reviews
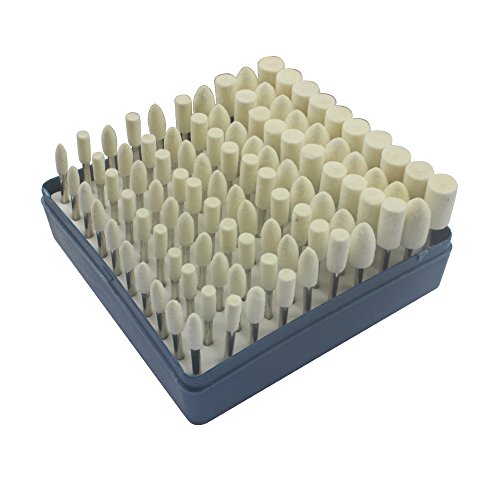
6. Carving Expert 100pcs Multifunctional Wool Felt Mandrel Mounted Grinding Polishing Accessories Attachment Set - Fit Dremel-1/8 Inch Shank
Sentiment score: 0
Number of reviews: 1
Material: high-quality wool head.Application: works great for polishing,grinding. carving or gunsmithing, likejewelry,gemstones,glass,watches,crystal,car,motorcycle,bike,feed ramps or trigger jobs etc.Best effect used with electric drills, grinders or Dremel rotary tools. Make your polished goods mo...
 Show Reddit reviews
7. Easy Mold Silicone Molding Putty for Casting and Jewelry Making, 1/2-Pound
Sentiment score: 0
Number of reviews: 1
Quantity: 1/2-PoundFast Working TimeSilicone PuttyPackage dimensions : 6.2 inches (H) x 6.2 inches (L) x 3.2 inches (W)
 Show Reddit reviews
8. #1.5-2 Kg Foundry Clay Graphite Crucibles Cup Furnace Torch Melting Casting Refining Gold Silver Copper Brass Aluminum
Sentiment score: 0
Number of reviews: 1
Rated to withstand temperatures up to 1560°F - 2912° F (850°C - 1600°C)Designed for melting gold, silver, copper, brass, aluminum, and more metalsIdeal for use with propane melting furnaces/forges
 Show Reddit reviews
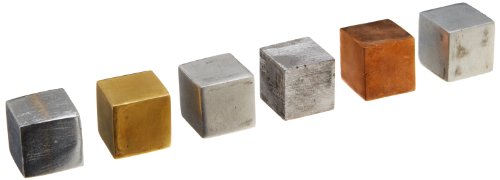
9. Ajax Scientific ME004-0620 6 Piece Cube Density Metal Set, 20mm
Sentiment score: 0
Number of reviews: 1
Country Of Origin: IndiaModel Number: ME004-0620Item Package Dimension: 4.0" L x 3.0" W x 1.0" HItem Package Weight: 1.0 lb
 Show Reddit reviews
10. MEECO'S RED DEVIL 610 Refractory Cement - Indoor Use Only
Sentiment score: 0
Number of reviews: 1
Pre-mixed, fiber-reinforced, high temperature silicate mortarUse where thicker joints are requiredWithstands working temperatures up to 3000-Degree F1/2 Gallon Size, Buff in colorNOT FOR OUTDOOR USE. Made in the USA
 Show Reddit reviews
11. Hardin HD-2344SS Stainless Steel Tabletop Melting Furnace with 4 Kilogram Crucible 110 Volt
Sentiment score: 1
Number of reviews: 1
Proven and Durable 14 Gauge Swedish Kanthal Heating Element4 KG High Purity Graphite Crucible IncludedRoughly 20-35 minutes for most melting operations. Max temp 1200°C/2192°F (Display in Fahrenheit)User Friendly Microprocessor PID Electronic Temperature ControlContinuous Run 4 1/2 Fan To Keep Ele...
 Show Reddit reviews
12. Practical Casting: A Studio Reference, Revised Edition
Sentiment score: 1
Number of reviews: 1
Used Book in Good Condition
 Show Reddit reviews
13. PYLE Meters PIRT30 High Temperature Infrared Thermometer with Type K Input
Sentiment score: 0
Number of reviews: 1
Built-in Laser PointerType K Temperature Measurements20-point MemoryAutomatically Captures Emissivity For TargetingLaser TargetingModern Housing Design - Laser Targeting - Display Hold Function - Type K Temperature Resolution: 0.1° up to 2000, 1° over 2000 - Weight: 4.76 ozBuilt-in Laser Pointer -...
 Show Reddit reviews
15. Do-It Molds Hot Pot-2
Sentiment score: 2
Number of reviews: 1
Made of highest quality materialManufacturer: Do-It MoldsDo-It Molds hotpot-2A must buy item
 Show Reddit reviews
16. Ingot Mold 310 Gram Capacity
Sentiment score: 1
Number of reviews: 1
This is a new open ingot moldThis can be used to recycle scrap metal into sheet and wireIt has a capacity of 200 dwtThe ingot size measures approximately 6 1/8" x 2 9/16" x 1 9/16" (155 x 65 x 40 mm)Overall length measures approximately 10 1/4" x 3 5/16" x 2" (260.35 x 84.2 x 51 mm)
 Show Reddit reviews
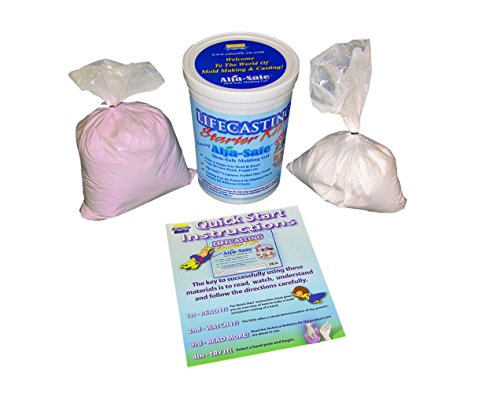
17. Life Casting Starter Kit With Alja-Safe Alginate
Sentiment score: 1
Number of reviews: 1
Comes with: 0.85 lb. Alja-Safe Molding Gel - the world’s first and only crystalline silica free alginate (a known carcinogen), 2 lb. casting plaster, Quick Start Guide
 Show Reddit reviews
18. LEE PRECISION Production Pot IV (Grey)
Sentiment score: 0
Number of reviews: 1
holds approximately 10 pounds of lead.has a large, stable base for safety.Capable of Reaching 900 Degrees Fahrenheit
 Show Reddit reviews
19. RCBS Ingot Mould
Sentiment score: 0
Number of reviews: 1
Made of the highest quality materialsHunting reloading bullet casting toolsAnother quality Bushnell productRCBS is the leading manufacturer of ammunition reloading equipment for rifles and pistolsMould up to four ingots at oncePerfect for melting down scrap lead for future use
 Show Reddit reviews
20. BernzOmatic Basic Use UL2317 Brass Pencil Flame Propane Torch Head
Sentiment score: 1
Number of reviews: 1
Manual start (light with a Bernzomatic Spark Lighter, sold separately)Basic pencil flame for small diameter soldering, thawing, melting and heat applicationUse only with propane fuel, such as the Bernzomatic 14.1 oz. Propane Hand Torch CylinderBrass construction for durabilityFlame control valve eas...
 Show Reddit reviews
Quick and dirty, this can work, it is uses relatively easily available and cheap materials, and can give reasonable results. There might be some cracks or flashing in the finished hand but the can be filed out relatively easily. However you need a dedicated oven for a good few days.
Use either alginate to make a hand mold, they sell kits
Be aware the alginate molds do degrade rapidly, and are generally unusable in less than a day. If you send one to your sister, have her make the hand in plaster then make a simple gauze mold of the plaster positive.
or..
Buy plaster infused gauze and do a quick 2 part mold around the hand using it. Lay hand flat do one side, with a bit of gauze to form a parting lip, wait to set up, flip hand over, grease the lip, and do the other side. Then remove it carefully reinforce it enough to hold wax.
Ideally you want to end up with a void you can do a slush casting. Heat the wax (preferably microcrystalline, or beeswax, but paraffin can do in a pinch) Melt it in a double boiler for safety, do not over heat the wax. Pour in enough to fill the mold, then wait maybe 10 15 seconds and dump it out. Repeat the process until you get about an 1/8 " thick shell of wax.
Remove the wax from the mold carefully, and fix any issues that you may have. for quick and dirty I would simply plan on using the wrist as a all purpose pour cup, vent/sprue. I would attach the wrist to a square of cardboard wix wax to make the wax easier to handle for the next steps.
Mix up dry 50/50 by weight, plaster (buy a 50lbs bag from a home store for $12-15) and silica flour (might be able to find locally at pottery supply or if flour is too difficult to find, use as fine as possible silica sand). This will be your investment.
Mix a small amount thinly and paint it on the surface of the hands, essentially making a very thin shell. This will help prevent bubbles from forming. Once the thin layer is on, Mix up a thicker mix and layer it on about a half inch thick. I usually would wrap it with some hardware cloth or steel wire about now. It will help the mold from cracking apart when heated. It does not need to be extremely tight it is just there to provide reinforcement. You can then cast or lay on a thicker mold around it. For a hand sized piece should for roughly 1" minimum plaster all the way around. The thicker the mold the longer it will take to dry out in the oven.
After the plaster is set I would give it a day, then in a 200 F ish oven melt out the wax. put a pan of water under and watch it like a hawk. The wax will melt and float on top, and the steam can help transfer the heat to the mold. This is a fire hazard so watch it. It will probably take a few hours. Once the wax is all out (this will melt out quicker as a slush mold vs solid wax) turn up the heat to 350, and cook it for 6-8 hours, then take it up to the max temp usually about 500 and cook it for at least 24 hours, more if possible, and more if considerably thicker than an inch. Long story short, you want all the free water gone.. Unless your oven goes over 600, there will be some H20 still chemically bonded in the plaster, but it should not matter too much if you drive off all free water. You can melt out and cook the mold ahead of time, but they will reabsorb moisture from air if not kept in hot dry place.
When you are ready to pour, you will want to pour these mold while still hot straight from the oven, and buried up to the top in sand ideally in something like a steel bucket. The sand will ensure nothing will seep out if the mold cracks. Level the wrist opening so it will cast evenly.
Be forewarned and perform at your own risk. Wear full protective layer of clothing, mask and head covering. These type of molds could easily trap moisture and cause a pop and send molten metal flying in the air that rain downs upon you. This can sometimes happen up to a minute or so after they are poured. Pour the aluminum in slowly, and if it starts to spit or pop up out of the mold, just stop. The mold is too wet to pour and needed to be dried further.
So what hot stuff do you work with? Hot is kind of an understatement when it comes to molten metal. Molten metal comes with it's own share of unique problems, that quite frankly many back yard casters choose to ignore.
u/vigg-o-rama has set you up on the right path, but I think he overlooked that you were talking copper too. The advice he gave is pretty damn good for aluminum, but copper is not aluminum, and behaves nothing like it. Take it as a starting point.
If you want to buy something, buy a gold furnace. Something like this:
https://www.amazon.com/HARDIN-234-4-Melting-Furnace-Casting-Recycling/dp/B00A9WQO5O/ref=sr_1_2?ie=UTF8&qid=1469799337&sr=8-2&keywords=jewelry+furnace
a 4kg gold furnace will have a melting capacity of about 1lb of aluminum, and about 4lbs of copper. I am assuming your dad is a contractor and you're using wire scraps. You shouldn't have any troubles putting it into one of these furnaces.
If you want to DIY it, but are concerned about the refractory, just buy a commercial furnace refractory. It takes some looking, but it isn't hard to get if you are willing to pay for it.
Get a real crucible, you don't have time to play around with DIY when dealing with copper. I would do my best not to use metal molds, and if you do, make sure they're steel, and have been pre-heated before you pour anything into them.
On the safety side of things, leather is your friend. Copper will ignite cloth on contact, and really does't stop it at all. Aluminized PPE is even better.
What do you plan on doing with your ingot when you're done?
Would that work with this new crucible (https://www.amazon.com/gp/product/B07H539V5D)?
I was looking on amazon and other places and found the (https://www.amazon.com/dp/B07S6BG8HC/). Obviously the price sucks, but when I start casting from 3d prints it will be a lot safer for the 2nd type of tongs.
In terms of what I am melting. I actually have an insane amount of material i need to melt. I have ~400-500 disk platters of hard drives already removed (why i bought the crucible above). Then the shell of the hard drive can also be melted down. I then have around ~200 laptop hard drives i still need to dissemble. Waiting to finish the old large hard drives first.
Then I have the copper from the R/W heads, which will be fun to just have a bar of copper from that.
I also have pure aluminum shavings from milled aluminum. That I am holding off on until i am ready to deal with the possible oil issue of melting those.
The cans I save are simply the ones I drink. I have around ~4 more bags of cans to melt. I like doing this since i already buy the soda, might as well get something out of it and put it towards my hobby.
Since no one really answered your question ill try to give you some advice.
one i find all my pewter at goodwill i have collected pounds of it over the last 2 years. I personally use a 3d printer to make my models i use a monoprice maker select https://www.monoprice.com/product?p_id=13860
I use the lost pla process https://www.youtube.com/watch?v=TiugV_K8PdE
all the equipment you need to do this can get expensive but once you have it you can make a one of piece for a lot less than using silicone
Useing silicon is easier i use mod max 60 https://www.smooth-on.com/products/mold-max-60/ but is more expensive if i plan to make i bunch of an item ill make a silicon mold bit first i usually make the first one using the lost pla method then perfect the pewter piece then cast a mold from that.
For melting the pewter i use this https://www.amazon.com/Do-It-Molds-1892-Hot-Pot-2/dp/B002QG3H9M its good beacuse its easy to pour but just a small iron skillet on the stove works fine.
Ive not sold any items yet but im about to start you can see some of the things iv made in my profile.I plan to charge 4 times the cost of materials i saw on a forum some ware that that was a good starting point
I used this premade refractory lining on my blast furnace. It goes on in thin layers, and hardens to a very hard and durable coating.
I don’t usually recommend products like this, but it worked very well for me. I have abused it, used it, and even accidentally melted some steel onto it.
I don’t think it will work as well for you, as it is only as strong as the stuff it is on. If the plaster expands much, it will crack. If the plaster turns to powder, it will come off. My furnace used a stronger and harder refractory cement.
It would probably work in the furnace, because it can handle the heat, but the lid might not do so well.
you are overkilling it for that little furnace. You could just use a propane tank and burner from home depot like in that imgur album. You dont need to go crazy with it if that small. you will focus the heat on the little crucible and the wool will hold in the heat. so you wont need to make a burner or use a 20lb tank to melt an oz or two of metal. you could buy a 15.00 bernzomatic setup and start on this right away.
​
also - maybe look into spin casting (centrifugal casting) as that's the right method for casting precious metals into smaller shapes like a ring. its kinda different and comes with its own way of doing things that means different PPE than typical metal casting.
I use a graphite crucible. My steel one oxidized through in two melts. I've done about 12 now with my graphite one and it's great. I got mine on Amazon. I just bought this one to do aluminum and use my current #3 for copper.
With the lost wax casting I've done (in silver and brass, mostly) the investment was heated to around 1200 degrees. A hot mold is what you want, it'll keep your metal from being bound up in the sprues as easily. Also http://www.amazon.com/Practical-Casting-Reference-Revised-Edition/dp/096159845X/ is the best.
Ingot Mold 310 Gram Capacity https://www.amazon.com/dp/B000RB520U/ref=cm_sw_r_cp_api_5-cQBb75Z7AHM
This is the one i use and it works great
$15?! link? if you're paying only $15 for graphite you'll be getting something slightly bigger than a thimble. this is the one I got. $36. the opening is big enough to melt cans. I wish I went bigger. next time.
I use this propane regulator, I'm sure you can find something similar with the correct connectors.
https://www.amazon.com/gp/product/B007VLW464/ref=oh_aui_detailpage_o00_s00?ie=UTF8&psc=1
This uses the same connector as a barbecue LP Gas connection. It also fits a common rubber hose w/LH thread hardware (Which I covered with 1/2" Flexible electrical conduit).
I have been using this large (4" - 5" mouth?) graphite crucible that I ordered from Amazon. It has worked perfectly so far, after at least 11 pours, with no sign of degrading:
http://www.amazon.com/Foundry-Graphite-Crucibles-Refining-Aluminum/dp/B00FBG3ROO
If your budget is pretty firm, there are smaller and cheaper, versions that are similar:
http://www.amazon.com/Foundry-Graphite-Crucibles-Refining-Aluminum/dp/B00FBFUB3U
What about Amazon?
https://www.amazon.co.uk/Ajax-Scientific-Piece-Density-Metal/dp/B00EPQM6U2/ref=sr_1_fkmr1_2?ie=UTF8&qid=1491859324&sr=8-2-fkmr1&keywords=Assorted+Metal+Cubes
http://www.amazon.com/Foundry-Graphite-Crucibles-Refining-Aluminum/dp/B00FBFOFPK?ie=UTF8&psc=1&redirect=true&ref_=oh_aui_detailpage_o08_s00
These are handy for lead.
https://www.amazon.com/Lee-Precision-Production-Pot-Grey/dp/B000NOORXY
I'm actually about to start casting dice and I've established a decent method of producing the wax models. I started with a blank die (my local game shop sells blanks, you can buy them online if you can't find any local), and I used a silicon food molding putty I found on amazon to make a mold of the blank. From there you fill the mold with wax and you can add your numbers to the wax and then continue from there with the lost wax method.
If you're more comfortable carving the numbers into the dice blanks that works just as well, but it might make the putty mold not come off as cleanly.
https://www.amazon.com/Meters-PIRT30-Temperature-Infrared-Thermometer/dp/B005FU5NFW
Claims it can automatically set emissivity, which is the hard part.
Ya, I have these. Its my last resort, it will mess up some of the finishing polish though. https://www.amazon.com/gp/product/B00XJINV42/ref=oh_aui_search_detailpage?ie=UTF8&psc=1
Looks like 70USD for .75kg on amazon. Sucks that I can't get in 3mm for my Ultimaker :(