Top products from r/myog
We found 33 product mentions on r/myog. We ranked the 197 resulting products by number of redditors who mentioned them. Here are the top 20.
1. REX INDUSTRIAL SEWING MACHINE SERVO MOTOR 550 WATTS
Sentiment score: 0
Number of reviews: 3
 Show Reddit reviews
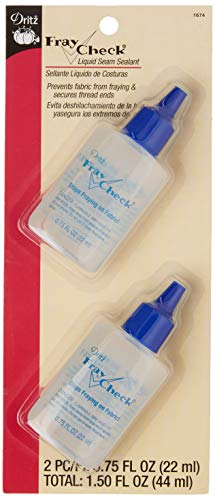
2. Dritz 1674 Fray Check Liquid Seam Sealant, 0.75-Fluid Ounce (2-Count)
Sentiment score: 2
Number of reviews: 2
Prevents fabric from fraying and secures thread endsGreat for sewing, quilting, home and crafting projectsWashable and dry cleanableThis package contains 2 bottles of 0.75 fl oz. of Dritz Fray CheckDritz Fray Check contains: n-Propanol, Nylon Terpolymer, Water
 Show Reddit reviews
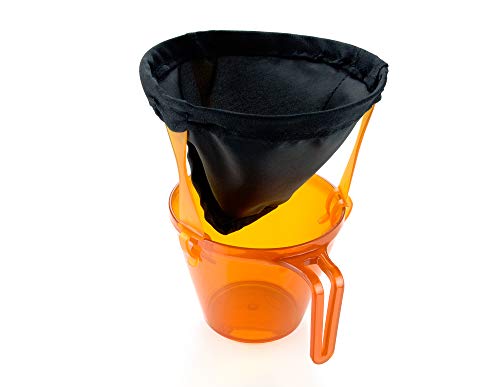
3. GSI Outdoors Ultralight Java Drip for Drip Coffee While Camping and Backpacking
Sentiment score: 1
Number of reviews: 2
STAY CAFFEINATED: Coffee? Always! The Ultralight Java Drip makes your caffeine needs attainable during car camping, gourmet backpacking, or any pursuit where space and weight is at a premium, but coffee is a must.DURABLE DESIGN: The Ultralight Java Drip's sturdy legs clip to nearly any mug while its...
 Show Reddit reviews
4. Wideskall 2" inch Mini Metal Spring Clamps w/Red Rubber Tips Clips (Pack of 30)
Sentiment score: 1
Number of reviews: 2
Size: 2" inch lengthMax. Jaw Opening: 0.8" inchMaterial: Nickel plated steelRed rubber pads on handles and tips
 Show Reddit reviews
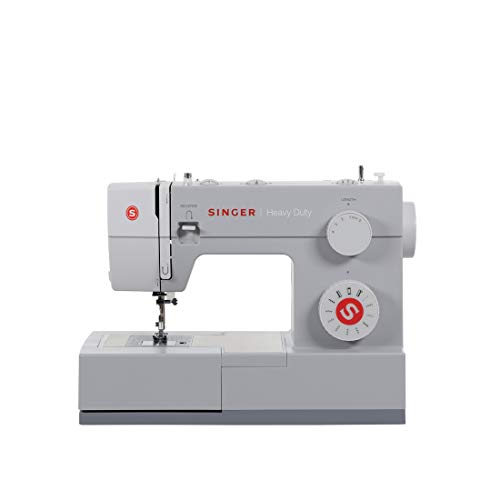
5. SINGER Heavy Duty 4432 110 Stitch Applications, Metal Frame, Stainless Steel Bedplate Made Easy Sewing Machine, Gray
Sentiment score: 2
Number of reviews: 2
HEAVY DUTY METAL FRAME: Adds stability and provides long lasting durabilitySEWING MACHINE ACCESSORIES: A variety of accessories are included: all-purpose foot, zipper foot, buttonhole foot, button sewing foot, seam ripper/lint brush, edge/quilting guide, needles, bobbins, screwdriver, auxiliary spoo...
 Show Reddit reviews
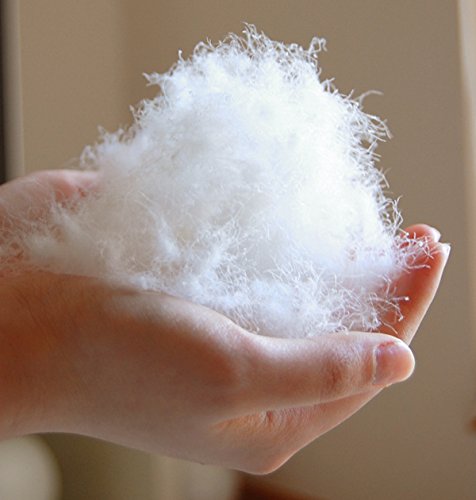
6. ROSE FEATHER Bulk White Goose Duck Down and Feather -Filling Stuff Bedding Pillow DIY USA Standard 95/5 Goose Down 200g
Sentiment score: -1
Number of reviews: 2
Natural 95% White Goose Down 200g-Ultra-soft, and hypoallergenic making it perfect for beds pillows and sleeping bags.Light and Fluffy 850+ Fill Power Comfort-Natural white goose down is a warm, efficient insulator that¡¯s super plush and comfortable no matter the weather.Create Pillows and Crafts...
 Show Reddit reviews
7. SINGER Heavy Duty 4411 with 69 Stitch Applications, Metal Frame and Stainless Steel Bedplate Made Easy Sewing Machine, Medium
Sentiment score: 2
Number of reviews: 2
SINGER HEAVY DUTY SEWING MACHINE: It has 11 Built-in Stitches- 6 Basic Stitches, 4 Decorative Stitches, 1 Built-in Buttonhole—perfect for crafts, home decor, fashion sewing and much moreADJUSTABLE NEEDLE POSITION: The needle can be changed to any of the three available positions to add zippers or ...
 Show Reddit reviews
8. Us Army Molle Desert Camo Molded Waist Belt
Sentiment score: 2
Number of reviews: 2
Genuine US Military SurplusMolle II adaptableCamouflage Molded WaistbeltEasily adaptable to military ALICE packs and many other packs
 Show Reddit reviews
9. 3 Drawer Table Chest VTC-421 Black
Sentiment score: 0
Number of reviews: 1
Color: BlackSize: 10"W 12 3/4"L 12 7/8"HDesktop 3 Drawer Chest is made from durable polypropylene.The 2 small drawers measure 3"h x 9"w x 12"d, the large drawer measures 5.25"h x 9"w x 12"d.Drawer stops prevent drawers from falling out.
 Show Reddit reviews
10. Katadyn Carbon Cartridge
Sentiment score: 0
Number of reviews: 1
Simple-to-useReduces chemicals and bad taste from waterConnects to water bottlesGenuine OEM ProductBottle adaptor and outlet barb with replaceable activated carbon cartridgeReduces chemicals and improves taste of treated/filtered waterAdapter connects to all popular water bottlesCan be used with mos...
 Show Reddit reviews
11. Light weight camping equipment and how to make it
Sentiment score: 0
Number of reviews: 1
 Show Reddit reviews
12. HUIHUIBAO 48 PCS Black Heavy Duty U Shape Nylon Zipper Pulls Cord Extension Replacement for Backpacks, Jackets, Traveling Cases, Luggage, Purses, Handbags
Sentiment score: 0
Number of reviews: 1
MATERIAL: Made of high quality nylon, light weight and durableSIZE: Nylon zipper size about 2.4 x 1.2 inch / 6 x 3.1cmFEATURES: Easy to connect to each zipper, can be used as a replacement for zipper or attached to zipper for added lengthWIDELY USED: Suitable for outdoor camping backpacks, travel ba...
 Show Reddit reviews
13. Permatex 80050 Clear RTV Silicone Adhesive Sealant, 3 oz
Sentiment score: 0
Number of reviews: 1
General purpose, clear RTV indoor/outdoor sealantSeals, bonds, repairs, mends and secures glass, metal, plastics, fabric, vinyl, weather stripping and vinyl topsWaterproof, durable, and flexible; resists water, weather, and vibrationTemperature Range: -75°F to 400°F (-59°C to 204°C)Suggested App...
 Show Reddit reviews
14. Megahome Countertop Water Distiller, White, Glass Collection
Sentiment score: 1
Number of reviews: 1
YOUR SAFETY COMES FIRST: This Megahome distiller is UL (Underwriters Laboratory) approved. UL is the trusted independent global safety science company for US products, and determines product compliance with stringent safety standards. PLEASE NOTE: For fire safety, many home insurance policies requir...
 Show Reddit reviews
15. MSR Dromedary Bag Spigot Cap
Sentiment score: 0
Number of reviews: 1
Lightweight at only 1.1 oz / 32.4 g
 Show Reddit reviews
16. NEWELL OPERATING CO DRAPERY HDWR A7004214851 Metal Shower Ring, 1-3/8-Inch, 12-Pack
Sentiment score: 1
Number of reviews: 1
This product is a 12pk1-3/8"metal shower ringPurpose of use for tub and shower faucets and accessories, bathtub-and-showerhead-faucet-systemsManufactured in china1-3/8" in diameterNot just for shower curtainsZinc finishReturns will not be honored on this closeout item
 Show Reddit reviews
17. Weller D550PK 260-Watt/200W Professional Soldering Gun Kit with Three Tips and Solder in Carrying Case
Sentiment score: 0
Number of reviews: 1
The Weller D550PK brings professional strength and control to the serious hobbyist, with 2 clear front-facing lights for clarityPistol grip design with easy adjustment fingertip trigger switches between 260-watt and 200-watt settingsHeats up completely in just 6 seconds, transferring heat to the hea...
 Show Reddit reviews
18. The Ultimate Hang: An Illustrated Guide To Hammock Camping
Sentiment score: 1
Number of reviews: 1
The Ultimate Hang An Illustrated Guide to Hammock Camping
 Show Reddit reviews

We were tagging three 4000 footers somewhat near Zealand falls... First night we night hiked and climbed Mt. Hale, then we continued night hiking til almost 3 am lol...there was almost a full moon and coming through the section of the AT where it meets the Zeacliff trail was epic at 1am with almost a full moon shining on the talus fields below Whitewall Mountain. We then camped for the night a little past that section after an exhausting bushwack looking for a legal spot off trail. We spent the next night at an overflow spot off of the AT and waited out most of the rain that day. The next day the weather cleared and we climbed Mt. Tom and Field. Was a great trip :D
Ya you should definitely give hammocks a try sometime! A few tips to ensure that you have a chance at good nights sleep in a hammock...make sure that you are using a hammock that is at least 10.5 feet long...11 foot is even better. Anything shorter than that is only really good for lounging in, not sleeping (in my and many other's opinion). You need a proper length hammock to get a good diagonal lay, which is the position that most people find the most comfortable. With a good diagonal lay, you can get your body almost completely flat (as opposed to laying in the hammock like a bananna, which is not comfortable for most folks). You will find that you have a dominant side that you like to position your body which usually corresponds to your dominant hand...so for example, I am left handed and I find it most comfortable to have my feet to the left and my head to the right. A lot of right handed people find that laying the opposite (feet right, head left) is more comfortable for them though. You just have to play around to figure out which position works for you.
Hang angle is also very important in achieving a comfortable position. Your suspension should typically be around 30 degrees to the tree, although I find I like my head end a few more degrees than that. Make lots of micro adjustments to find what is ideal for you. Also, most folks find it more comfortable to have the foot end slightly higher than the head end so that you are not slipping down towards the bottom of the hammock all night. I like to find trees that are spaced about 7 paces between them.
Some sort of bottom insulation is quite necessary to stay warm unless it's around 70 degrees or above. On the ground we lose heat due to conduction, but when hanging we lose heat due to convection. A simple CCF or inflatable pad will do the trick for sure but nothing beats an underquilt for comfort and simplicity...pads work but there is much more "fiddle factor" involved in getting them where you want them, and that process starts over when you get out and back in... but it's totally doable and not that bad... but an underquilt will forever spoil you after using one.
I highly recommend reading Derek Hansen's book The Ultimate Hang before embarking on a journey into the world of hammocks...it's a fun, easy read and will give you all of the essential info that you need.
Regarding the weight issue, while it is true that you will be probably be able to go the absolute lightest with a ground setup using something like a torso length GG CCF pad and minimalist tarp etc., you can go pretty darn light with hammock setups these days using something like a hammock made of the 1 ounce per yard fabrics like Hexon 1.0 with a partial bug net (a Dutchware Half-wit or an add on net like the HUG available at Arrowhead Equipment) , Dutch's new Dyneema 2.0 straps, whoopie slings and an 11 ounce partial length underquilt like a Hammock Gear Phoenix 40 degree. That is essentially my setup at the moment (with a few different tarps that I swap out depending on weather conditions). I've been rocking my whole setup in a GG Kumo with no hip belt and am usually right under a 10 pound baseweight for warm weather loadouts. The slight weight penalty that my hammock setup incurs over ground setup has been totally worth it to me because it has translated into a very consistent sleep experience and has really opened up so many new camping locations. I find that a hammock setup under a tarp is so much more enjoyable when having to ride out a storm as well...the hammock can be used a super comfortable seat to do all sorts of camp chores from. If you take one side of the hammock and fold it over on itself it makes super comfortable seat (you do this to avoid the feeling of the hammock pressing into behind your knee when sitting in it normally). Poor drainage is not as much of a concern as well in a hammock setup which is another huge plus.
My last tip would be expect that your first few trips using a hammock are going to be learning experiences and you may not get it right the first few times. It can take a few trips to get your setup dialed in, but once you do, it's amazing! I'd be happy to answer any questions that you have and I am sure that many of the other hammock users around here would as well. Happy hanging :D
About 10 years back I came across recommendations for an oddly-named book. It was a great read.
I never did start a business but if I had, I would have jumped from the sole do-everything person to a designer/manager/facilitator as soon as I could. One huge problem with a small business is success, which kills a lot of operations. How many 20-hour days can you work? What happens when you need to work 30-hour days and 9-day weeks to keep up?
From the PDF summary (below)...
> The E-Myth, or Entrepreneurial Myth, says that most new businesses are not started by entrepreneurs who set out to build a strong business but by technicians who enjoy the hands-on work themselves. Because of that natural bias, most business owners focus on working in their business when really they should be working on their business.
> A business that is built and managed by someone who combines the approach of the technician, the manager and the entrepreneur will have a far greater chance of future success than one guided by someone thinking like a technician alone.
References:
> [Michael Gerber](https://en.wikipedia.org/wiki/Michael_Gerber_(non-fiction_writer) (Wikipedia)
> Michael E. Gerber Companies
> The E Myth: Why Most Businesses Don't Work and What to Do About It (Amazon)
> The E-Myth Revisited: Why Most Small Businesses Don't Work and What to Do About It (Amazon)
> Summary of "E-MythRevised" (PDF)
This episode of the Survival Podcast will tell you more about home distillation than you'd hope to know. In my state Everclear is darn cheap and much more pure than what you can do at home. Then again, we're the DIY types, aren't we.
That said, hands down the easiest way to distill at home is with a counter-top electric still. I suppose you could hypothetically start with a cheap vodka and go from there, but nothing says you couldn't start from scratch with any scrap starch, sugar or corn and make a fuel mash in a 5 gallon bucket. Not economical, but certainly a useful skill.
EDIT: They mention it in the podcast, but I should add it's perfectly legal to make your own fuel at home. You can get a free permit from the treasury department. On the scale you're talking about, however, I don't think it would matter.
The unfortunate reality is that many of the tribes lost the art and history behind the tipi. The best resource we have today is a book by a white man who resided with several tribes and wrote down his knowledge in a book originally published back in 1957.
http://smile.amazon.com/The-Indian-Tipi-History-Construction/dp/0806122366?sa-no-redirect=1
Today pretty much everything you read is taken either directly or indirectly from that book. Fortunately it's a great read and the Laubins took great care in not only detailing how a tipi is made/built/lived in but also why and the cultural heritage behind it.
That is a great starting point.
After that talk attending pow wows can be another resource as methodology varies greatly not only from tribe to tribe but from family to family.
Do you mean industrial, or heavy duty? If you mean industrial, then /u/Radio_rons_child has your answer. If you mean heavy duty (meaning its not some off the shelf light weight multi-function machine), then yes, they are out there and exist.
I have an 1963 Kenmore Heavy Duty 158-13500 that will sew several pieces of leather together, and it has a walking foot and does both straight and zigzag stitches. I purchased it off of Craigslist for $25.
If you are interested in something heavy-duty, be sure to research on several DIY/MYOG areas of forums and see what other people have. Sometimes they call them "thread injectors". This is what I did, and I had compiled a list of makes/models to keep my eyes out for.
If you are looking for something right now, I have heard good things about the Singer 4432 Heavy-Duty , and I know that it too will also sew leather, so backpack straps shouldn't be an issue.
I've had luck with this:
https://www.amazon.com/gp/aw/d/B006UBSXSY/ref=mp_s_a_1_1?ie=UTF8&qid=1500576466&sr=8-1&pi=AC_SX236_SY340_FMwebp_QL65&keywords=molle+waist+belt&dpPl=1&dpID=41V1YLbk3gL&ref=plSrch
Definitely took some sewing, and I had the original to copy the details, but pretty easy.
I needed a heavy duty machine to fix a canvas teepee and sew a hot tub cover and I got the Singer 4432. It's VERY affordable, runs like a champ, and it's super easy to reload thread with the drop in bobbin. I'd definitely recommend it as a first sewing machine, especially because of the low price. I sewed through 6 or so layers of marine vinyl with no problem.
I think it's a great idea to make your first pack with cheap ($$) stuff, and then spend money on later packs, once you've gained some knowledge, techniques, and preferences on what you like in a pack.
So, to address the other comments, presumably - I say, because I haven't tried it - you could use some fray-stop on your seams to help them hold. Maybe silicon seam sealer?
For the water, you could try and apply water resistance with a Wash in product, a spray, or some people do wash and spray after. If washing, I'd do it before constructing, spray could happen after, but I'm hypothesizing, as I haven't used either.
Probably should still use a trash compactor liner but it would help keeping the water from weighing your pack down.
I highly recommend installing a servo motor. https://www.amazon.com/INDUSTRIAL-SEWING-MACHINE-SERVO-MOTOR/dp/B001VK9YH8
You can dial down the speed and make it easier to use. Careful adjustment of the pedal on the industrial machines are one of the advantages. You can change the pedal action based on what the machine is used for. For example, my binder is set up as mostly an on/off, because all the positioning is done before I start and I run long lines. My 20U and straight stitch is set up for fine work with long engagement.
Of course, the servo motor fixes all that-just change the speed. No vibration, no power use when not sewing, and it's quiet.
I used 3/4" blue sleeping pad as the foam in shoulder straps and a hip belt. If you don't need a lot of padding, it'd be easier to sew through/around 3D mesh (possible ventilation) or thinner 1/4" foam or a yoga mat. 500D Cordura is extremely durable and affordable fabric, 250D would be lighter and thinner. Using ripstop nylon would be another option (Joann's fabrics has some) and lighter weight, but not as tough as Cordura. Note that Cordura and different nylons aren't 'breathable' but I prefer not having them soak up sweat.
Check http://www.rockywoods.com/ and http://www.seattlefabrics.com/
How I made straps (two cordura layers around blue foam)
3D Mesh Belt (cordura outside, 3D mesh inside)
[edit]
Look at these for inspiration (or buy one) this, this, this, etc. You can also search for 'removable hip belt' patterns. Make sure you leave enough space in the front to cinch the belt (so foam only covers back and hips)
I have a video I just shot heading to YouTube soon that should help. For now, the advice about using the notches is the best. I rarely pin. I use clips .
Basic outline:
I had never heard of those. Pretty cool, though not something I'd even consider investing time or money in. A stone found on the trail and a bit of twine will do very nicely.
There are some shower curtain rings that are shaped similarly to that, eg.. Just JB-Weld them shut or something, putting loads on them would probably pop them open as is.
I use a Singer 4411 for basically exactly what you described. I really like it.
I paid a bit more for it at my local crafts store (Joann's) because they have a basically unlimited return policy (i.e., I can return it at any time). I didn't know if I'd like it, so I bought it there, and having to ship a sewing machine back to Amazon or wherever seemed like a lot of hassle.
I have a GSI ultralight drip filter and it was only 10 bucks and works great. Sorry I’m mobile or would post the link but easy to find on amazon.
Edit: here ya go GSI Outdoors Ultralight Java Drip https://www.amazon.com/dp/B001LF3ICU/ref=cm_sw_r_cp_api_Oe8NBbA727VFY
A old singer 201 would be perfect, but the new industrial ones are good aswell.
You could check fray check. It's like putting clear nail polish on a run in hose. It'll seal the raw edge like a glue. Especially for small bits after you've finished construction. https://www.amazon.com/Dritz-1674-Liquid-Sealant-0-75-Ounce/dp/B000YQKIDY
Another option that one could implement from the very beginning of the build process is to sew with a different kind of seam. A flat felled seam is cleaner and stronger. It takes a smidge more time, but once you get used to it, it's not so bad. A French seam is also an option without a raw edge, but I think it's more work than needed. http://sewdelicious.com.au/2012/09/different-types-of-seams.html
I forget about patterns sometimes, thank you!
These are what I use. The rubber helps on slippery material.
https://www.amazon.com/dp/B01D3XNLDS/ref=cm_sw_r_cp_apa_i_ky.QCbR5NCTWT
I added a Camelbak Hydrolock for a shutoff, but without one, just hang the filter above the bag to stop the flow. That's about the only hassle in the field. I'm not in love with the Hydrolock, I'd like a bit bigger shutoff, but it works for now.
Oh, and a lot of people also add one of these. Slows the filter down a bit but improves taste.
[Edit] Ah, I guess MSR makes this dealie too. Makes me want to go the Dromolite route over the Platy.
You can also try
Permatex 80050 Clear RTV Silicone Adhesive Sealant, 3 oz https://www.amazon.com/dp/B0002UEPVI/ref=cm_sw_r_cp_apa_zxA7BbVD8X59R
I like what you did there, but the katadyn carbon filter is refilable and connects to the mini with the rubber tube that comes with the mini. It costs around $20.
https://www.amazon.com/Katadyn-8013450-Carbon-Cartridge/dp/B0007U0184/ref=sr_1_1?ie=UTF8&qid=1497327341&sr=8-1&keywords=katadyn+carbon+filter
Ripstop has two styles of those, though not an exact match:
https://ripstopbytheroll.com/collections/plastic-zipper-pulls-clips/products/u-insert-puller
https://ripstopbytheroll.com/collections/plastic-zipper-pulls-clips/products/beam-puller (sold out at the moment)
Sometimes Amazon works for bulk purchases:
https://www.amazon.com/Luckycivia-Extension-Replacement-Backpacks-Traveling/dp/B07L71P99J/
https://www.amazon.com/dp/B07XBF2XML/
https://www.amazon.com/Light-weight-camping-equipment-make/dp/B0007EF3TW
A used 4th edition is yours for a mere $647 plus shipping.
https://www.amazon.com/GSI-Outdoors-Ultralight-Java-Drip/dp/B001LF3ICU/ref=asc_df_B001LF3ICU/?tag=hyprod-20&linkCode=df0&hvadid=194852051030&hvpos=1o3&hvnetw=g&hvrand=12237604162458949391&hvpone=&hvptwo=&hvqmt=&hvdev=m&hvdvcmdl=&hvlocint=&hvlocphy=1025658&hvtargid=pla-368658970447&psc=1
I put servo motors on both my industrial machines, the work takes only an hour and is well worth it. One can dial in a very precise speed on the motor and then lock it down-so if you want to sew at say 300 spm you can do it. The other thing (and it's a big one in my opinion) is that the servo motors are much quieter than a clutch motor. Clutch motors are noisy as hell, and I already have a significant hearing loss.
/edit-used these if you're interested. They work fine.
I use these drawers for all my myog stuff, electronics, and other nick nacks.
Those come with a "hot knife" tip in the kit.
https://www.amazon.com/Weller-D550PK-260-Watt-Professional-Soldering/dp/B00002N7S1
https://www.amazon.com/gp/aw/d/B00OREW8PA/ref=ya_aw_od_pi?ie=UTF8&psc=1.
https://m.aliexpress.com/item/32382506109.html
Looks like both are out of stock now though! :( Sorry
Totally! I’ll never go back to clutch motors, I loathe them.
https://www.amazon.com/INDUSTRIAL-SEWING-MACHINE-SERVO-MOTOR/dp/B001VK9YH8
Salvaging down is a pain in the ass. Stick to buying it. If you absolutely must salvage then do it in an enclosed tent with a shop vac and a mask. You will still regret it.
I bought this but I have yet to receive it. https://www.amazon.com/gp/aw/d/B00OREW8PA/ref=ya_st_dp_summary