Top products from r/wanhaoi3
We found 30 product mentions on r/wanhaoi3. We ranked the 47 resulting products by number of redditors who mentioned them. Here are the top 20.
1. Wangdd22 3D Printer Accessories 4pcs/lot 38 Tooth Mold Steel Linear Extruder Filament Drive Gear for Planetary Gear Extruder
Sentiment score: 2
Number of reviews: 2
100%brand and newCNC wire cutting.Durable wear resistant.Mold steel gear is a high-quality gear that have better effect than the brass ones.
 Show Reddit reviews
2. 12V 40W 1/4-in (6.35mm) Ceramic Cartridge Heater for 3D Printer MK10 Extruder/Hotend
Sentiment score: 0
Number of reviews: 2
12 Volt 40 Watt (12v 40w) MK10 3D Printer Ceramic Heater Cartridge with a 1/4-in (6.35mm) Diameter and 1m WireDesigned to be the proper OEM fit for 3D printers with a MK10 extruder and a 6.35 mm (1/4 inch) heater block boreCompatible with Wanhao Duplicator i3, FlashForge Creator, Monoprice Maker Sel...
 Show Reddit reviews
3. [Gulfcoast Robotics] Borosilicate Glass for Wanhao Duplicator i3 Anet A8 MP Maker Select 3D Printers, 4mm Thick.
Sentiment score: 3
Number of reviews: 2
Thick 4mm glass plate will not warp or bend under heatCompatble with Maker Select, Wanhao Duplicator, Anet A8 and other 3D Printers219x219mm outer size, see attached drawing for details.Plate perfectly matches larger aluminum plates 220x220mm on Wanhao Duplicator i3, MP Maker Select, Anet A8100% Bor...
![[Gulfcoast Robotics] Borosilicate Glass for Wanhao Duplicator i3 Anet A8 MP Maker Select 3D Printers, 4mm Thick.](https://m.media-amazon.com/images/I/51RX52S+XIL.jpg) Show Reddit reviews
Show Reddit reviews4. Micro Swiss All Metal Hotend with Slotted Cooling Block for Wanhao i3 w/.4mm Nozzle
Sentiment score: 0
Number of reviews: 2
Fits: Wanhao i3, Monoprice Maker Select 3D Printer v2, Cocoon Create 3D Printer.4mm Nozzle Plated with HIGH LUBRICITY WEAR RESISTANT TwinClad XT CoatingKit Includes: Thermal Barrier Tube, Plated Nozzle and Slotted Cooling blockSlotted Clamping system, No set screw to ding and damage thermal tube, Si...
 Show Reddit reviews
5. BIQU Heat Bed Power Module Expansion Hot Bed MOS Tube for 3D Printer
Sentiment score: -1
Number of reviews: 2
A general add-on heated bed power expansion module for 3D printerCompletely solve the hot bed power is too large and the load current issue. It can work with the Anet A8With this addon module to your 3D printer motherboard you can lead the maximum current up to 15AUnder the premise of normal heat di...
 Show Reddit reviews
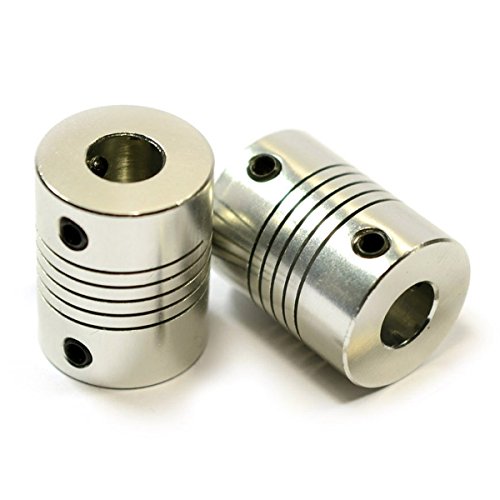
6. OctagonStar Flexible Couplings 5mm to 8mm NEMA 17 Shaft for RepRap 3D Printer or CNC Machine(2PCS)
Sentiment score: 1
Number of reviews: 1
Flexibility of this coupler removes stress between motor and driving component.Compatible with NEMA 17 stepper motors (for 5mm to 8mm shaft diameter).Useful in RepRap 3D Printers and small CNC machines.Dimensions: 19mm x 25mm.NOTE:OctagonStar Quality Assurance.Item package or product surface have Oc...
 Show Reddit reviews
7. Micro Swiss CNC Machined Lever and Extruder Plate for Wanhao i3 (Full Kit)
Sentiment score: -1
Number of reviews: 1
Upgrade for MK10 ExturdersFits: Wanhao i3, Wanhao i3 Plus, Monoprice Maker Select V2, Cocoon Create 3D PrinterExtruder Plate is designed with the 4mm hole for Flexible Filament Mod.For Right Hand ExturdersMade in USA by Micro Swiss
 Show Reddit reviews
8. Interface Plate Keypin - Wanhao Duplicator i3 Plus/Maker Select Plus
Sentiment score: -1
Number of reviews: 1
 Show Reddit reviews
9. Happisland 5pcs NTC 3950 100K Thermistor with 1 Meter Wiring and Female Pin Head for RepRap 3D Printer Heatbed or Hot End
Sentiment score: 1
Number of reviews: 1
Pack of 5PCSTemperature sensor 100KΩ accuracy of ± 1%Wiring length: 1 meterUse it with heated bed or extruderConviniently pre-wired with 1 meter long high temperature PTFE insulated wiring
 Show Reddit reviews
10. POP VIEW Dog Bark Collar for Small, Medium, Large Dogs, Anti Bark Collar with Sound and Vibration, No Shock, Harmless & Humane
Sentiment score: 1
Number of reviews: 1
wellwellwellwellwell
 Show Reddit reviews
11. EPBOWPT Voltage Converter DC 24V 36V 48V to 12V Buck Converter (24V to 12V 5A, 24V to 12V 60W)
Sentiment score: 1
Number of reviews: 1
Convert unstable 24 DC power supply into stable 12V DC power outputOver-voltage, over-current, over-temperature, short-circuit auto protection, and can return to normal conditions in the workEssential for car audio system or other 12V car products (particularly useful in vehicles with 24V power supp...
 Show Reddit reviews
12. Gizmo Dorks PEI Sheet, 8" x 8" 3D Printer Build Surface Polyetherimide Ultem
Sentiment score: 1
Number of reviews: 1
 Show Reddit reviews
13. uxcell 400mm x 205mm x 0.5mm Silicone Thermal Pad for CPU GPU Heatsink
Sentiment score: 1
Number of reviews: 1
Product Name : CPU Thermal Pad;Material : SiliconeSize : 40 x 20.5cm/15.7'' x 8.1'' (L*W)Thickness : 0.5mm/0.02''Weight : 103gPackage Content : 1 x CPU Thermal Pad
 Show Reddit reviews
14. CTYRZCH 12Pcs LM8UU Linear Bearings for 3D Printer, RepRap Prusa Mendel DIY CNC Motion, Prusa Mendel, reprap(8mm x 15mm x 24mm)
Sentiment score: 1
Number of reviews: 1
12 lm8uu linear bearings8Mm inside diameter, 15 mm outside diameter, 24 mm lengthBearings may require lubrication and break in periodGreat for linear motion on 3D printer, cnc, and other applications
 Show Reddit reviews
15. Micro Swiss MK10 Plated Wear Resistant Nozzle for PTFE Lined Hotend M7 Threads 1.75 mm, 0.4mm (Flash Forge/Dremel/Wanhao), Bright Nickel
Sentiment score: 0
Number of reviews: 1
USA made Micro-Swiss Plated Brass Wear Resistant Nozzles extend nozzle life dramatically when using abrasive materials.Fit a large variety of machines, check listing name carefully to make sure it fits your printer, or get in touch with us if you are unsure.Ultra-hard coating creates a low friction ...
 Show Reddit reviews
16. Anycubic NTC 3950 100K Thermistor with 1 Meter Wiring and Female Pin Head for RepRap 3D Printer Heatbed or Hot End Pack of 5PCS
Sentiment score: 0
Number of reviews: 1
Conviniently pre-wired with 1 meter long high temperature PTFE insulated wiringUse it with heated bed or extruderTemperature sensor 100KΩ accuracy of ± 1%Pack of 5PCS
 Show Reddit reviews
17. Letool10pcs High Carbon Steel 1.5mm Deep 3x12x4mm V Groove Guide Pulley Rail Ball Bearings Wheel
Sentiment score: 0
Number of reviews: 1
ePacket delivery from China, it usually takes about 7-12 days to arrive you.Material:High carbon steelDimension:(Inside diameter)3mm x (outer diameter)12mm x (thickness)4mmV groove width: 2.5mmV groove deepness: 1mm
 Show Reddit reviews
18. uxcell M3x0.5mm Stainless Steel Self-Locking Nylon Insert Hex Lock Nuts 50pcs
Sentiment score: 0
Number of reviews: 1
 Show Reddit reviews
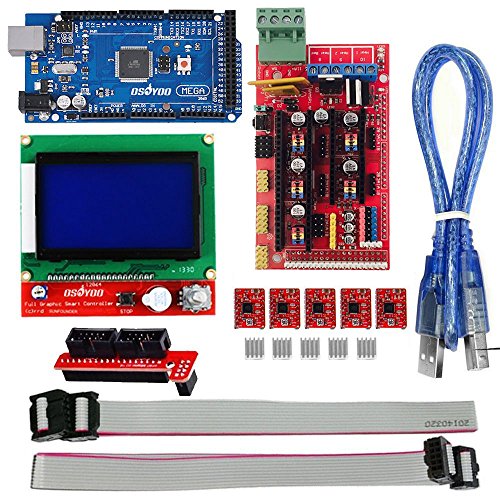
19. OSOYOO 3D Printer Kit with RAMPS 1.4 Controller + Mega 2560 board + 5pcs A4988 Stepper Motor Driver with Heatsink + LCD 12864 Graphic Smart Display Controller with Adapter For Arduino RepRap
Sentiment score: 1
Number of reviews: 1
3D printer Kit guide: 3D printer Kit guide: http://osoyoo.com/driver/3D%20printer%20instructions.pdf3D Printer Controller RAMPS 1.4 interfaces an Arduino Mega2560 board. The modular design includes plug in stepper drivers and extruder control electronics on an Arduino-compatible MEGA shield for easy...
 Show Reddit reviews
20. BINZET DC 24V to 12V 5A 60W Converter Step Down Regulator for Car Low Voltage Transformer
Sentiment score: 1
Number of reviews: 1
*24v to 12v 5A step down converter*Short-circuit protection and automatic recovery, full waterproof potting*High conversion efficiency: Over 90%*Over-voltage protection,over-current protection,overheat protection*Widely used in automotive, electricity, surveillance systems, railway signals, instrume...
Show Reddit reviews
What I did was I got a nice thick borosilicate glass plate from amazon, the one with the corners cut off so it fits the bed perfectly without the heated bed bolts interfering. Then I got a sheet of PEI with 3M adhesive on the back. I cleaned the glass with alcohol and then carefully applied the PEI so there weren't any air bubbles.
​
This is the glass:
https://smile.amazon.com/Gulfcoast-Robotics-Borosilicate-Duplicator-Printers/dp/B07B2YLWF9/ref=sr_1_5?crid=2640M0KDOPOV&keywords=borosilicate+glass+plate&qid=1555903635&s=gateway&sprefix=borosilicate+glass+pl%2Caps%2C153&sr=8-5
​
And this is the kind of PEI:
https://smile.amazon.com/Gizmo-Dorks-Preapplied-Laminated-Adhesive/dp/B07GSJSDWR/ref=sr_1_4?keywords=PEI+sheet&qid=1555903728&s=gateway&sr=8-4
​
I have gone through a handful of these borosilicate sheets, and have had one or two that were warped. All of them were thinner than the Gulf Coast Robotics one. Theirs is bang on flat and way tougher, hands down the best. When you apply the PEI, make sure you do it very carefully as to not create any bubbles underneath. I started on the center of one edge and slowly applied from one side to the other, peeling the backing off as I went. Press it down from the center out as you lay it down and you shouldn't get any bubbles. Lots of very tiny bubbles are to be expected and work their way out after a while (Im talking really tiny). As for attaching the glass to the bed, a set of four binder clips are perfect. Don't bother with the thermal pads some people suggest, they make it a pain to remove the glass in between prints and don't really do anything.
​
This is a great way to have a removable build surface that everything sticks to. I have since moved up to a Prusa MK3, so I get to enjoy the luxury of the magnetic PEI build plate. You could get a similar thing going, BuildTak sells a magnetic build surface that you apply to the heated bed. The drawback of this is that if your bed is warped at all, the magnetic sheet does nothing to correct it. The thick glass on the other hand makes everything nice and flat.
​
I should add that to put the glass sheet on, you will have to move your z endstop switch down. There are several mounting holes on the printer to do this already so its really not that hard, you just have to experiment. The glass is about 4mm thick so you have to adjust for it.
I did all of those upgrades plus the extruder gear change. It prints great and highly recommended. The microswiss machined idler stuff is nice but I'm not sure how nessassary it was. I have that fan and have had no issues with 11+ hour prints.
Edit:
I added these split Zaxis couplers. https://www.amazon.com/dp/B01HBPHSII/
I added this gear: https://www.amazon.com/dp/B06ZYG5Z47/
And the Zaxis brace kit from GulfCoast also.
I've been pretty happy with these upgrades.
I added the Z probe for ABL and used a PEI sheet vs the old sticker. I tried the glass and had good luck until it chipped...too much abs adhesion with the juice.
I've had this machine now for about 4 or 5 years, and it went unused for a little over 2 years because I wound up with a clogged PTFE tube and decided that I would just change the hot end for the all metal. I went out and bought the hot end, put it on a shelf, had a baby and been running around until about 3 weeks ago when I finally found some time in my schedule to rip into the printer and replace the hotend. The prints are decent (I wish I could push it a bit faster) but I still have problems with bed leveling (more like annoyances that I actually have to relevel it every so often).
The upgrades I've done (both before and now) are:
I mostly print ABS (trying PETG and it's driving me crazy) so cooling hasn't really been an issue as the fans are usually off (maybe I need a better cooler for the PETG?) and find that the glass (now mirror) is definitely the way to go and forget the binder clips, those things are a damn nuissance. The thermal pad holds the glass so tight when it's warm it's not going anywhere, and it doesn't let go too easily when it's cool either.
What I really want to add next is an auto bed level, but I keep finding people complaining about how hard it is to add to the Melzi board. Hopefully I find something soon, that's probably about the last "major" change I want to make (until I find a new annoyance).
I recently went through exactly this same situation. I was ready to upgrade to a microswiss all-metal hotend and the catastrophic failure of the print leaving gunk all over my heater block forced the issue. In my case, I opted to replace everything I could including the thermistor and heating element. They are both very inexpensive and you should have a spare laying around anyway in case you need one in a hurry. So...how to clean your heating block...
Fire. Seriously. I used a combination of blowtorch and solvent to remove all the gunk (and mine was a LOT worse than yours...it basically encapsulated one entire end of my heater block, entombing the thermistor, heater and associated wiring).
I used your typical propane torch, holding my heater block in a vise or vise grips. I'd heat it up then quickly wipe away the melted PLA with a clean cloth. Heat, repeat. Then I'd soak the whole thing in some solvent (acetone, MEK, etc). Repeat until clean. Pay careful attention to the tiny setscrew that holds the heater in place...work it free with a hex wrench while it is hot...chances are you got some PLA stuck on there, too. Obviously be super careful when you do this. Ventilation, fire-extinguisher handy, your mom on speed-dial.
When you replace the thermistor and heating element you'll need to do some soldering. This is pretty unavoidable. Those elements come with very long wires attached to them and the Wanhao/MP print heat doesn't need that length. Clip it short, make good solders and use heatshrink over your joints. For the thermistor I simply cut out the center section of the wire and spliced the connector back to the component at the length i needed.
Now, when you put it all back together you will have the option of re-wrapping the heater block with cotton and Kapton tape. People seem split on if this is necessary, but since I'd battled heat creep before I didn't want to introduce any more heat up the block...so I opted to do it. It's a bit tricky if you get the non-punched cotton strips like I did. Luckily I had hole punches handy to make the provision for the hotend and nozzle to get thru the insulation. If you don't have these tools (or don't quite know how to do it), i'd shop around for pre-punched sets.
good luck. Let me know if you need any more help.
here are the parts i used:
https://www.amazon.com/gp/product/B071K8Z9KF/ref=oh_aui_detailpage_o00_s00?ie=UTF8&psc=1
https://www.amazon.com/gp/product/B01N4KY6TR/ref=oh_aui_detailpage_o01_s00?ie=UTF8&psc=1
https://www.amazon.com/gp/product/B076NW3GNH/ref=oh_aui_detailpage_o02_s00?ie=UTF8&psc=1
https://www.amazon.com/gp/product/B01E1HANLS/ref=oh_aui_detailpage_o03_s00?ie=UTF8&psc=1
I bought a pei sheet off Amazon and just clamped it on top of the original surface. No need for glue or hairspray or anything like that. It sticks perfectly and when it cools down it pops right off.
Would recommend it to everyone.
Gizmo Dorks PEI Sheet, 8" x 8" 3D Printer Build Surface Polyetherimide Ultem https://www.amazon.com/dp/B01KBGJU5S/ref=cm_sw_r_cp_apip_IA4KofJ8WMGmf
I have this one, works great. A quick wipe of iso alcohol on the bed before a print does WONDERS. :)
https://www.amazon.com/Gulfcoast-Robotics-Borosilicate-Duplicator-Printers/dp/B07B2YLWF9/ref=sr_1_3?crid=3R1DVT6ST84HS&keywords=duplicator+i3+glass+bed&qid=1555892960&s=gateway&sprefix=duplicator+i3+glass%2Caps%2C145&sr=8-3
Bearings most likely. My Select Plus sounded exactly the same when I got it. Really scratchy, but still worked fine.
I decided to go nuts with the upgrades and put a new Y carriage on from Amazon. Figured I'd replace the bearings while I had it apart. It's been smooth since!
Got these bearings:
CTYRZCH 12Pcs LM8UU Linear Bearings for 3D Printer, RepRap Prusa Mendel DIY CNC Motion, Prusa Mendel, reprap(8mm x 15mm x 24mm) https://www.amazon.com/dp/B01CE4H5PC/ref=cm_sw_r_cp_apip_l2HAoWJvMaMg6
And this Y carriage:
RepRap Champion Y Carriage Plate Upgrade for Wanhao Duplicator i3 and Monoprice Maker Select V1, V2, V2.1 and Plus 3D printers https://www.amazon.com/dp/B01MUAMRN7/ref=cm_sw_r_cp_apip_2q6Hk7jXWW3EW
I've been working on converting to a ramps 1.4 kit. That's the one I ordered. I also picked up an ATX power supply so I can control it with my pi. As far as the conversion goes, it seems pretty simple, installing the Marlin firmware was weird (I ended up having to do the configuration/install myself with the current version of Marlin, not using osoyoo's custom one). I just printed the mount conversion and I'll be installing it soon.
Not sure if it helps or not, just wanted to give you my perspective :)
The MS hotend doesn't require any craziness to get to print good. Do remember to increase your temps about 10 degrees over what you were previously printing at (as recommended by MS).
If you are having issues it is almost certainly because of the 0.2 mm nozzle. To print with the 0.2 mm nozzle you really need to upgrade your extruder gear, the stock one is crap. It takes more force to print through a 0.2 mm hole and the stock gear just isn't up to the task.
Install one of these:
https://www.amazon.com/Wangdd22-Accessories-Extruder-Filament-Planetary/dp/B06ZYG5Z47/ref=sr_1_8?keywords=extruder+gear&qid=1556118531&s=gateway&sr=8-8
Then calibrate your extruder steps: https://3dprinterwiki.info/extruder-steps/
This is my favorite nozzle for Wanhao -
https://www.amazon.com/Micro-Swiss-HW-NOZ-MK10-04-Plated-Resistant-Nozzles/dp/B01BDL4NKM/ref=pd_bxgy_328_2?_encoding=UTF8&psc=1&refRID=DDCZV1Y9Q7PXDZKTPBR9
I tried the All metal hotend, and couldn’t get it to work. For some reason the cold end wasn’t cold enough and clogging was continuous. I went back to the teflon tube and this nozzle and it’s been spectacular. Simple, and it just works.
Yes That is the one I got.
https://www.amazon.com/Anycubic-Thermistor-Wiring-Printer-Heatbed/dp/B01B41K7OM
It technically doesnt add anymore cables, just puts a brick between the fan and the board.
https://www.amazon.com/BINZET-Converter-Regulator-Voltage-Transformer/dp/B00J3MHUWM/ref=sr_1_10?ie=UTF8&qid=1538683488&sr=8-10&keywords=24v+to+12v
Ha! I broke mine 2 days ago. As far as I can tell, The bearing is a V623ZZ. 3mm ID x 12mm OD x 4mm Wide.
I found these on Amazon. They arrive tomorrow.
The thumb wheels the printer comes with vibrate loose real easy. I printed some new ones and put in nyloc nuts. I only have to level the bed every 10-15 prints.
Edit: Here's a guide for replacing them.
Did anyone of you do the mosfet mod on the msp? I bought this mosfet I am wondering if it will work or will this specific cause more problems? Seeing that most people use a different mosfet for the msp.
https://www.amazon.com/gp/product/B01E1HANLS/ref=ppx_yo_dt_b_asin_title_o08_s01?ie=UTF8&psc=1
Had almost the same problem on my Monoprice clone - would stop feeding, changed brands, etc. until finally the filament had fused to the PTFE tube in the hot end. Required a complete tear down to find it. I figured as long as I'm in there, upgrade the extruder plate
https://www.amazon.com/gp/product/B06WVB6CYD/ref=ppx_yo_dt_b_asin_title_o08_s00?ie=UTF8&psc=1
and the thermistor
https://www.amazon.com/gp/product/B07B3ZYBTM/ref=ppx_yo_dt_b_asin_title_o08_s01?ie=UTF8&psc=1
Follow the instructions - do not skip the "tight, then back off 1/4 turn. Heat up to 250 and then tighten the nozzle" steps.
Strip off the Kapton tape (if it hasn't already torn off) and use these instead
https://www.amazon.com/gp/product/B07B9KW1L1/ref=ppx_yo_dt_b_asin_title_o05_s00?ie=UTF8&psc=1
The screen on the plus only really works on the plus, which is why I said replace it. Some have hacked it for use on other printers but it's not really worth it.
I forgot that they use the daughter board on the plus. You could get another daughterboard and use it as a breakout, but its kind of pricey, roughly $20 on ebay/amazon/aliexpress. You would still need short jumper cables to go from this to the board.
https://www.amazon.com/Interface-Plate-Keypin-Wanhao-Duplicator/dp/B07KQQBF89
Personally if I were to fix it then I would cut the end off the connector and extend/crimp the proper connectors on, they need to be JST-XHP. You could buy a kit for $10 and crimpers for <$20. Almost every printer has moved to these connectors so it's generally a good investment for the future.
I had the same thing happen on my non-plus. Replaced the mezli and it died again half a year later when the new board burned up. The entire design of the printer is a pain in the ass. I'd sell it for parts and get a better platform.