Best beer brewing kegs & kegging products according to redditors
We found 583 Reddit comments discussing the best beer brewing kegs & kegging products. We ranked the 264 resulting products by number of redditors who mentioned them. Here are the top 20.


I would stay away from using commercial air compressors and pesticide sprayers.
Just buy a Cornelius keg (they're about 50 bucks) and get a mobile keg charger like this. You can then connect a 1/4 vinyl line and then get a ball lock or pin lock disconnect (depends on the type of corny keg you buy) and then attach a picnic tap at the end. If you want it to spray just buy a bottle filling wand or a racking cane and shove it into the outlet of the picnic tap.
Hey all,
I wanted to take a minute to show you what I came up with for a pretty hassle free SV setup. It's so nice not to have to lug this back and forth to the sink to fill/drain and it keeps temperature very well! It sits on my washing machine, is filled by the hot water supply and drains into the laundry drain.
Here are the materials I used:
Coleman 33-Quart Party Stacker Cooler: https://www.amazon.com/gp/product/B002BMEFHE/ref=oh_aui_search_detailpage?ie=UTF8&psc=1
1/2" Weldless Cooler Bulkhead: https://www.amazon.com/gp/product/B01C85GCMO/ref=oh_aui_search_detailpage?ie=UTF8&psc=1
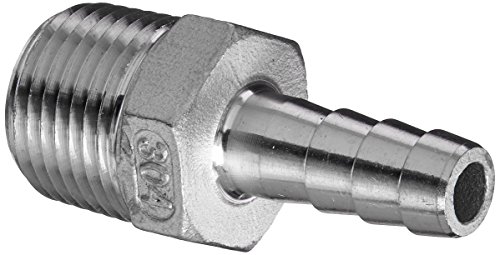
1/2" x 3/8" Barb: https://www.amazon.com/gp/product/B013S23HJM/ref=oh_aui_detailpage_o08_s01?ie=UTF8&psc=1
Hose Splitter: https://www.amazon.com/gp/product/B01K40WBTI/ref=oh_aui_detailpage_o09_s00?ie=UTF8&psc=1
Water Utility Hose
https://www.onlinemetals.com/merchant.cfm?id=1424&step=2&top_cat=1
My only challenge with this setup is for smaller cooks like a chicken thigh or two - it just seems a little wasteful to heat up that much water for such a small meal. Thus, I'm considering buying some of these to fill in the cooler a bit: https://www.onlinemetals.com/merchant.cfm?id=1424&step=2&top_cat=1 I'll try to remember to update if that works out.
One thing I did that I haven't really seen yet is simply cutting the lid for easy access. I was tired of having to lift the whole lid off so I sliced it in two and it still retains temp just as well as when it was in one piece.
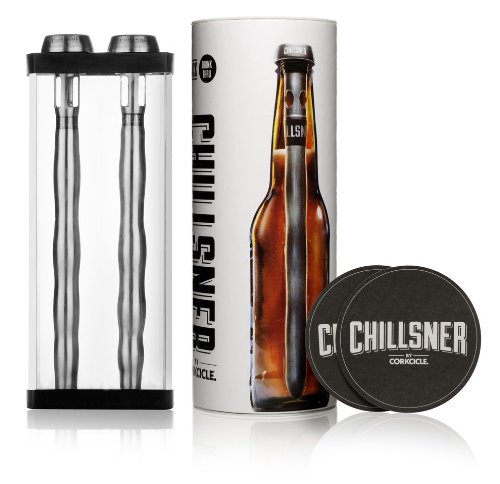
Seriously, I throw one or two of these in to my mug, pour the coffee in, and wait about 5min. Perfect temp
http://www.amazon.com/Corkcicle-Chillsner-Beer-Chiller-2-Pack/dp/B00B5EDXMM/ref=sr_1_1?ie=UTF8&qid=1420237242&sr=8-1&keywords=beer+cooler+stick
I just want a stainless growler with a ball lock post, so I can re-carb and purge O2 to keep it fresh enough for as long as I feel like nursing it.
edit: that won't cost $100 for the growler and lid.
Or you could get this for $30.
http://www.amazon.com/Faucet-Chrome-Cornelius-Disconnect-Attached/dp/B003ZZRR3K
i got a pair of kegs during AIH's sale as well and i'm also new to kegging.
On your first question, here's what I'm doing:
and of course the two 5 gallon ball lock kegs from AIH.
>Have you made any liquor based drinks?
Screwdrivers are pretty good. Vodka and cranberry carbonated is pretty good as well. Margaritas you would think would be really good, but not so much. The sweeter the starting liquid the better it tastes carbonated, as carbonic acid is pretty bitter by itself. (carbonic acid is co2 dissolved in waters technical name, fun fact: The Ph value of our blood is what our bodies use to determine how much we need to breath. It is made slightly more acidic the more co2 is present.)
As far as supplies go, you need at a minimum,the stuff below. You can always get a bigger tank or longer/better hoses etc. But this is quite literally exactly what I have, and I only fill my tank up every 6-8 months (sooner if I make some dry ice with it.)
If you buy everything from amazon it will run you about $150, my local beverage distributor, in Atlanta suburbs, had most of this stuff a fair bit cheaper, so you may want to check with them first (I got burned by not checking).
Honestly, this was one of the best $100 or so I have ever spent. We buy those Mio squirt drinks when they go on sale, its like paying $0.08 for a 2 liter of Diet Faygo, plus all of the SodaStream flavors work as intended, you can get those from target for like 5 bucks and they make gallons of Soda. Plus all of the fruit stuff, and quixotic beverages just for fun.
Usage:
Make consistently good beer without temp control....not really.
Get this: it is very affordable, it is very easy to maintain the temps using the methods they say (5 degree cooling for each 2 liter of ice). It folds up so when you are not fermenting it can be out of site, it doesn't take a lot of extra space. It really has helped my brewing improve. One other thing is, its a safety measure agianst ruining anything in the apartment because of a blow off. Unless the blow off happens to happen when you open the bag anything would be contained inside the bag. The bag is water tight as stated and I have tested that out.
https://www.amazon.com/gp/product/B008EKD7CQ/ref=oh_aui_detailpage_o06_s00?ie=UTF8&psc=1
I don't have a Yeti, but I did recently setup a mini keg dispensing kit. My problem with a large growler is that whatever you put in it will go flat after you pour a few glasses from it unless you keep it under pressure with some C02.
This is what I did:
$165 Total
You could compare that to the $230 Growlerworks system.
I'm another advocate for 30-40psi for 24 hours, then serving pressure from then on. If you want that first taste in a hurry, get one of those carbonation caps , and shake some up that way.
How about this: http://www.amazon.com/Genuine-Innovations-G5040-Charger-Black/dp/B000NV9CE6
No regulator, but it is technically C02. And you can keep the little refills in the cooler to chill them and bring as many as you want.
Obviously carb your keg at home with this solution. It would just be a way to expel the beer.
Or buy a CO2 inflator like this to initially pressure it.
http://www.amazon.com/Genuine-Innovations-G5040-Charger-Black/dp/B000NV9CE6
My wife drinks 3-4 bottles of carbonated water every day. We used to buy Pelligrino at Costco, at $14/case, or around $60/mo. That was 3 years ago. This thing paid for itself a long, long time ago for me.
On top of that, I purchased a 5 pound tank from Amazon, and an adapter which hooks the tank up to the SodaStream. The tank costs $23 to refill, but has far more capacity than the little bottles the SS comes with. I have to refill it about once every two months.
Links:
https://co2doctor.com/freedomoonespec.htm
http://www.amazon.com/CO2-Tank-Aluminum-Cylinder-Valve/dp/B0085282UK/ref=sr_1_fkmr0_1?ie=UTF8&qid=1393961834&sr=8-1-fkmr0&keywords=7ln+co2+tank
Note: You can get a tank and swap it at some local shops, but where I live I can't find anyone who does that, so I had to buy the new tank.
I keep posting this in the keezer builds for people who are about to build, here is the list of what I did with costs and where I bought things:
Here, while not basic, but a list that might help. This is a 4 keg setup. Some items are not exactly needed, for example hose clamps, MFL push to connect (you could just get barb ones), but helpful for disconnecting/cleaning. You can save a lot on faucets - my 4 costed me $280 total all in. You could also get a cheaper freezer.
I got a regulator with 2 possible pressures so I can have carbonation pressure plus serving pressure at the same time - also not a requirement.
Name|Price|Quantity|Total|URL
:--|--:|:-:|--:|:--
Inkbird Itc-308 Digital Temperature Controller Outlet Thermostat 2-stage 1100w w/ Sensor|$35 |1|35|https://www.amazon.com/gp/product/B011296704
Intertap Self Closing Faucet Spring|$1.99 |4|7.96|https://www.morebeer.com/products/intertap-closing-faucet-spring.html
Intertap Stainless Steel Faucet Shank|$32.99 |4|131.96|https://www.morebeer.com/products/intertap-stainless-steel-faucet-shank-4.html
Duda Energy HPpvc025-100ft 100' x 1/4"" ID High Pressure Braided Clear Flexible PVC Tubing|$28.50 |1|28.5|https://www.amazon.com/gp/product/B00LX6LS7E
Brewer's Edge UX-CAOO-IQIT Keg Lube 1 oz.|$5.98 |1|5.98|https://www.amazon.com/gp/product/B0064OK99S
Hilitchi 60 Piece Adjustable 8-38mm Range Stainless Steel Worm Gear Hose Clamps Assortment Kit|$12.99 |1|12.99|https://www.amazon.com/gp/product/B01IOE4RQQ
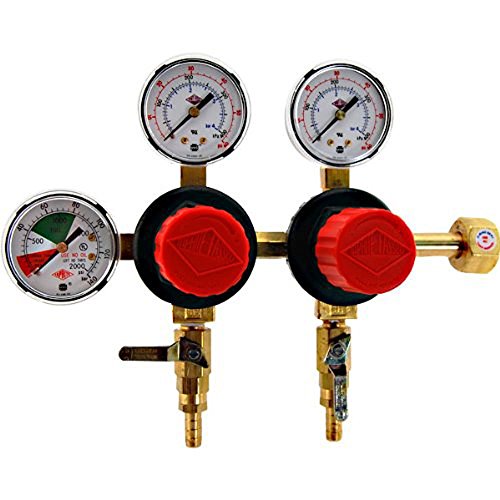
Taprite T752HP Two Product Dual Pressure Kegerator CO2 Regulator|$89 |1|89|https://www.amazon.com/gp/product/B0060NOX40
KegWorks Beer Tap Faucet Handle Black|$4.30 |4|17.2|https://www.amazon.com/gp/product/B000VI753Q
Intertap Forward Sealing Beer Faucet (Stainless Steel)|$31.54 |4|126.16|https://www.amazon.com/gp/product/B01NAGS3ST
4 Way Co2 Manifold|$42.99 |1|42.99|http://www.farmhousebrewingsupply.com/4-way-co2-manifold/
Accuflex Bev-Seal Ultra (3/16) 50'|$15.99 |1|15.99|http://www.farmhousebrewingsupply.com/accuflex-bev-seal-ultra-3-16-50/
Pin Lock Disconnect- 1/4 MFL Gas Side|$5.99 |4|23.96|http://www.farmhousebrewingsupply.com/pin-lock-disconnect-1-4-mfl-gas-side/
Pin Lock Disconnect- 1/4 MFL Liquid Side|$5.99 |4|23.96|http://www.farmhousebrewingsupply.com/pin-lock-disconnect-1-4-mfl-liquid-side/
1/4" MFL Push To Connect|$3.79 |4|15.16|http://www.farmhousebrewingsupply.com/1-4-mfl-push-to-connect/
5/16 x 5/8 BSPP (Shank Connector) Push To Connect|$5.99 |4|23.96|http://www.farmhousebrewingsupply.com/5-16-x-5-8-bspp-shank-connector-push-to-connect/
Igloo 7.1 cu ft Chest Freezer Black|$219.99 |1|219.99|https://www.walmart.com/ip/Igloo-7-1-cu-ft-Chest-Freezer-Black/31136433
Set of Four 5 Gallon Pin Lock Kegs Used|$28.90 |4|115.6|http://www.homebrewing.org/Set-of-Four-5-Gallon-Pin-Lock-Kegs-Used_p_3179.html
20 CO2 tank|$60|1|60|craigslist
2 in. x 8 in. x 10 ft. #2 and Better Prime Douglas Fir Board|$9.86|1|9.86|http://www.homedepot.com/p/2-in-x-8-in-x-10-ft-2-and-Better-Prime-Douglas-Fir-Board-604364/206182008
ZMAX 7 in. 16-Gauge Galvanized Reinforcing L-Angle|$3.27|4|13.08|http://www.homedepot.com/p/Simpson-Strong-Tie-ZMAX-7-in-16-Gauge-Galvanized-Reinforcing-L-Angle-L70Z/100375233
||||1019.36|
You would also need a wrench if you don't have one yet to unscrew the posts on the keg.
reposting again...
As I've posted before, a nice alternative to the swamp cooler method is the Cool Brewing Cooler. It works the same way as a swamp cooler, if not better, but you don't have to deal with a giant vat of water.
A CO2 pressure gauge isn't very useful. It shows about the same pressure all the time, until you are SUPER low, and then it drops fast. As another poster said, there could be temperature variants too.
Unless it is critical that you never run out of gas, I would skip the gauge, and just refill when you are out.
Lastly note that you can track CO2 use by the weight of the cylinder. Weigh it when it is full, then again every month or two, and you will get an idea of how fast you are going through it.
Oh, edit to add: consider ditching the Soda Stream entirely. Get a real CO2 regulator, and use a "carbonation cap" on a 1L or 2L bottle. Using soda bottles is going to be way cheaper than using SodaStream bottles, and you can carb larger volumes.
One thing you might consider is 2.5 gallon kegs. If you have some room to spare in your regular fridge, you could fit one of these in there and possibly get a small co2 tank or just use a keg charger like this:
http://www.amazon.com/Genuine-Innovations-Cornelius-Keg-Charger/dp/B000NV9CE6
Point being, if you put your mind to it, you COULD start kegging now. You'll never look back once you do.
Happy brewing!
It's sold by Amazon, not a 3rd party... so I don't think it is. Unless whoever Amazon buys it from is promoting it, which I doubt.
ref=in amazon links just tells amazon which button the user clicked.tag=is what is used for the amazon affiliate program (examples)./u/Akira_Yamamoto could have removed everything after
/dp/B00H7HFINS/and the link would still work.Do you ever plan on doing 5 gallon batches? If you have the space it will be more cost effective to just go for a full size keging system. Mini kegs are going to cost you roughly what a new 5 gallon keg will.
That said if it's only a one-off thing you could use some 2 liter bottles and get yourself a co2 tank and regulator and a carbonation cap and force carb that way, it won't be on "tap" but it will be force carbonated.. and you can keep it carbonated if you leave the cap on and top off the bottle with co2 each time you pour from it.
If you have nothing then you'll need a regulator I have this one: (taprite t742hp primary double gauge co2 regulator, brass https://www.amazon.com/dp/B002UZUJ22/ref=cm_sw_r_cp_apa_i_auBCDbBPZ3V0H)
A co2 tank, something like this: (5lb co2 tank- new aluminum cylinder with cga320 valve https://www.amazon.com/dp/B00HQQ3WWE/ref=cm_sw_r_cp_apa_i_BvBCDbXPB33KP)
Some 5/16 tubing l, and a ball lock gas disconnect like this (5/16" gas line assembly - ball lock https://www.amazon.com/dp/B0064OI77Y/ref=cm_sw_r_cp_apa_i_6wBCDbSWZWMNY)
And a carbonation cap like this : (stainless carbonation cap counter pressure bottle filling with 5/16" barb,co2 coupling to carbonate soda beer fruit juice water https://www.amazon.com/dp/B01K4GGYT0/ref=cm_sw_r_cp_apa_i_BxBCDbK0V3J35)
I also have this regulator for my mobile mini keg set-up: Ultimate CO2 Regulator works with 5 types of CO2 tanks (0-50psi) https://www.amazon.com/dp/B071J9FKVD/ref=cm_sw_r_cp_apa_i_nABCDbQWF87S3
It works great and I use it with a soda stream co2 tank which are a little pricey for how much co2 you get but they're convenient and available everywhere. This makes a nice compact system since you don't have the big regulator and big co2 tank.
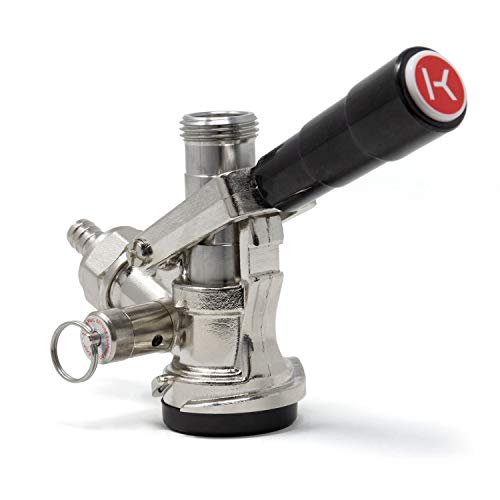
If you want to be the best friend ever, listen up. A standard keg pump uses ambient air to pressurize the keg, which means the keg will go bad after a very short time. If you get a portable co2 system, it will cost a bit more, but I believe you will be considered the best friend ever. Here goes...
First you need the appropriate tap, which you have indicated is the S-type. You'll then need to get an MFL connector for gas hookup. While there, buy a party faucet with beer nut. You then buy the keg charger and mini CO2 cartridges (similar to those used in a pellet gun). I'll leave it to you to find Canadian sources for these products, but this is what you'd need.
You are going to have to buy the correct type of tap; not really another way around it. Then you will have to get the right connector to connect the gas line to the tap, then you can throw on a picnic tap or something.
My setup is something like this:
Homebrew shops generally carry the tanks, and can fill them for you. You're probably looking at $120-$150 initial cost, but your cost per carbonation is pretty close zero: just the cost to refill the tank.
With this setup, you carbonate directly in plastic soda bottles. I generally use seltzer bottles, since they don't have any residual flavors in them, and they're designed to hold the pressure.
Transfer whatever you want to carbonate into a plastic bottle (about 3/4 full). Get it as cold as possible: for sodas, that's as close to 32-F as you can get; for cocktails, it's maybe 20 to 25-F. Squeeze the excess air out, screw on the carbonator cap, attach the gas hose, and shake the hell out of the bottle. Release the pressure (carefully; some mixtures can foam a lot), and repeat once or twice if you want really strong carbonation. For water, I usually carbonate around 35 psi. For cocktails, closer to 45 psi.
To bottle cocktails or sodas once they're carbonated, you can use 187ml champagne bottles and an inexpensive bottle capper. Your local homebrew shop probably carries both.
Gonna copy and paste one of my previous replies to a similar question last year. Hopefully that helps a bit.
Your question about ballpark cost is a bit "how long is a piece of string..?". It totally depends on your choices. Mine ended up costing me around $1k all up, but I'm in Australia and everything is bloody expensive over here.
------
Recently built a keezer myself so I can offer a bit of advice. I think the main reason most people shy away from kits is they tend to bundle cheap and nasty parts. Here's a list of parts you'll need and my insights to go with them:
I'm super happy with my system, the 650ss are awesome and let me use less than a metre of beer line. I also shelled out a little extra for a ball lock gas post and bulkhead to replace the gas-in barb on my gas manifold. That combined with another quick disconnect just lets me easily remove the gas bottle from the freezer and gas another keg for storage or something. Hope that helps a bit, feel free to ask any more questions.
So, you want to think about how many kegs you want in service at any one time. As others have mentioned, second-hand and sales are the shit. But there's something to be said for shiny and new.
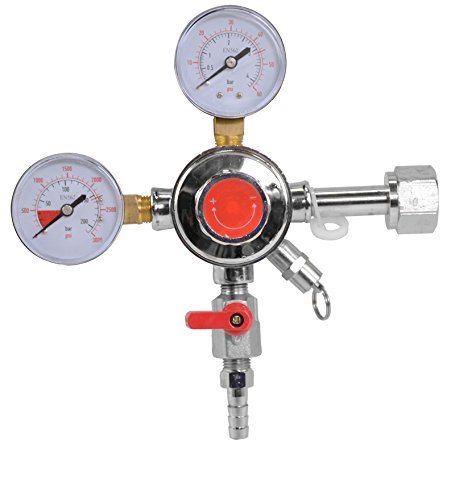
A quick note in case you're not familiar with regulators. If you are, skip this. Basically when you get a tank of gas, it's holding a shitload PSI worth of gas. Whether or not the gas is in a liquid or gas state varies, but is largely irrelevant for this treatise. If you straight open that valve, it comes out at the highest speed that the nozzle on the tank will allow. So you screw on a gas regulator. The one that you attach to a tank is a primary/secondary combo. The Primary Regulator gauge is the left part of the regulator. It shows how much gas is in your tank. Co2 turns to liquid under pressure, so don't worry too much about what that gauge READS, just know that the internal mechanisms of the primary portion of the regulator are dropping 500-800PSI down to 0-100PSI or so. The second part of your regulator is the top gauge, which shows your Secondary PSI, or the output PSI, if you will. Depending on the sensitivity of the gauge and internal mechanisms, it can max out anywhere from 40-100. The screw on the front is how you adjust what PSI is coming out of that barb post at the bottom. This is the number you care most about. I only go into this much depth because when I first started kegging, I really didn't have a good grasp on these distinctions
If you plan on building a Keezer with space for 6 kegs, but only want to serve 3 at a time, I would get a single primary regulator with a secondary out and run that to an array of 6 Secondaries. That way you can carbonate and serve at variable pressures/volumes. However, even if you build that from scratch from used/new parts, it's still a pricey proposition.
Or, you could use that single regulator above and run the secondary to a 6 way manifold. The downside is each keg would receive equal pressure and therefore all carbonation in the kegs would be the same.
You could also mix and match for a more even approach: get a regulator like this and run the two outputs to two different 3-way manifold so 3 kegs could be X PSI and 3 kegs could be Y PSI. Meaning 3 kegs would be carbing and serving at 1 pressure, and 3 kegs would be carbing and serving at another.
Correct, the pressure applied to one keg, will be applied to both without regulators on each line. You'll have to disconnect the second keg to force carbonate. This would make a great Christmas present.........
> Please list ALL the basic equipment for pressurized CO2?
I use a CO2 fire extinguisher rather than a normal cylinder, but it's essentially the same.
Only real downside is the ongoing cost. Other thing to think about are balancing CO2 levels when the lights go off, but that's easy enough to accomplish with the timer plug.
Cost for me was about £100 all in, but I got lucky with some cheap CO2..
I have a DIY I built from googling for my 15g. It is a constant pain in the ass to get the mixtures right for given surface agitation and bioload. And then every time you want to make a change, you have to wait a day for the mixture to restart. And if you are using CO2 to lower pH, this causes wild pH swings. And, you can't turn it off at night.
Save yourself pain and buy a real setup:
http://www.amazon.com/gp/aw/d/B001DTNWF2?pc_redir=1407847266&robot_redir=1
http://www.amazon.com/gp/aw/d/B0058XWDFO/ref=pd_aw_sims_5?pi=SL500_SS115&simLd=1
http://www.amazon.com/gp/aw/d/B0085282UK/ref=pd_aw_sims_2?pi=SY115&simLd=1
http://www.amazon.com/gp/aw/d/B008UCOFJW/ref=pd_aw_sims_1?pi=SY115&simLd=1
$175 with prime.
EDIT: Jesus I totally forgot about the leaks. Constant leaks in the DIY system. I had several seals give after several weeks of use. So you are never safe. I think I currently have zip ties holding my overflow lines together.
A small gift idea would be a beer chiller.
http://www.amazon.com/Corkcicle-Chillsner-Beer-Chiller-2-Pack/dp/B00B5EDXMM/ref=sr_1_15?s=kitchen&ie=UTF8&qid=1449440872&sr=1-15&keywords=beer+mugs
Also, my dad is pretty much the same way and loved the Leatherman multi tool I bought him one year.
http://www.amazon.com/Leatherman-2996-831426-Wingman-Multi-Tool/dp/B005DI0XM4/ref=sr_1_1?ie=UTF8&qid=1449441021&sr=8-1&keywords=multitool
https://www.amazon.com/Sankey-Ball-Quick-Disconnect-Conversion/dp/B00C30F75I
If wanted to use a Sanke to ball lock conversion kit (see link below) would I not need a liquid dip tube? I'm guessing that's all taken care of within the commercial Sanke keg.
https://www.amazon.com/Sankey-Ball-Quick-Disconnect-Conversion/dp/B00C30F75I
Amazon has them for pretty cheap.
https://www.amazon.com/Sankey-Ball-Quick-Disconnect-Conversion/dp/B00C30F75I
Mash tun cooler (this is probably cheaper at your local hardware store or wal mart) Also, this isn't the only cooler that works. Pretty much any plastic cooler works. But you'll need a different false bottom if you use a chest cooler, which may allow you to mash bigger batches.
Weldless Ball Valve Just take the plastic valve off the cooler and screw this one on. Will work on most any cooler you choose.
False bottom Put this at the bottom, connecting the silicon hose to the ball valve and the top of the false bottom.
3/8" barb You'll need to screw this onto the ball valve on the inside of the mash tun to connect the silicon hose to.
Honestly, if you've already got a kettle that can boil 6 gallons, you're good to go there, and just add this to the mix. Otherwise, pick up a Stainless Steel Brew Kettle.
This whole setup comes in just under $200 but you'll need some hoses and some hose clamps as well. But I'm sure that if you shop around (even on amazon) you might find better deals than I linked. But that's the gist of it. And there's no need to stick with the specific brands I linked. But just make sure to stick with stainless steel for the kettle, ball valve, and connecting accessories and food-grade plastic for the cooler. And any hoses need to be high temp hoses. Silicon is ideal.
This is by no means the "only" way to do it, but a great start down the road. You may also choose to use a pump. It has advantages and disadvantages. You can make great beer with and without one.
Not so much a commercial product as putting together a DIY system. A 5lb CO2 tank (or larger if you like), a regulator valve (example), a ball lock disconnect (example), one or more carbonator caps (example), and some simple 5/16 ID tubing and hose clamps like you can pick up from any hardware store to hook it all together. There's tutorials online, and you can make them a bit fancier if you like, but that's the gist of it.
I wouldn't drill the lid for a thermowell and ball lock port. There are a combo action of items on Amazon you could get and utilize the bung hole that already exists.
Homebrew #7 Stopper Thermowell
Stainless Carbonation Cap Counter
Home Brew Ohio Solid Rubber
Drill a 1/4" hole in the undrilled stopper for the carb cap and you have a ball lock connector.
The bung with the thermowell works great on my anvil fermenters.
If you're into DIY, you might be able to do something with these:
Carbonate
Cap
you can probably find a CO2 bike inflator from Walmart or something that might be cheaper and easier than marbles, but if you're in a pinch, i guess marbles could to it. They also have argon inert gas in a aerosol that you can buy for like $10.
Or you can get some 2 L bottles, one or more carbonator caps, and a ball lock fitting and air hose. You can hook those up to your tank's regulator and carbonate all the bottles you want.
You can also get a CO2 Charger and a ball lock fitting if you don't want to buy the big tank up front, but the running costs are a lot higher.
Either way, you can use your equipment to carbonate the water and use sodastream (or any other) syrup... or make and carbonate your own drinks.
you need something like this
The best way to do this (in my opinion) is to buy the normal sanke tap thing (https://www.amazon.com/dp/B002UZUSIM/) and get a snake to ball lock adapter (https://www.amazon.com/dp/B00C30F75I/)
You essentially take off two parts of the sanke tap thing, and replace them with the kit. This allows you to tap a sanke keg, then attach it to your system as if it was a ball lock keg. So normally you’d have two ball lock kegs, and sometimes you’d hook up this to the connections and tap a sanke keg with it.
Depending on your line type, removing the ball lock quick disconnects from the setup can be a massive PITA, this is very simple, almost an instant change over.
Btw those were just the first product results on Google, I’m not recommending those necessarily. Just an example.
For force carbing I just set to 40psi for 24 hours then drop to serving pressure and let it sit for a couple of days. It's pretty drinkable after the first day, but I'm not overly concerned about super accurate volumes of co2.
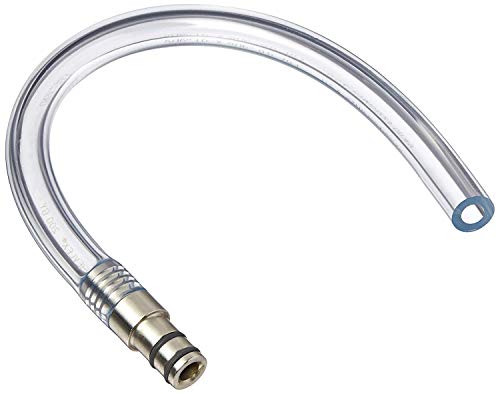
To bottle without some kind of beer gun, you'll want to drop pressure as low as you can and put the bottles in the freezer to get super cold first. I'd also pour half a glass first to let the beer cool down the faucet. I got one of these for filling growlers and it would make things easier for bottling from keg on the cheap too. Leave about as much space in the neck as if you were bottle conditioning and cap on top of the foam.
I visited them a few weeks back since I have heard some good things about them. Overall I thought they had a good line-up with nothing offensive but also not really anything that made me stand-up and cheer. I visited again on the Hartbeat release and while it was a good offering, I thought it was actually more underwhelming than their normal IPA offerings. It really needed a more generous dry hop punch.
And not to be a beer snob or anything, but they fill the growlers straight from the tap. They don't use a growler filler (which is basically tubing that allows the beer to fill from the bottom of the growler to the top) or flush with CO2 prior to filling. This was noticeable the next day when we opened the growler and it was under-carbonated and had lost a bunch of aroma.
You might be able to, If you went with a pin lock keg they are cheaper. Only problem with the mini fridge is that you may have to modify the fridge to get the C02 lines into the fridge, unless the tank, regulator, and keg can fit in there. I use this regulator https://www.amazon.com/Kegco-KC-LH-542-Premium-Regulator/dp/B003WX772G/ref=sr_1_1?ie=UTF8&qid=1491405625&sr=8-1&keywords=c02+regulator with the dual output. This one is a little cheaper. You will need lines I suggest 5/16th for air and 3/16th for serving. 5 feet each should get you in a good situation for kegs. See if you can find a C02 tank on say craigslist or an old one. I swapped a really old tank at Airgas that was no longer fillable for a decently new one.
You would probably also want a picnic tap for your setup.
I picked up both my 9 gallon kettles (one with dual ports) for <$100 bucks shipped on black friday 2 years ago. I have seen other stuff go on sale for pretty cheap. If you can hold out, it might be worth waiting.
As for your regulator. I picked up this dual gauge regulator last week. It appears to be working well. For less than 50 bucks shipped (I have prime) it worked out well. However I don't know about longevity. It looks to be a much better build quality than my last one that went out because of what looked like old age.
Maybe something like this?
Otherwise I don't think a faucet would be easy to hold and pour with one hand. Even if you could figure that out, idk how you could figure out how to attach the beer line to the faucet w/o the shank. The headache, to me, wouldn't be worth the 10/15 bucks.
Ha nvm! I'm gonna spend the money on dual-body three gauge regulator for my keezer instead :-P
And I'll get this for beer dispensing
It's not a perlick, but I found this on amazon.
http://www.amazon.com/gp/aw/d/B003ZZRR3K/ref=pd_aw_sim_79_3?ie=UTF8&amp;dpID=41BFBUX9KcL&amp;dpSrc=sims&amp;preST=_AC_UL100_SR100%2C100_&amp;refRID=0CF56R1NTYF00TJ9ADEY
No you do not want those. You want these. http://www.midwestsupplies.com/5-16-barbed-shutoff-valve.html
the 4 way should already come with them. You need a way to turn the CO2 on and off as well as preventing any beer from back flowing into your gas lines. These will accomplish that
I currently have this one. http://www.amazon.com/Taprite-Product-Pressure-Kegerator-Regulator/dp/B0060NOX40
That is a good price for the 4 way
If he is using a dual regulator couldn't he have each manifold connected to the separate nosels? like this one?
I have a dual regulator exactly like this. One line is for primarily force carbonating and the other goes to a manifold such as this for dispersion. The post with the manifold is always kept at serving pressure.
When I have a keg of Belgian beer, I'll keep that on the line that I usually use for force carbonating so I can keep it at a higher pressure. If I need to force carbonate at the same time that I have a Belgian beer on tap, I just remove the gas from the Belgian keg for two days while I force carb. After those two days, I put the regular beer on the main manifold gas and put the Belgian beer back on the "force carb" gas post. This method works well for me
Also, my force carbonating method is to set the pressure to 30psi for 24 hrs, then 20psi for another 24hrs and then down to serving pressure.
Absolutely!
Almost everything came from Amazon, it was a little more in some cases... but you cant beat their support. If something is broken its replaced immediately and I wanted that reassurance.
Here is a list of the important stuff:
Nitro Regulator: https://www.amazon.com/gp/product/B07DY9SBMB/ref=oh_aui_detailpage_o09_s01?ie=UTF8&psc=1
CO2 Regulator (dual tap):https://www.amazon.com/gp/product/B0060NOX40/ref=oh_aui_detailpage_o08_s00?ie=UTF8&psc=1
Stout Faucet: https://www.amazon.com/gp/product/B000BO1KFY/ref=oh_aui_detailpage_o08_s00?ie=UTF8&psc=1
Shank for the stout faucet (beer faucets came with shanks): https://www.amazon.com/gp/product/B00829HN7E/ref=oh_aui_detailpage_o09_s02?ie=UTF8&psc=1
Beer Faucets: https://www.amazon.com/gp/product/B01D6MSELA/ref=oh_aui_detailpage_o08_s00?ie=UTF8&psc=1
Thermostat: https://www.amazon.com/gp/product/B0152LYY0I/ref=oh_aui_detailpage_o09_s00?ie=UTF8&psc=1
Drip tray: https://www.amazon.com/gp/product/B002NQIROA/ref=oh_aui_detailpage_o04_s00?ie=UTF8&psc=1
This was the nitro tank (probably the best deal IMO), its a nitro coffee place but it holds beer gas fine :) - I had to use this specific one because of the space it had to fit into, I wanted everything to be self contained in my build: https://beveragelements.com/beverage_elements_shop/cold-brew-nitro-coffee/cold-brew-coffee-nitro-coffee-cylinders/23-cu-ft-nitrogen-cylinder-nitro-coffee/?gclid=Cj0KCQjwlqLdBRCKARIsAPxTGaVyfeABi5S7mFR-ByXCWkDGRbyimzJ52J-2TXkyxDyYABYQxXios2oaAiDuEALw_wcB
&#x200B;
Obviously this thin wasn't cheap, but 3 tap kegerators aren't cheap either and this one does nitro! It was a decent investment spread over about 2 months of the build so that eased the pain on the wallet.
&#x200B;
Taprite all the way. I've got a dual primary and a 5 way secondary from them, love the way they adjust and lock.
http://www.amazon.com/gp/product/B0060NOX40/ - Purchased Oct 2012, 0 complaints.
Thanks! Good question. I definitely spent more than was necessary trying to figure everything out but the most expensive item was the king carousel. I was able to get it for on sale for about $45 brand new Amazon prime. Here it is but when I found it, it was on sale http://www.amazon.com/gp/product/B0055OWLFI/ref=oh_aui_detailpage_o03_s03?ie=UTF8&amp;psc=1.
Fridge I scored for free.
I'd say for the rod extension, coupler, bolts, screws, caulk, fasteners and glue was about $30. Used these to keep the front door closed with the seal they work great! http://www.amazon.com/gp/product/B00N2H50XA/ref=oh_aui_detailpage_o05_s00?ie=UTF8&amp;psc=1
The wood was one 8' board 8" x 1" I got at Home Depot and they trimmed to my specs, about $10.
The cost of stain and chalk paint 8 oz cans ~$6 each x 3 (primer for chalk) = ~$20.
I had all the keg lines already I just adapted them from old picnic taps.
Elbow shanks I got for 13.99 a piece plus shipping from Adventures In Homebrew with shipping $36.98 (46.98 actually now that i look back had a $10 credit). http://www.homebrewing.org/Chrome-Plated-Elbow-Shank_p_1187.html
Regulator off Amazon for $114.13 with Prime. http://www.amazon.com/gp/product/B0060NOX40/ref=oh_aui_detailpage_o00_s00?ie=UTF8&amp;psc=1
$29.90 for both chrome faucets off amazon free shipping http://www.amazon.com/gp/product/B00370AT2Y/ref=oh_aui_detailpage_o00_s00?ie=UTF8&amp;psc=1
Quick Connect I used for the top tap area $6 http://www.amazon.com/gp/product/B0000DD23N/ref=oh_aui_detailpage_o01_s00?ie=UTF8&amp;psc=1
So I guess when all is said and done 292.01.
But if you have the regulator and other bits laying around it could be around $177.88.
Kinda pricey but I guess I had to use that x-mas bonus somewhere!
Oh - and the thing takes about 6 pounds of nuts and dried fruit to fill. That gets pricey but gum balls sell for pretty cheap in bulk from here http://www.gumballmachinefactory.com/gumballscandy.html
Here is what I plan on getting for the 10 gallon. I also plan on buying a Finnex Planted+ II whenever it comes out.
CO2 Regulator- http://greenleafaquariums.com/products/gla-gro-co2-regulator.html
Fertilizer- http://greenleafaquariums.com/aquarium-fertilizers-supplements/pps-pro-fertilizer-package.html
CO2 indicator solution- http://greenleafaquariums.com/products/cal-aqua-double-check-indicator-solution.html
Drop Checker- http://www.amazon.com/dp/B00J594UVM/ref=wl_it_dp_o_pC_S_ttl?_encoding=UTF8&amp;colid=1XASUQHYFCLHB&amp;coliid=I3NWGM7JZJRTSD
CO2 Tank- http://www.amazon.com/dp/B0085282UK/ref=wl_it_dp_o_pC_nS_ttl?_encoding=UTF8&amp;colid=1XASUQHYFCLHB&amp;coliid=I2XE9EO3Z2DAGA&amp;psc=1
Subtrate- http://www.amazon.com/dp/B0002DH0QM/ref=wl_it_dp_o_pC_nS_ttl?_encoding=UTF8&amp;colid=1XASUQHYFCLHB&amp;coliid=I10PPPB3TWL6ZG
Picknick tap, the cheapest co2 regulator and bottle you can find and a 5 gallon ball lock keg. Eventually you will want them cold too, and then you can build a keggerator.
https://www.amazon.com/PERA-ball-lock-assembly-making/dp/B079MF7RMP
https://www.amazon.com/Gallon-Home-Brew-Keg-Stainless/dp/B01HKZUQIs
https://www.amazon.com/Brewin-Gauge-Draft-Dispensing-Regulator/dp/B013J44ILA
https://www.amazon.com/Luxfer-CO2-5LB-LUXZebra-Aluminum-CGA320-Brushed/dp/B0085282UK
There is a shopping list, I am sure you can find cheaper on craigslist/the internet with some patience.
I just bought a 3 gallon used pinlock soda keg, with all the fixings (dual regulator, picnic tap, o rings.etc) for $150 from Adventures in Homebrewing. Went on amazing.com and got a 5# co2 canister for $66. Just need to fill it up at a local air soft store and I'm good to go for a little over $200.
Still leaves me 2 gallons to bottle, or I could just brew in 3 gallon batches.
FWIW, I ended up buying a tank on Amazon for $64, and then immediately swapping it out for a full tank for $20 at a welding supply store in the Bronx (http://www.awisco.com/). Even with cab fare there and back, it still beats the $150 for a refill and empty tank that website recommended.
You can use a fermentation cooler bag and ice packs.
This isn’t fool proof but does the trick for me at room temperature. I cool using some ice packs it comes with.
Home Brewing Fermentation Cooler - Beer Brewing Temperature Control, Keg Cooler, Fermentation Brewing Bag. The Original - Cool Brewing Fermentation Cooler. https://www.amazon.com/dp/B008EKD7CQ/ref=cm_sw_r_cp_api_i_Zy9RDb3E513D0
I am an all grain brewer that lives in a 550 sq. ft. apartment with my girlfriend (including a 50 sq. ft. balcony area). I brew 5 gallon batches, and created by own cooler mash tun using the following link:
http://www.popularmechanics.com/home/how-to/g1580/how-to-build-your-own-home-brewing-mash-tun/
It's a 5 gallon cooler that I got at Home Depot. All of the other parts can be sourced at your local hardware store.
In addition to the cooler mash tun I have the following:
I list all of that to show the type/quantity of things I am able to store. My girlfriend loves the hobby and participates on brew day (yay me!) so that's a bonus, but I don't think the stuff above is truly prohibitive in terms of storing. I have a section of my standard 2x5 ft closet for the large equipment, and I store a lot of the minerals and water chemistry stuff in my bottling bucket when not in use. Cleaned bottles are stored in the 12 packs they originally came in, stored in a little nook above my kitchen cabinets. The mash tun doesn't take up much square footage, being one of those cylindrical coolers, and I keep that outside (no doubt a benefit of the place I live).
I boil on a pretty standard, probably low-end electric stove. Takes a little longer to get things going, but I do get to a rolling boil. I cool the wort in my sink, which I fill with a party-size bag of ice. I also have a few pounds of hops portioned and stored in the freezer.
I hope that helps ease any concerns about apartment brewing.
tl;dr Apartment brewing is incredibly doable, even for someone like me who does all grain 5 gallon batches in a shared 550 sq. ft. apartment.
[Edit: additional info]
Not op but I was only able to bring it down a few degrees using this method. Ended up getting one of these for about $50. It brings it down by up to about 15 degrees depending on how many frozen water bottles you use. It's also pretty easy to dial in a desired temp within a few degrees.
I use a Fermentation Cooler that I put 2 half gallon frozen jugs in each morning.
You'll definitely still want a starter kit either way. It has a lot of nice tools that you'll need either way. Then build from there. Here's what I would do:
So that puts you at about $500. That gives you a badass kettle and everything you need to do a full-boil extract batch, or enough for brew-in-a-bag if you want to dive into all-grain right away.
Honestly, I wouldn't go much over that for a first batch. Try it a few times and see what suits you. You may want to get into the science end more and get a pH meter and hemocytometer. You may want to do 3-vessel all-grain and build a nice mash tun and get another kettle. You may want to get another coil and do a recirculating system. You may just want a pump to transfer faster. You may want to build a big stand for it all. You might decide you want electric controls to it... you won't know until you get into it a bit and determine what your priorities are.
OR... watch craiglist for a month or so, and see if anybody is selling a big system. There's some badass ones out there that i've seen for very reasonable prices.
A quick Google search provided me this. Seems easy enough. I'm sure there are cheaper prices out there if you do a little more searching than I did. All hail the almighty Amazon. Cheers!
I put these adapters on my sankey fitting, i keep all of my fittings ball lock and then if i have a sanke keg i just use the adapter.
https://www.amazon.com/Sankey-Ball-Quick-Disconnect-Conversion/dp/B00C30F75I
My LHBS is where I first heard about them, but amazon has them as well as a few other places.
http://www.amazon.com/Sankey-Ball-Quick-Disconnect-Conversion/dp/B00C30F75I
Cut the hose for the sanke connector and add on a threaded connector end to the gas line. Do the same to the liquid line going up the tap tower. Get the threaded connectors, not barbed. You would then get either pin lock or ball lock gas/liquid connectors and screw then onto the hoses and then connect to the keg. If you ever want to put a regular keg in there, get one of these so you can use ball lock connectors with a regular keg:
http://www.amazon.com/Sankey-Ball-Quick-Disconnect-Conversion/dp/B00C30F75I
There are a couple conversion kits. This one adapts the sanke tap to have ball lock connects. https://www.amazon.com/Foxx-4048Sankey-Quick-Disconnect-Conversion/dp/B00C30F75I
This kit swaps the sanke barb fittings for the flare fittings found on nicer ball lock connectors so you can easily swap lines over.
https://www.homebrewing.org/Kegerator-Homebrew-Conversion-Kit_p_720.html
edited links to not be a mess.
Sankey to Ball Lock Quick Disconnect Conversion Kit https://www.amazon.com/dp/B00C30F75I/ref=cm_sw_r_cp_apa_DNxTzb11NFBW2
Or just put these on a Sankey tap.
Haven't tried this but it might do the trick:
Ball lock adapters on the shank. Ball lock disconnects with hose barbs on the beer line.
https://www.amazon.com/gp/aw/d/B00C30F75I/ref=mp_s_a_1_1?ie=UTF8&amp;qid=1486097663&amp;sr=8-1&amp;pi=AC_SX236_SY340_QL65&amp;keywords=ball+lock+sankey+adapter&amp;dpPl=1&amp;dpID=41jBW4GS4IL&amp;ref=plSrch
https://www.amazon.com/gp/aw/d/B002VLD7QU/ref=mp_s_a_1_1?ie=UTF8&amp;qid=1486099355&amp;sr=8-1&amp;pi=AC_SX236_SY340_QL65&amp;keywords=ball+lock+disconnect&amp;dpPl=1&amp;dpID=41w9JDJx6jL&amp;ref=plSrch
They come in pairs and you only need the beer lines, but I suppose you can figure out a way to QD that gas manifold too if you were eager.
ha, loud and clear! I'm on call now, so you lucked out!
I wish I could give you some definitive advice, but without seeing what he's got, I can't comment with authority. He's probably got standard sanke couplers and I've not seen a good solution there. If you live close, I'd pay him a visit and see what you're dealing with. It's probably going to come down to you just making up some new lines to mate with your corny.
We're getting ready for our Strausstoberfest this weekend and over the summer I reconfigured all of my kegging lines to use 1/4 MFL's for an easier change out than barbed fittings. I may have a last minute surprise myself, as a friend has offered to bring a 1/6 barrel to the party, but it will be sanke. Fortunately, I already have a sanke connector and these from Amazon:
https://www.amazon.com/gp/product/B00C30F75I
If there is anything I can help with, let me know!
Yes sir.
CO2Meter RAD-0301 Mini CO2 Monitor, White
https://www.amazon.com/dp/B00H7HFINS/ref=cm_sw_r_cp_apa_i_uI0rDb4NME0AN
So I learned a long along the way. The graphs and stuff was the easy part!
Originally I wanted to wire up my own sensor so I picked up a breadboard, a dht22 sensor, some jumpers to wire it up, and a ribbon cable / adapter to connect the breadboard.
The basic guide for that can be followed from this tutorial here:
https://www.raspberryweather.com/wiring-for-dht22/
However, in my search for a co2 sensor to add to my breadboard, a fellow redditor pointed out a low cost usb sensor that includes temp and co2! The hackaday project seems to mention one that also does humidity along with it, but it appears to be over twice as expensive on their site ($200!). So decide if you want humidity. It's an important stat, but you can get it with the dht22 if you go that route.
The usb co2 sensor and hackaday links are here:
https://hackaday.io/project/5301/logs
https://www.amazon.com/CO2Meter-RAD-0301-Mini-Monitor-White/dp/B00H7HFINS
Ok, so now all the sensors are up, you need code that reads the sensors and outputs json. I put these together based on the samples from dht22, and the hackaday project. I can post these if you need them.
Ok, next step. This is overkill I suppose for what we are doing, because it's designed to be super scalable. Anyway, I have a server running influxdb (open source, free) and it runs a time series database. I would not recommend saving the influxdb database onto a sd card. Either put it on a server that is always running, or get a second raspberry pi, and attach a usb harddrive, and write to the harddrive. USB speeds are slow, but sd card writes are atroicious, and sometimes kill cards
Then on the raspberry pi, which is connected via wifi, I run a client called telegraf which will run the scripts that parse the sensor data and output json. Telegraf sends the sensor data to influxdb where it is stored very effeciently.
Here are the links for graphing side of things:
https://docs.influxdata.com/influxdb/v1.2/introduction/installation/
https://docs.influxdata.com/telegraf/v1.2/introduction/getting_started/
Ok so now we have all of our data in the database, the last step is presentation. There's a "standard" opensource tool for this too, again, because this software is used by major players in the tech industry, we can leverage their work.
A project called grafana is my dashboard tool. I run this on my server and it allows me to point it at influxdb, and design queries to create graphs and dashboards. grafana installation info is here:
http://docs.grafana.org/installation/
http://docs.grafana.org/guides/gettingstarted/
Sorry this is getting long....
I also installed the raspberry pi camera, so that I can run timelapses. Originally this was simply a timelapse, but once I had influxdb running I had to take it a step further!
Now I added a couple steps to my timelapse script. Between each picture, I ran a script that queries influxdb to get the json data out of it, then runs a ruby script to create a graph based on that json using a gem called gruff, then superimposing that on the source images so when my timelapse was created later it had the environmental data.
It's still a work in progress (no co2 yet) but here's a recent one I made to show off the floodtrays / irrigation timers I got going this weekend:
https://www.instagram.com/p/BQKAUu7DXed/
Anyway, it was . If you want some code dumps from my setup or help with parts lists let me know. The data is all realtime, and the dashboard auto refreshes as data comes in :)
Don't how cheap you are going but this is the one I bought and it's worked steady for 2 years so far. https://www.amazon.com/CO2Meter-RAD-0301-Mini-Monitor-White/dp/B00H7HFINS/ref=sr_1_4?ie=UTF8&amp;qid=1520996795&amp;sr=8-4&amp;keywords=desktop+co2+meter
I got a c02 mini desktop usb sensor on amazon, actually works with linux! only about $60! I have not used it yet but in testing it has worked great.
Edit Link: https://www.amazon.com/gp/product/B00H7HFINS/ref=oh_aui_detailpage_o05_s00?ie=UTF8&amp;psc=1
This is dependent on your faucets. Many brands have growler filler attachments, e.g. I use this growler filler for my Perlick 630's. But they are not a universal size (even the Perlick 600's and 500's are different). Some faucets you can just shove some tubing up inside the spout, or stretch it around the outside. It really depends.
But I would only use that for a growler or bottle I was going to drink that day. For bottles I really think some sort of beer gun or counter-pressure filler is better since they allow you to purge with CO2, virtually eliminate foaming, and let you do a ton of bottles relatively quickly. Filling from the tap is always a little slow and messy.
Well, I'm going to be honest. Not sure what the hell the solenoid is or what it's for.
But in the US....
5 pound (A little more than 2.2 kilos) CO2 canister: $56 (http://www.beveragefactory.com/draftbeer/tanks/co2/C5.shtml)
Regulator: $50 (https://www.amazon.com/dp/B013J44ILA/)
So... 93 Euros.
I have an Anvil kettle and had the exact same issue. I had bought this barb, which didn't screw in all the way and leaked a bit. I contacted customer service and they indicated that the female threads are tapered, so we'd need a tapered barb to fit properly- however, if you wrap teflon tape around the threads of the barb and then screw it in, it won't leak!
Another note, don't over-tighten the dip tub inside the kettle! I did and busted the gasket, so I wrap that side's threads in teflon tape too now (have had no issues with that approach).
The one I have has ball lock posts
It sounds possible to me. Dry Ice is just frozen CO2, so if you know you're carbonation level you should be able to figure out how many grams per bottle. I would recommend you remove as much of the carbonation in the barleywine as you can. Warming it up a little should do that.
I'm assuming you have a scale for measuring hop additions. That might give you enough resolution. It's going to be a really small amount of dry ice i would think.
The PET bottles should be plenty strong even if you over carbonate. I was looking into burst strength of them for a German Wheat and they are good to a crazy high PSI.
Also if you don't want to risk ice burns.
This https://www.amazon.com/dp/B013QTGMGM/ref=psdc_979840011_t1_B000NV9CE6
and this https://www.amazon.com/Stainless-Steel-Carbonation-Weekend-Brewer/dp/B01EEAPVD2/ref=sr_1_2?s=home-garden&amp;ie=UTF8&amp;qid=1491314003&amp;sr=1-2&amp;keywords=2l+bottle+co2
should work easier and on any PET bottle you find.
https://www.amazon.com/Stainless-Steel-Carbonation-Weekend-Brewer/dp/B01EEAPVD2/ref=pd_sim_328_17?_encoding=UTF8&amp;pd_rd_i=B01EEAPVD2&amp;pd_rd_r=2G9YQF0ZWYZTNJ96R1N3&amp;pd_rd_w=YEIdq&amp;pd_rd_wg=qgUfU&amp;psc=1&amp;refRID=2G9YQF0ZWYZTNJ96R1N3
I use a short piece of tube from a drilled stopper to the barb on $10 ball lock soda bottle carb cap:
https://smile.amazon.com/Ferroday-Stainless-Carbonation-Pressure-Carbonate/dp/B01K4GGYT0
If you are willing to look worse but have a much better solution than filling growlers from the keg, use plastic soda bottles (or seltzer bottles, same thing), and get one of these.
https://www.amazon.com/gp/product/B01K4GGYT0/ref=ppx_yo_dt_b_search_asin_title?ie=UTF8&amp;psc=1
You can connect the gas and liquid line to it. First crunch the bottle, then fill with CO2. Remove the gas connect, then connect to the keg
using a liquid to tube to another liquid connect (also good for doing keg to keg transfers/blends), and then gently unscrew. As a bit of pressure is released, the liquid will fill the bottle.
You can do a counter pressure fill, which means you lose very little CO2, and get very little O2 exposure.
Non-homebrewers think plastic bottles look a little sketchy. Homebrewers appreciate the simplicity/technical advantages/well carbonated beer.
Can anyone recommend a particular carbonation cap? I'll be grabbing 1-3 of these for nearly continuous use. I'm hoping that I can still use my kegs for aging/storing the beer, then filling a bottle up and put 1-3 of them in the fridge and ditching my kegerator for a few years.
It definitely speeds it up, but I don't have hard numbers yet. My kegs are 10 gallon corny kegs. Compared to the shake and roll method, it's a lot faster. When you're doing isobaric carbonation, you connect the stone up, and meter CO2 in very slowly. If you dribble in from the gas fitting without the stone, the headspace quickly reaches saturation pressure, and it stops bubbling because the bubbles are large and break through the surface. But with the stone, you can set it at a very low rate and come back later and it's still bubbling, meaning the bubbles are dissolving before they surface.
The biggest problem with this approach (using the gas-in dip tube) is how to remove the tube and stone once it's done carbonating. With things like home made ginger ale (or other non-hopped things where oxygen is less critical), I open it up and remove the hose, but with beer, I don't want to open it at all. So this weekend I'm going to modify a spare corny lid that I have laying around and silver solder a 1/4 flare bulkhead fitting to the inside, so I can leave the stone in there, and still use the gas post. With the bulkhead flare fitting protruding through the lid, I can add a gas-in post to the lid using an adapter like this one: https://www.brewhardware.com/product_p/ffltogaspost.htm If this works, I'll probably modify several lids.
Of course, I can buy a lid with the post in it already, specifically for this purpose...so maybe I'll take the easy way out.
I've thought about trying the rig that Blichmann sells (well, I'd make my own) that uses a small diaphragm pump to recirculate through a fitting that has the stone inline. Since it's outside the keg, you just disconnect when you're done. Haven't decided to go this way yet, though.
Oh, I get ya. Yeah, I was planning on adding carb stones to my gas posts on all my legs just like you. I initially didn't think about the carb lids because the only ones I saw were super expensive (like $75) and they are all ball lock and I'm pin lock. Then I found these ones on Amazon for $25. I've had a CO2 utility line forever and so I just added a ball lock connector for that. Once I found the cheap lids, it made my decision very easy to not do the carb stones on gas post idea like we originally had. It's like $10 more for a lid than a carb stone, tubing and fittings, and super easy to clean and move around, so you only need 1 or 2. I've used them half a dozen times or so, and I've been very happy.
This thing was pretty recently on sale for ~$85
https://www.amazon.com/dp/B06ZYQRLSS/ref=sspa_mw_detail_3?psc=1
just bought this one for father's day, haven't used it: https://www.amazon.com/dp/B000NV9CE6/ref=psdc_979840011_t3_B01IFXQAYS
Could keg condition, get 1 gas in and 1 beer out disconnect, some hose and clamps, one of these, and some co2 cartridges. Ice down the bottom of the upright keg in a spare cooler or bucket.
Just be careful with the keg charger. The first time i used mine i way over pressurized and got cups of head.
I did last night it was easier than pie. Brought my carbonated keg over, put it on ice set up the picnic tap & used this. Then just remove & take home to put on your tap. Fresh draught beer at your friends. What's so hard about that?
Have to agree with everyone on here, a charger is the easiest way to go. Also they are small and relatively inexpensive.
http://www.amazon.com/Genuine-Innovations-G5040-Charger-Black/dp/B000NV9CE6
I do the same thing, only I keep the spring assembly in the bottle filler in place. You can keep the cobra tap open the whole time, and push down to release the beer. I spill less this way.
I also MacGyvered up a hand held co2 charger to purge the bottles, as I fear the oxygen goblins.
Kegco KC KT85D-L Beer Keg Coupler D System Tap Lever Handle, Black https://www.amazon.com/dp/B002UZUSIM/ref=cm_sw_r_cp_apa_UvFsxb2C2H2HD
This from Amazon will set you right up in that case.
I used this and these and just use ball lock quick disconnects on all tubing -- works great.
You could definitely go cheaper if your boss-man is worried about price: intertap faucets
kegco couplers
The intertaps are pretty new to the scene so IDK how well they perform. I think their design is pretty close to Perlick. Perlicks have been around forever and they are really solid.
I don't know if the freezer you end up buying will have a setting above freezing, or if it will have precise enough control for an optimal kegerator. You might plan on buying one of these temp controllers if the freezer isn't capable of holding ~38F +/- 1F.
I've got this thing to go with my perlick taps on my kegorator. I haven't tried it yet though.
Meh, I use one of these not that exact one but one that fits my tap. I just turn the flow down to a trickle and it fills bottles or growlers fine.
Growler filler would work. I keg almost everything but a growler for travel is great sometimes. Maybe like this: https://www.amazon.com/Bev-Rite-Extraordinary-Jug-Growler/dp/B003FW6BA8
I was wondering if I wanted over the top or lock inside. Which is why I'm polling right now.
And while a beer gun is a sexy toy to add to my collection, it's not $100 sexy.
Hi everyone! I have This kegerator http://www.edgestar.com/KC2000TWIN-EdgeStar-Full-Size-Dual-Tap-Kegerator-And-Keg-Beer-Cooler/KC2000TWIN,default,pd.html I am trying to find a hose big enough to fit. I bought this growler filler http://www.amazon.com/Draft-Warehouse-Extraordinary-Jug-Growler/dp/B003FW6BA8/ref=sr_1_1?ie=UTF8&amp;qid=1453319907&amp;sr=8-1&amp;keywords=growler+filler however, its too big. Does anyone have a similar kegerator and perhaps can direct me to the right diameter hose that will work for this? Thanks in advance.
Edit - sorry for the poor formatting. I copy pasted this from a couple of days ago when I asked and it wont let me put links in update mode.
Thanks!
This is now the easiest method you've found :-)
https://www.amazon.com/gp/product/B003FW6BA8/
Yea I feel ya. I'm getting this co2 tank with this regulator
I wanted to get the 5lb cause it will last a long time and is only like $15 to refill at the welding supply near me. I hopefully won't have to upgrade until I get my 250g tank and ill be getting a 20lb for that one.
If he were to buy a TWO product dual regulator like the one you link to, then the answer is yes. His pricing indicated that he was only looking at a single product dual regulator like this: http://www.amazon.com/Kegco-Premium-Series-Gauge-Regulator/dp/B003WX772G/ref=sr_1_3?ie=UTF8&amp;qid=1407323203&amp;sr=8-3&amp;keywords=dual+pressure+regulator
Ah yeah good catch - will need to pick a different regulator and remove that bubble counter.
Hows this one look?
http://www.amazon.com/Kegco-Premium-Series-Gauge-Regulator/dp/B003WX772G/ref=sr_1_4?ie=UTF8&amp;qid=1421537185&amp;sr=8-4&amp;keywords=c02+regulator
Says for beer specifically but I'm guessing that doesn't matter
Get a 5lb CO2 tank, a regulator, ball lock valve and a Carbonator and make your own fizzy water. It's delicious.
Try amazon, this one says they can ship to finland. Shipping would be ~30 bucks though. Might buy the whole assembly in that case.
Ball Lock and hose
Coupler and valve assembly
As for getting the tank filled, I would go to your nearest bar or restaurant that uses co2 for their soda/beer and just see who their vendor is.
Am I missing anything? Or better reccomendations?
Tank
Regulator
Diffuser
Wow thank you!
http://www.amazon.com/gp/product/B003WX772G?psc=1&amp;redirect=true&amp;ref_=oh_aui_search_detailpage
Clearly states how to even add onto it in the question section.
Looking into cask condition homebrew. Thinking of trying a beer faucet to dispense, but unsure of a good way to vent.
Any experience in this? Tips and tricks?
Taprite T752HP Two Product Dual Pressure Kegerator CO2 Regulator https://www.amazon.com/dp/B0060NOX40/ref=cm_sw_r_cp_api_Wh0FAb87R778N
88 bucks. This is the one I have. Works great.
That makes sense. I see one on Amazon for $89, so I know what the price range I'd be looking at is. I figured it was that easy, but I wanted confirmation before I leapt before I looked.
[Used Kegging Equipment - ID and Setup]
Relevant
Tangent
Thanks!
Very good than. Now you can just piece the rest togethers. For the Regulators, I'd recommend the Taprite T752HP. These regulators are awesome, super accurate and the knobs lock. 20-30' of 3/16" of Bev Line. Buy your gas in and liquid out keg fittings, some hose clamps and cobra taps. You should be able to get all that and a tank for not much more than $200 if you already have the kegs. Faucets will run you $40-50 a piece for a decent faucet and shank.
A word of warning about Taprite: I would definitely recommend testing everything in a quiet room before actually hooking up any hoses/disconnects/etc... just the regulator and a CO2 tank.
I purchased a new 4-way secondary regulator last year. Lost most of the first 20# tank... I didn't notice that one of the gauges was audibly leaking from the pressure relief valve for quite a while, because I didn't hear it over the fan I use to circulate air in the keezer. It wasn't until turning it up to 40PSI to burst carb a keg that I noticed it.
Went back and forth with customer service for a while trying various things. I finally disassembled the valve and found an o-ring that was obviously bad (visibly rough on one side, like it was stamped from a damaged sheet), so definitely not a shipping problem. The gauges all had QC stickers on them, but this had clearly not been tested very well... once I took it out of the keezer I could hear the leak as low as < 5PSI. It then took about a month before I had a replacement o-ring in hand.
Around the same time I also purchased a 2-way primary which showed up with a non-working high pressure gauge. This one though, I don't know for sure wasn't damaged in shipping.
I've had other Taprite regulators for years with no problems, so not sure if this is just bad luck or if something has changed.
EDIT: I should probably point out though that I would still purchase from taprite because while it was overall annoying, customer service was responsive, directed me to finding the problem, and shipped me a part to fix it. I would definitely be more thorough with my own testing though.
My regulator is this -https://www.amazon.com/gp/product/B0060NOX40/ It says it doesn't need a washer. I've closed the gas line valves and it sat fine.
I have a 5 lb [co2 tank](Zebra DNA Luxfer L6X Aluminum CO2 Tanks with CGA320 on/off Valve 5 LB, Brushed https://www.amazon.com/dp/B0085282UK/ref=cm_sw_r_cp_api_IxrIybWJW0EKA) it came empty, but I found a local place that fills my tank and gives it back instead of taking the empty and giving you an already filled one. I personally didn't want to do DIY because it's way more work where this you just fill it, attach your regulator with tubing and have your diffuser in the water. Pretty quick and easy setup. Highly recommend co2.
It came out to about $325. I opted for the led on the solenoid. Also, having the atomizer on the outside of the tank will be nice. This is the CO2 tank I went with.
Just kinda brainstorming here, I think I know my options but maybe somebody has some suggestions. I have a tiny crowded apartment, can't get a freezer/mini fridge. It stays pretty warm, like 75 ish. I keep my fermenters in our closet, which i shut the vent to and keep the door closed, but I'm not sure how much that helps. I'm planning on mainly doing 1-2g brews, and i was considering either doing a swamp cooler set up, which i don't really wanna do just cause itd look bad, or getting this which i don't really do because it's kinda expensive and i could probably only fit one of my small batch fermenters in it. There's gotta be some other kinda way to efficiently cool down a tiny 1g fermenter!
Good to know, I saw a few websites that had calculators for that but just went with what the recipe called for. A refractometer is absolutely my next purchase, and a fermenter bag like this which I've heard great things about. Wish I had the space for a chest freezer to convert in my home. ( http://www.amazon.com/Cool-Brewing-LLC-5B-YTCW-X9LG-Fermentation/dp/B008EKD7CQ)
I can fit my 6.5 gal carboy into my kettle (its short and wide) with room for a bag or two of ice.
Frozen water bottles are great if you have a container that will hold them. I use one of these now, its soft and folds up nicely: https://www.amazon.com/Home-Brewing-Fermentation-Cooler-Temperature/dp/B008EKD7CQ
When its occupied and its real hot, I've been using Voss Kevik, which has been delicious even fermenting at 90-100 deg. https://www.theyeastbay.com/brewers-yeast-products/sigmunds-voss-kveik
Do you have a porch or patio? I have been way happier since I ditched the stove in my small apartment and moved to a banjo burner on my patio. I also bought a short hose and adapter to screw it into my kitchen sink. So I can run water out to the patio for cooling and cleanup. (It isn't food grade so I don't use it for water used in the brew) Way nicer to be able to just hose everything out when done as well as hose away any spills or boil overs ect.
Even if you don't have a patio or porch, some sort of courtyard or BBQ area in your complex might work if you have access to a hose spigot.
I also don't have room for a temp controlled fermentation chamber but one of these fermentation cooler bags has worked really well for me and it collapses down to store away.
http://www.amazon.com/Cool-Brewing-LLC-Fermentation-Cooler/dp/B008EKD7CQ
> The lady friend isn't too thrilled about having a bonus fridge in the living room though.
Yeeeeeeah, I'm running into that as well lol. I picked up one of these a couple weeks ago, which should be more than sufficient along with some frozen water bottles. I'm hoping to start a new batch this weekend, we'll see how it works!
Here you go, fam. Frozen 2 liters cycled once a day or less keeps temp down significantly. I keep my house 66°f-68°f and was able to hold carboy temp at 60°f in peak fermentation with 2 frozen 2 liters cycled once a day for the first 3 days. After that just 1 sufficed.
I use a gaint carboy sized cooler bag found here. It can fold up pretty small or slide under your bed when not in use so you aren't commiting to bulky fridge or something similar. Putting a frozen 2 liter in there will easily bring you down to around 65 degrees.
they also make a chillsner for your beer.
You're basically describing the setup I'm slowly putting together.
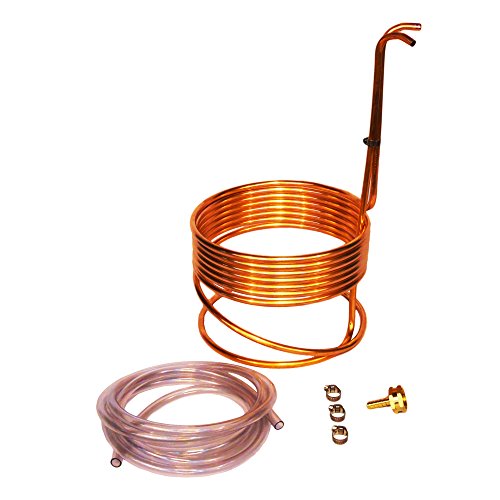
For cooling the wort, the best, cheap thing to buy is a copper wort chiller like this one. There's lots of variations on this design (more efficient, stainless instead of copper, better fittings, etc), but ultimately an immersion wort chiller like that is a common way to go.
You can make your own with hardware store parts too, if you want. That's what I did but after making it, then getting some more plumbing fittings to make it "better", I spent more than if I'd just bought one. Plumbing supplies are so damned expensive in Canada.
For recipes, there's recipe sites all over, but I've had too many issues translating the ingredients to things I can get locally. I've heard Beersmith recommend heartily as a good recipe source. There's also several really good books that many recipes but also detailed information on how to modify them, or design your own from scratch.
As to your kegerator build - watch a couple of Youtube videos. For example:
https://www.youtube.com/watch?v=zHWy_Vlw3J4
and
https://www.youtube.com/watch?v=kq_59KhCebM
The videos are super useful both as an instruction manual and as a list of mistakes to avoid (like things to remember when measuring where to drill the tap holes).
Saving up for two things to make my foray into Homebrewing a little bit easier on me. The thing I really need is a nice pot. This pot would remove the need for me to have a thermometer. And I'd also like a wort chiller because I've been told this is one of the most crucial points of the process.
I'm new to homebrewing, but I'd like to start gathering some nice pieces so that I can one day turn it into more than just a hobby! (Not that I'll be selling moonshine or anything) I could definitely see myself becoming a real brewer if this is something I turn out to be good at. It's something that interests me a lot!
https://www.amazon.com/Sankey-Ball-Quick-Disconnect-Conversion/dp/B00C30F75I
Thanks, yes it is a Sanjay keg. Is it one of these I need along with the regular co2 set-up?
https://www.amazon.co.uk/Sankey-Ball-Quick-Disconnect-Conversion/dp/B00C30F75I
http://www.amazon.com/Sankey-Ball-Quick-Disconnect-Conversion/dp/B00C30F75I
So I can hook up sankey kegs to my ball lock disconnect system. Works great
Easy! You can build the exact same thing, but you'll have to slightly modify your Sanke keg coupler with something like these. Basically, you put those ball lock conversion couplers onto your Sanke coupler and add ball lock disconnects to your existing gas/liquid lines. Now your system will work with the device in the hbt thread, and you'll be able to tab ball lock kegs too!
Thanks! Are these the products you're talking about?
https://www.amazon.com/dp/B01N2QZJND/ref=asc_df_B01N2QZJND5365060/?tag=hyprod-20&amp;creative=395033&amp;creativeASIN=B01N2QZJND&amp;linkCode=df0&amp;hvadid=198078807540&amp;hvpos=1o1&amp;hvnetw=g&amp;hvrand=12368553783614370258&amp;hvpone=&amp;hvptwo=&amp;hvqmt=&amp;hvdev=c&amp;hvdvcmdl=&amp;hvlocint=&amp;hvlocphy=9016563&amp;hvtargid=pla-349513331250
https://www.amazon.com/Foxx-4048Sankey-Quick-Disconnect-Conversion/dp/B00C30F75I/ref=sr_1_1?ie=UTF8&amp;qid=1518202987&amp;sr=8-1&amp;keywords=ball+lock+to+sankey&amp;dpID=41jBW4GS4IL&amp;preST=_SX342_QL70_&amp;dpSrc=srch
Will this be all I need?
You'll want to do some research on the height you have and the height you'll need. You know the height if the 1/6 keg, how much room do you have for the line connections? Any sanke to ball lock conversion kit would add extra height.
This kit would work if you have enough clearance but it would easily add 4-6 inches to your keg height.
https://www.amazon.ca/Sankey-Ball-Quick-Disconnect-Conversion/dp/B00C30F75I
Price History
ReviewMeta: ★★★★☆ 4.0/5 from 59 valid reviews
CamelCamelCamel - [Info] │ Keepa - [Info]
_
These savings aren't just Black and White.
^(Info) ^| ^(Developer) ^| ^(Inquiries) ^| ^(Support Me!) ^| **[^(Report Bug)](/message/compose?to=The_White_Light&subject=Bug+Report&message=%2Fr%2Fbapcsalescanada%2Fcomments%2Fcyte23%2Fother_desktop_co2meter_sensormonitor_109_tax126%2Feyu3i1c%2F%0D%0A%0D%0A%0D%0A%0D%0APlease+explain+here+what+you+expected+to+happen%2Fwhat+went+wrong.)**
$65 https://www.amazon.com/CO2Meter-RAD-0301-Mini-Monitor-White/dp/B00H7HFINS/
I hear you. It was $70 on Amazon: https://www.amazon.com/gp/product/B00H7HFINS/ref=ppx_yo_dt_b_asin_title_o03_s00
Even though it's a low-end model it logs data over USB, so I have to hooked up to a raspberry pi feeding data to a graph. It's very handy for knowing empirically how any of my attemtps to lower CO2 actually perform.
I got this one from Amazon and I really like it: https://www.amazon.com/gp/product/B00H7HFINS/ref=oh_aui_detailpage_o07_s00?ie=UTF8&psc=1
What do you mean by quality filler? I just started kegging and am about start experimenting with bottle filling from the keg so I got this. Should I be able to fill bottles with this that maintain carbonation?
It was this one
https://www.amazon.com/Chill-Passion-Growler-Perlick-Faucets/dp/B013GWR8VC
Has anyone had to replace the o-rings on a growler filler? I have this growler filler that fits my Perlicks. I noticed the other day that the o-rings are getting torn and shit so I need to replace them.
In the Q&A on the page, someone says 9mm ID x 12mm OD o-rings. Can anyone verify if that's accurate? Just wondering if anyone has replaced these and what they used. Thanks.
I have a 5 lb. CO2 tank that sits on a small shelf in the back of my kegerator, with a regulator to dispense CO2 at 30PSI. The CO2 is attached to the corny keg using some 5/16" gas line and a ball-lock fitting.
The 40 ft. of beverage line is 3/16" (internal diameter) vinyl tubing that is coiled and wrapped with zipties to make sure it doesn't get tangled. Even though that sounds like a lot of line, there is only ~8 ounces of fluid in it when it is completely full. When the keg runs dry, I detach the CO2 and beverage lines, clean the keg, add about a liter of sanitized water (diluted starsan) to the keg, reattach the lines, and push the sanitized water through the beverage line. When the beverage line looks nice and clean (but still has the sanitized water in it), I can take it off and leave it in my kegerator until it's ready to use again. When I add another full keg, I just discard the first glass (which is half sanitized water and half sediment from the cold crash), and then I'm good to go.
My lawn trimmer has a broken screw that connects to a gasoline tube. Basically a tiny version of this. Sears don't sell that part alone. The smallest part I found is a big assemble which doesn't make sense. Is there anything I can do?
Finalizing my shopping list to move from 1 gallon to 2.5-3 gallon batches, BIAB, all to be done on my condo glasstop stove. Can anyone tell me if I'm missing anything on my shopping list?
5 Gal Kettle w/ thermometer and valve
Hose Barb Fitting
Elbow Barb Fitting for bottling (assuming I use my kettle as a bottling bucket)
Fresh Grain Bag
Grain Mill to replace Corona Mill
3 Gal Carboy (or should I get a 5 gallon bucket? Or something else?)
Hose for clean transfer to fermenter
Wort Chiller (and all the necessary plumbing to add a t bar and valve to my kitchen sink)
I have a larger auto-siphon (although I'd rather find something else - I hate auto siphons) to rack to a bottling bucket.
What am I missing? Do I need a false bottom?
Thanks!
Just items like these:
$103 - 1 Gal Keg Kit with Regulator and Tap
$45 - Additional 1 Gal Keg
$43 - An alternative adaptor that requires an external tank and regulator
I totally get it. Honestly, you could look at these setups, too. I've got a couple of these and they work surprisingly well:
https://www.amazon.com/HaveGet-Pressurized-Dispenser-Adjustable-Regulator/dp/B06XCXGK15/ref=sr_1_6?ie=UTF8&amp;qid=1539188718&amp;sr=8-6&amp;keywords=mini+keg+growler&amp;dpID=41-5MFvwNmL&amp;preST=_SY300_QL70_&amp;dpSrc=srch
Comes in 1/2 gallon and 1 gallon sizes.
Or get mini stainless steel growler kegs and get this guy, and you can use your ball lock equipment (assuming that's what you have):
https://www.amazon.com/Weekend-Brewer-BDP-Dispenser-Standard/dp/B01D52ZWFC/ref=sr_1_2_sspa?ie=UTF8&amp;qid=1539188718&amp;sr=8-2-spons&amp;keywords=mini+keg+growler&amp;psc=1
Just remember that you don't want, or need, to throw the super high PSIs on it. Just throw normal serving pressure on it and let it sit and you'll be fine.
I've considered buying this to carbonate small test batches. Curious to see if itll work.
https://www.amazon.com/dp/B01EEAPVD2?psc=1
Cool. For about $10 you can get a carbonation cap. It will carb up a water bottle in about 30 seconds. I know my son can't wait for it to carbonate up, so we use this for a few small taste tests.
https://www.amazon.com/Ferroday-Stainless-Carbonation-Pressure-Carbonate/dp/B01K4GGYT0/ref=sr_1_3?ie=UTF8&amp;qid=1518870801&amp;sr=8-3&amp;keywords=carbonation+cap&amp;dpID=413n%252Bhm4z9L&amp;preST=_SY300_QL70_&amp;dpSrc=srch
Hey, this might not be what you're looking for, but it's a pretty good solution, and cheaper than a keg.
Ferroday Stainless Carbonation Cap Counter Pressure Bottle Filling With 5/16" Barb,CO2 Coupling To Carbonate Soda Beer Fruit Juice Water https://www.amazon.com/dp/B01K4GGYT0/ref=cm_sw_r_cp_apa_LS8fzbCZGKM80
My favorite is option 3.
With these you can even bottle from a warm keg to check how carbonation is going or how well a beer is aging. It's also nice for transporting beer. Instead of using a growler that will oxidize easily, just purge a 1 or 2L bottle and counter-pressure fill it. Only big drawback is you can't use them for competition beer.
\> want siphonless
Buy this kit: https://www.morebeer.com/products/sterile-siphon-starter-smooth-neck-carboys.html
Get a CO2 tank, and a gas-to-barb adapter and use that rather than blowing
Place carboy higher than target destination (e.g. on two milk crates), so you don't need to pressurize the container (much) to move the liquid, only enough to prime the siphon line
Now you're pressure-started gravity racking. No more dealing with autosiphons. No oxidation because you're filling the void with CO2. Bonus points if you flush the target container as well/go into a purged keg.
I really dislike spigots on plastic or glass fermenters.
20 psi
https://www.amazon.com/Ferroday-Carbonation-Stainless-Micron-Diffusion/dp/B01M335AXA/ref=asc_df_B01M335AXA/?tag=hyprod-20&linkCode=df0&hvadid=198083537724&hvpos=1o1&hvnetw=g&hvrand=8164251579683964832&hvpone=&hvptwo=&hvqmt=&hvdev=c&hvdvcmdl=&hvlocint=&hvlocphy=9028277&hvtargid=pla-351328117329&psc=1
Ferroday Carbonation Keg Lid, Stainless Steel Carbonation Lid With 2 Micron Diffusion Air Stone & 19.68 Inch Hose https://www.amazon.com/dp/B01M335AXA/ref=cm_sw_r_cp_api_i_dasnDb7SF483W
This is what I purchased.
https://www.amazon.com/Ferroday-Carbonation-Stainless-Micron-Diffusion/dp/B01M335AXA/
Some folks have issues with it leaking, so test it well.
Get a couple of stainless steel 1 gallon growlers with a tap and CO2 adapter. I have 2 of the growlers and one dispensing cap between them, so it's like a tiny Brite tank. Sure beats bottling.
Is this not roughly the same thing, but sold as a package deal (I'd just need to buy c02 cans) https://www.amazon.com/HAVEGET-Pressurized-Dispenser-Adjustable-Regulator/dp/B06ZYQRLSS/
Definitely not on sale now. Keep an eye on it. I had it droplisted, and was notified when it was a deal of the day.
https://www.amazon.com/dp/B06ZYQRLSS/ref=cm_sw_r_other_apa_i_KPAbBb0R7BF17
I was recently gifted this 128oz mini keg/growler. Would a setup like this be better to force carbonate or should I just pour into the keg from bottles after bottle conditioning and use as a pressurized growler?
Also does anyone have this model or a similar one? How do you like it?
So something like this would not be good?
http://www.amazon.com/CO2-Tank-Aluminum-Cylinder-Valve/dp/B0085282UK