Best auger drill bits according to redditors
We found 50 Reddit comments discussing the best auger drill bits. We ranked the 34 resulting products by number of redditors who mentioned them. Here are the top 20.
We found 50 Reddit comments discussing the best auger drill bits. We ranked the 34 resulting products by number of redditors who mentioned them. Here are the top 20.


This is a great way into learning enough about your house to tackle some home improvement. Low voltage wiring such as ethernet (and speaker wires if you do a home theater / media room) is easy and safe, and has very relaxed building code compared to actual electrical work.
Like always, good tools are key:
For single story, it's pretty trivial if you have a half-decent crawl-space under the house, or an attic you can move around in. I've gone below and above once each in the two different houses I've owned.
For below:
If you're trying to put jacks in an exterior wall, you need to know how much space you have between the framing and your foundation. If none, it's going to be more difficult to go below, and the insulation means finding wires in the wall is harder (avoid exterior walls if possible).
For above:
For the terminating work, just follow the color guide on the keystone. If you have a nicer spring-loaded 110 punch tool, make sure the blade faces the outside :) Coil any cable slack inside the wall (dont' feed it back down), Snap the keystone into the cover and screw it into the wall. Most people in the home lab community are going to get a 19" rack-mountable patch panel for the aggregation side, which generally use the same 110-style terminating plates on the rear, or you can get a rack-mountable keystone plate, and install keystones on both ends. Then your switch and rack are hopefully in the same location you pulled all the cable to.
Test it, plug in, and enjoy! Wired gigabit is so much better than wireless, or power-line adapters. You can pull some multi-mode fiber too, if you feel like doing 10G in the future.
EDIT: fixing markdown
You can just buy one
Draper 1050 x 150mm Fence Post Auger - 24414 https://www.amazon.com/dp/B00D847FYY/ref=cm_sw_r_cp_apa_i_EjBBDbRKJ0FJ0
If you are looking to do this yourself you need a combination of the following:
DataComm 45-0001-WH 1-Gang Recessed Low Voltage Cable Plate (White) https://www.amazon.com/dp/B00193U3O0/ref=cm_sw_r_cp_api_VF7EzbAP6DKCZ)
If you are just going to mount the monitors right in front of your desk and don't need to go sideways like OP then you can just cut the drywall where you are going to mount the monitors and then go down to where your exit point will be and cut there and drop your wires through.
If you need to do some fancy stuff - Ideally you would want to see if where all your studs were, measure the distance you'll need to bore through studs and then get glow rods and flex bits with sufficient length to do the job. Also your flex bit will need to be a big enough diameter to fit your cables through. Flex bits are super easy to work with.
Hope this helps!
yeah. fire block. that'll happen. you need to scan horizontally for studs as well as vertically for fire blocks.
​
i'm getting towards the end of a low voltage remodel on the casa, and the money shot here is the flex bit. i went with the 72", but that's because i was doing some long distance runs. you could probably get away with like a 36" or whatever the distance is between hole and block plus maybe a foot or so. measure the widest connection you're going to need to get past the fire block and pick the bit width up from that. it'll require a decent drill with some torque (ikea won't cut it). before you start drilling, remove the black coating on the flat parts on the end of the shank which connects with the drill, otherwise it'll slip like a greased up deaf guy. good luck.
Get an installer bit that's 54 in or 72 in, you'll make way fewer holes. https://www.amazon.com/Eagle-Tool-EA56254-Installer-16-Inch/dp/B00DNEEYFW/
Also a boroscope is great to make sure you don't hit any electrical wiring.
https://www.amazon.com/ANWA-Professional-Inspection-Megapixels-Smartphone/dp/B075FGMW6T/
I'm the guy op bought from. I sell them on Etsy, eBay, and Amazon. Feel free to hit me up with any questions. I just sell these as a side gig after having some made for myself.
$150-180 +Tax (if Prime) to DIY
You need a spool of cat 5e/6, 6 Keystone jacks, 3+ Faceplates, some single and double gang brackets and a few cheap tools.
The brackets are what goes into the dry wall so the face plates have something to screw into.
Single / Double Gang is the size of the bracket.
Single gand = the size of a box for 1 outlet.
Double Gang = The size of a box for 2 outlets (side by side)
Tools: https://www.amazon.com/Zoostliss-Portable-Ethernet-Crimping-Detector/dp/B01JU2XERY/ref=sr_1_27?ie=UTF8&qid=1497913897&sr=8-27&keywords=cat+5+punch+down
Cable: https://www.amazon.com/Ethernet-Cable-000ft-Cat-6-VIVO/dp/B0092TK2U8/ref=sr_1_2?s=pc&rps=1&ie=UTF8&qid=1497914001&sr=1-2&keywords=1000+ft+cat6&refinements=p_85%3A2470955011
Keystones: https://www.amazon.com/Cable-Matters-25-Pack-Keystone-Punch-Down/dp/B004D5PFGW/ref=sr_1_2?ie=UTF8&qid=1497914060&sr=8-2&keywords=cat+6+keystone+jack
FacePlates (Dual): https://www.amazon.com/Mediabridge-Keystone-Plate-2-Port-White/dp/B0722K3K8R/ref=sr_1_12?ie=UTF8&qid=1497914110&sr=8-12&keywords=keystone+faceplates
Note* You are going to be under the house or in the attic. The work sucks but its way worse going in there for a 2nd time to run 1 extra wire... do yourself a favor... if you are running 1 length to a room.... run 2.
Faceplates (Double Gang): https://www.amazon.com/Port-Keystone-Faceplate-Dual-White/dp/B004FUWY3C/ref=sr_1_7?ie=UTF8&qid=1497914196&sr=8-7&keywords=keystone+faceplates
Low Voltage Bracket (Double Gang): https://www.amazon.com/Cmple-Low-Voltage-Bracket-Dual-Gang/dp/B003ZWHK6C/ref=sr_1_2?ie=UTF8&qid=1497914233&sr=8-2&keywords=double+gang+low+voltage+wall+plate
[BUY 3 of these] Low Voltage Bracket (Single Gang): https://www.amazon.com/Cmple-Low-Voltage-Bracket-Dual-Gang/dp/B003ZWJGGE/ref=sr_1_2?ie=UTF8&qid=1497914233&sr=8-2&keywords=double%2Bgang%2Blow%2Bvoltage%2Bwall%2Bplate&th=1
[EXTRA]
This is not necessary but super helpful for drilling through studs you cants see. Also keeps you from cutting more holes in the drywall than necessary. If you are done drilling holes, sell it on Craigslist for @ afterwards.
Stud Drill Bit: https://www.amazon.com/gp/product/B00LLGT4GI/ref=oh_aui_detailpage_o00_s00?ie=UTF8&psc=1
I’m like you, just a guy doing his own cabling at home. So not professional advice, just my experience.
Like others have said the fibreglass push rods are amazing. Could also look at the magnetic pullers; one magnet goes on cable inside wall, dragged down by magnet on outside. If firechecks turn to an issue this may help.
You don’t need a $100 punchdown tool, but if you have the money it’s up to you. I just got a $30ish (AUD) one, so not the $10 Asian one but a step up. Super cheap ones more often then not will do shit punches. I’d recommend going one with a 110 blade rather then krone, but that’s up to you.
For crimps I’m super suuuuuper happy I swapped to using one that worked with pass-thru style jacks.
I’d highly recommend getting a fairly decent stripper though, just makes life so much easier when it comes to not nicking conductors.
A nice trick for multiple runs, run something like clothes line first. Then tape your cable along side the line letting the line and drag through. Once that cables done, tape off to that same end and pull back the opposite way. Means you only have to fish the wall once and the line is being dragged back and forth not the cable.
Last but not least, always test your cables when you’re done.
Have you ever seen one of these?
Eagle Tool EA75072 Flex Shank Installer Drill Bit, Auger Style, 3/4-Inch by 72-Inch, Made in the USA https://www.amazon.com/dp/B00IP87QHO/ref=cm_sw_r_cp_apa_i_R513AbZ7WXANZ
And you were low power so you didn't need boxes. It also looks like you ran high power next to low power without 90 degree crossing.
9/16” x 72” from Eagle Tool.
https://www.amazon.com/gp/aw/d/B00DNEF1VI
usually a hole in the headers, drilled with a long drill bit
https://www.amazon.com/Eagle-Tool-EA56254-Installer-16-Inch/dp/B00DNEEYFW
or, if you have access to the attic, drill down and fish the wire with a fish tape
Close.
Cut the hole in the wall and use a long flex bit to drill through the bottom of the wall from the top down.
Then just clip the wire to the end (these bits have holes in) and pull it up. This is called an 'installation' drill bit, it's exactly what the pros would use for this.
I would use this.
​
https://www.amazon.com/Eagle-Tool-EA56254-Installer-16-Inch/dp/B00DNEEYFW/ref=sr_1_4?crid=J5EGT9THD1RC&keywords=klein+drill+bit+extension&qid=1563999563&s=gateway&sprefix=klein+drill+%2Caps%2C462&sr=8-4#customerReviews
​
Then not have to mess with any drywall.
https://www.amazon.com/Eagle-Tool-EA37536-Installer-36-Inch/dp/B00IP87DZE
There are some really clean augur bits available today.
https://www.amazon.com/dp/B00CBKVLMS/ref=cm_sw_r_sms_c_api_qqLUzb7Q07H3N
I would suggest you do it the hard way. I am a network admin that has run roughly a mile of Ethernet cable this year (5 spools). Before this year I had never run cable so my answer encompasses everything that I have learned from running cable in commercial and residential buildings.
You'd need a square bit for that. I've never used one before, as consumer bits fairly new. Here's a video showing how it works. You'd still need to file out the corners if you don't want rounded corners. The other option would be to drill a round hole and hand file the corners, otherwise you'd need a CNC machine. Here's one on Amazon.
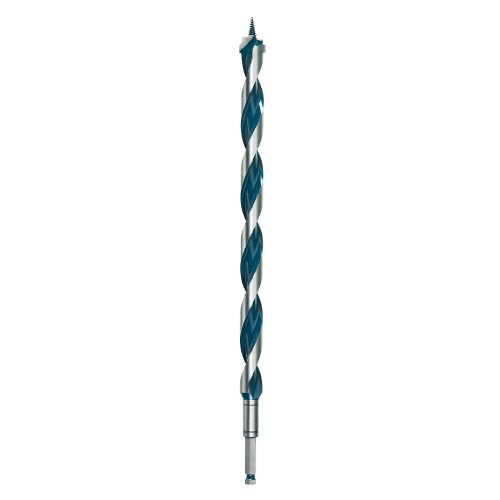
I use this bit daily, been doing Resi for 6 years and I swear by the bit. Will chew through nails pretty easily. And once it gets dull, they are pretty easy to file back to sharp. I usually make this bit last 6 months, and to be honest could go longer if I wanted to.
https://www.amazon.com/Bosch-Daredevil-NKLT16-1-Inch-2-Inch/dp/B003BIFMWO
2x4 studs, trying to limit my cuts in the drywall to a single gang area. Thinking about the 36" version of this guy. https://www.amazon.com/Eagle-Tool-EA56254-Installer-16-Inch/dp/B00IP87QT2/ref=sr_1_3?ie=UTF8&qid=1524185437&sr=8-3&keywords=flex%2Bbit&th=1#customerReviews
IS the drywall/plastic the side where the TV is mounted? Kind of hard to get a perspective from how the picture is.
If so that cross 2 x 4 makes sense, builders will install bracing to help reinforce TV mounting, to make installing wall mounts easier.
If you want to reach it and drill through it, you need to get a long flexible drill bit like this https://www.amazon.com/Irwin-Tools-1890759-Installer-54-Inch/dp/B00LLGT4GI that'll help get you the angle and distance you need to drill through it, its also great for pulling wire through those drilled holes as well.
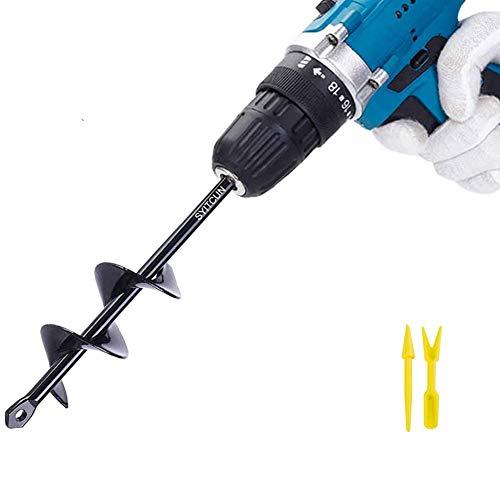
Would an auger bit with the impact drill achieve the same results?
https://www.amazon.com/Garden-Flower-Planter-Bedding-Umbrella/dp/B07RNL48X9/
Flex bit for drilling down through subfloor. Take it slow and easy. Hit a snag, stop and back out and move over a bit. Knots in the wood will destroy these things. Use razor blade and/or drywall knife to knock out wall plate size hole. Plenty big enough to put flexbit through. Used this many many times running AV cabling
Irwin Tools 1890759 Flex Shank Installer Drill Bit with Auger Tip, 3/4-Inch Shank, 54-Inch Length https://www.amazon.com/dp/B00LLGT4GI/ref=cm_sw_r_cp_apa_dp8CAbDY3MD5J
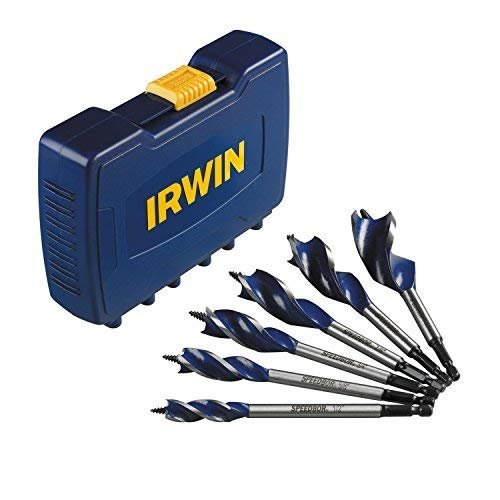
Yeah those are metal bits. There are a number of kinds of wood bits. Like:
https://www.amazon.ca/Irwin-Industrial-3041006-Speebor-6-Piece/dp/B000LQ905E/ref=sr_1_9?ie=UTF8&qid=1511098255&sr=8-9&keywords=wood+drill+bits
or for larger holes this type is better:
https://www.amazon.ca/8milelake-Forstner-Individual-Woodworking-15mm-35mm/dp/B074N4819N/ref=sr_1_28?ie=UTF8&qid=1511098331&sr=8-28&keywords=wood+drill+bits
I had good luck with an Irwin:
https://www.amazon.com/gp/aw/d/B00LLGSK1I/ref=oh_aui_i_d_old_o0_img?ie=UTF8&psc=1#
Although you might want to go smaller, I had to run 5-6 cat6 cables through and didn't want to go too small.
The Klein flexible bit holding tool is not optional, especially if you are doing it through a 1 gang. I did the same thing and ended up tearing up drywall in one out of 5 holes. I would recommend making a reinfored cover to place over the hole in the drywall so you don't damage the edges. Think like a metal low voltage gang box.
>Should I call an electrician to install an ethernet port?
Why not do it yourself and save hundreds of dollars?
Is there a basement or attic? Use that for horizontal runs.
For the walls, if you have a typical twigs and plywood house, getting between floors will be a bit tricky, but not super hard. Cut a small hole at the floor and ceiling along the wall in the 1st floor, using a long, flexible drill bit drill down into the basement from the hole near the floor. Drill up to the second floor the same way. Try to keep the bit centered on the sole plate/top plate.
If you have to use the attic to run from one side of the house to the other, you'll need to repeat the above process on the second floor to get to the attic, then once you're in the attic above the bedroom, drill up from a hole near the ceiling to get into the attic from the bedroom, then cut a hole where you want your wall plate.
Then you'll have a few small holes to patch and paint.
My house was all Cat 3 6 home runs to the exterior. I replaced it all with solid core Cat 6 and added two runs for wireless access points in the ceiling. It was a PITA. I home ran the new stuff to a network enclosure box I added.
Cat 3 is junk I've seen it send 100Mb or more inside a house but if you ever have to troubleshoot issues your wires will always be the unknown.
As others have said you can never plan on just pulling new cat 6 behind the cat 3 it works like 10% of the time thanks to staples. So if you accept that you are cutting drywall and learning to fix those numerous holes then it's a much more realistic job. Basically everytime I got a snag I got the drywall saw out. Transitioning floors can be tricky but not impossible again cut the drywall.
Here are the best tools for the job. Flexibile long drill bit was a major cheat once I started using it. Fishing tape is a waste of the time except for conduit in my opinion use the fiberglass sticks I linked below.
https://www.amazon.com/Eagle-Tool-EA56254-Installer-16-Inch/dp/B00DNEEYFW/ref=sr_1_7?keywords=drill+extension+wire&qid=1564611470&s=gateway&sr=8-7
https://www.amazon.com/dp/B005LW4CFG/ref=psdc_6396129011_t3_B07F2LWVDV
https://www.amazon.com/Stanley-15-556-Jab-Cushion-Grip/dp/B00002X21W/ref=sr_1_4?crid=12ICHMNHKXEGF&keywords=drywall+saw&qid=1564611505&s=gateway&sprefix=drywall+saw%2Caps%2C125&sr=8-4
No - that looks like a Forstner bit.
I'm thinking of something like this:
https://www.amazon.com/IRWIN-Tools-SPEEDBOR-6-Piece-3041006/dp/B000LQ905E/ref=sr_1_2?crid=3UWGOB8BDL6HT&keywords=irwin+speedbor+bits&qid=1568602522&s=hi&sprefix=irwin+speed%2Ctools%2C139&sr=1-2
or
https://www.amazon.com/Drill-Master-Piece-Auger-Bit/dp/B006ZBBBQK/ref=sr_1_10?keywords=auger+drill+bits&qid=1568602582&s=hi&sr=1-10
> Finally, if you have the money you can get a power auger of some sort, you will be looking upwards of $300 here.
I'll add one of those new Drill-Augers to that if he has a drill he can use. Could buy the 6" mora and one of the basic auger plates, doesn't necessarily have to be the Clam Drill Plate thing. And with that he's got something that should work all season and won't tire him out for about 90$.
You're so wrong. Why the hell would you be using a hammer drill on wood? First mistake. Hammer drills are for brick, concrete and masonry.
Second mistake, a professional grade impact driver with an auger tip bit will just roar though any wood, even lignum vitae.
I guess you didn't know that.
And, using such a bit in a professional grade impact driver eliminates the danger of kick-back.
https://www.youtube.com/watch?v=17hnNOFaRH4
I think what /u/saintnicster was getting at more than anything was to not use a hole saw to go through studs (at least for wiring, plumbing is a whole different issue)
Edit: I also hate spade bits. These have done wonders for me but are starting to get dull after 4 years