Best couplings, collars & universal joiners according to redditors
We found 32 Reddit comments discussing the best couplings, collars & universal joiners. We ranked the 23 resulting products by number of redditors who mentioned them. Here are the top 20.


https://imgur.com/a/MgXzPYB
https://i.imgur.com/ODlUasp.jpg
https://www.homedepot.com/p/1-1-2-in-x-10-ft-Black-Steel-Sch-40-Pipe-GS11-210BTBE/202310232
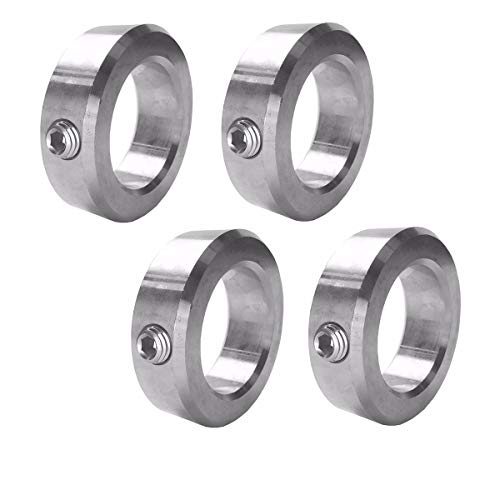
https://www.amazon.com/Solid-Steel-Plated-Shaft-Collars/dp/B01CDKJ2YE/
I had a guy at Home Depot cut the threads off, then cut a piece at 60", ended up with another piece of scrap that's like 55" that I'm going to use for a Viking Press station for my wife.
Look into z rod couplers for 3d printers. The most common size is for an 8mm threaded rod.
There should be a lot of different options.
Here is an example of what I was thinking of:
uxcell 8mm to 8mm Stainless Steel Shaft Coupling Flexible Coupler Motor Connector Joint L30xD25 Silver https://www.amazon.com/dp/B07G6Q1GHN/ref=cm_sw_r_cp_apa_i_kCjhDbQB6CMGQ
You definitely want a metal hub. Here's an example.
Somebody asked about this on another forum. I suggested to put a locking collar or clamp onto the headrest posts so that they settle to the desired height.
Something like these, but find ones that fit the headrest posts.
https://www.amazon.com/Stainless-Steel-Shaft-Collars-Screw/dp/B019978OC0/ref=sr_1_3?ie=UTF8&qid=1538000705&sr=8-3&keywords=set+screw+collar
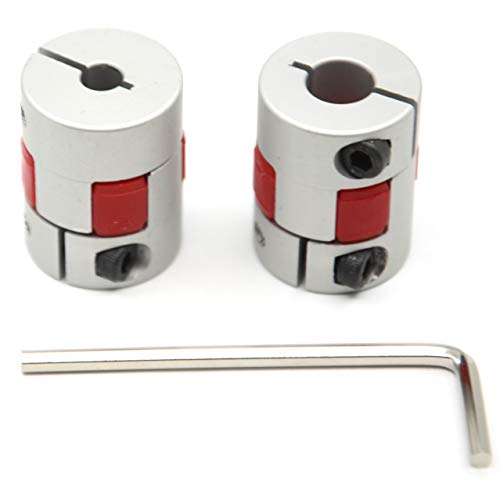
The two part shaft coupling/prune type coupler/whatever is the best! Absolutely worth its extra cost, however you have to make sure you get a good quality one. I bought one off of eBay before for cheap, and it's really not worth the extra cost.
The one in the picture doesn't look as good (due to the red pieces being much smaller than they should), but this type is so much better for one simple reason: if your print head ever slams into the bed on accident or goes too far up (because you leveled incorrectly or pushed Z too far up or down) the piece will act as a safety mechanism and actually dislodge. The two pieces will separate and will save the motor, coupler, and anything else from getting destroyed.
The stock ender 3 coupler that I had actually was destroyed because I kept on using my hand to push the X axis up, and after using too much force, the piece bent upward. It was stuck permanently until I took the dremel out to cut the screw out.
If anyone looks for a coupler, GET one of these. Most people don't think this is an upgrade, but it has saved my life multiple times.
UXCell's model is by far the best, but quite expensive. Here is the link. If you do choose to buy it, you'll actually need a button head screw for the bottom coupler piece as it will hit against the motor mount. Unlike the stock one, it is super heavy duty thick (which is why the screw hits the mount) and is quite well cut.
As others have stated it looks like Z wobble
Do you use Flexible Coupling's? (eg:https://www.amazon.com/uxcell-5mmx8mm-Helical-Coupler-Coupling/dp/B00KHTVOEU/ref=pd_lpo_328_lp_img_4?_encoding=UTF8&psc=1&refRID=C2PXGYBEHJNE7GHTR8RY)
To connect your Z motors to the rod/lead screw?
If so, I would swap this to a solid connector (And upgrade to lead screws if you haven't already)
Even these work better than the Flexible Connectors
http://www.thingiverse.com/thing:602481
Hard to tell from the blurry pic (seems like it's bad pic day today), but looks like a shaft collar.
Like this:
https://www.amazon.com/Ruland-MSC-6-SS-Collar-Stainless-Metric/dp/B0063KWH7U
I found this to be the EASIEST way to get them running or at least evaluate if it's even worth bringing them back. If this doesn't work it may be worth re-evaluating if its worth actually reviving them or not. many times older models are hard to get parts for when things inevitably do break it can be rough. If you do decide to restore at that point, you can get compression back in your motor for pretty cheap and get clamps from amazon or a local hardware store. LHS (Local Hobby Shop) is a good place to replace any cracked tires or rims, or any flat spots on the tires/foams. rebuilding the shocks with some shock oil from LHS. A new radio can be a little cheaper through the traxxas power up program if your LHS supports it, but as you can see its not cheap for a new radio and its pretty important to replace them. the older radio frequencies are so overused now that interference is common and your precious nitro that you spent all that time and energy on will get throttle locked and take off on you and blow a motor or destroy an arm and it can add up pretty quick. so again, new radios really are a must. you can also choose to replace motors through the power up program but its a more expensive option.
​
If you do decide to restore keep us posted! welcome back to the hobby!
Oh right!! 3D printing. I had not thought of that.
I saw a youtube channel once This guy had a nice vintage radio with a chicken head knob. He made a silicone cast and then used black epoxy to make his own knob. The tools and amount of work and detail he had to do to make it look good. He had a slotted shaft so made a small spring clip inside the round hole he drilled though.
But. for 3d printing. What if you 3d printed a knob to fit on top of metal collar with a set screw already in it. Something like this https://www.amazon.com/Lovejoy-LSC-10-Shaft-Collar-Plated/dp/B007JOHR9W/ref=lp_16411961_1_2?s=industrial&ie=UTF8&qid=1570770594&sr=1-2
you would need some kind of epoxy or maybe just a good friction fit to make the 3D printed part stick over this collar. And drill a hole to get to the set screw maybe. Or if you can. attach the collar and friction fit the 3D printed part over it?
set screw and collar
http://www.amazon.com/Climax-C-075-DT-Steel-Screw-Collar/dp/B005L6A8EG/ref=sr_1_7?s=industrial&ie=UTF8&qid=1422653418&sr=1-7
or you could flatten one side of the shaft and press something on.
Could be, maybe something like this and this together? Obviously not the correct sizes.
Haha! Yeah, thanks. I built it with a tripod mic stand I wasn't using and got the orange Pamona Test Lead Holders and an appropriately sized clamping collar to keep it at the right height and still be able to spin it around to access cables on all four sides.
I have a similar weekend! Adding an aluminum extruder and this coupler for the lead screw:
https://www.amazon.com/dp/B07RMZCLZ3/ref=cm_sw_r_sms_apa_i_dTu2DbW7VEA45
The first photo shows the orientation on the bed. If you look, you can see lines at the bottom of the print, but they aren't too bad, if at all as the print goes up.
This is on a Tevo Tarantula on which I have relocated the z-axis motor to the bottom and I am using this coupler - https://www.amazon.com/Befenybay-Aluminium-Flexible-Coupling-Connector/dp/B07RMZCLZ3. I am running this oldham coupler - https://www.thingiverse.com/thing:2568712. I am wondering if the coupler is causing more wobble at the bottom than the oldham can compensate for but as it goes up, the oldham is better able to compensate?
Any help will be appreciated.
My banding improved a lot by installing a flexible coupler. You need one that is 3mm on one end and 4mm on the other. Be warned that sellers on Amazon and eBay have realized they sell more couplers by putting flexible in the name. If they don’t look flexible, they probably are not.
I used something similar to this, although the exact part I ordered is no longer available.
https://www.amazon.com/Ochoos-Accessory-Aluminum-Flexible-Coupling/dp/B07MWC8N8F
Just starting on my ball stretching journey . But I was in the same position as you as to I didn’t want anybody finding my package and opening it . Well I found a very nice item on amazon with is a metal collar of some sort and it work perfectly . Maybe they sell them in local hardware stores ? Or if you have amazon it’s possible to get it delivered to a Dropbox and a near by location and that way it doesn’t go directly to your house. That’s what I did for my self. Here’s the link .... Climax Part 2C-150, Mild Steel,... https://www.amazon.com/dp/B00207ULIC?ref=ppx_pop_mob_ap_share
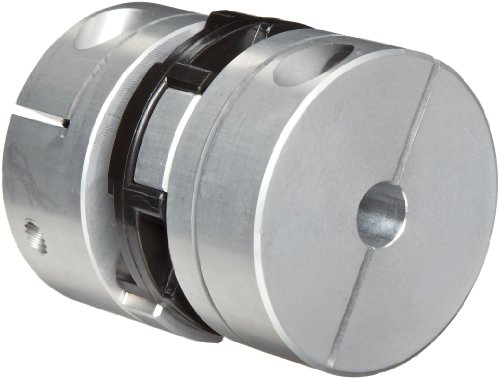
I ended up getting a double loop coupler this one so far it had reduced most if not all of the wobbling issue I was having it allows the shafts to be a good 2 or 3mm off and still spin as if they were perfectly aligned. I didn't think it would be very good because it looks like it wouldn't, but it actually seems decent so far. just waiting to see what the life of the thing is. hopefully it doesn't rip apart after 10 hours or something.
I just got the wheel today and brought it back to my house.
It is a Brent CX. The shaft coming out is turning nicely, and so is the wheel. It looks like the coupler itself is simply broken. This piece connected the motor shaft and shaft going into the gear box.
The shaft looks like it was made out of plastic. And appears to look like this: Product on eBay
The parts list on the Amaco website has a part for this machine called a 5/8 to 5/8 coupling. Thing is, I could get a coupling with set screws from online or a hardware store. I am worried about one thing though. The one that broke, is made out of plastic and has that design, instead of a simple tube coupler to connect them. Would this be for some sort of flexibility? Is flexibility needed? Or could I just get a 5/8 to 5/8 coupler from anywhere, even if it looks just like this: Coupler on Amazon
Haven't tried these, but I have seen them recommended a few times. https://www.amazon.com/gp/aw/d/B06X9TVW64/ref=mp_s_a_1_1?ie=UTF8&qid=1527124792&sr=8-1-spons&pi=AC_SX236_SY340_FMwebp_QL65&keywords=uxcell+5mm+8mm&psc=1
There are cheaper spiral cut flex couplers out there too. 5mm to 8mm is what you need. Can also try swapping the couplers on either side and see if the issue moves to the other side. Do some research on properly mounting and adjusting them before you attempt though.
Here's what you'd need: two 8mm x 295mm leadscrews w/ the brass nut things, clamp-style couplers, and then print any parts you may need for converting from threaded rods to leadscrews. The couplers I linked are expensive, but they work really well.
Be warned though, these parts will not help you fix any misalignment in your z-axis, they'll only help with bent rods. You need to ensure that everything is aligned yourself.
You can do this by installing the parts that hold the brass nuts and looking through the hole to align it with the motor shaft, or screwing the leadscrews in and using those to help align everything.
Why do you need a second dumbbell?
I got a couple of these set screw collars that are awesome for keeping the weights in place. They use a 1/4 inch hex key which is mildly inconvenient.
Try a shaft coupler or adapter like this: https://www.amazon.com/dp/B003XHCMU8
They make them with different bore sizes, with or without a shaft on one end. I'm sure you could rig up something to make sure the rope stays good and clamped in.
I've got a Jr where I've got some intermittent wobble issues. Tried unscrewing my lower stepper motor with some success but I'm fairly certain this should help a lot. I got this guy http://www.amazon.com/gp/product/B004HW7190/ref=oh_details_o01_s00_i00?ie=UTF8&psc=1
I made the mod to my Simple Metal and while it's sort of functional, it's making noises that obviously indicate some issues. I'm hoping someone here has some suggestions on what's wrong.
I used this leadscrew: http://amzn.com/B015PS2Z4K and this coupler: http://amzn.com/B00KHTVOEU that I'd picked up a few months ago. I'm using the Machine Control Panel of Simplify3D for my testing.
There's a small "thunk" every time I start moving the Z axis. Aside from that, moving the extruder assembly up is smooth. But moving the extruder assembly down is very herky-jerky. Something must be binding and catching but it's not obvious to me what.
If I remove the set screws attaching the lead screw to the adapter I can manually lift and lower the extruder assembly fairly smoothly. The lead screw can be pushed up and will drop down smoothly under gravity. The stepper spins smoothly both directions. Is it an issue with the coupler I'm using? I tried pushing the lead screw down as far as I could before tightening and leaving it up a bit before tightening it down to no difference. I'm thinking the "springy" coupler design was a bad choice?
Or is my problem elsewhere?
X and Y look awesome, but you are experiencing LOTS of Z banding/wobble. Look into some Z axis stabilizers or some flexible Z axis couplings like these. Also it looks like you have some underextrusion on the top. Try either increasing the number of top layers or run an E-step calibration for your extruder
No problem. I believe most people use something like this to connect the screw to the Z stepper.