Best thickness gauges according to redditors
We found 32 Reddit comments discussing the best thickness gauges. We ranked the 16 resulting products by number of redditors who mentioned them. Here are the top 20.
We found 32 Reddit comments discussing the best thickness gauges. We ranked the 16 resulting products by number of redditors who mentioned them. Here are the top 20.


Thickness gauge
Vktech® CM8801FN 0-1250um/0-50mil Coating Thickness Gauge Paint Tester Meter FN Type https://www.amazon.com/dp/B00FDJGMBY/ref=cm_sw_r_cp_apa_RyA8ybKK0D6R8
Just to double check, the swirls aren't leftover from the compound being aggressive right? If not, then you likely haven't gone through a whole lot of clear and you should be fine, but I would definitely start with a polish first and see if it clears it up. This is the paint thickness gauge I have, btw. It doesn't differentiate between the clear, base and primer, but it will give you an idea of how much you're removing. This is a really informative post to refer to if you want to know how much is generally safe to correct.
http://www.ebay.com/itm/New-CEM-DT-156-Paint-Coating-Thickness-Gauge-Tester-F-NF-Probes-1250um-/171398634717?pt=LH_DefaultDomain_0&hash=item27e8279cdd
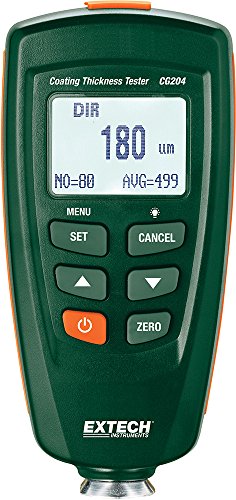
EDIT: Better recommendation: http://www.amazon.com/Extech-CG204-Coating-Thickness-Tester/dp/B005LNX7KQ/ref=sr_1_1?ie=UTF8&qid=1399171046&sr=8-1&keywords=extech+coating
This is the one I'm going to get.
Sandro from Car Craft Detailing recommends this one Paint Gauge
I am not familiar with a scale or rating, but pipe and vessels are designed with a corrosion allowance. They are inspected periodically and the corrosion rate is calculated to estimate remaining life. The pipe or vessel is EOL when the corrosion allowance is depleted. An ultrasonic thickness gage is a handy tool for measuring remaining wall thickness.
Metric offset feeler gauge made setting the height easier and more precise. Try something like this :
ABN Universal Standard SAE and Metric Offset Valve Feeler Gauge 16-Piece Blade Tool for Measuring Gap Width/Thickness
https://www.amazon.com/dp/B01IPWOAOQ
Okay so the first time you used Ultimate Compound and Ultimate Polish. That means you compounding, an aggressive cut. No matter how "gentle" you were, this is an aggressive paint correction. Depending on the paint, you could have taken little or a lot off(I was shocked to see how much the Cadillac STS I did this week was losing in paint depth after just a polish.). This is why I encourage you to invest in a depth gauge if you plan to do another round of paint correction. I'll be honest, you really shouldn't need to correct this quickly after the first round. You mention that there are swirl marks from previous owners still, so either your paint is hard or you didn't do much with your last round("gentle" I guess, but really with a machine nothing would be gentle IMO). Ultimately I am just telling you this because a gauge is like $125-$150 on Amazon and a repaint is more expensive than this, and if you plan on doing anymore paint correction it is a worthwhile purchase. This is just a cautionary thing, heed it or not.
​
A polish is typically going to be your final step unless you're working on some super finicky paint. In that case you may need a "jeweling" type polish that is super low cut, but this isn't exactly normal. My black Honda paint which is soft can be finished with m205 and a Yellow Rupes pad(m205 is typically a little more cut than polishes and the yellow pad is a standard polishing pad). Really shouldn't need to switch pads either unless again, finicky paint.
https://smile.amazon.com/CM8801FN-Coating-Thickness-0-1250um-0-50mil/dp/B00DKUUUP2/ref=sr_1_8?ie=UTF8&qid=1541731263&sr=8-8&keywords=paint+depth+gauge This is solid. $150<Repainting
You can get away without the gauge, but you're running a risk. Do what you will with that. Typically you should only really need one compounding correction then light polishing after that to maintain assuming you use safe washing methods.
On mobile so I'll grab a link later but you might be better off with a thickness gauge. Mitutoyo adapts the same digitals while making the form factor much more suited for your purpose.
... here you go. https://www.amazon.com/Mitutoyo-Quick-Digital-Thickness-Gauge/dp/B00WML11DU
There are also Dial ones which may be more ergonomic for your purposes.
https://www.amazon.com/Mitutoyo-7300S-Thickness-Standard-Graduation/dp/B000VB8J10
Looking for some paint thickness gauge / meter recommendations on the cheap. For personal use. Not interested in spending thousands on a professional gauge.
https://www.amazon.com/dp/B07D337RPW/?coliid=I1B4EN3ZFPAIRQ&amp;colid=3GJZC1EZZLFLA&amp;psc=0&amp;ref_=lv_ov_lig_dp_it
Seems too good to be true, but is it worth trying out?
Otherwise, I might end up with this one, seems like it has good reviews.
https://www.amazon.com/dp/B00DKUUUP2/?coliid=I39I2VK46CLC8P&amp;colid=3GJZC1EZZLFLA&amp;psc=0&amp;ref_=lv_ov_lig_dp_it
https://www.amazon.com/Filler-Detective-Autobody-Damage-Detector/dp/B004R26JJ8
https://www.amazon.com/Thickness-Tester-Crash-Test-IMPROVED-Detector/dp/B01LWXBIFS
Just from my experience, sometimes the print bed can get dusty if I don't use it for a long time. Something like Acetone works well to clean the bed if you have glass. My printer doesn't have a bed height probe, so I also use a feeler gauge to set the initial height.
Something like this will do it.
https://www.amazon.com/ABN-Valve-Offset-Feeler-Gauge/dp/B01IPWOAOQ/ref=sr_1_2?ie=UTF8&amp;qid=1481432332&amp;sr=8-2-spons&amp;keywords=feeler+gauge&amp;psc=1
Let us know if you are able to solve it.
Thanks everyone for the advice everyone, I probably would have bought them had I found them yesterday, but I decided to go the DIY route. Since picking must be a very budget conscious hobby for me, I went ahead and took the plunge and bought the important tools. I figured making my own pins would be difficult and require a lot of crazy equipment, but I looked into it and realized it was a lot easier than expected. So just for anyone who's curious, here's what I got:
&nbsp;
So in total $112 for all the components needed to make as many locks as I can imagine, many of which can be used for other projects.
&nbsp;
To add supplies for a few other DIY projects I also added:
&nbsp;
So another $21 brings it to $133 plus $2 per 2-3 tools that you need. Add in this $6 case and a few $4-$6 practice locks around aliexpress (1st, 2nd, 3rd, 4th 5th, 6th, 7th), and you've got a great starter kit that sets you up to DIY anything you might need in the future. I also took advantage of Peterson's mega christmas sale (plus the 10% discount code they gave us) and got a ~$25 order of $1-$3 picks to start me off
Depending on your clearance, these offset valve feeler gauges might work... They only go to 0.127mm, tho.
Interesting. They should have known. Use this: https://www.amazon.com/Thickness-Detector-Measurement-Crash-Test-Resistant/dp/B01H1PVMSA and find locations of "impact" and use that to haggle.
Could be risky then. Do you have a paint thickness gauge?
If not, I would try compounding for several minutes on it first.
There is one more way you can do it. Get a paint thickness indicator that will allow you to check whether any part of the car has been repainted. It works most of the time because there are parts of the car that can't be replaced and have to be repaired and repainted.
A lot of the used car guys use it to check for accidents.
Something like this...
https://www.amazon.com/all-sun-Digital-Painting-Thickness-Coating/dp/B0126JMCQM/ref=sr_1_3?s=industrial&amp;ie=UTF8&amp;qid=1482076429&amp;sr=1-3&amp;keywords=paint+thickness+gauge
Take it to a mechanic to have them check for frame. If you want, grab one of these to test the paint thickness. BUT you won't be able to haggle down a few grand, MAYBE 1k, more likely 500, but rarely ever 1k. Unless you find something with the same specs and miles and color as yours, you can price match and then a bit less than that.
I saw Jason Rose from Rupes using this gauge in a video and it is the one I was going to get. If it is good enough for him, it should be good.
https://www.amazon.com/dp/B005LNX7KQ/ref=cm_sw_r_cp_apa_i_sFNwCb5X24P9E
Thanks for the tip. I'll do that.
Is this a good tool for measuring AWG?
I just bought one
That would mean there are two left.
Edit: Do I have the link to the one you bought? The price was $99.88
What is the bed surface? This gives a good list of things to try: https://www.matterhackers.com/news/choosing-the-right-3d-print-bed-surface
I personally would perfect manual bed leveling, if you haven't already. Bed temperature is really only a major factor with ABS and not so much with PLA, so I do think you do not need to go so high with the temperatures regardless.
The absolute first thing I suggest is getting a set of feeler gauge's to accurately measure head height: https://www.amazon.com/Precision-Brand-19740-Thickness-Assortment/dp/B007IVPCSY/
If all else fails, and you just need to print, start using full rafts. It's quick and dirty, but it works. Most rafts these days are printed really slow and with a really thick/wide first layers and helps
negateimprove adhesion.Edit: derp.. it's opposite day for me.
Here's one.(amazon) No pointy end.
I use this one
For what it's worth, it does the job. I know it's over $100 but I wouldn't trust anything lower than this one. $120 bucks is a lot better than a respray though!