Best drafting tools & drafting kits according to redditors
We found 62 Reddit comments discussing the best drafting tools & drafting kits. We ranked the 38 resulting products by number of redditors who mentioned them. Here are the top 20.
We found 62 Reddit comments discussing the best drafting tools & drafting kits. We ranked the 38 resulting products by number of redditors who mentioned them. Here are the top 20.


Gedess Lead Pointer
What you're talking about is technical drawing. It's a vanishing art . . . or rather, it's a dwindling technique, because it isn't really art at all. It's all migrated to the digital environment, now.
It isn't actually easy to do in Photoshop, or not correctly. It is easy to do in AutoCad, Sketchup, and a host of other CAD platforms. Manually, it's mathematical. You use scale, meaning that, for instance, you draw a .25" line on your paper for every 1' of real measurement. You can find some common scales here.
You can't do precise work freehand. To implement scale correctly, you'll need the tools of the trade; a drafting table, straight-edges, scales (a special sort of ruler) compasses, etc, Wikipedia has a nice article on these tools. And here's a more pragmatic Amazon link to get you started, as well as a collection of YouTube tutorials.
I work full time in Sketchup, by the way, and apply my drafting training (from shop class way back in 80's era junior high) all the time. Unlike other CAD programs, the tools are designed to be intuitive to folks who understand this kind of technical drawing. It's also free, so if you feel like moving off paper and into the digital realm once you've got the hang of it, knock yourself out.
I am assuming from your profile that you are in the U.S. and will be attending a U.S. school.
First of all, I echo what others have said about questioning "Architecture Engineering". Architecture and Engineering are related but otherwise completely different disciplines. Yes, you use some mathematics and engineering knowledge when practicing architecture, and many engineers also use design principles, but in terms of your education these are very different majors. If I had to guess based upon other programs I've seen, I would hazard that "Architecture Engineering" is some kind of composite course that covers bits of Civil Engineering, Structural Engineering, Construction Engineering, maybe Mechanical Systems (HVAC, Plumbing, Etc.), and maybe even Construction Management. Each of these is difficult academic program all its own, and I can't imagine there being meaningful time for any sort of Architecture Studio curriculum, let alone interior design.
That said, you need to decide if you want to go into Design(Architecture/Interior Design) or Engineering first; don't waste time and money pursuing programs that you aren't interested in. If your goal is to become a practicing, licensed architect then you need to get a NCARB accredited degree from an accredited College of Architecture. This usually takes the form of getting an undergraduate Bachelor of Science in Architecture followed by a Master of Architecture. The Master's degree is the actual accredited, professional degree which is required in order to become licensed. Of course, that means you could study whatever you wanted as your undergraduate degree and still apply to a Master program, but I think you'd be very lost without the solid foundation that an undergraduate architecture degree gives. During or following school, you also must intern under a licensed Architect who will sign off on how many hours you work for the Architecture Experience Program. Once you have completed these hour requirements as well as the professional architecture degree from your Masters, you must pass the Architectural Registration Exam, a series of exams which test your capabilities and education. Finally, after that, you may legally practice architecture and call yourself ARCHITECT.
So, regarding your questions, it's VERY important that you start actually researching the profession of architecture to see if it's even what you want to do. I HIGHLY recommend you read Architect? A Candid Guide To The Profession by Roger Lewis. It's the most accurate, thorough and honest overview of the entire process of practicing architecture that I've found. Architecture is a competitive field which requires an intense dedication and discipline to mastering a wide array of complex and disparate skills. It costs a lot of money and at least 7 or so years of your life to become an architect. One upside is that the skills you learn can be applied to all kinds of other industries, though, so many people don't even stick with architecture following graduation but find work in all kinds of other design fields.
Architects, in general, don't make very much money. In general, you won't really be hitting your stride in your profession until your early 50s. Most of this job is sitting down at a computer/desk for very long periods of time doing very monotonous work for someone else. In practicing professionally, you'll find that most people want a simple box for their home/business, and would much rather spend their money on their families/a boat/investments than a nice building. I don't say all this to be cynical, but it's just part of it you have to be ready for. Most of this job is enormously fulfilling, but it's on you to find that.
If, after all of this, you are still interested in Architecture, here's my recommendation for preparing for the Fall:
Of course, this is all based upon my own meandering experience, and parts of this probably don't apply to every person. Take it with a grain of salt.
Feel free to DM me if you have any further questions. Good luck!
Any type of notebook can be a BuJo notebook - that's the beauty of it!
I really don't care too much about the fanciness in mine, so I use old A5 maths exercise books like this as I find it easy to plot it all out!
I have one and it comes in very handy. Here is the link.
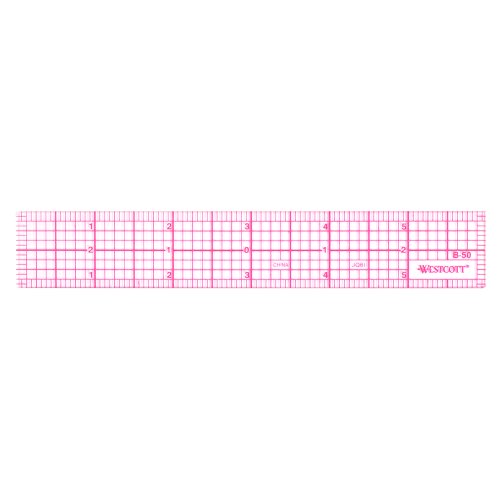
If you are going to try Broom Stick Lace, I suggest picking up a drafting ruler. The triangle shape makes it much easier to slip the hook in.
They have them on Amazon or at office supply stores.
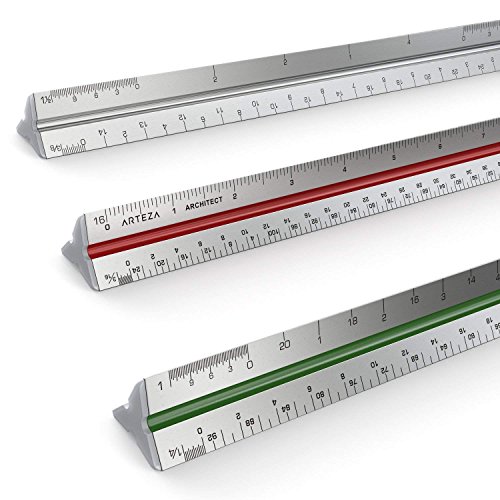
Arteza 12" Triangular Architect Scale Aluminum Color-Coded Grooves (Imperial) https://www.amazon.com/dp/B01LY2BJ1G/ref=cm_sw_r_cp_apa_i_pa0BCbVWWWPEE
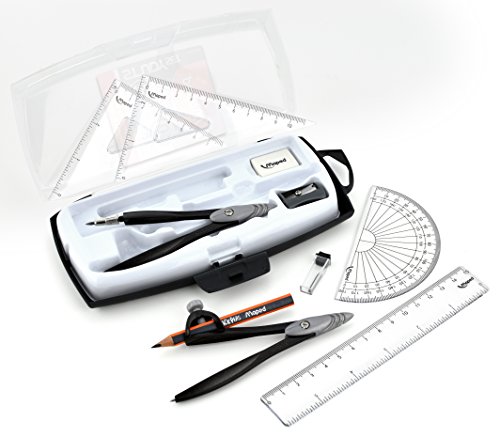
Right on. I'm thinking about getting this:
https://www.amazon.com/Mr-Compass-Protractor-Geometry-Students/dp/B01F4HU076/
Only $10 shipped...
What kind of turntable are you using? If you have a technics with an s-shaped tonearm the Technics Alignment Tool is the bee's knees.
Otherwise I like the mirrored protractors you hook on the spindle and align by eye. They're more tedious to use than the alignment tool but not too bad.
This is the one I own: Cartridge Alignment Protractor https://www.amazon.com/dp/B00OS7VO2Y/ref=cm_sw_r_cp_api_y3y8ybFW7BR6Q
Architects and engineers commonly use scales like this one.
Plans drawn at 3/4" scale means that 3/4" on the paper equals 1' in real life. So, on the ruler, every 3/4" is marked incrementally, indicating the number of feet the measurement is.
If it’s in its own room, there is an adapter on Thingiverse for a 4” tube to go to a fan and such to vent out a window.
https://youtu.be/Rhyf_JttQEY watch this to learn how to properly hollow prints. You don’t have to for jewelry unless it’s really thick but otherwise it’s worth doing to save on that expensive resin.
I personally only use Anycubic resin. I tried one of the cheaper trains on Amazon (monoprice) and couldn’t get anything to print on it. Ended up slowly mixing that resin into some Anycubic resin to not have a waste of a bottle.
If you have Facebook, there are great groups out there for troubleshooting and discussion
https://youtu.be/roAqm5c3rfU this is the flint reed method of leveling the bed. I heard of it before I got my printer and used this method out of the box. Works perfectly
FEP Film for UV 3D Printers - 5mil (0.127mm) Thick - 6 Pack https://www.amazon.com/dp/B07CTT6JNR/ref=cm_sw_r_cp_api_NQG5Bb1A0EJ4A
You’ll eventually need to change out the film. These work great and cost way less than the official $10 single sheet. YouTube how to change out. Pretty simple after you do it once.
When using the Photon slicer, I always use medium or heavy supports. Had several failures trying to use just light supports
That’s all I can think of for now.
Look for drafting supplies. Just do a quick search on Amazon.com and find some kits. Mechanical pencils get a thin and a thick for different line weights, or pens if he prefers but I make to many mistakes to go with ink. Triangle scale rulers are awesome and in my mind a must.
https://smile.amazon.com/Alvin-BDK-1E-Beginners-Drafting-Engineers/dp/B000JM47FS/ref=sr_1_3?ie=UTF8&qid=1481911877&sr=8-3&keywords=drafting
https://smile.amazon.com/Staedtler-Combo-Circle-Template-977/dp/B000KIBQ46/ref=pd_sim_229_2?_encoding=UTF8&psc=1&refRID=HDZAG4H645K0RBS0WTGD
https://smile.amazon.com/Staedtler-Drafting-Mechanical-Pencils-925WP3/dp/B000GR7SUM/ref=pd_sim_229_1?_encoding=UTF8&psc=1&refRID=HDZAG4H645K0RBS0WTGD
https://www.amazon.com/Flexible-Transparent-Shatterproof-Plastic-Straight/dp/B07QW5DP8C/ref=mp_s_a_1_3?keywords=ruler+bendable&qid=1574064789&sprefix=Ruler+be&sr=8-3 here.
Go Rams! Drafting is drawing the various pieces of the set to scale and often from multiple angles. For example, 1/4" = 1' would be scaled down to 1/48th of the original size, so a 4' x 8' standard platform would be drawn at 1"x2" in the drawing. Get yourself one of these bad boys and once you learn how to use it, it can help handle the math for you.
I bought these and they have been working just as well as the included fep, correct size and everything.
Interesting. I though I was done screwing with the cartridge, maybe not :( I ended up using this protractor instead of printing one. I thought it would be better to have "the real thing" but the mirrored coating makes it a pain in the ass. Do you know whether that's Stevenson? I don't know much about the ins and outs other than what to do with what I have. There is surprisingly no mention whatsoever in the listing or the reviews what standard it is. I assumed it was Stevenson since it's so commonly used.
Should the tonearm actually be completely parallel on the Orbit?
I would bet it has something to do with mis-alignment or anti-skate.
The needle is most likely riding in the groove incorrectly.
If you printed your alignment protractor, make sure it was printed correctly. It needs to be exactly right. Might wnat to buy one of these:
https://www.amazon.com/Sleeve-City-Cartridge-Alignment-Protractor/dp/B00OS7VO2Y/ref=sr_1_1?ie=UTF8&qid=1468248741&sr=8-1&keywords=alignment+protractor
Test your antiskate on a blank disc.
That's the stuff I use...
That is a sharpener for lead holders (I'm not sure what size lead). Specifically it is the Gedess Lead Pointer (Amazon link)
I like it, nice coverage and cool stickers. What might look cool is to add a black border around the edges with the really thin marking tape like this: https://www.amazon.com/Chartpak-Graphic-Inches-Black-BG1251/dp/B002Q1I2AG/ref=sr_1_2?ie=UTF8&qid=1505996982&sr=8-2&keywords=thin+electrical+tape
I really like it, good job!
I think they would absolutely work without the glitter! Painting the inside should work, but you might have to do multiple coats to cover any streaking.
I know they make lots of thickness of black tape that aren't glittery. I was originally going to use this until I found the glitter tape:
http://www.amazon.com/Chartpak-CHABG1251-Graphic-Tapes/dp/B002Q1I2AG/ref=sr_1_6?ie=UTF8&qid=1449277862&sr=8-6&keywords=whiteboard+tape
For the button they make the same type of cardboard in matte colors. If you go to the scrap-booking section of any craft store they'll be a bunch styles/colors to choose from!
The device on the right here is a parallel ruler. The idea is it slides perpendicular to the lines you draw, so that you can draw parallel lines. Like this.
I just came here to be snooty and tell you architects dont use rulers, we use scales ;P
https://www.amazon.com/Staedtler-12-Inches-Architect-Triangular-98718-31BK/dp/B001E67XZ4
I used silver prismatic ( pretty) duct tape and a neon index card to make a pocket for my small ruler
Geometry box
Like this one? https://smile.amazon.com/gp/aw/d/B01LY2BJ1G/ref=mp_s_a_1_3/132-3557358-8743653?ie=UTF8&qid=1494559555&sr=8-3&pi=AC_SX236_SY340_FMwebp_QL65&keywords=Architect+scale&dpPl=1&dpID=51s9kGRO8IL&ref=plSrch#immersive-view_1494559967675
I'm guessing I'd use the marks on the green side labeled 1?
Personally, I enjoyed the capability of my table-top drafting table that I ended up giving to a friend, but that may not always be the best suited since you either need a table or a somewhat stable surface to sit on (can work laying over your lap on a couch, for instance).
I always thought having a collapsible drafting table (stand folds up; think TV dinner tray), that would stand on its own, and be sturdy enough to not move when in use (locking positioning will be crucial). Given the fact that she paints, glass is probably the best idea. Also, angle adjustment will likely be very important to swap between a building surface for models, and a drafting surface for drawing.
This was the portable drafting table I had.
This is more what I always thought would be awesome to have, but it doesn't have the attached straight-edge; which I would deem necessary, but your girlfriend may not.
Hopefully those examples can lead you into building something appropriate.
Best of luck and have fun!
I like the Safe-T compass
https://www.amazon.com/Learning-Resources-Safe-T-Compass-Pack/dp/B07NC7RBDQ/ref=sr_1_2?crid=32L0V4XMMQUO6&keywords=safe-t+compass&qid=1558482307&s=industrial&sprefix=safe-t+com%2Cindustrial%2C127&sr=1-2
You could get a parallel straightedge board. I got one a few years ago but haven't gotten much use out of it since they really don't teach manual drafting at my engineering school.
https://www.amazon.com/gp/product/B001700RFU/ref=ppx_yo_dt_b_asin_title_o09_s01?ie=UTF8&psc=1
Or if you have the space and want to get REALLY fancy, a drafting machine. https://en.wikipedia.org/wiki/Drafting_machine
Neither of these are particularly good for notebooks though.
I bought these sheets, https://www.amazon.com/gp/product/B07CTT6JNR/ref=oh_aui_detailpage_o08_s00?ie=UTF8&psc=1. 6 sheets for $30.
This isn't exactly what you asked about, but maybe it'll help anyway.
I occasionally make lines between the dots of my LT1917 A5 and I use this ruler to do so. I line up the grid of the ruler using the dots on the page and draw the lines pretty easily. Obviously, this can still have some errors occur, but if you really like your LT1917, it might be worth it.
This is a physical way of demonstrating one (of many) definition of scalar curvature. Wikipedia has a good formula and explanation. https://en.wikipedia.org/wiki/Scalar_curvature#Direct_geometric_interpretation
Hopefully a more intuitive explanation is the following. Let A(r) denote the area of a circle (the set of all points in the surface at distance r to p) around a point p on the surface. Express A(r) as a Taylor expansion around r = 0. At orders 0 through 3, the series matches the formula one would get in flat space. At fourth order, it stops matching (in flat space the series is just \pi r\^2), and the coefficient of r\^4 is scalar curvature.
What this means is that for surfaces of positive curvature, there is less area than there should be in the plane, so when you flatten it into a plane there's a gap. For surfaces of negative curvature, there is more area than there should be in the plane, so you get a ripple refusing to flatten down. I like to think of a kale leaf.
When I learned this, my prof brought a kale leaf to class. I have a favorite tool for demonstrating this to students: https://www.amazon.com/ETA-hand2mind-85104-Polydron-Triangles/dp/B06XJH14M8
If you're not comfortable with curves, but are willing to prototype in cardstock, then I would recommend picking up a set of drafter's french curves. I have this set of 8, and they are a nice thick plastic (you can definitely just apply them to a squarish leather scratch-out and scratch against them ad-hoc), that you can make tick marks against with a sharpie to use the 'same curve' on multiple pieces.
I don't know a good way to make pleasing curves without doing it by eye, and I don't know a good way to make those curves discrete/repeatable without using a french curve. Bonus - these are also great for a wide variety of corner rounding.
I use an architects ruler like this. It lets me "scale" my drawings and work out dimensions. But I don't go full blown "drafting"... There are youtube videos on how to use them.
This is... really good for a second day doing calligraphy. Actually, it's pretty damn good for a second month doing calligraphy. Stop making the rest of us look bad by comparison, you talented jerk! >:( Ok, but you wanted tips on how to improve. So...
**
It's good that you're using a nib ladder, but it looks like you aren't using guidelines? Either that, you're using guidelines that are misaligned. One of these two things is causing irregular letter heights, and for each line of letters to sag downwards as it goes to the right.
Either way, it's an easy fix: when you make a nib ladder, align a straightedge to the bottom and draw a line to the opposite end of the page (a lot of people on here use a T-square or a rolling ruler; I usually just use another piece of paper because it's easier to tell if it's really perpendicular and also I am a cheapskate). Then do the same thing to the top of the nib ladder. If you want, you can also make a nib ladder on the opposite end of the page to check if the lines are really parallel. Do this for a whole page of lines.
When you've done this once, you can use that piece of paper to rule future practice papers: just make tick marks at the places the guidelines begin/end and use a straightedge to draw between them.
*
Other than that, it looks really good, especially for the second day! You have all the letterforms down, your strokes are confident, and you're keeping the nib at a consistent angle. I'm especially impressed with C, O, Q, and G—it was months before my circles were that even. some days they still arent! If not for your title, I'd have guessed you were at least 3 weeks along. Bravo!*
>The letters S, X, and Z
Saaaaaaame :( I'd suggest studying the geometry of those letters. X and Z are basically diagonals drawn across a rectangle. Figure out the proportions of that rectangle (x units wide by y units tall) and try to internalize them. Try drawing a bunch said rectangles and filling them with X's and Z's. Then have that in mind while writing them. It looks like you might already be doing this, since they're underlined? If so, ignore this entire paragraph except the last sentence. If not, I found this pdf to be mildly helpful, although not as helpful as I thought it would be when I first found it, if that makes sense. I'm afraid it's mostly going to come down to practice.
S is like that, but more complicated. There's guides out there that have it as circles inside of circles, or inside a half-square, but I could never keep it all in my head. So far, I don't have a better answer than "practice, compare with examplar, practice some more." There's some pretty awesome people in this sub, though, so maybe one of them will have better advice.
One final note that has nothing to do with calligraphy:
I haven't seen anything like that in a stencil form, but perhaps something like this might help you.
Hey there! I'm thinking a geometry set that includes a protractor and miscellaneous drafting tools. Those were indispensable my 7th grade year.
OR, if he's not at that level, maybe a notebook with a quick-reference sheet. There are math-themed, English-themed, and Geography-themed notebooks which have simple equations, syntax rules, or world maps. Those were always awesome! :)