Best construction rulers according to redditors
We found 125 Reddit comments discussing the best construction rulers. We ranked the 76 resulting products by number of redditors who mentioned them. Here are the top 20.
We found 125 Reddit comments discussing the best construction rulers. We ranked the 76 resulting products by number of redditors who mentioned them. Here are the top 20.


Tools/Materials:
You find all of these supplies at Walmart.
As far as an approach, for some games I've used existing plans (Castles of Burgundy, Descent), but others I haven't found plans or didn't like the plans others had.
When creating my own plans I use the following process.
Having good spacial awareness helps to visual how the components will fit. My insert for Agricola took forever to figure out how to fit the pieces in a useful way. That game is dense.
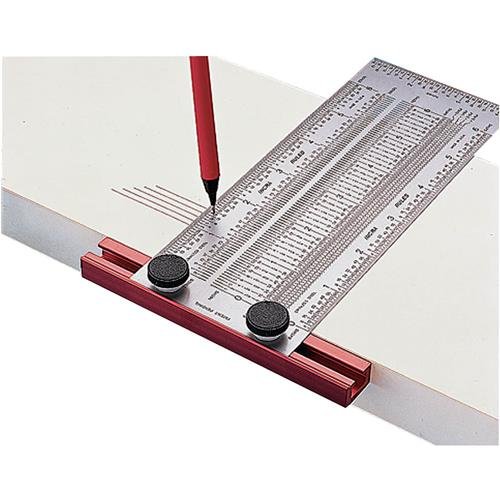
Some good suggestions, but this ruler would be my pick. It is constantly being used when doing precision work. Always in my pocket. Got my dad who is an old school woodworker one, and he loved it.
http://www.amazon.com/INCRA-TINYT03-Precision-T-Rule-3-Inch/dp/B002GU68LM/ref=pd_cp_hi_3
No it isn't, it's inertia. Telling a 50 year old architect who's been using stupid US measurements for years to change units completely is difficult because you need him to do the complex conversions in his head that the article writer couldn't even do between centi and millimeters.
And the "Metric Maven" really doesn't understand how to use amazon. Bad article.
Incra rulers:
Here is a video of it: https://www.youtube.com/watch?v=X4P-I8b2rxs
This one is awesome.
https://www.amazon.com/gp/product/B00004TRBX/ref=ox_sc_act_title_2?ie=UTF8&psc=1&smid=A2F8KAB7F15GZF
I'm pretty sure any woodworker would like this A LOT
SECTION | CONTENT
:--|:--
Title | Basic parachute patch. Skydiving Services LLC
Description | This video is about Basic parachute patch. Skydiving Services LLC. It will help people preparing for the parachute rigger oral and practical test. If you need to book a rigging course or test contact me at [email protected] are some links for the squares and rulers: https://www.amazon.com/gp/product/B000YQEUBK/ref=oh_aui_search_detailpage?ie=UTF8&psc=1 https://www.amazon.com/gp/product/B000TSWOLQ/ref=oh_aui_search_detailpage?ie=UTF8&psc=1 https://www.amazon.com/gp/product/B000YZ43T0/...
Length | 0:26:07
****
^(I am a bot, this is an auto-generated reply | )^Info ^| ^Feedback ^| ^(Reply STOP to opt out permanently)
---
Section 1: Tools
---
Note: Just because it is more expensive doesn't mean it is better. You could get by just fine with the "cheaper" options.
---
| Tool | Required vs. Optional | Use | Notes | Price & Link |
|:---|:---:|:---|:---|:---:|:---:|
| Tandy Wholesale Membership | O | Allows you to get better pricing at Tandy. | This is definitely optional. Items will cost slightly more without it OR if you have a tax ID you can get the membership with better pricing for free. | $35 / Free|
| Awl Haft | R | The handle which will hold your blade. | This particular haft allows for different blades to be added or removed with ease. | $16 / $35|
| Diamond Awl Blade| R | This is the blade used for piercing the holes in your projects.| This goes in the awl haft.| $4.80 / $28
| Channel Groover | R | Used to measure and gouge channels where your thread will lay. | Some say gouging a channel is optional however I find it to be required. It further protects your thread from damage. | $16 / $80 |
| Overstitch Wheel | R | Marks where you will punch your holes. | This particular overstitch wheel is a few dollars more than the versions that only offer one wheel. | $24 / $225 |
| Edge Beveler | R | Used to bevel and round off the edges of your project prior to burnishing. | Sizes vary. The smaller the number, the smaller the round edge. | $12 / $55 |
| Adhesive Glue | O | Used to hold your pieces of leather together prior to piercing the holes. | Some people prefer binder clips instead of glue. I've found that the clips end up making marks on my projects so I've always stuck with glue. | $6 / $30 |
| Gum Tragacanth | R | Used as a burnishing agent for your edges.| Some people use saddle soap. I prefer gum trag.| $6.40 / $21|
| Harness Needles | R | Used in combination with the thread for your projects. | Avoid the stitching needles. They break very easily.| $5.99 / $7.50 |
| Xacto Blade | R | Used for cutting projects. | You may have one of these at home already. Be ready to have replacement blades handy ($21.95) | $2.49 / $50 |
| Self-Healing Cutting Mat | R | Used for cutting your leather projects.| You may have one of these at home already. If so, you can obviously use that.| $14.73 / $50.80 |
| Cork-backed Ruler| R | Used for cutting straight lines.| I highly recommend the cork-backed version. It will save from accidental cuts/slips.| $4.80 / $14 |
| Burnishing Tool | R | Used in combination with the gum tragacanth to get a good burnish.| A good piece of canvas can be used as well. | $8.99 / $80 + $99|
| Sanding Tool| O | Used to sand down the edges prior to burnishing.| You might have sandpaper at home. Feel free to use that too.| $7.30 / $0 with dremel|
| Steel Square | O | Used for creating nice, even squares/rectangles for projects. | Learn to use this correctly!| $8 / $14|
| Thread Cutters | O | Use these for cutting your thread in the hard to reach places without running the risk of damaging your project. | Scissors work for cutting thread and the xacto blade can work for cutting thread inside your projects -- just be careful! | $3.95 / $39 |
| Maul | O | Used for end punches, rivets, snaps, chisels, or irons. | You really only need one of these if you are planning on doing any of the activities mentioned previously. | $20 / $55 |
| Pricking Iron/Chisel | O | Use these to mark or punch your holes instead of an overstitch wheel and awl. I prefer using the overstitch wheel and awl but others like the irons/chisels. | There is a big difference between irons vs. chisels, diamond vs. lacing. They all produce different results. Definitely ask before purchasing! The ones I linked are very different.| $12 / $259|
| Creaser | O | Used for decorative creases on things like card slots. | Definitely optional and definitely personal preference. | $14.40 / $72 |
| Wax | O | Used for burnishing. Gives the edges a nice seal. | The $10 is my top secret wax I use. I bought a bunch on sale for $5 and it is fantastic. | $4 / $10|
---
Incra t rule
The combined stress of all 6 (or 7) strings of your guitar is quite a bit of force for the neck to resist. A minor change in the string tension shouldn't greatly affect your neck action. If your neck was a noodle it would go out of tune when you bent a note. Also the change in stress the neck of your guitar feels by changing from 9 to 10's is probably small compared to the amount of stress induced by thermal variations your guitar experiences during the day. If your guitar buzzes like hell with 10's, it probably buzzes like hell with 9's. Just saying.
These things aren't really separate, but all fall under the umbrella of "guitar setup". Setting up a guitar takes time, practice and experience. There are several variables at play here, namely: height of the nut, height of the saddle, bow of the neck (i.e. truss rod). Also involved are height of the pickups, height of the frets, evenness of the frets, radius of the fretboard. If you have a properly setup guitar and you want to then adjust the intonation, it is fairly easy. If you want to adjust the action, it is fairly easy. If you want to do one or the other with a guitar that is poorly setup, then changing one will probably greatly change the other.
Here is an image that I made a number of years ago for the deanguitars.com/forum. I made it because it seemed that everyone was trying to get their action as low as possible with no fret buzzing, but they weren't getting the results they wanted: everyone instinctively wanted to put the bridge as low as it would go, and use the truss rod to put enough of a curve in the neck to stop buzzing. Doing the opposite gives much better results: http://imgur.com/mhMOu Maybe this image will help you, maybe not. (note that I'm not saying that you want a "flat" fretboard, I am just saying that higher saddle height and "less" curve of the neck can give much better action).
If you are serious about setting up your guitars action, do not delay and buy one of these:
http://www.amazon.com/General-Tools-300-Precision-Stainless/dp/B00004T7SW/ref=sr_1_4?ie=UTF8&qid=1311814731&sr=8-4
You will need something that measures the action of your guitar to the 1/64 th of an inch. Rather than relying on "feel" as you drunkenly adjust one of the many variables controlling your guitars action, you can quantitatively measure it and know exactly how a quarter turn of your truss rod changes things.
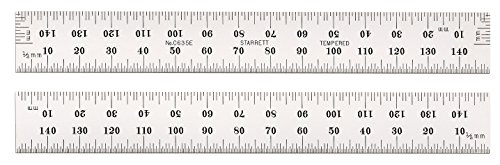
Starrett
Glubot - it looks funny to a non woodworker, but it is an amazing thing to have around the shop. It makes glue ups about 100 times more enjoyable. Maybe get some silicone brushes to go with it.
Magnifying Lamp - a great addition to any shop. Be sure to get one with a long arm like this one so he can mount it behind his bench and still be able to use it.
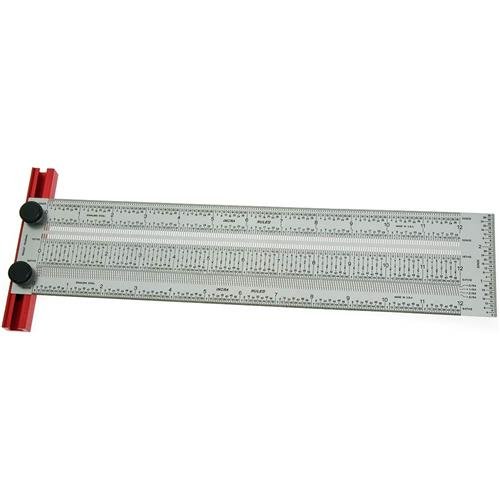
Incra Rulers - these are the best damn rulers you'll ever use. The slots make consistent marks that are very reliable. A 12 inch T ruler would be best, but this one is also cool.
Wool Socks - if you live in a cold climate and his shop isn't heated, this would be an awesome gift. I got these socks specifically and they are awesome. Me feet never overheat, but they keep me very warm and are very comfortable. This is a damn good deal actually... I might order these now.
Just get a small 6in scale ruler like this https://www.amazon.com/Starrett-C316R-6-6-Inch-Steel-Graduations/dp/B0002FUN0K
Or this and cut the rounded end off https://www.amazon.com/Mascot-Precision-Tools-Metric-Scale/dp/B0006O99V6
The tandy beginner set is geared towards tooling, which certainly does require veg tan. Depending on whether or not that's the aesthetic you are going for, you may not need the swivel knife and stamps (or you may want many more stamps). But at it's core, you need:
And a slight step above that is something to finish edges (acrylic edge paint, water/gum tragacanth/wax etc.)
I personally do not do a lot of tooling, and also usually use stitching (vs rivets), so if I were going to recommend some starting tools I would say
Edit: I didn't include an awl because the Seiwa irons are designed to punch through, but a good diamond awl from Bob Douglas/Barry King or similar would probably be my first upgrade to this set of tools.
The things I use a lot:
Think thats it?
I actually don't know, but if you just need basic truss rod/action adjustments, I would recommend learning to do it yourself. It's really not that hard and the tools can be found at any local hardware store. Adjust in this order:
Truss Rod: You will need Feeler Gauges and a Capo on the first fret. press down with one had on the low E on the fret where the neck meets the body and stick a feeler gauge (.010") between the fret and the E string halfway between the first fret and the one you are pressing (usually 8th or 9th). Adjust the truss rod until the gap allows the gauge to slide in without pushing the string, and with no residual gap. The truss rod section of this page is good.
Bridge Height: You need a 6" Steel Ruler to measure the strings to your comfort, around 5/64's of an inch on the low E and 4/64's on the high e measured at the 17th fret. Adjust the bridge height with a screwdriver or allen wrenches as applicable.
Nut Height: You'll need your feeler gauges again and nut files that match the gauge of each string. You may be able to find a cheap alternative in a hardware store. As a rule of thumb, any tool branded as a luthier tool probably has a dirt cheap exact alternative at your local hardware store. Nuts should be filed down so that the string lays in halfway in the groove, halfway over the top. Bottom of the trough should be filed down to be .010" from the top of the first fret (use the feeler gauge).
Intonation: quoting from that fender link i posted above
>Set the pickup selector switch in the middle position, and turn the volume and tone controls to their maximum settings. Check tuning. Check each string at the 12th fret, harmonic to fretted note (make sure you are depressing the string evenly to the fret, not the fingerboard). If sharp, lengthen the string by adjusting the saddle back. If flat, shorten the string by moving the saddle forward. Remember, guitars are tempered instruments! Re-tune, play and make further adjustments as needed.
skipping the nut height isn't the end of the world if you dont want to shell out for the files.
Edit: oh and pretty much any tool has a high quality demo video on stewmac.com so check those out.
God damn you reddit, you made me spend money, again.
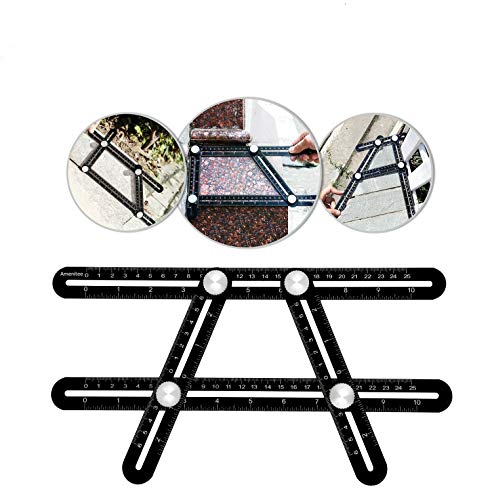
Amenitee Angle Measuring Tool-Universal Angularizer Ruler - Full Metal Multi Angle Measuring Tool-Upgraded Aluminum Alloy Ruler (Black) https://www.amazon.com/dp/B07589P46D/ref=cm_sw_r_cp_api_i_XlS6CbW6VRQ9F
Hard to say for sure without knowing his shop, so you'd probably want to try to scope out any recommendations for specific stuff to see if he already has something similar before you buy.
A good suggestion that I think always works well for any budget is to go to a local hardwood dealer and just pick out a selection of interesting exotic lumber, any woodworker will always appreciate getting cool woods to use in their projects.
If you want to have some ideas for stocking stuffers / tools though I'll list some cool things that I think are not super common that I enjoy owning or make my life easier.
Tiny-T Pocket rule
6" precision t rule
A really nice miter gauge
Router setup bars
A nice marking knife
Marking gauge
Magports
Tapeboss
Grr-ripper
Dozuki & Ryoba
Alexa (Alexa, what is 5 and 3/8 times 16... Alexa set reminder for 30 minutes to spray the second coat... Alexa order shop towels... etc, it's actually really useful, and it plays music too)
Shop apron
Quick sanding strips
Digital Angle Gauge
Digital Height Gauge
Anything from Woodpeckers is pretty much guaranteed to be great, albeit kinda pricey
I didn't use any books, I just watched the video. I saw the beginning where the guy showed how the slot isn't square, and thought "I can make a cut that isn't square."
I used this, one of these, these, and a pencil.
I think it's wiser to learn how to properly setup a guitar on your own. It's not as difficult as many people think and only requires a few amount of tools. Here's what I use:
That's basically it. You don't really need anything else unless you are getting into advanced guitar repair stuff like fretwork or wiring and the like (in which case I would advise you do take it to a pro unless you know what you're doing).
Total cost = $39.93 That's cheaper than any professional guitar setup I know of.
From there you just have learn how to do simple things like neck adjustments, intonation, string height, and pickup height. You can find out how to do all of this stuff with a simple search on youtube.
The advantages of doing it yourself are plentiful. You can find out exactly what relief you like in the neck and exactly what type of action you like on your strings. Professional setups just setup the guitars the way they think they should be setup which isn't always the way you would want to do it.
Also, my guitars go out of whack with the seasons as the neck can fluctuate with the temperature and other things. Rather than pay another x amount of dollars to get it setup again, you can just set it back to the way you original set it up.
TL;DR Learn to setup a guitar yourself. It's better.
EDIT: You need a tuner too. For some reason I just think every guitar player has one of these already.
One of these amazing rulers would be a great gift too
https://www.youtube.com/watch?v=X4P-I8b2rxs
A thread about them recently blew up on this subreddit. The 12" is only $15 on amazon http://www.amazon.com/Incra-RULE12-12-Inch-Rules-Marking/dp/B0000DD2U7/
the factory edges on a sheet of plywood can be considered straight. Rip the long edges of a sheet of plywood off for the rails of a router flattening setup then rip the factory edged short ends off of the plywood to use as the vertical ribs of the router sled. Spring for a high grade plywood for this sort of thing, baltic birch or other cabinet grade plywood is a pleasure to work with.
Edit 2 more pieces of something straight can be used as winding sticks to make sure your rails when set up don't twist. I recommend a metal straight edge/ruler, these can be had cheaply here: http://www.amazon.com/Starrett-ASE-24-Anodized-Aluminum-Straight/dp/B002C29SG6/ref=sr_1_4?ie=UTF8&qid=1414522871&sr=8-4&keywords=straight+edge
1kg 00 flour
600ml Yorkshire water
30g pink salt
Teaspoon of ADY
Made 10x 170-175g balls which for me are 9 to 11 inch pies depending if I want big crust or not.
2 room temp prove after mix and kneed. 24hr cold ferment, out of fridge and 2 hours room temp then balled, then another hour to rise abit.
New flour really made a difference, higher protein than my normal one, lots more colour. Link below.
Molino Grassi Italian Flour for Pizzas and Focaccia, 1 kg, Pack of 10 https://www.amazon.co.uk/dp/B07FWMVW5R/ref=cm_sw_r_cp_apa_i_OKWuDbK6MY3KR
I just did this floor plan on a box lid and yeah straight lines suck.
First, I would suggest drawing everything in pencil with a ruler. I always do this - not sure if others do or not.
Second, there are two ways you can do the lines. Free hand can work if you take your time, but it's always going to give you a little waviness unless you're very good. The other way is to get a steel ruler with a cork backing (something like this). Set that right next to your pencil line and you have a guide for your burner to run along.
Practice!
What burner are you using? I just use the Walnut hollow Versa Tool which isn't too elaborate or expensive, but the rheostat for the temperature can help a lot. I think /u/smolderingdesigns uses the same tool, and she does way better work than me. There are much nicer tools out there, but I wouldn't say they're a requirement to do good work.
I got mine on Amazon... E.g. Alvin R590-36 36 inch Flexible Stainless Steel Ruler https://www.amazon.com/dp/B000UQ3REA/ref=cm_sw_r_cp_api_KqjIyb0VXKVCN
https://www.amazon.com/Incra-RULE06-6-Inch-Rules-Marking/dp/B0000DD2U5
https://www.amazon.com/T-RULE06-6-Inch-Precision-Marking-T-Rule/dp/B00004TRBW
https://www.amazon.com/Incra-RULE12-12-Inch-Rules-Marking/dp/B0000DD2U7
these are my favorite tools for measuring in the shop. might go for the 3 inch t-rule this year.
Oh I would only use the calipers on a blade I just bought and plan on rehoning. Otherwise I've got a few of these six inch metal rulers to measure to the nearest 32nd if I want but I usually just do to the 16th. The rulers are handy for carrying into antique stores and markets. I should start carrying my 10x loupe with me. I've picked up a few razors only to find later they had some tiny chips in the bevel (it doesn't ruin the blade just means I have to do extra work on the hones to get the chips out).
That sticky is exactly what you need. I would add that a ruler that has a non-slip/cork back on it is essential for your sanity. Something like this: https://www.amazon.com/Metal-Ruler-18-Cork-Back/dp/B003W0R8EG
Also, perfection is nice, but mine are super wonky and still work. After I've made them I never look at the detail again. You can make them fairly quickly and with some nice zen if you are okay with "happy little accidents"...
Well it all depends how you print out the images, and how used to it you are. I'd say by the end of my degree I was much quicker and more accurate with a scalpel than I ever was with a guillotine.
As to the sharpness, you swap the blades out, which is why I say scalpel instead of craft knife (hobby stores are awful for gouging pricewise).
So you can get a handle for £1.29 (http://www.amazon.co.uk/Swann-Morton-no3-scalpel-handle/dp/B0038WJPGC/ref=sr_1_3?ie=UTF8&qid=1395077088&sr=8-3&keywords=swann+morton+scalpel)
A box of 100 blades for £9.97 (http://www.amazon.co.uk/Swann-Morton-number-scalpel-blades/dp/B001VG4P5I/ref=sr_1_2?ie=UTF8&qid=1395077088&sr=8-2&keywords=swann+morton+scalpel)
And a ruler for about £1.46 (http://www.amazon.co.uk/Silverline-MT66-300-Steel-Rule/dp/B000LFVRK6/ref=sr_1_1?ie=UTF8&qid=1395077127&sr=8-1&keywords=steel+ruler)
The handles will last forever and as long as you're getting the proper blades they have a decent life too - I didn't even get through a box of 100 through my entire course.
I've always preferred the Starrett 316R. It has 10ths & 100ths on one side and 32nds & 64ths other side. It's expensive but I thought it was the easiest to read.
https://www.amazon.com/Starrett-C316R-6-6-Inch-Steel-Graduations/dp/B0002FUN0K
I did some looking on Amazon and found this gauge and it comes with a deal on epoxy to attach it. Do you think this would make sense? https://www.amazon.com/gp/product/B00QWFYA7G/ref=ox_sc_act_title_2?smid=A1M28DLBL7Z5KO&psc=1
You could get a machinist scale: they don't have any empty space before the zero.
Someone just asked a similar question yesterday. Their budget was only $20 but there are a ton of good ideas in that thread and you could just get him a few items.
The most popular item was the Incra Precision T-Rule and Incra has a quite a few other items that he may find useful (regular precision rule, bend rule, centering rule, protractor) and they all come in different sizes. If the 3" is too small, there is 6", 12" and 18". Just search Amazon for "Incra Rule" and you'll see them all. I've added the 3" T-Rule and Regular Precision Rule to my Xmas list. I've also added the 6" T-Rule and the protractor to my own "Wanted List" for a future purchase.
My recommendation in that thread was a woodworking calculator that computes within Feet and Inches down to 1/32. It does metric, areas, board feet, and more as well. Very useful tool that most people don't realize how much they would use.
And here's a link to the thread itself: http://www.reddit.com/r/woodworking/comments/2olpbx/best_woodworking_gift_for_under_15/
Thx for the info. I just bought this one due to your post.
Sure:
Molino Grassi Italian Flour for Pizzas
Quite honestly it will be a revelation to your dough making compared to bread flour. Make it as wet as you can get away with while still being manageable then knead in with sprinklings of extra flour until you get that perfect texture.
I use this all the time for when I have any angle that isn't a perfect 90 or 45 degrees.
Wouldn't a 6 inch scale be more compact and a bit more functional? Or maybe a machinist's scale?
Best way to meet members of the opposite sex. Hmmm...I'm going to go with doing the things you like to do. If it's not completely one-sex dominated (mudding, quilting, etc), then you know you have at least that activity in common. That will get your foot in the door, as long as you don't go all stalkery on them.
These were the only things on my lists that qualified. Would be one step closer to having all the tools I need for my classes.
A marking rule is good for smaller things: https://www.amazon.com/Incra-RULE12-12-Inch-Rules-Marking/dp/B0000DD2U7
Starrett rule.
metric
inches
Pizza Flour: https://www.amazon.co.uk/gp/product/B07FWMVW5R/ref=ppx_yo_dt_b_search_asin_title?ie=UTF8&psc=1
Would something like this be good enough? https://www.amazon.com/Anodized-Aluminum-Straight-Guaranteed-Within/dp/B017CG96UY/ref=sr_1_2?ie=UTF8&qid=1467852700&sr=8-2&keywords=precision+straight+edge
I just started as well using only hand tools. Hopefully this helps in some way. Don't hate me if it doesn't.
So far here is what I've collected:
Note - I have no idea if that knife sharpener is correct to use with the chisels and plane. I'm only using the fine stone and it seems to work, but I have no idea what I'm doing in that department.
This seems to cover the basics for me. I'm about halfway through a desk project and struggling, but I think that's user error more than the tools. More clamps and a better workspace would work wonders.
You can use a crack monitoring gauge:
https://www.amazon.com/CRACKMON-4020A-Heavy-Duty-Building-Foundation/dp/B00QWFYA7G
For reference only. You can get them for significantly less money, if you shop around.
Checking your chain alignment is really really easy.
Get a ruler. Metric is preferable, but if all you have is inches, we can work with that. However, if it's an inch ruler, this is going to be a lot harder. I have one of these. I use it for a lot of stuff, and you can get them almost anywhere, so I would recommend you get one.
Measure from the center of your seat tube to the inside edge of your sprocket. The more precise you measure, the better your chainline will end up, but at a minimum, you need to measure to the nearest 1mm (or 1/32 inch). Write that number down. We'll call this dimension S.
Now measure from the inside of your dropout to the inside of the driver teeth, again to the nearest 1mm (1/32 inch). White that number down. We'll call this dimension D.
Finally, add S and D together. If you used inches, you need to convert fractional inches to decimal inches, then convert the inches to mm. Don't be scared, Google will do it for you.
For a perfect chainline, S+D=55. If it's less, add spacers between the sprocket and the frame to make up the difference.
For example, suppose you measured your sprocket at 42mm, and your driver at 12mm. That's 54mm, so add a 1mm spacer.
If S+D is greater than 55, remove spacers. You might get in trouble with stuff hitting your chainstays though.
By the way, 55mm is 1/2 the width of the hub (BMX hub spacing is 110mm). We are just using the inside of the dropout as a reference plane to measure the distance from the driver to the centerline of the bike. If you have a driveside hubguard, you need to subtract that thickness from the D measurement.
I hope that helps.
Just go slow, don't use too much pressure on the blade, and don't be afraid to make multiple passes. As long as you don't shift the straight edge you will get a perfectly clean cut even with three or four passes.
Using lines on the mat will not get you the precision that you need. Use a good square and line it by feel against your already perfect edge. The hardware store square from your garage is probably not actually square enough. Make plenty of layout marks with a sharp scratch awl. Look into the Incra t-square, it's very handy for parallels.
Also here's a method which I haven't tried yet but wish I knew about long ago: https://www.youtube.com/watch?v=1JAPRs6tx2w
The ruler is branded "Silverline", and I've found it on Amazon for you here: https://www.amazon.co.uk/Silverline-MT66-Steel-Rule-300-x/dp/B000LFVRK6
where do you live? US?
Amazon, HD, office depot, staples, etc. Harbor Freight has aluminum ones as well, which is fine. Just get a metal one without a cork back.
Example: http://www.amazon.com/Carpenter-Stainless-Steel-Straight-Measuring/dp/B009EOQ0VG/ref=zg_bs_553278_18
Sorry for the double up comment, but if you're really interested in a kit, here are each of the tool's they'll give you
Feeler Gauge
Allen Wrench Set (this is actually more comprehensive)
64th inch ruler
Straight Edge (For judging neck relief/bow)
Mini Screwdrivers
String Winder (with wire cutter)
Compare to $60 dollars
$100:(http://www.stewmac.com/Luthier_Tools/Essential_Tool_Kits/Basic_Setup_Kit.html)
This actually seems like a solid deal, but you can get all of these at a hardware store for less and not pay for shipping and wait around for it.
I'm a huge fan of Starrett scales and rulers. They have a nice satin chrome finish with crisp embossed lettering and numbering, and they're solid and durable too. I pretty much always have the 6" scale in my pocket when I'm in the shop.
Here's an Amazon link to the one I use:
Starrett C604RE-6 Spring Tempered Steel Rule With Inch Graduations, 6" Length, 3/4" Width, 3/64" Thickness https://www.amazon.com/dp/B0002FULFM/ref=cm_sw_r_cp_api_Gga6xbHV0ZRZ0
You only need a mark for the beginning and the end of the line. Once those are marked, it's best to use a straight edge like this or this.
Bill was using a triangular scale which are really common in the engineering fields.
It is and it isn't, drafting is still taught in most schools as an introduction to CAD to understand the drawing standards. All the engineering programs I've seen stick with CAD or 3D modeling but architectural programs still like hand drawn models.
We would need more pictures of the surrounding area, and maybe the exterior, before we'd have any sense on if this is benign or something that needs immediate attention.
How about a crack gauge to monitor this? It'd allow you to see if it has stabilized, or is continuing to grow:
https://www.amazon.com/CRACKMON-4020A-Heavy-Duty-Building-Foundation/dp/B00QWFYA7G
If it is stable, you could use a self-leveling caulk to seal it:
https://www.homedepot.com/p/Sikaflex-29-oz-Gray-Self-Leveling-Sealant-106711/202523824
Given that the cracks are minor and the house is 30 years old, I wouldn't be that concerned. I'd be surprised to find an uncracked basement foundation in a house that age. Sealing and monitoring would be appropriate.
If you really wanted to go nuts you could install some of these and check them every three months or so.
an Incra t-square, and a bunch of .05 mechanical pencils to use with it.