Best electrical conduit fittings according to redditors
We found 53 Reddit comments discussing the best electrical conduit fittings. We ranked the 35 resulting products by number of redditors who mentioned them. Here are the top 20.
We found 53 Reddit comments discussing the best electrical conduit fittings. We ranked the 35 resulting products by number of redditors who mentioned them. Here are the top 20.


DEWALT DWA2600IR Impact Ready Conduit Reamer https://www.amazon.com/dp/B00OA02UBS/ref=cm_sw_r_cp_api_0yMVBbWEH0WGQ
I don't have the exact make/model. These outlet covers came with the house. Some are clear enough that you wouldn't even need to drill a hole, but would not work with IR. If you go to any home improvement store you fill find them in the electrical isle. They also have white/grey ones if you plan on cutting out a hole anyways there isn't a need for clear. Here are some examples:
Home Depot
Lowes
Menards
Amazon
Simple setup.
BOM:
Software side:
Notes:
4 channel relay setup is necessary because the valves function when the user reverses the polarity of the 12V power.
Valves have internal limit switches and do not need monitored or timed by user. When it's "open" it stops supplying power to it's own motor until polarity is switched.
ewelink works but Google usually reports an error in function even though there is none and it fires correctly every time when the routine is called. The cause of this is still unknown.
Valves can be left in a partially open position.
My setup is to simply control the shower and tub function of being on or off. It does not regulate the temperature because this setup will be upstream of the showerhead/faucet via a single PEX line carrying water that has already had the temperature regulated. If you were to set your physically controlled handle to where you like it then sure, the "problem" of having the perfect temperature every time is also addressed. It could also be addressed by setting the time that the valve turns when opening if you used this in a hot/cold control configuration rather than on/off. The setup is rendered useless when the upstream valve regulating the temp of the water is not open.
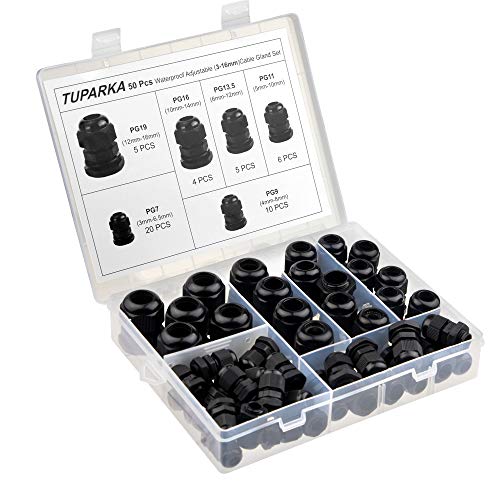
What I think you're looking for is a bulkhead fitting like this, usually installed so the threaded part is facing the inside but you could mount it the other way and get a cap that screws onto it.
You could also use something like this a cable gland but grab a closed end sealing nut to make it into a cap.
Yup, this is the answer.
Drill a hole in the blank plate. Run cables through. Bolt the camera to the blank plate. Use silicone sealant under the camera and around the hole and where the screws go through the blank plate.
Then make your connections, test everything, and put silicone around the edges.
If you really want to put the camera separate, use a cable gland to feed the cable through into the box.
Strain Relief?
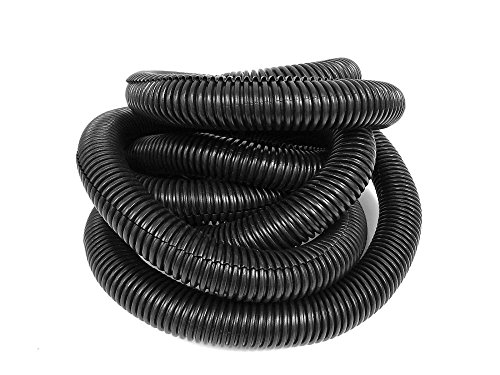
If you are running a bunch of pipes or racks, get something like this.
https://www.amazon.com/DEWALT-DWA2600IR-Impact-Conduit-Reamer/dp/B00OA02UBS
You want split loom (or if you're really fancy, the Tech Flex kind).
Sure, here are some links to the components.
Basic kit: https://smile.amazon.com/gp/product/B00Q8JT9H2
Batteries: https://mahbattery.com/sanyo-ncr20700b-4050mah-15a-battery/
BMS: https://www.aliexpress.com/item/32821764284.html
Triangle Bag: https://smile.amazon.com/gp/product/B006JA8WEG
Cable Glands: https://smile.amazon.com/gp/product/B07KFCGFYF
Torque arm: https://www.ebikes.ca/product-info/torque-arms.html
If you've never built a battery before and don't have the tools I would start with a pre-built pack. Spot welders are expensive and a mistake building a pack could be destructive and life threatening. My pack is a 48v nominal pack (39-54.6v). I'm not sure about using a true 52v pack(42-58.8v), though I'd guess it would be "ok".
Amazon has them
You may want to look into one of these vs the Wago on your power line. Its waterproof and secures the line better. Don't want to get shocked or have an fire because line was accidentally tugged on. https://www.amazon.com/gp/product/B01N5I73QI/ref=ppx_yo_dt_b_asin_title_o02_s00?ie=UTF8&psc=1
Other then that it looks great!
You'll also need any 3-prong extension cord for the AC side of the driver. I just used one of these to make the AC cord connection, and it works nice and easy.
for the DC side connections, I like Wago 221 terminals, but you can use any wire terminal, or just solder the leads... that's a pretty simple connection.
If you don't want to build a frame, you can order a sheet of aluminum cut to size HERE, then just drill holes for mounting and hanging. It may run you an extra $30-40 over making a frame from angle aluminum, but it might save you some time and effort. (note: i'm not sure how rigid a big sheet of 1/8" aluminum would be, but I think it should hang flat).
https://www.amazon.com/ATPWONZ-Waterproof-Junction-Outdoor-Electrical/dp/B01N5I73QI/ref=mp_s_a_1_5?ie=UTF8&qid=1541518744&sr=8-5&pi=AC_SX236_SY340_FMwebp_QL65&keywords=waterproof+power+connector&dpPl=1&dpID=41cd%2Bk1Nx-L&ref=plSrch
I've been using these connectors to connect the wires to the driver. They make T connectors too. It can fit about 4 18g wires in each pole max, but they make for really clean builds. Wago connectors are handy, but I don't trust them in the long run for a grow environment.
These are great as well https://www.amazon.com/ATPWONZ-Waterproof-Junction-Outdoor-Electrical/dp/B01N5I73QI/ref=sr_1_4?keywords=waterproof+power+connector&qid=1563477341&s=gateway&sr=8-4
I got some of this http://www.amazon.com/Carlon-CRL-12007-100-COND-100ft/dp/B008N00FXG at my local lowes for ~$30. Not sure why it's so much on amazon.
But based on my research, it's fine for low voltage applications, and once you have it run, it's fairly easy to run line through. Shopvac+plastic bag tied to the cables you want, and you're good.
I just ran a conduit to all of the areas I wanted to have access to. In some cases, I just followed the phone lines through the attic, in others I went ahead and just drilled a new hole with some care and pushed the conduit through there.
In one case I just ran it through a closet, and secured it to the front corner (out of sight). No visible cables, but if I decide I want to run anything else I don't have to get my fat ass back into the attic. I've run cables by themselves before, and had too many times where I ran a cable and accidentally stapled through the cable, then had to re-run. With conduit, I just stapled a zip tie, then secured the conduit to that. It doesn't look that pretty in the attic, and thankfully I have a drop ceiling in my server room so I can hide the conduit, but all in all it was fairly painless.
Oh! And get some wire lube. Don't use a lot, but I've heard some horror stories of dish soap or other lubes eventually causing problems with the cables down the road. Wire lube is meant for this job, and won't cause you problems.
Depends on the LED strip you bought and how the RGB controller connects to the lights. Some solderless RGB connectors will match up with male breadboard pin headers, but not all of them.
Personally, I would avoid all solderless connections that don't have screw terminals. I have a mix of both soldered and solderless connections in my kitchen and I have had to go back and solder most of them due to failures of the solderless connectors.
Soldering is not difficult at all. Buy a cheap soldering iron and some thin (1mm) rosin core solder. Your connections will be much more reliable as a result.
Don't forget to buy extension wire. You will need some for both soldered and solderless connections.
Check this out at Amazon.com
Wago 221-413 LEVER-NUTS 3... https://www.amazon.com/dp/B06XGYXVXR?ref=ppx_pop_mob_ap_share
I got red and black...
Check this out at Amazon.com
Remington Industries... https://www.amazon.com/dp/B010T5Y6PU?ref=ppx_pop_mob_ap_share
Check this out at Amazon.com
Cable Matters 2-Pack 16 AWG Heavy... https://www.amazon.com/dp/B00WA0W62S?ref=ppx_pop_mob_ap_share
Check this out at Amazon.com
ATPWONZ IP68 Waterproof... https://www.amazon.com/dp/B01NALYPFT?ref=ppx_pop_mob_ap_share
We have a similar casing for our wires, I believe it was extra from a members 3d printer
Edit: found it!
I would do something similar to what u/bdjookemgood said. The low voltage available here, and if you wanted were set on the condiut. But you don't need it all, you're just fishing some electrical, hdmi, and whatever else you need for your tv to function. I've used an extension cord to extend the electrical into the wall if the tv's power cable isnt long enough. One last tip I've done. Use these to give it a more finished look instead of just the holes in the wall. But all in all its a pretty simple idea.
Have you ever used Wago's before? I ditched all my wiring nuts and switched to these... will never go back. FWIW.
That row of three protuberances look like strain reliefs for hanging lamps. Given that I'd guess that this is some sort of decorative junction box for a hanging lamp or some other electrical setup.
Yep. Although the smaller solar panel I linked to comes with a controller (a bit simpler one), I used these. It looks like maybe amazon doesn’t carry them anymore so if you want that one might try eBay. I’ve bought it as “Anself Solar charge controller” as well as “Docooler Solar charge controller” it’s just a 12v controller.
I actually have started using this one on my bigger setups because it has more info:
https://www.amazon.com/dp/B01LZZMDSQ
But they are all basically glorified switches that monitor the output of the panel and battery and connect them when the energy on the panel is high enough and disconnect when it’s lower so you’re not draining the battery.
The project box is this one:
https://www.amazon.com/dp/B005T990I0
With this backing plate inside to screw into to mount the timer and controller:
https://www.amazon.com/dp/B005UPE83U
Oh and if you want it to be water tight when you run cables through holes in the sides you’re gonna want something like these to go with it:
https://www.amazon.com/dp/B01GJ03AUQ/
I’d imagine you could get a single one from an electric supply store if you didn’t want a set.
Bundle together.
Place in here.
Cable tie in place behind monitor stand.
I used these
Box - https://www.amazon.com/gp/product/B005UPANU2/ref=oh_aui_detailpage_o04_s00?ie=UTF8&psc=1
Box Insert - https://www.amazon.com/BUD-Industries-NBX-32916-PL-Plastic-Internal/dp/B005UPE83U/ref=pd_bxgy_328_img_2?_encoding=UTF8&pd_rd_i=B005UPE83U&pd_rd_r=38ca7968-edbf-11e8-8842-7d002f82d6fa&pd_rd_w=A8lwS&pd_rd_wg=QT89F&pf_rd_i=desktop-dp-sims&pf_rd_m=ATVPDKIKX0DER&pf_rd_p=6725dbd6-9917-451d-beba-16af7874e407&pf_rd_r=JFVRZXED3FN2MWQ13E95&pf_rd_s=desktop-dp-sims&pf_rd_t=40701&psc=1&refRID=JFVRZXED3FN2MWQ13E95
​
Works great. There are no punch outs or anything so I drilled my own holes and used these water proof strain reliefs. https://www.amazon.com/Lantee-Cable-Gland-Waterproof-Connector/dp/B07BGVV8N1/ref=sr_1_3_sspa?s=hi&ie=UTF8&qid=1542826797&sr=1-3-spons&keywords=waterproof+gland&psc=1 Just make sure your cables will fit through the gland nuts.
If you really want it to be water tight you could get some of the compression seal nipple plugs and a water tight box and build an enclosure for them that way. Basically you'll just leave the cable plugged in on the terminal side and only plug unplug the ipad side.
What do you mean by helm guard?
Get these to daisy chain. Some of the controllers come with them, you just have to look. Im at work right now so I cant look up the one I got.
I also have a sit / stand desk but have my computer on a separate table to the side of it. Here's what i did!
My desk is ikea, and has a mesh cable management net mounted to the bottom. I found that the best thing to do was mount a big power strip to the bottom of the desk, and plug in all my accessories there. Then i only have the one power strip cable coming down from the desk underside, and goes down along the back of the table leg and plugs into my UPS that's on the floor. Then I mount all of the cables to the underside of the table with these guys (https://www.amazon.com/eBoot-Pieces-Adhesive-Management-Holder/dp/B01HR9VS4I/ref=lp_11042051_1_15?s=electronics&ie=UTF8&qid=1543598131&sr=1-15) . So I have a power strip next to the net, all the cables being plugged into the strip are being hidden by the net, but since the cables are mostly fastened to the underside, the net doesn't sag and stays mostly out of sight.
Since my computer is on a side table i use really long cables, and used one of these to go from the inside of the cable net to the back of the computer (https://www.amazon.com/Black-Split-Tubing-Cover-Marine/dp/B00J7SAHTK/ref=sr_1_3?s=electronics&ie=UTF8&qid=1543598333&sr=1-3&keywords=plastic+cable+sleeve). There are more modern looking ones, i just happened to like the "industrial" look of this one, if you could call it that...
​
Hope that helps! I know for me, once i got started seriously trying to take care of the cable situation, all the ideas on how to make it better just come to you as you are doing it. Figuring out where to start is often the hard part :D
I have the original 3-in-1 cable. When its HDMI died, instead of replacing the entire cable, I replaced just the HDMI cable with an active HDMI cable. It's about a foot shorter than the 3-in-1 cable.
https://www.amazon.com/gp/product/B014GMB5LA/ref=oh_aui_detailpage_o01_s00?ie=UTF8&psc=1
I chose the ultra slim cable as I didn't want to trim the connector to fit inside the headset.
This was meant to be temporary as the 3-in-1 cable was out of stock at the time. But I found that it doesn't bother me at all so I decided to keep it as is.
EDIT: I use a braided sleeve for the cables (including the link box power cable) from the PC to the link box. I use 1/2 inch split wire loom for the 3-in-1 cable:
https://www.amazon.com/Black-Split-Tubing-Cover-Marine/dp/B00J7S39CW/ref=sr_1_3?ie=UTF8&qid=1505055741&sr=8-3&keywords=1%2F2+split+loom+tubing
The split wire loom works very well in preventing kinks. I use 1/2 inch due to the side of the original 3-in-1 cable, I suspect you can use a smaller size for the new 3-in-1 cable,
i use wire loom.
think of it as a harder slip shield for the cable. i think it works really well. you can get it on amazon...https://www.amazon.com/gp/product/B00J7RKTDA
the wire loom will twist around, but it wont get all kinked up like that. and it will help the actual cable from getting into weird knots.
last time i mentioned this i got downvoted, but really, it works well and its super cheap..
Here is the mobile version of your link
If you're in the US you should know that the outlet (cover) in this picture isn't code compliant for outdoor continuous use. it would need to look something like this: http://www.amazon.com/MM710C-Weatherproof-Outdoor-Receptacle-Protector/dp/B0013FRYH8/
Outdoor outlets need to be GFCI protected (normaly a GFCI receptical), outlets that are in odd places like this one might be protected by a special GFCI breaker in the panel, so that resetting it is no different than resetting a normal 'blown' breaker. If this is the case what you're seeing might not be fixed by removing that split and you would need to replace that cover with a weatherproof one.
I see, I misunderstood and thought the outlet was Wi-Fi controlled. I see now that's not the case.
If you intend on keeping the light I would use a an offset nipple (note that item is just one even though it is advertising two) to navigate the siding, and come out of the top of your existing box into a bell box. Mounting higher makes it less prone to tamper.
You can do what your plan is. I suggest saving as much space in the box as possible. That means going small. I would not use a normal outlet.
First cut off 6" to 9" length of SPT cable , split the two conductors apart for about 3" to 4" and leave the other end together.
On the together side clamp on this zip plug . You don't want any cable sticking out the end so make this connection carefully and you can do electric tape over it to be safe.
Strip the split end and wire (power off of course) one to black the other to white (in this instance it doesn't matter). Plug your adapter in.
The thin power cord now needs to escape the box. Use one of these strain relief guys.
problem solved