Best sanding blocks according to redditors
We found 75 Reddit comments discussing the best sanding blocks. We ranked the 44 resulting products by number of redditors who mentioned them. Here are the top 20.
We found 75 Reddit comments discussing the best sanding blocks. We ranked the 44 resulting products by number of redditors who mentioned them. Here are the top 20.


>>Sanding screen connected to a vacuum handle because it prevents dust from going everywhere.
>I have a $25 kit from Hyde that makes me wonder WTF I was doing all of these years without it.
The screen sander that connects to your vacuum that you two (& /u/kendrickshalamar) are referring to are the Hyde Tools 09165 (hand version) and Hyde Tools 09170 (pole version).
Hyde actually makes a sponge sander that connects to a vacuum which is similarly priced (Hyde Tools 09160). Does anyone have experience with this model?
I am skeptical about its efficacy, considering that a sponge has no holes, so the only way that dust can be sucked up is through the small gap around the sponge's outer edge.
Is it more effective than the method suggested by /u/fateislosthope (ie, just holding the vacuum hose under the sponge)?
---
Section 1: Tools
---
Note: Just because it is more expensive doesn't mean it is better. You could get by just fine with the "cheaper" options.
---
| Tool | Required vs. Optional | Use | Notes | Price & Link |
|:---|:---:|:---|:---|:---:|:---:|
| Tandy Wholesale Membership | O | Allows you to get better pricing at Tandy. | This is definitely optional. Items will cost slightly more without it OR if you have a tax ID you can get the membership with better pricing for free. | $35 / Free|
| Awl Haft | R | The handle which will hold your blade. | This particular haft allows for different blades to be added or removed with ease. | $16 / $35|
| Diamond Awl Blade| R | This is the blade used for piercing the holes in your projects.| This goes in the awl haft.| $4.80 / $28
| Channel Groover | R | Used to measure and gouge channels where your thread will lay. | Some say gouging a channel is optional however I find it to be required. It further protects your thread from damage. | $16 / $80 |
| Overstitch Wheel | R | Marks where you will punch your holes. | This particular overstitch wheel is a few dollars more than the versions that only offer one wheel. | $24 / $225 |
| Edge Beveler | R | Used to bevel and round off the edges of your project prior to burnishing. | Sizes vary. The smaller the number, the smaller the round edge. | $12 / $55 |
| Adhesive Glue | O | Used to hold your pieces of leather together prior to piercing the holes. | Some people prefer binder clips instead of glue. I've found that the clips end up making marks on my projects so I've always stuck with glue. | $6 / $30 |
| Gum Tragacanth | R | Used as a burnishing agent for your edges.| Some people use saddle soap. I prefer gum trag.| $6.40 / $21|
| Harness Needles | R | Used in combination with the thread for your projects. | Avoid the stitching needles. They break very easily.| $5.99 / $7.50 |
| Xacto Blade | R | Used for cutting projects. | You may have one of these at home already. Be ready to have replacement blades handy ($21.95) | $2.49 / $50 |
| Self-Healing Cutting Mat | R | Used for cutting your leather projects.| You may have one of these at home already. If so, you can obviously use that.| $14.73 / $50.80 |
| Cork-backed Ruler| R | Used for cutting straight lines.| I highly recommend the cork-backed version. It will save from accidental cuts/slips.| $4.80 / $14 |
| Burnishing Tool | R | Used in combination with the gum tragacanth to get a good burnish.| A good piece of canvas can be used as well. | $8.99 / $80 + $99|
| Sanding Tool| O | Used to sand down the edges prior to burnishing.| You might have sandpaper at home. Feel free to use that too.| $7.30 / $0 with dremel|
| Steel Square | O | Used for creating nice, even squares/rectangles for projects. | Learn to use this correctly!| $8 / $14|
| Thread Cutters | O | Use these for cutting your thread in the hard to reach places without running the risk of damaging your project. | Scissors work for cutting thread and the xacto blade can work for cutting thread inside your projects -- just be careful! | $3.95 / $39 |
| Maul | O | Used for end punches, rivets, snaps, chisels, or irons. | You really only need one of these if you are planning on doing any of the activities mentioned previously. | $20 / $55 |
| Pricking Iron/Chisel | O | Use these to mark or punch your holes instead of an overstitch wheel and awl. I prefer using the overstitch wheel and awl but others like the irons/chisels. | There is a big difference between irons vs. chisels, diamond vs. lacing. They all produce different results. Definitely ask before purchasing! The ones I linked are very different.| $12 / $259|
| Creaser | O | Used for decorative creases on things like card slots. | Definitely optional and definitely personal preference. | $14.40 / $72 |
| Wax | O | Used for burnishing. Gives the edges a nice seal. | The $10 is my top secret wax I use. I bought a bunch on sale for $5 and it is fantastic. | $4 / $10|
---
Now that you've done structural work, you want to fill the other side. I'm not a fan of bondo (polyester) - it cracks when you look at it wrong and it doesn't bend at all. Polyester fillers are for pinholes at most 1-2mm in diameter.
Instead, use resin mixed with a polyethylene balloon filler - this allows it to be sandable like bondo but takes overnight to set obviously since it's epoxy resin, but actually bonds to the underlying fiberglass and it far more flexible and structurally sound. Mix in around 1:1 with resin, it should nearly stand on it's own (think baking meringue) so it doesn't run when applied to the outer surface of your part. Dry overnight, sand by hand with 80 grit, repeat until you have a surface you are happy with painting.
Bondo is literally the last step you do 1h beforehand, just run it with the rubber squeegee into all the little pinholes.
As for painting, lots of guides on this... Generally you'll want everything at least down to old primer before painting, work through the grits. 80/120/180 at least and 220, you can use a festool or good soft palm sander for big spots like a bellypan but at least 75% of it is done by hand with a soft block and sandpaper. Use your hand or sander around corners and it will not turn out, trust me. Clean meticulously with acetone and then tack wipes before priming. Then sand primer with 120 grit and then paint.
This process took me about 30-35 hours of work over a month, I did around 30 structural repairs and 25-30 fills on the outside.
Parts list:
Last words - patience here. You are the master of the engineered product - you can take it down and add to it as many times as you want if you screw up. Doing the structural repairs in pieces, small batches of resin mixing, just take your time and do a couple hours of work, let it cure overnight, then sand and do some more.
PPE is NOT optional. (masks, gloves, etc).
Also your arms will be itchy from the fiberglass dust for eternity.
Edit: cleaned things up a bit.
The conditions of the environment are the most important. If you work in a garage with no insulation or climate control and you live in an area with large temperature and humidity fluctuations; you are screwed. That doesn't mean heating your garage up so you can work in it and then letting it freeze again, but keeping a fairly consistent temp all the time (I don't let mine go below 50).
Storage with doors and either blocks of camphor or VC2 emitters will keep them mostly rust free during storage, but it doesn't take long for rust to start. Think of it like taking that ice cold can of beer out of the fridge on an 85 degree humid day. Condensation forms instantly when you have a big temperature/RH mismatch.
I have a fully insulated and climate controlled garage so I don't have many rust issues anymore, but you'd be surprised how fast that sweaty thumb print turns to rust. I wasn't always so lucky. That's my old no.7 that rusted up in the time it took me to eat lunch when I was in my old non-climate controlled shop.
There are some things you can do to keep the rust to a minimum
This thing is fantastic for applications like this
I don't think toothpaste will do much, but it depends on how much time you want to spend and what end result you want.
Pipe makers use buffing wheels, which, if you have one, is an option, but be aware that the first few times you try this, you'll probably launch the stem across the room and destroy it. ;)
To bring it to a nice matte black, your best bet is the tried and true method of soaking it in oxyclean for an hour or three. This will actually make it look worse, but what it's doing is helping to bring out the oxidation in the stem. After the oxy bath, you can clean it with a Mr. Clean Magic Eraser. That usually helps get the oxidation off. At that point, it'll be mostly black, but it'll be a dull black.
If you want shiny, you need to buff it, and the best option there aside from wheels is to use micro mesh polishing pads. https://www.amazon.com/Micro-Mesh-Sanding-Pads-Grits/dp/B0756MT6X8/ref=sr_1_6?ie=UTF8&qid=1525279219&sr=8-6&keywords=micromesh+sanding+pads
Start with the lowest grit (1500) and polish until you've got the whole thing nice and black. Then start moving up in grit. By the time you hit 6000 it'll look really nice, and if you want that mirror black shine, go all the way to 12000. It takes about an hour of elbow grease.
There are also commercially available sanding blocks that work well. But making your own is more fun.
SE DD312 12-Piece Stainless Steel Wax Carvers Set https://www.amazon.com/dp/B000SVRSRY/ref=cm_sw_r_cp_apa_i_GAPFDbPW0RSP7
Apoxie Sculpt 1 lb. White, 2 Part Modeling Compound (A & B) https://www.amazon.com/dp/B0013UDWXI/ref=cm_sw_r_cp_apa_i_9APFDb4BZREHF
Sand Detailer Finishing Kit, Finer Grits, 24 piece https://www.amazon.com/dp/B0039ZCQAK/ref=cm_sw_r_cp_apa_i_BCPFDbBV5SSGW
SERONLINE 24pcs Ball Stylus Dotting Tools, Polymer Modeling Clay Sculpting Tools Set Rock Painting Kit for Sculpture Pottery https://www.amazon.com/dp/B0776SN7Y5/ref=cm_sw_r_cp_apa_i_JDPFDbTH56VM0
Monster Clay Premium Grade Modeling Clay (5lb) https://www.amazon.com/dp/B0722NKKYF/ref=cm_sw_r_cp_apa_i_dEPFDb1WPY7K2
I bought these "Rust Erasers" recently and used them to clean a few small rust spots off of my bandsaw table. They are basically rubber with embedded grit. It worked really well.
Oh no worries, of course!
If your nib is loud and also feels scratchy on paper, you can fix that easily with some micromesh and adjusting the nib yourself. Take a look here...
Here's a link to what I use for nibs;
Micro-Mesh Pen Sanding Kit https://www.amazon.com/dp/B0037MEIT2/ref=cm_sw_r_cp_apa_i_ueHGDb3Q1NQKS
Not sure about what you can find in Germany, but it shouldn't be too difficult to pick up cheep.
And here's a link to a fellow talking about adjusting and smoothing;
https://youtu.be/7WKo9nx8UdA
Hope this helps make your fountain pen experience a more enjoyable one! :)
Take a look at products like the Robert Sorby Sandmaster
They're actually very easy to make yourself, here's a video from Cap'n Eddie on how to do so:
https://www.youtube.com/watch?v=G1DR3Ptv1QQ
No batteries/plug in requirements, sanding dust isn't going to kill it, etc...
Refurb that stem.
Soak it in warm water and oxiclean all night
scrub it with a mr clean magic eraser, then buff with these from lowest to highest grit
repeat the magic eraser and mesh pads as needed
lastly dip a pipe cleaner in obsidian oil and rub it over the stem (seriously just the end of the cleaner, a dab will do ya)
let dry
They actually make gloves like this that would probably work a lot better. Sand glued to a rubber glove is just going to rub off and get everywhere.
You got it! After cutting my pieces out, I like to soften the edges and sand them down to 320 Grit. In addition to sandpaper, I use [sanding sticks] (https://www.amazon.com/Lumberton-12302-Sanding-Sticks-Finishing/dp/B0039ZCQAK/ref=sr_1_1_sspa?keywords=sanding+sticks&qid=1550855377&s=gateway&sr=8-1-spons&psc=1) Thanks to u/yason2 for that suggestion. I also use [needle files] (https://www.amazon.com/Teborg-Swiss-Pattern-Needle-Assorted/dp/B002RPJ9P8/ref=sr_1_1?keywords=fine+needle+files&qid=1550855454&s=gateway&sr=8-1) to hit some of the tight spots. Finally, I use a some little picks and tweezers to maneuver some of the smaller pieces into place.
2" Diameter Bowl Sander with Foam... https://www.amazon.com/dp/B07HZ27J2K?ref=ppx_pop_mob_ap_share
Micro-Mesh pads. Pretty sure this is the set I bought.
https://www.amazon.com/Micro-Mesh-Pen-Sanding-Kit/dp/B0037MEIT2?ref_=bl_dp_s_mw_3035508011
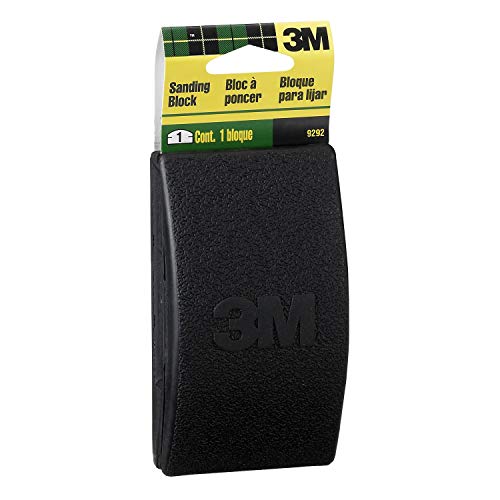
http://www.amazon.com/3M-9292-Rubber-Sanding-Block/dp/B00004Z4CY
Thank you! Of course, I'd be happy to help in any way I can.
The shield is actually a sled from Amazon, but it can be found on other sites too for about 25$.
While a dremel can be used, because of the extent of the sanding required I prefer some good old fashioned sanding sponges. Any mistakes that were made in the cutting can also be fixed here.
I used a Dewalt DW317K Jigsaw, and specifically a DM3778 Blade, though any blade that is small and fine will do nicely (the finer, the better).
The straps are belts with holes cut in them, and screws are simply glued onto the shield before a bolt is screwed in. This video explains what to do - it's not the most efficient way but the rest of the video can also be used as a guideline.
It probably took me a month and a half to two months, but I have been busy and had to take long hiatuses ranging up to three weeks at a time. You can probably buff the whole thing out in about two weeks (four days cutting and sanding), (four days painting), (two days attaching the straps), (two days repairing any mistakes and adding an optional gloss) with only an hour or two every night.
No need to apologize - your questions are great! PM me if you have any more! Best of luck friend.
Can't remember if I did 2 or 3 coats. The clear I bought is made to go on thick so I didn't do as many as I would have for a different kind.
Wet sanding is easy. It seems scary and after you start and see what the paint looks like it can feel like this will never get better if it's your first time but don't be afraid.
First tip is to never use just your hand and sand paper. Always use some kind of pad. I got a small flexible one made for automotive sanding and it's great. Like this one but mine is oval shaped and not squared. Thankfully the Miata doesn't have huge areas so it's not hard to do by hand.
Second make sure the surface is perfectly clean before sanding. If you have been driving the car at all it's a good idea to give it a bath and clay the car to make sure the paint is perfectly clean before sanding.
I went 800-1500-2000. Then used my DA polisher with Meguiars M105 compund and a yellow pad, then Meguiars M205 Polish with a white pad.
/r/autodetailing has great FAQ section with all the products and instructions on how to go at it. H[ere is the link straight to the stuff they suggest to use.] (https://www.reddit.com/r/autodetailing/wiki/recommended#wiki_paint_correction_kit)
These are absolutely incredible for removing rust. I always put a coat of Boeshield for rust protection on surfaces that might rust. It works like a charm. rub on some paste-wax and buff it off and you have a slippery tabletop that wont need any attention for months!
Your sand paper could be loading with waste and not cutting, use a cleaning stick like this on it periodically to clean it and it will cut better. I don't know what your situation is or why you are using such course paper, but fi you are trying to reduce thickness by sanding then it is going to take a very long time.
http://smile.amazon.com/Vermont-American-17889-Sanding-Cleaner/dp/B0002YUOT6/ref=sr_1_2?s=power-hand-tools&ie=UTF8&qid=1406778904&sr=1-2&keywords=sand+paper+cleaner
Maybe try a file of different coarseness? I still don't like the really hard sandy-feeling nail files from beauty companies, but I found that a 320 grit sanding sponge lasts long and works really well. It's a sponge, so it has plenty of give to it that a chalk board normally doesn't.
If you've got some free time, stop by your local hardware store and check out the sandpaper aisle so you can get a feel for the grit/firmness in person. If the sandy-ness really turns you off, then try to a find a coarse metal file with obvious ridges, instead of an abrasive powder coating.
Seriously, I never thought I would stop biting my nails until realized how much better it felt to use a tool to smooth them out, and then an actual pair of clippers to trim them down. My fingers aren't raw anymore, they're totally pain free :)
https://www.amazon.com/Sanding-Polishing-Grinding-Diamond-60-3000Grit/dp/B07LCKNH5C/
Literally the exact thing you want. Ideally the original tilers should've done it before installing that seat - that's pretty shitty of them to leave an exposed edge in that condition.
That's one of the things I discovered doing this project. My traditional approach is "what power tool works best for this job", but I wound up having to hand sand the skirt to maintain the chamfer. Even with a crappy 3M rubber sanding block, it was surprisingly easy and a little zen-like. I'm planning on picking up one of these for my next project.
I’ve used these before...wrapped with several spare microfiber cloths I had laying around...
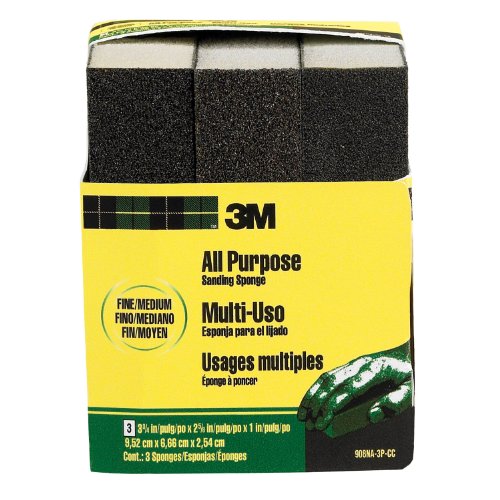
3M Sanding Sponge, Fine/Medium, 3.75-Inch by 2.625-Inch by 1-Inch, 3-Pack https://www.amazon.com/dp/B0061JM4GC/ref=cm_sw_r_cp_apu_GP4YAbPSQHEYD
If you live in the states its going to be a ton easier to get ahold of, but they sell these bigger ones for 20$, which work really well to cut into 4 squares
living in Canada im pretty much stuck getting the smaller ones for 40$ unless I can stand waiting the longer shipping times for the larger ones from the states.
a single bigger set will definitely last you a few sets of keys especially if you cut it into 4. Its also worth noting they last a really long time if you can use them with water, sometimes when using them on wood with an oil finish, i cant use water without ruining the finish so they tend to get kinda clogged up and dont last super long, but with plastic and using water to lubricate they will last you a very long time.
Something like this
Warner Sanding Block Hand Sander, 34436A https://www.amazon.com/dp/B00L8TII9C/ref=cm_sw_r_cp_apa_i_bitvCb0JKBG96
i'm using a sponge and mask
https://www.amazon.ca/3M-Pro-Grade-Precision-2-5-Inchx4-5-Inchx1-Inch/dp/B00OB250I0/ref=sr_1_17?keywords=sanding+sponge&qid=1566286096&s=gateway&sr=8-17
https://www.amazon.ca/gp/product/B000UM13RW/ref=ppx_yo_dt_b_asin_title_o02_s01?ie=UTF8&psc=1
Go for it! I have a Dewalt, and I love it. That’s just preference though. The only down side to me is the sanding discs. You can’t just use regular paper like you can on some of the other sanders. But I have a block with Velcro I use for easier stuff or quick hand sands that works with the random orbit discs. It’s crazy handy.
Miter Box (Find one that allows you to cut the 30 degree angle pictured in the guide)
Sanding Block
Clamp
Hammer
Boom! Now get to it!
It hasn't been said here yet, so I thought it might be worth mentioning that you should get the finest grade of grit you can.
Even better if you use a sanding sponge like this one
It will wrap the shaft more closely than sandpaper would.
Long light strokes, turning the shaft as you go.
You won't need to remove much at all, probably less than you think, so test the glide often.
Good luck.
Then I share a tip too.
Sanding sticks for roughing grain on edges before gluing. Give good precision.
(Link just to show the product, haven’t bought them on Amazon)
https://www.amazon.com/Lumberton-12302-Sanding-Sticks-Finishing/dp/B0039ZCQAK
Before I had a Bridgeport I did it this way. I’ve found cleaning up the file marks with [these](Sand Detailer Finishing Kit, Finer Grits, 24 piece https://www.amazon.com/dp/B0039ZCQAK/ref=cm_sw_r_cp_api_i_LRJRDb077KS97) helps quite a bit
Edit: hyperlink not working, it was supposed to link to sanding sticks on amazon, just google it
Its a sanding stick! Quite useful really.
First, a good, sharp knife or v gouge would clean up a number of the rougher areas.
These are excellent for getting into hard to reach areas.
This is the last one I got ... 2” by 2”. They’re small but work just fine. Just be sure you’re aware of the grain
micro mesh on amazon
Also when turning the colorful acrylic, sometimes the blank has a kinda translucent spot, so you may want to keep some white or other colored tubes sitting around, and then some wet micro mesh sandpaper for the finish will be all you’ll need for acrylic.
I use hard Wave sticks too and love them. They sand very flat (something I liked files for) but are quite gentle on the plastic in terms of deap scratches. BUT for some reason the 800 grit is disconnected like in your link. Anyone know where else you can get it?
In terms of files I have the Tamiya basic , Tamiya fine basic , and a (hopefully) nicer plastic hobby file on order just to try. Files are nice for larger jobs like serious molding flaws (not common in Bandai kits) and the fine ones are OK for nubs but still quite rough compared to any sanding stick. Although, as you know I'm sure, files last forever and require much less effort and time to chew through plastic. I'm hoping the plastic file is the Holy grail and is a good balance. I bought a set of needle files and diamond files from harbor freight and they blow. The trash just don't grip or cut don't waste your $3.
And as a reference I own Revell, squadron , nail buff sticks, and have made my own sticks from automotive sand paper. The nail files are way too rough imo, making my own is a pain, and while the squadron sticks are nice I mainly only used the tri-grit while I used all the Revell except the roughest and are probably the best value imo. I still use the other more flexible kinds but dramatically prefer wave. Wish the 800 grit still were available.
Long post sorry. Hope it helps
Edits: spelling, phrasing, and lots of links
I use Revell Sanding Sticks. Can't tell you the exact grit since it doesn't use the traditional grit scale.
It is probably for sanding bowls on a woodturning lathe. Like this.
I've had that sander for several years.
The belt portion of the sander is fine and I use it all the time to smooth stuff out with an #80 grit belt. The disc sander portion I've been less impressed with- the table locks for shit and the set screw in the disc that keeps it on the shaft has stripped out. The table keeps the disc from flying off, but it does move forward and backward which is less than ideal. At some point I was going to drill and tap a new set screw through the shaft, but I don't use it that much and I'm lazy.
The sandpaper that comes with it is shit- you'll replace it soon. Do yourself a favor and get yourself one of those rubber abrasive cleaning sticks and a decent belt lasts a surprisingly long time. HF has them too, so get one while you're there for cheap. Home Depot and Lowes both sell the standard sized replacement belt in various grits.
Like you I have festool products including a CT dust extractor. If you want to adapt the festool hose to mate with the sander you should pick up one of these adapters and trim it to fit. They're awesome, cheap, and work great- I've used 4 or 5 around the shop to mate my non-festool stuff with the festool extractor. You'll need 2 adapters, trimmed to fit, to connect to the two different sized dust collection ports on the machine.
You really want to hook up dust collection to the sander- it creates a LOT of dust.
Run to Home Depot and pick up some belt sander cleaner. http://www.amazon.com/Vermont-American-17889-Sanding-Cleaner/dp/B0002YUOT6
I get access to all the machinery so it's more than just the square footage. The spindle sander is great. It's so much faster than trying to hand sand the contours of the things I'm making. It's pretty cheap, has lots of different spindle sizes, and has a dust extraction port that fit my rigid vacuum. Just make sure you grab the multipack of different sizes/grits to make sure your maximizing the machine, it's only $15.
WEN 6510SPC Assorted Grits Spindle Sanding Sleeves (18 Pack)
https://www.amazon.com/dp/B01HD4E7WM/ref=cm_sw_r_cp_tai_RnjizbT21FBRZ
I also picked up a sanding pad/belt cleaner. I don't know how much it's really helping anything but it's only $10.
Vermont American 17889 Sanding Belt / Pad Cleaner
https://www.amazon.com/dp/B0002YUOT6/ref=cm_sw_r_cp_tai_FojizbBZS5T0K
For sanding, I highly recommend you drop
$7$5.47 on a sanding block. For doing much sanding at all, your hands will be sore and the tips of your fingers numb for a couple of days otherwise. Or, if you've got a staple gun, staple the sandpaper to a chunk of wood. The commercial blocks are nice, though, as they're a little more hand-friendly in shape.For holes, pick up a cheap coping saw. Makes cutting holes not too bad. This could be used for both the open hole for the cat to get through and for helping to mount the PVC. With an appropriately-sized hole, where the pipe will friction-fit it, a bit of epoxy will keep it strong enough that the board will break before the joint does. Just rough up the end of the pipe that goes in the hole so the epoxy has something to grab.
For mounting, L-brackets and screws will be fine, but make sure you drive the screws into the studs. I wouldn't take a chance using molly bolts or expanding anchors. If it fell, your cat would probably leap to safety just fine, but either you're not getting your security deposit back or you're learning to drywall.
There will be people that disagree, because to some extent it is about preference, and it also depends on what, exactly you do. Having said that, I'll give you a run down of stuff I either had when I started, or use frequently, or serves multiple purposes, etc.
Other than that, it really depends on what you want to do. I left out power tools except for a drill because when I started I couldn't even afford that and used my dad's. I never like when people give starter lists that include table saws and stuff, because if I had seen that on a woodworking starter list I would have been turned away. You can start with cheap stuff and make good pieces, it just takes a little longer and a lot more elbow grease.