 Reddit reviews Neiko 50413A Insulated Wire Terminals and Connectors Assortment with 3-in-1 Wire Stripper, Cutter and Crimper Tool | 175-Piece Set
We found 10 Reddit comments about Neiko 50413A Insulated Wire Terminals and Connectors Assortment with 3-in-1 Wire Stripper, Cutter and Crimper Tool | 175-Piece Set. Here are the top ones, ranked by their Reddit score.
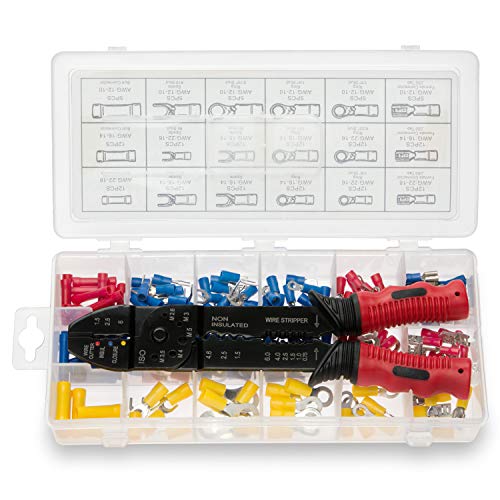
Includes 18 different types of wire terminals and connectors from 22 to 10 gauges that are ideal for electrical repairs and automotive servicesHighly conductible copper construction provides secure connection between wires without soldering63pcs Ring terminals, 53pcs Spade terminals, 29pcs butt connectors and 29pcs female quick connectors, all with color coded insulation sleevesEquipped with a 9” heavy duty wire cutting, stripping and crimping tool with comfortable soft gripComes in a re-sealable storage case with each individual size zipped in a poly bag for quick selection and easy organization
Yes that is a standard crimp connector. Just buy another one, strip the wire, and crimp it back on.
Measure the width of the connector. It is hard to tell how wide it is from the photo.
This set is probably overkill, but personally I can't get enough connectors and it comes with a (shitty) stripper/crimper if you don't have one.
Cut out the damaged portion (pay attention to any wire markings or make your own if none are present) restrip the wire but stager the lengths so that the splices aren't all in one area. Install the splices then wrap in a self adhering silicone tape. When using the tape start 1 inch past where the insulation starts, wrap with 50% overlap until you reach 1 inch on to the insulation across the repaired area. The wrap should be tight and the first and last wrap sould be perpendicular to the repaired wire.
Edit: required supplies...
Splices with Crimper Tool
Silicone Tape
Quick Guide
Here is a video I made demoing my NC Nexus 7 install. It is very basic now. I wanted to see how little I need to get audio working. It isw working better that I expected. Let me know what you think or if you have any questions.
Edit 1:
Parts and pricing(includes shipping) list:
Total: $88.81 + the cost of a Nexus (2012) which is about $150-$180 depending on which configuration you get. (Note: Timur's ROM only works with Nexus 7 2012)
So $238-$268 grand total.
I also bought a wire stripping and crimping kit - http://www.amazon.com/gp/product/B000K7GRCI/ref=oh_details_o09_s00_i01?ie=UTF8&psc=1
And a Dremel for cutting the metra bezel and the command hooks
I also rooted my Nexus 7 and installed Timur's rom. That was a headache and not needed because you can duplicate the functionality by using Tasker, a Nexus 7 task scheduling app. But to install Timur's ROM basically you need to unlock the bootloader, install TWRP recovery, then install Timur's USB Host ROM. That ROM gives you the ability to plug USB devices like thumb drives into the Nexus 7. It also gives you the option to put the tablet into deep sleep when you turn your car off.
As cougar618 already mentioned, you will need to remove the old stereo anyway to install any sort of auxiliary port. As such, do not bother messing with it. Get a new head unit.
You can get this Pioneer headunit for $100 from Amazon. Then you will need a mounting kit and a harness adapter. The harness adapter AND the stereo harness that will come with the headunit, are labeled on each wire. Connect all the matching wires, and leave the rest alone. Plug the antenna wire into the headunit, and then install new stereo into hole.
edit//Forgot something. Since you're a n00b, go to the local Autozone/parts store/Radioshack and get one of these. It has some very basic electrical things that you will want to use to make sure you get good connections from the wires. Twisting them together and covering with tape is a bad idea. They don't hold up very well. Use the butt connectors that crimp on both sides where each of the wires come into the connector. This will be a pretty permanent solution, but you will have no worries of it coming loose.
Would this be okay?
Its easy! Buy this cheap wire crimp kit.
Take off the driver door kick plate (should just pop up, they are usually held in with Jesus clips). Then you pull the rubber trim off from the kick plate to the head liner. Install your dash cam. Then hook the USB mini-b end of the 12v adapter to the dash cam. Tuck the wire up along the top of the head liner. Carefully feed the wire under the top of the trim in the a pillar. Then carefully lift the side of the a pillar trim and continue running the wire down the inside lip until you reach the bottom of the trim. Be careful as the side curtain airbags are in the pillar. Using a soft piece of plastic, pry off the side panel of the dash, this will be held on with more Jesus clips. This will allow you to run the wire under the dash and into the fuse box.
Use a red butt connector to crimp the add a circuit lead to the red wire on the 12v adapter. Then crimp a red ring terminal to the black wire on the 12v adapter. There should be a bolt under the side panel that you took off, take that off and put it through the ring terminal and then reattach. This is your ground point. If there is paint under where the bolt was, scrape it off so you can get a good ground.
Find a 10a fuse in your fuse panel, pull that out and put the add a circuit in that spot filling the blank spot on the add a circuit with the fuse you removed.
Turn your car to on (do not start) and you should see your dash cam fire up! Now look for any sharp points along the way that the wire could rub on and wrap them with some electrical tape and button things back up!
Should take you < 20 minutes.
Use this adapter
Dash kit
antenna adapter
Wire crimp set
You need to identify a leak or other cause of the corrosion.
Use some sharp scissors, Cut that wire back an inch or so and see if the corrosion is that far back. Might need to get a length of wire to replace it if it's that bad. Attach the pieces using butt connectors. (Only crimp to copper that is not corroded obviously)
Go buy a tool something like this (auto part store or home store) those crimpers are not great but cheap if you will only use it once a year and they come with the terminals.
https://www.amazon.com/Neiko-50413A-Insulated-Connectors-Assortment/dp/B000K7GRCI/ref=mp_s_a_1_14?keywords=crimp+tool+kit&amp;qid=1573491705&amp;sr=8-14
https://www.amazon.com/Stereo-Harness-Sorento-wiring-installation/dp/B000KL50TA
as others have mentioned, you need to splice whatever connector harness comes with the new radio to the wiring harness linked above. The best way to do this is to individually solder each connection and insulate with heat shrinkable tubing, the second best way is with some 'butt' connectors and a crimping tool.
https://www.amazon.com/Neiko-50413A-Insulated-Connectors-Assortment/dp/B000K7GRCI/ref=sr_1_1?ie=UTF8&amp;qid=1486664654&amp;sr=8-1&amp;keywords=wire+crimping+kit
If you don't care about it being "completely stock", just rewire the whole damn bike. It's pretty straight forward. That's what I did on my first project bike, you learn a lot by rewiring a bike from scratch. Go out and by some nylon sleeving, an assortment of 14g-18g multicolored wire, heat shrink, misc pack of electrical connectors. If you are somewhat mechanically/electrically inclined than by all means you should go for it. All you need to start is a soldering iron, multimeter, crimper/wire cutters, and a desire to learn. Shit man, its how I learned. Don't half ass it, and don't give up!
https://learn.sparkfun.com/tutorials/working-with-wire/how-to-crimp-an-electrical-connector
http://www.amazon.com/Neiko-Solderless-Terminal-Connection-Stripper/dp/B000K7GRCI/ref=sr_1_1?ie=UTF8&amp;qid=1371692640&amp;sr=8-1&amp;keywords=electrical+connectors