Best power milling machines according to redditors
We found 47 Reddit comments discussing the best power milling machines. We ranked the 27 resulting products by number of redditors who mentioned them. Here are the top 20.
We found 47 Reddit comments discussing the best power milling machines. We ranked the 27 resulting products by number of redditors who mentioned them. Here are the top 20.
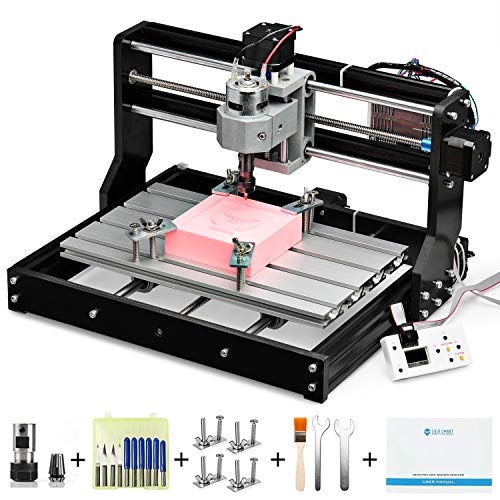


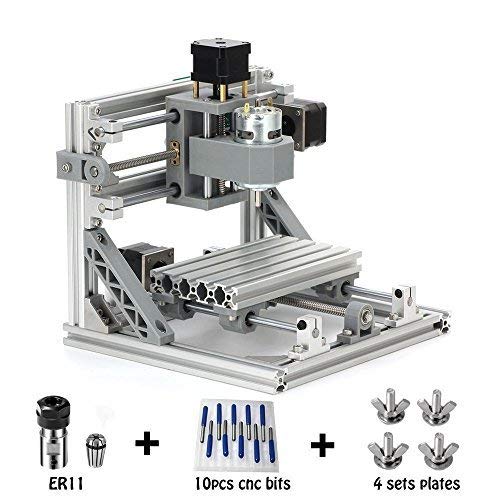


There is also this 200 dollar cnc router for cutting wood and engraving and you can buy a laser for basic laser cutting with it.
https://www.amazon.com/Genmitsu-3018-PRO-Control-Engraving-300x180x45mm/dp/B07P6K9BL3
Teaching tech even did a video.
https://www.youtube.com/watch?v=Y5nyjvytlBk
To ensure consistency, let's do 4 commands
G20 G91 (Inches, Relative)
G38.2 Z-5 F2 (Move until interrupted by probe or 5 inches whichever is first, Z-move down, Feed Rate 2in/min)
Machine should now stop when it detects contact with touch plate
G92 z0.0605(After interrupt/pause/resume set current z work position to 0.0605 (the thickness of my plate, so z0 should be the top of my work))
G0 Z0.25 (Raise bit to safe height above work)
The 0.0605 in this case is the total thickness of the touch probe. This would be the height the bit stops above your workpiece when in contact with the touch probe.
All of this is from the wiki page or links posted in the wiki page.
https://wiki.shapeoko.com/index.php/Touch_Plate
$12 with prime
https://www.amazon.com/Setting-Engraving-Machine-Auto-Check-Instrument/dp/B074W58JHW/ref=mp_s_a_1_1?keywords=touch+probe&qid=1555825054&s=gateway&sr=8-1
Be sure to connect ground to the clip and power to the probe surface.
Yes. If my wimpy machine can be made to do it, an OX should be able to do so too. I have an old Shapeoko 2 that I have made some significant upgrades to increase rigidity (but not by much, unfortunately).
I've been using it almost exclusively to cut aluminum. Most recently I've been cutting 12mm thick plates with some real success. This weekend I'm going to attempt 20mm.
I've had to apply a lot of trial and error. I am absolutely not a professional. Here are some of the lessons I've learned:
My machine lacks rigidity. If I try to be aggressive at all, I can see the x-axis flex. This flexing on any of the axises can lead to your bit breaking, getting stuck and causing your belt to slip. This almost always leads to a ruined part. The best way I've found to minimize this is to make very shallow passes. I usually choose between 0.5 and 0.6 mm per layer. For 0.25" aluminum that'd be 11 to 13 or more passes.
The general advice is that you want to get good size chips. I know this is ambiguous, but I'm not a pro. Basically, if you read around, you'll see that professionals would typically have a slow spindle speed (much slower than my palm router will go), a moderate feed speed, and a two flute end mill. With a router, you take off so much material so quickly that you need to have a higher feed rate. So, slow router speed, high feed, two flutes.
But, with my sloppy machine, it's just too flexible and things go badly quickly. So, I've only partially followed the advice. I use a fairly high router speed (5 out of 6, whatever that means in RPMs. I use what, to me, seems like a fairly fast feed speed. I think 700ish mm a min. And for these thick sheets of aluminum I've been using a four flute 1/8" endmill. I put the end mill in as far as I can, giving me less room for the end mill itself to flex. The only reason I use four flutes is because I made a mistake the first time I had a successful cut and and put a four flute end mill in, not my two flute. Once I got something to work, I was too scared to change things up.
All together, quickly shaving layers has worked well for me. The downside is you can clog the end mill and it will wear out much more quickly. It's just a tradeoff I've had to make.
One thing I learned while figuring out my process is that the deeper your endmill goes in the material, the more likely it is to bind up and cause damage to itself or the piece your trying to cut out. A trick I've learned is to use multiple passes with step overs. I use Fusion 360 to generate my tool paths. With contours in particular, I'll do three passes. The first pass obviously cuts the whole tool width (EG: 3.125mm). The next pass goes over half the thickness of the tool (1.5625mm). The next pass goes over a tiny bit, I think about 0.5mm. This is a finishing pass. It helps give a nicer cleaner edge to the piece your cutting out. This process removes much of the rubbing that the end mill would otherwise be doing along the slot of the contour being cut out.
I don't think I've ever had a piece that I cut out successfully on my first try. Usually the belt will skip (yes, they're tensioned as much as I reasonably can - I'm just pushing way past the limits of my machine), but sometimes other things go wrong. Maybe my coolant mister flakes out. Whatever. I hover my hand over the stop button and reflexively kill the machine as quickly as possible. When this happens, my machine forgets its position in space and I need to re-zero it. While I have limit switches, their repeatability is in the order of 1mm+, which is not nearly accurate enough to restart a failed cut.
So, what I've done is learned how to probe using my machine. You can probe in all three directions. Knowing this, I can start a cut by pocketing a small square hole a known depth into the material I'm cutting. Say 20mm wide x 20mm long x 5 mm deep (depending on how deep your material is). When things go wrong, I can relatively easily determine where the bit should be when it was cutting the sides of the hold and I know how deep the bit was when it cut the bottom. I can then probe to the back of the machine and reset my Y position, to the right to reset X, and down to reset Z. With this approach I've been able to get what I'd estimate to be 0.1 mm or 0.01 mm of repeatability.
This will require you to have both limit switches and the ability to probe for positioning. I use grblShield, which makes this moderately easy to setup. I'm not sure if your OX would have this.
TL/DR:
You can cut even thick sheets of aluminum on even a fairly non-rigid machine, you just need to experiment with it until you find a technique that works for you.
https://imgur.com/1x4no51
Made a real good pop sound too!
The capacitor didn't look great when I started wiring it up, but I thought I'd give it a try anyway. It ran for a while, then heard it [the phase converter motor] bog down and then pop from the control box.
I also have a big old 3 phase milling machine with a 5hp 3 phase spindle motor that I have never managed to make work.
I'm thinking I should just buy a vfd to use for both toys and be done with it.
Data plate from the lift: https://imgur.com/WSgn1RF
Data plate from the spindle motor of the mill: https://imgur.com/EkR1Mkz
The mill: https://imgur.com/jSV8HYV
I saw this one cheap on Amazon: Mophorn 220V 4KW VFD Variable Frequency Drive CNC VFD Motor Drive Inverter Converter for CNC Router Milling Machine Spindle Motor Speed Control (220V2/4KW VFD) https://www.amazon.com/dp/B01M7PR9BJ/ref=cm_sw_r_cp_apa_i_SKcNDb0XQAYNG
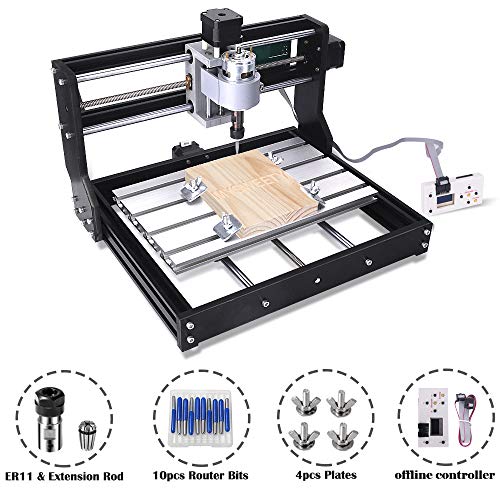
I would say that if you're going to upgrade the rods and such and have access to a 3D printer (which you will need to do that), just buy your own extrusions and build it yourself. Use a dual rail gantry to hold up the beefier 12mm rods to stiffen everything then get a 500w or so spindle and driver from Amazon. The default 3018 spindle is weaksauce. No sense buying any of it, you'd just be replacing it all. All the parts are available on Amazon, and better 3018 parts are available on Thingiverse.
Get a raspberry Pi and a Protoneer CNC Hat (my current solution for the 3018) or just get a cheap GRBL controller from Amazon. That way you can get the nice Trinamic drivers and such too if you want it to be quieter.
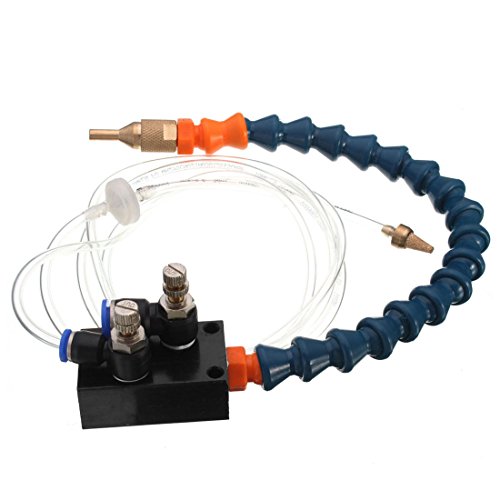
Cool idea. Ive wanted to try a touch plate for awhile now, you can get them fairly cheap.
https://www.amazon.com/Z-Axis-Router-Touch-Setting-Milling/dp/B07GT3CHWZ/
I strongly recommend a Shapeoko 3 based on my team's experience with it this past year.
I bought a Shapeoko 3 about 1.5 years ago and due to other things got it operational before Sept 2017 - just in time for kickoff. My team has used it extensively for cutting 1/8" AL for all kinds of parts on the robot throughout the season. I think that the Shapeoko 3 is better than the X-carve because it is more rigid. It also has about a 16"x16" working area which is as big as any part we needed to cut.
Over the last year I would often figure out something just before the team did and sometimes they figured it out before me.
Here's a few random notes about using a CNC for cutting AL for an FTC bot.
Get it with the Makita RTC0701C router instead of the Dewalt DWP611. It can go down to 10k RPM instead of 16K RPM.
You will want the collet or reducing bushing so you can do 1/8" bits.
Cutting AL is all about keeping the heat build up down. If the bit is rubbing instead of cutting it creates heat. The heat makes the AL gummy. The gummy material sticks to the bit. The bit gets clogged. The bit breaks and you are sad. So using smaller bits, with lower RPMs and faster linear speeds means you are cutting more and rubbing less. The problem is that if you push it two hard the bit and/or the machine flexes which can also break bits.
End Mills - for AL get 1/8" and single flute. It took us several months to dull/break all 10. They are slightly undersized (about 0.121" cutting width) but worked well.
https://smile.amazon.com/gp/product/B00HN07XQE/
You will want to blow compressed air at the tool tip - I bought this and then figured out a way to mount it to the router clamp.
https://smile.amazon.com/gp/product/B071DXGGP4/
When stuff gets a bit tough we will use denatured alcohol thru the misting part of this - not a lot just a small "spit" coming out of the tip. The alcohol cools the bit and the AL.
Raw stock - There is a local steel yard, Discount Steel, that has a retail area where they put cut-off ends at great prices. The bigger pieces of AL (2'x4' or so) will be priced at $2.50/lb but slightly smaller will be $1.25/lb. That is what we use. We used some 0.10" and some 0.063" AL as well. I'm pushing them to use more thinner AL or make more cut-outs to lighten parts in the future.
We screwed down a sacrificial MDF board to the bed. Then the AL was typically screwed down to this. We just drill a few small holes in the AL and then use #6 x 5/8" sheet metal screws to hold it down. Typically the part is put into 2 separate G-code files - the first cuts the interior holes in the part. Then after that is run additional screws are put thru some of those holes. Then the 2nd part is run which cuts the perimeter of the part. This was we don't have to use double-sided tape nor use tabs.
I did eventually get a Suckit dust shoe but you can make your own - either CNC cut or 3d printed.
Software - the Carbide Create is just not powerful enough. We took parts designed in Creo and uploaded them to Fusion 360 (very easy import - no problems) and then used Fusion 360's CAM module to create the G-code. The G-code was then sent to the CNC using Carbide Motion.
Parameters for running:
For a 1/8" square end mill our typical is 0.015" depth per pass with 30 ipm linear speed and 10 ipm plunge speed. We generally have our CAD design with 0.15" diameter holes for a 6-32 bolt. This handles the slightly undersized bits and any flex that occurs while cutting those small holes.
If you like wet grinding (like I do) get this + this. The mist system requires an air compressor but it doesn't have to be a big one, I just use a pancake compressor. There are several brands of grinding fluid you can use, I just linked that one as an example, but Maxim oil has the best priced one. That stuff is great, you get a better finish and you can use it for everything you use oil for without the stinky oil everywhere, annoying rust spots will be a thing of the past.
It concerns me that they haven't developed a mechanical system yet. If they want to ship their alpha release with what looks like currently a Zen Toolworks machine (http://www.amazon.com/Zen-ToolworksTM-Carving-Machine-7x7/dp/B002ARTLUG/ref=sr_1_1?ie=UTF8&qid=1405603336&sr=8-1&keywords=cnc+machine) that's fine, but I would be very weary if these guys are saying that they're going to use kickstarter funds to develop and ship their own cartesian robot in addition to all of the custom functionalities that they're building.
It was a kit like this that I bought. Amazon is the most expensive place to get the kit, but I like how easy returns are if something goes wrong. Thanks! I just happened to stumble across the drive-in nuts when I was at the hardware store looking for regular nuts and decided the drive-in ones would be a better option.
By "program," do you mean getting it to cut stuff? Don't worry about the name of the board if they aid it is Arduino based.
Did it come with an off-line controller board, that may help get it to start doing things without a computer?
https://www.amazon.com/Offline-Controller-Control-Working-Engraving/dp/B07JJZDTD6/
​
OR -- You will need to hook the CNC to a computer with a USB cable, install the Arduino IDE software on the computer and then use it to transfer files to cut to the "board." It sounds like you have a lot to figure out so take it in small steps. Get to know the Arduino IDE first then how to send cutting data to the CNC.
this one?
Fair enough, would the marketed z travel account for the bit or am I losing a few cm of total travel?
With this, it looks like I can just print a bigger housing and swap in longer rods?
here's the upgraded model
I saw amazon has it today for 200 after coupon. My first thought was to come here and see if they are at least decent. Maybe entry level. I did a search and there are 4 results including this one.
​
https://smile.amazon.com/gp/product/B07P6K9BL3/
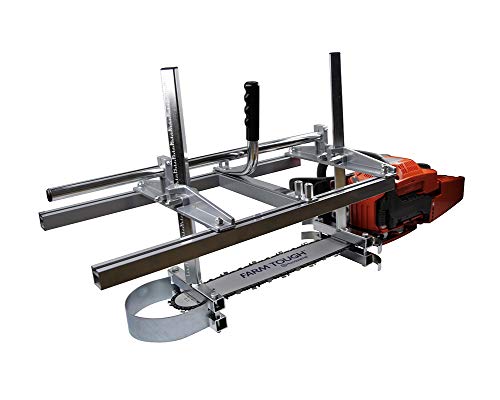
Not sure what you’re after, but if you own a chainsaw these exist:
https://www.amazon.ca/dp/B07D73YW7X/ref=cm_sw_r_cp_api_i_bRjzDbP7F7BFG
I think they come wider as well, but at a cost.
I'm sure those machines are in the multi-kilobuck range. But for $360 you can get something that you can scratch that same itch with.
Then you might want to stay away from a used machine, as you will invariably have to tear it down to repair it at some point.
My suggestion is to get one of the kits that are only a couple hundred dollars.
https://www.amazon.com/Genmitsu-3018-PRO-Control-Engraving-300x180x45mm/dp/B07PFGTYW7/ref=pd_cp_469_1?pd_rd_w=Zae1C&pf_rd_p=ef4dc990-a9ca-4945-ae0b-f8d549198ed6&pf_rd_r=5CM6TC0AFKYHFH9ZE31Z&pd_rd_r=26b3470b-a274-11e9-a94e-716468749152&pd_rd_wg=pyzgW&pd_rd_i=B07P6K9BL3&refRID=5CM6TC0AFKYHFH9ZE31Z&th=1
Use it to build confidence before you get a larger kit or used machine.
VFD CNC Spindle Motor Kits:110V 1.5KW VFD+110V 1.5KW 3 bearings Water Cooled Spindle Motor+110V 75W Water Pump+80mm Motor Clamp Mount+5m Water Pipe (110V-1.5KW VFD,1.5kw 3 bearings motor) https://www.amazon.com/dp/B078HRTBZ7/ref=cm_sw_r_cp_apa_i_G25FDbKB4MHR6
Make sure you have the correct amp circuit for 110v
What about this machine? The price is $165.89 it’s pretty small though. CNC 1610
Here is the machine:
DIY CNC Router Engraving Kit, Working Area 30x18x4.5cm, DIY CNC Router Milling Machine 3 Axis Mini Wood PCB Acrylic Metal Engraving Carving Machine https://www.amazon.com/dp/B075QFKXJZ/ref=cm_sw_r_cp_apa_DGhiAbDZHB6SW
Here is the power supply that the machine comes with:
MYSWEETY 110/220V 12v 30a Dc Universal Regulated Switching Power Supply 360w for LED Strip Light CCTV Radio Computer Project https://www.amazon.com/dp/B06ZXR1MPZ/ref=cm_sw_r_cp_apa_iFhiAbNG9XKNM
You will notice the circuit board notes a location to hook up a laser of up to 5.5w.
The actual seller is MySweetie on Amazon, but I’m not actually sure if legitimately their design. It’s been good so far. No complaints. If you do decide to get one, use this link so I get a credit for the referral.
https://www.amazon.com/gp/product/B074PS7ZP6/ref=as_li_tl?ie=UTF8&camp=1789&creative=9325&creativeASIN=B074PS7ZP6&linkCode=as2&tag=caseyjmorton-20&linkId=1060c7cf8c7f5f10b66861db4e336f30
For the hobbyist, this one offers flexibility of size, and fine control of the product:
https://www.amazon.com/Control-Engraving-30x18x4-5cm-110V-240V-Extension/dp/B074PS7ZP6
Has decent reviews, and most folks are pleased with it.
Thanks. Must be fun to have one. I found a 210 dollar cnc router on Amazon. It has a horrible name. https://www.amazon.com/dp/B01NBVXO0V/ref=cm_sw_r_cp_awdb_mt1MzbX7JZZ12
Cheapest I’ve seen:
https://www.amazon.com/MYSWEETY-Control-Engraving-16x10x4-5cm-110V-240V/dp/B01NBVXO0V/ref=sr_1_5?ie=UTF8&qid=1503638904&sr=8-5&keywords=cnc+router
Maybe you could find one used, since I can’t imagine anyone finding it useful enough to keep.
Learn to draw parts in CAD (Fusion 360 is free for hobbyists, and very powerful, does CAM too). Save up.
Spend a lot of time reading on the DIY CNC Router section of cnczone.com. Build your second machine first and save.
No, just got the XY table. I have a separate jig for 80% ARs that I'm hoping to get to this weekend so I can finish my PSA pistol. The table I got was something like this, I wouldn't use it for anything serious but some polymer should be fine.
https://www.amazon.com/dp/B01F587T3M/
something like this: https://www.amazon.com/Maxwolf-1-5KW-Variable-Frequency-Inverter/dp/B01E21K81I/ref=sr_1_3?keywords=variable+frequency+drive+250v&qid=1574117139&sr=8-3
distance is 40 ft
I am trying to get details on the motor, its not huge.
something like this
http://www.amazon.com/Engraver-Milling-Machine-Engraving-Drilling/dp/B010AOL0N6?ie=UTF8&keywords=cnc&qid=1463431539&ref_=sr_1_3&sr=8-3
Thanks for the followup. The $500 figure I came up with was the cheapest decent consumer machine I could find, which is the Zen Toolworks ($359 on amazon, but still requires you buy extra parts)
I really hate how much I want that thing too.. I don't need it. But I want it.
Zen Toolworks CNC Carving Machine DIY Kit 7x7