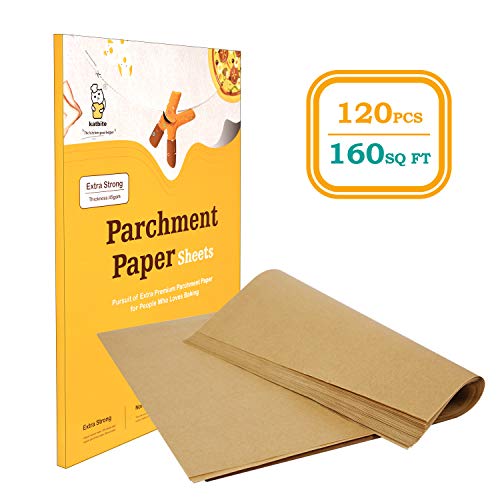
Best baking parchment according to redditors
We found 113 Reddit comments discussing the best baking parchment. We ranked the 55 resulting products by number of redditors who mentioned them. Here are the top 20.
We found 113 Reddit comments discussing the best baking parchment. We ranked the 55 resulting products by number of redditors who mentioned them. Here are the top 20.


Holy crap, someone else who cooks like me!
Did you see Stella's recommendation on parchment? They sell it in PRE-CUT SHEETS!!! I have this one:
I've used Silpats for baking cookies, but I don't like how it makes the cookies puff up or how it traps too much moisture on the bottom. So now I just do a pre-cut parchment & some cookie dough balls straight from the freezer & voila, dessert! I also do the same with my Lodge 5" cast-iron skillets for fancy desserts with ice cream:
These are the skillets I use: (you can usually find them cheaper locally, if you can find somewhere that sells them - specifically this size, for 1 person or 2 people to share, as the smaller ones tend to burn a bit easier)
I use Dixie 35 lb weight ''genuine'' parchment paper.
My test results have no contaminants.
https://www.amazon.com/PIZ121-Parchment-Silicon-Treated-Length-Sheets/dp/B007G1E5NO
All the testing in cannabis land regarding silicone coating revolves around Reynolds and Raw.
If I tested the 2 worst cars on the market and declared all cars to be shitty, I'd be looked at as if I were the biggest dumbass in the history of mankind.
Professional baking forums are filled with people who have tried all the brands.
They uniformly dismiss any parchment you can buy in a retail store as ripoff crap for the unsuspecting public who are not aware of what ''parchment paper'' means, and have nothing to compare their shitty retail choices to.
RAW is jumping for joy that the cheapest shit they could find, for maimum profit, is being bought by all the fools hoodwinked by their ''cool guy'' cannabis product stature. Why the fuck would they bother making a decent product, when the shitty one sells like hotcakes, because the name RAW gives millions a hard on, for no reason, except that they saw it in High Times.
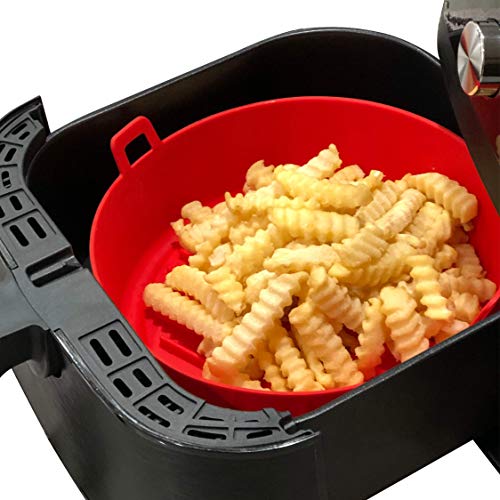
I got awesome parchment paper liners from Amazon, 100 for $4.99. The have the holes to allow even air flow and fit in my basket just right. I got 7.5 inch for my Phillips fryer, and it comes in different sizes.
.
Hot tip- Do Not Pre Heat With Just The Paper In The Fryer- it will get sucked up to the heating element and you can guess what happens next. Hope this info helps.
Here is the link:
100pcs Air Fryer Liners, Vancens 7.5 inches Bamboo Steamer Liners, Premium Perforated Parchment Steaming Papers, Non-stick Steamer Mat, Perfect for 3.5 & 3.7QT Air Fryers/Baking/Cooking https://www.amazon.com/dp/B07H4MNL9M/ref=cm_sw_r_cp_api_i_Jv6EDb1WRTBBB
No, it's called parchment paper. It's non stick paper used for lining pans for baking, and no it's vastly different from stretched animal hide you are confusing it with. It is not in anyway too porous to put cookies on.
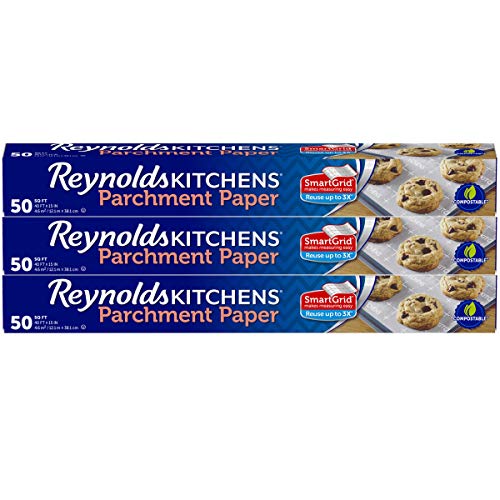
https://www.amazon.com/Reynolds-Kitchens-Parchment-SmartGrid-Non-Stick/dp/B074C9N6TQ?keywords=parchment+paper&qid=1537897343&sr=8-3&ref=mp_s_a_1_3
https://www.amazon.com/Kirkland-Signature-Stick-Parchment-Paper/dp/B006JCWGIC
If you want parchment paper use this.
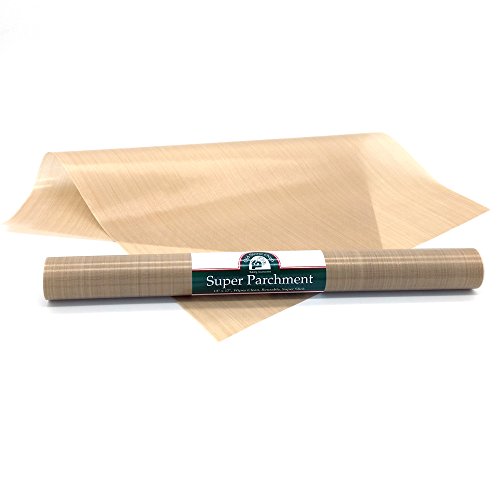
But you could also use this. Special woven teflon rated for higher heat. It is a little newer on the scene. Bubbleman, Tony and the dnail guys were keeping it quiet for a few months whilst they tested it.
The benefits are that it is reusable and won't tear/blowout. John Berfelo has ran tests on Rosin and parchment is still safe.
I've never seen a rolling machine like that before. However, I personally use a RAW rolling machine for my jay's and they come out a perfect .6 grams (paper + filter too) everytime.
Maybe someone can weigh in with some more scientific and/or exact knowledge, but I can at least give you my impressions lately, it's more a hobby for me but I really should write all this down anyways...
Temps... 165~190 = butter range, takes a bit longer, and the lower the more thicker whiter butter consistency. At 200 it is getting into the more sappy / golden yellow instead of the opaque white color with lower temps. Sometimes if you press at 190 or so it will change from somewhat sappy into butter if left overnight (strain dependent?). Yield is relative to temp from what I see, so if you press at 165 you get some white cake frosting looking material, but somewhat lower yields than if you press at 180 and still get some pretty nice butter.
Pressing method... I use a simple system that works for me. I do have a pressure gauge on my press, so if you don't, you may have to figure out the steps, but for my press, each pump of the hydraulic hand pump takes it up about 1 ton.
use a timer, ~1 min per ton...
I may vary slightly from this pressing method, always adding more time if anything, but usually just stick to it. Also, I would love to run a bunch of tests to see what is really best. Because sometimes strange things happen I forget I was pressing and leave it at 2 tons for 15 mins and look and there is a nice amount of rosin batter there! So maybe I should increase these lower times, I am still learning too ;)
Other notes...
I prepress using just my hands to form into a 'disk shape' about 2-3 grams around 1 inch around / 3/4 inch high/thick. I prefer material that is so sticky it just forms into a nice disk and all sticks to itself. Usually this is just a matter of hydration. After squishing the puck ends up about 3x3 when flat. I have not used filter bags much yet, I did try them some, but mostly I just press with no filter bag. I may use them to process more quantity if I need to, noticed I can fit an extra gram or two using a bag without worrying about the 'puck' expanding beyond the plates.
I always start with material hydrated to 55-65% (measure with a hygrometer in a ball jar). I prefer to just start with my own home grown and never let it dip below this humidity level, but rehydration can be done.
favorite parchment, heavy duty, better release IMHO - https://www.amazon.com/gp/product/B007G1E5NO/ref=oh_aui_search_detailpage?ie=UTF8&psc=1
Agree with all of the above. I have a standard oven (nothing fancy, no big commercial sized cooker) and a half sheet pan fits quite nicely in my oven with room to spare. And I find a half-sheet is the perfect size for almost everything.
Ditch the non-cook stuff, buy basic aluminum sheet pans like this one:
http://www.amazon.com/Fat-Daddios-Aluminum-Gauge-Sheet/dp/B001IZZGKU
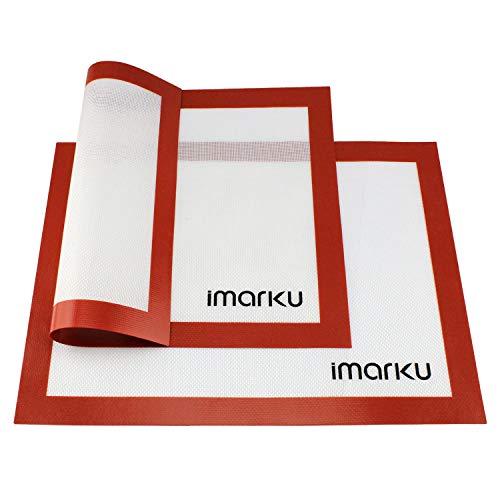
And get either a Silpat:
http://www.amazon.com/Silpat-AE420295-07-Premium-Non-Stick-Silicone/dp/B00008T960
Or a box of parchment sheets:
http://www.amazon.com/2dayShip-Premium-Quilon-Parchmet-Baking/dp/B00UVTEPXS
(or both, really - the parchment is useful for so many things)
This is the answer! Link for those interested.
Keeps your paint wet, no cleanup, easy to replace and parchment paper is $10 for 205 ft^2, more than you'll ever need or use.
There's a machine you can use. Get em at any smoke shop.
Time to make your day again!
As far as I can tell, some parchment papers are coated with a silicone product, but basic parchment paper is not. https://en.wikipedia.org/wiki/Parchment_paper For example, I found this one on amazon that is silicone free: https://smile.amazon.com/Regency-Natural-non-Stick-Parchment-Baking/dp/B001GEZ4W8/
Edit: Can you just store them in the molds in a secondary container? No need for wrapping at all in that case.
I found this it’s silicone
https://www.amazon.com/WaveLu-Air-Fryer-Silicone-Pot/dp/B07SVGT743/ref=mp_s_a_1_4?keywords=silicone+air+fryer+liners&qid=1562271420&s=gateway&sprefix=silicone+airfyer+&sr=8-4
https://www.amazon.com/gp/product/B007G1E5NO
I bet it's just parchment paper (but in envelope form), which is available in just about any grocery store in the US. You could probably just buy baking parchment and fold it.
EDIT: Nope, it's PTFE or polytetrafluoroethylene or teflon. Parchment paper would probably work though.
What utility does 25 dollar foil backed parchment provide over this?
http://www.amazon.com/Reynolds-Lining-Paper-Square-Foot/dp/B0068TZUXO
Legitimate question, not trolling, not hating, but failing to actually see the difference
Also, seems to be a shoddy product judging from the reviews, actually inferior to Reynolds
If it can't handle a casserole, can it handle a real rosin press? I mean as opposed to your sis's hair straightener?
What kind of parchment disintegrates under any conditions?
https://www.amazon.com.au/Press-Club-Parchment-Paper-Sheets/dp/B07NRH5Q3D/ref=mp_s_a_1_1?keywords=press+club+parchment&qid=1574090633&sr=8-1
Spendy but excellent
Er, hmm, upon waking up further you are correct. Sorry, my brain doesn't brain in the morning.
These should work fine:
https://www.amazon.com/Kirkland-Signature-Stick-Parchment-Paper/dp/B006JCWGIC
https://www.amazon.com/Reynolds-Kitchens-Parchment-Premium-Non-Stick/dp/B0166SPEL4
This stuff should work fine:
https://www.amazon.com/Kirkland-Signature-Stick-Parchment-Paper/dp/B006JCWGIC
they have kits on amazon -- multiple sizes too
-------------
I have no idea how much weed I put into it, but this video might give you a decent idea
Back when I was magnetizing bases I used rare earth magnets, hot glue, a metal baking sheet and a silicon parchment paper like this:
http://www.amazon.com/Kitchen-Supply-Inch-Parchment-Paper/dp/B00004RKFR/ref=sr_1_9?ie=UTF8&qid=1435163442&sr=8-9&keywords=baking+liner
I set up my baking pan and liner and followed these steps:
put a glob of hot glue on the pan (with silicon sheet)
put a magnet int he middle of that glob
put glue in the bottom of the miniatures base
put the miniature on the magnet and glue
when dry, peel away from the silicon sheet.
the magnet floats in the solidified glue. the whole process only takes a few minutes.
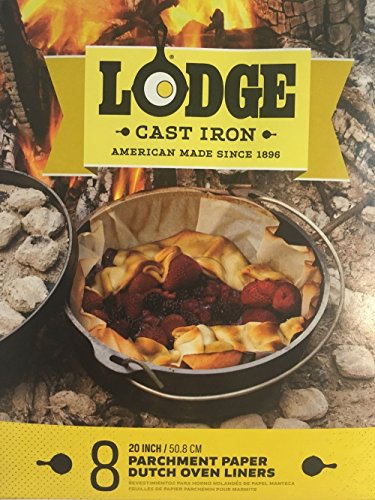
I use the parchment liners, mostly for sticky stuff like cobblers and dump cakes that are harder to clean up. https://www.amazon.com/Lodge-Manufacturing-Parchment-Paper-Liners/dp/B0073E1O6U
You can also cut your own from standard parchment paper, you just have to be a little more careful as they don't go as far up the sides.
This is what my store carries
http://www.amazon.com/gp/aw/d/B0000VLYBI?cache=acd33a880fb8c7f633e9ba24a889c603&pi=AC_SX110_SY165_QL70&qid=1404501689&sr=8-8#ref=mp_s_a_1_8
I found this one on Amazon: https://www.amazon.com/gp/aw/d/B07H79KX8W
I don't know if it's the best, but I thought it was pretty good and it's definitely better than the one I was using before
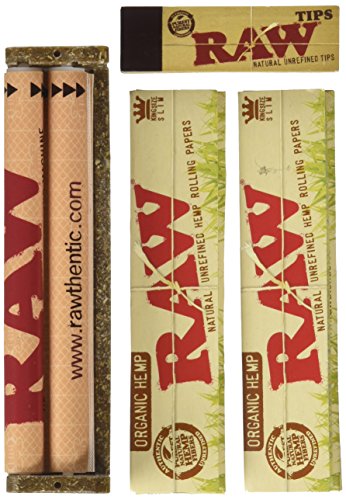
RAW makes these as well except it rolls out like traditional parchment paper.
I actually hate Silpats now! I’m using these sheets which are nonstick and amazing!!
Parchment Paper Sheets-100 Count, 12x16 inch Parchment Baking Paper Fit for Half Sheet Baking Pan(9x13,16x24 Available) https://www.amazon.com/dp/B07L9S9C7D/ref=cm_sw_r_cp_api_i_kQG2DbSCG1NMR
They have some cheaper options out there if you ever did want to give it a shot
75 sq ft -Reynolds for $5.99
Kirkland 205 sq ft for $11.10
And then there are these silicone sheets, which I've never used but have heard good things about.
Ludy's Kitchen 2-Pc Silicone Baking Mats for 19.75
I don't have a good pound cake recipe, but I would look on Pinterest for a 'moist pound cake', then make them one at a time until you find the one you like best. I would start with plain yellow and go from there.
A couple of suggestions of where to start:
Never over mix. Unless baking directions say to mix longer, mix just until the flour is blended in.
Scrape the bowl every time you add a new ingredient to make sure you get everything evenly emulsified.
Use parchment. I bake on half sheet pans often, so I get these https://www.amazon.com/2dayShip-Premium-Quilon-Parchmet-Baking/dp/B00UVTEPXS/ref=sr_1_1?ie=UTF8&qid=1466958623&sr=8-1&keywords=parchment+paper+for+half+sheet+pan I find the flat sheets easier to work with overall than the rolls available at the grocery store. Spray or butter the entire pan first, put the parchment in (cut it so it fits inside whatever pan you use), then lightly spray or butter the parchment as well. Your cakes will NEVER stick. In my early baking days, I had some heartbreaking experiences with a delicious cake looking like hot garbage because it got stuck in the pan and tore when pulling it out.
Learn how to tell when a cake is done so you don't have to solely go by the directions on a recipe. All ovens are different, ambient temperatures are different, and the ingredient temperatures are different, so for me to tell you to bake an 8" round for 35 minutes might be 5 minutes too much. So-- forget the toothpick test, and learn how to tell by look (it will be less shiny) and touching it gently in the center (it will spring back when done and the depression from your finger will not show).
Buy a $10 kitchen scale and weigh your ingredients. You will always get exactly the same results when you bake--makes life monumentally easier in my book.
Finally, I bake a great deal, so I got these http://www.webstaurantstore.com/6-qt-clear-square-polycarbonate-food-storage-container-with-red-gradations/407S006PC.html for all my sugar and flour varieties. I bought some plastic scoops at the dollar store which stay in the containers all the time, so gathering ingredients is a piece of cake. ;) If you order from the source I linked to, don't forget the lids, they are sold separately.
That's about it to get started. I apologize for the wall of words, but things just kept coming to me... If you have any questions or need more help, feel free to message me, I'd be glad to help.
Edit: a bit of clarity
I'll second the dutch oven and throw in a tripod that can be used to hang the oven above the fire. Also, do yourself a favor and get the parchment liners.
As far as food goes, paella is always a hit with my friends. Here is a great vegan recipe, but you can substitute flesh if you wish:). I prep everything in advance just to make things easier and more relaxing on site.
Another angle is to freeze pre-made burritos that are wrapped in foil. Toss them on the coals for a bit and they will be good to go. Same with corn on the cob.
sorry, switched to laptop now so here's the page link without Pinterest
https://www.frugallivingnw.com/amazing-no-knead-bread-step-by-step-recipe/
Basic No-Knead Bread
Slightly adapted from Jim Lahey’s My Bread
Ingredients
6 cups bread flour (recommended) or all-purpose flour, plus more for work surface
1/2 t. instant or active-dry yeast
2 1/2 t. salt
2 2/3 c. cool water
SECTION | CONTENT
:--|:--
Title | How To Make A WATERMELON out of CAKE! PINK VELVET cake with BUTTERCREAM and FONDANT!
Description | Click The Notification Bell To Get Freshly Baked Vids - Hot Out Of The Oven! Get The Vids EARLY! SIGN UP To Become One Of My VIPS: http://bit.ly/HowToCakeItVIP New Videos EVERY TUESDAY! SUBSCRIBE for more: http://bit.ly/HowToCakeItYT Want to see more of Walter? Check out my HOLIDAY COOKIE SANDWICHES video for his epic undercover mission! http://bit.ly/HolidayCookieSandwich Hi, I'm Yolanda! Some people call me the Beyoncé of cakes. I post my drool-worthy, jaw-dropping caking creations every Tuesday at 11am EST! From novelty cakes that look like your favourite foods to my MEGA mash up cakes that have layers upon layers of goodness - I dream in cake! Got an idea for a cake? I'd love to hear it - subscribe & comment below! FOLLOW ME: Facebook - https://www.facebook.com/HowToCakeItW... Twitter - https://twitter.com/yolanda_gampp Instagram - http://instagram.com/yolanda_gampp Pinterest - https://www.pinterest.com/yolanda_gampp Snapchat - @yolanda_gampp USEFUL LINKS: For the FULL BREAKDOWN of how I made this PINK VELVET WATERMELON CAKE go here - http://bit.ly/WaterMelonCakeRecipe Check out this vid for full instructions on how to make my ITALIAN MERINGUE BUTTERCREAM - http://bit.ly/YolandasButterCream GET YOUR VERY OWN CAKE TEE HERE! http://bit.ly/HowToCakeItTees What is that liquid I drizzle all over my cakes?? SIMPLE SYRUP! Read more here - http://bit.ly/YOsSimpleSyrupRecipe Get my SIMPLE SYRUP SQUEEZE BOTTLE! - http://bit.ly/SimpleSyrupSqueezeBottle INGREDIENTS PINK VELVET CAKE - Makes 3 x 9” Round Cakes and 1 9” bowl cake - 1 1/2 cups butter 1/2 cup vegetable oil - http://amzn.to/1U2TmE7 4 1/2 cups sugar - http://amzn.to/1Sm38i3 2 teaspoons vanilla - http://amzn.to/1O4VV4O 6 eggs 1 1/2 teaspoons Wilton Rose Icing Colour - http://amzn.to/1MSIHYx 6 cups flour - http://amzn.to/1f1mn3M 1 tablespoon salt - http://amzn.to/1DfvFPq 3 cups buttermilk, at room temperature 1 tablespoon apple cider vinegar - http://amzn.to/1M9lUu8 1 tablespoon baking soda - http://amzn.to/1M9lVOI 2 cups semi sweet chocolate chips - http://amzn.to/1I5Bp0n 4 lbs Satin Ice White Fondant - http://amzn.to/1SKaUCx WATERMELON PINK BUTTERCREAM 400g sugar - http://amzn.to/1Sm38i3 8 Egg Whites 1 lb Butter Wilton Red Icing Colour - http://amzn.to/1HWbdar 1 cup Chocolate Chips - http://amzn.to/1I5Bp0n PAINT COLOURS FOR RIND Wilton Moss Green Icing Colour - http://amzn.to/1HWcmPg Wilton Kelly Green Icing Colour - http://amzn.to/1LOzOk8 Wilton Buttercup Yellow Icing Colour - http://amzn.to/1LOzUIl Wilton Ivory Icing Colour - http://amzn.to/1HWcRZI Clear Alcohol OR Lemon Extract ALL TOOLS 3 x 9” Round Pans - http://amzn.to/1DK4RHg 1 x Stainless Bowl 9” in diameter - http://amzn.to/1OMrtxo Electric Stand Mixer with Paddle Attachment and Whisk Attacment - http://amzn.to/1Sm3oh6 Lazy Susan - http://amzn.to/1JOhx6o Whisk Sifter Mixing Bowls Rubber Spatula Parchment Paper - http://amzn.to/1IDuQHI Serrated knife Paint brushes with round tips Palette Knife Ball tool - http://amzn.to/1I5FCRy Pointed sculpting tool - http://amzn.to/1I5FCRy THE HOW TO CAKE IT TEAM Director of Photography: Chet Tilokani http://www.chet4days.com Editor: Orhan Sumen https://vimeo.com/orhansumen Producers: Jocelyn Mercer & Connie Contardi http://www.cjmercon.com T-Shirt: http://www.howtocakeit.com/
Length | 0:09:29
****
^(I am a bot, this is an auto-generated reply | )^Info ^| ^Feedback ^| ^(Reply STOP to opt out permanently)
Ah yes, looks similar to my first hand rolled joint. This changed the game for me though, highly recommend
Raw King Size Organic Deal - King Size Slim Organic Rolling Papers, 110mm Rolling Machine and Wide Filter Tips INCLUDES Black Velvet Pouch https://www.amazon.com/dp/B007TO1HFC/ref=cm_sw_r_cp_api_i_KGgGDbHA9P4RT
Reuseable Parchment Paper <-- this is the most awesome thing I have bought for baking yet..... pizza literally slides right off after baking with 0 issues, and I have noticed the underside bakes great while using this.
Standard iceberg lettuce!
I fucking LOVE unwiches. In fact, I make them at home! I bought unbleached parchment paper, butcher's twine, and iceberg lettuce and I make my own low carb and super delicious unwiches for a fraction of the cost of a JJ's sub.
If you're at a JJ's though, definitely try the 'gargantuan' as an unwich. It's like it was hand crafted by the Keto Gods just for us.
Also, here's what I usually put on my home made sandwiches:
Iceberg Lettuce, Ham, Roast Beef, Salami, Chicken Breast, Pepperoni, Sliced Onions, Sliced Mushrooms, Sliced Cherry Peppers, Sliced Pepperocinis, Sliced Pepper-Jack Cheese, Mayonnaise, Newman's Own Family Italian Dressing (very low carb and no sugar), Cracked Pepper and Kosher Salt.
There are different thicknesses to the Silicon coating. Different brands probably all spec different. They have a 27lb and 35lb coating rating available, like this http://www.amazon.com/gp/aw/d/B007G1E5NO/ref=mp_s_a_1_fkmr0_1?qid=1457826765&amp;sr=8-1-fkmr0&amp;pi=AC_SX236_SY340_FMwebp_QL65&amp;keywords=Dixie+35+lb+parchment
Get an airtight sandwich container like the Lock & Lock ones then get a cellulose sponge cloth (the brand doesn't matter, just make sure it doesn't have any anti-bacterial stuff or soap already in it. Cut the sponge cloth to fit the container, then lay a piece of parchment paper overtop of it. It's key that it's parchment paper and not wax paper, since parchment paper is semi-porous and allows water to be wicked up into the paint, without allowing the medium and pigment to sink through.
This is the one I use (highly recommend it)
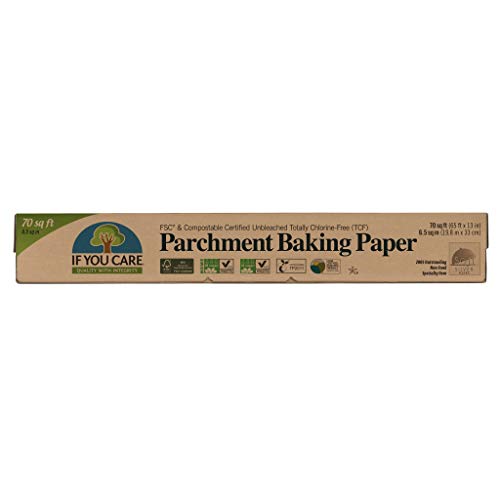
http://www.amazon.com/Beyond-Gourmet-Unbleached-Parchment-71-Square/dp/B001KUWGDS
Quick note on wet palettes, check some google searches for a DIY. I found one a few months ago and it changes my painting style completely, sadly didn't bookmark or I'd pass on a link.
Personally I have a small 4x5 inch rectangular plastic lid with a half inch lip from a chopped garlic container, with a piece of paper towel folded 4 times (so 4 layers) with a cut piece of parchment baking paper over the top. Total cost, I don't know like 25 cents?
Here's the parchment I use from Costco (US)
https://www.amazon.com/gp/aw/d/B006JCWGIC/ref=psdcmw_678533011_t1_B000I1X4UY
Spend that money on more models, more paints or better brushes!
This recipe is from my blog, https://veggiechick.com/skinny-shiitake-black-bean-burgers-w-spicy-aioli/ More notes on the blog post. Recipe below.
Shiitake Black Bean Burgers w/ Spicy Aioli
Spicy Aioli
INSTRUCTIONS
Yeah its somewhat annoying. I saw a few threads about using the oil slick with the what looks like aluminum backing for flower pressing. Ill order some of that if no one recommends any other sheets.
Edit: link to what I'm talking about [Oil Slick Wrap Foil Backed Parchment Paper 12"x600"] (https://www.amazon.com/dp/B00XV01S16)
Edit2: Picture of how PTFE looks after 6tons
this stuff is cheap and great.
https://www.amazon.com/Georgia-Pacific-Dixie-27S14-Parchment-Silicon-Treated/dp/B007G1E5NO/ref=sr_1_5?crid=1JAGHXH6EGZX2&keywords=dixie%2Bparchment%2Bpaper%2Bsheets&qid=1573513355&sprefix=dixie%2Bpar%2Caps%2C187&sr=8-5&th=1
I like this
https://www.amazon.co.uk/Wilton-Baking-Parchment-Paper-Stick/dp/B07H9G7V76/ref=mp_s_a_1_5?keywords=wilton+baking+paper&amp;qid=1556404652&amp;s=gateway&amp;sr=8-5
This is the stuff I use and have never had a problem with a paint drying out.
I use the ones below. They’re usable, I can cut them to fit whatever pan I’m using, and they’re good up to 550!
these
Dough made using the same recipe as my pan pizza I posted earlier: http://www.susanscookingschool.com/pizzadough.html
I used parchment paper on my pizza peel instead of flour or cornmeal because I don't like the taste/texture of them on the finished crust very much. Ended up working like a charm, got off the peel very easily and was easy to take out from under the pizza a couple minutes into cooking. This is the parchment paper I used.
Cranked the oven to 545F (why can't the oven just go to 550? Mr. Monk would not approve) and let it sit at that temp preheating my cordierite pizza stone for about 45 minutes. The pizza cooked in about 9 minutes, taking the parchment paper out after 3.
Used about 30% of the dough from the recipe above, which is around 2500 kcal, which ends up being 750 kcal for the one pie. Used about 3 servings of Giant Eagle pizza sauce (I know, I know, I'm going to make my own next time) which was 120 kcal, and then 1.25 cups of cheese which was 450 kcal. Entire pizza is 750+120+450=1320 + 80ish for mushrooms = 1400, or 700 kcal for half the pie.
For next time, I need to make my own sauce and also work a little bit at stretching the dough a bit more evenly. Gotta say I enjoy the pan pizza I made a decent bit more! I think with a thicker crust (more dough) I'd like this one at least just as much.
A rolling machine makes a perfect skinny joint every time:
https://www.amazon.com/dp/B007TO1HFC/ref=cm_sw_r_cp_apa_0hX8BbXG1NNDZ
RAW rolling papers makes parchment paper. here
Contact paper like this? Never used it for this purpose (I would have thought the plastic might melt), but I have used parchment paper like this with a clothes iron to cure plastisol ink. It was my first big run, something like 180 white prints on black shirts. Took forever. Got a heatpress with the money from that job, and still recoil at the sight of an iron.
I use stuff like this with no silicon.
Honestly, Amazon.com(.au) will likely be the most affordable place around. Here is a box of Double Platinum Blunt Wraps - Various Flavors 25 Packs (50 Wraps) for £16.93. That is what, about two dollars cheaper per pack than you are paying at the local shop?
If you are willing to pay the shipping cost to order the product from the US you can score some amazing deals on various products. For example, you can get 64 "RAW King Size Organic" rolling papers, a 110mm "RAW Organic" branded rolling machine, and a book of 50 "RAW Organic" filter tips for about $6(AUD). You can also order an extra 512 "RAW King Size Organic" rolling papers and 500 "RAW Organic" filter tips for about $15(AUD).
In the event that you want glass pieces you could always try Etsy. Many sellers are individuals just looking to sell their art. I am sure you could easily make shipping arrangements by contacting the individual. Here is a sick Piranha Plant pipe, a Pineapple Chillum that looks impossible to use, and a wicked Earth-tone pipe with Mandala designs on it.
Helpful Kitchen Tools:
Baking sheet
Parchment paper or aluminum foil
Ingredients:
2 cups Carbquick
2 oz butter (diced)
1 cup sharp cheddar cheese (shredded)
¼ tsp garlic powder
¼ to ½ tsp salt
¼ cup heavy cream
¼ cup water (add more if necessary)
1 small jalapeno (diced with seeds removed)
6 strips of cooked bacon (coarsely chopped)