Best power drill chucks according to redditors
We found 102 Reddit comments discussing the best power drill chucks. We ranked the 32 resulting products by number of redditors who mentioned them. Here are the top 20.
We found 102 Reddit comments discussing the best power drill chucks. We ranked the 32 resulting products by number of redditors who mentioned them. Here are the top 20.


Hmmm.....
If you go to Home Depot, see if there are any scraps of pressure treated lumber you can pick up for cheap. If you can get, say, a 12" length of 4"x4" (actual: 3.5"x3.5"), and if we assume your tubes are 10mm outside diameter (about .4") then you can put...(does math stuff)...128 tubes into it.
Fair warning: I'd have to fucking kill you if I found this cache.
Pick any of the four "long" faces of the wood. Parallel to each edge, draw a line 1/4" from the edge. The large middle area will be 12" long by 3" wide. In that space draw a 3/4" grid; that'll give you a 4x16 grid. At each intersection inside the grid (not along the edges) drill a 1/2" hole straight down 1" into the wood. (The diameter of the hole should be slightly larger than the diameter of the tube so as to fit the tube and the glue that will hold it in. I'm assuming a 10mm tube, but if the tube diameter is different then the hole diameter should be different too.) That'll give you 45 holes.
Flip the wood over and repeat the process for another 45 holes.
Now turn the wood on its "side" (one of the two sides that have no holes) and repeat the process again — only this time drill only the middle column of 15 holes. (You can't do the other two columns because they'll intersect the previously-drilled holes.)
Flip the wood over and repeat for another 15 holes.
Stand the board on end (so you're looking at a cut end). Parallel to each 3.5" edge, measure out and draw lines 1 3/8" from each edge. You should have an out-of-proportion tic-tac-toe board. At each of the four intersections, drill another 1/2" hole 1" deep.
Flip the wood over (so you're looking at the opposite cut end) and repeat for another four holes.
Sand the surfaces lightly to remove all of your lines, and blow out any dust from the holes. Spray a bit of water into each hole, pour a couple of drops of Gorilla Glue inside, then press a tube into it. Repeat for the other 44 holes. When you're done flip it upside-down, put a weight on top of it, and let the glue set. Repeat for each of the other sides and the ends.
Make one (1) log scroll and put it randomly into a tube. Make 127 other scrolls that say nothing but "NOPE!" or "WRONG ONE!" or "SORRY!" or "TRY AGAIN!" and use them to fill up the other tubes. (Make sure the type is big and fat enough — and printed on both sides — so that people can't use them as logs to sign.)
Hide, publish, and prepare for (more) death threats.
EDIT: Call the cache "16 Bytes" because it has 128 bits in it. :-)
impact drivers aren't ideal for drilling but if you really want to go through with it you need a set of 1/4" hex shank drill bits like this
An alternative is getting a proper drill bit chuck that fits into you impact driver so that you can use any bits you want (give you the option to get bits specific to the material you're drilling)
But really the best thing to have is a real drill meant for drilling, especially the larger the hole you're trying to drill.
EDIT: the reason impacts aren't ideal for drilling is that by nature they're supposed to start banging away in small powerful knocks when they encounter resistance, and which allows a relatively small motor to drive deep screws or loosen tight bolts, but a drill bit cuts most efficiently when it just powers through and keeps spinning and slicing. If the bit stops and start chipping you're mangling the work and might get your bit jammed. Newer more expensive drills have some power management built in to adjust torque automatically depending on load to try and keep the bit spinning smoothly, which is even better, but even a cheap drill will be better at drilling holes than an impact drive.
That said, for what you're doing, the impact drive will do exactly what you want (for free). So have at it. But if you want to start drilling large holes in those joists, get a drill.
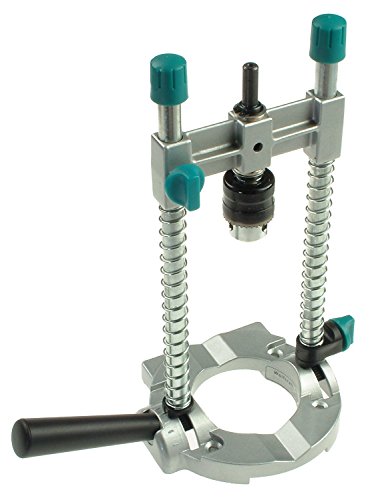
A drill guide like this will work. They lack the absolute precision of a drill press, and definitely not built for daily use, but for an occasional DIYer who can't justify drill press, it gets the job done.
You'd be better off with a guide like this:
Wolfcraft 4525404 Drill Guide Attachment for 1/4-Inch or 3/8-Inch Drills https://www.amazon.com/dp/B000JCIMEA/ref=cm_sw_r_cp_api_alA0xbMA692QH
this drill press attachment looks like your best option for me. Since you are doing a grid a standard drill press will not work. I'd say its either this for $25, or a cnc for $2500.
http://www.amazon.com/Wolfcraft-4525404-Attachment-4-Inch-8-Inch/dp/B000JCIMEA
> Needless to say this would be a royal pain to machine out without a CNC
Don't see why it would be a royal pain, do you have a mill already? If so, look at https://www.amazon.com/OrangeA-Dividing-Precision-Tailstock-Universal/dp/B06XYYGLQ8 for a more accurate but more expensive option or https://www.amazon.com/Inches-Tilting-Rotary-Centering-T-nuts/dp/B072BSVMSW for a more manual, less accurate option. Both will get you there, including the cap top effect.
Fun design, if you have the lathe and mill you should try to make it.
You said hand tools .do you mean hand tools or hand power tools? But I’ll give you my list of things you should pick up if you have a minimal amount of space. keep in mind that you will need to develop a lot of skill to make up for not being able to rely on things like fences.
I will also try to give you tools that do multiple things so that will cut down on space
A dremel or similar tool - every one who does any kind of making or creating should have one. with the amount of bits you can put in there to do things they are very useful
A worx axis saw - this is a battery operated saw that will cover most saws for you. You can use it as a jigsaw or a reciprocating saw. It takes both kinds of blades. I have this tool and I love it it’s so useful
https://www.worx.com/power-tools/saws/20v-axis-recip-jig-saw-wx550l.html
A circular saw- a circular saw can do everything that a miter saw or a table saw can do it just takes a bit of practice. If your trying to do straight cuts then this is what you want
A cordless impact driver - and only a cordless impact driver. Some people say that they prefer to have a driver and a drill because they think that the drivers Chuck is limiting to them . It’s not limiting if you buy the Chuck attachment on amazon so it covers both tools
I don’t have a recommendation for drivers but if you want a cheap one go for the harbor freight one
Here’s a good attachment I was talking about
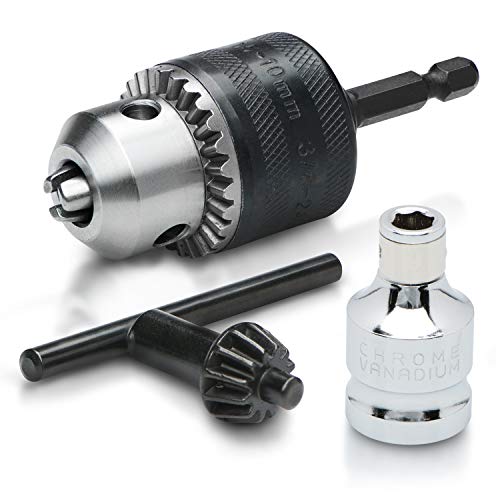
Neiko 20754A 3/8" Drill Chuck with 1/4" Quick Change Hex Shank | Convert Impact Driver and Wrench to Drill https://www.amazon.com/dp/B0051AE85W/ref=cm_sw_r_cp_api_i_-cPXDbT1M8D3T
A router - you said you wanted fancy routers will help you do fancy.
The bits that can go into these things can accomplish quite a lot from edges to cutting to shaping to jointing
That I would say is the bare minimum that could cover a wide range of things but extra power tools that would help are
A belt sander ,palm sander an electric hand planner or a
Now for the hand tools you should get. I’ll try to keep this as organized as I can.
Measuring and layout
Speed square-use full for quick angles. Read up on how to use one they are surprisingly versatile
Combination square- very nice for a 90 degree or 45 degree line. The blade is also adjustable so you can mark a line from an edge at a set distance
Sliding t bevel - nice for angels but that’s about it
Carpenters square or framing square- it’s those big l shaped squares that you see in stores. I learned from the old school craftsman on this one, and they used this to lay out rafters,stairs ,straight lines , circles ovals you name it . Also get yourself some stair gauges to go with this one you’ll thank me
Tape measure- of course
Level - of course
Shaping
Files - get a two cut and a rasp of each variety (rat tail ,flat , half moon )and you should be fine or just get one of the 4 in ones if you wanna cut down on something
Chisels - wonderful tools ,get a good couple sizes. You can also buy a cheap general pack to start with and see what you need from there. Keep them sharp and remember that if you flip the chisel over you can accomplish something different
Spoke shave - a bit extra but still worth is since you said you wanted to do chairs
Cutting
Japanese pull saw - has both a coarse and fine blade and flexible for flush cuts
Coping saw - nice if your adding trim or just trying to get that really tiny precise cut
Bits
Spade bits - cheap and come in many sizes . Also once you see the tip come out the one side pull out and start the drill again from the other side so you don’t blow out the hole
Twist bits - cheap comes in many sizes especially smaller
Driver bit set - useful for dealing with screws and such
Plug cutters - useful for hiding screws
Counter sunk bits - useful for keeping screws flush or just flush below the surface
Finishing
Sand paper - get every grit you can and when you sand,sand the daylights out of it !!! That always helps . Also look up wet sanding. I’ve made a wooden mirror with wet sanding. And remember to climb your grit ladder
Sanding block - so you don’t hurt your hands sanding
Misc
Hammer- self explanatory for putting in nails
Tack hammer - used for tiny nails or for tiny areas
Dead blow hammer - put pieces into place without damaging or marring your piece
Clamps - you can never have enough clamps
And that’s my list I hope it helps you with what you’re doing. I hope the chairs turn out well
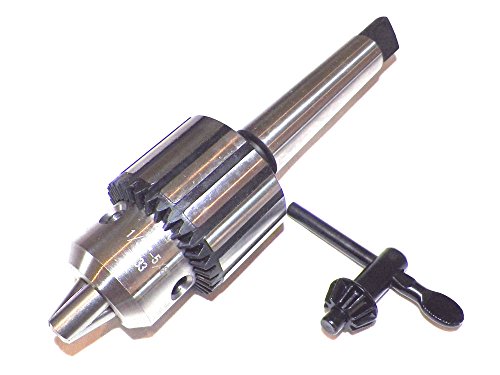
The taper is a 2. This is the one I bought. Works great.
Pen turning is an excellent hobby! For making pens, some things you'll need might include:
Note: Of course there are a million ways to do everything. I don't promote any of the links, they're just examples to show what the tools look like.
I have a very similar lathe, except it is Alltrade brand. Here's what I got:
PSI Woodworking TM21 3/8 inch Diameter Drill Chuck with 1 Morse Taper Mount https://www.amazon.com/dp/B01N3YU1TT/ref=cm_sw_r_cp_apa_i_AqfxCbCB8KD4R
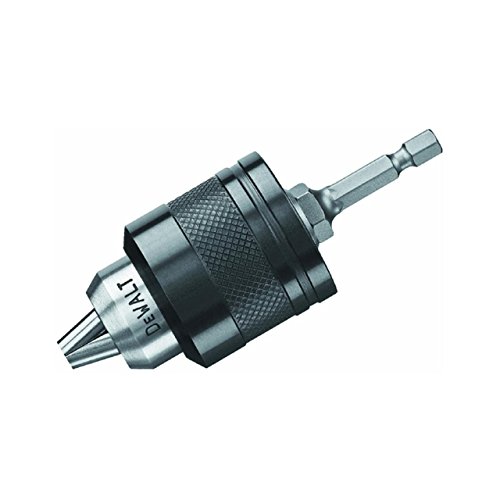
it came with this drill chuck https://www.amazon.com/Neiko-20754A-Change-Convert-Impact/dp/B0051AE85W but Both Milwaukee and Dewalt have their own version. https://www.amazon.com/DEWALT-DW2298-2-Inch-Square-Adaptor/dp/B001BZ9YZU/ https://www.amazon.com/Milwaukee-48-03-4410-Shockwave-2-Inch-Adapter/dp/B002KKBBR4
I don't know anything about dowels, but if the OP is talking about the need to drill perpendicular holes, I just picked up this jig and I like it so far for general woodworking:
Milescraft 1312 DrillBlock
​
There's another style that might be more precise for dowels since you can buy more bushing sizes. For example:
Dowel drill bit guide
​
And if you need more angles than just 90 degrees, there are hand drill guides like this one:
Milescraft 1318 Drillmade drill guide
​
Edit: I don't necessarily recommend the specific models in the 2nd and 3rd links. They were just the first examples I came across.
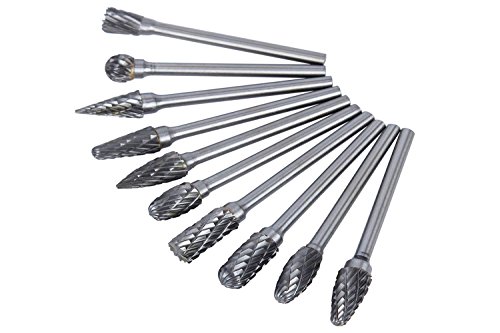
Understood. I used a dremmel with a burr set like these:
https://www.amazon.com/Tungsten-Wood-working-Polishing-Engraving-Drilling/dp/B076D4Z8LX/ref=sr_1_3?keywords=dremel+burr&qid=1562334018&s=gateway&sr=8-3
and a 3d-printed guide to clip mine, then did some clean-up with a file. It's a pain in the ass and I totally understand not doing it, especially if you're already happy with the performance.
> The Lathe:
Sounds like you've got this well under control.
> The Tools:
There are very split camps on tools: replaceable carbide tips vs traditional tools. Personally I think both have a place, but I do feel it's best to start with traditional tools to learn the how and why tools work the way they do. My personal opinion is always to spend the real money on good tools. They don't have to be expensive, but the right tool of the right quality (sharp, of course) will make all the difference in the world. Every try to dig a post hole with a hand trowel? :)
Also don't feel bound by just one brand or type of tool...most of us have lots of tools!
You can go with carbide-tipped tools such as Easy Wood Tools, Simple Woodturning Tools, or other brands. You can make your own for a fraction of the cost to buy.
There are a few of good entry-level HSS sets out there for about $80, such as this frequently recommended set of Benjamin's Best. I also like Hurricane brand tools which I feel are excellent entry-level HSS tools for the money. Either of those would serve you well through the learning curve and a good ways into your turning career.
If you wanted to pick just two higher-end tools, I feel Crown's Pro PM are good for the price. I own several, they're nice, but the handles are a bit short for my knuckle-dragging frame! All you really need for the projects you listed is a skew chisel and a spindle gouge.
Lastly, you could buy some of the popular "buy it for life" tools like Thompson Lathe Tools or D-Way Tools. These are widely considered the upper end of turning tools with each tool running between $55-200 (handles sold separately). Many people who get serious about their hobby end up with these tools because the harder tool steels are more durable.
> The Bench Grinder:
The Rikon 80-805 is the most common good deal for a grinder. Occasionally some other Asia-import will pop up on the scene for a little while, but the Rikon is pretty predictable about going on sale. Also, it comes with two decent wheels to get you started; not all import grinders come with decent wheels.
Eventually you might want to invest in CBN wheels to replace the frangible wheels that come on the grinder, but that's probably down the road for you.
Lots of people use that grinder, I've not heard anything outright bad about it (although some people prefer one with more HP).
> Drill Press?
A cheap drill press will get you there just fine.
The most common alternative is to purchase a 4-jaw chuck, such as the Nova G3 (which requires the appropriate insert), and also a set of pen drilling jaws and a drill chuck for the tailstock. That lets you drill blanks entirely on the lathe (and with better accuracy than a drill press IMO).
The downside is that the 4-jaw chuck, insert, jaws, and drill chuck collectively will cost damn near $200, which is a lot more than a cheap drill press. The upside is that the chuck is exactly what you will need if you decide to get deeper into turning and want to try bowls, boxes, and other things. Many of us already owned or planned to own a chuck, so the only real cost addition was the pen drilling jaws and the drill chuck.
> Pen turning attachments
If you plan on using something else for the finish, make sure you buy what you need.
You could try one of these drill guides . It’s sort of like a portable drill dress. Will probably still be tricky with forstner or spade bits though.
Something like this (https://www.amazon.ca/Milescraft-1318-DrillMate-Drill-Guide/dp/B014A1Z92I/ref=asc_df_B014A1Z92I/?tag=googlemobshop-20&linkCode=df0&hvadid=292949808887&hvpos=1o2&hvnetw=g&hvrand=6187848914128197040&hvpone=&hvptwo=&hvqmt=&hvdev=m&hvdvcmdl=&hvlocint=&hvlocphy=9000694&hvtargid=pla-437180793075&psc=1) would be cheaper but would drill straighter holes than free handing it
Get an 18mm or larger forstner bit and a depth gauge or drill guide. http://www.rockler.com/jig-it-drill-guide or like this https://www.amazon.com/Wolfcraft-4525404-Attachment-4-Inch-8-Inch/dp/B000JCIMEA/ref=sr_1_1?ie=UTF8&qid=1484608162&sr=8-1&keywords=drill+guide
and one of these: https://www.amazon.com/CMT-537-180-31-Forstner-32-Inch-Diameter/dp/B000P4HLGC/ref=sr_1_1?ie=UTF8&qid=1484608191&sr=8-1&keywords=18mm+forstner
It might be worth while getting a bit slightly oversized for epoxy squeeze out or magnets with holes for screws in the center to hold everything in place.
Perhaps this will get me flamed here for doing things the wrong way but it's working for me on my table-less setup (currently making a router table and saving up for a table saw so I can avoid relying so heavily on these techniques in the future).
A table saw is probably what you need to do this properly but this is sort of a "poor mans fence".
My current workaround is to draw my cut line, and then clamp a straight edge ruler (or other material that's perfectly straight) 1" to the side. When I make my cut I know it will be perfectly straight if I keep the metal guide flush to the clamped piece the entire time.
This is also how I'm using my router with straight bits to make dado cuts (measure up 2 3/4" from the center line for my router guide)...I know there are probably better ways to do this but again, no table saw so I'm making due with what I know and what I've got.
http://www.amazon.com/dp/B007K5HIFS/
http://www.amazon.com/dp/B000JCIMEA/
Those are both probably tools/adapters which are not going to be better than a table saw or drill press but they're also appealing for those with limited budget or limited work space.
Not the best option, but, it is relatively inexpensive, and will get to you in 2-days:
Wolfcraft 4525404 Drill Guide Attachment for 1/4-Inch or 3/8-Inch Drills https://www.amazon.com/dp/B000JCIMEA/ref=cm_sw_r_cp_api_i-ptxb4CC034N
https://www.amazon.com/Wolfcraft-4525404-Attachment-4-Inch-8-Inch/dp/B000JCIMEA
https://www.amazon.com/Neiko-20754A-Change-Convert-Impact/dp/B0051AE85W
Then use any bit you want.
That chuck only accepts 1/4" hex bits. You'll need something like thisin order to use twist drills, or you can buy 1/4" hex/"impact ready" drill bits like these.. The other style you are used to is called a keyless chuck.
So I've started buying the parts to see if I could make this thingamabob as well. It looks so useful!
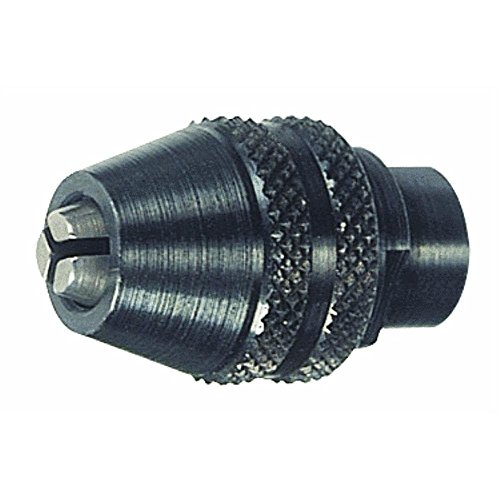
One thing I think I've discovered while researching: I think it might not be absolutely necessary to buy the exact same chuck that the original maker used. I'm thinking any 1/2" threaded chuck would do. Here's my reasoning: I thought at first that the threaded rod coming off the lever piece would screw directly into the chuck (and thus it would be important to match up the threading of the lever shaft with the threading inside the chuck. But now that I look at the step-by-step instructions on the original maker's webpage, the lever shaft is screwing directly into the nut he's epoxied onto the chuck. I think the lever shaft screws into the nut and then just moves deeper into the chuck when he adjusts the height of the piece, never actually touching the threads of the chuck itself. I ordered the same lever you did, and after taking it down to a hardware store and playing with that little gadget that helps you determine threading sizes, I found out the lever shaft on this one is threaded M8 1.25 (metric). That's definitely narrow enough to fit into the 1/2" thread inside the chuck.
I came just 'cause I was thinking if you were getting impatient about the delivery time of the chuck you ordered, I think you could get a different (but still cheap) 1/2" chuck on Amazon with Prime and get it lickety split. This is the one I got, but it appears to be out now. :(
https://www.amazon.com/gp/product/B00LDSSNP2/ref=oh_aui_detailpage_o03_s00?ie=UTF8&psc=1
This one looks like it might also work:
https://www.amazon.com/Eyech-Keyless-Universal-Replacement-Electric/dp/B078H9N23D/ref=sr_1_26?s=hi&rps=1&ie=UTF8&qid=1525220991&sr=1-26&keywords=1%2F2+keyless+chuck&refinements=p_85%3A2470955011
Anyway, just a thought. As it turns out, I'm not using the one I bought, because I remembered I had an old . drill of my dad's, and I just took off the chuck and am using that one.
For epoxying the nut to the chuck, I ended up buying Original JB Weld at the local Home Depot, simply because it was the strongest they had. I haven't tried it yet.
Speaking of the nut, I held up my M8 1.25 nut to the chuck, right where the guy showed he epoxied his, and wow, there's just a tiny TINY about of metal-to-metal contact available there. I'm starting to think about how difficult it will be to get that nut on there centred, and how well it will stay. As a possible solution, I bought some flanged nuts of the right size, in hopes they'll provide more surface area for the epoxy. I went to two stores in my area, and they didn't have a bunch of metric hardware, so I just ordered these on Amazon. Fingers crossed.
https://www.amazon.com/gp/product/B077HSXHPV/ref=oh_aui_detailpage_o00_s00?ie=UTF8&psc=1
I'm now wondering how to get a threaded shaft that screws into both the lever and the nut. The lever assembly I got just has a bolt screwed into the end, so threaded one end and a hex cap on the other end. What I really need is a threaded rod. What I might do is just get a M8 1.25 bolt and hacksaw the cap off. There's a big fingers crossed moment.
Hope your build is going well! Thanks again for this great post!
You bought a drill with a shitty 1/4 inch hex chuck. What you should have bought is a drill with a real drill chuck. You can buy something like this http://amzn.com/B0051AE85W but its going to suck if you ever need to drill a real hole with a larger bit.
note, they are right about the mandrel, but if you want to drill the blank on the lathe, you'll need a jacobs chuck and a regular one. I got a cheap Grizzly and it works great on my harbor freight lathe(18x10)
http://www.amazon.com/Grizzly-H8049-6-Inch-4-Jaw-1-Inch/dp/B000M63176/ref=sr_1_6?ie=UTF8&qid=1451192165&sr=8-6&keywords=lathe+chuck
http://www.amazon.com/PSI-Woodworking-Products-TM32-Diameter/dp/B004CVJC20/ref=sr_1_1?ie=UTF8&qid=1451192244&sr=8-1&keywords=jacobs+chuck
Side note, some pen kits are fine to turn between centers but a mandrel is certainly the safest.
OK FINALLY got it right.
I will post this here and in a new thread. This is my final stand and it is a good one. It is the FINALLY formula with a small tweak.
See below for links to all products.
Employ the JimOakey set up. Wear protective gloves and eye wear.
Very nice, comfortable high. Should last at least 4 session depending how intense you huff.
JimOakey's set up please go find it and do as it says. I re-posted it here: https://www.reddit.com/r/popperpigs/comments/3k1i6j/adventures_in_popper_production/ Those who do; I will give enough details so you will not need to review the posts.
Sodium Nitrite here:
http://www.amazon.com/gp/product/B00L74HO5M?psc=1&redirect=true&ref_=oh_aui_detailpage_o03_s00
Isobutyl alcohol. http://www.amazon.com/gp/product/B009S08MB2?psc=1&redirect=true&ref_=oh_aui_detailpage_o02_s00
Battery Acid: http://shop.advanceautoparts.com/p/autocraft-battery-acid-cycle-acid/2030000-P?searchTerm=battery+acid
Mixer device: http://www.amazon.com/Wolfcraft-4525404-Attachment-4-Inch-8-Inch/dp/B000JCIMEA/ref=sr_1_1?ie=UTF8&qid=1452057063&sr=8-1&keywords=portable+drill+press
Put in a plastic container like this:https://images.search.yahoo.com/images/view;_ylt=AwrB8qAYo4xW_WUAdiMunIlQ;_ylu=X3oDMTIzdWtmaWIxBHNlYwNzcgRzbGsDaW1nBG9pZAMzMTBmNWZjMzU4NDAwY2Q1ZGM4NWE1YjRjMzQ2YzE0NgRncG9zAzIwBGl0A2Jpbmc-?.origin=&back=https%3A%2F%2Fimages.search.yahoo.com%2Fyhs%2Fsearch%3Fp%3Dplastic%2Bbottles%26fr%3Dyhs-mozilla-001%26fr2%3Dpiv-web%26hsimp%3Dyhs-001%26hspart%3Dmozilla%26tab%3Dorganic%26ri%3D20&w=500&h=500&imgurl=cdnll.freundcontainer.com%2Fimages%2F500%2F3390B01NAT-Condiment-Bottles.jpg&rurl=http%3A%2F%2Fwww.freundcontainer.com%2Fplastic-condiment-bottles-ldpe%2Fp%2Fv3390B01NAT%2F&size=11.9KB&name=%3Cb%3EPlastic%3C%2Fb%3E+Condiment+%3Cb%3EBottles%3C%2Fb%3E+-+LDPE&p=plastic+bottles&oid=310f5fc358400cd5dc85a5b4c346c146&fr2=piv-web&fr=yhs-mozilla-001&tt=%3Cb%3EPlastic%3C%2Fb%3E+Condiment+%3Cb%3EBottles%3C%2Fb%3E+-+LDPE&b=0&ni=21&no=20&ts=&tab=organic&sigr=12cmkin1v&sigb=14a3rnv76&sigi=125l9qmk1&sigt=11eiodf26&sign=11eiodf26&.crumb=pIsY04NLJw4&fr=yhs-mozilla-001&fr2=piv-web&hsimp=yhs-001&hspart=mozilla
https://www.amazon.com/wolfcraft-4525404-Muilt-Angle-Attachment-Drills/dp/B000JCIMEA
I used this guide for a project a few years ago. I wasn't thrilled with the build quality of this model when I opened it but it got the job (6, ~1.5"x6" deep holes 90deg to the surface) done.
https://www.amazon.com/dp/B000JCIMEA/
Here's the bosch set. I mostly use the weras now too.
I did it without a drill press - did it by hand without an aid actually, but I've been doing woodworking for a while so I'm pretty comfortable with that. I know you can get a drill that has a bubble level on the back, which is great if you have that. There are also drill guides like this one.
Lots of option here. From the incredibly simple (and not as accurate for a very deep hole) to the more secure to the more intricate setups where there is a separate chuck and you can set angles if you want to. Look around a bit and figure out what the easiest way for you to securely clamp the drumstick is gonna be then I guess decide from there what option you want to go with, that will also give you enough travel to be able to drill out the full length of the stick.
Edit: also something to keep in mind is the longer the hole, the more resistance you are gonna get so depending on the size of your hole the drag might get a bit excessive.
I think the people saying, "DONT BUY BATTERY DREMELS!" don't really have experience with the latest Li-Ion dremels. The one I bought has 2 Li-ion batteries and a 1 hour charger. I never have downtime with how I use it. I use to be on the "no battery!" train too, until this Dremel.
I use mine for making decorative patterns on canes, cutting nails/bolts, sanding, drilling, screwing, etc. I get at LEAST an hour worth of solid work out of mine. If you're planning to use it as a router, or some other heavy duty task, then I would just an actual router or get a corded Dremel. For how I use it, the ease of use and the fact that it came with two batteries to give me 2 hours of solid Dremel use means that I haven't needed to use my corded Dremel since I bought the new cordless one.
Here is what I have: http://www.amazon.com/gp/product/B003ARTBY6
Hate fucking with Dremel Collets?: http://www.amazon.com/gp/product/B0000302ZV Best Dremel add on ever.
I use this:
https://www.amazon.com/Wolfcraft-4525404-Attachment-4-Inch-8-Inch/dp/B000JCIMEA/ref=sr_1_1?ie=UTF8&qid=1466287521&sr=8-1&keywords=drill+press+attachment+for+hand+drills
Don't sweat it, I have the same lathe. It's not some one off oddball, so you can find anything you want for it, just like the Jet mini's and stuff.
I have this chuck, these pen jaws, and this pen mandrel. Oh, and this drill chuck.
The chuck comes with everything you need to get started with bowls and such. All the other stuff I use for pens.
http://www.amazon.com/Wolfcraft-4525404-Attachment-4-Inch-8-Inch/dp/B000JCIMEA/ref=sr_1_2?ie=UTF8&qid=1416019787&sr=8-2&keywords=sontax+drill
No comments on drill bushings, but I have something nearly identical to the linked guide, and with a better (corded) drill I think it'd be fairly accurate. I've only used it for rough work (deliberately). Might be worth considering. Certainly cheaper than bridge city stuff.
Bosch quick bit change thing. They work GREAT: https://smile.amazon.com/gp/product/B00004R9LD/ref=ox_sc_sfl_title_13?ie=UTF8&psc=1&smid=ATVPDKIKX0DER
Use one of these.
That, with the proper speed (too slow is better than too fast) and some oil and you'll be fine.
There are some "hand drills" that may be close to what you're thinking of. Most of them are cheaply made from China, and most of them only have 1/8" chucks and are meant for light duty stuff.
A quick search yields something like this and this, And of course you can always get a 1/4" to 3 jaw chuck adapter like this.
Ratcheting tap wrench is an interesting idea, although they don't have 3 jaw chucks, they're typically 2 jaw chucks with square recesses that probably don't grip anything well that's not a square end tap.
I have the same lathe you need a 2mt drill chuck .
https://www.amazon.com/Heavy-Duty-Drill-Chuck-Arbor/dp/B00MS2RINK/ref=pd_lpo_vtph_469_tr_t_2?_encoding=UTF8&psc=1&refRID=PP1PTDSW7XWAT79XPWAR
You can buy an attachable jig for a hand drill like this one
This "rotary tool" is great. I got mine for $12 at Walmart. I've had it for 3 years now and it still works great. OP, I recommend this; it makes using attachments so much easier.
If you can part with $35 or so, I suggest this in the interim:
http://www.amazon.com/gp/product/B004CVJC20/ref=oh_details_o01_s00_i00?ie=UTF8&psc=1
What I do is make a basic shape with the spindles on the lathe, then drill a hole lengthwise through the peice. Then run a bolt through the wood, so that it sticks out 1" or so on one side. Then clamp the bolt with this chuck.
Yeah, there's a hole in your piece, but it adds a little freedom until you have $180 to drop on a chuck.
See MS paint drawing below. The wood is a cutaway view.
http://i.imgur.com/TY8f5aJ.png
It is a torque setting, but as torque gears up, max speed goes down. I should have said that more clearly.
There are a few ways to go keyless. You can replace the chuck, or you can use something like this in various configurations: http://www.amazon.com/Rockwell-RW9275-Keyless-Chuck-Accessory/dp/B005BTM5JY
No I bought on of these to permanently leave on the shaft.
Neiko 20753A Keyless Chuck Conversion Tool | 1/4-Inch Shank https://www.amazon.com/dp/B007TCHKXW/ref=cm_sw_r_cp_tai_bYXZzbJ6KP7XJ
No worries happy to help.
As far as a dremel goes, I got this and this to take Dremel tips. It works amazing.
I know a polish like that serves no practical use but they sure do look purdy!
Here is the polish & the felt wheels, I also had to pick up the chuck just to make is easy.
both have been linked in this thread.
you yourself found the hex shank bits:
> I’m assuming my only option is impact ready like this DEWALT DD5160 Impact Ready 10 Piece Titanium Drill Bit Set https://www.amazon.com/dp/B017KUENH8/ref=cm_sw_r_cp_api_i_BH57AbSDWFX1B
and the top comment linked you to the keyless adapter:
> That chuck only accepts 1/4" hex bits. You'll need something like this in order to use twist drills, or you can buy 1/4" hex/"impact ready" drill bits like these.. The other style you are used to is called a keyless chuck.
It's a little small. It has a 208 mm swing, which is 8" in Freedom Units. That means its maximum depth is 4", which is too shallow for some bridge posts.
If you're looking to go cheap, and you're building from scratch instead of performing repairs and general shop projects, a cordless drill attachment will work for you.
There's only 6 or 8 holes to drill on a standard 6-string guitar, so while a drill press is very useful, it's not an absolute necessity.
That being said, having a drill press is awesome, and it's worth paying for a larger used one if you decide to invest in one. I have a used one with a 14" swing and it's an ideal size.
If you want to pay money, couldn't you just buy a universal chuck?
I did use a drill press. And even then not all the holes lined up perfectly. I be to do some fine tweeks at the end. I'd say either find a buddy with a drill press or save up and buy one. Some aren't all that expensive. Drill presses come in handy. Good luck with you build. This Or This
I don't have a drill press. I have had great success with the Barracuda Wood Lathe Chuck and Drill Chuck. This works very well. Still need to tap it out slowly to prevent build up inside the tube.
https://www.amazon.com/COMOWARE-Titanium-Twist-Drill-Bit/dp/B07D9J6JLD/ref=mp_s_a_1_10?ie=UTF8&qid=1538519940&sr=1-10&pi=AC_SX236_SY340_FMwebp_QL65
They make light duty 1/4" bits these are just an example.
https://www.amazon.com/DEWALT-DW0521-Connect-Impact-Conversion/dp/B000KKWLE8/ref=mp_s_a_1_3?ie=UTF8&qid=1538520015&sr=8-3&pi=AC_SX236_SY340_FMwebp_QL65&keywords=dewalt+drill+attachment&dpPl=1&dpID=41Z8TOZy3mL&ref=plSrch
This will convert any impact or the drill I linked.
Either option keeps you under budget.
Depends on the material the face plate is made of. If it's metal get a step bit, a decent drill and a drill guide
https://www.amazon.com/Neiko-10194A-Titanium-Drill-Speed/dp/B000FZ2UOY
https://www.amazon.com/wolfcraft-4525404-Muilt-Angle-Attachment-Drills/dp/B000JCIMEA/ref=sr_1_5?s=hi&ie=UTF8&qid=1519142267&sr=1-5&keywords=drill+guide
those should work.
If it's plastic I'd get some forsner bits depending on what size buttons you want
Yes they do https://www.amazon.com/dp/B01N7K3S5U/ref=cm_sw_r_em_apa_X5mJAb8REWEYW
Too late for this, but easy outs are NOT for use with seized screws. They are only for use with screws whose head is buggered.
I wrote this up a while back, you should give it a read:
Best tools for removing broken or stripped screws.
As for getting the easy out OUT, there is another option, but you need some crazy tools. Mainly a drill-press stand for your hand held drill, and a hollow, diamond coring bit, like what you would use for drilling a hole through glass or ceramic. If you can cut around the easy out with the coring bit, then you can break it free. Next, you finish over-drilling the hole, and then insert a threaded insert to bring the hole back down to the correct size.
Parts I'm talking about:
Drill guide The drill guide is important because the coring bits will walk all over the place since they don't have a center point. The guide can be fastened, held, etc. in place better, and help guide the bit to where it needs to go.
Core bit
You can also use a more standard bimetallic hole saw, just without the pilot bit installed.
Threadsert (Choose the ID of the original fastener, and find it in SS, not carbon) Don't use a Helicoil, those things are shit. (Speaking from LOTS of experience here...)
Two taps that match the outside threading of the threaded insert. One a taper tap, and one a bottoming tap.
Forstner bit as mentioned, and one of these is key for making the hole level, straight, and better than by hand:
https://www.amazon.com/Wolfcraft-4525404-Attachment-4-Inch-8-Inch/dp/B000JCIMEA/
Ow that's awesome!
Happy birthday already!
Great to hear that the RAM will be used! That really makes me happy.
I've seen your updated OP and my god, I get way too jealous, haha! This is going to be an amazing PC.
---
Watercooling
---
I have been looking at it in depth. You don't want to go with the 480mm in the top & 240mm in the bottom setup?
Here is a double 480mm build. Which does look pretty awesome as well.
Here is an other double 480mm build. This one is a bit messy, but just to show you how it will "look".
I would advise to buy the pretty expensive but probably very good & awesome looking window from MNPC tech.
I've send them a mail to question if a 480mm radiator will still fit in the bottom. I am very sure, but not entirely.Just got a reply from MNPC tech and the 480mm radiator will fit no problem.
---
As for the tubing, you mentioned that you want hard tubes. Would you perhaps like the extra step to go with glass?
The benefit of glass is that it's very scratch resistant & it stays very clear. It's also not that hard to "cut" but you need to take your time for it. It will take a full weekend for sure to completely watercool it. Or I would say, 2 days at least.
Here is a video that explains on how to cut glass tubes. But it also shows you and explains why you would perhaps want glass tubes.
As you can see at 3:23 the soft tubing got pretty damn clouded. I don't know how long this took, but I guess about a year+ for sure. Probably 2 years, not entirely sure.
When you do go for glass, it's recommended to actually set up the whole loop in plastic first. To get the exact lengths, since you can cut plastic a lot easier than glass. Then you can use the plastic parts as templates for the glass. This will cost you an other $50 extra, but it's mostly going to cost you time.
I will put the plastic in the list.
It's actually great that you'll get the case soon, because then you can measure up a lot of things that I need to know. So I can suggest the right parts! So be ready with a measuring tape.
---
GTX1080s, cables & monitors
---
GTX1080s:
Yes, getting 2 GTX1080s is going to be "rough". They sell out in a snap, so I highly recommend to make an account at this website:
https://www.nowinstock.net/computers/videocards/nvidia/gtx1080
Then you can get an email / SMS text notification for when parts come back in stock, so that you can order it very quickly. It sells out in less than 2 hours the last time a card came into the store on Amazon.
You can buy any "founders edition" card from any brand really. But EVGA & Asus are 2 that keep the warranty even when you put waterblocks on them. So I prefer those 2 brands, maybe MSI, Gigabyte, Zotac & other brands started to also keep the warranty if you put their cards under water. But I am not sure about that.
I highly recommend to be very careful about all the screws when you put on the waterblock. Just in case you have to send the card back for RMA. You need to have all the screws & the cooler.
Cables:
You have to tell me which color combination you would prefer. They have a lot of options from CableMods.
Then I have a better idea on how to pick out the colors for the rest of the components.
Monitors:
Ow yes, the monitors! I assume that you probably would prefer to have the same monitors all around? That would of course shoot your budget into the roof. If you do go for the Acer 1440p, 165Hz gaming monitor of $759. The LG 4K monitor that I recommended got a very sleek design as well, but it of course is a bit different compared to the Acer 1440p monitor.
Other parts:
I hope that you didn't buy that CPU for $549.99? But anyway, you want to buy a cheap after-market air cooler as well. Since the i7-6700K does not come with a cooler on it's own.
You need this to test the system, before you put it under water, you have to make sure it works on air. Including a stress test for about 2-12 hours. Whatever you prefer. I generally let it stress test for 1 night. Which is about 8-10 hours.
I will post my list with all the parts later tonight. I hope, but I have to tell you, that you should not order it right away. We have to do some measurements first!
Measurements:
I will make a paint drawing to show you exactly what I need to know in terms of all the measurements.
Tools:
I've also looked at some tools that you need to build the PC and to watercool it. But I have to ask you if you have certain tools already.
There may be some other products I am forgetting about right now. Excuse me if I do!
Item|Price
:----|:----
Magnetic screwdriver set | $20
Set of files | $15
Handsaw | $13
Electronic drill | $50
1/8" to 5/8" adapter chunk | $20
Velcro straps | $8
Anti static wrist strap | $5
Working on the whole list now (again).
---
Again, if you have any questions. Feel free to ask!
I would probably try to make a jig that incorporates a drill guide.
Basically, use scrap wood to knock together some kind of cradle to hold your blank perfectly horizontal, then find a way to mount the drill guide onto the cradle, rigidly and at perfect right angles, then drill away.
There are several listed on Amazon, for example this: https://www.amazon.com/PSI-Woodworking-TM21-Diameter-Drill/dp/B01N3YU1TT/ref=sr_1_3?keywords=morse+taper+1+drill+chuck&qid=1563500373&s=hi&sr=1-3
Also - I don't have a drill press, so I'm considering getting one of these drill-holder-guides from Milescraft or Wolfcraft in order to control the drill during this operation.
Originally I was planning to drill them on the drill press before lamination the top. I totally forgot to do that, so I impatiently went at it with a forstner bit. I should have gotten a drill guide because some of the holes are a touch wonky.
https://www.amazon.com/Milescraft-1318-DrillMate-Drill-Guide/dp/B014A1Z92I
No, you don't need titanium, but they're relatively cheap. Since 1/4 shank drill bits usually aren't being used in wood, they're made of a little tougher stuff for masonry etc. But these will be fine.
http://www.amazon.com/Tooluxe%C2%AE-10171L-4-inch-Titanium-13-Piece/dp/B000P6G74M/ref=pd_bxgy_469_img_2?ie=UTF8&refRID=1ZYCR1J8C8C1ZMH419NS
You can also get a drill chuck for your impact driver:
http://www.amazon.com/dp/B005BTM5JY?psc=1
And then just use any cheap drill bit.
http://www.amazon.com/Decker-15-110-General-Purpose-10-Piece/dp/B00280MC9M/ref=sr_1_5?s=hi&ie=UTF8&qid=1457123622&sr=1-5&keywords=drill+bit
The pot rack doesn't tell you the size of the hooks so you can't just buy one drill bit but drill bits are cheap. You want to choose a drill bit that is approximately the size of the shank on the ceiling hook, but you need to have it in hand to figure out. Hold the drill bit behind the threads on the hook and choose one where you can just barely see the drill bit between the threads.
Essentially something like this but not sure of the DB of that specific motor, attach it to a board of whatever length you like..
https://www.amazon.ca/Deal%E3%80%91-OriGlam-12-24V-Mounting-Bracket/dp/B06Y2G8XZL/ref=sr_1_3?rps=1&ie=UTF8&qid=1540676545&sr=8-3&keywords=lathe+motor+with+chuck&refinements=p_85%3A5690392011
Throw a mini vice on the other side and then attach something like one of these.
https://www.amazon.ca/dp/B07J1CTW1N/ref=sspa_dk_detail_7?psc=1&pd_rd_i=B07J1CTW1N&pf_rd_m=A3DWYIK6Y9EEQB&pf_rd_p=0c4797d7-01ae-4f2b-9625-15b63bbba1db&pf_rd_r=B534F4P16VSCGP2G5HY5&pd_rd_wg=x1Dqm&pf_rd_s=desktop-dp-sims&pf_rd_t=40701&pd_rd_w=4kQ4o&pf_rd_i=desktop-dp-sims&pd_rd_r=cfe03f27-da32-11e8-af33-013c6f83c3a6
Edit* even if the motor was a little loud you could soundproof it a little with some wood and Styrofoam.
Pretty much, yes. I suggest getting a small chuck that way you can put anything with a shank 1/32 to 1/8 of an inch in. It's also quicker than using lock collets. Dremmel brand cutting bits and stuff tend to be expensive, but there's not a whole lot of off brand stuff out there. Craftsman may make some. I would avoid Harbor Freight Tools at all costs. With tools, you get what you pay for.
I use a quick change bit holder to switch from drill bit for pre-drilling to fastening bit. https://www.amazon.com/DEWALT-DW2505-Rapid-Load-Holder/dp/B0000225OD/ref=sr_1_4?s=hi&ie=UTF8&qid=1541778940&sr=1-4&keywords=quick+release+bit+holder and
https://www.amazon.com/gp/product/B078Y1329C/ref=oh_aui_search_detailpage?ie=UTF8&psc=1
I use the following(links below). I've seen them all available at walmart for not too much more.
Using the drill press you wont break any bits, at least I havent. If you size your holes correctly the lack of copper in the middle of the hole will guide your drill bit automatically so you can be off center by a small amount. I've made about 40 boards all with a crapton of holes and still havent worn out my smallest drill "1/32" bit which I use constantly.
The smallest drill bit I've been able to find is 1/32 which works for chips that fit into a breadboard. I haven't found smaller but if you see something smaller get it because even 1/32 is a pretty big hole for the majority of leads. Its about 2x too big for most chip feet.
http://www.amazon.com/Dremel-628-01-Piece-Drill-Bit/dp/B0000302Z3/ref=sr_1_1?s=industrial&ie=UTF8&qid=1414792230&sr=1-1&keywords=dremel+drill+bits
http://www.amazon.com/Dremel-4486-MultiPro-Keyless-Chuck/dp/B0000302ZV/ref=sr_1_2?s=industrial&ie=UTF8&qid=1414792230&sr=1-2&keywords=dremel+drill+bits
http://www.amazon.com/Dremel-Workstation-Drill-Press-Holder/dp/B008F6HLS0/ref=sr_1_4?s=industrial&ie=UTF8&qid=1414792250&sr=1-4&keywords=dremel+drill+press
https://www.amazon.com/SE-82331TF-30-Piece-Titanium-Coated-Diamond/dp/B003K2E7CM/ref=sr_1_3?ie=UTF8&qid=1537360803&sr=8-3&keywords=HOMEIDOL&th=1
For finishing
https://www.amazon.com/dp/B076D4Z8LX/ref=sspa_dk_detail_0?psc=1&pd_rd_i=B076D4Z8LX&pf_rd_m=ATVPDKIKX0DER&pf_rd_p=f52e26da-1287-4616-824b-efc564ff75a4&pf_rd_r=3RCNSN0TMJKMBZZES4V2&pd_rd_wg=ypDkP&pf_rd_s=desktop-dp-sims&pf_rd_t=40701&pd_rd_w=2IRyq&pf_rd_i=desktop-dp-sims&pd_rd_r=a34681d1-bc07-11e8-b7c1-abe19be0e9b5
Burrs
I have a keyless chuck. You can get one on Amazon for $8.
Just a thought, there's a $30 accessory that will let you put a keyless chuck on am impact driver, so not having a drill doesn't always mean drilling is put of the question. Also there are a number of impact-ready drill bits on the market these days.
I haven’t tried one but [I’ve seen this](Milescraft 1318 Drillmate Drill Guide with chuck https://www.amazon.com/dp/B014A1Z92I/ref=cm_sw_r_cp_api_i_wS9JDbTKQYZ2Q) which could help.
I am considering purchasing this chuck attachment
https://www.amazon.ca/Dremel-4486-MultiPro-Keyless-Chuck/dp/B0000302ZV
as the chuck on the stock dremel only goes to schlage sized pin diameter, i want to modify american pins which are almost half that.
2Pcs Keyless Drill Chuck Conversion Tool,Adapter,1/4-Inch Hex Shank by Rekukos https://www.amazon.com/dp/B075RZ3P6T/ref=cm_sw_r_cp_apa_i_gGYODbYQEXQ0B
How's this?
I bought a couple of these when it was $7CDN on amazon:
https://www.amazon.com/Bosch-CC2100-5-Piece-Chuck-Adapter/dp/B00004R9LD
They allow me to use driver and hex shank drill bits. A better, more versatile option IMO.
This may be silly, but would a flex shaft from a power drill work?
Like this Amazon link
Or are they just way underpowered?
This is the one I used. I would be very cautious to use it again. Just be sure it is square before you start. I set mine at the labeled 90deg mark on the tool but clearly was not.