Best air conditioning line repair tools according to redditors
We found 98 Reddit comments discussing the best air conditioning line repair tools. We ranked the 41 resulting products by number of redditors who mentioned them. Here are the top 20.
We found 98 Reddit comments discussing the best air conditioning line repair tools. We ranked the 41 resulting products by number of redditors who mentioned them. Here are the top 20.


Hey guys as a heads up. In the lab if we make silicone we always degas the mixture before pouring. To degas just put the silicone after mixing into a closed container and pull vacuum. I think even a cheap aspirator will pull enough vacuum to work. Pull until the bubbles stop than you're good to go.
https://www.amazon.com/Dynalon-312635-Faucet-Aspirator-Vacuum/dp/B004AHL77E
https://www.amazon.com/Nalgene-6140-0010-Aspirator-Polypropylene-Threading/dp/B003OBYNBO
Both look promising. Google degassing silicone for more it's a common technique in soft litho.
Edit: For a chamber just get a plastic dessicator. They aren't that expensive : https://www.amazon.com/United-Scientific-55204-Polypropylene-Polycarbonate/dp/B00ES3GPMM
Edit2: Cus degassing silicone just looks so pretty : https://www.youtube.com/watch?v=bbSvzD8g_S0
Edit3: Decent part combo for degassing
https://www.amazon.com/Stainless-Chamber-Urethanes-Silicones-Epoxies/dp/B00KSWL29I/
https://www.amazon.com/Single-Stage-Rotary-Economy-Vacuum-Refrigerant/dp/B012CFTYX4/ref=pd_bxgy_236_img_2?ie=UTF8&refRID=1N0WKYM5MHVXTF9FVB8K
Remember keep the vacuum so that it slowly degasses you do not want it to bubble over and all into your chamber.
Side Can Tap.
Using this jar sealer and this vacuum pump, you can vacuum seal the big mason jars to store bulk items without having to buy an expensive food sealer.
Take a tube, hold it against a ear and block the other ear. This will make your hearing very directional and help you locate the noise.
You may look a little silly though.
Or you can buy one of these to be really precise.
https://www.amazon.com/Wekster-Stethoscope-Automotive-Diagnostic-Motorcycles/dp/B07C1WCB2Y
Are you using an NPT or triclamp style tube? If you're using NPT (national pipe thread, american pipes in inches basically) you can get a brass NPT ball valve, a reducer to put into the valve for a smaller thread size, and another brass piece, this time a 1/4" flared end for gas. You'll need teflon pipe threading tape to seal everything up and a vice grip or a couple of pipe wrenches to put the thing together. You can get all of this on amazon.
If you have a device like in picture with triclamp ends you'd already know where to get all of this crap but www.glaciertanks.com and www.brewershardware.com sell all the triclamp pieces you will ever need. Glacier Tanks is in oregon and supports the CLS extractor community directly by selling pre-fabbed terpinator style lids and collection pots, Brewers Hardware has a bunch of stuff they don't carry though as well. I've used both and they are awesome. Brewers Hardware also has lower prices on a lot of stuff like the spools you'll be using as extraction tubes, and they sell the national pipe thread to triclamp ends that I'm gonna need to modify my own old open blast tubes (my 1-2 and 3-5oz tubes depending on material and how tight it packs) into CLS parts. I have a calculator setup i've figured out though for how big of a tube can fit how much material for CLS use though. a 3"x18" spool fits about a half pound (bhogart sells a 3"x36" as their 1LB unit and it fits roughly that), so I figured out its volume from there and I can figure out how big of a tube will fit say 1oz, 2 ounces, and so on. you don't need perfectly filled tubes with CLS extractors either, you can fluff the top with coffee filters so the butane disperses evenly on the top, and typically in a shower style unit like the Bhogart, the top few inches don't get properly extracted anyways if you fill it all the way to the brim. I try to leave 2-3 inches at the top of the 36" column bare so it can just shower down and it seems to work really well, but with a narrower tube size you will probably be okay.
IF you got this far, you also are going to want a can cracker. You can use it on the top of the pipe in lieu of the brass hose hookup by screwing it directly to the top, but you need to make sure you get the right fittings for it. It looks like the crackers they sell all have the 1/4" flare end facing the wrong angle, so you'll probably need the hose after all. here's the cracker and a link to the right type of hose, as well as a link to one of the fitting types (though maybe not in the right NPT thread you need).
cracker: http://smile.amazon.com/Robinair-10102-Side-R134A-Respective/dp/B0009XT7NY/ref=sr_1_2?ie=UTF8&qid=1421275663&sr=8-2&keywords=refrigerant+can+
PTFE lined chemical hose buying list. you want 1/4": http://smile.amazon.com/Unisource-Chemical-Assembly-Connection-Pressure/dp/B007USNQNI/ref=sr_1_6?ie=UTF8&qid=1421275772&sr=8-6&keywords=ptfe+lined+hose
the style of brass end you need: http://smile.amazon.com/dp/B000WTXICQ/ref=biss_dp_t_asn
brass coupler to put the end into:
http://smile.amazon.com/dp/B006PKMJCQ/ref=biss_dp_t_asn
something to put the brass coupler into to make it fit your valve: http://smile.amazon.com/dp/B00835RTY4/ref=biss_dp_t_asn
2" brass valve: http://smile.amazon.com/dp/B0081LIGIS/ref=biss_dp_t_asn
ptfe tape: http://smile.amazon.com/Dixon-Valve-Coupling-TTB50-Temperature/dp/B00IIJB7F2/ref=sr_1_3?s=industrial&ie=UTF8&qid=1421277137&sr=1-3&keywords=ptfe+tape
after reading around, you said your pipe was 2" so i modified the list with everything you'd need to modify a 2" pipe.
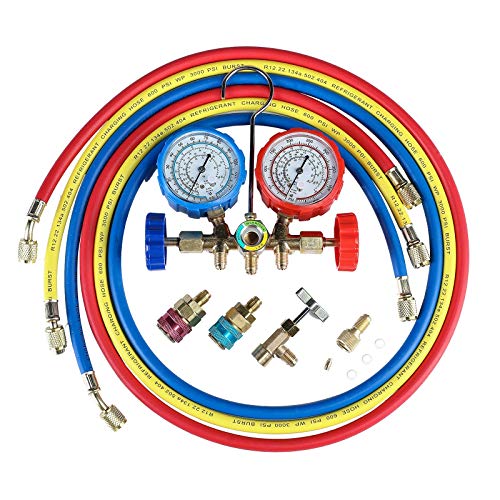
You have to vacuum the air out of the system before putting refrigerant in. You can do this yourself if you have a set of filler valves, a vacuum pump, and a very accurate digital scale. Most people don't have these lying around, so they'll just go to the shop for this part only.
Edit: You could use a kit like this. You would also need the scale to measure the correct amount of refrigerant going in.
ball valve with a 45* angle on it so the cans dump and also an adapter to fit the 1/4" NPT of the T and the 1/4" flare thread from the ball valve.
Can tapper: http://www.amazon.com/gp/product/B0009XT7NY/ref=oh_details_o05_s00_i00?ie=UTF8&psc=1
(remove the schrader valve on the side you use and also the ball in the inside as well.)
Ball valves: http://www.amazon.com/gp/product/B0014JC9HI/ref=oh_details_o07_s00_i00?ie=UTF8&psc=1
(I had to file down the end of the ballvalve where the adapter fits on because at first it was only held on by one thread. Making the ball valve shorter allowed it to fit inside the adapter deeper and make contact with more threads)
Adapter: http://www.amazon.com/gp/product/B0056ODEP8/ref=oh_details_o02_s00_i00?ie=UTF8&psc=1
(take a pair of needle nose pliers to remove the unnecessary internals that would reduce the flow rate.)
I got the T splitter from ebay. I found one with male 1/4" NPT on the bottom and female 1/4" NPT on each side.
Light : https://www.amazon.com/gp/aw/d/B07D6D91FC?psc=1&ref=ppx_pop_mob_b_asin_title
Dye: https://www.amazon.com/gp/aw/d/B002M4E0VC?psc=1&ref=ppx_pop_mob_b_asin_title
Light has 3 strength settings ajs uses 3 AA.
Very bright. I was amazed when I found the leak. Super bright with the dye. I did look at night to make sure I found it but I'm sure you don't have to look ar night, I just wanted to really make sure I could see it lol
A standard AC service gauge set is $35 on Amazon.
https://www.amazon.com/OrionMotorTech-Diagnostic-Manifold-Freon-Refrigerants/dp/B07JLQTK9C
Dyes are fine.
Fun fact, Nissan factory AC systems include leak-detect dye with their refrigerant oil. It's almost like Nissan feels sorry for their customers...
start with this and a blacklight - right tools for the job and all that
Fixing it is really easy. It's just plumbing, and the special tools needed can be bought for $130 online.
I know people have different priorities, but I consider AC to be pretty much a direct quality of life feature on a daily driver. Cleaning out a muddy alternator ain't that hard.
> stainless steel 316 Tee
http://www.amazon.com/dp/B003LSSLE0/ref=biss_dp_t_asn -----
>stainless steel 316 nipple 1/4 ----------
http://www.amazon.com/gp/product/B004Y18C56/ref=pd_luc_rh_bxgy_01_02_t_lh?ie=UTF8&psc=1 ----
>ball vales
http://www.amazon.com/Stainless-Steel-Mini-Ball-Valve/dp/B006VE3BF0/ref=pd_sim_sbs_auto_2?ie=UTF8&refRID=0QATKNJ8JPYS71CX5ZPG
>can tap
http://www.amazon.com/Robinair-10102-Side-R134A-Respective/dp/B0009XT7NY/ref=sr_1_2?ie=UTF8&qid=1417119173&sr=8-2&keywords=can+tapper
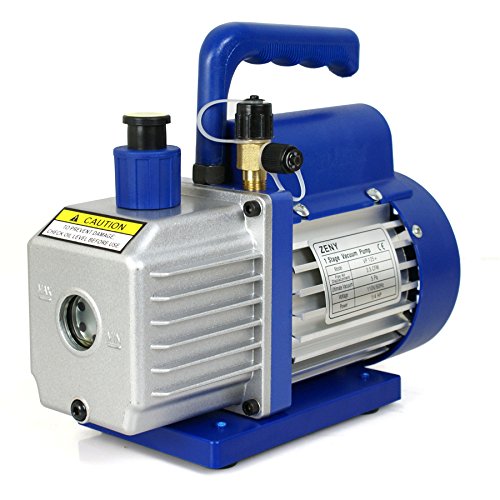
vacuum pumps for your needs are cheap, https://www.amazon.com/ZENY-Single-Stage-Economy-Conditioner-Refrigerant/dp/B012CFTYX4/ref=sr_1_1_sspa?ie=UTF8&qid=1541948266&sr=8-1-spons&keywords=vacuum+pump&psc=1
I would go for this chamber:
http://www.ebay.com/itm/Vacuum-and-Degassing-chamber-1-5GL-/221257099507?pt=BI_Pumps&hash=item3383f368f3
If not this one, then a stainless steel one, the bell plastic chambers are not good if you have a heat pad or something in it.
Go for this vac pump:
http://www.amazon.com/FJC-KIT6-Vacuum-Pump-Gauge/dp/B001C6LG3Q/ref=sr_1_2?ie=UTF8&qid=1375192421&sr=8-2&keywords=vacuum+pump
You could get one cheaper there on amazon, search around, but this set includes a lot of gauges and wires that could be useful.
This hot plate is battery powered, fits in the chamber, and can keep a pretty good constant low temp:
http://www.amazon.com/Aroma-AHP-303-Single-Plate-Black/dp/B0007QCRNU/ref=sr_1_1?ie=UTF8&qid=1375192614&sr=8-1&keywords=battery+hot+plate
Hopefully this gets you started in the right direction, there are many many options for a nice vac set up, I'm sure if you look around you'll find good deals.
They make a combustion gas tester.
https://www.amazon.com/UView-560000-Combustion-Leak-Tester/dp/B000NPDL76
Sometimes that helps diagnose.
Had a similar problem, found out that the pump does not hold vacuum when shut off. Added a shut off valve to the yellow service hose, closed the valve before shutting off the pump when at 30 mmhg. Held vacuum after that. Not sure this is your solution is but thought I would share my experience.
Something like this. Attached the yellow valve to the end of the service hose and the other end to the pump port.
https://www.amazon.com/dp/B07S8CCN1H/ref=cm_sw_r_cp_api_i_OeTFDbN39Z97M
Use one of these to check for combustion gasses in the coolant.
Well I guess it's not a dye it's like a 2 part turkey baster and you fill it with the blue fluid in two chambers, then open the cap and start it. Hold the turkey baster looking thing over the radiator sucking no fluid just air above hole from the radiator and the fluid instantly turns green when funes are detected in radiator. Here is the one I have and use.
https://www.amazon.com/UVIEW-560000-Combustion-Leak-Tester/dp/B000NPDL76
I just purchased a $100 5G vac chamber off amazon along with a vac pump off amazon as well - all said and done $160.
Tried to get link for Vac chamber setup but doesn’t look like it’s sold anymore, see vac pump link below though -
https://www.amazon.com/gp/aw/d/B012CFTYX4/ref=ppx_yo_mob_b_inactive_ship_o0_img?ie=UTF8&psc=1
Hey, I used to live in Sacramento too! (but I didn't move here to work for Epic, lol)
Most cars have 50/50 glycol/water in them already, so you shouldn't need to change it unless you've been topping up with straight water as Californians are known to do. Madison doesn't get cold enough to need 60/40. You can buy a floaty ball tester (like that but not "professional") for $2 at Farm and Fleet or any auto parts store. Last winter was the coldest in 30+ years and it got somewhere around -25°F.
What you will need to do is use up all your washer fluid before it freezes for the first time. California has this wonderful low-VOC stuff that "protects to 32°F", i.e. doesn't do shit for freezing. The stuff you get here freezes somewhere around -20 to -30°F. Resist the temptation to use the sprayer to melt ice off your windshield. Sometimes you can get away with it, but just scrape it.
You can try a combustion leak tester. It's made to detect combustion exhaust gases in your coolant system, which only occurs if there's a headgasket leak between the cylinders and cooling system/water jackets. I don't know what you guys have across the pond, but auto parts stores here will rent the tool out for free (with a security deposit that is returned when the tool is returned), you just gotta buy the bottle of liquid. ...if you can find an employee that knows what the heck you are talking about lol. Last time I needed one, I had to try several different stores before I found someone who knew what it was.
They look like this:https://www.amazon.com/UView-560000-Combustion-Leak-Tester/dp/B000NPDL76
It does sound like your head gasket is a goner though. Unless there's a crack in the metal somewhere, it shouldn't need a new head, but you should get the head resurfaced to ensure it's flat. We don't have any machine shops in my area, so last set of head gaskets I did, I used a big thick mirror as a flat working surface and glued sandpaper onto it and used that to sand down the head. People here will probably discourage this, but it's a decades old tried-and-true DIY method.
Here's my setup:
Vacuum Chamber: https://www.amazon.com/gp/product/B00I3Q8D2K
$117
Pump:
https://www.amazon.com/gp/product/B012CFTYX4
$52
That pot will hold a lot of wood, but you also need a couple gallons of Catus Juice to fill it. Grab a cheap toaster oven from Salvation Army to cure.
Listen to /u/Glock19mos. I don't typically dye (I purchase mine dyed) and his pictures speak volumes about his capabilities with the process.
Sounds like vacuum would be your best choice - no rotovap (the roto part and delicate doesn't seem to go well together for me) and no heat necessary.
Sealing the container and getting a cheap vacuum pump and leaving it running would make a huge difference imo. Just make sure that the container in which you soak your stuff won't explode from the vacuum. It'd be best if, while under vacuum, the container would be in another container, that would contain the possible explosion - for your own safety.
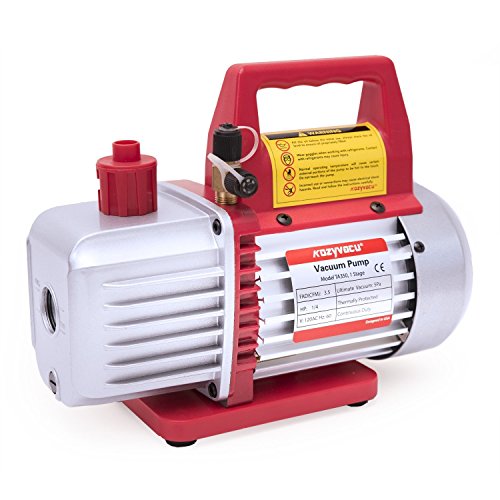
https://www.amazon.com/Kozyvacu-TA350-Single-Stage-Refrigerant-Recharging/dp/B01N6IOBWF/ref=sr_1_3?keywords=vacuum+pump&qid=1566315507&s=gateway&sr=8-3
I've got a 2000 honda civic and need to do some A/C work.
think I might be buying this kit
http://www.amazon.com/FJC-KIT6-Vacuum-Pump-Gauge/dp/B001C6LG3Q/ref=sr_1_3?ie=UTF8&qid=1371620274&sr=8-3&keywords=ac+gauges
pretty good video on AC
https://www.youtube.com/watch?v=lglPJuBXVeE
FAQ about doing it on honda-tech
http://honda-tech.com/showthread.php?t=1665946
Also sometimes you can get the tools on loaner program with Autozone or Advance Auto
Gasses can stay in solution because of temperature, and because of pressure. With soda, opening the top releases all the pressure, and so all of the CO2 bubbles come out of solution and fizz up - CO2 is a gas at room temp and pressure, like butane.
We can only heat up our product so much, and so we can do the rest of the work with pressure. Applying a vacuum to the concentrate forces the remaining butane still in solution to become a vapor, which can bubble out.
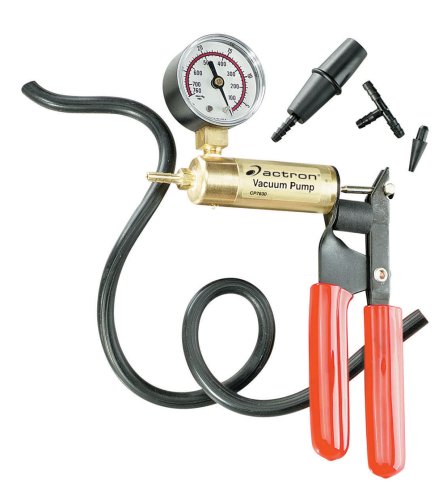
Something like this would be awesome: http://www.amazon.com/Actron-CP7830-Hand-Vacuum-Pump/dp/B0009XQUK2/ref=sr_1_1?ie=UTF8&qid=1346382578&sr=8-1&keywords=hand+vacuum+pump
That, the right top, and a mason jar is all that you need. Warm it up on some parchment paper till it's very runny, put the piece of paper in the jar, vacuum the crap out of it and watch it bubble up, let it cool. Repeat 3-4x.
https://www.amazon.com/UVIEW-560000-Combustion-Leak-Tester/dp/B000NPDL76
That won't tell you which gasket is leaking, but it will tell you if either of them are. If there is exhaust gas in your coolant system, then you're replacing something. You'll get it broken down to replace the LIM gasket and you'll be able to tell if that's the issue or not once you get the LIM off and inspect it. If it's ok, then you'll just keep going and pull the head. On a 3800 engine, it's gonna be the LIM gasket 99% of the time.
There is a chemical test for exhaust gasses in the coolant. That is probably the best test. This is the tool. https://www.amazon.com/UView-560000-Combustion-Leak-Tester/dp/B000NPDL76
​
A cylinder leak down tester is an option too. Although you don't really need to do the leak down test. You may be able to just use your compression tester hose and put 100 psi in the cylinder from your air compressor. If the head gasket is leaking into the water jacket, you will get bubbles in the coolant.
​
You could do a coolant system pressure test, but that won't really tell you that much. You already know it is leaking.
​
Does that bike have a weep hole on the water pump body? Any signs of coolant in the weep hole?
what pump are you running with this one? http://www.amazon.com/FJC-KIT6-Vacuum-Pump-Gauge/dp/B001C6LG3Q/ref=sr_1_3?ie=UTF8&qid=1369336827&sr=8-3&keywords=vacuum+pump is this in the right ball park?
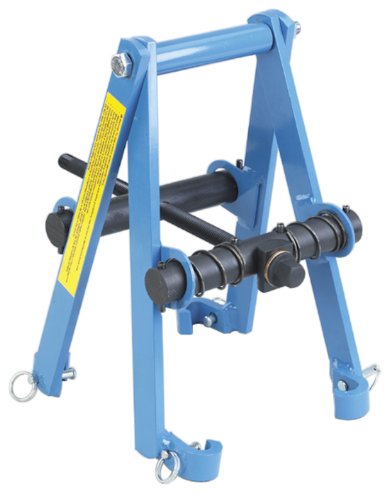
Ever use the clamshell type such as http://www.amazon.ca/OTC-6494-Clamshell-Spring-Compressor/dp/B0002SRHU6
Here's the one I bought.
The amount of pumping you need depends on how much air space is in the jar. A jar of soup wouldn't take much. A jar of pretzels would be a bit of a workout.
Edit: Err, don't use it for soup ;)
Thanks for the info, I was thinking bout going to my local autozone, I just wasn't sure of the type of pump and what places would have it, I'm probably gonna get one online, I just don't know how to tell if it's good or not, what do you think about this?
https://www.amazon.com/ZENY-Single-Stage-Economy-Conditioner-Refrigerant/dp/B012CFTYX4
And I've been considering this chamber
https://www.amazon.com/gp/aw/d/B06XPSKLC7/ref=mp_s_a_1_1?th=1&psc=1
That's why I bought one of these sucks all the air out of the system while you fill it with coolant so you don't need to worry about bleeding
here is my parts list lol i think this would be a better idea splitter. can-tap. going from the splitter to my glacier top. and camico adapter. and ball valves. Does this look adequate or which part do I need to be able to press the valve depressor?
This is the one I purchased. It gets around our Subaru group pretty well. People love it.
https://www.amazon.com/gp/product/B0015KH93K/ref=ppx_yo_dt_b_asin_title_o04_s00?ie=UTF8&psc=1
Being that it was Firestone, I'm surprised it wasn't more to be honest. Still though you can certainly save yourself $40-$50. You can get a cheap vacuum pump off amazon that will get the job done for $60 here: https://www.amazon.com/gp/product/B012CFTYX4/ref=s9_acsd_top_hd_bw_b13u7N_c_x_1_w?pf_rd_m=ATVPDKIKX0DER&pf_rd_s=merchandised-search-3&pf_rd_r=NXXYP4JC802N2NRXEGN7&pf_rd_t=101&pf_rd_p=e98866ae-299e-5a56-8e32-a4a8bf2f2b3f&pf_rd_i=15707041
Just dont expect it to be /r/buyitforlife quality of course.
As far as finding on the how to of AC systems I would check out ChrisFix's videos here:
How to replace a compressor: https://www.youtube.com/watch?v=rulXlnG2Unk
How to recharge an AC system: https://www.youtube.com/watch?v=Pdq8JAlct6s
How to find a leak (if need be): https://www.youtube.com/watch?v=pCv7rCdcXsc
Antifreeze should be used all of the time regardless of the temperature outside. It's not just for preventing the water freezing, it also has additives in it that raises the boiling point of water and anti corrosion properties to stop things corroding. Get an antifreeze tester to test the strength, but a rule of thumb is a 50/50 mix for most cold climates.
Someone else has also mentioned a thinner weight oil. Personally I'd use semi synthetic on an older engine.
Before you go do a service on both vehicles. Change the oil and filters, fuel filters, check the spark plugs and the leads / distributor cap on the van. Also check transmission and axle oils. Take spare belts with you too, something as simple as a broken belt could hold you up for a few hours if you don't have a spare!
Yuck. That sound like it might be burning Coolant. Might be the intake gasket. My friends Pacifica did the same thing, ran bad when cold and white smoke. Then would be fine. Well one day the intake gasket completely blew and it chugged to a stop. It also could be a damaged head or blown head gasket. I would buy this, it's really easy to use
Alright so everything I got-
New condensor
r134a refrigerant
compressor kit
vacuum
vacuum gauge set
Think that's basically everything! Thoughts?
Yes the tension will help it stay on, but probably not enough. Get this stuff put it in your coolant, use an ultra violet light to look in the engine to find the leak.
http://www.amazon.com/Interdynamics-375CS-Radiator-Coolant-Dye/dp/B002M4E0VC
Right now its at about 280 k miles. Looking up online there is a combustion leak tester. What is your thoughts on it?
Also if it is blown head gasket do you think those head gasket sealers would work?
Everyone is telling me to get rid of my 5.0 but fuck that I love her!
I will look into compression test right now
edit: fixed links
these cars are notorious for blowing a head gasket, but usually do so around 130-140k. Maybe you were unlucky. It might be worth doing a combustion gas check with a kit you can get at any auto part store.
http://www.amazon.com/UVIEW-560000-Combustion-Leak-Tester/dp/B000NPDL76
Nope. I used one of those ball valve dealies. It still had a partial charge when I swapped the valves. Only a little vented while I was changing the valve; not enough to reduce the system pressure more than a PSI or so.
Interdynamics Certified A/C Pro Engine Cooling Systems UV Dye (1 Ounce) https://www.amazon.com/dp/B002M4E0VC/ref=cm_sw_r_cp_api_i_hPUADbY33B7CS
Check this out at Amazon.com
Interdynamics Certified A/C Pro Engine Cooling Systems UV Dye (1 Ounce) https://www.amazon.com/dp/B002M4E0VC/ref=cm_sw_r_other_apa_i_Lp8wDb30153E3
Get some of this (AutoZone, Advance, O'Reilly all have it too) and some of the glasses and UV flashlight. Pour it in the coolant and let it run for just a short while (since it seems like it is leaking pretty fast, you don't want it to go too long and let the dye get all over the place, which will make it more difficult to track down the exact source of the leak)...then just wait until after dark and go outside, open the hood, put on the glasses and shine the UV light around under the hood until you see where looks like a highlighter exploded. I definitely don't recommend buying the stuff that you can pour into the radiator to "fix" a leak if you find one, that stuff seems to long term make matters worse, not better.
I was going to suggest this below my last comment but saw your response here.
A head gasket could also leak between the cylinder and the coolant passages creating excessive pressure in the cooling system and overheating. There are kits available for testing the presence of combustion gases in the cooling system like these: UVIEW 560000 Combustion Leak Tester https://www.amazon.ca/dp/B000NPDL76/ref=cm_sw_r_cp_api_Yr.DxbRWDM302
Note that the head gasket might not be leaking both ways(cylinders > coolant, coolant > cylinders). If coolant was leaking into the cylinders, you would see white clouds of smoke from your exhaust, not water. I would assume if you saw water it would be a bad enough leak to hydro lock your engine.
Edit: Sorry for bad formatting...still learning to Reddit.
Time to do a combustion leak test. or have one done.
https://www.amazon.com/UVIEW-560000-Combustion-Leak-Tester/dp/B000NPDL76/ref=sr_1_1?ie=UTF8&qid=1475125843&sr=8-1&keywords=Combustion+Leak+Tester
So air pocket it is. I knew it'd be something pain in the ass like that.
I went ahead and got this earlier this week, should be on its way:
>https://www.amazon.com/Robinair-75260-Coolant-Refiller-Preventer/dp/B001QFDRS0
Any opinions? Now to borrow an air compressor...
Hmmm.... I don't want to scare you, I'm obviously just another shadetree intent on saving money and learning myself.
But coolant, as it boils, shouldn't alter it's state or composition. It just boils off into steam or pressurizes the system until it literally boils out of the overflow tank..
The white/orange worries me a bit. Orange could maybe be rust related, but naggs me as dexcool gelling up.
Coolant turns thick and milky when it mixes with oil at high temperature, looks like inconsistent chocolate milk. Real terrible stuff for an engine. Gums up everything and leaves a sludge residue on most of the moving parts.
I also don't like the look of the 'floaters' in the rad fill picture, espescially if this fluid is relatively 60%-75% new. It looks (to me, from the picture) like water mixing with oil. I'd like others to look at and comment on this as well.
At this point, I would do a combustion gas leak test.
You can get a [Cumbustion Gas Leak Tester] (https://www.amazon.com/UView-560000-Combustion-Leak-Tester/dp/B000NPDL76) for under $50 there on amazon. Probably cheaper elsewhere.
The concept is simple, you pull off the radiator cap, put the tester up to the opening after you fill the tool with the included dye. Start the vehicle,
The tool then creates suction (when pressed against the radiator cap opening) and draws a bit of air through it's tube from the radiator itself.
If the dye changes color, it indicates Cumbustion gas in the cooling channels, which could indicate either a bad intake or head(s)/gaskets.
Also a major indicator that oil is also doing the chacha with your coolant.
So, how do ya feel about pulling the motor? Lol
Does it throw ANY codes?, idle/Accelerate/decelerate funny?
Depending on how vested you are in a properly running vehicle, keeping costs low, and/or preventing terrible things before they become terrible, you may just leave it and continue driving while keeping a hawk eye on gauges, sounds/smells and appropriate liquids.
Or maybe pull the oil pan and find out exactly what's going on under there..
Possibly take the car into a shop/dealer and see what they have to say.... I'm here with ya until the end either way haha.
Edit* There also is a test, a mentor once taught me,. I'd have to confirm, but it goes something like pull the spark plugs, look for obvious signs of fouling/detontion etc. Put them back. Pull each spark plug one at a time. Pour distilled water into the spark plug sleeve (threaded hole on the block.) Then you try and start the car. Theory goes that if there are any cracks in the cylinder walls, head gaskets et cet, you'll get water spewing itself from the spark plug hole you're working with. To clarify, you do the test on each spark plug separately. Also tests compression I believe. Will update when I locate my notes on the subject.
Edit* I just read the other comment, honestly, you may have a serious problem and I think you should be worried about this car ceasing to function soon.
The new presence of the milky substance, is absolutely the result of whatever* was still in the block mixing in with your radiator contents as it cycles it's way through, however I believe I recall you stating you put a garden hose up to it. This makes me think that that either the heat warped a head, or ruined a gasket seal while contracting, I also think the same happeneded to your water pump.
Only, with the intake your the heads, it's oil plumbing around where it shouldn't. Or coolant running rougue in similar fashion. It's entirely possible the sudden coolant blow was a symptom, and not the cause.
I guess some options, in the case that lady luck isn't on your team, are to save for a new car, trade this one in, or buy a harbor freight engine hoist and get ready to develop mild, temporary alcoholism and a sudden tick in the left eye.....
Coolant pressure test, exhaust gas chemical test (like this) or a cylinder leakdown test would be the way to check that. Unless you overheated the car, I would be amazed if you really had a head gasket failure though. Head gasket failures are very rare in the VW world.
https://www.amazon.com/ZENY-Single-Stage-Economy-Conditioner-Refrigerant/dp/B012CFTYX4/ref=sr_1_1_sspa?s=automotive&ie=UTF8&qid=1541546220&sr=1-1-spons&keywords=vacuum+pump&psc=1
Its called a side can tap.
You just have to remove the schrader valve inside the 1/4 fitting.
http://www.amazon.com/Robinair-10102-Side-R134A-Respective/dp/B0009XT7NY/ref=sr_1_11?ie=UTF8&qid=1412257252&sr=8-11&keywords=refrigerant+can+tap
Here is the vacuum pump I use with a pressure gauge and a big pickle jar. It works. https://www.amazon.com/ZENY-Single-Stage-Economy-Conditioner-Refrigerant/dp/B012CFTYX4/ref=sr_1_4?ie=UTF8&qid=1501206918&sr=8-4&keywords=vacuum+pump
Kozyvacu R134a Refrigerant Self-Piercing Can Tap Valve with 1/4 Flare port for AUTO AC recharging, Easily connecting with Quick Coupler https://www.amazon.com/dp/B073ZZSYWC/ref=cm_sw_r_cp_apip_UIEP31yzdf8t6
I thinj something like this could work
Joyway 8pcs A/C Car Air Condition Refrigeration Connector Adapter Hoses AC CH-138 Set Kit https://www.amazon.com/dp/B07DH6553C/ref=cm_sw_r_cp_api_i_vAiPDbSRKZTP1
And this
Flexzion Car AC R134a Quick Connectors System Port Adapters Couplers Low High Set Conversion Kit for HVAC Auto Air conditioning with Manifold Hose Gauge https://www.amazon.com/dp/B018766NTA/ref=cm_sw_r_cp_api_i_sBiPDbGX0YNK8
UVIEW 560000 Combustion Leak Tester https://www.amazon.ca/dp/B000NPDL76/ref=cm_sw_r_cp_apa_i_sxjVDbMXN8XFW
Something like that. Or take it to a mechanic and they can test it for you. Might be cheaper idk.
Buy a quality strut spring compressor, do NOT go cheap. I bought this one from OTC after renting the autozone version a few times. I like this one because it includes safety pins so the spring shouldn't be able to get out of the clamps. https://www.amazon.com/OTC-6494-Clamshell-Spring-Compressor/dp/B0002SRHU6
If you have an air compressor, you can purchase a small venturi pump to pull a vacuum on the system.
That'll let you test your conversion before paying the shop to do the charging with new coolant.
fuck that, my truck needs this
The answer really depends on where its leaking from. If you can find the leak UV dye can help if you cant find it make sure to get a black light and yellow glasses. Let the car idle for a bit and let the cooling fan kick on and off a couple of times while monitoring the temperature gauge making sure you don't over heat. Put on the glasses and shine the light on all of the cooling system components looking for anything that shines green. Once you know where its leaking from you will know if you can tackle the job yourself, as others have said a bad hose/connection is easy, but a radiator and head gasket are tougher. A radiator is doable with a good walkthrough and I'm sure there are plenty out there, but the head gasket would be pretty tough on someone with limited experience and tools.
2004 Impala ex-owner here with a couple of tips for whatever they're worth.
First and foremost, the petcock (the drain valve for the radiator) is located right there where it drips in the first video, above the actual drain. Tighten that sucker up if it's loose -though I doubt that's the problem. It would be leaking from the middle of the drain, not around it.- which leads me to the next point.
Have you hit any hard potholes or bumps recently? Jiggle the radiator- does it move about, i.e. not snug and tight?
I ask because something similar happened to me traveling on a dirt road once, where I hit a bump, and it knocked the condenser off its hooks. The condenser/radiator aren't secured the best, and Chevy thought it would be genius to have protruding pointy screws right below it, and when the thing fell, the screws pierced the condenser and leaked all my A/C fluid. (I don't know your level of expertise, so just in case, the condenser is a smaller and thinner 'radiator' meant for the A/C system, and it sits in front of the radiator.) Maybe something similar may have happened to you.
That leak looks 85% likely that it's coming directly from the radiator, (and if not, it's coming from a hose that leads to/from the radiator, but I'm not convinced if it's pooling underneath.) Regardless, you're gonna be playing around with the radiator, so learn up on it- it's not that hard to replace.
If you're willing to splurge the extra $10-15, get yourself one of those UV dye kits that come with a UV dye and light. Clean and dry everything up as much as you can, and drip a couple of drops in the radiator. Let it flow for a minute with some coolant, and make like you're in CSI- look for highlighter splotches and follow them back. If they concentrate throughout the fins of the radiator or pool underneath it, you have to change the whole thing. If they seem to be a bit splattered higher up closer to a hose, you found the culprit. Either way, it's not a super hard or bad replacement if you have the patience and a basic set of tools. And if you can't see the source of the leak, as I said, it's most likely damage to the underside/ within the fins of the radiator.
Regardless, I always add my own personal disclaimer: I might be wrong.
Edit: The UV dye and the UV light in question. That particular dye says it's not compatible with DEX-COOL which the impala has, but if I were in that position, I'd give your radiator a nice flush anyways while you're down there. Or, look for one that is compatible.
I bought my chamber off of ebay, if you want to stabilize wood ive read you need to get a pyrex lid for the chamber, or if you're just using a pressure pot or something to make one I guess you don't have to worry about it but it helps to see inside to prevent overflow. There's a few different brands but shattervac is the one that comes to mind it's designed specifically for stabalizing wood .This is the pump I bought and it works like a champ, what you're paying for with the pumps is speed, and to evacuate a small chamber doesn't really take long. I would definitely invest in some casting resin though it's amazing what you can do with it, i think I paid 30$ for half a gallon and I haven't even gone through half of it yet even with all my dicking around with it.
https://www.amazon.com/dp/B012CFTYX4/ref=cm_sw_r_other_awd_CB2IwbH651W8M. This is all you need in a vacuum. I've been working on both a bestvalue and a provac recently. Hands down the best value has an easier seal to deal with than the provac. The vacuum listed links an adapter. You might need this depending on the hosing you use
Your edit probably covers more than I could tell you. I use 409 or purple power, nothing special. I did mean rinse with water, just dry everything up as best you can and keep the water away from the alternator, battery and air filter. And you could use power tools. Power tools make everything more fun. For example a pump could be used to suck out the wells as you rinsed with degreaser / water. Sort of like getting your teeth cleaned at the dentist.
Cheap One
Good One
I added an image and now it does not show my text post.. Here it is again:
Looking at this specifically.
https://www.amazon.com/gp/aw/d/B0009XT7NY/ref=ox_sc_act_image_21?ie=UTF8&psc=1&smid=ATVPDKIKX0DER
I have a 90g closed column pressurized extractor from Extraction Experts. (http://www.extractionexperts.com/products.html) It includes:
Main Stainless Steel herb fill column.
1 top lid with valve and 3/8 gas flare fitting.
1 bottom lid with valve and fine barb exit port.
1 50 micron screen.
1 150 micron screen.
2 clamps to secure each lid.
The question:
Really appreciate want help. Thanks to all!