Best automotive electrical wiring accessories according to redditors
We found 196 Reddit comments discussing the best automotive electrical wiring accessories. We ranked the 93 resulting products by number of redditors who mentioned them. Here are the top 20.


![[ALL STAR TRUCK PARTS] 2-Headlight H4 Headlamp Light Bulb Ceramic Socket Plugs Relay Wiring Harness Kit](https://m.media-amazon.com/images/I/51lzT+1ndLL.jpg)


I googled "red black two wire connector" and the first result was this:
https://www.amazon.com/CES-Gauge-Quick-Disconnect-Harness/dp/B0057ZQJ12
The name is a SAE bullet connector according to the second result.
That's crazy. Good thing it was just a tweaker and not a total psycho. Ford Transits are super easy to get into. Pop off the plastic lock shroud and turn the entire locking mechanism a few times and the door unlocks. You would have noticed that though. Maybe he used a wedge and a slim jim or something like that.
Get a simple blinking red light fake car alarm. Place it in a good spot that doesn't give away the whole show of course and tweakers will think twice about trying to get in. To prevent your ride from getting stolen though, find a clever spot to put a kill switch. Even then they are easy to bypass, but thankfully most thieves will move on to the next car pretty fast if they encounter some difficulty.
https://www.amazon.com/D-yun-Motor-Alarm-Wiring-Flash/dp/B00PBQN9OC/ref=sr_1_5?s=automotive&ie=UTF8&qid=1521584284&sr=1-5&keywords=fake+car+alarm
A headlight harness will help a lot. H4 conversion housing like the ones made by Hella (I have the e-code) will be amazing.
I highly recommend against getting cheap flea-bay junk like those Cree lights. Spend the money on quality parts for your own safety and others on the road.
I just upgraded the lights on my kawasaki, so I got all this worked out.
For the fast/4-way flashing issues, I can't say if they will effect your bike. I have a feeling they will, and if they do you know how to address them. All in this upgrade runs about 90 bucks, minus 17 if you decide to stick with halogen rear turn signals.
​
Good lord that's a long post
If you want a decent upgrade, start with replacing the stock harness to one with relays. I used this Putco harness (though I'm sure there are better ones). I saw a significant increase in brightness with the stock bulbs. Just something to consider.
$27.64 https://www.amazon.com/gp/product/B000CRZXPI/ref=oh_aui_detailpage_o07_s01?ie=UTF8&psc=1
I also bought a 12V horn wiring harness relay kit (basically extension cords for the horn) for $12.99 just in case https://www.amazon.com/gp/product/B00XM107FC/ref=oh_aui_detailpage_o07_s00?ie=UTF8&psc=1
The best bang for the buck is to upgrade your wire harness. The way the factory wiring is routed on your XJ, the power goes into the switch in the cabin of the vehicle only to go out into the engine bay and supply power to your lights. Even a very small drop in voltage at the headlights themselves will make them appear dim. The way to get the lights brighter is to feed them more power. There are kits online you can buy or you can make one yourself using a write up like this: http://go.jeep-xj.info/HowtoHeadlightLoom.htm
If you don't want to make one, you can use the harness that everyone seems to buy on Amazon. A lot of people who have reviewed the product are talking about putting them into XJs. http://www.amazon.com/Putco-230004HW-Premium-Automotive-Lighting/dp/B001P29X4G
The way a headlight harness upgrade works is it uses relays. You don't remove any of your existing wiring, just add the kit to your existing electrical system. Instead of your factory wiring feeding power to the lights, it now activates relays which will draw power right off of your battery. That delivers more power to your lights and makes them brighter without even replacing them.
Many people will recommend upgrading the headlights themselves, but be aware that the vast majority of the kits for sale online aren't DOT approved. That means you will fail a safety inspection if your state requires them and you can get a ticket for having them on your vehicle when driving on the road. The DOT regulations are to keep lights from blinding other drivers by defining cut off points of the beam and specifying focused beam patterns. If a cop pulls you over for suspected non-compliant headlights, all he has to do is look at them. If the glass doesn't say DOT, you're getting a ticket.
An alternative that a lot of people get away with are using E-code headlights. Autopal and Hella make lights that are compliant to European standards, but they're still not DOT approved for use here in the United States. People seem to get away with them though because at a glance they don't look like the cheapie "for offroad use only" H6054 composite housings for sale all over eBay. The Autopal and Hella headlight housings allow the user to pop in H4 headlight bulbs. That opens you up to a whole lot more options in terms of lighting. Fitting HIDs in an XJ can be done, but simply popping a cheap HID kit into a H6054 composite housing isn't going to do the trick because an HID bulb is longer and will project light in a very different pattern which can blind other drivers.
There are also LED H6054 headlights on the market as well as true HIDs for H6054s. They're expensive, but they exist if you want to spend the money. Truck-lite makes LED headlights and they're $215 each. The "boobie light" Real factory-made and DOT approved HIDs (not some enclosures a guy on a forum made in his garage) cost a grand a pair including ballasts. They're the Philips Bi-Xenon XP6054. A guy on jeepforum has/had them, but that's a ton of money for a pair of headlights. This link shows pictures from that jeepforum user. http://www.headlightrevolution.com/Starr_HID_5x7_Headlights_Black_p/starr-xp6054b.htm
I've been asked this several times haha. I'll do a little explaining now, but I think it's time I put together an album explaining it with pictures.
I used the following wiring harness:
OPT7 Offroad Light Bar wiring Harness Kit (4 Items), 380W - Single Connector https://www.amazon.com/dp/B00K1NS0PS/ref=cm_sw_r_cp_apa_u9hrxb06G38RA
The wiring is in a protective plastic/rubber sleeve. I ran the sleeve up the side of the windshield. On my windshield there's a slight gap between the metal of the body and glass, like the Rubber seal is set in a little bit. I cut a thin strip of 3m exterior mounting tape and used a screwdriver or something to push it into the gap.
Scotch Exterior Mounting Tape, 1-Inch by 60-Inch https://www.amazon.com/dp/B00004Z4BV/ref=cm_sw_r_cp_apa_UaLrxbHN01CVZ
The adhesive tape has held up all winter and about a total of 8 months, so I'd say it works well.
I ran it up the passenger side because the way my light bar was the wiring came out on that side, plus you don't see it easily everytime you get in the car. You could do the drivers side also. The wiring harness I used was basically just long enough. I'd recommend starting from the light and working backwards to the battery, that way you don't have any extra wiring up top.
You can also use some type of adhesive wire clip to guide the wire down the rain gutter thing so it's a little more secure till it gets to the light. I attempted to do this, but I had trouble getting the clip things to stick.I'll probably try to redo it soon.
Like I said, I'll try to get some pictures when I get around to it to help explain it further.
This way is a lot easier and "safer" than drilling through the roof or something.
Use this:
Wiring Harness
Parts List:
A friend and I did the installation ourselves in about 90 minutes (it definitely helps to have an extra set of hands!). Here are the basic steps we followed (refer to this guide for pictures):
Hope this helps!
$83.94 IPF housings
$20.98 Hella H4 55/100W
$27.34 Putco harness
$14.56 Backup relays
$146.82 for a sharp cutoff and much more light on the road, and an incredible high beam, delivered in two days if you have an Amazon Prime membership. I bet you use high beams a lot now, but you'll probably rarely feel the need to use them on the road with this setup.
$147.99 for a 50 inch light bar. Even though the headlights offer a lot of light, having extra flood would be great when off road. I don't actually have this yet, but I plan on buying it as a reward for getting some work done on my XJ. Mine is still new to me, and I haven't yet had the time to earn it yet.
Less than $300 and two days for an incredible amount of light output.
If I don't buy that light bar, it's because I'm getting a Cree light bar with XP/XT or XM emitters that I'll be upgrading...I'm on the hunt for a light bar that uses XTE emitters like this light because output can greatly be increased by swapping in XP-L's, and more than doubled if power can be increased. That mod is more of a hobbyist thing than an attempt to save money, and not all of them would be done anyway since it'd sacrifice some throw for flood.
It's hard to beat the Chinese at this one... I've seen a guy on Facebook reselling prebuilt harnesses as his own creation, but I'm more interested in making a quality product that's going to outlast the rig it's installed on. I want my reputation to be built on quality and value for the dollar.
Example:
For $20:
http://www.ebay.com/itm/CERAMIC-H4-HEADLIGHT-RELAY-WIRING-HARNESS-2-HEADLAMP-LIGHT-BULB-SOCKET-PLUGS-7-/330997592807
For $40:
https://www.amazon.com/Putco-230004HW-Premium-Automotive-Lighting/dp/B001P29X4G/?tag=vig-20
And at the premium/benchmark end:
http://www.lowrangeoffroad.com/ipf-wiring-harness.html
If I could make and sell a harness that people would be interested in, I'd be game. We'd be talking OEM quality TXL wire, ceramic plugs, HELLA style relays... but it's not going to be $20. That's the hard part, being competitive in price and quality in relation to other offerings.
Hella 200mm Rectangular E Code H4 Halogen Replacement Headlight Kit with 100/80W H4 Bulbs https://www.amazon.com/dp/B000FLTAE6/ref=cm_sw_r_cp_apa_nk2tybG699D1P
H4 100w Ceramic Fused PnP Heavy Duty Automotive Wiring Harness Headlight Foglight Booster Relay 12v https://www.amazon.com/dp/B00BMN30HY/ref=cm_sw_r_cp_apa_bl2tybWQNP2HX
Install the relay harness then just use the bulbs and housings and forget that kits wiring. With those bulbs you absolutely need the harness first or you will burn out wiring.
Non-mobile: http://www.amazon.com/dp/B001P29X4G/ref=redir_mdp_mobile/184-6657873-1060049
^That's ^why ^I'm ^here, ^I ^don't ^judge ^you. ^PM ^/u/xl0 ^if ^I'm ^causing ^any ^trouble. ^WUT?
Hey y'all! Some of you asked about mods so here is a full list of what I have done so far with links.
Radiator guard - Has a nice little FZ-07 etched at the bottom.
https://www.amazon.com/gp/product/B075MCXCM7/ref=oh_aui_detailpage_o08_s00?ie=UTF8&psc=1
Shorty levers - Mine are gray but they come in lots of colors.
https://www.amazon.com/gp/product/B0197N3KA2/ref=oh_aui_detailpage_o03_s00?ie=UTF8&psc=1
Bar end mirrors - You can find these for less but I chose these because the reviews indicated that they might be better quality than others.
https://www.amazon.com/gp/product/B00Q3UL6S6/ref=oh_aui_detailpage_o06_s00?ie=UTF8&psc=1
Yoshimura fender eliminator - Kinda pricey for what it is but it looks really nice.
https://www.amazon.com/gp/product/B00T6J9IM2/ref=oh_aui_detailpage_o05_s00?ie=UTF8&psc=1
Motodynamic integrated tail light - I also looked at the TST but after looking at some videos decided on this one.
https://www.amazon.com/gp/product/B015NN3YUG/ref=oh_aui_detailpage_o04_s00?ie=UTF8&psc=1
Proton 500 flush mount LED - These things are brighter than the sun. You can also change the signal pattern which I thought was cool.
http://www.hightechspeed.com/products/Proton500/yamaha.html
Flasher relay - Prevents hyper flash and let me get rid of resistors.https://www.amazon.com/gp/product/B00RM26LXO/ref=oh_aui_detailpage_o01_s00?ie=UTF8&psc=1
Stompgrip volcano black - I really like these and they have great grip. You can also get them in clear from their website if that's your thing.
https://www.amazon.com/gp/product/B018NH74BE/ref=oh_aui_detailpage_o00_s00?ie=UTF8&psc=1
Akrapovic TI - This exhaust sounds sweet, I also purchased the CAT for it through cyclegear.
https://www.amazon.com/gp/product/B00L44J56G/ref=oh_aui_detailpage_o02_s00?ie=UTF8&psc=1
Other mods that i'm considering in the future
Stainless Steel braided brake lines, FTECU on the bike flash kit, T-Rex Racing no cut combo.
Bonus - https://i.redd.it/en8vfnpv46u01.jpg
I just bought one of these and put it together last weekend. I bought this adapter off (and the camera) Amazon: http://www.amazon.com/gp/product/B00KWLA3T0/ref=oh_aui_detailpage_o00_s00?ie=UTF8&psc=1
The camera's field of view is a little weird. Installed on the recommended spot, I have trouble seeing all of my right side. It's still great though, and you should be using your mirrors anyways.
My .02 worth for ya..... Go in this order instead of jumping right into a set of LED headlamps.
1 - Upgrade the wiring harness.
I installed a Putco harness in 2013 when I first got the XJ and it was a definitely improvement.
Putco 230004HW Premium Automotive Lighting H4 100W Heavy Duty Wiring Harness and Relay
Other folks have gone the eBay route, and I bought one of these on a whim (because it was stupid cheap) just to see if the quality was worth it.
CERAMIC H4 HEADLIGHT RELAY WIRING HARNESS 2 HEADLAMP LIGHT BULB SOCKET PLUGS 7
Ended up not installing it because I had other things to work on instead of replacing the Putco harness that was working fine. Overall though, the quality was surprisingly good and I would have used it if I didn't already have the Putco harness.
For all the negative comments people have about the Putco upgrade harness, it's still working fine a little over 3yrs later. Knock on wood, of course.
2 - Get a set of H4 housings. I bought these off Amazon, but there are other reputable brands out there which work just fine.
GENSSI DOT H6054 7x6 Inch 200mm Headlights Pair with Bulbs Non-Sealed H6014/H6052/H6054
These came with some crappy OCONUS-made no-name bulbs that sucked balls and were immediately thrown in the garbage.
I went to my local PepBoys and grabbed a set of Sylvania SilverStar "Ultra Halogen" H4 bulbs and threw those in the housings.
Holy shit, #1 & #2 were an incredible upgrade to the shit stock XJ headlights.
If you're looking to stay right at or a hair under $100 that's the way to go.
Last year, I came into some $$$ and got it into my head that I wanted LED headlights. Went this route: Truck-Lite (27450C) Headlamp
Wow.
Significant difference from the H4 bulbs + wiring harness upgrade but I'm honestly glad I did the H4 bulbs + wiring harness upgrade first.
Now that said... In hindsight, the LEDs weren't absolutely necessary and I could have put the $$$ into a SYE or something else.
But hey, ya learn as ya go. Right?
I had my GSXR600 stolen a few years ago, luckily I put GPS on it and I was able to recover it. I left it unlocked at my old apartment complex (used to chain it to a post with a huge Kryptonite MC chain/lock) for less than 6 hours, ONE TIME, and it was gone.
Besides using a disc brake lock, I also bought one of these:
D-yun Fake CAR Motor Alarm No Wiring Only Led Flash https://www.amazon.com/dp/B00PBQN9OC/ref=cm_sw_r_cp_api_i_uSRzDb46HMNFN
It’s just a flashing LED, and I velcro’d the battery box to the frame underneath a fairing, so I can still switch it on and off easily, and change out the batteries. Then, I put the LED kind of near the triple clamp so that you can see it blinking if you were to sit on the bike, or look near the gauges. I use Lithium batteries and the thing lasts for 4 months or so, sometimes I even forget to turn the LED off for weeks, and it still doesn’t die. I would say this is absolutely worth the $10 on amazon.
Most bike thefts are just crimes of opportunity, and if someone sees a little light blinking down near your gauges, the best you can hope for is that they move on to someone else’s bike.
I recommend a disk brake lock, but with Groms, the things are so light that it’s not really hard to just pick it up and put it in the back of a truck and drive off. So don’t rely solely on the disk lock. Locking it to a post with a serious chain is much better than just a disk brake lock, but then you have to bring a chain with you in your backpack. I used to use this one at my apartment complex, but there's no way you could carry it around in a backpack, the thing weighs like 20 pounds. (Also, you can see in the reviews plenty of people still cut through these. A battery-powered angle grinder will pretty much get you through most locks/chains. Which is why the goal is just to make your bike harder to steal than all the other bikes around it.)
The thing with bikes is, if someone wants it bad enough, they will take it. Whether that means using a cutoff wheel to cut your chain in 15 seconds, or picking it up and putting it in the bed of their truck, etc. The best thing you can do is make your bike harder to steal, so they are less inclined to steal it.
If you want full protection, I highly recommend buying a GPS unit, I have two SpotTrace units that I bought on Amazon, you pay monthly but there is a promo code rn for 50% off of an annual subscription, so I think I got a whole year of service for $100. Their app works pretty well too, and if you use Energizer Lithium batteries, they last for several months. The ONLY reason I was able to recover my GSXR was because it had GPS. If it weren’t for that, I’d have never seen it again. There are other GPS units on Amazon too, SpyTech (I think?) makes one that uses 4G data, so if you live somewhere with good cell coverage, that's a good choice too. I think SpotTrace uses satellite data, so it's good for Boats, hot air balloons, etc (things that travel far outside of cell coverage) but it has also always worked well for me on my cars and bikes.
EDIT: The only reason I don’t like disk brakes with alarms is that some of them are so sensitive that they start going off every time the wind blows. You don’t wanna be the guy in your neighborhood whose alarm is going off every 15 minutes while you’re not home. Also, I’ve seen people pretty much “silence” those alarms with chewing gum.
EDIT 2: Also, know that the handlebar lock (the one you engage with your key) is a joke. Most bikes handlebars can be unlocked by sitting on the seat, leaning back, and kicking the bars using your legs and leverage. Sure, it will break the lock mechanism, but the thief doesn't care.
I just installed this stereo in a 01 dodge 1500 sounds good. But single-din stereo you pick should fit with this dash kit and wiring harness. stereo
wiring harness
Dash Kit
invest in a headlight modulator http://www.amazon.com/Kisan-pathBlazer-P75W-Headlight-modulator/dp/B00HS2VEF8/ref=sr_1_7?ie=UTF8&qid=1410661116&sr=8-7&keywords=headlight+modulator
it pulses yourheadlight or pulses between hi/low.
Only proven device to increase visibility unlike loud pipes.
I don't know those connectors, but I would just rewire it to use these in the appropriate gauge:
Nilight 10 Gauge 2 Pin Quick Disconnect Harness,Heavy Duty SAE Connector Bullet Lead Cable,2 Years Warranty https://www.amazon.com/dp/B0057ZQJ12/ref=cm_sw_r_cp_apa_i_H4rmDb7KWNX16
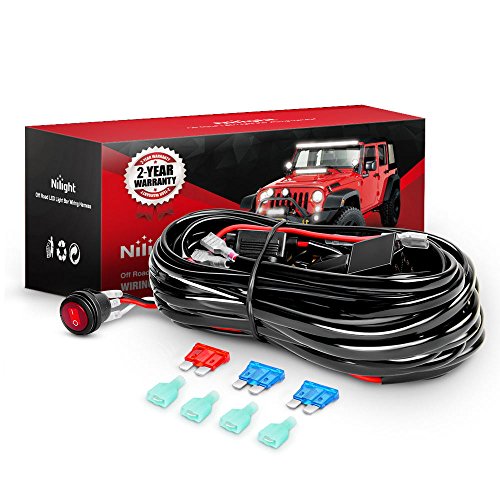
MICTUNING MIC-B1002 LED Light Bar Wiring Harness, Fuse 40A Relay On-off Waterproof Switch https://www.amazon.com/dp/B00O72R7Z8?ref=yo_pop_ma_swf
I hope this works
I used this harness. Worked out perfect and drilled a 3/4" hole in one of the blank knock outs in the dash near the light dimmer dial. Has an illuminated switch when on and has spade connectors for two front lights. I just used one since I have a 20" led bar behind the lower grille.
MICTUNING MIC-B1002 LED Light Bar Wiring Harness, Fuse 40A Relay On-off Waterproof Switch https://www.amazon.com/dp/B00O72R7Z8/ref=cm_sw_r_cp_apip_ZYjgQJvFDJ4ET
> I'm looking more for what, if anything, is needed in the wiring behind the socket.
You need an Automotive Receptacle, and an Inline Fuse (2A is plenty) to protect it.
> But I'm wondering if there is some other interference on that battery and the wiring that I'm going to need to address.
What else do you have hooked up on the Leisure Battery and how do you charge it?
-------
Automotive Socket:
https://www.amazon.com/Attwood-Marine-12-Volt-Power-Outlet/dp/B003EET3XY/
(IIRC 12V and 24V use the same physical socket, though you might want to look for a 24V specific one if you don't want to risk it)
------
Inline Fuse (Actual Fuse Not Included):
https://www.amazon.com/Scosche-0400ATCFH16-5-Fuse-Holder-Gauge/dp/B008CVPE8C
I have some Auxbeam LED pods on the corners and a Primeprolight 32" light bar front and center mounted up with some cheapo brackets. The wiring harness is ran along the roof basket, through the trunk, and under a ton of plastic up to the driver side dash. I drilled a hole in my blank switch to install a little flip switch.
Here are some pics of the wiring situation.
http://imgur.com/a/8GGx2
Here are some links to the lights.
Auxbeam pods:
https://www.amazon.com/Auxbeam-Waterproof-Off-road-Military-Equipment/dp/B00T62RK1U
Primeprolight 32" Light bar
https://www.amazon.com/Primeprolight-Light-Flood-Combo-Waterproof/dp/B014KTTC1E/ref=sr_1_5?s=automotive&ie=UTF8&qid=1500079310&sr=1-5&keywords=32%22+light+bar
Brackets:
https://www.amazon.com/Northpole-Light-Horizontal-Mounting-Brackets/dp/B06XRG11TY/ref=sr_1_8?s=automotive&ie=UTF8&qid=1500079337&sr=1-8&keywords=light+bar+mounting+brackets
Wiring harness:
https://www.amazon.com/Nilight-Wiring-Harness-Switch-Warranty/dp/B072M1CXQB/ref=sr_1_22?s=automotive&ie=UTF8&qid=1500079439&sr=1-22&keywords=light+bar+wiring+harness
https://www.amazon.com/dp/B001P29X4G/ref=cm_sw_r_awd_RsQDub1QPR7JG
That's the exact harness I bought.
I put LED turn signals on my bike and I used an electronic turn signal flasher instead of the stock one. You just unplug your old flasher and plug this one in, this way is a lot easier than resistors. You'll have to use an electronic flasher or resistors if you change to LEDs otherwise you'll get hyperflashing.
You can use something like this, this one might even work for your bike.
https://www.amazon.com/iJDMTOY-Electronic-Flasher-Motorcycle-Signal/dp/B00RM26LXO
I do not know of LED lights that are heated, but alternatively you can go hella h4 upgrade which I prefer to LED/HID
Relay Kit - https://smile.amazon.com/2-Headlight-Headlamp-Ceramic-Socket-Harness/dp/B06XHSFLTZ
Head lights - https://smile.amazon.com/HELLA-003427811-132mm-High-Headlamp/dp/B001G72VIK
Bulbs- https://smile.amazon.com/HELLA-H4-100-80W-Wattage/dp/B000COBLKW
You'll have really good lights and will melt snow without problem.
The other option is to just plug in a power strip if you don't need permanent installed outlets. If you are going to permanently install the outlets the wiring should be SJO cable to circuit breaker, circuit breaker to all outlets.
https://rvpartsexpress.com/product/20-amp-gfci-stand-alone-circuit-breaker/
7.https://www.amazon.com/Nilight-Terminals-Self-stripping-Insulated-Disconnects/dp/B07CP987BN/
T-taps and some spade connectors would be the easiest way, otherwise it'll be a lot of cutting and soldering. If you go with t taps you can mix the colors of the connectors. It'll likely be a yellow tap on the 12 gauge trunk line, and the LED positive will get a red spade connector to plug into the yellow tap. The spades themselves are all the same size, so use the right color connector for each individual wire.
Other comments: the wires coming from the charge controller to batteries only needs to support 40 amps. They can be 8 gauge and fused at 40 amps, not 150. Your wire from battery to fuse block can be 8 gauge as well. I only see 25 amps of accessories in the block, and you'll likely never run all of them at once. So an 8 gauge supply and ground line with a 40 or 50 amp inline fuse will give you plenty of room to add more accessories later while being safe.
Edit: make sure you buy twisted strand copper wiring and not aluminum clad or solid core. Best spot for the thicker wiring is car audio stores or search amazon for stereo amp installation kits. If you go to home Depot for 0 gauge wire it'll be rigid and hard to work with, the car stereo wiring is super flexible.
Edit 2: you may want to consider adding a battery management system after the isolator. They make many variations, some that include the isolator function as well. Some allow you to program a maximum current for charging the lifepo4, which will make it easier to judge wire size for that run. The big benefit though is that a standard car alternator will only charge lithium batteries about 75% because it's regulated to about 14.2 volts. That's what the lead acid battery expects for charging. The lithium needs 14.7 or more to charge fully. So adding the bms will allow the lithiums to fully charge while driving, otherwise you'll have to rely on the solar for the last 25% of the charge. Just make sure to program the charge controller for lithium batteries.
Wiring Harness: https://www.amazon.com/dp/B071ZPX32N/ref=cm_sw_r_cp_api_i_dUV1DbJY985KX
The wiring harness came with a pretty crappy switch so I bought a separate switch and went the extra mile.
Switch: CH4X4 Rocker Switch for Nissan... https://www.amazon.com/dp/B01I006EUQ?ref=ppx_pop_mob_ap_share
You just have to remove the switch that come with the light bar and connect it to the new switch.
The switch is designed to be placed in stock switch panel. I routed mine to the left side panel. There are two clips to remove the placeholders. Just have to reach behind the left side (or remove) panel to do so.
Nilight 10007W 1 Wiring Harness... https://www.amazon.com/dp/B073XMM3T5?ref=ppx_pop_mob_ap_share
Just ran the wiring along others and wired into the fuse block. Switch ran through same hole as the hood release. The switch is the exact size as the hole on the bottom for your steering column. So no drilling and it's out of sight. Absolutely no issues.
I've heard those called Vampire taps before. It doesn't seem right to call this a "brute force" mod. It's quite simple, elegant, and non-destructive.
EDIT
I guess vampire tap just refers to the old 10BaseT networking thing. Found these "T-taps" on amazon:
https://www.amazon.com/Nilight-Terminals-Self-stripping-Insulated-Disconnects/dp/B07CP987BN
Links to components used:
Headlight
Wiring Harness
36v-12v Converter
Tail Lights
heat shrink
Mounting Brackets
I've used this one- https://www.amazon.com/Northpole-Light-Control-Harness-Driving/dp/B01M02ZFT8/ref=sr_1_5?crid=429XQFX3EYX8&keywords=wireless+12v+switch&qid=1555512330&s=gateway&sprefix=wireless+12v+%2Caps%2C129&sr=8-5
This reverse harness made it all plug-n-play. Only thing I had to do was solder the cable providing power to the camera to the harness.
https://www.amazon.com/gp/product/B00KWLA3T0/ref=oh_aui_detailpage_o00_s00?ie=UTF8&psc=1
It's a regular light bar, but I bought a wiring harness that is remote controlled. Here's a link for the wires.
https://www.amazon.com/gp/product/B01M02ZFT8/ref=ppx_yo_dt_b_asin_title_o02_s00?ie=UTF8&psc=1
Here's the actual lightbar. It comes with a standard, non-remote harness. https://www.amazon.com/gp/product/B07NTBKM9N/ref=ppx_yo_dt_b_asin_title_o03_s00?ie=UTF8&psc=1
I used this light bar, and this wire harness and switch.
I got the idea from a thread over at focusst.com and the whole install took 6 hours max for me.
God I hope this formats correctly - I am a neophyte.
Exhaust - http://www.ixilusa.com/ixil-l3xb-black-hyperlow-xl-full-exhaust-yamaha-mt-07-2014-2015/
Super deep and loud sound - videos online don't do it justice, its unbelievably loud when the baffles are out. Had to have the cat cut out of it. Be aware they have a cat in the V section before the end of the pipe.
Removed the snorkel covering the airbox - I was told its basically blocks airflow.
ECU Flash / Dyno by 2wheelDynoWorks - https://2wheeldynoworks.com/shop/ecu-flashing-service/15-17-yamaha-fz07-mail-in-ecu-flashing-service/
Nels himself worked on my bike - super stoked (shout out to Nate too) They have the best customer service.
Active Tune - https://2wheeldynoworks.com/shop/ecu-flashing-service/yamaha-activetune-afr-closed-loop-self-tuning-ecu-kit-2/
Tune as you go
Bike side harness - https://2wheeldynoworks.com/shop/ecu-flashing-service/ftlink-v1-1-6-pin-bike-side-harnesses/
For tuning later
Windscreen - https://www.revzilla.com/motorcycle/puig-touring-naked-new-generation-windscreen-yamaha-mt-07-2018
I got light smoke, I think it goes better with the bike and pushes wind over my shoulders even at 80+ mph
Protection - https://tstindustries.com/Womet-Tech-Total-Crash-Protection-Pack-for-Yamaha-FZ-07-MT-07-2015.html
Basically got everything from this except the bar ends
Bar Ends - https://motostarz.com/collections/mt-07-2018/products/rhinomoto-barends-mirror-mounts-for-yamaha-fz-mt-models
Super easy to replace mirrors etc with these - and they add protection
Throttle tube - https://www.amazon.com/gp/product/B005C59NO2/ref=oh_aui_detailpage_o01_s00?ie=UTF8&psc=1
90 to 60 degree conversion - its amazing for the price
Dash Screen Protector - https://www.amazon.com/gp/product/B078SMP4ND/ref=oh_aui_detailpage_o00_s00?ie=UTF8&psc=1
Mirror stem deletes - https://www.amazon.com/gp/product/B07BN8QGPV/ref=oh_aui_detailpage_o02_s00?ie=UTF8&psc=1
Current Mirrors - https://www.amazon.com/gp/product/B01N6GB7DZ/ref=oh_aui_detailpage_o02_s00?ie=UTF8&psc=1
Mirrors in photo - https://www.amazon.com/gp/product/B003RESHVU/ref=oh_aui_detailpage_o00_s00?ie=UTF8&psc=1
I like the CRG Mirrors but they get bumped and are hard to readjust - the cheap ebay/amazon mirrors work great
Headlight replacement - https://www.amazon.com/gp/product/B01H6NZ5QW/ref=oh_aui_detailpage_o01_s00?ie=UTF8&psc=1
Signal replacement LED bulbs - https://www.amazon.com/gp/product/B06XK4PL33/ref=oh_aui_detailpage_o01_s00?ie=UTF8&psc=1
Super bright replacements for stock bulbs - used the original housings, they plug right in
Running light LED replacements - https://www.amazon.com/gp/product/B00JRE38EA/ref=oh_aui_detailpage_o01_s01?ie=UTF8&psc=1
For inside the headlight housing
Tail Tidy - https://www.amazon.com/gp/product/B01BH5YGOM/ref=oh_aui_detailpage_o04_s00?ie=UTF8&psc=1
Flasher Relay for LEDs - https://www.amazon.com/gp/product/B00RM26LXO/ref=oh_aui_detailpage_o01_s00?ie=UTF8&psc=1
Levers - https://www.ebay.com/itm/CNC-Brake-Clutch-Yamaha-MT-07-FZ-07-2014-2018-Adjustable-Engrave-Long-Lever/123350737715?_trkparms=aid%3D555018%26algo%3DPL.SIM%26ao%3D1%26asc%3D20131003132420%26meid%3D17a37c1b2d204ffcba65903d19a97b4a%26pid%3D100005%26rk%3D4%26rkt%3D12%26sd%3D122997203335%26itm%3D123350737715&_trksid=p2047675.c100005.m1851
Passenger peg deletes - https://www.ebay.com/itm/for-YAMAHA-MT07-FZ07-Footrest-Cover-Passenger-Footpeg-Removal-Delete-Kit-2014/253869999740?hash=item3b1bd4c67c:g:3qEAAOSw0JVbm1FQ:rk:1:pf:0
I removed the passenger pegs, needed a bracket to hold the brake fluid reservoir - also cleaned up the pegs
Havent done the brakes yet - going to replace the lines etc with steel braid.
Also want to do a sprocket / chain swap for acceleration
I used a quadlock phone mount for a little bit - but took it off because I was playing with my phone too much.
I installed this one on my beater truck. Looks to be available for under $100. Also there's a youtube video on how to install it. Just wire it into one of the backup lights (I used a T-Tap) and it will only come on when you put it in reverse.
Okay, so, here is everything I used:
Light bar 28" flood/spot
Mount to 1" roof basket bar
Wire Clips
Wire harness, this comes with the bar if you choose the package. I ran the switch through the firewall wire grommet by cutting a hole in the grommet (BE CAREFUL NOT TO CUT ANY WIRES). The wire that plugs into the car was run under the hood and up the window, secured by the clips. I followed this guys guide, u/DauphDaddy He didn't use the same harness but its the same idea. Hope this helps!!
Nope haven't had any issues with the battery and been running AUX lights for a year now. Granted though it's a kickstart and the spark plug is powered by the bike's generator so I can completely pull out the battery and it'll still run.
LED lights
wiring harness & fuse
It's from Octane Lighting:
LINK
this
That's really awesome that you say that I bought h4 stuff on Amazon and I'm gearing up to install.
Anyone have any experience? Is this a good setup? Tough to install?
HELLA 003427291 Vision Plus 190x132mm High/Low Beam 12V Halogen Conversion Headlamp
H4 100w Ceramic Fused PnP Heavy Duty Automotive Wiring Harness Headlight Foglight Booster Relay 12v
HELLA H4 12V 100/80W Halogen High Wattage Bulb Off Road Use
My plan was to use one of those generic harnesses you can get on amazon
https://www.amazon.com/MICTUNING-MIC-B1002-Wiring-Harness-Waterproof/dp/B00O72R7Z8/ref=pd_sim_263_1?_encoding=UTF8&pd_rd_i=B00O72R7Z8&pd_rd_r=EMCEVT45F8CJRMC2888D&pd_rd_w=iMy2G&pd_rd_wg=ob0Kh&psc=1&refRID=EMCEVT45F8CJRMC2888D
the autopal housings are great and take H4 bulbs. super easy refit, although you should also do a relay harness if you are going to overpower them because all the power goes through the headlight switch in the stock config.
harness
housing
bulbs
Note that if you have fogs the highbeam cutoff circuit might malfunction if you install a relay harness. Some info here
TL;DR: Any h6054 housing will fit. Do a harness swap too.
Edit: the Autopal and some other housing brands are available with ECODE or DOT glass lenses, for LHD or RHD.
DOT means there is not as sharp a cutoff. This is used in the US because overhead road signs are not illuminated as they are in the EU. As another poster said, once you have the housing in with it's little stamp you pretty much have carte blanche for the bulbs
(Pair) 5''x7'' 6''x7'' High Low... https://www.amazon.com/dp/B06XRXTX32?ref=ppx_pop_mob_ap_share
SAMLIGHT Led Light Bar 2 PCS... https://www.amazon.com/dp/B077VDYFWW?ref=ppx_pop_mob_ap_share
MICTUNING MIC-B1002 LED Light Bar... https://www.amazon.com/dp/B00O72R7Z8?ref=ppx_pop_mob_ap_share
Wiring harness for the fog lamps
I used this for my aux lights.
Nilight LED Light Bar Wiring Harness Kit 12V On off Switch Power Relay Blade Fuse for Off Road LED Work Light Bar,2 years Warranty https://www.amazon.com/dp/B072M1CXQB/ref=cm_sw_r_cp_apap_3bzCkAy8mqrCE
I put a Pioneer 4100 NEX in my 2011 Prius II. It can use Android Auto or Apple CarPlay.
Here are the parts I used to install it.
For the steering wheel controls
I also installed the [OttoNavi Prius Backup Camera] (http://www.ottonavi.com/Toyota-Prius-2009-2013-Back-Up-Camera-p/ty0913pr-kdcmrcxx.htm) but is out of stock now.
This wiring harness looks like it matches up
This dash kit too
A car audio store/best buy will probably have it also
Very good point bringing up the relay harness. The stock wiring is crap. This upgrade is as important as the e codes themselves. Even what I'm running (55/60 bulbs) the difference is massive. But I upgraded the wiring long before I did the headlights. Bought mine years ago still going strong
https://www.amazon.com/Ceramic-Automotive-Harness-Headlight-Foglight/dp/B00BMN30HY/ref=pd_sbs_236_1?_encoding=UTF8&pd_rd_i=B00BMN30HY&pd_rd_r=AMFGSTM0NEFJBJ5FY5BG&pd_rd_w=FP7E4&pd_rd_wg=lmaEX&psc=1&refRID=AMFGSTM0NEFJBJ5FY5BG
These are the brackets I used. These are the lights I used. Installation of the brackets is fairly straightforward. A guide comes with the purchase. Wiring the lights was probably the most difficult aspect just because I had to extend the reach of the relay . Feel free to ask me any more specific questions.
Do you need a harness, or are you skilled/have tools to make one?
Here is a basic harness that should work, about the only thing that might need adjusting it where the stock horn wires plug in.
https://amazon.com/iJDMTOY-Wiring-Harness-Grille-Included/dp/B00XM107FC/ref=sr_1_3?keywords=Hella+horn+harness&qid=1567535218&s=gateway&sr=8-3
cool, so would this do the trick -
https://www.amazon.com/Scosche-0400ATCFH16-5-Fuse-Holder-Gauge/dp/B008CVPE8C/ref=sr_1_1?ie=UTF8&qid=1493947984&sr=8-1&keywords=16+gauge+fuse
I added fog lamps to my bike using the following parts:
lights: https://www.superbrightleds.com/moreinfo/led-light-pods/10w-mini-aux-2in-modular-led-off-road-work-light/1699/12998/
switch: https://smile.amazon.com/dp/B0779S35VB/ref=cm_sw_em_r_mt_dp_U_wL2ACbWR4NQZ1
​
I powered my relay with Aux DC 1. Check out pages 88-91, 552-553 of the shop manual
​
Her's some helpful files:
Schematic: http://i66.tinypic.com/vi1ye9.png
Bracket: https://www.scribd.com/document/399947695/Fog-Lamp-Bracket
The Relay I cut up: https://smile.amazon.com/dp/B07B51PVJV/ref=cm_sw_em_r_mt_dp_U_AQ2ACbSQ82139
​
I also suggest this harness for wiring them.
iJDMTOY (1) 12V Horn Wiring... https://www.amazon.com/dp/B00XM107FC?ref=ppx_pop_mob_ap_share
I got mine from Octane, 1 for our jeep and 1 for our 76 motorhome. H4 100w Ceramic Fused PnP Heavy Duty Automotive Wiring Harness Headlight Foglight Booster Relay 12v https://www.amazon.com/dp/B00BMN30HY/ref=cm_sw_r_other_awd_voo4wbV1EG5FJ
If anything a harness won't hurt. I upgraded to the Hella e-codes and versus stock wiring there was a noticeable increase in light output.
https://www.amazon.com/Putco-230004HW-Premium-Automotive-Lighting/dp/B001P29X4G
1.
Which wires specifically? In general, I was planning on going for heat-shrink solder terminal connectors and crimp connectors.
One of the reasons I posted this is because there are quite a few connectors and I am still not entirely 100% sure what I need. Obviously when screwing something in to a screw terminal block, the ring crimp connectors. But when joining wires, I would prefer to use the heat-shrink-solder type, but there are also butts and blades (heh).
I bought this set of terminals, figured I'd need them anyways: Assorted crimp terminals
I am probably going to buy this set of solder terminals: Fancy solder terminals
I am pretty good at soldering (though usually circuit boards, not automotive wires, hence not entirely knowing what to do.) I have easy access to a heat gun as well.
2.
Well, both - the breaker goes on the battery, and it sets the maximum amperage for the entire new fuse block and everything attached to it. The fuses go for each individual circuit. I want to use just one fuse for each circuit, instead of having several different circuits sitting on the same fuse, largely for my own desire for neatness and debug-ability. I could have one main fuse instead of the main breaker, but I figure that they will serve the same function and I may as well go for the re-usable option.
I was going to go for this breaker: Fat breaker
That said, I bought this fuse kit, which includes up to a 35A fuse, which will be more than enough. I also bought this fuse holder, in case I decide to use one main fuse instead of one main breaker. (I figured I'd need both of these anyways for some project, may as well get them even if I don't use them right now.)
Fuse Kit
In-line Fuse Holder
---
In general, I think my system will basically look like this:
Battery 12V + Breaker = safe 12V
Save 12V + ignition 12V (do I need a fuse here?) + Relay = ignition-switched 12V
Ignition-hot 12V + Fuse Block + ATC/ATO Fuses = eight fused circuits
Fused circuits, obviously, feeding from above. I will probably add a 20A switch in line with high-power circuits, just in case, as an emergency switch.
Fused circuits will terminate at something like this Ground Bar.
 
What do you think of this proposed setup?
I do realize that it's kind of overkill for what I want.
But you can probably agree that overkill is better than your car burning down!
Accessory wire is the 12v+ that gets current when you put your car key in the ignition and turn it (or, if you have wireless keys, just when ever the radio can play, but not the engine) (accessory has 12v+ with the engine running)
Basically, if you can turn your radio on, the accessory wire has current.
You want to use this wire, because the lights will turn off automatically when you get out the car.
You can tap into the wire using a t-tap like this
Nilight 120 Pcs/60 Pairs Quick Splice Wire Terminals T-Tap Self-stripping with Nylon Fully Insulated Male Quick Disconnects Kit, 2 Years Warranty https://www.amazon.com/dp/B07CP987BN/ref=cm_sw_r_cp_apa_i_DXa2Cb03G4FAR
I think you screwed yourself by not buying a wiring adapter for your 96 Ford Explorer.
https://www.amazon.com/Stereo-Harness-Explorer-Wiring-Installation/dp/B000KL0LVW
http://imgur.com/a/AjnXI
That's my chick.
Akrapovic carbon, crash cage (but don't get the one I have, go impaktech!), The front signals are high-tech speed proton 500s, the rear light has integrated signals here, the relay for the front (rear comes with them) here, tail tidy, stainless steel lines were easily the best upgrade by far. I bought it with a stoltec ECU flash (amazing), and racetech suspension front and rear (also awesome).
I'm thinking it's your headlight switch or this is your problem...
http://www.cherokeeforum.com/f59/putco-harness-re-designed-167600/#post2420785
http://www.amazon.com/Putco-230004HW-Premium-Automotive-Lighting/dp/B001P29X4G
It's a device that you add on. Here's one on Amazon. It flashes constantly, but not seizure-inducing speed.
https://www.amazon.com/CES-Gauge-Quick-Disconnect-Harness/dp/B0057ZQJ12/ref=
I had a similar issue with my XJ. Electronically there is no other form of resistance on the wire when off then the switch and over time it can wear out just like any other component. I installed this wiring harness that added relays to the circuit. not only does it brighten up your headlights but it removes the load from your switch. Its a really simple install, the hardest part is taking off the grill.
Do you know what wiper motor you have? Or what year and model car it came from? From that we can get the amperage.
Voltage doesn't matter-- everything is 12 volts (DC).
Amperage does matter, but I'm guessing your wiper motor uses around 1A. The relay of the remote I linked to earlier has a rating of 5A, so you might put a 5A fuse in there. If there's a short, it will definitely go above 5A and blow the fuse (which is what you want). Here's an example of a fuse holder that would work, but there a million options.
Since you're using a 5A fuse, you could use 16 or 18 AWG wire (rated for 7 and 10A).
So far I've been talking about the circuit for the motor that passes through the relay. For the receiver's power, you could use another 5A fuse with the same wire just to be consistent, though it really is only using milli-amps.
So basically, we size the protection (the 5A fuse) above the normal operating current (1A?), and then everything else is sized to be higher than the protection (5A+).
Finally, you'll wonder how you're supposed to connect the wires together. The best option is to solder the wires together and put heat shrink around the joint. If you can't handle that, they sell crimp wire splices for that. You can buy a real crimper or just use pliers.
I got the Hella housings that take an H4 bulb, then put SilverStars in them because I like the nice white color temperature.
I think the biggest difference honestly came from this harness. With it bypassing the stock wiring (if I remember correctly it just uses the stock light cables to trip the relays) it can supply a lot more juice from the battery.
I have the 55/60 watt bulbs now, but I might swap in the 90/100's when these go since the harness can support them.
https://www.amazon.com/dp/B07CP987BN/ref=cm_sw_r_cp_apa_i_SzyZDbW15NCS6
Are these the correct ones? I just want to make sure before I buy. I might look on eBay to see if I can just get a couple since I don't need so much lol
You can buy a little setup from Amazon that includes a blinking light that’s battery powered and easy to mount;
D-yun Fake CAR Motor Alarm No Wiring Only Led Flash https://www.amazon.com/dp/B00PBQN9OC/ref=cm_sw_r_cp_api_i_K3qVDb2P5VV5F
Also, read some of the reviews about how others mounted theirs. The blinking light might make thieves believe there’s a wired alarm. Of course if they’re real pros they’ll take a closer look and not be put off. But you can only plan for so much. Just a few bucks and better than nothing.
This would be the better option, wouldn't it? It converts it from 9004 to H4 safely?
https://www.amazon.com/Putco-230004HW-Premium-Automotive-Lighting/dp/B001P29X4G
I just bought a 07 FZ6 and my blinkers/hazards were not working. I was at wits end because everything checked out. Turns out my signal relay (a 2 pin connector) was messed up.
Ordered http://www.amazon.com/iJDMTOY-Electronic-Flasher-Motorcycle-Signal/dp/B00RM26LXO/ref=sr_1_3?ie=UTF8&qid=1453800145&sr=8-3&keywords=motorcycle+signal+relay and pluged it in and now im blinking again.
dont know if this applies to your older bike though
Edit: My running lights, tail and brake were all working. Just no blinky
Unfortunately if you are on a paved road, its illegal to have auxiliary lights turned on (unless its a private road). Have you considered upgrading to an H4 harness on your lights with relays?
http://www.amazon.com/Putco-230004HW-Premium-Automotive-Lighting/dp/B001P29X4GGGGG
Also, how old are the current headlights? Over time, bulbs get dim. If they are really old, you may just need new lights
This probably won't help much, but it might be another option instead of the LEDs.
Here's what I put in my 04 EX.
Headlights:
ALL STAR TRUCK PARTS 2-Headlight H4 Headlamp Light Bulb Ceramic Socket Plug
HELLA H4 130/90W High Wattage Bulb
Along with a modified harness for the fog lights and HELLA H83135111 12V 100W H3 Replacement Light Bulbs
I had fog lights added to my '04 Grand Cherokee that didn't have the factory option. Holes were there already, but the wiring wasn't. I used this kit. The wires weren't long enough for my car, so more had to be added. Everything worked perfectly besides that.
Here's what I'm using: https://www.amazon.com/iJDMTOY-Electronic-LED-Hyper-Issue/dp/B00RM26LXO
Plug and play for my '14 STR. You really only need two of the three wires if I remember correctly.
Are you talking about the adapter for the headunit? When I did the install on my sister's FR-S I used this harness https://www.amazon.com/gp/product/B00KWLA3T0/ref=oh_aui_search_detailpage?ie=UTF8&psc=1
But I've also heard good things about SVXDC http://ae64.com/
who is very popular on NASIOC
I bought this wiring harness
https://www.amazon.com/gp/aw/d/B00O72R7Z8/ref=mp_s_a_1_4?ie=UTF8&qid=1509824892&sr=8-4&pi=AC_SX236_SY340_QL65&keywords=light%2Bbar%2Bwiring%2Bharness&dpPl=1&dpID=514cd74Z1UL&ref=plSrch&th=1&psc=1
It’s basically plug and play. Wire the lights. I mounted the relay next to the battery. Connect to battery, then run switch wires through the firewall and into the dash. Took me two hours.
Its this one here, for the 300w max, while the light bar is only abour 120W
https://www.amazon.com/gp/product/B00O72R7Z8/ref=oh_aui_detailpage_o03_s00?ie=UTF8&psc=1
The diagram for the wiring is the 4th pic down
This is the package i have put together so far (2005 Prius w/ JBL + Nav). Can anyone tell me if all of this is required, and/or if there are better options available (I'm sure there are better receivers - this just seemed like the best bang for the buck)
Metra Axxess ASWC-1: https://www.amazon.com/gp/product/B00B4PJC9K/ref=ox_sc_act_title_6?ie=UTF8&psc=1&smid=ATVPDKIKX0DER
Metra 70-8114 Steering Wheel Control Wire Harness: https://www.amazon.com/gp/product/B0064J4LOM/ref=ox_sc_act_title_5?ie=UTF8&psc=1&smid=ATVPDKIKX0DER
Metra TYTO-01 JBL Amplifier Interface Harness: https://www.amazon.com/gp/product/B00133RCCC/ref=ox_sc_act_title_4?ie=UTF8&psc=1&smid=ATVPDKIKX0DER
Pioneer AVH-X2800BS Receiver (i may go for one without a backup cam): https://www.amazon.com/gp/product/B01C6BHJUY/ref=ox_sc_act_title_3?ie=UTF8&psc=1&smid=A17Y7218I8U3RT
Metra 95-8240B Stereo Dash Kit: https://www.amazon.com/gp/product/B00EDVR9V0/ref=ox_sc_act_title_2?ie=UTF8&psc=1&smid=ATVPDKIKX0DER
It says it doesn't fit, but it does. Trust me, I'm a stranger on the internet.
This is the battery I currently have:
https://www.ebay.com/itm/BikeMaster-TruGel-Battery-MG3L-A-Honda-XL250R-XL350R-XL200R-NS50F-Aero/332711011937?epid=171190126&hash=item4d771f2661
My bike's an '83 Honda xl200r
This is the kit I'm looking at:
https://www.amazon.com/gp/product/B071ZPX32N/ref=oh_aui_detailpage_o00_s00?ie=UTF8&psc=1
https://www.amazon.com/gp/product/B00IY3YLCI/ref=oh_aui_detailpage_o00_s00?ie=UTF8&psc=1
I would want to install them so they operate independently of the headlight, so I can switch off and on on their own
SECTION | CONTENT
:--|:--
Title | FZ-07 Progress Report
Description | The Build Parts so far, TwoBros "The Garden Snake" edition Exhaust - [email protected] Stage Two Filter and Lid Kit, https://www.e-dnafilters.com/product/Stage-2-and-3-Applications/Yamaha/DNA-1092/YMA-MT07/Yamaha-MT-07-(13-15)-DNA-Air-Box-Cover-and-Filter-TC-Y7N14-S2 ECU Flash Tune - http://www.veloxracing.com/ Core Moto brake lines - http://amzn.to/2iYwoR2 LED Relay - http://amzn.to/2iq0Mnj Pro Taper Carmichael Bars - http://amzn.to/2iGkCyz Pro Taper Pillow Top MX Grips - http://amzn.to/2j6VDFB Shorty CNC Levers - http://amzn.to/2iGe6It R6 Throttle Tube - http://amzn.to/2iGbJFq RAM Mounts - http://amzn.to/2hPo0aY Phone Mount - http://amzn.to/2iG7slt GoPro Mount - http://amzn.to/2j2EGrz Bar End Mirrors - http://amzn.to/2iGdouu Bar End Mount Kit for MX Bars - http://amzn.to/2hQqdRT Washers Needed for Bar Mount - https://www.napaonline.com/napa/en/p/RFD8071034B/RFD8071034B The Proton 500 blinkers SAVE 15%-http://hightechspeed.refr.cc/bullwacky Motodynamic Fender Eliminator - http://amzn.to/2iP0L0A Motodynamic Integrated Tail Light - http://amzn.to/2ircKkB Mini Fly / Windscreen (Its only $30!) http://amzn.to/2iz4Q61 Merch http://bit.ly/1Rxcefz Shirts https://teespring.com/stores/thegardensnake Support my Patreon here, https://www.patreon.com/TheGardenSnake TheGardenSnakes Second Channel, https://www.youtube.com/channel/UCjDp-bUClKTq8lzoC18iJLw TheGardenSnake on Instagram http://instagram.com/jake_thegardensnake TheGardenSnake on FaceBook http://www.facebook.com/TheGardenSnake TheGardenSnake on Twitter https://twitter.com/#!/thegardensnake and only if you want to, https://www.paypal.com/cgi-bin/webscr?cmd=_s-xclick&hosted_button_id=DSV4PQ4B2L28E Business inquiries, [email protected] Cold Funk - Funkorama by Kevin MacLeod is licensed under a Creative Commons Attribution license (https://creativecommons.org/licenses/by/4.0/) Source: http://incompetech.com/music/royalty-free/index.html?isrc=USUAN1100499 Artist: http://incompetech.com/
Length | 0:11:55
****
^(I am a bot, this is an auto-generated reply | )^Info ^| ^Feedback ^| ^(Reply STOP to opt out permanently)
RioRand Dual USB 12v to 5v 3a transformer; Scosche 16ga fuse holder with two right angle usb cables from startech.com
From memory/Amazon history, here's what I installed:
The thing that sucks about Cherokee headlights IS the wiring.
Buy this and install it.
http://www.amazon.com/gp/aw/d/B001P29X4G/ref=redir_mdp_mobile/184-6657873-1060049
Changing the lights themselves will not help without feeding them ample current.
Stock lights work GREAT after you fix the wiring.