Best power rotary tool parts & accessories according to redditors
We found 163 Reddit comments discussing the best power rotary tool parts & accessories. We ranked the 79 resulting products by number of redditors who mentioned them. Here are the top 20.


If you search "flexible drill extension" on amazon there's a bunch, just not as cheap.
Buwico makes this cheapo one for $7.99
Dremel makes a nicer-quality one for $25.99, which seems to be the going price for all similar products
I would think this tool would work, it works wonders on vinyl lettering and pinstripes and stickers and such. I don't see why it wouldn't work for this. Check out some videos on Youtube on how to use it
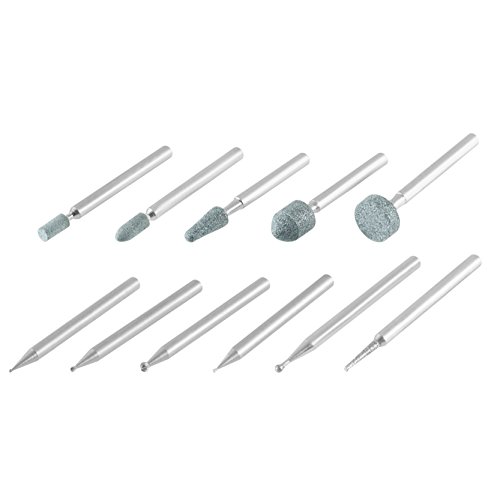
I think this is the same kit that I used:
Dremel 689-01 11-Piece Rotary Tool Carving and Engraving Kit https://www.amazon.com/dp/B000L9T4C0/ref=cm_sw_r_sms_apa_i_PE8ODbB91W7G3
I used the smallest ones.
Dremel is a name brand for hand held rotary tools. I have and have had several so I will give you my .02
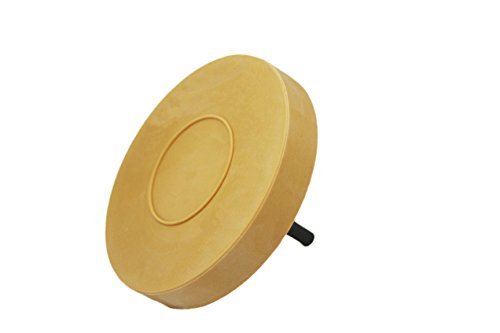
Vacuum powered - You connect it to a shop vac or other vacuum and the suction powers it, while this may sound good on the surface I can't see this having anykind of power from this I suggest avoiding it.
Cordless - Battery powered, I have had several. You get less torque than with a corded version, and they run down. I do have their new micro version and I like it so far, but cordless will always be a balance between power and battery life.
Corded - Best bet IMHO, get more features for less money than with the cordless and do not have to worry about waiting for one to charge.
Suggested Features -
Bits - This will depend on what you want to use it for. I use my Dremels for everything from mixing epoxy to cutting and sanding everything (metal, wood, foam, fiberglass, etc). You can get more for your money if you buy a family of bits in a kit (example) but a few bits I have found most useful are:
NOTE Like most power tools, a rotary tool takes a bit of practice, they can get away from you and eat up material (including your jeans and leg) if you are not careful. I have found that 90 percent of the time a light touch.. pull back.. and light touch.. pull back is the best method.
edit: spelling and format
We used a regular hair dryer to soften the adhesive, though it was likely unnecessary since it was also hot out and kind of inconsequential to the final result.
I then flossed behind the plastic letters with fishing line (12 lb. test, for what its worth), which easily popped them off but left the thick chunky adhesive behind.
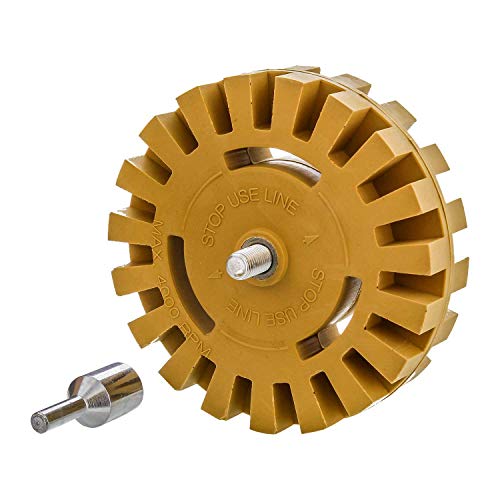
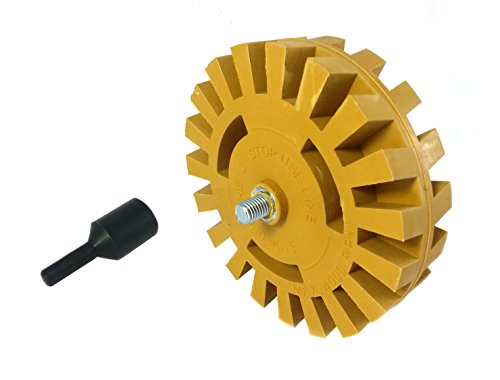
The real key here is the adhesive remover wheel you attach to a drill. I used this one: https://www.amazon.com/dp/B018WG2XYE/ref=cm_sw_em_r_mt_dp_U_Pw.wDb34TNWHK
The trick is to keep the RPMs relatively low and apply strong pressure. The adhesive will fling off easily, it's just a matter of making sure you go over each spot thoroughly.
Then I dabbed a little goo gone on a rag and wiped down the area, which revealed any further stuck on adhesive / stains. Used the drill again if need be.
The last step for me was a super quick pass with carnauba cleaner wax since there was kinda some grime around the letters that left an outline of them behind. The cleaner wax took it off with almost no effort. :)
I did all of the badges too - two on the sides, the Ram on the back, and the Promaster logo on the back. Took probably 45 minutes total, maybe less.
Id recommend getting a diamond disk for a dremel and cutting it off. To do so you need a small stream of water running on the cut while the disk is cutting to ensure no glass dust is created, as to avoid silicosis. Also wear safety glasses and a dust mask. Once you've cut off the stem I suppose sanding to smooth any rough parts will do. For such a project I would not recommend using heat or fire at all, you'd most likely wind up cracking the glass due to thermal expansion.
Link for diamond dremel cutting wheel
>cooling down is easy
Ho ho ho great joke.
Been running one of these pretty much non stop since march. Still too warm.
Have you even been checked for thyroid issues. That can make you feel cold all the time?
Get a machete. Cut it to a 3" circle with a hole for mounting to a dremel bit. Drill circles on the edge periodically. Done.
Well a nice set up on a bandsaw would probably work really slick, but requires a bandsaw.
My first idea I had before seeing how you did it was to use a Dremel with some EZ-Lock cutoff wheels. You could try free handing it or you could mount the Dremel horizontally on a platform on some drawer slides so it slides straight down the middle of the cap, which is sitting in its own jig.
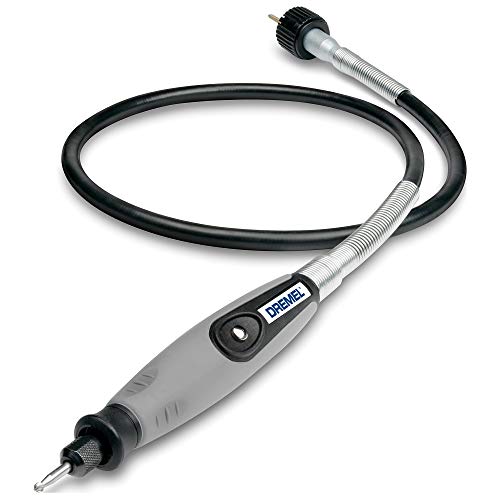
Dremel 225-01 Flex Shaft Attachment https://www.amazon.com/dp/B0000302Y8/ref=cm_sw_r_cp_apa_i_V263Bb572K5XA
Best tool I've ever bought for my dremel ever
Before pics
Wonderwheel
There are more expensive versions of this but for 10$ it did pretty damn good
Just use low rpm (I think it says less than 2000 rpm drill) and don’t stay in the same spot for long. After wards I just brushed off the remnants and wiped away with goo gone and a towel.
I’m not like a mechanically inclined person so if I can do it you can too
Okay, first, don't believe anything that the PO told you.
Initial turning was done fairly clean, so I started with 220 grit , switching directions through 600 grit. Then I put on 2 back to back applications of danish oil. At this point, that is the picture on the left, and it looked really good, and normally I'd call that done.
I have a couple of 8" buffing wheels mounted in a Threaded Arbor Mandrel and this goes in a jacobs chuck mounted on my lathe. It could just as well go in the drill press. Spinning at about 800 rpm, I load up the buffing wheel for about 3 seconds with the tripoli bar. Then buff out the wood piece against it. Then take a scrap piece of wood, and use the edge to clean the buffing wheel. You're supposed to use a different wheel then, but I use the same buff wheel to load up the white diamond compound, and put the wood to it. wipe clean with paper towel.
Then I switch to a new wheel, just for wax. I load up the wheel for a few seconds by buffing a stick of carnuba. Then apply wheel to the wood piece at around 1000 rpm. Keep the wax thin on the wheel, so that it stays thin on the wood.
So 2 rounds of buffing compound, and 1 round of carnuba. Process took me about 20 minutes.
[Here is a pretty good youtube video on this! ] (https://www.youtube.com/watch?v=1XgspdjERyI)
You need a flexible shaft rotary tool and a place to use it that you can gently run a trickle of water on the area being cut. I've seen a shower stall pan used, it has a large flat surface with a drain in the middle. http://www.amazon.com/gp/aw/d/B0000302Y8/ref=redir_mdp_mobile
You might get lucky and have it just come off with a little prying, try that first. I've had some pop right off.
I highly recommend these Dremel EZ Locks over the older style cutting wheels that screw into the bit. They're much faster to change, because these wheels get eaten through and torn up pretty easily and quickly. Just get the metal cutting ones, and you should be good to go.
Edit: I also remembered the other reason i like the EZ lock's a lot more. The discs typically die in 3 ways 1) They just get worn all the way down (rare) 2) The outside breaks off 3) (On the old style) They break at the center mounting point. The EZ lock has a wider diameter at the mounting point for the EZ mount and its more reinforced, making it much rarer that they break the 3rd way.
Eraser wheel.
ABN Rubber Eraser Wheel 4in Pad & Adapter 1-Pack - Pinstripe, Adhesive Remover, Vinyl Decal, Graphics Removal Tool https://www.amazon.com/dp/B018WG2XYE/ref=cm_sw_r_cp_api_i_vkIKDb53F3HEB
ABN Rubber Eraser Wheel 4” Inch Pad & Adapter 1-Pack – Pinstripe, Adhesive Remover, Vinyl Decal, Graphics Removal Tool https://www.amazon.com/dp/B018WG2XYE/ref=cm_sw_r_cp_apa_b1k-BbKAHXSWA
there are at least 2-3 of this (almost) exact model with different brands floating around on Amazon, most likely sourced from China.
The one good thing this has is a "flex shaft" which I've purchased individually and higher quality versions of.
It is really helpful for getting impossible to reach spaces (like inside a PC case) or anything around your house.
And for you Dremel fans, Dremel has a nice flex shaft extension:
https://www.amazon.com/Dremel-225-01-Flex-Shaft-Attachment/dp/B0000302Y8/ref=sr_1_5?ie=UTF8&qid=1491852439&sr=8-5&keywords=flex+shaft
Wow! At first I thought the branch was real until I read your comment about the leaves being maple with green sharpie.
Do you ever use one of those dremel flex shaft attachments? Like these: https://www.amazon.com/Dremel-225-01-Flex-Shaft-Attachment/dp/B0000302Y8/ref=sr_1_3?keywords=dremel+attachment&qid=1557652236&s=gateway&sr=8-3
I curbrashed my 3's 19" silver 3 rim :'(
I watched a ChrisFix tutorial on how to repair an aluminum rim using a dremel w/ a sanding detail brush.
Has anyone tried this? Also, I can't tell if there's a clear coating on the rim. Would it make sense to sand with the course & fine grit detail brush? Or do I really need to strip the whole thing and recoat?
I hear shops will do this for $100-200, but would be nice to avoid that expense.
I was thinking about wrapping the bottom of the stem with tape, and trying to use that diamond cutting wheel to make a flat clean cut. Yay or nay?
https://www.amazon.co.uk/gp/product/B00HU3BF22 on the floor in front of me. Does the job, still get sweaty AF on a hard workout. Friend in the club has https://www.amazon.co.uk/Sealey-HVD24-24-Inch-Industrial-Velocity/dp/B000RO8326 and says "I haven't dared switch it above the lowest setting."
Picture for scale: https://islingtoncc.microco.sm/api/v1/files/592e573b9b25588883cec13d747a6ab456fd4a4a.jpg
A dremel maybe? I'd make a little jig for the extension cable (see amazon ) but there's Dremel brand adapters & tools you might be interested in.
> Acastus Knight Porphyrion
I'm not sure about that one. It's a mighty big model, but it's leg assembly seems to be more like a knight titan, than a cerestus or warhound. It doesn't have the inverted knee like the other knights do. No idea what cabin assembly is like either. The warhound cabin is a bunch of huge pieces, I don't know of anything that can prepare you for it. I used about 20 rubber bands while I was building, to make sure it all held together and looked good before gluing. There is a pic of my warhound WIP below, you can see how it's legs have 3 segments, making a forward joint, and reverse joint. Standard Knights and the porphyrion only have a forward, and Cerestus only have a reverse. The only non +warhound models I know of with similar 3 segment opposite joint style assembly are the decimator and I believe the kytan daemon engine.
For pinning big ass models, I still use paperclips. However instead of pinning straight across a joint, like you might on infantry, I go through the joint from the outside. You can see some paperclips under the warhounds foot. There is one in each toe that goes all the way through, so if the warhound wants to move, the pin must be pulled out. That is the only place I pinned the warhound though. I used big ass magnets on the head, torso, and arms so I could do this to transport it.
My knight titan has 3mm neodymium magnets in each arm. They are the same ones I use on marines, dreadnoughts and just about everything. They hold knight weaponry up decently, but some people prefer larger ones. You can get bulk magnets on ebay much cheaper than the hobby store, but if you don't want to wait, go to a hardware store, as they are still cheaper than hobby store.
I believe this dremel is the new version of the one I have. The flex shaft attachment makes life so much easier. A basic drill bit set is good for getting started, but make sure it has the same size as the magnets you use. I've started using jewelry bits for mine, and they are insane good. However the larger ones (1.5mm-3mm set) are difficult to use, as they cut more than bore. Just last night I couldn't keep a handle on the arm bit I was drilling, ended up flying across the room. On resin they are easier though. I bought a set of cutter bits from the hardware store. It was all spherical tip and tube tip of various sizes. It has been very useful for battle damage, and the tube tip is how I widen holes for giant ass magnets.
The real MVP of a dremel for hobby conversions and building has been the circular saw bits I got mine from a wood carving magazine, and they are paper thin. Not 100% about these ones, but they are great for precision cuts and removing chunks of resin.
http://www.amazon.com/Dremel-709-01-110-Super-Accessory/dp/B003BIFMKG/ref=sr_1_1?ie=UTF8&qid=1375524787&sr=8-1&keywords=dremel+bit+set
Try this for removing the decals. It will usually take up everything including the gunk and sticky left if you do it by hand, and this won't mark up the underlying paint like some other methods. https://www.amazon.com/dp/B07L1BVQB7/ref=cm_sw_em_r_mt_dp_U_qQaRCb9QJYPKN
​
The two biggest things I'd say to be aware of-- make sure your surface is super clean and free of any contaminants. Everyone says it, and you can't say it enough.
​
Second-- if you are taping off, remove the tape promptly-- while its still wet. If you hit a dry spot, stop pulling and grab an exacto or razor and try to cut along the tape pull rather than pulling up the dip.
and on the end of that flexi shaft
http://www.amazon.com/Dremel-545D-545-Diamond-Wheel/dp/B00004UDI9/ref=sr_1_2?s=hi&ie=UTF8&qid=1368536646&sr=1-2&keywords=diamond+dremel
i used a continuous rim diamond blade in an angle grinder to cut out rectangular holes for the receptacles in my misco wire backsplash in my kitchen. that trickle of cold water is key.
Got this kit works great so far. The keyless chuck works fine too I got.
Which piece are you talking about to sand down the MVP?
Got this too
https://www.amazon.com/ABN-Pinstripe-4-inch-Sticker-Removal/dp/B018WG2XYE/ref=pd_lpo_vtph_328_bs_img_1?_encoding=UTF8&psc=1&refRID=W3892VGE3A2YFF602443
You need to either use a lot less pressure while cutting with the disc, or get some better discs. I use my dremel a ton and definitely get longer life out of a disc than that.
I recently picked up some of these and I'm liking them so far. They seem to last longer than others I've tried, and the "EZ Lock" is totally awesome.
I know Foredom is (or was) the "go to" option for woodcarvers and others doing similar work - but like all high-end tools, it comes with the price tag. Likely to last forever, but also might be overkill for model-making.
I ended up getting the flex shaft for the Dremel:
https://www.amazon.com/Dremel-225-01-Flex-Shaft-Attachment/dp/B0000302Y8
Does the job, and easier than holding the Dremel for fine work. You can get the adjustable 3-jaw chuck on there, otherwise it has a chuck with interchangeable inserts.
Does all I need it to do in terms of sanding, grinding, drilling, etc - and was a cheap option as I already had the Dremel, which may not be a factor for you. You then have the option of using the Dremel as a handheld tool for other jobs.
What are you doing with the Dremel? The only time I use it like a pen is for engraving & I use the flex shaft attachment. Anything else is either a vertical or horizontal grip & not at all pen-like.
Yea it's electric. It's not really a nail filer though... more of a rotary tool for general use. This is the model I have. It comes with a lot of different attachments: wire bushes, sanding drums, grinding stones, grinding wheels, small rotary files or burrs, maybe some more stuff so it's pretty useful around the house too.
My mom got me into it because she's involved with greyhound rescue groups and their nails are in really bad shape when they come off the tracks. Using clippers, they had way too many blood-spraying, dog-helping-in-pain-accidents. Clippers are easy to overshoot your intended cut and cut the quick and they're also known for splitting nails in half or muliple pieces, either right when you cut it or if they snag a small piece on the carpet it can rip off the splintered part of the nail.
My mom swears by [this extension](
http://www.amazon.com/Dremel-225-01-Flex-Shaft-Attachment/dp/B0000302Y8/ref=pd_bxgy_469_2?ie=UTF8&refRID=0HS02GVFVQ5Z8AQDSF7G) that allows the noise of the electric motor to be a few feet away. I don't have one these.
Then when you run out of sanding drums that came with your dremel, you can but a lifetime supply for [$8.99]
(http://www.amazon.com/TEMO-sand-coarse-Mandrel-dremel/dp/B00564U22G/ref=pd_sim_469_10?ie=UTF8&dpID=41G2GNphVlL&dpSrc=sims&preST=_AC_UL160_SR160%2C160_&refRID=0YAGTNM5J58CC1PVN0B9)
Edit: Dremel must have caught on, they now sell a specific pet grooming model. I can't speak for it but it looks quite a bit smaller than mine, I'll admit mine is a little overkill but I use it for other things too.
I've had good success with these as well.
https://www.amazon.com/Dremel-EZ406-02-Cut-Off-Mandrel-Cutting/dp/B000FBLRVA/ie=UTF8&qid=1495130513&sr=8-2&keywords=dremel+quick+connect
I always recommend people upgrade to these cuttof wheels instead:
https://www.amazon.com/Dremel-EZ406-02-Cut-Off-Mandrel-Cutting/dp/B000FBLRVA
They are way easier to use.
For getting rid of molded clothes, and so many other super useful things, I recommend owning a dremel, or other rotary tool.
You don't need a fancy one. I've got 3 dremel tools, of varying degrees of torque and power. One is identical to this one - only without the pet grooming branding. It's still a dremel - it'll still work.
Dremel 7300-PT 4.8V Pet Nail Grooming Tool https://www.amazon.com/dp/B003TU0XG4/ref=cm_sw_r_cp_api_i_jF4xDb8CJPTXW
$30
I did find this guy for a super cheap price -
WEN 23006 Two-Speed Cordless Rotary Tool Kit with 10-Piece Accessory Set https://www.amazon.com/dp/B07MSL9PW4/ref=cm_sw_r_cp_api_i_4C4xDb9MG46FY
$12
Can't vouch for it being any good, given its price, but it should be compatible with the dremel rotary bits, and for a starter tool, and just working on dolls, it should be fine.
Whatever rotary you get, you'll need a few things to go with it. I recommend one or both of these -
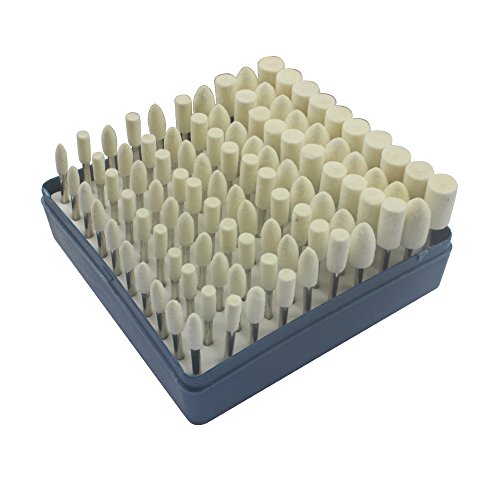
Sanding drums
https://www.amazon.com/dp/B07BK1VRH6/ref=cm_sw_r_cp_api_i_yJ4xDb738D61Y
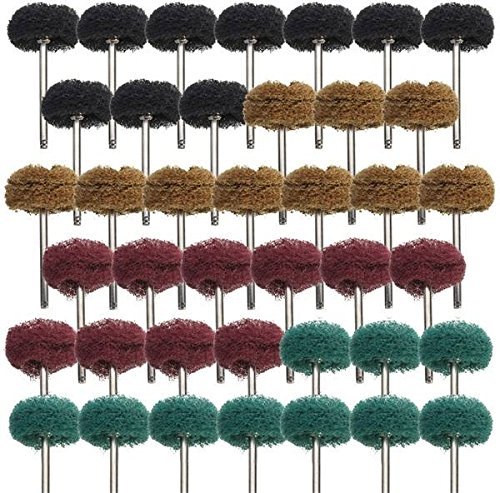
Abrasive buffing wheels
https://www.amazon.com/dp/B075C72PGK/ref=cm_sw_r_cp_api_i_NH4xDbCZ6DM5C
The buffing wheels are pretty good a removing tiny molded clothing details without eating up the plastic a lot.
If you ever do anything with apoxie-sculpt, the dremel can come in handy with grinding down things after its cured.
OH - and sand paper. Buy sand paper.
I recommend getting some 120 grit, 220 grit, and some 400 grit. You work your way from the lower, rougher paper, up to 400 to get a smooth finish. When you get up to 400, make sure you sand in circular motions to avoid leaving gouges in the plastic.
I'd just stipple it. I can tell you what to buy and how to do it including the borders. You'll need the following:
https://www.amazon.com/Dremel-107-Engraving-Cutter-Shank/dp/B00008Z9ZV/ or https://www.amazon.com/Dremel-106-Engraving-Cutter-8-Inch/dp/B00008Z9ZU
https://www.amazon.com/Dremel-120-volt-Variable-Attachment-Accessories/dp/B075174NCV/ (you may have your own dremel, but definitely get a flex shaft for it)
https://www.amazon.com/HTS-401B3-Multi-Grit-Diamond-Medium/dp/B00U0E0KRE
https://www.amazon.com/AUSTOR-Grinding-Polishing-Accessories-Attachment/dp/B078Y5XGM8 (careful with these, light touch and keep it moving)
https://www.amazon.com/Flitz-Multi-Purpose-Fiberglass-Aluminum-Sterling/dp/B000MUSOW4
First use your engraving cutter to cut the borders that you've drawn on with a water-removable Stabilo marking pencil. Try to cut as smoothly as possible, with a steady hand. Don't try to cut it all at once, be patient (be patient for all of this, it took me a whole week doing a little at a time to complete the whole process, and turning my dremel off periodically because I have an older model flex shaft that gets hot after some use - solved this by wrapping the grip with bicycle inner tube)
The smoother you cut it the easier the rest will be. Some people just use the engraving cutter for borders, but I followed someone's guide and then used the diamond burs to smooth it out and polish it. Go from the lowest grit to the highest. You can either use the ball bits that are the same size as your cutter, or use the rounded cylinder bits. You can angle the cylinder bits in certain ways to get around curved surfaces, you'll kind of have to experiment with that. Once you get to the highest grit, I found that the only way to get it near-glass smooth was to apply a lot of pressure. It doesn't remove much material and you kind of want it to heat up the plastic to get it smooth. Then, still not satisfied with this, I got those felt wheels and cut the very tip off the smallest one, and used a bit of flitz paste, and then went over all the borders. That got it close enough for me. You can get more advice from the Weapons Stippling group on Facebook.
After you do the borders, I use the round tip on the walnut hollow wood burner on a medium heat setting. You don't want it too hot, not with the P80 plastic anyway. My technique was to press in, not too much but just enough, and drag downwards. A random totally pattern is best, I did a somewhat orderly snake pattern and then went over it again and smeared it out to give it a more organic texture. Then I went over it one more time, lightly and fastly rubbing all along the surface to blend the ridges that were created into the rest of the texture. You can do this several times to get it just right. The result is a texture that is grippy, yet not rough. That's how I like it, but you can experiment. The key is not to heat it up too much and don't stick any of the tips in too deep, and don't try to do it perfectly ordered unless you've gotten good at that with practice and are using an appropriate tip. You can make your own tips out of #8-32 brass screws or buy blanks from OT Defense, or some other place.
ABN Rubber Eraser Wheel 4" Inch Pad & Adapter 1-Pack - Pinstripe, Adhesive Remover, Vinyl Decal, Graphics Removal Tool https://www.amazon.com/dp/B018WG2XYE/ref=cm_sw_r_cp_tai_835kDbE8GQNEZ
Drilling under water with a diamond bit and with a towel at the bottom of the sink works well. Glass breaks pretty quick sometimes when it gets hot and vibrates. The water limits the Dremel/drill vibration and cools the glass. The towel is not just for smacking the bottom (which you will do), but also for leverage. I used one of these attached to the dremel.
*edit for formatting
A dremel. I heated up an X-acto knife on my stove and cut them out, but I don't recommend it as it can be dangerous.
Make sure to get one with variable speeds. I use mine a lot, so the finer control comes in handy. If you just need a tool that will get the job done, Black & Decker make the 3 speed RTX-B for about $30 and it works great.
More important in this case though is to have a proper plastic cutting/shaping tool. The trick with plastic is removing the material without melting all of it. They make special cutting bits for wood and plastics, which honestly I wish they'd made a lot sooner. It'll still melt some of the softer plastics if you go too fast but is miles ahead of the high-speed steel cutters..
Sure will, & thanks for the info! :)
Planning on buying this dremel and these bits. What do you think?
Use the diamond saw blades, the thinnest is about .1mm thick.
http://www.amazon.com/Dremel-545D-545-Diamond-Wheel/dp/B00004UDI9
There will be some melting and edge cleanup, use a hobby knife and then some fine-grit sandpaper. This is pretty much as clean as you can get.
This and a drill.
I'd just use a standard cut off wheel.
Provided, of course, that your tool has the torque and speed capability to do so.
Tile cutting bit: https://www.amazon.com/Dremel-562-Tile-Cutting-Bit/dp/B00004UDIC
Diamond cutting wheel:https://www.amazon.com/Dremel-545D-545-Diamond-Wheel/dp/B00004UDI9/ref=pd_sim_469_3?_encoding=UTF8&pd_rd_i=B00004UDI9&pd_rd_r=269YAJP4K67TJ18GNAYD&pd_rd_w=t28id&pd_rd_wg=i2XAg&psc=1&refRID=269YAJP4K67TJ18GNAYD
Even carbide burr bits will work (slowly).
Wetting the area will keep down the dust and extend the life of your tools, but isn't strictly necessary.
for the shaping a basic carving tool. for the indents I used a bit like this http://www.amazon.com/Dremel-107-Engraving-Cutter-Shank/dp/B00008Z9ZV/ref=sr_1_11?ie=UTF8&qid=1314083870&sr=8-11
I bought this kit and a keyless chuck. It's been able to do everything I've needed - including cutting down the fish filters for ceramic wicks.
You could use the reinforced disk to cut/grind out the air channels in the MVP and you can buy a cheap drill bit to drill out the RSST.
Ya, I have these. Its my last resort, it will mess up some of the finishing polish though. https://www.amazon.com/gp/product/B00XJINV42/ref=oh_aui_search_detailpage?ie=UTF8&psc=1
Well rip it off too. Lol.
You can get the rest of the adhesive off pretty safely with one of these. https://www.amazon.com/gp/aw/d/B07L1BVQB7/ref=sspa_mw_detail_0?ie=UTF8&psc=1.
I used a dremel, and to every one saying OH IT'LL MELT IT...Nah, it actually worked faster, better, and easier than a hacksaw. Dremel makes a "plastic" cutting blade that works wonders. If you just try to cut straight through, then yes, it will heat it up too fast. What I did was cut a section, pull away for 2-3 seconds, turn the tube a little and cut another section. 3-4 cuts and boom it's off. Takes less than 30 seconds. You will have to use a chamfer tool like this: https://www.amazon.com/XSPC-PETG-Acrylic-Tubing-Chamfer/dp/B016B29RK4 but again, that only takes another 20 seconds. Then using some 400 grit sandpaper to finish it off.
I used a dremel 3000 series, set it to power 8, and used this cutting wheel : https://www.amazon.com/Dremel-EZ476-2-Inch-Cut-Off-Plastic/dp/B000FBLRW4
The first thing to use is Frame Protector for the inside of the frame. This can be messy so do this first. Next a brass wire brush on an electric drill or better yet on Dremel-type tool. Third thing is VHT SP229 Rust Convertor Can - 10.25 oz.. This stuff is amazing. It will turn your rust to a mineral that can be sanded off. Lastly, prep for paint. You can get in all the nooks and crannies with these and these. Do not try to paint it yourself. You suck at it. Take it to a motorcycle painter and if you ask for clear he will just hang it next to a motorcycle tank or fender and do them both at the same time. Should cost next to nothing if your prep is good.
Edit: sp
Thank you for submitting to /r/SmallYTChannel. You have spent 3λ to submit here, making your current balance 0λ.
/u/Dave_Ipsen, please comment
!givelambdato the most helpful advice you are given. Youwill be rewarded 1λ if you do so. For more information, read the FAQ.
Video data:
Field|Data
:-|:-
Title|Making A Tiny Viking Sword From Pieces of Scrap Metal
Thumbnail|Link
Views|66
Length|05:58
Likes/Dislikes|15/0
Comments|13
Description|In this week's video on The Ideas Guy, I take some pieces of scrap metal and forge, grind, sand and polish them into a tiny viking sword. Besides the adorable size (it's adorable, seriously) it accurately shows how many viking swords did actually look in history. Join me in making a tiny sword for all the tiny vikings of the world lol :)⤶⤶If you are interested in some of the tools I use in this video, follow these links to buy your own!⤶⤶Dremel 3000 Tool:⤶https://amzn.to/2Jot7tq⤶⤶Dremel Flex Shaft Attachment:⤶https://amzn.to/2JBaYbY⤶⤶⤶#theideasguy #tinyviking #modelviking #vikingsword #scrapmetal #imadeit
Channel Data:
Field|Data
:-|:-
Name|The Ideas Guy
Thumbnail|Link
Subscribers|205
Videos|23
Views|3449
^/u/SmallYTChannelBot ^made ^by ^/u/jwnskanzkwk. ^PM ^for ^bug ^reports. ^For ^more ^information, ^read ^the ^FAQ.
I would totally say "OMG YAAAAAAAY!!!!" if I were to receive either Cards Against Humanity or this great Dremel Flex Shaft attachment for my Dremel, which would help me with my etsy orders! :D
Thank you for the contest! Yay! :D Keep on being awesome!
Probably if you're careful, I've used these https://www.amazon.com/Drill-Warehouse-Abrasive-Buffing-Polishing/dp/B075C72PGK
Something more like this, for a bench grinder
https://www.amazon.com/Cotton-Grinder-Buffing-Wheels-8BUFF088/dp/B000SLNQCK
then you buy some fine polishing compound that you touch to the wheel while its spinning.
I wouldn't use a dremel or other small rotary tool, its too hard to get it all nice and even. The big buffing wheels do a large enough area that it looks good and even.
Cutting wheel https://www.amazon.com/Dremel-EZ688-01-Cutting-Metal-Plastic/dp/B002Q8T4OM/ref=sr_1_6?ie=UTF8&qid=1542600284&sr=8-6&keywords=dremel+cutting+wheel
​
you can see that there is some melted plastic on the part i intend to use as a jar to hold stuff in. However i think most of that came from having to make a second line of cuts to make the thing even as i did not have a even level cut with the first cut.also i may have been using it at to slow of a speed as i own a Wen brand Variable speed Rotary tool and may have had it set too slowly. so i am just going to contact Dremel and see what speed i should use for cutting plastic with this head.
Now for my review of this tool: this tool worked beautifully for cutting plastics even i used a containor made from Polypropylene which has a melting point of between 130-172 C depending on the type of PP used. this melting point is a lot lower then the 240 C melting point of the Polystyrene used in gundam kits.
However i wont be starting scratch building yet as i need to invest in a face sheild as the thing kicked up a lot of small pieces of plastic as i was cutting. luckly i wear glasses so i did not really need to worry about getting a piece in my eye. so if you buy this cutting head for your Rotary tool i strongly recommend getting a face shield as a to be safe. at the moment (3/29/16) this head is 16.29 plus tax on amazon right now. its a prime eligible Item so you can get it with primes 2 day free shipping.
I hope this helps with your scratch building endeavors my fellow gunpla builders. here is a link for the tools amazon page: http://www.amazon.com/Dremel-543-Cutting-Shaping-Wheel/dp/B000HI5WUS?ie=UTF8&psc=1&redirect=true&ref_=oh_aui_detailpage_o01_s00
You could have saved if you got everything off Amazon:
Dremel 4000 = $73
15 100mm x 3mm brass rods = $8
36 Sheets of sandpaper = $8
Flex Shaft = $20
12 Euro Tools Needle Files = $14
2 Day trial of Amazon Prime (Includes free 2 day shipping) = $2
The files are more expensive than the $3 ones you find in Harbor Freight but you get two of every nice and sharp profile Including the Knife that helps you to get into tight spaces to make things like ASSA Gin Spools!
>Flex Shaft
https://www.amazon.com/dp/B0000302Y8/
this is what I've used in the past - probably what you got. That said, I did have to dremel a notch to get them to fit just right. I recommend aquick change disc for that.
Engraving bits
Flex Shaft attachment
EZ Lock cutinng wheel kit
Vinyl sticker remover, basically a rubber wheel that attaches to a drill
ABN Rubber Eraser Wheel with Drill Adapter 1-Pack – Pinstripe, Double Sided Adhesive, Vinyl Decal, Graphics Removal Tool https://www.amazon.com/dp/B00HZ4ABKS/ref=cm_sw_r_cp_apa_MgLPBb9C1P0DW
This. They sound super handy but in actuality mine spends most of its time in a drawer. But, I have many other tools like an actual angle grinder, pneumatic cut-off tool, sander, etc. so if I didn't already have these it might see more use.
The flexible shaft attachment has saved my butt a handful of times when I needed to grind/drill off something in a tight area.
I live in Vancouver. My glass is literally out of a photo frame that I got at Dollarama for $2.5. Nothing fancy.
I cut it to size using my dremel https://www.amazon.ca/2305-Rotary-Tool-Flex-Shaft/dp/B003BYRFH8/ref=sr_1_1?s=hi&ie=UTF8&qid=1501045676&sr=1-1&keywords=dremel with these wheels https://www.amazon.ca/SE-DW13-5-Piece-Diamond-Wheels/dp/B000P49NCC
I attached the glass with 4 binder clips, each measuring 15mm in width. Also from Dollarama; a pack for a Loonie.
Few tips. If you do this, get 2 or 3 frames because you will probably end up cracking your first one as I did. Also be safe. You need to protect your eyes, your hands, and your breath. Again, don't really have to be fancy. For my eye protection I was wearing just my glasses. I also had some good fitting working gloves (any comfortable slightly thick gloves would do) and I wore a surgical mask for protection from glass dust (a slightly damp cloth covering your mouth and nose would work fine too)
Alternatively, you could do this the normal and easy way and use an actual glass cutting tool https://www.amazon.ca/L-TMS-Professional-Handle-Cutter-Cutting/dp/B06X9GRGGD I didn't have one at hand to I just used my dremel.
Get an EZ-Lock for cut-off wheels: EZ-Lock Metal Cut-off Kit at Amazon
Haha, when it comes to building my own computers, I have raging OCD; so when it came to modding it and putting a dremel to the nice brushed aluminum case, it was extremely nerve racking. I used a pretty cheap single speed Dremel from Walmart with these metal cutting wheels.
The acrylic sheet that I used was precut and sold off the shelf at Home Depot, it's 8"x10" clear acrylic (.9mm thick)
You might try getting the flex shaft attachment. It's far enough away that it doesn't freak my dog out, and makes life generally easier
I don't see anything called a "dremel pen". Maybe you mean something like this?
Dremel Flex Shaft Rotary Tool Attachment with Comfort Grip and 36" Long Cable- 225-01- Engraver, Polisher, and Sander- Ideal for Detail Metal Engraving, Wood Carving, Sanding, and Jewelry Polishing https://www.amazon.com/dp/B0000302Y8/ref=cm_sw_r_cp_apa_i_QG-JDb0MBRBF1
Some cuts I couldn't get with a Dremel. I used the quick detach metal disks http://www.amazon.com/Dremel-EZ406-Cut-Off-Mandrel-Cutting/dp/B000FBLRVA
Dremel 689-01 11-Piece Rotary Tool Carving and Engraving Kit https://www.amazon.com/dp/B000L9T4C0/ref=cm_sw_r_cp_apa_i_SS8GDb59D42FQ
This is the exact set I'm using currently. 107 and 7103 were the two I used most. Did a bit of finishing/leveling with 7134.
(NOTE: The part numbers I'm referring to are on the second image on the listing.)
I’m guessing you meant to ask how to remove the scratches, and if that’s the case your best bet is a Dremel (or similar) with a set of buffing pads and a 3 step polish like Novus. You could do it by hand if you don’t have a Dremel, but you’d need some serious patience.
Does anyone here have experience with different brands of eraser wheels? I'm trying to take the 13 year old clear bra off the front of my car and I want to know if the 3M is any better than a generic one. I would also appreciate a recommendation for an adhesive remover for the areas of the clear bra that I already pealed off.
Thanks
This thing ABN Rubber Eraser Wheel 4in Pad & Adapter 1-Pack - Pinstripe, Adhesive Remover, Vinyl Decal, Graphics Removal Tool https://www.amazon.com/dp/B018WG2XYE/ref=cm_sw_r_cp_apa_i_w3w2DbDZV2EWK
I used the same molding tape to attach as you did, to remove I used one of these rubber wheels and a drill to get the old adhesive off. You have to get the right technique of light pressure, but once you do it works perfectly.
Removing the gunk was the most tedious part of it, but once it was off and things were clean getting stuff reattached was a breeze. It's also very likely that you won't need those new fasteners and that the old ones are just popped out in a way that they can't be popped back in without twisting like you can when it's off.
How about something like this?
Dremel EZ Lock 456
I wouldn't have said anything if I hadn't cut plastic with a dremel before.
Here you go cheif. Let me know how it works.
The instructions also say to "Go slower."
Don't even mess with trying to heat and peel decals that old. Use a drill and a rubber eraser wheel. Heat guns are for amateurs that don't know any better.
https://www.amazon.com/gp/aw/d/B018WG2XYE/ref=yo_ii_pd_dx_gr_1/188-7323185-1878014?ie=UTF8&pd_rd_i=B018WG2XYE&pd_rd_r=MYRGCVXK6K2NTR47WFW0&pd_rd_w=s6OIm&pd_rd_wg=NzRRH&psc=1&refRID=PK1A5W57D0GPM348SN3F
You can thank me later.